Chapter 1
That Out-of-the-Box Experience
In This Chapter
![]() Unboxing the tablet
Unboxing the tablet
![]() Charging the battery
Charging the battery
![]() Locating important tablet-things
Locating important tablet-things
![]() Getting optional accessories
Getting optional accessories
![]() Storing a tablet
Storing a tablet
Your Android tablet adventure begins by opening the device’s box. Sure, you’ve probably already done that. I don’t blame you; I had already opened the box that my Android tablet came in before I read this chapter. No problem. So, to help you recall the ordeal, or to get you oriented if you found the process daunting, or just to prepare you for that out-of-the-box experience yet to come, this chapter provides you with a gentle introduction to your new Android tablet.
Initial Procedures
If you’ve purchased a cellular or LTE tablet, the folks who sold it to you may have already done some configuration before you left the store. That’s great because an LTE tablet requires some extra setup before you can use the device. That duty is explained in Chapter 2. For now, all tablet owners — LTE and Wi-Fi — need to perform two basic tablet activities, described in this section.
Liberating the tablet from the box
Thanks to an excess of funds, your federal government has conducted numerous studies on how people use electronic devices. Men and women wearing white lab coats and safety goggles, and wielding clipboards, drew solid conclusions by thoroughly examining hundreds of Android tablets. The results were unanimous: An Android tablet works better when you first remove it from its box. Thank you, federal grant!
I assume that you’re pretty good at the box-opening thing, so I probably don’t need to detail that procedure. I can affirm, however, that it’s perfectly okay to remove and throw away those protective plastic sheets clinging to the front, back, and sides of the tablet. And don’t be embarrassed when, three weeks from now, you find yet another plastic sheet you haven’t removed. Feel free to remove and throw away the plastic sheets.
Along with the tablet, you’ll find the following items in the box:
- USB cable: You can use it to connect the tablet to a computer or a wall charger.
- Power adapter: Use this thing (and the USB cable) to charge the tablet’s battery. The adapter may come in two pieces, both of which must be assembled.
- Power charger and cable: These are included with some tablets that don’t use the USB cable to charge the battery.
- Useless pamphlets: If your tablet is like mine, you’ll find that the safety and warranty information is far more extensive than the flimsy setup guide. That shows the priority our culture places on lawyers versus technology writers.
- The 4G SIM card holder: For an LTE tablet, you need a 4G SIM card. If you purchased your tablet at a phone store, someone there may have tossed the SIM card holder into the box as well. You can throw it out.
 Keep the box for as long as you own your Android tablet. If you ever need to return the thing, or ship it anywhere, the original box is the ideal container. You can shove all those useless pamphlets and papers back into the box as well.
Charging the battery
The very first thing that I recommend you do with your tablet is give it a full charge.
Assemble the charging cord: Attach the wall adapter to the USB cable. Plug the cable into the tablet and the adapter into a wall socket. Wait.
Some tablets use their own charging cord, not the USB cable. If you own such a tablet, ensure that you’re using that cord and not the USB cable; directions buried somewhere in the box explain how charging works.
Upon success, a large “battery charging” type of icon might appear on the tablet’s touchscreen. This icon lets you know that the tablet is functioning properly — but don’t be alarmed if the battery icon fails to appear.
If a Welcome screen or Setup screen appears when you charge the tablet, you can proceed with configuration. That process is covered in Chapter 2.
 Some tablets feature an HDMI connector, which looks similar to the USB or power connector. Don’t jam the USB cable into that hole.
- Even if your Android tablet comes fully charged from the factory, I still recommend giving it an initial charge, to at least familiarize yourself with the process.
- The USB cable is also used for connecting the tablet to a computer to share information, exchange files, or use the tablet as a modem. The latter process, called tethering, is covered in Chapter 23.
- You can also charge the tablet by connecting it to a computer’s USB port. As long as the computer is on, the tablet charges.
- Feel free to use the tablet while the battery is charging. And you don’t have to wait for a full charge, either.
- When the battery is dead or just very low, you can’t turn on the tablet. Just wait until the thing gets charged an eensie bit, and then it will turn on.
- The battery charges more efficiently if you plug it into a wall, as opposed to charging it from a computer’s USB port.
- Most Android tablets I’ve seen don’t feature a removable battery, so the battery cannot be replaced if it’s defective. If the battery doesn’t charge or keep a charge, you should return the tablet for a refund or replacement.
Tablet Exploration
Everyone loves a good game of hide-and-seek — except when it comes to technology. It’s important that you know where certain key items are found on your Android tablet. The problem is that the location of these items isn’t consistent, even when two tablets are made by the same manufacturer.
Finding things on the tablet
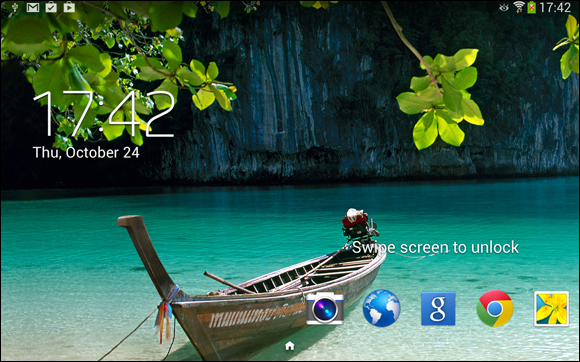
Take heed of Figure 1-1, which is my attempt at illustrating a generic Android tablet’s hardware features. Use this figure as a guide as you follow along on your own tablet to locate some key features.
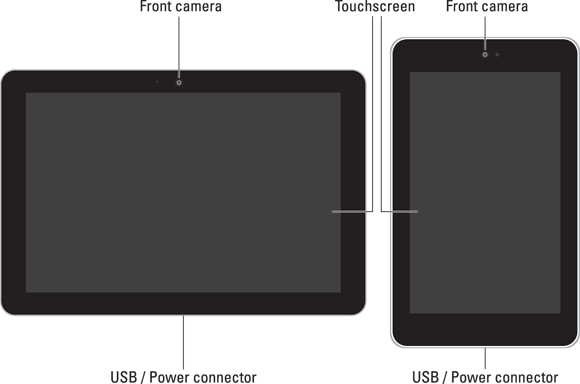
Figure 1-1: Things to find on your Android tablet.
Important items you’ll find on the front of the tablet include the items in this list:
Touchscreen display: The biggest part of the tablet is its touchscreen display, which occupies almost all the territory on the front of the device. The touchscreen display is a look-touch gizmo: You look at it but also touch it with your fingers to control the tablet.
Front camera: The Android tablet’s front-facing camera is found above the touchscreen. On larger tablets, the camera is on top when the tablet is oriented horizontally (refer to the left side of Figure 1-1). On small-format tablets, the camera is on top when the tablet is oriented vertically (refer to the right side of Figure 1-1).
Navigation icons: The bottom of the touchscreen shows the Android navigation icons. On some tablets, these icons are physical buttons found below the touchscreen. Refer to Chapter 3 for information on the navigation icons.
Important items found on the tablet’s edges include the ones in this list:
Power/Lock key: This button, or key, turns the tablet on or off, or locks or unlocks the device. Directions for performing these activities are found in Chapter 2.
Volume key: The tablet’s volume control is two buttons in one. Press one side of the key to set the volume higher or the other side to set the volume lower. This key is often found next to the Power/Lock key. It’s the larger of the two.
USB/Power connector: This slot is where you connect the USB cable, which is used both to charge the battery and to connect your Android tablet to a computer. The slot is also where the tablet connects to the dock, should one of those be available. See the later section “Optional Accessories.”
External storage slot: The tablet’s external storage is added by inserting a memory card into the external storage slot. Details on using this feature are covered in the next section.
SIM card cover: This spot is used to access an LTE tablet’s SIM card, which is inserted into a slot beneath the cover.
Headphone jack: This hole is where you can connect standard headphones.
Speaker(s): Stereo speakers are found left and right on the tablet, although smaller-format tablets may have their speakers on the back.
Microphone: A miniscule, circular opening serves as the device’s microphone. Some tablets may feature two microphone holes. Don’t worry if you can’t find them; they’re there.
The typical Android also has a back side. It’s not shown earlier, in Figure 1-1, because the censors won’t let me do an illustration but also because the back is boring: On it you may find the tablet’s main camera and LED flash. That’s it.
- Samsung tablets feature the Home button directly below the touchscreen. This physical button serves the same purpose as the Home icon on other Android tablets.
- Samsung tablets also feature touch-sensitive Recent and Back buttons. A Menu button is found instead of the Recent button on older tablets.
- Be careful not to confuse the SIM card slot with the external storage slot. They’re not the same thing. You’ll rarely, if ever, access the SIM card.
 SIM stands for Subscriber Identity Module. The SIM card is used by a cellular provider to identify your tablet and keep track of the amount of data transmitted over the mobile data network. Yep, that’s so you can be billed properly. The SIM also gives your LTE tablet a phone number, though that number is merely an account and not something you can dial into or use for sending a text message.
- Don’t stick anything into the microphone hole. Yes, it’s tempting, but don’t. Only stick things into your tablet that you’re supposed to, such as the USB cable, headphones, memory card, or SIM card.
Inserting a MicroSD card
Removable storage is available on some Android tablets in the form of a MicroSD card. It can be used to store photos, videos, music, evil plans, and so on.
The MicroSD card is teensy. (That’s a scientific description.) The card fits into a slot on the edge of your tablet but can also be inserted into your computer and read like any removable media card.
The card can be inserted into your tablet whether the device is on or off. Heed these directions:
Locate the MicroSD card hatch on the tablet’s edge.
Figure 1-2 illustrates the hatch’s appearance, although it may look subtly different on your tablet. The card may be labeled MicroSD. Do not confuse it with the SIM card cover.
Poke your fingernail into the slot on the teensy hatch that covers the MicroSD slot, and then flip up the hatch.
When pressure is applied to the slot, the hatch pops up and kind of flops over to the side. The cover may not come off completely.
- Orient the MicroSD card so that the printed side faces up and the teeny triangle on the card points toward the open slot.
Use your fingernail or a paperclip to gently shove the card all the way into the slot.
The card makes a faint clicking sound when it’s fully inserted.
If the card keeps popping out, you’re not shoving it in far enough.- Close the hatch covering the MicroSD card slot.

Figure 1-2: Opening the memory card hatch.
If the tablet is on (and has been configured), you may see an onscreen prompt. If so, ignore the prompt and just tap the OK button on the tablet’s touchscreen.
 Not every Android tablet features external storage. If you can’t find a MicroSD card slot on the tablet’s edge, that feature isn’t available to your tablet.
- The tablet works with or without a MicroSD card installed.
- The MicroSD card is a purchase you must make in addition to your Android tablet. Check the tablet’s documentation (on the box) to see which capacities are compatible with your tablet.
- MicroSD card capacity is in gigabytes (billions of bytes), abbreviated GB or just G. Common capacities include 16GB, 32GB, and 64GB. The higher the capacity, the more stuff you can store but also the more expensive the card.
- To use a MicroSD card with a computer, you need an SD card adapter. Insert the MicroSD card into the adapter, and then plug the SD card adapter into the computer. The adapter is an extra purchase, although some MicroSD cards come with such an adapter.
- SD stands for Secure Digital. It is but one of about a zillion media card standards.
- In addition to the MicroSD card, your Android tablet features internal storage. That storage is used for the programs you install on the tablet, as well as for the tablet’s operating system and other control programs.
- Refer to Chapter 17 for more information on storage.
Removing the MicroSD card
Most of the time, the MicroSD card dwells contently inside your Android tablet. When the urge arises to remove it, heed these steps:
Turn off your Android tablet.
You can damage the media card if you just yank it out of the tablet, which is why I recommend turning off the tablet first. Specific directions for turning off an Android tablet are found in Chapter 2.- Open the itty-bitty hatch covering the MicroSD card slot.
Use your fingernail to press the MicroSD card inward a tad.
The MicroSD card is spring-loaded, so pressing it in eventually pops it outward.
- Pinch the MicroSD card between your fingers and remove it completely.
The MicroSD card is too tiny to leave lying around. Put it into a MicroSD card adapter for use in your PC or another electronic device. Or store it inside a miniature box that you can label with a miniature pen in miniature letters: “MicroSD Card Inside.” Don’t lose it!
It’s possible to remove the MicroSD card without turning off the tablet. To do that, you need to unmount the card while the tablet is running. This technical procedure is explained in Chapter 17.
Optional Accessories
Your credit card company will be thrilled when you discover that an assortment of handy Android tablet accessories are available for purchase. You can find them at the place where you purchased your tablet, online, or in the real world. Here are just a few of the items that you can consider getting to complete your tablet experience:
Earphones: You can use any standard cell phone or portable media player earphones with an Android tablet. Simply plug the earphones into the headphone jack at the top of the tablet and you’re ready to go.
Covers, pouches, and sleeves: Answering the question “Where do I put this thing?” is the handy Android tablet pouch or sleeve accessory. Special pouches that double as covers or tablet stands are also available. Try to get one designed for your tablet. If not, check the size before you buy. Not every 10-inch tablet fits into the same 10-inch pouch.
Screen protectors: These plastic, clingy things are affixed to the front of the tablet, right over the touchscreen. They help defend the touchscreen glass from finger smudges and sneeze globs while still allowing you to use the touchscreen.
Vehicle charger: You can charge the Android tablet in your car if you buy a vehicle charger. It’s an adapter that plugs into your car’s 12-volt power supply, in the receptacle that was once known as a cigarette lighter. The vehicle charger is a must if you plan on using the Android tablet’s navigation features in your auto or when you need a charge on the road.
Docks, various and sundry: Most people manhandle their tablets. Tsk, tsk. You can be more refined and get your Android tablet a dock. There are several kinds, from the simple prop-dock that holds up the tablet at a pleasant viewing angle to docks that contain keyboards to multimedia docks that feature USB ports.
Keyboard: Some docking stands double as tablet keyboards, but you can also obtain any Bluetooth keyboard for use with your Android tablet. See Chapter 16, which covers the Bluetooth connection.
USB Adapter: This USB adapter isn’t the same thing as the USB cable that comes with your tablet. It’s a dongle that plugs into the tablet’s power/USB jack to allow the tablet to host a USB device, such as a keyboard, mouse, or modem, or an external storage device (hard drive or optical drive).
Other exciting and nifty accessories might be available for your tablet. Check frequently for new garnishes and frills at the location where you bought your tablet.
- None of this extra stuff is essential to using your tablet.
- You can use Bluetooth earphones or a cell phone Bluetooth headset with any Android tablet.
- If the earphones feature a microphone, you can use that microphone for dictation, recording, and even chatting online with friends.
- If the earphones feature a button, you can use the button to pause and play music. Press the button once to pause, and again to play.
- Android tablets generally don’t recognize more than one earphones button. For example, if you use earphones that feature a Volume button or Mute button, pressing that extra button does nothing.
- Another useful accessory to get is a microfiber cloth to help clean the tablet’s screen, plus a special cleaning-solution wipe. See Chapter 22 for more information about cleaning an Android tablet’s screen.
Where to Keep Your Tablet
Like your car keys, glasses, wallet, and phaser pistol, your Android tablet should be kept in a safe, easy-to-find, always handy place, whether you’re at home, at work, on the road, or orbiting the Klingon home world.
Making a home for the tablet
I recommend returning your Android tablet to the same spot whenever you finish using it. If you have a computer, my first suggestion is to make a spot right by the computer. Keep the charging cord handy, or just plug the cord into the computer’s USB port so that you can synchronize information with your computer on a regular basis, not to mention keep the tablet charged.
Another handy place to keep the tablet is on your nightstand. That makes sense because, in addition to using the tablet for nighttime reading or video watching, it can serve as an alarm clock (see Chapter 14).
If you have a docking stand, plug your tablet into it whenever you’re not toting it about.
Above all, avoid putting the tablet in a place where someone can sit on it, step on it, or otherwise damage it. For example, don’t leave the tablet on a table or counter under a stack of newspapers, where it might get accidentally tossed out or put in the recycle bin.
Never leave the tablet on a chair!
As long as you remember to return the tablet to the same spot when you’re done with it, you’ll always know where it is.
Taking the Android tablet with you
If you’re like me, you probably carry the Android tablet around with you to or from the office, at the airport, in the air, or in your car. I hope you’re not using the tablet while you’re driving. Regardless, it’s best to have a portable place to store your tablet while you’re on the road.
The ideal place for the tablet is a specially designed pouch or sleeve. The pouch keeps the device from being dinged, scratched, or even unexpectedly turned on while it’s in your backpack, purse, or carry-on luggage or wherever you put the tablet when you’re not using it.
Also see Chapter 21 for information on using an Android tablet on the road.