
Chapter 2
Android Tablet On and Off
In This Chapter
![]() Turning on an Android tablet
Turning on an Android tablet
![]() Unlocking the screen
Unlocking the screen
![]() Configuring the tablet
Configuring the tablet
![]() Adding more accounts
Adding more accounts
![]() Locking the screen
Locking the screen
![]() Shutting down the tablet
Shutting down the tablet
The bestselling Pencils For Dummies has no chapter describing how to turn on a pencil. Pens For Dummies does have the chapter “Enabling the Pen to Write,” but that’s not really an on–off thing, and the author of that book describes in great detail how awkward an On-Off switch or power button would be on a pen. Aren’t you and I lucky to live in an age when such things are carefully described?
Your Android tablet is far more complex than a pen or a pencil, and, often, it’s more useful. As such an advanced piece of technology, your tablet features not an On–Off button but, rather, a Power/Lock key. That button does more than just turn the Android tablet on or off, which is why this book has an entire chapter devoted to the subject.
Greetings, Android Tablet
The first time you turn on an Android tablet — the very first time — it prompts you to complete the setup process. This step is necessary, and it may have already been completed for you by the cheerful people at the Phone Store who sold you an LTE tablet. Whether or not that’s the case, better read this section, just to be sure.
 Initial tablet setup works best when you already have a Google, or Gmail, account. If you lack a Google account, you’re prompted to create an account in the setup process; see the next section.
The tablet will not start unless the battery is charged. Or unless you plug it in. See Chapter 1.
Turning on your Android tablet for the first time
The very, very first time you turn on your Android tablet, you’re required to work through the setup process. It’s a must, but it needs to be done only once. If your tablet has already been set up, skip to the next section, “Turning on the tablet.”
The specifics of the setup-and-configuration process differ from tablet to tablet. For example, some tablets may prompt you to sign in to services like Dropbox. Tablets on certain mobile data networks may require you to run specific setup apps, which you’ll read about during the configuration process. Generally speaking, however, the process is similar on all Android tablets, which is what I’ve documented in this section.
I recommend reading through these steps first, and then turning on the tablet and working through them afterward — the process goes kind of fast, and the screen may dim if you spend too much time waiting between steps:
Turn on the tablet by pressing the Power/Lock key.
You may have to press the button longer than you think; when you see the tablet’s logo appear on the screen, the tablet has started.
 It’s okay to turn on the tablet while it’s plugged in and charging.
- Answer the questions that are presented.
You’re asked to select options for some, if not all, of these items:
- Select your language
- Activate an LTE tablet on the mobile data network
- Choose a Wi-Fi network (can be done later)
- Set the time zone
- Accept terms and conditions
- Sign in to your Google account
- Add other online accounts
- Set location information
When in doubt, just accept the standard options as presented to you during the setup process.
To fill in text fields, use the onscreen keyboard. See Chapter 4 for keyboard information.
Other sections in this chapter, as well as throughout this book, offer information and advice on these settings. You can’t screw up anything at this point; any selection you make can be changed later.
After each choice, tap the Next button, or large triangle icon.
 The Next button might appear on the screen, labeled with the text Next, or it might appear as a triangle icon, shown in the margin.
Tap the Finish button.
The Finish button appears on the last screen of the setup procedure.
You’re done. From this point on, starting the tablet works as described in the next section.
After the initial setup, you’re taken to the Home screen. Chapter 3 offers more Home screen information, which you should probably read right away, before the temptation to play with your new tablet becomes unbearable.
- You may find yourself asked various questions or prompted to try various tricks when you first start to use the tablet. Some of those prompts are helpful, but it’s okay to skip some. To do so, tap the OK I Got It button or select the Do Not Show Again check box.
- Additional information on connecting your tablet to a Wi-Fi network is found in Chapter 16.
- Location settings relate to how the tablet knows its position on Planet Earth. I recommend keeping all these items activated to get the most from your Android tablet.
- It’s important to have a Google account on an Android tablet. If you don’t have one, sign up during the setup process.
- By setting up your Google account, you coordinate with your new Android tablet whatever information you have on the Internet. This information includes your email messages and contacts on Gmail, appointments on Google Calendar, and information and data from other Google Internet applications.
- It isn’t necessary to use any specific software provided by the tablet’s manufacturer or the cellular provider. For example, if you don’t want a Samsung account, you don’t need to sign up for one; skip that step.
- See the later sidebar “Who is this Android person?” for more information about the Android operating system.
Turning on the tablet
To turn on your Android tablet, press and hold the Power/Lock button. After a few seconds, you see the tablet’s start-up logo, enjoy some hypnotic animation, and maybe even hear a tune. Release the Power/Lock key; the device is starting.
Eventually, you see the unlock screen. See the later section “Working the screen lock” for information on what to do next.
Unlocking the tablet
You’ll probably leave your Android tablet on all the time. That’s great! Tablets are designed that way, and the battery supports keeping it on for lengthy periods. When your tablet is bored, or when you’ve ignored it for a while, it locks itself similarly to a computer entering Sleep mode. After the tablet is locked, the touchscreen turns off to save power.
To unlock the tablet, press the Power/Lock key. Unlike turning on the tablet, a quick press is all that’s needed.
After unlocking the tablet, you see the lock screen. Work the lock as described in the next section, and then you can start using the device.
- On Samsung tablets, you can press the Home button to unlock the tablet. The Home button is centered below the touchscreen.
- On the Samsung Galaxy Note, you can unlock the tablet by removing the S Pen.
- If your tablet features a cover, opening the cover unlocks the device.
- Android tablets don’t snore while sleeping, but they can dream. See Chapter 23.
Working the screen lock
The swipe lock isn’t a difficult lock to pick. In fact, it’s known as the No Security screen lock on some tablets. If you’ve added more security, you might see any one of several different screen locks on your tablet. Here are the common Android screen locks:
Swipe: It’s the standard screen lock. Swipe your finger on the screen to unlock the device, as illustrated in Figure 2-1. If a more secure lock is set, you’ll need to work it next.
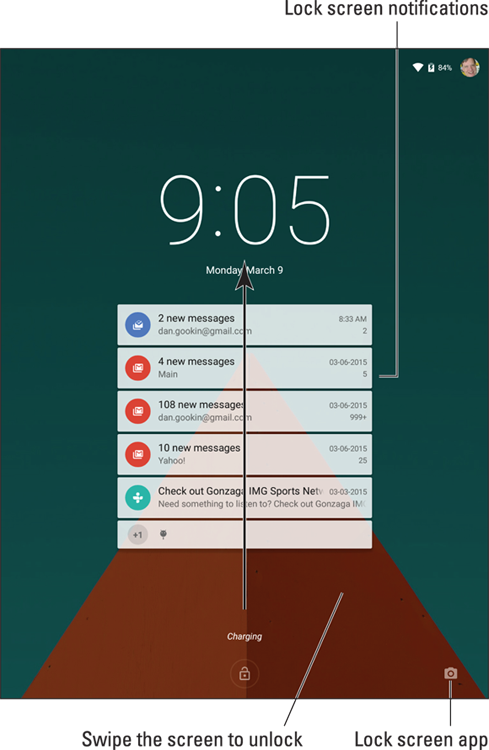
Figure 2-1: The lock screen, featuring the swipe lock.
Pattern: Trace a preset pattern over the nine dots on the screen.
PIN: Type a number to unlock the device.
Password: Type a password, which can include letters, numbers, and symbols.
Some tablets provide additional, fancy screen locks. Among the variety are the following:
Face Unlock: Look at the tablet. In a few moments, your visage is recognized and the tablet unlocks.
Fingerprint: Rub your finger or thumb over the sensor, such as the Home button on a Samsung Galaxy Tab S, to unlock the device.
Signature: The Samsung Galaxy Note line of tablets lets you sign your name on the screen by using the S Pen. If the signature matches, the tablet unlocks.
Finally, some tablets provide the None option for the screen lock. When this option is selected, the device lacks a screen lock and you can use the tablet immediately.
The PIN and password locks are considered the most secure. To use certain tablet features, you must choose either the PIN or password screen lock. Other locks offer moderate security, and may require a PIN or password as a backup. The swipe and None locks are the least secure.
See Chapter 20 for information on setting your tablet’s screen lock.
Unlocking and running an app
Your tablet’s lock screen may feature app icons, such as the Camera icon, shown earlier, in Figure 2-1. You can unlock the tablet and run a given app: Drag the app icon across the touchscreen. The tablet unlocks, and the chosen app starts automatically.
- When a secure screen lock is set, the tablet isn’t actually unlocked when the app runs. To do anything else on the tablet, you must eventually work the screen lock.
- Refer to Chapter 3 for details on performing the drag operation.
More Accounts
Your Android tablet can serve as home to your various online incarnations. That includes your email accounts, online services, subscriptions, and other digital personas. I recommended adding those accounts to your tablet to continue the setup-and-configuration process.
With your tablet on and unlocked, follow these steps:Tap the Apps icon.
 The Apps icon is found at the bottom of the Home screen. It looks similar to the icon shown in the margin, although it has many variations. See Chapter 3 for the variety.
When you tap the Apps icon, you view the Apps drawer, which lists all apps available on your tablet.
Open the Settings app.
You may have to swipe the Apps drawer screen left or right a few times, paging through the various icons, to find the Settings app.
After you tap the Settings icon, the Settings app runs. It shows commands for configuring and setting tablet options.
Choose the Accounts category.
On some Samsung tablets, tap the General tab atop the Settings app screen to find the Accounts category.
Some tablets may name the item Accounts and Sync.
Upon success, you see all existing accounts on your tablet, similar to the ones shown in Figure 2-2.
Tap Add Account.
 The Add Account item is illustrated in Figure 2-2, although it may appear as only a plus sign, shown in the margin.
Choose an account from the list.
For example, to add a Facebook account, choose the Facebook app from the list.
Don’t worry if you don’t see the exact type of account you want to add. You may have to add a specific app before an account appears. Chapter 15 covers adding apps.
Follow the directions to sign in to your account.
The steps you take depend on the type of account you’re adding. Generally speaking, you sign in by using an existing username and password.
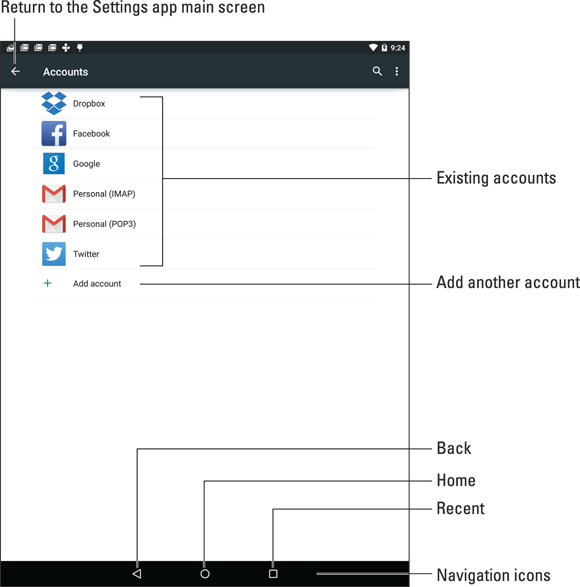
Figure 2-2: Accounts listed in the Settings app.
 You can continue adding accounts by repeating these steps. When you’re done, tap the Home icon to return to the Home screen.
- See Chapter 6 for specific information on adding email accounts to your Android tablet.
- Chapter 9 covers social networking on your tablet. Refer there for specific information on adding Facebook, Twitter, and other social networking accounts.
- The accounts you add are your own. If you need to add another user to the tablet (who would have her own accounts), see Chapter 20 for information.
The End of Your Android Tablet Day
I know of three ways to say goodbye to your Android tablet; only one of them involves the application of high explosives. The other methods are documented in this section.
Locking the tablet
Locking the tablet is cinchy: Simply press and release the Power/Lock key. The display goes dark; your tablet is locked.
- Your Android tablet still works while locked; it receives email, can play music, and signals alerts. While it’s locked, the tablet doesn’t use as much power as it would with the display on.
- The tablet will probably spend most of its time locked.
- Locking doesn’t turn off the tablet.
- Any timers or alarms you set still activate when your tablet is locked. See Chapter 14 for information on setting alarms.
- To unlock your tablet, press and release the Power/Lock key. See the section “Unlocking the tablet,” earlier in this chapter.
- Refer to Chapter 19 for information on setting the automatic timeout value for locking the tablet.
Turning off your Android tablet
To turn off your tablet, heed these steps:
Press and hold the Power/Lock key.
You see the Device Options menu, which may contain only one item: Power Off. Some tablets feature more items on this menu, such as the Samsung version of the Device Options menu, shown in Figure 2-3.
 If you chicken out and don’t want to turn off your tablet, tap the Back icon to dismiss the Device Options menu.
Tap the Power Off item.
If a confirmation message appears, tap the OK button. The Android tablet turns itself off.

Figure 2-3: The Device Options menu.
The tablet doesn’t run when it’s off, so it doesn’t remind you of appointments and doesn’t collect email, nor do you hear any alarms you’ve set. The tablet isn’t angry with you for turning it off, though you may sense some resentment when you turn it on again.
- Varieties of the Device Options menu on various Android tablets include the Restart command as well as commands to silence the speakers or control vibration. I’ve also seen a Kid Mode command on some tablets.
- Samsung tablets sport a Restart command on the Device Options menu. To restart other Android tablets, you need to turn the device off and then on again, as described in this chapter.
- The tablet can be charged while it’s off.
- Keep your tablet in a safe place while it’s turned off. Chapter 1 offers some suggestions.