
Chapter 20
Apps and Widgets
IN THIS CHAPTER
![]() Organizing apps on the Home screen
Organizing apps on the Home screen
![]() Working with widgets
Working with widgets
![]() Rearranging the Home screen
Rearranging the Home screen
![]() Creating folders
Creating folders
![]() Performing app updates
Performing app updates
![]() Removing apps
Removing apps
![]() Selecting default apps
Selecting default apps
![]() Organizing the Apps drawer
Organizing the Apps drawer
Of the gazillions of apps available for your Android, you probably want to keep a handful of your favorites ready and available. The best way to keep them accessible, neat, and tidy is to place their launcher icons on the Home screen. Indeed, the whole point of having a Home screen is to keep handy apps and widgets.
Apps and Widgets on the Home Screen
Your Android came with app launchers and perhaps some widgets affixed to the Home screen. You can keep those items, add your own, remove some, and change their locations. And when the Home screen brims with launchers like an overflowing teacup, you can build folders to further organize and keep your apps neat and tidy.
 App icons on the Home screen are called launchers.
Adding launchers to the Home screen
As you find yourself using an app frequently, consider slapping its launcher icon on the Home screen. Here's how that works:
-
Visit the Home screen page on which you want to stick the launcher.
The page must have room for the launcher icon. If it doesn’t, swipe the screen left or right to hunt down a page with room.
If you’re organizing Home screen pages by app type, visit the proper page. For example, on my Android gizmos, the second Home page is just for games.
- Tap the Apps icon to display the Apps drawer.
-
Long-press the app icon you want to add to the Home screen.
After a moment, the Home screen page you chose in Step 1 appears, as shown in Figure 20-1.
On some Samsung devices, you may see a pop-up showing several actions for the app icon. You can choose Add Shortcut to Home, though if you wait a tick, you can proceed with Step 4.
-
Drag the app to a position on the Home screen page.
Launchers are aligned to a grid. Other launchers may wiggle and jiggle as you find a spot. That’s okay.
- Lift your finger to place the app.
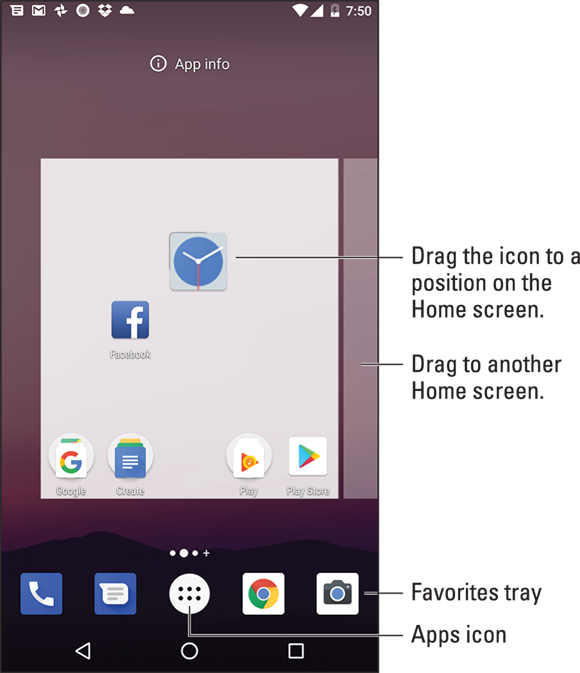
FIGURE 20-1: Placing an app icon on the Home screen.
The app hasn’t moved: What you see is a launcher, which is like a copy or a shortcut. You can still find the app in the Apps drawer, but now the app is available — more conveniently — on the Home screen.
- Newly installed apps often automatically affix a launcher to the Home screen. If you want to remove that launcher, see the later section “Removing an item from the Home screen.”
- Not every app needs a launcher on the Home screen. I recommend placing only those apps you use most frequently.
- The top row of the Apps drawer may list frequently accessed apps. Review this list to consider adding a frequent app to the Home screen if its launcher isn’t there already.
-
 You can't cram more launchers on the Home screen than will fit in the grid. As an alternative, consider moving launchers to another Home screen page, as covered in the later section “Moving launchers and widgets.” Also see the section “Working with folders” for another solution. Finally, if your Android allows you to add more Home screen pages, you can solve the problem that way; see Chapter 21.
Placing a launcher on the Favorites tray
The row of launcher icons at the bottom of the Home screen remains the same no matter which Home screen page you’re viewing. It’s called the Favorites tray, and it’s an ideal spot for apps you use most frequently.
Launchers are added to the Favorites tray in one of two ways:
- Drag a launcher off the Favorites tray, either to the Home screen page or to the Remove or Delete icon. This step makes room for a new icon on the Favorites tray.
- Drag a launcher from the Home screen to the Favorites tray, in which case any existing icon swaps places with the icon that’s already there.
Of these two methods, the second one may not work on all Androids. In fact, the second method may create a folder on the Favorites tray, which is probably not what you want. (See the later section “Working with folders.”)
![]() The best launchers to place on the Home screen are those that show notifications, as shown in the margin. The apps include Facebook, Twitter, Email, and others.
The best launchers to place on the Home screen are those that show notifications, as shown in the margin. The apps include Facebook, Twitter, Email, and others.
Using launcher shortcuts
Some apps feature shortcuts to common activities. These shortcuts let you do something with an app without opening it and then working through specific steps. As an example, in Figure 20-2 you see shortcuts for the Clock app.
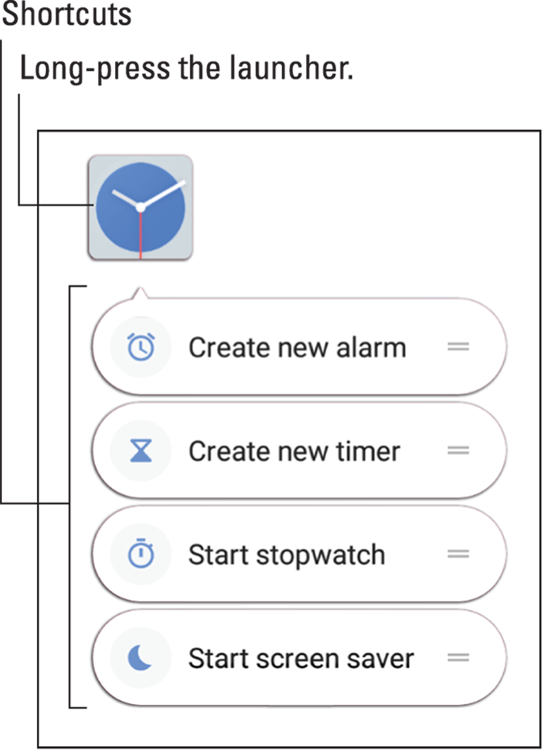
FIGURE 20-2: Launcher shortcuts.
To view the shortcuts, long-press the app. You can long-press a launcher on the Home screen or any app in the Apps drawer. Then choose an action from the cartoon bubbles displayed.
- The Phone, Contacts, and text messaging apps pop up frequent contacts. Other apps pop up specific activities, such as the Twitter app, which lets you instantly create a new tweet.
- Not every app features pop-up shortcuts.
Slapping down widgets
Beyond launchers, the Home screen is also where you’ll find widgets. A widget works like a tiny, interactive or informative window, often providing a gateway into another app, or it displays information such as status updates, the current song that’s playing, or the weather.
To add widgets to the Home screen, obey these steps:
-
Switch to a Home screen page that has enough room for the new widget.
Widgets come in a variety of sizes. The size is measured by launcher dimensions: A 1x1 widget occupies the same space as a launcher. A 2x2 widget is twice as tall and twice as wide as a launcher.
-
Long-press a blank part of the Home screen.
You see a Home screen overview, along with icons at the bottom of the screen.
-
Tap the Widgets icon.
A list of widgets appears.
-
Long-press the widget you want to add.
Swipe through the pages to find widgets, which are listed alphabetically and show preview images, just like apps. Also shown are the widget’s dimensions.
-
Drag the widget to the Home screen.
As you drag the widget, existing launcher icons and widgets jiggle to make room.
-
Lift your finger.
If the widget grows a border, it can be resized. See the next section.
After adding some widgets, you may be prompted for additional information — for example, a location for a weather widget or a contact name for a contact widget.
- The variety of available widgets depends on the apps installed. Some apps come with widgets, some don't, and some widgets are independent of any app.
- Fret not if you change your mind about the widget’s location. See the later section “Moving launchers and widgets” for obtaining the proper feng shui.
- To remove a widget, see the later section “Removing an item from the Home screen.”
Resizing a widget
Some widgets are resizable. You can change a widget’s size immediately after plopping it down on the Home screen — or at any time, really: The secret is to long-press the widget. If it grows a box, as shown in Figure 20-3, you can change the widget’s dimensions.
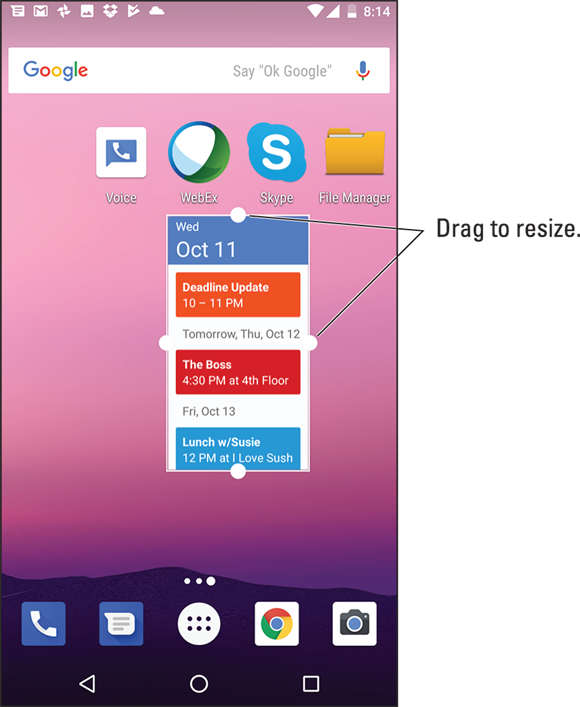
FIGURE 20-3: Resizing a widget.
To resize, drag one of the resizing dots in or out. Tap elsewhere on the touchscreen when you're done.
Moving launchers and widgets
Launchers and widgets aren’t fastened to the Home screen with anything stronger than masking tape. That’s obvious because it’s quite easy to pick up and move a launcher or widget, relocating it to a new position or removing it completely. To start, long-press an item, as illustrated in Figure 20-4.
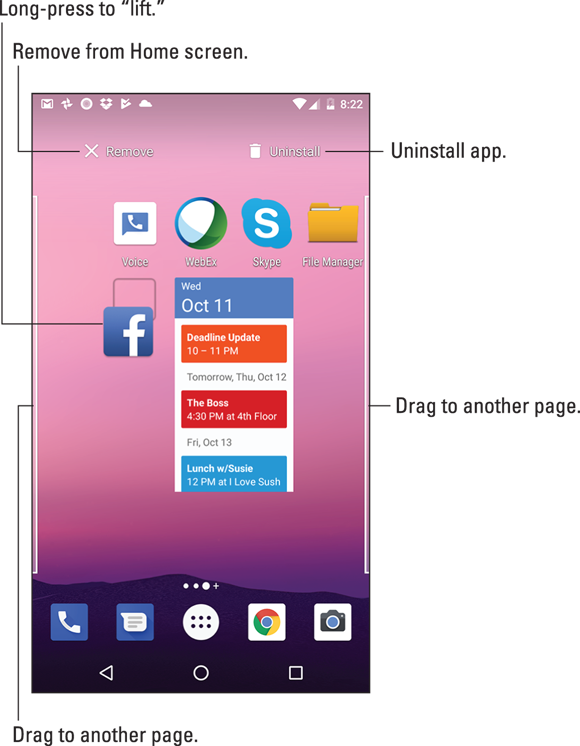
FIGURE 20-4: Moving a launcher.
Drag the item to another position on the Home screen. If you drag to the far left or far right of the screen, the icon or widget is sent to another Home screen page.
-
When you long-press some launchers, action shortcuts appear. Refer to the earlier section “Using launcher shortcuts.” To move the launcher, ignore the shortcuts and drag your finger to relocate the launcher.
- On some Samsung devices, long-pressing a launcher displays a pop-up of actions for the icon. As with the shortcuts, drag your finger to make the pop-up vanish.
Removing an item from the Home screen
To banish a launcher or widget from the Home screen, move the launcher or widget to the Remove icon located atop the Home screen.
For some Samsung devices, long-press the app to view its shortcut menu. Choose Remove Shortcut.
-
 The Remove icon may be an X or the word Remove (refer to Figure 20-4), though some devices show a Delete (trash) icon. Be careful because the Trash icon is often used for the Uninstall action, as illustrated in Figure 20-4.
 - Removing an app or widget from the Home screen doesn’t uninstall the app or widget. See the later section “Uninstalling an app.”
Working with folders
For further organization of the Home screen, consider gathering similar apps into folders. For example, I have a Listen folder that contains all my streaming music apps. Your Android may have come with a Google folder, which contains all the various apps provided by Google. These folders not only help organize your apps but also solve the problem of a crowded Home screen.
Folders are created in different ways, depending on the device. The stock Android method to create a folder is to drag one launcher on top of another. When the two launchers get close, a circle encloses them, which provides visual feedback that a folder is created.
Another technique is to look for a folder creation icon: Drag the launcher icon up to that icon, which creates a new folder. Or, perhaps, you long-press the Home screen and choose the Create Folder action. Drag icons into the new folder.
Examples of various folder icons are shown in Figure 20-5.
FIGURE 20-5: Folder icon varieties.
To open a folder, tap its icon. Tap a launcher to start the associated app. Or, if you don’t find what you want, tap the Back navigation icon to close the folder.
- To add more app launchers to the folder, drag in their icons.
- Some folders may feature a Plus (+) icon or the ADD APPS button. Tap this icon or button to add more launchers.
- Folders are organized just like other items on the Home screen. You drag folder icons around or delete them. When you delete a folder, you remove the launcher icons from the folder; deleting the folder doesn’t uninstall the apps.
- To change a folder’s name, open the folder and tap the folder’s name. Use the onscreen keyboard to type a new name.
- Some Androids may display a palette in a folder, from which you can set the folder’s background color.
- To remove a launcher from a folder, open the folder and drag out the icon. When the second-to-last last icon is dragged out of a folder, the folder is removed. If not, drag the last icon out, and then remove the folder as you would any other item on the Home screen, as described in the preceding section.
App Management
The apps you install on your Android originate from the Play Store. And that’s where you can return for basic app management. The task includes reviewing apps you’ve downloaded, updating apps, and removing apps that you no longer want or that you severely hate.
Additional app management is provided in the Settings app, though for most app chores, it’s off to the Play Store.
Reviewing your apps
To peruse the apps you’ve downloaded from Google Play, follow these steps:
- Open the Play Store app.
-
Ensure that you’re viewing the main screen.
Tap the Back navigation icon until you see the main screen.
 Tap the Side Menu icon.
- Choose My Apps & Games from the navigation drawer.
- Peruse your apps.
Your apps are presented in three categories: Updates, Installed, and Library, shown in Figure 20-6. You might also see a Subscriptions tab, with recurring items, such as video subscriptions and magazine subscriptions.
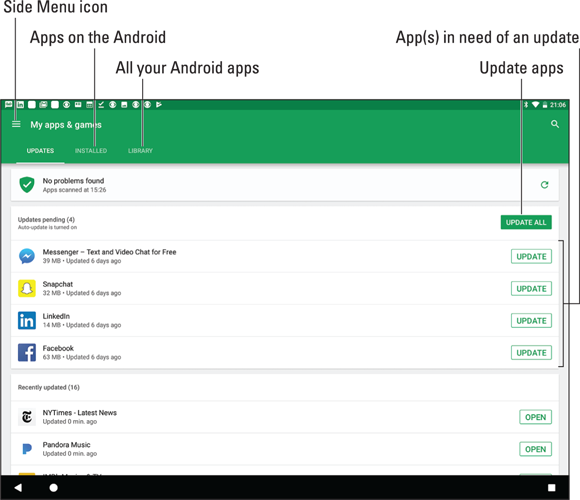
FIGURE 20-6: Locating all your Android’s apps.
The difference between the Installed and Library tabs depends on the apps installed on the device. Only those apps appear on the Installed tab. Apps you’ve obtained, even on other Android gizmos, but not installed on the device, are listed on the Library tab.
- Tap an app in the list to view its details. Some of the options and settings on the app’s details screen are discussed elsewhere in this chapter.
- Uninstalled apps remain on the Library tab because you did, at one time, download the app. To reinstall them (and without paying a second time for paid apps), choose the app from the Library tab’s list and tap the INSTALL button.
Updating apps
![]() New versions, or updates, of apps happen all the time. They’re automatic. Occasionally, you’re called upon to perform a manual update. How can you tell? The App Update notification appears, which is the generic Google Play notification, shown in the margin.
New versions, or updates, of apps happen all the time. They’re automatic. Occasionally, you’re called upon to perform a manual update. How can you tell? The App Update notification appears, which is the generic Google Play notification, shown in the margin.
To deal with a manual update, open the Play Store app to view all your installed apps as presented in the preceding section. What you’re looking for is the UPDATE ALL button, shown in Figure 20-6. Tap that button to apply necessary app updates. If prompted to accept the app’s permissions, tap the ACCEPT button.
You can view the app update process in the Play Store app or wander off and do something else with your Android.
- Yes, an Internet connection is required in order to update apps. If possible, try to use Wi-Fi so that you don’t incur any data surcharges on your cellular bill. Android apps aren’t super-huge in size, but why take the risk?
- If the Internet connection is broken during an update, the update process continues once the connection is reestablished. Apps aren’t messed up by the interruption.
Uninstalling an app
I can think of a few reasons to remove an app. It’s with eager relish that I remove apps that don’t work or that somehow annoy me. It’s also perfectly okay to remove redundant apps, such as when you’re trying to find a decent music-listening app and you end up with a dozen or so that you never use.
Whatever the reason, heed these steps to remove an app:
- Open the Play Store app.
- Choose My Apps & Games from the navigation drawer.
- Tap the Installed tab.
-
Choose the app that offends you.
Tap the app’s card, not the OPEN button. You see the app’s description from within the Play Store app.
- Tap the UNINSTALL button.
-
Tap the OK button to confirm.
The app is removed.
The app appears on the Library list even after the app has been removed. That’s because you downloaded it once. That doesn’t mean, however, that the app is installed.
- You can always reinstall paid apps that you’ve uninstalled. For paid apps, you aren’t charged twice for doing so.
- It’s possible to remove an app from the Home screen and uninstall the app. Refer to Figure 20-4: When you drag an icon off the Home screen, drag it to the Uninstall icon instead of Remove. The app is then uninstalled.
- On some Samsung galactic gizmos, long-press an app in the Apps drawer. Choose the Uninstall action from the shortcuts pop-up.
-
You can't remove apps that are preinstalled by either the manufacturer or cellular provider. I'm sure there's a technical way to uninstall such apps, but seriously: Just don't use the apps if you want to remove them and discover that you can't.
Controlling app notifications
The Android operating system now collects all app notification controls in a single location in the Settings app. This change is convenient in that formerly you changed notification settings within each app.
To set an app’s notifications, heed these directions:
- Open the Settings app.
-
Choose Apps & Notifications.
If you don’t see this item, your device is using an older version of the Android operating system that lacks this feature.
- Choose Notifications.
-
Tap the Notifications item.
You see a list of all apps on the device.
-
Choose an app to set individual notification options.
For example, in Figure 20-7, notification options for the Gmail app appear. You can disable all notifications by switching the master control to the Off position. Or you can set individual notification options as offered by the specific app.
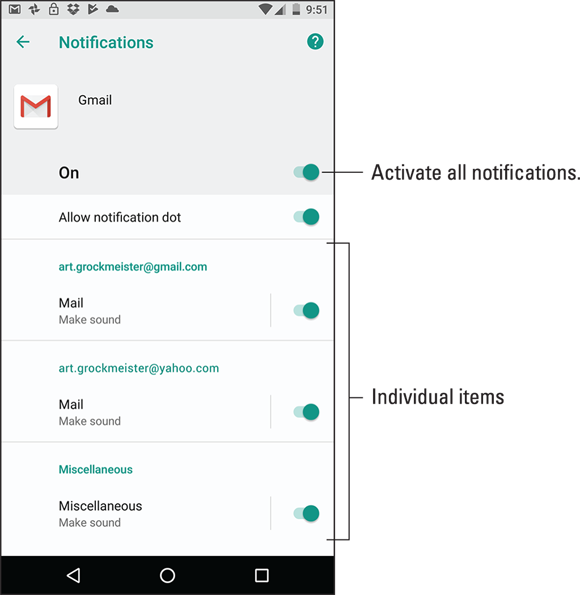
FIGURE 20-7: App notifications.
As an example, I disabled notifications on one app that kept bugging me all the time with trivial notices. The app still runs, albeit silently.
Selecting an “Open by default” app
Every so often, you may see the Complete Action Using prompt, which may look like the one shown in Figure 20-8. Regardless of its appearance, you’re prompted to choose an app to complete an action and then given the choice of JUST ONCE or ALWAYS.
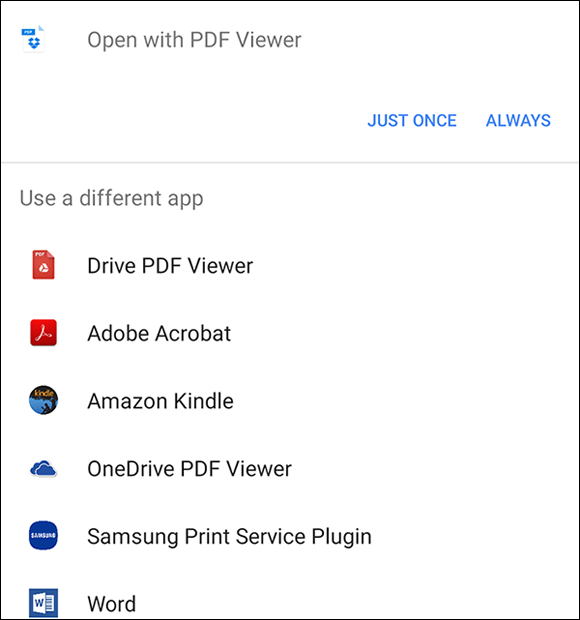
FIGURE 20-8: The Complete Action Using question is posed.
The app atop the list is the one you used previously, or the first installed app. To use that app all the time and never be bothered again with the prompt, tap ALWAYS.
To use the top app and see the prompt again, tap JUST ONCE. Otherwise, you can choose a different app from the list, which is opened “just once” for the current task. Next time, you see the prompt again.
-
My advice is to choose JUST ONCE until you get sick of seeing the Open With card. At that point, choose ALWAYS and set the open-by-default app. The fear, of course, is that you’ll make a mistake. Keep reading in the next section.
- The open-by-default app is different from what Android refers to as “default apps.” See the later section “Setting a default app for specific duties.”
Clearing “Open by default” apps
Fret not, gentle reader. The settings you chose for the Complete Action Using prompt can be undone. For example, if you select the PDF Viewer app from Figure 20-8, you can undo that choice by following these steps:
- Open the Settings app.
-
Choose Apps & Notifications.
This item is titled Apps in some releases of the Android operating system.
-
Choose App info.
If you don’t see this item, skip to Step 4.
-
Choose the app that always opens.
This is the tough step because you must remember which app you chose to “always” open.
-
On the app’s screen, choose Open by Default or Set as Default.
If the item shows the text Some Defaults Set, you’re on the right track. Apps that haven’t been chosen as the default show the text No Defaults Set.
- Tap the CLEAR DEFAULTS button.
After you clear the defaults for an app, you see the Open With card again. The next time you see it, however, make a better choice.
Setting a default app for specific duties
Adding confusion to the already befuddling term default, your Android features a set of default apps. These are the apps designated to control specific device features, such as
- The app to place phone calls on an Android phone
- The app to send and receive text messages on an Android phone
- The web browser app
- The camera app
- The Home screen app
- Other various duties
For example, if you want to use a different camera app or text messaging app, you can reset the default app by following these steps:
- Open the Settings app.
-
Choose Apps & Notifications.
On some devices, this item is titled Apps.
-
Choose Default Apps.
You may need to expand the Advanced item: Tap the chevron to view the Default Apps item. On Samsung devices, tap the Action Overflow on the Apps screen to locate the Default Apps action.
-
Select a default app to reset.
For example, choose Browser App to set a web browser other than Chrome.
-
Choose the default app.
Available apps appear in the list.
If the list is empty, you can obtain alternative apps at Google Play; see Chapter 17.
- The most common default app to change is the text messaging app. Usually, a phone has two: the stock Android version and one supplied by your device’s manufacturer. See Chapter 8.
- The Home screen app is the one you see when you tap the Home navigation icon. Yes, it can be changed. Many alternative Home screen apps are available, from those that display very basic uses to advanced and nerdy Home screen apps.
-
I don’t recommend resetting default apps until you become comfortable using your Android. Remember that the documentation and helpful resources such as this book assume that you’re using the stock Android apps, such as Chrome for the web browser.
Reviewing app permissions
The Android operating system is completely open about which apps access which device features. That’s the reason you see the various permission cards to allow or deny access. To review or reset those permissions, obey these directions:
- Open the Settings app.
- Choose Apps or Apps & Notifications.
-
Choose App Permissions.
On Samsung phones and tablets, tap the Action Overflow to locate the App Permissions action.
You see a list of hardware and software items an app can access on your Android. For example: Location, Microphone, Storage, and so on.
-
Tap a category.
A list shows apps that can access the resource. Each app has a master control set to On or Off, indicating whether it has permission to use the resource.
- Reset the master control to allow or deny access to the specific app.
Resetting the access permission doesn’t prevent the app from asking again in the future. Some permission cards feature a Do Not Ask Again check box, which you can select to ensure that the question doesn’t arise again. Still, some apps are persistent.
Shutting down an app run amok
Sometimes an app goofs up or crashes. You may see a warning message on the touchscreen, informing you that the app has been shut down. That’s good. What’s better is that you too can shut down apps that misbehave or those you cannot otherwise stop.
First, try dismissing the app from the Overview:
 Tap the Recent navigation icon.
-
Swipe away the miscreant app’s thumbnail, or tap the X button.
The app is closed.
When these steps don’t work, more drastic measures are required:
- Open the Settings app.
- Tap the Apps or Apps & Notifications item.
- If you don’t see a list of apps, choose App Info.
-
Choose the errant app from the list.
For example, if the Annoying Sound app is bothering you, choose it from the list.
-
Tap the FORCE STOP button.
The app is terminated.
If the FORCE STOP button isn’t highlighted, the app isn’t running.
Use the FORCE STOP button only as a final act. Don’t kill off any app or service unless the app is annoying or you are otherwise unable to stop it. Avoid killing off Google Services, which can change the device’s behavior or make the Android operating system unstable.
Apps Drawer Organization
Some Androids offer tools for arranging apps in the Apps drawer. These tools allow you to present the apps in an order other than alphabetical, rearrange the apps, or even collect apps into folders.
The key to organizing the Apps drawer is to look for an Action Overflow or for specific icons or buttons on the screen. For example, some Samsung gizmos feature an EDIT button, which is used to arrange icons in the Apps drawer. The A-Z command arranges apps in alphabetical order.
You may find a FOLDER action that lets you build Apps drawer folders, or you might create folders by dragging icons over each other, similar to how folders work on the Home screen folder. Refer to the earlier section “Working with folders” for details.