
CHAPTER
3
Oracle Database 12c Release 2 Multitenant New Features
Oracle Database 12c Release 1 introduced a radically different database architecture in the form of Oracle Multitenant. In this new architecture, Oracle provides the ability to store multiple databases called pluggable databases (PDBs) within the management infrastructure of a single Oracle Database instance called a container database (CDB), or even within multiple database instances in the case of Oracle Real Application Clusters (RAC).
Oracle Database 12c Release 2 adds several new features related to Multitenant databases, which we will discuss in this chapter. Also, Oracle has announced that the old Oracle database architecture has been deprecated. What this means is that as time goes on, we are more likely to see new features that will work only with the new multitenant architecture. So, now is a good time to start becoming familiar with Oracle Multitenant.
We discuss Multitenant database new features in several other chapters in this book. For example, Chapter 2 discussed upgrading Multitenant databases. Chapter 4 introduces new features related to scalability and agility, and Chapter 6 covers new features related to backups and RMAN. Quite probably, most of the new features discussed in the next edition of this book will be related to PDBs in some way.
In this chapter we start with a review of some of the new features related to the creation of Oracle pluggable databases, as well as new cloning features—with every new release, more operations can be done while the PDB is online. There are new security features that are important to cover as well. Last, but not least, we’ll cover performance enhancements to a container environment so that each PDB in a container will coexist more peacefully with the other PDBs in the CDB in terms of resource usage.
New Features Related to Creating Pluggable Databases
New features related to creating (including cloning) pluggable databases include the following:
![]() Increase in how many PDBs a CDB can contain
Increase in how many PDBs a CDB can contain
![]() Parallel creation of PDBs
Parallel creation of PDBs
![]() Hot cloning of PDBs
Hot cloning of PDBs
![]() Refreshable read-only PDBs
Refreshable read-only PDBs
![]() Creating UNDO tablespaces in individual PDBs
Creating UNDO tablespaces in individual PDBs
![]() Creating a PDB with a default tablespace
Creating a PDB with a default tablespace
![]() Fine-grained PDB memory usage
Fine-grained PDB memory usage
![]() Support for PDBs with a different character set from that of the host CDB
Support for PDBs with a different character set from that of the host CDB
![]() Changes in PDB support for time zones
Changes in PDB support for time zones
That’s a lot to cover, so let’s get started!
Support for Thousands of PDBs for Each Container Database
In the first release of Oracle Database 12c, you could create a maximum of 252 PDBs within a CDB. Oracle likely thought that was more than enough PDBs per CDB at the time. However, I can think of many cases where more than 252 PDBs might be helpful, and apparently Oracle agrees. In Oracle Database 12c Release 2, you can now create 4,096 individual PDBs within a CDB. I have no doubt someone will be bumping up against that limit any day now!
Parallel PDB Creation
When you create a new PDB, using PDB$SEED as your source, you can now choose to parallelize the creation of that PDB. You do so by using the new PARALLEL clause of the CREATE PLUGGABLE DATABASE command, as shown in this example:
![]()
If you don’t indicate a degree of parallelism by using the PARALLEL clause, then Oracle will decide one for you, even if you don’t use the PARALLEL clause. If you don’t want to have the PDB created in parallel, you can force it to be created in serial mode by using the PARALLEL parameter with a value of 1.
Hot and Cold Cloning a PDB
You can now create a PDB from another PDB while the source PDB is still in READ WRITE mode. To do so, the CDB must be in ARCHIVELOG mode. You can also incrementally refresh a PDB that was opened READ ONLY. This fine-grained UNDO for PDBs also enables flashback features at the PDB level. All three of those features require setting up local undo mode. As long as these requirements are met, no additional parameters are required when issuing the CREATE PLUGGABLE DATABASE command.
Configuring CDB Local Undo Mode
Oracle Database 12c Release 2 now offers the capability for PDBs to use their own UNDO tablespaces as opposed to the UNDO tablespace of the entire CDB. You can define the UNDO tablespace at the time you create the PDB or you can modify an existing PDB to start using local undo mode (this requires restarting the entire CDB). Additionally, when you create a PDB using the Database Configuration Assistant (DBCA), it will create a local UNDO tablespace for the new PDB, and enable local undo mode for that PDB by default.
To use local undo mode, you must enable it on the CDB. For an existing CDB, you can do this through the following steps:
1. Shut down the CDB.
2. Restart the CDB in upgrade mode with the STARTUP UPGRADE command.
3. While connected to the root container, issue the command ALTER DATABASE LOCAL UNDO ON.
4. Shut down and restart the CDB.
After restarting the database, you can tell that it’s in local undo mode by querying the DATABASE_PROPERTIES view and searching the PROPERTY_NAME column for the value LOCAL_UNDO_ENABLED. If local undo mode is enabled, then the PROPERTY_VALUE column returns TRUE; otherwise it returns FALSE. The following example shows a query of the view and confirms that the database is in local undo mode:

After the CDB is put in local undo mode, each PDB will have a new UNDO tablespace created when it is first opened, and the UNDO_TABLESPACE parameter will be set to the value of that new UNDO tablespace. (Note that the creation of the new UNDO tablespace in the PDB may cause the reopening of the PDB to take a bit longer the first time.)
Another way to confirm that local undo tablespaces have been created is to look in V$DATAFILE:


The container itself has its own undo tablespace as well as both the seed database and the single PDB in this CDB.
It is possible that this new local undo tablespace will not be sized correctly, or you may wish to create the local undo tablespace in a different location. Once the CDB is in local undo mode, you can connect to a PDB and create its own custom undo tablespace. Once it is created, simply change the UNDO_TABLESPACE parameter to point to the new UNDO tablespace. Once you have done that, and once the old UNDO tablespace is no longer in use, you can drop the old UNDO tablespace that was created.

You can reverse this process to take a CDB out of local undo mode. When you take the CDB out of local undo mode and put it back into shared undo mode, the UNDO tablespaces in the PDBs will not be used. Also, Oracle does not automatically drop the local UNDO tablespaces when the CDB is taken out of local undo mode. The DBA must drop these tablespaces in the individual PDBs in separate operations.
Creating a PDB with a Default Tablespace
In Oracle Database 12c Release 1, you can define the default tablespace of a PDB when creating the PDB only if you are cloning it from the PDB$SEED container. To do so, you simply use the DEFAULT TABLESPACE clause as a part of the CREATE PLUGGABLE DATABASE command, which enables you to define the name, datafile location, and size of the datafile associated with that temporary tablespace. If you don’t define a datafile, Oracle creates one for you.
However, in Release 1, if you are creating a PDB through any other method, then you cannot define the default tablespace for the PDB being created. For example, if you are creating a PDB using another user-created PDB as the source, you can’t use the DEFAULT TABLESPACE clause. Instead, you have to connect to the new PDB once it has been created and then create the new tablespace that you want to use as the default tablespace. Then, you need to create a temporary tablespace for that PDB.
In Oracle Database 12c Release 2, you can now use the DEFAULT TABLESPACE clause within the CREATE PLUGGABLE DATABASE command when creating any PDB. Cloning the PDB from PDB$SEED really has not changed much in this respect. There is one additional requirement if you are cloning the PDB using any method other than cloning from PDB$SEED: the tablespace you will define as the default tablespace must already exist in the source database that the PDB will be cloned from.
For example, assume we have a PDB called DB12CR2NF and we wish to create a new PDB called TESTPDB using the DB12CR2NF PDB as the source. Further assume that we want to define a tablespace called DEFAULT_TBS as the default tablespace for the new PDB. To do this, first we would create the DEFAULT_TBS tablespace in the DB12CR2NF PDB (which will be the source PDB):

Now, we connect to the CDB root and simply issue the CREATE PLUGGABLE DATABASE command, including the DEFAULT TABLESPACE clause that will cause the DEFAULT_TBS tablespace to be used as the default tablespace:

We can see the impact of this by logging into the TESTPDB PDB, opening it, creating a user, and then querying the data dictionary to see the user’s default tablespace assignment:

Support for Different Character Sets in PDBs
When Oracle Multitenant was first released, a PDB had to be defined with the same character set as the CDB that owned it. This caused problems if you wanted to consolidate databases into a CDB if they did not share the same character set.
Oracle Database 12.2 relaxes the rules related to the compatibility of character sets in the PDBs contained in a given CDB. Now, for each PDB being plugged into a CDB, you must consider the combinations of database character sets and NLS character sets to determine if the plug-in of the PDB will be successful, or if you must convert the character set of the PDB to be able to use it.
Table 3-1 lists the different actions that will occur when you plug in a PDB, based on the character sets in use in both the PDB and the CDB.

TABLE 3-1. PDB to CDB Character Set Compatibility
In Table 3-1, when we talk about a character set being compatible, we mean that it must be plug-in compatible. This means that the character set in the PDB is a binary subset (proper subset) of the character set of the CDB that it’s being plugged into. You can find the list of compatible character sets in the Database Globalization Support Guide, which is part of the Oracle Documentation Set for Oracle Database 12c Release 2.
One thing that is clear from Table 3-1 is that it’s a really good idea to create any CDB using the AL32UTF8 character set. You should also always use the AL16UTF8 character set as the NLS character set for the CDB. In doing so, you will make the migration of PDBs into the CDB a much easier process.
Even when Oracle plugs in a PDB without an error message, and even converts the character set of the database, this does not mean that you are home free. Some character set conversions can still be problematic. For example, CHAR or VARCHAR2 column data may all of a sudden exceed the declared column lengths during the conversion. For these reasons, Oracle recommends upgrading the character set of the database or PDB before plugging it into a CDB.
Note that many of the Oracle utilities (such as LogMiner) and database features (such as standby databases) will also support the mixing of character sets between a CDB and a PDB. This support enables extended features such as rolling upgrades of the Oracle database.
PDB Support for Different Database Time Zones
In Oracle Database 12c Release 2, you can now permanently set the time zone for any PDB to be different from that of the CDB by using the ALTER PLUGGABLE DATABASE command with the SET TIME_ZONE clause. To change the time zone of a PDB, you must be connected to the PDB. Once you have changed the time zone setting, you must restart the PDB. You can then see that the new time zone has been set properly by calling the DBTIMEZONE function. Here is an example that sets the time zone to GMT minus 6 hours:

When you change the time zone for a PDB, it does not actually change any data. Therefore, you cannot change the time zone setting for a PDB if it has any columns with a type of TIMESTAMP WITH LOCAL TIME ZONE.
PDB Support for Different Database Time Zone Files
You can now analyze the potential impact of upgrading to new time zone files for an individual PDB and then upgrade that PDB to use new time zone files, independent of the time zone file of the CDB. For example, you can run the DBMS_DST.BEGIN_UPGRADE command from within a PDB to upgrade its primary time zone setting as shown here:


NOTE
Oracle Support Document 1509653.1 provides a great deal of detail on upgrading time zone files in a database. The information in that document also applies to upgrading time zone files for a PDB.
Moving, Copying, and Migrating PDBs
One of the reasons you use PDBs is to be able to unplug them, relocate them, and plug them into another CDB on the same or a different server. Oracle Database 12c Release 2 gives you several new options for PDB relocation and cloning such as moving a PDB to a different hardware and OS platform as well as using a PDB archive file to more efficiently unplug, package, and move a PDB as a single compressed file.
Cloning a PDB in READ WRITE Mode
In Oracle Database 12c Release 1, you could easily clone one PDB to another, either within the same CDB or to another CDB on the same or different server, but the source PDB had to be opened READ ONLY. To allow cloning while the source PDB is open in READ WRITE mode, Oracle uses the current system change number (SCN) and undo data to ensure that a logically consistent copy of the PDB will be created in the target CDB.
In this example, you want to make a copy of a PDB called TESTPDB and call it TESTPDB_CLONE while TESTPDB is still open as READ WRITE. First, verify TESTPDB’s open mode:


Ideally, you want to minimize the amount of DML happening on the source PDB to speed up the completion of the cloning operation, but often you don’t have that luxury in a production system that needs to be cloned during peak activity.
Incrementally Refreshing a Read-Only PDB
Whatever method you use to clone a PDB, it’s going to be a point-in-time snapshot of the source PDB, and in Oracle Database 12c Release 1, to refresh the clone you have to do a full copy of the source PDB. This can be a resource-intensive process if the source PDB is large and the clone needs to be refreshed on a frequent basis. Oracle Database 12c Release 2 makes this process less painful by supporting PDB refresh.
The refresh mode of the PDB is specified when the PDB is created. Here are the three refresh modes you can specify as part of the CREATE PLUGGABLE DATABASE … FROM command:
![]() REFRESH MODE NONE (default) The PDB will not be refreshable.
REFRESH MODE NONE (default) The PDB will not be refreshable.
![]() REFRESH MODE MANUAL The PDB can be refreshed on demand.
REFRESH MODE MANUAL The PDB can be refreshed on demand.
![]() REFRESH MODE EVERY num_minutes MINUTES The PDB is refreshed automatically every num_minutes minutes.
REFRESH MODE EVERY num_minutes MINUTES The PDB is refreshed automatically every num_minutes minutes.
There are a few restrictions on incremental PDB refresh, and most of these make sense:
![]() A refreshable (manual or automatic) PDB can only be opened READ ONLY.
A refreshable (manual or automatic) PDB can only be opened READ ONLY.
![]() The clone PDB must be closed during a refresh.
The clone PDB must be closed during a refresh.
![]() The source and clone PDBs must be in different CDBs.
The source and clone PDBs must be in different CDBs.
![]() If a PDB clone is open during a scheduled refresh, the refresh is attempted again at the next scheduled refresh time.
If a PDB clone is open during a scheduled refresh, the refresh is attempted again at the next scheduled refresh time.
You can use ALTER PLUGGABLE DATABASE to change the refresh type from MANUAL to EVERY … MINUTES and vice versa. If you no longer want a clone to be refreshable, you can change it to NONE. However, you can’t change it back without dropping and re-creating the clone as refreshable.
Some of these seem like features that are not fully implemented, but consider the restriction on the PDB always being in READ ONLY mode. What if the cloned PDB had a few table rows changed? It doesn’t make sense that the changes would be propagated back to the source PDB. Even more importantly, what if the changes made to the clone conflicted with a recent change to the source PDB at refresh time? What if a table in the PDB clone was dropped? How would those conflicts be resolved? That kind of functionality is well outside of the use cases that incrementally updated PDBs were designed for.
Flashback a PDB
Many of Oracle’s Flashback features have been available for several releases of Oracle Database, and even Flashback Database was available in Oracle Database 11g. However, in Oracle Database 12c Release 1, you could use Flashback Database only at the CDB level. In other words, if you needed to flash back a PDB to a previous point in time (SCN), all PDBs in the same CDB would be flashed back to the same SCN. This is clearly not very granular and is highly undesirable when you find out that your PDB has to be rolled back to yesterday because someone else’s PDB lost a few tables and the only way to get them back is to flash back to the time before the tables were dropped.
Using Flashback Database, you create normal or guaranteed restore points (SCNs) at the PDB level independent of any other PDB. To perform flashback on a PDB, it must first be closed:
![]()
You can perform the flashback itself by referencing an SCN or a restore point, as in these examples:
![]()
As with any other incomplete recovery operation, you will have to open the PDB with the RESETLOGS option:
![]()
Flashback Database for PDBs is faster and less error prone when local undo is enabled for a CDB, but still possible without local undo. However, when flashing back, RMAN must create an auxiliary instance to perform the flashback, which could temporarily cause problems with disk space since some tablespaces must be restored to the fast recovery area to finish the flashback operation.
Relocating a PDB
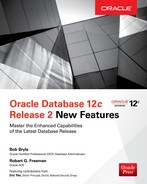
You can now use the CREATE PLUGGABLE DATABASE command to move a PDB between two CDBs while both CDBs are online with a minimal outage during which incremental redo is applied. To relocate a PDB, you include the FROM and RELOCATE clauses in the CREATE PLUGGABLE DATABASE command. These clauses indicate which PDB you wish to relocate and that it will be moved, not copied, to the current CDB. Oracle then moves the PDB, and its associated database files, for you automatically. While the PDB is being relocated, you can still query the source database. Any DML or DDL operations are queued during the relocation process, and they will be executed on the relocated PDB once the relocation is complete.
You can choose to relocate a PDB by issuing the CREATE PLUGGABLE DATABASE command on either the source CDB or target CDB. Relocating a PDB requires that a database link be created between the two databases.
If you are relocating the PDB from the source CDB, then you need to create a database link from the source CDB to the target CDB, connecting to the root container of the target CDB. If you are relocating the PDB while connected to the target CDB, then you need to create the database link from the target CDB to the source CDB. That link needs to connect either to the root of the source CDB or to the source PDB being relocated itself.
NOTE
Relocation of PDBs is one way of moving PDBs into application containers. We discuss application containers in Chapter 4.
After the PDB is relocated, Oracle drops all connections to the old PDB and then removes the source PDB. This is the default method and is known as normal availability. You can also declare the use of this method outright when issuing the CREATE PLUGGABLE DATABASE command by using the parameter AVAILABILITY NORMAL. Alternatively, you can choose to have Oracle actually redirect all connections for you, and move the PDB service, as a part of the relocation process. This is known as maximum availability. To indicate you want to use the maximum availability method, use the AVAILABILITY MAX parameter of the CREATE PLUGGABLE DATABASE command.
Several requirements must be met before you can relocate a PDB:
![]() The user issuing the CREATE PLUGGABLE DATABASE command must have the privileges to execute that command and must be connected to the root of the CDB.
The user issuing the CREATE PLUGGABLE DATABASE command must have the privileges to execute that command and must be connected to the root of the CDB.
![]() The source CDB and target CDB must be configured for local undo mode.
The source CDB and target CDB must be configured for local undo mode.
![]() The source PDB can be open in READ WRITE mode during the relocation only if the target database is in ARCHIVELOG mode; otherwise, the source PDB must be in READ ONLY mode.
The source PDB can be open in READ WRITE mode during the relocation only if the target database is in ARCHIVELOG mode; otherwise, the source PDB must be in READ ONLY mode.
![]() The source and target platforms must have the same endianness byte format and must have the same set of database options installed.
The source and target platforms must have the same endianness byte format and must have the same set of database options installed.
![]() The character set of the target CDB must be compatible with, or the same as, the character set of the source PDB (see Table 3-1 earlier in the chapter).
The character set of the target CDB must be compatible with, or the same as, the character set of the source PDB (see Table 3-1 earlier in the chapter).
In this example, a new PDB called NEWPDB in the PDBRELOCATE is created by moving TESTPDB from another CDB.

Manually Transporting PDBs Across Platforms
If you can’t use the PDB relocation feature just discussed (for example, if there are byte format issues or you want to move the entire CDB), there are several other methods you can use to transport PDBs across various platforms:
![]() Transport the entire CDB between two different platforms. This method has not changed between Oracle Database 12c Release 1 and Release 2 and thus won’t be described in this chapter.
Transport the entire CDB between two different platforms. This method has not changed between Oracle Database 12c Release 1 and Release 2 and thus won’t be described in this chapter.
![]() Transport a PDB between two different platforms using a read-only PDB as the source. This method is covered in the previous section as an alternative when a read-write PDB can’t be the source during the relocation because the target database is not in ARCHIVELOG mode.
Transport a PDB between two different platforms using a read-only PDB as the source. This method is covered in the previous section as an alternative when a read-write PDB can’t be the source during the relocation because the target database is not in ARCHIVELOG mode.
![]() Transport a PDB between two different platforms using a closed PDB as the source. This method is new in Oracle Database 12c Release 2.
Transport a PDB between two different platforms using a closed PDB as the source. This method is new in Oracle Database 12c Release 2.
![]() Transport a PDB between two different platforms using incremental backups as the source. This method also is new in Oracle Database 12c Release 2.
Transport a PDB between two different platforms using incremental backups as the source. This method also is new in Oracle Database 12c Release 2.
![]() Transport tablespaces that belong to a PDB across different platforms. This method is supported in Oracle Database 12c Release 1, but the requirement that the platforms be of the same endian format has been removed in Release 2.
Transport tablespaces that belong to a PDB across different platforms. This method is supported in Oracle Database 12c Release 1, but the requirement that the platforms be of the same endian format has been removed in Release 2.
Let’s look next at the two new methods introduced in Oracle Database 12c Release 2 and the change to the final method that enables higher availability.
Transporting a PDB Between Two Platforms Using a Closed PDB as the Source
Oracle Database 12c Release 2 provides the ability to transport a PDB across platforms using a closed PDB as the source. To perform this movement you must follow these steps:
1. Connect to the root using a common user, or SYS, with SYSDBA or SYSBACKUP privileges.
2. If the PDB is not already closed, then close the PDB.
3. Use the BACKUP PLUGGABLE DATABASE command with the TO PLATFORM clause to back up the PDB with RMAN.
4. Move the backup sets that were created in the previous step to the destination platform.
5. To perform the restore, on the destination CDB connect to the root container as a common user, or SYS, using the SYSDBA or SYSBACKUP privilege.
6. Check the backup to ensure that the PDB you are transporting over is compatible with the destination CDB. To do this, use the DBMS_PDB.CHECK_PLUG_COMPATIBILITY procedure. The function will return TRUE value if the source PDB is compatible with the CDB you intend to plug it into.
7. If the source PDB is compatible, then use the RESTORE PLUGGABLE DATABASE command with the FOREIGN PLUGGABLE DATABASE clause to complete the movement of the PDB into the new CDB.
8. Open the PDB.
Transporting a PDB Between Two Different Platforms Using Online Incremental Backups as the Source
Movement of larger databases, or mission-critical databases, often allows only a small, if any, window for an outage. Oracle Database 12c Release 2 addresses this issue by supporting an incremental backup and restore strategy for cross-platform movement of a PDB. This method does require one outage, but it should be significantly shorter than previously supported methods.
The procedure to move PDBs in this way is as follows:
1. Create the first backup of the PDB with the BACKUP PLUGGABLE DATABASE command, along with the FOR TRANSPORT option. Use the new ALLOW INCONSISTENT keyword and INCREMENTAL LEVEL 0 parameters of the BACKUP command to indicate that the backup is the base of an incremental backup.
2. Start to restore the level 0 incremental backup on the remote CDB. Since the level 0 backup might be quite large, it could take a long time for the restore operation to complete. To restore the level 0 backup, first log into the destination CDB and then use the RESTORE PLUGGABLE DATABASE FROM BACKUPSET command after you have copied the RMAN backupset files to storage accessible to the CDB you want to import the PDB into.
3. On the source database, make one or more incremental backups that can be used to update the destination CDB. To do this, use the BACKUP PLUGGABLE DATABASE command again with the FOR TRANSPORT option. As in step 1, use the ALLOW INCONSISTENT keyword, but this time use the INCREMENTAL LEVEL 1 keyword.
4. Apply the incremental backups on the CDB that you are moving the PDB over to by using the RMAN RECOVER FROM BACKUPSET command with FOREIGN DATAFILECOPY.
5. When you are ready to complete the transport of the PDB, close the PDB on the source system with the ALTER PLUGGABLE DATABASE CLOSE IMMEDIATE command.
6. Use the BACKUP FOR TRANSPORT RMAN command to make the final backup of the PDB to be applied in the CDB that you wish to plug the PDB into.
7. Use the RECOVER FROM BACKUPSET command to complete the recovery of the PDB.
8. Once the PDB recovery is complete on the target, you can open it using the ALTER PLUGGABLE DATABASE OPEN command.
Transporting Tablespaces That Belong to a PDB Across Different Platforms
Oracle Database 12c Release 2 now allows you to transport tablespaces between PDBs regardless of endian byte format differences between the two platforms. All requirements related to transporting of tablespaces still exist (for example, they must be self-contained).
Oracle Database offers three different options with respect to transporting PDB tablespaces across platforms. Note that all of these options require that you put the source tablespace in READ ONLY mode before you convert it.
The first option is to connect to the PDB with RMAN (with the PDB being the target), put the tablespace(s) in READ ONLY mode, and then use the BACKUP TABLESPACE command along with the TO PLATFORM and DATAPUMP FORMAT options. When using this option, you use the RMAN RESTORE FROM BACKUPSET command while connected to the target PDB.
The other two options are to use either the RMAN CONVERT TABLESPACE command or CONVERT DATAFILE command, whichever would be more appropriate for your situation. Clearly, if you had a tablespace with many datafiles, then the CONVERT TABLESPACE command would be the preferred way of starting the conversion process. RMAN will convert the datafiles and will also create a Data Pump dump file that is required to complete the transport of the tablespace(s) or datafile(s).
In this situation, after using the RMAN CONVERT command, you would then copy the converted files and the Data Pump export file that RMAN created to the destination database server. Once the files are copied over, you simply connect to the PDB you want to plug the tablespace into with Data Pump. You then transport in the tablespace(s) in the same way you would if you were using a non-CDB database.
Using PDB Archive Files when Unplugging a PDB
Moving a PDB to another CDB can require the movement of a number of different files, including an XML file that contains the metadata related to the PDB as well as all of the datafiles associated with that PDB. Managing all these files can get cumbersome. In Oracle Database 12c Release 2, Oracle simplifies this process a great deal through the creation of PDB archive files.
A PDB archive file is a collection of all the files required to move a PDB between CDBs. The contents of the PDB archive file are compressed and Oracle assigns a .pdb extension to the file that is generated. Let’s first look at an example of creating a PDB archive file when we unplug a database and then look at an example of using the PDB archive file when we plug the PDB in again.
Creating a PDB Archive File when Unplugging a PDB
You issue the ALTER PLUGGABLE DATABASE command along with the UNPLUG INTO clause to unplug a PDB from a CDB (after closing the PDB, of course). If you include a filename with an extension of .pdb in the UNPLUG INTO clause, then Oracle will create a PDB archive file. You can also still create the XML file, as in Oracle Database 12c Release 1, if you wish. Here is an example of unplugging a database and creating a PDB archive file:
![]()
Plugging In a PDB with a PDB Archive File
Oracle has made it easy to plug in a PDB with an archive file. You simply put the PDB archive filename with the .pdb file extension into your CREATE PLUGGABLE DATABASE command. Oracle will automatically detect that you are using a PDB archive file.
PDB Security: Lockdown Profiles
Oracle includes enhanced security features with every release of Oracle. When the multitenant features were introduced in Oracle Database 12c Release 1, the security at the PDB level was not fine-grained enough for the CDB owner to restrict a PDB’s DBA from performing some, but not all, administrative tasks at the PDB level that could have an adverse effect on the CDB as a whole.
As a result, there are new features in Oracle Database 12c Release 2 that allow the CDB’s DBA to set system-level attributes for the PDB, such as configuring minimum and maximum amounts of memory that the PDB must have available (discussed later in this chapter).
As the administrator of the overall CDB, you may want to restrict the PDB DBA’s ability to use the ALTER SYSTEM command. For example, you may not want to let the DBA configure memory-related settings, such as SGA_MAX_SIZE. On the other hand, you may well want to give the DBA a free hand to change settings such as CURSOR_SHARING, OPEN_CURSORS, and STATISTICS_LEVEL, all of which can be set at a PDB level. Prior to Oracle Database 12c Release 2, this raised a problem because the ALTER SYSTEM privilege was kind of an all-or-nothing affair, lacking the capability to fine-tune the nature of these grants. This is where lockdown profiles, new in Release 2, come into play.
Lockdown profiles provide the capability to restrict a number of operations in PDBs, including:
![]() The ALTER SYSTEM statement, and specific clauses of the ALTER SYSTEM statement.
The ALTER SYSTEM statement, and specific clauses of the ALTER SYSTEM statement.
![]() Common user object access.
Common user object access.
![]() Context operations that involve datastore types FILE_DATASTORE or URL_DATASTORE.
Context operations that involve datastore types FILE_DATASTORE or URL_DATASTORE.
![]() Operations that involve network access. For example, you can restrict usage of UTL_HTTP, UTL_SMTP, or UTL_TCP with respect to its ability to communicate outside of a PDB.
Operations that involve network access. For example, you can restrict usage of UTL_HTTP, UTL_SMTP, or UTL_TCP with respect to its ability to communicate outside of a PDB.
![]() XDB protocols.
XDB protocols.
A lockdown profile is created at the CDB level. However, a lockdown profile is enabled at the PDB level. This provides the ability to create and assign different lockdown profiles to PDBs as required. When a lockdown profile is created, it must be given a name that is unique within the namespace of the CDB. Oracle provides three lockdown profiles by default in Oracle Database 12c Release 2:
![]() PRIVATE_DBAAS Least restrictive lockdown profile. This profile allows users to connect to PDBs but prevents the use of administrative features, such as the ALTER SYSTEM command. This profile also requires that each PDB must have the same database administrator. You might use this lockdown profile if you are providing Database as a Service (DBaaS) as part of a cloud deployment.
PRIVATE_DBAAS Least restrictive lockdown profile. This profile allows users to connect to PDBs but prevents the use of administrative features, such as the ALTER SYSTEM command. This profile also requires that each PDB must have the same database administrator. You might use this lockdown profile if you are providing Database as a Service (DBaaS) as part of a cloud deployment.
![]() SAAS Moderately restrictive lockdown profile. This profile builds on the PRIVATE_DBAAS profile by adding a restriction with respect to the application that can connect to the database. You might use this lockdown profile if you are providing Software as a Service (SaaS) in your cloud deployment. For example, you may wish to only allow a single application to connect to the PDBs of the CDB.
SAAS Moderately restrictive lockdown profile. This profile builds on the PRIVATE_DBAAS profile by adding a restriction with respect to the application that can connect to the database. You might use this lockdown profile if you are providing Software as a Service (SaaS) in your cloud deployment. For example, you may wish to only allow a single application to connect to the PDBs of the CDB.
![]() PUBLIC_DBAAS Most restrictive lockdown profile. This profile allows for different DBAs, users, and applications in each PDB, but highly restricts the administrative and network activity that is allowed outside of a given PDB.
PUBLIC_DBAAS Most restrictive lockdown profile. This profile allows for different DBAs, users, and applications in each PDB, but highly restricts the administrative and network activity that is allowed outside of a given PDB.
The DBA_LOCKDOWN_PROFILES view provides a list of all lockdown profiles and the rules associated with those profiles. To create a new lockdown profile, you must connect to the root of the CDB as an administrative user or a user with the CREATE LOCKDOWN PROFILE system privilege. You can then use the CREATE LOCKDOWN PROFILE command to create the lockdown profile. As an example, let’s create a lockdown profile called NO_ALTER_SYSTEM:
![]()
Notice that we did not define the restrictions of the lockdown profile when we created it. This is done through the use of the ALTER LOCKDOWN PROFILE command, which we will use next to restrict the use of the ALTER SYSTEM command completely, with one exception: we will allow the CURSOR_SHARING parameter to be altered.
The first of the following ALTER LOCKDOWN PROFILE statements locks down the ALTER SYSTEM command completely. The second statement then eases that restriction slightly by allowing the use of the ALTER SYSTEM SET CURSOR_SHARING command.

We can now query the DBA_LOCKDOWN_PROFILES view and see that our new profile has been created:

Of course, all we have done at this point is create a lockdown profile. Now we need to actually assign it to one or more PDBs. The way we do that is to log into the PDB as an administrator, or a user that has the CREATE LOCKDOWN PROFILE privilege. Then we issue the ALTER SYSTEM command using the SET PDB_LOCKDOWN option to enable the lockdown profile for that PDB.
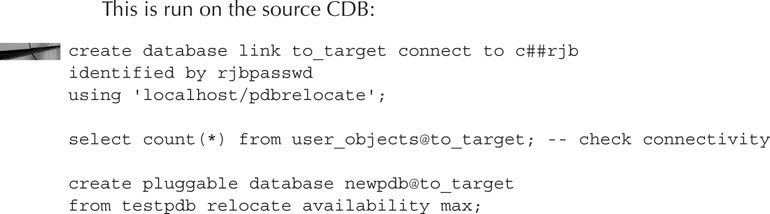
In this example, we have a PDB called TESTPDB that we will connect to as a privileged user. We will then enable the NO_ALTER_SYSTEM profile that we just created in the CDB by using the ALTER SYSTEM command. Note that this command is dynamic in nature, so the lockdown profile has immediate effect.

Now, let’s test the lockdown restriction. We have a local PDB user we have created in the PDB called TESTDBA. We have granted the TESTDBA user the DBA role within the PDB. If the TESTDBA user tries to use the ALTER SESSION command to modify the CURSOR_SHARING parameter, we can see that command ends in success. However, if that DBA then tries to flush the shared pool, Oracle gets a bit cranky (as we would expect) since we have locked down the ALTER SYSTEM command.
Note that this restriction impacts all privileged users in the PDB. Even if you connect to the PDB using a SYSDBA privileged user, they will still only be able to use the ALTER SYSTEM command to change the CURSOR_SHARING parameter. To be able to use other restricted ALTER SYSTEM commands within the PDB, you would first need to either modify the lockdown profile to allow for the use of the parameter you intended to use, or disable the lockdown profile in the PDB.
You can set the PDB_LOCKDOWN parameter from the CDB root to cause the lockdown profile to be globally associated with all PDBs. This would not restrict the use of the ALTER SYSTEM command at the CDB level (which, if you think about it, would tend to make unsetting the PDB_LOCKDOWN parameter a bit difficult).
Multitenant Performance-Related New Features
Oracle Database 12c Release 2 offers some new performance-related features that are specific to PDBs. First is the ability to limit the SGA usage of a specific PDB at the PDB level. Second, Oracle Database Resource Manager has some new improvements related to PDBs:
![]() Instance caging can be configured at the share level.
Instance caging can be configured at the share level.
![]() I/O rates can be controlled at the PDB level.
I/O rates can be controlled at the PDB level.
![]() Resource plans can be configured at the PDB level.
Resource plans can be configured at the PDB level.
Controlling SGA Use at the PDB Level
Oracle Database 12c Release 2 provides the ability to fine-tune the SGA settings for individual PDBs within a given CDB. Using the SGA_TARGET parameter, you can set a hard limit on how much SGA space that a given PDB can consume. This helps to prioritize instance SGA memory usage by PDB, and can also be useful when you are providing a shared services environment as one attribute of the service you provide.
Oracle has the ability to dynamically adjust the SGA memory allocated across PDBs. This works well generally, but in some scenarios you may want to make sure that certain PDBs always have a minimum amount of memory allocated to them. To ensure that a PDB has a minimum amount of memory available to it, you can use the new SGA_MIN_SIZE parameter.
Building on this notion, it should also be noted that many of the memory-related parameters that were previously CDB-level parameters are also now configurable at the PDB level. These parameters include:
![]() SGA_TARGET
SGA_TARGET
![]() DB_CACHE_SIZE
DB_CACHE_SIZE
![]() PGA_AGGREGATE_LIMIT
PGA_AGGREGATE_LIMIT
![]() PGA_AGGREGATE_TARGET
PGA_AGGREGATE_TARGET
You can still set these parameters at the CDB level (and in fact, you should), but the addition of being able to set them at the PDB level gives you additional control over individual PDBs. Here is an example where we look at the SGA_TARGET setting of a CDB, and then connect to a PDB and look at its SGA_TARGET setting:

Note that both SGA_TARGET and SGA_MIN_SIZE are currently set to 0. This means that they are not set for this PDB and that they will have their memory managed by the CDB without any constraint. Let’s change these parameters to test this new feature.
First, we are going to change the parameter SGA_MIN_SIZE to make sure that the PDB always has a minimum amount of memory. We need to be aware that Oracle requires that the value of SGA_MIN_SIZE be set to some amount less than 50 percent of the value of SGA_TARGET—as set at the CDB level. As you can see from the previous output, we have 4800 MB assigned to the SGA of the CDB. So, we need to make sure we allocate something less than 2400 MB to the setting of SGA_MIN_SIZE. After analyzing the needs of the database, we decide to make sure that its SGA always has 1 GB available to it. So, while connected to the PDB, we set the value of SGA_MIN_SIZE to 1 GB:

If we change to a different PDB, we see that the SGA_MIN_SIZE change affects only the PDB we were connected to:

You can also configure a SGA memory ceiling for each PDB by setting the SGA_TARGET parameter at the PDB level. Oracle still uses SGA_TARGET at the CDB level as an indicator of how much memory to allocate to the entire CDB.
When configuring the SGA_TARGET parameter for a PDB that has the parameter SGA_MIN_SIZE set, SGA_TARGET must be configured at a value that is 200 percent the size of SGA_MIN_SIZE. In this example, we reduce SGA_MIN_SIZE low enough to allow us to set SGA_TARGET to 3 GB:

Note that Oracle will let you set SGA_TARGET and SGA_MIN_SIZE values that are beyond the current memory setting of the CDB’s SGA_TARGET size and won’t generate an error. As with a CDB, by default any ALTER SYSTEM change at the PDB level is persistent through PDB and CDB restarts. You can use the SCOPE=MEMORY setting if you do not wish the change to persist through the next restart of the PDB.
You can see the current settings of the SGA_MIN_SIZE parameters across the CDB by using the V$SYSTEM_PARAMETER view (when connected to the root container):

As you can see, the sum of our SGA target dwarfs the database SGA target value of 4800 MB. This is basically oversubscription, and although Oracle will not generate an error, it will not allow the combined settings of SGA_TARGET at the PDB level to exceed the setting of SGA_TARGET at the CDB level.
Resource Manager Changes Related to CDBs and PDBs
In Oracle Database 12c Release 1, Resource Manager was already PDB-aware and able to manage resources across all PDBs in a CDB by using shares. Oracle Database 12c Release 2 adds more granularity and ease of management to PDB resource management.
Using PDB Profile Directives, you can create directives at the CDB level, then either assign them explicitly at the PDB level or designate a specific directive as the default for any new PDBs. In addition, you can control both CPU and I/O bandwidth at the PDB level using PDB instance caging and I/O throttling.
PDB Profile Directives
Oracle now makes it easier to manage sets of PDBs with Resource Manager. You can assign a single profile at the CDB level that can then be assigned to PDBs when they are created. The new DBMS_RESOURCE_MANAGER.CREATE_CDB_PROFILE_DIRECTIVE procedure is used to create the default directive. For example, we can create a profile directive (this example assumes you have already created the appropriate plan) that limits the amount of CPU that a given PDB can use to 30 percent by creating this CDB profile directive while connected to the root container:

Notice that this directive is assigned to the profile named YELLOW_PROFILE, which we would have already created. You can create different CDB profile directives to provide for varying classes of service. For example, you could create profiles that indicate some relationship to a class of service that a customer has purchased: red, yellow, and green perhaps. Red might have a higher number of PDB shares and a higher utilization limit, while green’s might be lower. Having created the CDB profile directives, when you create the PDB, you will need to set the parameter DB_PERFORMANCE_PROFILE to the name of the profile that you want to use in order for that profile to be activated with the PDB you have created.
There are default values assigned to PDBs when you have not defined a CDB profile directive. Currently, these defaults are a share of 1 and the UTILIZATION_LIMIT and PARALLEL_SERVER_LIMIT parameters are set to 1.
Share-Based Instance Caging
In Oracle Database 12c Release 2 you can combine instance caging (set with the parameter CPU_COUNT) and the utilization limit within your resource plan to control CPU utilization of a PDB at a finer level. For example, if CPU_COUNT is set to 6 and you have set a utilization limit of 50 percent, then the PDB will be limited to a maximum of three CPUs.
Limiting I/O Rates for PDBs
Resource Manager also provides the ability to control I/O rates of individual PDBs. This keeps one PDB from wreaking havoc on all of the other PDBs within a given CDB. Oracle Database 12c Release 2 provides two new database parameters to control PDB I/O operations:
![]() MAX_IOPS Controls the number of I/O operations that are allowed per second for a given PDB. The default for this parameter is 0, which means it’s disabled.
MAX_IOPS Controls the number of I/O operations that are allowed per second for a given PDB. The default for this parameter is 0, which means it’s disabled.
![]() MAX_MBPS Controls the total number of I/O operations in megabytes per second for a given PDB. The default for this parameter is 0, which means it’s disabled.
MAX_MBPS Controls the total number of I/O operations in megabytes per second for a given PDB. The default for this parameter is 0, which means it’s disabled.
Each parameter can be set to different values for individual PDBs within a CDB, giving you very fine control over I/O resource utilization of individual PDBs. These parameters can also be very helpful in shared services environments to ensure that you can meet negotiated service-level agreements and that one PDB won’t risk the response time of other customers’ databases.
Here is an example of setting each of these new parameters in a PDB. The first example limits the maximum I/O operations per second (IOPS) to a value of 4000. The second example limits the maximum number of megabytes of I/O per second to 10.
![]()
By the way, don’t worry that these limits will interrupt critical I/O operations—things like writing to the control file will continue as usual with the highest priority. However, the I/O from these operations will add to the overall limit and thus can impact DML statements or SELECT statements.
The DBA_HIST_RSRC_PDB_METRIC view has been around since Oracle Database 12c Release 1 to provide some insight into PDB resource consumption. You can use this view to get some idea on how you might want to use the MAX_IOPS and MAX_MBPS parameters.
You can use the DBA_HIST_RSRC_PDB_METRIC view to calculate a reasonable I/O limit for a PDB. Consider the values in the following columns when calculating a limit: IOPS, IOMBPS, IOPS_THROTTLE_EXEMPT, and IOMBPS_THROTTLE_EXEMPT. The rsmgr:io rate limit wait event indicates that a limit was reached.
PDB Resource Plans
Just as a CDB can have its own resource plan, Oracle Database 12c Release 2 provides the ability to create resource plans at the PDB level too. A PDB resource plan is used to manage the resources within a given PDB and is created and managed much like the resource plans you might have already used in non-CDB databases. You use the same procedures (for example, DBMS_RESOURCE_MANAGER.CREATE_PLAN_DIRECTIVE) to manage PDB resource plans that you already use to create and manage non-CDB resource plans.
PDB resource plans are subject to the overall CDB resource plan directives (see the PDB profile directives mentioned earlier in this section) related to PDB resource allocations. Therefore, if the CDB resource plan directive limits your PDB to 50 percent of CPU resources, a PDB directive that further restricts CPU by 50 percent will result in a maximum CPU usage of 25 percent for any session assigned to that directive.
PDB resource plans are subject to some restrictions:
![]() A PDB resource plan cannot have any subplans.
A PDB resource plan cannot have any subplans.
![]() A PDB resource plan can have up to eight consumer groups.
A PDB resource plan can have up to eight consumer groups.
![]() Resource Manager does not support multilevel scheduling policies for PDB resource plans.
Resource Manager does not support multilevel scheduling policies for PDB resource plans.
Summary
Well, this has been a whole bucketful of information on Oracle Multitenant–related new features in Oracle Database 12c Release 2. Really, it feels like we have not even scratched the surface as there are many additional new features discussed in coming chapters that can be used with Oracle Multitenant as well. This is only Chapter 3 and I hope your head is not already at capacity from all the new things you have learned. I also hope you are starting to see the flashing signs telling you that, in the future, the really good stuff is going to revolve around Oracle Multitenant.