
CHAPTER
5
Administrative, High Availability, and Security New Features
In addition to the significant performance improvements in Oracle Database 12c Release 2, there are also major improvements for the DBA who must administer the database and make sure that the database is available and secure for the users who need to leverage the high performance of Oracle Database 12c Release 2. A fast and feature-rich database is not of much use if the users cannot access the database, the database is down, or unauthorized users are accessing the database.
Redundancy at every level in the Oracle stack is key to high availability. Oracle Real Application Clusters (RAC) installations that are spread across widely dispersed geographic regions are easier to set up and manage. A key component of RAC, Automatic Storage Management (ASM), has been enhanced so that disk group rebalancing can be prioritized.
Last and certainly not least are improvements in database security. Transparent Data Encryption (TDE) for a single tablespace can happen online, and several new encryption algorithms have been added. Auditing of an application’s or a user’s SQL statements using Virtual Private Database (VPD) now includes not only the original SQL statement, but also the predicates in the WHERE clause that were generated by the VPD policy itself.
Administration
With the demand for instant connectivity and global access to e-commerce websites, there is little tolerance for downtime. In Oracle Database 11g, many table and index operations were enhanced to allow for concurrent user access—even DML operations—while the table definition was changed online with minimal table unavailability at the end of the operation. In Oracle Database 12c Release 1, more table types could be redefined while staying online. In Oracle Database 12c Release 2, the list of online capabilities has been expanded even more to include more scenarios with partitioned tables.
Online Table Redefinition
If you have a large production database, it will take a long time to perform any kind of operation on it, including adding or removing columns, adding or removing indexes, and so forth. Those operations need to happen while the table is online; however, things don’t always go as expected. Your operation may run for hours or days…and fail right before it completes. Instead of starting the operation over, Oracle Database 12c Release 2 lets you pick up where you left off. In another scenario, you may complete the table redefinition only to find out that the group requesting the change didn’t want the change after all. The new ROLLBACK procedure of DBMS_REDEFINITION lets you put the table back into its original state with minimal effort.
Restarting Redefinition After a Failure
When you re-create or redefine a table online, many things can go wrong. You may run out of space, the database instance may crash, or the power may fail. In many cases, the DBMS_REDEFINITION package will let you pick up after you left off when the failure condition has been addressed.
In this example, I’ll use a table called MY_SEGMENTS whose structure is similar to the data dictionary view DBA_SEGMENTS:

Unfortunately, the usage of the MY_SEGMENTS table has gone beyond its original purpose, and the column BUFFER_POOL has new values and must have its length changed from VARCHAR2(7) to VARCHAR2(20). Also, due to space limitations in the USERS tablespace, the new table must reside in the USERS2 tablespace. The following example shows how you can get your redefinition operation back on track when the unexpected happens.
To start out, I create the staging table as the target in the USERS2 tablespace:

Once the staging table is ready, I can initiate the conversion with the DBMS_REDEFINITION package:

The destination tablespace has run out of space. Check the view DBA_REDEFINITION_STATUS to confirm that this operation may be restarted where it left off:

Add more space to the destination tablespace as follows:
![]()
Rerun the SYNC_INTERIM_TABLE procedure and finish the redefinition process:

Rolling Back Redefinition
Even if your table redefinition is successful, you have the option to reverse the changes to the table. You may find that the performance of the table is suffering due to a data type change or you may find out that the user who requested the change didn’t change the right column! Figure 5-1 shows the flow of tasks you will perform whether you decide to keep your changes or reverse them.

FIGURE 5-1. Process flow for table redefinition
Starting the Table Redefinition Most of the redefinition process you’re already familiar with is the same when leveraging the rollback feature. You first create the interim table as you would during any redefinition effort, as in this example:

To start the redefinition, use the START_REDEF_TABLE, but add the ENABLE_ROLLBACK parameter like this:

As you might expect, to ensure backward compatibility, ENABLE_ROLLBACK defaults to FALSE.
Periodically Syncing the Interim Table Because DBMS_REDEFINITION.START_REDEF_TABLE is an online operation, it keeps the original table available for DML. If your redefinition operation takes a while, you might want to keep the interim table synced so that the final redefinition operation will take less time for the final full refresh. Continuing the previous example, you would use the following call to synchronize the redefinition operation:

Finishing Table Redefinition To finish the redefinition process, run the FINISH_REDEF_TABLE procedure as follows. You use this procedure whether or not you have enabled rollback.

The table is locked briefly during this procedure call. If you were absolutely sure that you wanted to keep the results of this redefinition, you could set the DISABLE_ROLLBACK parameter to TRUE—but in this example we’re really not sure at this point, so read on!
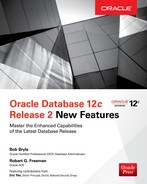
Accepting Table Changes Once your new table has been tested and validated, you can perform further cleanup by dropping the interim table, which was saved when you specified ENABLE_ROLLBACK => TRUE. Use the ABORT_ROLLBACK procedure. Using a procedure with the word “abort” in it usually means that something bad has happened, but in this case, you’re aborting the possibility of rolling back the changes to the original table. After you’ve finished the redefinition process with FINISH_REDEF_TABLE, run this:
The materialized views are dropped, the interim table retains the structure of the original table, and the interim table is truncated.
Rejecting Table Changes For whatever reason, the changes you made are not correct. To roll the changes back (and restore the original table to its original state), use the ROLLBACK procedure like this:

The original table has been restored to its original state and the materialized views are dropped. The interim table is still populated, however, so you can drop or truncate it at this point.
Assessing Redefinition Overhead What are the side effects of being able to roll back your table redefinition? Primarily disk space. Before you run the FINISH_REDEF_TABLE procedure, the interim table will be at least as large as the table to be redefined:

Even after running FINISH_REDEF_TABLE, the table MY_SEGMENTS_NEW is still populated with the old version of the table, in case you still wanted to change your mind:

Notice how the two tables have “switched roles”! As mentioned previously in this chapter, rolling back a redefinition leaves the interim table data intact, whereas aborting a rollback truncates the data in the interim table.
Converting Nonpartitioned Tables to Partitioned Tables
It’s often the case that when you create a table for a user or an application, you’re not sure how big it will get or how long it will be needed. Before you know it, the table grows so large that the reports running against the table are getting noticeably slower every week. One of your astute developers notices that most of the reports need only a small subset of the table’s rows and that partitioning the table will keep the table’s performance manageable.
The catch, of course, is that the table is used for reporting and analysis 24×7 and you really can’t afford to have downtime during the conversion of the table from nonpartitioned to partitioned. In Oracle Database 12c Release 2, the conversion is as easy as doing an ALTER TABLE … MODIFY on the table, specifying the partitioning scheme, and specifying the ONLINE keyword.
In this example, the table PART_OBJECTS has a good date column called CREATED for partitioning. Let’s convert the table to partitioned while online:

Looking at DBA_TAB_PARTITIONS, you can see that interval partitioning by day works well since the column CREATED is not nullable:


Existing indexes on the table can be migrated as is or changed to partitioned indexes. Although you cannot change the indexed column list, you can change existing indexes to either local or global partitioned indexes. To manage the indexes in the migrated table, use the UPDATE INDEXES clause. The PART_OBJECTS table was indexed on the CREATED column, so adding the UPDATE INDEXES clause to the previous example re-creates that index as a LOCAL index:

Remember that you don’t need to specify much for a local partitioned index since it inherits the partitioning scheme of the table. If you do not specify the UPDATE INDEXES clause, any prefixed indexes are automatically converted to a local partitioned index.
Creating a New Table with Partition Characteristics
You like using partitioned tables—it enhances performance, and partition maintenance operations make it easy to manage the table in parts or as a whole. However, even though the column definitions in your partitioned tables stay the same, other aspects of the partitioned table may change and cause issues when doing partition maintenance. This section will present an example of what I’m talking about and how to fix it with a new feature in Oracle Database 12c Release 2.
In the following scenario, my nightly ETL to the data warehouse uses a staging table that has the same structure as your partitioned fact table, and I do an EXCHANGE PARTITION every morning to refresh the live fact table. I had created the staging table yesterday like this:
![]()
During the ETL window, I populated PART_OBJECTS_EXCH. But when I tried to do the EXCHANGE early in the morning, I received an error:

But how could it be accurate? I performed the CREATE TABLE command to copy every column as is, so the tables must have the same number of columns! Not exactly…it turns out that earlier in the day, the developer requested that the other DBA add a virtual column:
![]()
When running the Create Table As Select (CTAS) command, the virtual column was converted to a physical column. Thus, the new table I created doesn’t have the same number and type of total columns as the partitioned table.
To fix this, you can use the new FOR EXCHANGE clause in your CREATE TABLE statement so that you copy all new or changed columns or attributes of the partitioned table, including hidden columns, unused columns, function-based indexes, and so forth. Here is how you can create your staging table to avoid the mismatch issues:
![]()
Notice that you also no longer have to use the CTAS syntax to create the staging table. Load the PART_OBJECTS_EXCH table and try the exchange again:

High Availability
Another aspect of Oracle’s high-availability infrastructure is at a much lower level: clustering and storage. With Real Application Clusters, you can scale your computing resources to meet your processing needs while keeping your availability high even if one or more nodes in the cluster go down. From a storage perspective, Automatic Storage Management will enhance performance by spreading out your I/O workload across multiple disks in your storage area network (SAN), or even by using sharding to move parts of your database storage geographically closer to where the subset of table data is needed.
RAC and Grid Infrastructure
Most of the enhancements in Real Application Clusters are in the areas of manageability and monitoring (ASM, an integral component of RAC, is covered in the next section). The level and types of logging available to the DBA go beyond just error reporting to providing the status and level of cluster resource activity as well as enhancements to the Cluster Verification Utility (CVU).
Cluster Resource Activity Log
The cluster resource activity log is an existing component of Oracle’s Autonomous Health Framework. Previously, the emphasis was primarily on reporting error conditions. It’s a fine line between an error condition and a problem waiting to happen—in other words, you can configure the cluster resource activity log to check and monitor file attributes. Why would you use file attribute monitoring? At the OS level, you have many key files and directories that need to be accessible either continuously or on a periodic basis. What if your Oracle background processes can’t get to the OS directory where the alert log is stored? What if the permissions of a directory were changed to allow any user to read or create files in that directory?
To address this issue proactively, you can run the Oracle ORAchk (orachk) or EXAchk (exachk) utilities with the -fileattr option. When you install ORAchk, be sure to have the expect package installed first, then start the monitoring daemon:
![]()
Once started, the daemon shows the current state of the monitored environment:

To configure and check for changes to file attributes, you’ll first specify any directories you want to monitor (in addition the default Grid home). In this example, you want to add the directory /etc to the list of monitored directories:

At some point in time after that ORAchk was run, the Oracle DBA accidentally sets the permissions of /etc/oratab to 666 instead of the default 664:

When you run exachk again, either on demand or on a schedule, you can find out if anything has changed recently:


Although this is not a fatal error by any means, you don’t want to give every Linux user on this server the ability to change the contents of this file!
Cluster Verification Utility
The Cluster Verification Utility (CVU) is a command-line utility that you run either on an ad hoc basis or during an install or upgrade via a GUI. When you initiate CVU, you can now save the output as an HTML file and each step in the CVU process provides more detailed status at each step of the check. In this example, you want to run a cluster health check, save the output as HTML, and put the results into the directory /tmp:
![]()
When the runcluvfy.sh command finishes, it will automatically open a web browser to display the results, as you can see in Figure 5-2.

FIGURE 5-2. HTML output from runcluvfy.sh
Automatic Storage Management
Enhancements to ASM include improved quota management and prioritized rebalancing in Flex ASM disk groups. I’ll talk about both of those in the following sections and how they can help you from a management and performance perspective.
Flex ASM Disk Group Quota Management
For local ASM disk groups, quota management is straightforward. However, with a Flex ASM disk group, controlling access is not enough given the global availability of Flex ASM disk groups: you need to limit the amount of disk space used with quotas. A quota is defined as an aggregate of disk space used by different databases. You can manage quota groups using SQL commands or within the asmcmd utility. To add the quota group QG01 to the disk group RECO_T01 and set the quota to 5 terabytes, you’d run this command:

To change the file group FG01 to use the QG01 quota group:

The following are some other important rules regarding quota groups:
![]() A file group can belong to only one quota group at a time.
A file group can belong to only one quota group at a time.
![]() A quota group cannot cross disk groups.
A quota group cannot cross disk groups.
![]() The quota value is evaluated and enforced when a file is created or resized.
The quota value is evaluated and enforced when a file is created or resized.
![]() A file group can be moved to another quota group even if the target quota group does not currently have enough quota for the file group.
A file group can be moved to another quota group even if the target quota group does not currently have enough quota for the file group.
ASM Prioritized Rebalancing
In the previous two releases of Oracle Database, you have been able to control the rebalancing rate so as not to adversely affect ongoing application I/O performance. Rebalancing capabilities have been enhanced in Oracle Database 12c Release 2 so that a particular file set is rebalanced before others. This is especially useful in a pluggable database (PDB) environment so that you can rebalance a file group for a critical PDB before rebalancing file groups for other PDBs.
Sharding
Oracle Database sharding is a data placement technology that is targeted at OLTP applications that leverage RAC in a widely distributed cluster: for example, a worldwide e-commerce site whose transactions still reside in the same logical database but from a storage perspective are stored in a local data center. Each shard of the logical database can be on a different version of Oracle and can go up and down without any effect on the other shards. The key is the application layer that binds together the different database servers into a single logical database. Figure 5-3 shows the architecture of a sharded database.

FIGURE 5-3. Sharding architecture
Each of the physical databases in the Sharded Database box in Figure 5-3 is a standalone database.
Security
Overall there are over 40 new security features mentioned in the various books of the Oracle Database 12c Release 2 documentation and in the Oracle Database New Features Guide, 12c Release 2 (12.2). The new security features you will most likely use immediately and most often will be presented in the following sections. Here are the features I’ll cover:
![]() Encryption and redaction
Encryption and redaction
![]() Database Vault
Database Vault
![]() Auditing
Auditing
![]() Privilege analysis
Privilege analysis
![]() Separation of duties
Separation of duties
![]() User and password management
User and password management
![]() STIG (Security Technical Implementation Guides)
STIG (Security Technical Implementation Guides)
Encryption and Redaction
In Oracle Database 12c Release 2, a dramatic improvement was made in securing the database with regard to encryption and redaction (E&R). But, before we get into these new features, let’s take a moment to review the basic concept of E&R. Encryption touches the actual data by scrambling plaintext data into a meaningless and unrecognizable form. Redaction, on the other hand, does not affect the data. Redaction obscures the viewing of the data. Please take a short moment to fully understand the difference before moving on. By taking the time to grasp this simple concept of how encryption differs from redaction, the rest of this section will fall into place.
Encryption
The need to secure data at rest is a best practice in many industries and is a requirement in several others. If you are working in a regulated arena such as healthcare, government, or financial industries, you are most likely required to use encryption. For those who are not working in one of those regulated industries, you should probably be using encryption anyway.
The new features related to Transparent Data Encryption (TDE) in Oracle Database 12c Release 2 allow for encryption, decryption, and rekeying of existing tablespaces online without downtime. Also, TDE in not just at the tablespace level anymore; now the entire database can be encrypted, decrypted, and rekeyed online without downtime. What is meant by the phrase “entire database”? Well, this includes the default database tablespaces SYSTEM, SYSAUX, and UNDO, all of which can now have TDE applied to them.

NOTE
New encryption algorithms that are supported in Oracle Database 12c Release 2 include SEED and ARIA for South Korea and GOST for Russia.
The ability to use TDE online for encryption, decryption, and rekeying opens up the opportunity to keep databases up and use fewer downtime windows. But, if you are in an organization that plans ahead or has a limited amount of available storage space, then use of offline conversion will interest you. In Oracle Database 12c Release 2, you can apply encryption to tablespaces offline and do so without additional storage space requirements. I’ll demonstrate both methods in the next two sections.
Leveraging Online Encryption Now it is time to see these new features of TDE in action. We will create a specific user with the SYSKM privilege in a pluggable database, PDB1, and work through examples of the previously mentioned new features.
In this example, log into the CDB as SYSDBA and then issue an ALTER SESSION command to move into the PDB. You can log into your test PDB directly if you prefer. I will create a tablespace, a user, and a couple of tables for the encryption examples in PDB1.
![]()
Once logged into the CDB, I run a query to confirm that the pluggable database is open and in the proper mode:

Then change your session to the pluggable database that you wish to use. In our case the pluggable database is PDB1.
![]()
I create a new tablespace next:

Next, I create a user and grant the proper privileges:

Finally, I create a table and load some data, and then confirm the data is there:

Now that I have created the TEST_ENCRYPTION tablespace and populated a table in that tablespace, I’ll encrypt the entire tablespace online using the AES192 algorithm. But before we can encrypt the tablespace, we need to create a KEYSTORE, as the following steps illustrate.
Modify your sqlnet.ora file as follows and create the corresponding location on your file system:

Here is the command to run as root at the OS level:
# mkdir -p /u01/app/oracle/admin/orcl12/encryption_keystore/
Create and open a master encryption key as SYSDBA in the CDB:

Now that the setup is complete, I’ll issue the actual command to execute the online encryption using the AES192 algorithm.
While still using the SYS account in the CDB, I run the following statements:

To confirm that the tablespace is now encrypted I’ll use the following query:

Now the TEST_ENCRYPTION tablespace is encrypted with the AES192 algorithm. But as normal, things change. A change request has arrived to alter the encryption algorithm to support the GOST encryption algorithm because we are now storing data of RUSSIAN origin. We can accomplish this by rekeying that tablespace (online!) and running the previous verification script:

Our results should show the following after changing the encryption algorithm to GOST:

Here are some important points to consider when using online tablespace encryption:
![]() There is a space requirement equal to the size of the tablespace being encrypted online. For a 100 GB tablespace, you will need at least 100 GB of additional file system storage space.
There is a space requirement equal to the size of the tablespace being encrypted online. For a 100 GB tablespace, you will need at least 100 GB of additional file system storage space.
![]() If the online encryption is interrupted, it can be recovered with the FINISH clause of the ALTER TABLESPACE command.
If the online encryption is interrupted, it can be recovered with the FINISH clause of the ALTER TABLESPACE command.
![]() A redo log is generated for each online tablespace conversion.
A redo log is generated for each online tablespace conversion.
![]() You cannot encrypt, decrypt, or rekey a temporary tablespace online.
You cannot encrypt, decrypt, or rekey a temporary tablespace online.
![]() Temporary tablespaces need to be dropped and re-created with encryption.
Temporary tablespaces need to be dropped and re-created with encryption.
For a complete list of other features and restrictions, please refer to “About Encryption Conversions for Existing Online Tablespaces” in the Oracle Database Advanced Security Guide 12c Release 2 (12.2).
Now that I’ve showed how to use the new feature of online encryption for user-defined tablespaces I’ll move on to offline encryption in the next section.
Leveraging Offline Encryption Why consider offline encryption? The simple answer is that offline encryption is an “in place” operation. As such, there is no additional storage needed when using offline encryption.
Offline encryption is a very straightforward operation. The steps are presented next with comments. To encrypt a PDB offline, you need to close it while keeping the root container (CDB$ROOT) open. Since this is an “in place” operation, taking a backup should be your first action and is highly recommended.
First, take the tablespace offline:
![]()
![]()
Encrypt the tablespace offline:
![]()
Or you can choose to encrypt each datafile individually:
![]()
Bring the tablespace online:
![]()
Choosing Between Online and Offline Encryption Here are some closing thoughts about encryption. Plan your success by determining ahead of time which method to use when encrypting tablespaces or the entire database. Online encryption is useful if you have enough extra storage space. Although the offline method needs downtime, it does not require the additional storage. The choice of encryption algorithms to use will, in most cases, be dictated by business and legal requirements. Plus, with the ability to now rekey online, changing encryption algorithms is much easier than before. In the next section I’ll talk about new features related to encryption’s close relative, redaction.
Redaction
Encryption protects data at rest from attacks on the database files from the storage level. Redaction, on the other hand, changes the appearance of the data when presented to the application layer. One of the new features in Oracle Database 12c Release 2 is redaction with the ability to set the redacted column to a null value. This new feature is shown in the following example.
I’ll continue to use the OVERWATCH schema in PDB1 for demonstrating the new redaction features. In the OVERWATCH schema, I create the table REDACT_ME with some data that will be redacted. The user NORMAL_GUY will then try to read the REDACT_ME table.


Another new feature related to redaction in Oracle Database 12c Release 2 is adding named Oracle Data Redaction policies which enables you to redact data based on runtime conditions; in other words, you can redact based on session characteristics such as where the user is connecting from or even what time of day the query is run. For instance, the user NORMAL_GUY logs into the database. A named Data Redaction policy can use SYS_CONTEXT ('USERENV', 'SESSION_USER') to activate redaction on a column of a table. The policy can be reused with DBMS_REDACT.APPLY_POLICY_EXPR_TO_COL against other tables or columns. Let us look at a working example of how to use this feature with explanations at each step of the example that follows.
First, I create and load an example table:

Confirm that NORMAL_GUY can read the table currently before the named policy is applied:
![]()
Build out the default redaction and give it a name:

To disable the overall redaction policy, you can use a conditional expression which will always evaluate to FALSE:

Next, I’ll modify the policy to redact only the column COL4:

Finally, I’ll use the named policy NORMAL_GUY_REDACT_POL to apply to the column COL4:

Confirm that NORMAL_GUY can only read columns other than COL4:
![]()
This enhancement to Oracle’s redaction provides the database administrator with a more fine-grained approach to redaction. You may not want to redact a particular column for all users or even a single user all the time—you can now redact one or more columns based on the user’s environment, whether it be the time of day or where they logged in from.
Database Vault
In previous releases of Oracle Database, it was often difficult to use the Database Vault (DBV) options. When DBV was installed, it “locked down” the database and enforced separation of duties. From a security administrator’s perspective, this was great, but from a development and day-to-day operation viewpoint, it meant “things just broke randomly.” This “all or nothing” characteristic of DBV was seen as a drawback and a reason not to use it.
DBV in Oracle Database 12c Release 2 resolves this “all or nothing” characteristic with Simulation Mode Protection (hereafter “Simulation Mode” for simplicity’s sake). In Simulation Mode, DBV records violations without enforcing DBV policies/realms. Instead of an abrupt and disruptive halt to the operation being executed, a record is entered into the DVSYS.SIMULATION_LOG$ table. That record can then be viewed by DBAs in view DBA_DV_SIMULATION_LOG.
After reviewing DBA_DV_SIMULATION_LOG combined with the code information in Table 5-1, DBAs can take corrective actions before fully enforcing DBV policies/realms.

TABLE 5-1. Database Vault Run-Time Error Messages
Let’s see Database Vault in action and prove the value of DBV Simulation Mode. First, create the users involved in this example:

Create the tables, load some data, and grant the SELECT privilege to the appropriate users:


As the BAD_DBA user, I update some rows:

View the violations that occurred (but were not prevented) when those UPDATE statements were run:

Next, fix the data as SYSDBA and change it back to its original state:

Change the policy so that it’s enforced going forward, preventing those UPDATEs from happening:

This simple case shows how to use the Simulation Mode of DBV. A more realistic use case would involve planning with the development team and implementing the DBV policies in Simulation Mode near the end of the Q&A process. Once there is enough data recorded, the DBA and security administrator can review the DBA_DV_SIMULATION_LOG and make adjustments accordingly.
Auditing
Auditing in Oracle Database 12c Release 2 has improved in a number of ways. I’ll focus here on the new feature that allows unified auditing to audit by roles. Auditing by role allows for an analysis of security violations by a role. For instance, auditing an APPLICATION or DBA role can identify unusual activity.
Our example of auditing by role involves auditing the DBA for using the system privileges CREATE ANY TABLE, ALTER ANY TABLE, and DROP ANY TABLE. But, before I get into creating the audit by role configuration, I need to enable unified auditing. Enabling unified auditing must be done at the CDB level:

Now that I have unified auditing configured, I can set up auditing by role. This example will use the pluggable database PDB1 and the OVERWATCH user. As the OVERWATCH user:

I will purge the unified audit trail to make it easier to review from this point on:

Next, I use the MATT account (which has the DBA role) to run the following SQL:

As the OVERWATCH user, I flush the memory and check results (not all records are shown due to space restrictions):

To remove the audit rule, I run the following commands:
![]()
The improvements in auditing are not limited to the new audit by role functionality. Also included are improvements to the AUDSYS audit schema itself. The AUDSYS audit schema contains the unified audit data, and the schema is now accessible with the privilege of SELECT ANY DICTIONARY. Previously, the AUDSYS schema could be accessible with the SELECT ANY TABLE privilege. You can think of this as bringing in the AUDSYS schema into the data dictionary and protecting it in the same manner as other data dictionary tables.
Equally important as the protection of the unified audit trail is the capturing of the predicate clause when using Virtual Private Database (VPD). The predicate clause is essentially the WHERE clause that VPD appends to a user’s SQL statement when VPD policies are enforced. Since the user’s original SQL_TEXT is also included in the unified audit trail, with the predicate clause it is easier to know what SQL the user actually ran.
Privilege Analysis
Understanding what privileges are being used, and not used, by users over time is the new feature we cover in this section. Privilege analysis (PA) now has an additional parameter called RUN_NAME. The RUN_NAME parameter can be used for multiple runs of the same PA policy. This functionality along with the use of the diff utility allows for monitoring of any changes in privileges.
To demonstrate privilege analysis below, I do the following:
![]() Create the users and grant the necessary privileges for the users PRIV_ADMIN and BAD_USER
Create the users and grant the necessary privileges for the users PRIV_ADMIN and BAD_USER
![]() Run the DBMS_PRIVILEGE.CAPTURE.CREATE_CAPTURE to set up what will be captured for the analysis
Run the DBMS_PRIVILEGE.CAPTURE.CREATE_CAPTURE to set up what will be captured for the analysis
![]() Run the DBMS_PRIVILEGE_CAPTURE.ENABLE_CAPTURE procedure with different values for the RUN_NAME parameter
Run the DBMS_PRIVILEGE_CAPTURE.ENABLE_CAPTURE procedure with different values for the RUN_NAME parameter
![]() After some length of time where users are active, run the DBMS_PRIVILEGE_CAPTURE.GENERATE_RESULT procedures with different values for the RUN_NAME parameter
After some length of time where users are active, run the DBMS_PRIVILEGE_CAPTURE.GENERATE_RESULT procedures with different values for the RUN_NAME parameter
Create the users with the necessary permissions:

Next, set up the privilege analysis to capture potential BAD_USER activity:

Use ENABLE_CAPTURE to start the capture process:

Here, the BAD_USER logs in and tries to view a table that they should not be viewing:
![]()
After some time has passed, top the capture process with DISABLE_CAPTURE:

After some time passes, I can view any possible bad activity by BAD_USER by generating the report data:

To see what privileges the user BAD_USER used, I query the data dictionary view DBA_USED_PRIVS:

Having found out what I needed to know, I can now stop the capture process:
![]()
The preceding example shows an iteration of the privilege analysis process. You can turn on the capture process on a schedule with different and meaningful values for RUN_NAME and perform additional analyses based on time of day or privilege usage over time.
Separation of Duties
Oracle Database 12c Release 2 continues to implement the separation of duties best practices with the introduction of the SYSRAC role. The SYSRAC role is needed when using SRVCTL. The Grid Infrastructure clusterware agent also uses the SYSRAC role.
The following is a list of PL/SQL packages that a user with the SYSRAC role can execute:
![]() DBMS_DRS
DBMS_DRS
![]() DBMS_SERVICE
DBMS_SERVICE
![]() DBMS_SERVICE_PRVT
DBMS_SERVICE_PRVT
![]() DBMS_SESSION
DBMS_SESSION
![]() DBMS_HA_ALERTS_PRVT
DBMS_HA_ALERTS_PRVT
![]() Dequeue messaging in SYS.SYS$SERVICE_METRICS
Dequeue messaging in SYS.SYS$SERVICE_METRICS
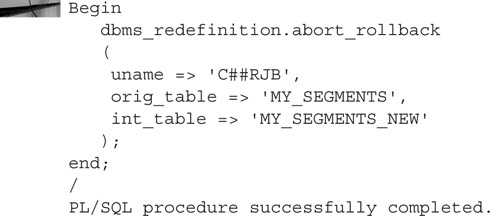
Additionally, Table 5-2 lists administrative actions and views that a user with the SYSRAC role can use.
TABLE 5-2. SYSRAC Role and Related Administrative Actions
User and Password Management
The management of user accounts is easier in Oracle Database 12c Release 2. User accounts can now be automatically locked after a period of inactivity. This period of inactivity can range from 15 to 24,855 days. Fractional days are not allowed when using this new functionality. A user is no longer considered inactive after logging into the database.
The implementation of automatically locking users is done with the use of profiles. The following example creates the profile INACTIVE_LIMIT with a 30-day inactivity limit. That profile is then assigned to the BAD_USER.

In addition, the password verification functionality has changed in Oracle Database 12c Release 2; the default value for SQLNET.ALLOWED_LOGON_VERSION_SERVER in sqlnet.ora is now 12. This setting requires the use of stronger password verifiers. Do not set or use the database parameter SEC_CASE_SENSITIVE_LOGON in Oracle Database 12c Release 2. It has been deprecated since 12.1. Also, the combination of setting SEC_CASE_SENSITIVE_LOGON to FALSE and the default value of SQLNET.ALLOWED_LOGON_VERSION_SERVER causes all accounts to become inaccessible!
STIG
For those of you working in a U.S. Government Sector (USGS), this section is for you. The Security Technical Implementation Guides (STIG) list requirements to gain the Authority to Operate (ATO) certification—in other words, the guides’ requirements must be met before you can implement the application in production. In Oracle Database 12c Release 2, the new security features that help you pass the STIG are various password complexity functions and a specific user profile.
The three password complexity functions are ORA12C_VERIFY_FUNCTION, ORA12C_STIG_VERIFY_FUNCTION, and ORA12C_STRONG_VERIFY_FUNCTION. Each function provides varying levels of validation for password complexity. The STIG-related user profile is ORA_STIG_PROFILE and is listed in the following example.
One thing to notice about the profile ORA_STIG_PROFILE is the password verify function that is used. It is ORA12C_STRONG_VERIFY_FUNCTION by default.

Summary
This chapter covered the most important new administrative, high availability (HA), and security features of Oracle Database 12c Release 2.
Administration of your Oracle database or even a widely distributed RAC database now has many more proactive and ease-of-use features, such as being able to perform even more types of database table partition operations with little or no downtime for the users.
The enhancements to ASM in conjunction with sharding can make your distributed databases even more heterogeneous and localized to meet the needs of each logical portion of the database application.
The covered security features include encryption and redaction, Database Vault, auditing, privilege analysis, separation of duties, user and password management, and STIG. You should try some or all of these features in your development and test environments. There is nothing like actually trying out a new feature to really appreciate it.