

20
Obstacles and Common Unexpected Problems
This chapter aims to describe the most common obstacles you’re likely to encounter in your nightscape quests, and ways to mitigate them. The goal is to help you maximize your enjoyment by developing strategies ahead of time for coping with the inevitable challenges and potential frustrations that accompany any outdoor activity. With patience, perseverance, skill, and good luck, you will be rewarded with one or more high-quality images that you will be proud to hang for display or videos you will be excited to share. Although challenging, landscape astrophotography is a rewarding pursuit that you can learn and improve through practice, provided you give yourself enough time.
Logistics—Time, Travel, and Costs
There are several fundamental logistical challenges to nightscape astrophotography. There can be major time investments involved in planning, traveling, and creating beautiful images. Objects move inexorably across the night sky. The costs of landscape astrophotography equipment and travel can add up. It is important to recognize these time and potential cost logistics so you make appropriate decisions and suitable preparations.
The large number of extraordinary nightscape images that we constantly see on social and commercial media, art exhibitions, television, and film documentaries have spoiled us. They make it easy to underestimate how difficult and time-consuming it is to actually create them. Planning and completing a successful landscape astrophotography session can take far longer than one might think. In many cases, we need to book airline tickets, rental cars, hotel accommodations, spend a day flying, and then driving hundreds of miles to reach our ultimate, unfamiliar destination. Once there, we need to unpack and prepare for the evening’s events. We need to carry our equipment to the shooting location and set it up during our scouting explorations during the day as well as our shooting expedition at night. Then, provided the weather holds, we will likely spend several more hours collecting images before returning home and spending, yet more hours post-processing them.
Night sky objects move with a seeming relentless consistency. There is no rewind button. Once the moon has crossed the horizon there is no going back. Once the Milky Way has begun to set, that’s it for the evening. Try measuring the time it takes for the sun to completely disappear beneath the horizon after first touching it. You might be surprised to find it is only a few minutes. The moon takes even less time.
On more nights than I can remember, image possibilities have slipped away as I have dithered, unsure of which image or image sequence I should take next! It really pays to have carefully thought through which images you wish to shoot during a given evening, and in what order, and with which camera and lens combination. Having even a cursory written plan can be remarkably helpful late at night when you are cold and tired; having the detailed plan we developed can really pay off. It can make the difference between coming home with memory cards full of images or coming home imagining what might have been possible if only there had been more preparations or time available.
By now you realize that I am a firm believer in the value of thoroughly pre-planning your trips. In addition to assessing the logistics discussed above, you may wish to estimate how much time you will need to create your image(s)—and then double it. Now you will have a reasonable buffer to deal with all the inconvenient realities of working in the field—airplanes and satellites flying through your shot, headlights from a car ruining a time-lapse sequence, needing to re-focus, changing a dead battery, trying a second composition…the list is endless.
Extraordinary landscape astrophotography images can be created with an entry-level digital single-lens reflex (DSLR) and a basic tripod. The inherent image quality, however, improves with more sophisticated sensors, lenses, and support equipment. As seen in Chapter 18, gadgets abound to make your life simpler and your images easier to create, and with higher quality. Post-processing and image archiving are facilitated with software and computers that all come at a price. Finally, the expenses of travel can quickly add up. There is almost no end to the ways in which you can spend money in pursuit of landscape astrophotography; it is up to you to determine whether the benefits are worth the cost.
There are a number of do-it-yourself (DIY) approaches within the realm of landscape astrophotography. When feasible, the author is an ardent fan of such methods. Care must be taken, however, not to sacrifice the benefits of your overall investments in an effort to pinch a few pennies. As one example, once you arrived at your destination, the incremental cost of a locally available map, guidebook, or knowledgeable guide may be almost insignificant compared to the overall cost of your travel and equipment budget. Yet, armed with this resident knowledge, you will almost certainly discover hidden destinations and other little-known photo opportunities that you otherwise might have simply driven past.
Setting Up at Night
You may find it helpful to arrive on-site at least an hour before your earliest shooting time. In addition, be sure to allow ample time to park, load up your gear, and hike in to the destination. Even though you have scouted the site, determined the best tripod location and reviewed your images from the day and chosen your favorites, everything takes longer than you might think! Simply setting up the tripod, acquiring focus, fine-tuning the composition, and setting exposures all take time. The worst feeling in the world is to be late to an event that simply can’t be replayed.
Focusing in the Dark
Focusing in the dark is probably the biggest technical challenge to those beginning in landscape astrophotography. Since it is done with your camera and/or your lens set to a manual focus setting, Figure 11.2, it is entirely up to you to achieve the best focus possible. You may spend all of your first night, or two, or even three or more mastering this vital skill. A sharp focus is critically important; blurry, out-of-focus stars will ruin an otherwise perfect image. It is important to be patient and give yourself time to learn this skill. Practicing at home will save you great frustration when you are in the field.
Many higher-quality lenses have a marking on the barrel that indicates a focus distance of infinity, ∞, Figure 20.1(a). While it would seem straightforward to simply set the focus ring to the setting, pinpoint focus of night sky objects is rarely achieved by doing so, most certainly so for zoom lenses. Changes in temperature, for example, can cause dimensional changes in lens components that lead to tiny, yet noticeable, focus imperfections. Changes in the lens zoom setting can discernibly shift the focus position as well, Figure 20.1(b).
I prefer to always focus directly on the stars themselves, thus ensuring the sharpest and most reliable focus of the night sky. Since stars are too dim to see clearly through the viewfinder, however, you must rely on the live-view feature of your camera. This process can be extremely challenging to perform in the field. Searching for the brightest stars in the sky can help, Table 2.1 and Figure 2.7. A handheld loupe can assist in viewing the stars on your camera’s liquid-crystal display (LCD), Figure 20.1(c). An alternative is to focus on the distant horizon, instead of the stars, before the end of civil twilight, and simply maintain this focus setting throughout the night. Another approach is to find a distance light on the horizon and to use it as a focusing target, again instead of the stars. Once you have achieved focus, you might like to tape the focus ring in position with gaffer’s tape, Figure 20.1(d).

20.1
Examples of where perfect focus lies for a Nikon 14–24 mm zoom lens set to a focal length of: (a) 14 mm and (b) 24 mm. (c) A hand-held loupe can greatly aid in focusing on stars visible on your camera’s liquid-crystal display (LCD) and (d) once set, gaffer’s tape is a great way to keep the focus ring in place.
If your camera lacks both a live-view option and/or a lens barrel infinity marking, don’t despair. You can always achieve sharp focusing through trial-and-error. While more time-consuming, trial-and-error is a reliable method for acquiring sharp focus under any condition. First, increase your camera’s ISO to 6400 or so for the duration of the focusing effort—you don’t care about image quality at the moment. Once you’ve established a sharp focus, you can change the ISO setting back to your preferred level. Next, with your camera and/or your lens set to manual focus, adjust your focus ring so that the lens is nominally set to an infinite focus distance. You may need to determine this approximate position during the day. Finally, make an image of the night sky and inspect it closely to assess the quality of the focus. If the stars are out of focus, make a minute adjustment to the focus ring and make a second exposure. When you inspect it, check to see if the focus of the stars has improved or deteriorated. If it has improved, adjust the focus ring a tiny bit more in the same direction and make another exposure. If the stars in this image are now less in focus, return the ring to the previous position. Continue with this process until you have achieved a satisfactory focus. Having done so, again, you might like to tape the focus ring in position with gaffer’s tape, Figure 20.1(d).
The Need for Spares
I will never forget waking up on the morning after my very first night of a weeklong, out-of-state trip and retrieving my high-end DSLR from its position atop the tripod. It had been set to collect a night-long time-lapse sequence of the Milky Way’s motion across the horizon. I eagerly tried to review the images, but the camera was dead. Okay, I thought, it just needs a fresh battery. Installing one, however, didn’t help. Instead, I was now confronted with a blinking “Err” message on the LCD display. Not good, I thought. Bottom line—the camera went into the shop and the rest of the trip was successfully completed with my backup camera. Moral of the story: bring backups of everything.
It may seem silly when you are packing it in the comfort of broad daylight, but an extra allen key to tighten a loose tripod fixture can be worth its weight in pure gold. This is especially true when you are an hour up the trail and the Aurora Borealis just roared into life on the last and only clear night of a weeklong expedition abroad. Or knowing just where to find that extra headlamp nestled in your pack in the moonless dark when it’s time to return to the car along the cliffside trail at 2 am and the headlamp you wore walking in just died. How about an extra car key to replace the one you just fumbled into 4 feet of powder snow? Or a spare lens cap for your delicate wide-angle lens? Repeat moral of the story: bring backups of everything.
Memory Cards and Batteries
Multiple spare camera batteries and memory cards should always accompany you into the field. Just like all equipment, both can occasionally malfunction. You will always want to have an extra empty memory card and fully charged battery on hand, just in case. Nothing is worse than being in the middle of an exciting shoot, only to realize that you have exhausted your memory, or drained your battery, and if only you had a spare replacement, the shoot could go on. They are such small objects, yet they have the potential to enable or completely end an entire night’s shooting. Finally, always check that your camera actually contains its memory card and battery before venturing into the field. All of us, at one time or another, have driven to our night’s destination, excitedly hiked up the trail to reach our shooting location, pulled out our camera only to realize its battery is still at home, plugged into the battery charger!
There are a number of methods for carrying spare memory cards, including wallets, sleeves, and plastic cases. One important reminder: be careful to never touch the gold-colored metal contacts on camera memory cards with any part of your body. Doing so inadvertently may trigger a discharge of static electricity from your body through the card. This electrical discharge may then interfere with and corrupt the data stored on the card, and ultimately the entire card itself.
Batteries generate electricity via internal chemical reactions. The strength of the reactions depends strongly on the ambient temperature. If the temperature is too low, then the rate of the chemical reactions slows, significantly reducing the level of electrical output. This reduced output is manifested as a shortened battery life. Solutions to this potential problem all involve keeping your camera batteries as warm as possible. On many occasions, I have successfully revived seemingly dead batteries simply by warming them in my hands or in a trouser pocket for several minutes. Attaching portable handwarmers to the camera body with tape, rubber bands, or other methods can prolong the battery life in the camera. Handwarmers also help keep the inner mechanisms of the camera working smoothly; I have one camera body that stops functioning after it cools below a certain sub-freezing temperature without them.
Maintaining Lens Cleanliness
Lens dryness and cleanliness are two issues that must be maintained. As mentioned in Chapter 9, under the wrong conditions, dew, and/or frost will condense on everything, including your lens. Unfortunately, other than using handwarmers taped to the lens, Figure 20.2, or a dedicated lens heater, there is little that can be done to prevent dew or frost formation during a shoot. Lens cleanliness, however, is a maintenance issue that is easily kept to satisfactory levels. Other than dew, frost, and precipitation, lens contamination arises from two primary sources: particulates and liquids. Particulate contamination includes dust, dirt, lint, hairs, etc.; liquid contamination includes random droplets from the sprays from waterfalls, mists, and the like.

20.2
Disposable handwarmers attached to your camera can help stave off dew and frost.
The first line of defense against particulate contamination is the lens cap, Figure 20.3(a), and a hand-operated, portable blower, Figure 20.3(b). Every photographer should carry these, especially when in the field. Avoid blowing directly on the lens from your mouth; your exhalations carry moisture that can condense on the lens and further contaminate it. A great deal of lens contamination can be removed through judicious application of such portable blowers. Their great advantage is that it is nearly impossible to damage the lens by using one, unless of course you accidentally touch the tip of the blower to the lens.
Another tool I use to gently remove larger particles of dust and dirt from not only the lens surface but also the camera body, eyepiece, and dial areas is a small camel hair artist’s paintbrush, Figure 20.3(c).

20.3
Tools for helping with lens cleanliness: (a) A lens cap on an elastic band ensures it never falls off and gets lost by accident; (b) hand-operated air blower; (c) camel hair artist’s brush for dislodging stubborn grains of dust or sand; (d) lint-free Pec Pads; (e) 99.9 percent alcohol for cleaning lens surfaces; (f) compressed air—always use short bursts of compressed air, never long blasts, and never invert the can while operating or else extremely cold, liquefied gas can emerge; and (g) a lens brush for final touch-ups of minor lens smudges.
This tool is very helpful in prying loose tiny grains of sand and dirt that have become wedged into little recesses throughout the body of the camera, and resist even the strongest puffs of air from the air blower. Finally, on very rare occasions, I may resort to very short bursts from a can of compressed gas, Figure 20.3(f). I use this approach with extreme care, since there is a significant risk of inadvertently spraying the object I’m trying to clean with the extremely cold, compressed liquid instead of gas, especially if I invert the can of compressed gas.
Once all the particulate debris has been removed from the surface of the lens, any remaining particulate contamination can be removed in a couple of different ways. It should be emphasized that, unless you are completely confident in your abilities, a professional cleaning service might be the route to go, since the following methods have the potential to scratch and even ruin a camera lens. Do not proceed if you are uncomfortable doing so!
My next step is to simply exhale half a dozen or so times onto the surface of the lens, intentionally fogging the entire surface. Next, a dry, absorbent cleaning wipe, Figure 20.3(d)1 is used to very gently clean the surface of the lens. The wipe is folded into quarters and used to wipe the surface of the lens; use the minimum pressure possible. I never actually press on the lens through the wipe directly with my finger; instead, I push on the folded wipe, which then transmits only a mild pressure onto the lens surface. The idea is to use the exhaled moisture deposited onto the lens to help very gently detach and/or dissolve any remaining contamination, and flush them from the surface without scratching it.
The motion of the lens wiping is in an outwardly spiraling pattern, starting at the center of the lens and moving outwards. Each wipe is only used once and then immediately discarded; there is thus no danger of accidently scratching the lens be re-using a wipe that was just used to pick up dirt and dust particles. After repeating this process with three or four wipes, I might then re-fog the lens surface with my breath and repeat the wiping process until I am convinced all the particulate contamination has been removed, leaving the lens surface covered only with residual droplets of water.
These remaining water droplets are removed by again folding a new wipe into quarters, wetting one corner of the folded wipe with a few drops of 99 percent ethanol,2 Figure 20.3(e) and repeating the gentle, spiral wiping motion, again moving from the center towards the periphery of the lens surface. The water dissolves into the alcohol and is gradually removed from the lens surface, leaving behind a thin film of ethanol which rapidly evaporates. After repeating this process several times, the lens surface should appear completely clean and devoid of any visible particulate or liquid contaminants. Never apply alcohol directly to the surface of the lens; it can easily spread under the fittings and leave a residue within the inaccessible interior of the lens.
After completing the cleaning procedure described above, there may be a few spots on the lens surface where there remains a stubborn streak or deposit of some kind. I then might use a specially designed lens-cleaning tool, Figure 20.3(g), to remove these final contaminants. With care, the lens can be returned to its original, pristine condition.
Maintaining Sensor Cleanliness
The sensor in your camera will inevitably tend to collect small particles of dust, lint, and dirt every time you expose it to the ambient environment. This is a simply unavoidable byproduct of changing lenses. The attraction of dust to the sensor is promoted by the electrical charge developed by the sensor during operation. The force of this attraction is very strong; attempts to physically remove the dust through in-camera, ultrasonic “sensor cleaning,” and even direct puffs of air from the hand blower shown in Figure 20.3 can be in vain.
Contamination on the sensor of your camera can be a serious problem. It can manifest itself as pesky, dark, out-of-focus specks and blobs on each and every one of your images, especially at high aperture settings, e.g. f/16 and f/22. Removal of these imperfections during post-processing is exceedingly time-consuming, and sometimes impossible if the contamination occurs in a critical part of your image. For example, it is very difficult to remove such defects from regions of images that contain the day and twilight sky. This is because the sky’s color constantly and subtly changes throughout the image. The eye of the observer is very sensitive to artifacts introduced during the removal and replacement of regions of the sky containing a spot; efforts to do so are hard to disguise.
Here is an easy way to check your own camera for contamination of your camera’s sensor. The results may shock you; don’t panic if your camera has a significant level of contamination. Instead, take this opportunity to consider having your camera’s sensor cleaned before your next major photography project. First, set your lens or camera to manual focus. The image you are about to collect does not need to be in focus; sensor contamination looks the same regardless of the degree of focus of the image. Next, set your camera to aperture priority (A or Av), and adjust the aperture to the maximum f-stop: f/22, f/28, or higher. The ISO doesn’t matter, nor does the shutter speed. Now go outside and aim the camera at a patch of clear blue sky and make a couple of exposures. If the sky is overcast, simply aim the camera at a featureless section of the sky, or even the center of a blank sheet of white paper outdoors and use these to create the exposures.
Load the images onto your computer and inspect them carefully for any visible spots or other signs of sensor contamination. Any dark specks that you see in precisely the same locations between successive images are from sensor contamination, and should be cleaned. If you really want to search for all the possible sensor contamination, open up the candidate image in Photoshop, Figure 20.4(a), and then open up the “Adjustments” tab, click on “Levels,” then click on “Auto,” Figure 20.4(b). This process changes the image settings to those that will highlight the presence or absence of sensor contamination. As you can see in Figure 20.4(b), the results can be shocking!
While there are many commercially available methods on the market designed to allow you to clean the sensor in your camera, my advice is to send your camera out to a professional for sensor cleaning. Although costly and time-consuming, the very real risks of permanently damaging your sensor or internal workings of your camera far outweigh the benefits of taking a DIY approach to this extremely delicate task.
You can now appreciate that it is well worth the efforts to minimize the collection of dust by the sensor by only changing lenses in controlled, dust free environments. First, always switch off the camera power before changing lenses to minimize the attraction of dust by the sensor through buildup of an electrical charge. Next, although inescapable, try to minimize the number of times
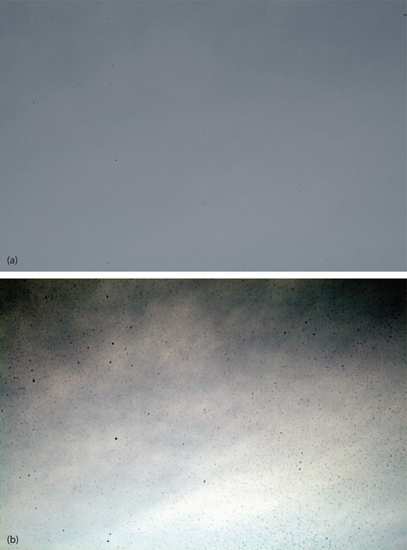
20.4
Images demonstrating the effects of severe sensor contamination: (a) An as-shot, unfocused image of the blue sky with an aperture setting of f/22; (b) the same image after auto-leveling in Photoshop. The sensor dirt revealed after auto-leveling can be shocking! Repetition of this procedure after sensor cleaning can help ensure that all sensor contamination has been removed.
needed to change lenses in the field, yet another reason to carefully plan the evening’s shooting sequence to avoid having to continuously swap lenses during the night. Whenever necessary, try to at least change lenses from inside a car, or better yet, inside a closed building.
Develop your own method of changing lenses that keeps the time during which the cavity containing the sensor is exposed to the ambient environment to less than a couple of seconds. My own method is to, while comfortably seated, position the replacement lens on my right knee with its body cap loosened, but still in place, and its alignment marker clearly visible. Next, I position the camera with its existing lens on my left knee, with the lens facing upwards. I then depress the lens release button on the camera body and slowly loosen the lens so that it is ready to be removed but still in place. I then remove the body cap from the replacement lens on my right knee and place it to one side. Holding the replacement lens in my right hand, I use my left hand to quickly remove the existing lens. I then immediately install the replacement lens and rotate it into position. As quickly as possible, I then install the body cap from the replacement lens on the newly removed lens, and place it carefully into storage. When done correctly, the time during which the body cavity of the camera is exposed to the air is for much less than a second.
Other Issues
There are several camera settings that can pose problems if neglected. Here are just a few examples; it is always a good idea to create a list of these and other potential problems that you actually consult in the field, so as to ensure smooth operation and a successful outing:
- Ensure your camera/lens is set to manual focus.
- Adjust the zoom setting of your lens before establishing focus.
- Be sure to turn off the long-exposure noise reduction setting during the collection of star trail images, otherwise the star trails will be dashed lines, with the gaps corresponding to the periods when the noise reduction was being performed.
- When conducting a sequence of images using an internal or external interval timer, it is important that the image collection period be longer than the shutter speed.
- Be sure to monitor the ISO so that it is not higher than necessary.
- Monitor the focus throughout the shoot; it is all too easy to accidentally and unknowingly bump the lens during the night, knocking it out of focus.
- Depending on the complexity of your night’s operation, you may end up with a number of electrical cables attached to your camera. It is important not to accidentally snag one and unintentionally shift the camera and tripod.
- If you are using a tracking head for the tripod that requires external power cables, take care to ensure they have enough slack to allow for the tracking head’s movement as the night progresses.
- Be sure each section of the tripod and head is fully secure.
- Adjust your camera’s LCD brightness to its minimum level to preserve your night vision and the camera battery life.
- Turn off your camera’s image review feature to also preserve battery life.
Intervalometer Operation
Setting up an interval timer can be frustrating, especially since different manufacturers of intervalometers can have different ways of accomplishing the same goal. It is wise to thoroughly practice indoors beforehand, including a sequence of test exposures. You will want to be completely confident you can set up whatever is required in the field without hesitation or uncertainty.
As described in Chapter 22, basic intervalometer operation is quite simple. The main choices pertain to: (i) the length of time during which the shutter is open for each exposure; (ii) the length of time during which the shutter is closed to allow for image storage; and (iii) the total number of exposures. You will want to know how to change each of the settings independently, along with the appropriate exposure settings on the camera itself. For example, you may wish to practice at home by collecting: (i) a hundred images, each twenty seconds in length separated by a one second gap and (ii) two hundred images, each five seconds in length separated by a two second gap. Finally, adhesively backed Velcro fasteners can help secure your intervalometer to the top of a leg of your tripod for easy access and to prevent it from dangling.
Cold
Many nightscape images are created in conditions where the air temperature is well below 0° F. Frostbite becomes a real possibility, and camera, cellphone, and even car batteries become less dependable. Cables used to power or otherwise control your camera will become stiff and even brittle. Care must be taken not to damage them, their fasteners or the camera. Finally, extreme cold may also affect your tripod, especially if it is made from a carbon fiber composite material. Such tripod legs have been known to break, especially when inserted into deep snow that can exert an outward force on the legs as they are inserted. Metal tripod legs, while sturdier, can inflict painful contact burns from the cold in subzero temperatures, since the cold metal is able to conduct heat away from your bare skin so efficiently. Care must be taken not to touch bare metal with exposed skin under these conditions.
There is no need to avoid such conditions, provided you follow certain precautions. It is imperative to travel in a reliable vehicle that you know can bring you safely home. It is also of vital importance to stock your vehicle with a warm sleeping bag, some emergency provisions, flares, and a shovel to help extricate yourself in an emergency. Finally, bring a large, sealable plastic bag with you into which your camera and lens can fit. You can use this bag to eliminate the condensation that otherwise might occur when you bring your cold camera indoors. Simply place your camera inside the bag, seal it, and leave it inside while you wait for the temperature to return to room temperature before opening the bag.
Human Factors
There are a number of human factors worth considering ahead of time that can make your nightscape field experiences more enjoyable and rewarding. The first of these is to appreciate that you will be working long hours, late at night, outside, and in the dark. You should expect to experience drowsiness and fatigue. You may find that your interest and motivation may dwindle. You may even find yourself rationalizing why it is not so important after all to stick around for that late night shot. That comfortable, warm bed can seem mighty appealing!
By anticipating such feelings, you can guard against succumbing to their temptations. Any account of extreme alpine mountain climbers will reveal thoughts of uncertainty, doubt, and temptations to return before reaching the summit. Those who succeed are able to overcome these feelings and push through to achieve their goal that has been so long in the making. Here is yet a further instance of how your pre-planning will pay off. By having a written list of objectives for the evening, it is much more difficult to rationalize why you should quit and head home.
The sheer fact that you will be working late at night will most likely produce feelings of sleepiness and lethargy, and make you prone to error. I recall a specific instance several years ago when a friend and I had backpacked into a remote wilderness area and set up our cameras for a night of star trail image collection. We made sure our cameras were correctly focused and in manual mode, the ISO, shutter speed and aperture were set properly, the tripod and ball head were secure, and the compositions were good. Everything was set to collect images with a delayed start a couple hours after we had retired for the night to allow the waning gibbous moon to rise. When I woke the following morning, I noticed that my friend had put his lens cap on his camera, but my lens cap was still off. I was a little surprised, since this was somewhat out of character; we were usually quite good at looking after each other’s equipment. I thought that if my friend had put on his lens cap for some reason, he would have done the same for mine. Not thinking much more about it, I went about my business, and only later, mid-morning, did I hear roars of laughter when my friend realized he had forgotten to remove his lens cap in the first place the prior evening, and none of his images had been exposed! This story has two morals: i) be sure to be on your guard against late-night errors and ii) pick your backpacking buddies with care; you want to keep company with those who have a good sense of humor, as I was so fortunate to have done!
On occasion when one is out in the field, especially when alone, many people, including myself, will suddenly experience an unexpected, irrational fear of the dark. You may even feel goose bumps rising on the back of your neck! Whether it harks from our ancestral past, or too many movie thrillers, most people at some point just don’t feel completely comfortable being alone outside in the dark. This is perfectly normal and should be expected. Again, by anticipating the onset of such feelings you can minimize their effects. Whether it’s by playing music, thinking positive thoughts, or anything else that works for you, having a pre-thought out defense against a basic fear of the dark will undoubtedly come in handy at some point in time.
The very act of working in the dark just by itself can add to the overall level of stress that naturally accompanies the excitement of landscape astrophotography. It is always a surprise to realize how much we depend on our vision to accomplish basic tasks. Even with the illumination provided by red headlamps, working in the dark simply takes longer then one might think. I find myself relying on my sense of touch to identify and retrieve objects from my camera bag in the dark. It helps to know how to work all the controls of my camera in the dark. It simply takes time to adapt to the dark, and you should give yourself plenty of time to do so.
It is very important to stay properly hydrated and nourished. Not drinking enough water can lead to headaches. A lack of food can lead to mental confusion and lethargy. I always carry a small container of water along with a high-energy snack to consume during the night.
Although the causes and effects of night vision and dark adaptation were described in Chapter 10, it bears repeating that it takes your eyes at least 20 minutes to fully adjust to the dark; try to eliminate all sources of light other than your red headlamp. Be sure to dim the LCD display of your camera. Some camera models also have small green or red light-emitting diodes (LEDs) on their back; the best way to block their light completely is to cover them with a small piece of aluminum foil taped in place. You may also wish to use averted vision as you study specific objects in the night sky, both with your naked eye as well as through the viewfinder of your camera.
In my years of experience exploring nature, camping, and creating photographs on continents across the globe, I have come to realize that the gear I carry can be divided into one of the following two categories: i) Used Every Day and ii) Nice to Have But Only Used Occasionally. Whenever I venture out on an expedition, I’m sure to confirm and re-confirm that I have all the equipment on my “Used Every Day” list. As you gain experience, however, you may decide to leave behind the “Nice to Have But Only Used Occasionally” items to save weight, distractions, and clutter. While it’s nice to have an extra pair of socks, or even a toothbrush, the absence of either won’t prevent you from returning with images.
Finally, I can think of several separate instances when the success of an entire trip literally hinged on the presence or absence of a group of physically small and almost weightless physical objects such as these. For example, it is always amazing to me how much power is contained in the small piece of metal shaped in the form of a car key. The absence of a spare car key when yours has slipped out of your pocket as you sat on a bridge over a river at midnight on the first day of a weeklong trip… such a small object, yet so important! The same goes for a memory card, camera battery, or container of insect repellent. They are small, yet have such value!
Finally, practice patience. Give yourself time to enjoy your surroundings. Sometimes it takes a while to work through technical or other issues, try not to hurry yourself.
Other Photographers
You will encounter other landscape astrophotographers in the field, especially at popular destinations on favorable dates. The word is out. It is not uncommon to have half a dozen or more photographers clustered around iconic foreground objects, each working to fulfill their artistic vision. Most, if not all, have each traveled considerable distances, and invested significant amounts of money and time in arriving at the spot for the night. Their family and friends eagerly await their images when they return.
Not surprisingly, I have witnessed tensions arise on many occasions, as I have watched individual photographers unintentionally, or worse, deliberately pursue their own vision without regard to the desires of others. As just an example, I was recently present at a well-known location to photograph the Milky Way on the night of the new moon. Three other parties were also present. We all arrived before sunset; we set up our equipment and waited for darkness to fall. As we chatted, it became apparent that one of the groups was creating an all-night time-lapse video sequence, and expected the others to refrain from any light painting or use of our headlamps once darkness fell, as the stray light would understandably interfere with their project. Another of the groups had extensive, detailed plans for elaborate light painting of the same scene. As darkness fell, while the light-painters withheld from their plans, they darted out brief flashes of light to obtain a couple images, despite repeated objections and requests for moderation from the group of videographers. Do you see where this is going? Raised voices ensued, and harsh words were exchanged. The videographers were upset that their time-lapse was ruined. The light painters were upset that their extensive nightscape shooting plans were being strongly condemned. Ironically, the groups of videographers and light painters were the first to depart, leaving myself and the other group to hours of collegial astrophotography.
The resolution of such a situation is unclear. Is it first-come, first-served? Or should the largest number of votes prevail? Or should the group who has traveled the farthest have a special say? My thoughts in such situations are to always remember the Golden Rule, “Do unto others as you would have them do unto you.” Respectfully, communicate with the others who are present, and work out a system for when to expose, and when to use your headlamps. I have been part of countless situations where the night is filled with shouts of, “Are you ready to expose?” followed by, “Exposing!” followed by, “Done!” at which point headlamps click into life in unison and we all excitedly chatter about the results and share information and suggestions. It is unreasonable for one individual or group to expect to monopolize an evening at the expense of others, and for them to prevent others from fulfilling their artistic vision. When two parties are on a direct, collision course, if possible, there is always the coin toss!
Finally, always keep your personal safety, and the safety as others, as your primary goal. No image is worth suffering injury or death. There are a number of hazards and risks associated with any outdoor activity, let alone one done at night, and without the benefit of lights! Always be aware of your surroundings, bring a first aid kit and know how to use it, and anticipate the possibility you may be forced to stay out all night if you become lost or seriously injured.
Security
Landscape astrophotographers typically carry a lot of visibly expensive gear. We generally need to park our vehicles at remote trailheads and parking lots where theft can occur. Maintaining your personal safety and security is your foremost concern. Unfortunately, since much of landscape astrophotography is performed in dark, remote areas, we can be especially vulnerable to the possibility of robbery or worse. Always be aware of your surroundings, and minimize the visibility of your equipment, when possible. I often use inconspicuous duffel bags and suitcases when traveling to avoid drawing attention to the valuable equipment inside. When parking my car at trailheads, I always ensure that absolutely nothing of value is in sight. When I am staying at a campsite, I try to refrain from flaunting my camera and electronic gear as much as possible. Finally, I often use a rather beat-up daypack to carry my equipment during the day in an attempt to disguise its contents.
Need for Practice
The very process of creating an exposure requires several steps that are greatly aided by the presence of light. Composing the image, focusing on the night sky or foreground objects, adjusting your exposure settings, all of these processes become exponentially more difficult in the dark. Only practice will help in developing proficiency and ease in doing so. Consider spending several nights at home, in a nearby park, or even your back yard setting up your camera, focusing on night sky objects such as the moon or bright planets, and making and reviewing test exposures. Think how much more confident you will feel having done so once you reach your destination!
During the photography classes and workshops I teach, there is occasionally a student who arrives with a brand new camera still wrapped up in the box. It has never been used, and has a battery that may or may not be charged! Or an intervalometer that has never been used before—not even once! I have been guilty myself of unwrapping a new piece of equipment on the trail for the first time and then having to learn how to use it. Why do we procrastinate so? Although I don’t have the answers, I can say that to the degree that you are able to practice ahead of time, it will always pay off!
Nuisances—Light Pollution and Satellites/Airplanes
Light pollution is the bane of landscape astrophotography, Figure 20.5. Excess light spilling into sky causes the phenomenon of light pollution, which tends to drown out the light of dimmer stars. The result is the dual combination of an artificially colored sky coupled with a greatly reduced number of visible stars. The effects of light pollution on the appearance of an image with the Milky Way are illustrated by comparing the brightly lit horizon near Los Angeles, California, Figure 20.5(a), with the dark horizon of a site a couple hundred miles to the north, Figure 20.5(b).
Airplanes and satellites can wreak havoc on nightscape images, especially in star trail images where they tend to accumulate. Their blinking green and red warning and navigation lights have cluttered more images than one can imagine, Figure 20.6(a). Worse, during the periods shortly after sunset and before sunrise, light from the now-set sun can brightly reflect from the polished metal fuselage of high-altitude airplanes and create highly distracting and very bright streaks. Unfortunately, there is no simple way to avoid having aircraft in the skies above you except to travel to locations unfrequented by airplanes, something of a catch-22.
Similarly, once you begin your nightscape quests in earnest, you will likely be astonished at the prevalence of satellite trails crisscrossing the sky, Figure 20.6(b). As in the case of airplane reflections, reflected sunlight from the satellites is the culprit. There is very little that can be done to avoid satellite trails, and their appearance is unfortunately likely to only intensify.
There are two main approaches for eliminating the nuisance of aircraft and satellite lights. The first is to create two images in quick succession, and as shown in the next section, mask and blend the necessary regions to eliminate the aircraft and satellite lights. The second approach is to use the photo-editing tools of Photoshop or an equivalent program to selectively remove the lights, also as shown in the next section. Both approaches work well and, while time-consuming and laborious, can remove most, if not all traces of both aircraft and satellite lights.
Immediate Image Review in the Field
Many issues that can arise in the field and potentially wreck your images can be detected simply by reviewing your images in the field immediately after creating them. Indeed, this capability is one of the main reasons that landscape astrophotography has gained such popularity in recent years. The ability to instantly review your images and make any necessary corrections on the spot has enabled new generations of nightscape photographers.

20.5
Light pollution can be a real problem, and often is unnoticeable while shooting. The effects of light pollution on the appearance of Milky Way nightscapes can be pronounced, as seen by comparing (a) the brightly lit horizon near Los Angeles, California, with (b) the dark horizon of a more remote site only a couple hundred miles to the north.
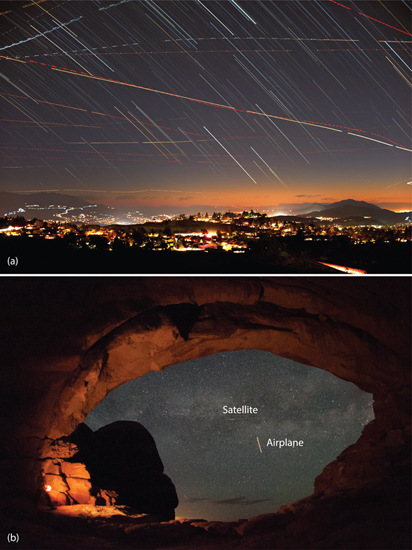
20.6
Nightscape nuisances: (a) Multiple airplane lights appear in busy skies over southern California even after only an hour or so in this star trail image. (b) A satellite and an airplane streak across the middle of this Milky Way shot in Arches National Park in Utah.
When you review your images in the field, the main features you might like to examine include:
- The degree of focus of the stars
- The shape of the histogram
- The degree of focus of the foreground objects
- The presence of any unexpected light sources
- The overall composition
- The presence of any unexpected foreground objects.
As one example of the latter, during on-the-spot review of the first few images created during a recent Milky Way photo shoot in southern Utah, I was surprised to find a group of six people casually reclining and enjoying the night sky amidst a large rock formation that I had prominently placed as my foreground subject. They were completely invisible to me in the dark, but clearly visible in the image as the result of the high ISO setting I was using! Had I not checked my image in the field, I would not have noticed their presence until I was home and it was too late to make a change. Fortunately, I was able to quietly change location, and continued on my way to create a series of people-free Milky Way images.
Bibliography
Fletcher, Colin, The Complete Walker III, 1984, Third Edition, Alfred A. Knopf, New York
Greenler, Robert, Rainbows, Halos and Glories, 1980, Cambridge University Press, Cambridge, England
Harvey, Mark, The National Outdoor Leadership School’s Wilderness Guide, 1999, Fireside, New York
Randall, Glenn, The Outward Bound Map & Compass Handbook, 1989, Lyons & Burford, New York
Renner, Jeff, Lightning Strikes, 2002, Mountaineers Books, Seattle, Washington
Rowell Galen, Galen Rowell’s Vision, 1995, Sierra Club Books, San Francisco, California
Rowell Galen, Inner Game of Outdoor Photography, 2001, W.W. Norton & Company, New York, London
Notes
1 Pec Pads—a wipe especially designed for cleaning optical surfaces. Available through camera supply stores and online.
2 Available at most drugstores.