

Your camera most likely comes with a number of meter priority settings, otherwise known as metering modes. These modes tell your camera’s meter how to react to the light that it is sensing, and how to adjust the various settings to optimize the shot for the best exposure. Auto-exposure settings have been around for quite a while, and are almost essential if we want to work quickly and efficiently during a photo-call. Many smartphones and point & shoot cameras rely almost exclusively on preset auto-metering selections. When coupled with auto-bracketing, which we will learn about in the next chapter, some of these metering modes are extremely useful.
On higher-end cameras, you will usually find at least four modes, including aperture priority, shutter priority, program, and manual. Simply put, aperture priority mode allows you to select the aperture that you would like to use and it instructs the camera to select the shutter speed that is appropriate for obtaining the optimal exposure for the shot. Likewise, shutter priority allows you to select the shutter speed you would like to work with, and then instructs the camera to select the most appropriate aperture to achieve optimal exposure. Program mode links appropriate aperture and shutter speed pairings for the shot you’d like to take, and then lets you scroll through these pairings, allowing you to select the best combination of the two for the shot. Finally, manual mode returns you to full control over all the settings yourself, and allows you to choose the aperture and shutter speed as appropriate for the shot that you like, based on the meter in your viewfinder. It does not, however, prevent you from taking a shot that is “off the meter,” which is very useful for us, since we are often in situations where we need to under-expose or over-expose the shot to capture the details of a certain moment.
Manual mode is great for experimentation and certainly very useful if you are comfortable with your camera settings. The program mode in my camera is very effective, but since I shoot frequently with auto-bracketing, I usually pick aperture priority, or occasionally shutter priority. Figure 11.1 shows the arrangement for my DSLR. Hold down the mode button, and then use one of the embedded thumbwheels (not visible) to scroll through the options. Currently my camera is indicating an A for aperture priority in this example.
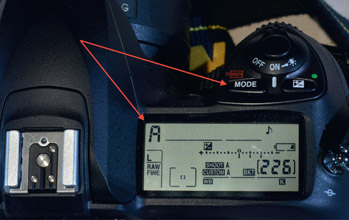
Figure 11.1:
Nikon DSLR mode button and setting indicator.
I prefer to use aperture priority, mainly because I have control over the movement of the performers and have reduced the blur I impart to the picture. There have been a few times when I have been surprised by the camera choosing a fairly slow shutter speed without me realizing it, especially when bracketing. The camera may shoot at 1/15th, 1/8th, and 1/4th, and that last exposure seems like it’s going on a while! Rarely do I find that the camera wants to shoot with a shutter speed that is faster than possible. More often than not, I find instead that it wants to shoot with a fairly slow shutter.
Figure 11.2 shows the method for selecting metering modes on the Canon PowerShot, and is typical of this level of camera. There is an easy-access selector dial located adjacent to the shutter release button, which allows you to quickly and easily move between the same set of standard metering modes. You’ll notice that the M for manual and the P for program are the same, along with an Av for aperture priority and a Tv for shutter priority.

Figure 11.2:
Canon PowerShot metering mode selector, standard settings.
Now if we look at the other side of the dial we will also see some of the pictograms I mentioned earlier, including a running figure, a landscape, and a portrait, amongst others. These are for sports photography, landscape photography, and close-ups of people, respectively, as you can probably guess. These presets can be very useful, as they make a number of settings changes for you that the manufacturer has determined are appropriate for these particular situations. For example, when set to the sports mode, the camera selects a high shutter speed, and makes other adjustments to the focus and exposure metering to provide great freeze-frame moments of a sporting event. It would be very useful for you to become familiar with what settings are being changed by the camera when you select one of these preset metering modes. By now, if you have experimented with all of the practice sessions so far in this book, you should be pretty familiar with most of the settings that these presets might be adjusting. While great for casual photography, you should be very comfortable with setting the camera up yourself by now, and may find that not every aspect of these presets works for you. If, however, you find that one of these hits a real sweet spot for your particular photographic style, then feel free to use it.
This is also a good point to talk about shooting menu banks. More advanced cameras will often have an option for you to set up your own presets or menu banks, which often go way beyond just setting up the metering mode of the camera. You may be able to set up a shooting menu that selects the metering mode that you’d like to use, the film speed, your preferred color space, file type and size, auto-bracketing options, and even your white-balance settings. This is certainly a very fast and convenient way to jump between the complex group of settings that are required for shooting in the theatre and the settings that you might use for more casual photography.

Figure 11.3:
Canon PowerShot metering mode selector, presets.
My camera can retain four banks, although I really only use two, one for normal use and one for stage. There are some settings that stay the same across both at this time, so here is a comparison of the settings that change in my “Stage Use” bank versus the “Normal Outdoors” bank. I use these as a starting point, but can easily change them on the fly if I need to.
| Option: | Stage Use Bank: | Outdoors Bank: |
|
|
||
| Image Quality | JPEG Fine | JPEG Normal |
| Image Size | Large | Medium |
| RAW Compression | NEF | Off |
| White Balance | 3200°K | Auto |
| ISO Sensitivity | 800 | 400 |
| EV Compensation | −1.0 EV | 0 |
When in the Stage bank, I still have to select an aperture (usually starting at f/2.8), set the metering mode to aperture priority, ensure that auto-bracketing is on, and set it to take three exposures with a 1-stop offset. When back outdoors, I move to no bracketing, metering set to aperture priority, and a starting aperture of f/5.6.
If your camera has shooting menu banks, then I urge you to use them as a way to make sure that you don’t forget one of the many settings that needs to be correct for your pictures to come out right. If you don’t have this possibility in your particular camera, then write down all the options that you want to make sure are properly set on a 3 × 5 card and throw it in your camera bag. That way you can quickly review it before the photo-call as a checklist. Several of my older film cameras used to have the ISO setting on a small ring on the bottom of the lens and I shot more than one roll of film with an incorrect ISO setting, causing some trouble when it came time to process the film.
Meter-Priority Practice Session
- 1. Let’s begin by utilizing your camera in full manual mode. Work out how to adjust the aperture and shutter speed while looking through the viewfinder so that you aren’t “chimping” or fumbling about to find the right dials and buttons. Once you are familiar with those settings, and can easily and quickly manipulate them to get your exposure on the meter, then you can move on.
- 2. Using the aperture-priority function, try setting several different apertures, and shoot a few setups with each while allowing the camera to select the shutter speed. What happens if the aperture that you have chosen is forcing the camera to shoot with a shutter speed that it can’t use? Is there a flashing indicator somewhere in the viewfinder that alerts you to this concern so that you can consider adjusting the aperture to allow the camera to shoot with a shutter speed it is capable of?
- 3. Using the shutter speed priority mode, try setting a few different shutter speeds and shoot a few setups, while allowing the camera to select the aperture. The options for aperture are far more limited than the options for shutter speed, so you are much more likely to run into a situation where your lens just can’t open up or close down any further than it already has. What sort of indicator does your camera show inside the viewfinder to alert you to this concern?
- 4. If you have the possibility of setting shooting menu banks, then try designating one for your stage use, set it up with the options you want, and then flip back and forth between it and normal use. Make sure that the settings are all changing to what you need for your theatrical photography.