
C H A P T E R 7
![]()
Encountering the Monsters in the Cave
Looking at Views in a Different View
This is it. We are about to enter the cave of monsters and dragons. You will need all your courage, and you will need to muster bravery beyond anything you have ever imagined.
Views are scary beasts. They look all cuddly and sweet when you look at them through the web interface, but beneath the surface they’re dragons. Step once in the wrong direction, and you will be spending the better part of eternity trying to figure out what went wrong. And designer support? Hah! Never!
To be honest, views are not all that bad. Granted, they are the most elusive and complex part of any SharePoint solution, but how many gazillion SharePoint installations are there, and how often do you hear in the news that a raging horde of mentally unstable SharePoint developers have stormed Redmond demanding their sanity back?
What most people do not realize is that they fear only the unknown. Having come as far as we have on our journey, we know that once we are armed with the proper amount of knowledge, stoic discipline, a desire to master new things, and a bit of fun, we are able to climb any mountain and face any problem.
So, with those comforting thoughts, I think we are as ready as we will ever be.
Mission Statement
Here is what we want to accomplish. Keep this in mind as we walk deeper into the cave.
Our goal is to understand enough of views to be able to create a list with a custom view from scratch. Because we studied lists in great detail in the previous chapter, we’ll focus solely on views here.
The second goal of this chapter is to explore some of the wealth of possibilities that views provide in order to start imagining all the cool things we can do to make SharePoint provide a great user experience. I won’t be able to cover every detail of every element, but the topics covered here should get you started and perhaps curious enough to investigate a bit on your own.
The third goal is to keep the complexity down and focus on those aspects of views that yield the highest reward. That means we need to leave some treasure behind, but it also means we are more efficient in our learning.
Our final goal will be to come out alive. That may prove more difficult than you realize.
As I stand before the opening of the cave, I cannot help but feel a bit scared. There are plenty of tracks leading into the cave but few, if any, leading out. The stench of sulfur and rotting flesh feels like a wall, trying to prevent entry, but I know I must go inside and face whatever menace rests within. I take one quick look over my equipment before glancing up at the sun, perhaps for the final time….
What Are Views Anyway?
Views are the display of list data, usually in an HTML page. You know when you click a list and you get a list of all the items in that list? That list of items is a view. The example in Figure 7-1 should be a familiar view to everyone. If not, well, you might be in the wrong book.
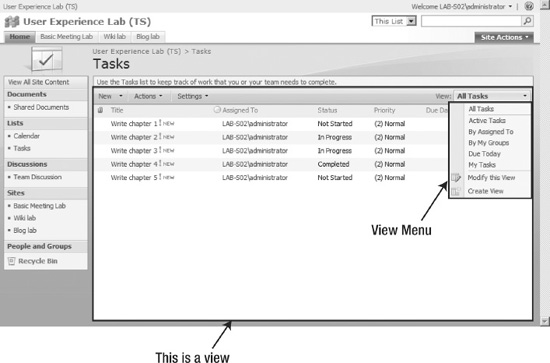
Figure 7-1. View of a list
You have probably created some of these views already through the web interface. If not, the following section is a quick run-through of how it’s done. Oh, and you might want to pay attention even if you have created views before, because I will be referring to these steps later.
A Web Interface with a View
Start with any list you have created. I’m going with a custom list of books that I created on the Team Site lab of my root site, so any screenshots may be different from what you see if you choose another list. If you want to set up your list like mine, do the following:
- Create a new custom list.
- Add a choice column called Genre, and add a few book genres such as sci-fi, horror, mystery, drama, and children.
- Add a number column titled Sales, and since we do not sell fractions of books, just change the number of decimals to 0. Make no other modifications.
- Finally, add some sample data. Find some random book titles on the Web, or just make up your own titles. Fill in random data for the remaining columns; we don’t need anything fancy.
Now you should be ready to follow the examples. Go into the list or library settings, and scroll all the way down where you will find the views that are already defined for the list or library. Hit Create View. You will be presented with two choices, either to create a view from scratch by selecting a view type or to start from an existing view.
The existing view list is created from all existing views, with a few modifications. Views that have the Hidden, EditorModified, or ReadOnlyView attributes set to True or that have an empty Title will not display.
We want to start from the beginning, so select the Standard view to start with a fresh view. Get it? Fresh view? The view puns will drive you mad.
![]() Note There is no way to add view types, but you can add view styles, which is something completely different—and, might I mention, not particularly fun or practical.
Note There is no way to add view types, but you can add view styles, which is something completely different—and, might I mention, not particularly fun or practical.
Once you have clicked the Standard view, you get to the Create View page, which, for the simplest examples, requires very little of you. You input a name, decide whether this is a personal or public view, and select the columns to display and their order, and that’s basically all you need to do.
The more advanced views require a bit more effort, but not much. If you want to add sorting, just select the columns on which to sort and then the sorting direction. For filtering, you select a column and then enter a value on which to filter the view. You can even add more filtering and sorting columns to make sure you display exactly what you want.
Want to limit the number of items in a view? Look toward the bottom of the available settings, and I am sure you can guess what “Number of items to display” means. Note that you can opt to display items in batches of a size or just limit the total number of items in a view. The latter is useful if you want to make a “Top 10 things to do for your cat” list, where numbers beyond 10 would ruin the point.
Grouping is also a nice option. Let’s say you have a list of books, sorted by published date. You might want to categorize the books to list books in a certain genre. To do so, expand the Group By setting, select the column on which to group items, decide whether to expand groups by default, and finally set how many groups should be present on each page. Figure 7-2 shows a basic view with grouping added.
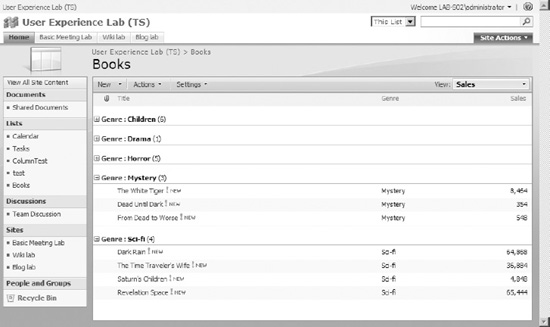
Figure 7-2. Your run-of-the-mill grouping
OK, you get the point here, and since you are a somewhat seasoned SharePoint user, these options should be familiar.
Somehow the cave didn’t seem so dangerous. There were some smaller monsters lurking right inside the entrance but nothing that could warrant the fear that even the bravest warrior had for this place.
What was all the commotion? Perhaps the big dragon at the end was dead. Perhaps no one had tried to enter the cave in a long time. How long could a dragon live without food? There might still be hope….
The next few settings for a view require a bit more explanation, and because these will be explored in code later, it pays to be attentive right about now.
The Totals setting allows you to create aggregated views. Let’s go back to your book list again and look at the Sales column for each of the book titles. By setting up an aggregate view, you will get a sum for all the book sales. This is even more useful if you have a grouped view since the aggregation will sum for each group as well. Take a look at Figure 7-3 for how this would look by default.
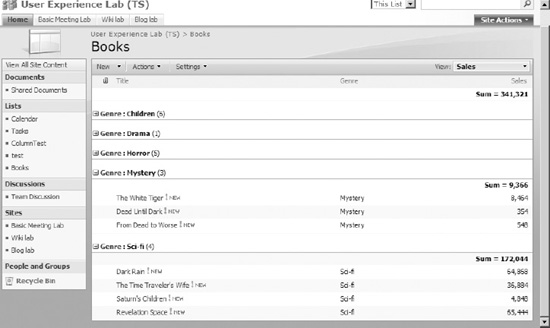
Figure 7-3. Grouping and totals view
You are not just limited to sums either; you can do averages, counts, variance, and other aggregations. Note that the available aggregations vary by field type. You cannot average a text field, for instance.
Next up are the view styles. View styles are sort of nice because they allow you to really change the user experience quickly. There are some built-in styles that you might explore, but basically there is little here that we cannot do in normal view development.
![]() Note View styles are a bit old-fashioned and will not be covered in this book.
Note View styles are a bit old-fashioned and will not be covered in this book.
The folder settings on the view give you an option to not display items inside a folder. If your name is Merlin and you’ve had dealings with a guy named Arthur, you may recall that we talked about folders being content types in the next chapter. For the rest of us, we will investigate folders more in Chapter 8.
For the impatient, you just need to know that folders are items, just like anything else, that are based on a certain content type. Although it may appear that items are stored in a folder, it is more accurate to say that items are connected to a folder. All items, including folders, are stored in the same spot, regardless of folder structure.
Finally, you can choose to make this view a mobile view, which in essence strips away a lot of the navigation and pretty stuff to make a low-bandwidth, low-screen-real-estate version of the view. If you want to make your new view the default mobile view, you can do so.
Fine, we’re done. These are the options we have when creating a view through the web interface. How hard can it be to do this in CAML?
No, this was way too easy. Something didn’t smell right, and it wasn’t the sulfur or the pieces of dead animals littering the floor of the cavern. No, this had the foul stench of trap.
Checking Your Gear
Before we go any further, it can help to have a basic list set up so that we can experiment a bit with the different elements. This basic list will be expanded during the course of our cave exploration.
- Start with the custom
MyListTemplatelist feature you created in Chapter 6. If you didn’t create that feature, you should do so now. - Make sure you have IntelliSense working. Developing views without IntelliSense is like parachuting without a parachute.
- Deploy your list to one of your lab sites. I am using the Team Site lab, but you can choose whichever lab you like. Verify that your list gets created. If not, go back to step 1.
A Simple View of the World
Up to now we have always started out by looking at an existing piece of code from the out-of-the-box SharePoint installation. However, most of the views that ship with SharePoint are so complex that it will probably make you dizzy just looking at the code and trying to make heads and tails of it; so, we should start with something simpler. And what could be simpler than starting out with our own view with nothing but what we really, really need?
Start with the customized custom list template that you should have made by now. In your schema.xml file, look at the Views section, but ignore the views that are there already. What we want to do is add our own view, so close the existing views, and start with a simple piece of code:
<View BaseViewID="2"

      DisplayName="Custom View"

      Type="HTML"

      SetupPath="pagesviewpage.aspx"

      WebPartZoneID="Main"

      Url="CustomView.aspx">

</View>
That is really all you need to create a view. Build your solution, which should include a deployment if you have followed the instructions from Chapter 3, and create a new list based on your template if you didn’t do this earlier.
The attributes to the view element are not very intimidating either. Your BaseViewId is the Id of the field, used to address this particular view, such as when you want to add your view to a page in a site definition. The DisplayName is, as always, the name shown to users of the view. Type can be set to HTML, Pivot, or Chart to specify, well, what type of view this is.
![]() Tip When adding a view of a list to a web part page directly from the web interface, SharePoint looks for a view with a
Tip When adding a view of a list to a web part page directly from the web interface, SharePoint looks for a view with a BaseViewId of 0. As such, if you want your users to be able to add a view of your list to a web part page, make sure you have a view with a BaseViewId of 0.
The next three attributes define how the view will be built into a page. SetupPath works like it does in modules and other places in SharePoint and defines a path, relative to [12], to a file from which the page holding the view will be created. The page itself may be a web part page, but you can also use regular pages. WebPartZoneID specifies in which web part zone on the page the view will be placed. This assumes that you have SetupPath pointing to a web part page.
Url is simply the list-relative URL where the final page will be placed. Note the fact that the URL is relative to the list. So, in our example, we will create a view, called Custom View, that will be placed inside the Main web part zone of a page. That page will be created based on the [12]pagesviewpage.aspx page and stored at lists/[MyCustomList]/CustomView.aspx.
Of course, our view does not actually contain anything, so it’s a rather pointless view at this time. We need to add some content. First, let’s add a toolbar to make sure we can add new items and get access to the actions and settings menus:
<View BaseViewID="2"

      DisplayName="Custom View"

      Type="HTML"

      SetupPath="pagesviewpage.aspx"

      WebPartZoneID="Main"

      Url="CustomView.aspx">

  <Toolbar Type="Standard"/>

</View>
By adding the Toolbar child element, at least now we have an easy way of doing basic list operations. Figure 7-4 shows the result of the previous code.
Figure 7-4. View with a standard toolbar
The cavern was quiet. Too quiet. The last stretch had been too easy. Not even the smaller monsters were roaming around; even the sound of dripping water had stopped. Now there was only silence.
Wait! What’s that noise? Something is coming this way—in a hurry by the sound of it. Time to quaff that potion of high alert.
![]() Tip When you are developing views, you should know that modifying the views is indeed possible without re-creating the list for each change. Update and deploy your new list template, and do an
Tip When you are developing views, you should know that modifying the views is indeed possible without re-creating the list for each change. Update and deploy your new list template, and do an IISReset before reloading your view. This way you do not have to delete sample data and create a new list for each change you make.
Toolbars
It is time to wake up. If you are reading this in a tired state, you might want to take a break. You are about to face your first serious challenge. Get a cup of coffee going. If you don’t drink coffee, now would be a great time to start.
View toolbars come in two distinct flavors. The first flavor, the standard toolbar, should be well known; you can see it in all standard views, and it contains the New button and Site Actions and Site Settings menus.
The second flavor is called a freeform toolbar, and it holds some extremely powerful modification options. However, to tap into all that power, you need to have a deep understanding of CAML. Figure 7-5 shows a very familiar use of the freeform toolbar.
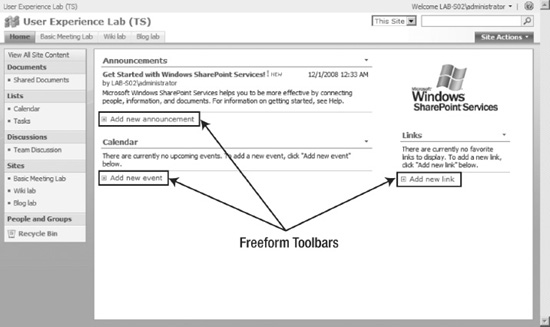
Figure 7-5. Yup, those are toolbars.
The nature of the freeform toolbar is that you can do mostly whatever you want. And, to be able to do whatever you want, you need a massive amount of options, which is exactly what freeform toolbars give you.
To start, let’s add a link to the site settings for a list. Figure 7-6 shows what our end result should be.
Figure 7-6. Our sample freeform toolbar
To accomplish this rather simple task, we need to get into what is called the view schema. The view schema is the part of CAML that handles views, including giving us the tools we need to customize our freeform toolbar. We will explore the view schema plenty more later in this chapter, but this little bit of code will get our feet wet.
Replace your <Toolbar Type="Standard"/> with the following code:
<Toolbar Type="FreeForm">

  <HTML><![CDATA[<A HREF="]]></HTML>

  <HttpVDir/>

  <HTML><![CDATA[/_layouts/ListEdit.aspx?List=]]></HTML>

  <List/>

  <HTML><![CDATA[">List settings for ]]></HTML>

  <ListProperty Select="Title"/>

  <HTML><![CDATA[</a>]]></HTML>

</Toolbar>
The HTML element tags are used to output plain HTML. Since XML cannot contain HTML, we need to wrap our HTML code in a CDATA child element.
The HttpVDir element outputs the path to the root of our current site. In my case, that would be http://lab-s02:10000/ for the root Team Site lab.
![]() Note The
Note The HttpVDir documentation includes two attributes that are not present in the schema, meaning you will not get IntelliSense. These attributes, URLEncode and URLEncodeAsURL, will encode the output to a URL-safe string. If you add these attributes, Visual Studio will complain that the attributes are not defined, but you can safely ignore this warning because the attributes do work. Refer to the documentation for more details on these attributes.
The List element outputs the GUID of the current list, in other words, the list to which the view is bound.
The ListProperty outputs various properties of the list. It is used here to output the title of our list.
Together these elements output a string resembling a link to the URL for the list settings:
<A HREF="http://lab-s02:10000/_layouts/ListEdit.aspx?List=

{0AD6263B-6616-4BEA-850B-F30E18C8E97A}">List settings for Testlist</a>
As mentioned, we will get much more experience with the view schema during the course of this chapter. For now just replace your new toolbar with the original standard toolbar:
<Toolbar Type="Standard"/>OK, that was a bit worse. That last monster proved that there really is a reason to be attentive in this place. If this was a preview of what is to come, then fighting the dragon at the end may be too hard.
Asking the Right Questions
Before we actually get to fill our new view with wonderful content, we need to know what that content should be. For this we need to look to another schema, the query schema.
You may already be familiar with the query schema if you have worked with extracting list items using the object model. The SPList.GetItems accepts an SPQuery object, which in turn has a Query property. That Query property is a string formatted according to the query schema.
A query schema string resembles SQL in structure and functionality and is used to filter, order, and group items.
All filtering is done in the Where child element inside the Query element. A simple filtering query schema string might look like this:
<Where>

 <Eq>

   <FieldRef Name='Title'/>

   <Value Type='Text'>My title</Value>

 </Eq>

</Where>
This query string would show items where the Title equals My title. You might remember this sample from Chapter 2.
To use the query schema in our view, we would add a valid query string to the Query element of our view. For example:
<View BaseViewID="2"

      DefaultView="TRUE"

      DisplayName="Custom View"

      Type="HTML"

      SetupPath="pagesviewpage.aspx"

      WebPartZoneID="Main"

      Url="CustomView.aspx"

      >

  <Query>

    <Where>

      <Eq>

        <FieldRef Name='Title'/>

        <Value Type='Text'>My title</Value>

      </Eq>

    </Where>

  </Query>

</View>
The query string can be much more complex than this. First, we have many more filtering methods. Table 7-1 shows the different comparison operators we can use to filter the items that should appear in our view.
Table 7-1. Comparison Operators
Query Element |
Description |
Eq |
Equals |
Neq |
Not equal |
BeginsWith |
Begins with |
Contains |
Contains |
Geq |
Greater than or equal |
Gt |
Greater than |
Leq |
Less than or equal |
Lt |
Less than |
IsNull |
Empty/null value |
IsNotNull |
Nonempty value |
DateRangesOverlap |
Used to check whether a recurring event is running at a given date |
The IsNull and IsNotNull operators have only a single child element, a FieldRef element, which points to the column name to check:
<IsNotNull>

 <FieldRef Name="Title"/>

</IsNotNull>
All the remaining elements have both a FieldRef element and a Value element, as shown in the My title samples. The Value element also has an attribute defining the type of value, such as Text or DateTime.
In addition to filtering, you can also sort and group with a query string using the elements OrderBy and GroupBy:
<Query>

 <Where>

  <Eq>

   <FieldRef Name='Title'/>

    <Value Type='Text'>My title</Value>

    </Eq>

 </Where>

 <OrderBy>

  <FieldRef Name='Created'/>

 </OrderBy>

 <GroupBy>

  <FieldRef Name='Category'/>

 </GroupBy>

</Query>
Both the OrderBy and GroupBy elements take a FieldRef child element, but OrderBy can take multiple FieldRef elements to sort on more than one field. If you add more than one FieldRef to the OrderBy element, the multiple sorting is done in the order the FieldRef elements are defined. For example:
This example will first sort the items on the Category column and on the Created column.
One thing to be aware of is that logical elements, such as And and Or, work only for two elements at a time. For instance, if you wanted to have three Or elements, you would need to do this:
<Query>

  <Where>

    <Or>

      <Eq>

        <FieldRef Name="Title"/>

        <Value>Title 1</Value>

      </Eq>

      <Or>

        <Eq>

          <FieldRef Name="Title"/>

          <Value>Title 2</Value>

        </Eq>

        <Eq>

          <FieldRef Name="Title"/>

          <Value>Title 3</Value>

        </Eq>

      </Or>

    </Or>

  </Where>

</Query>
This gets really tricky when you start doing complex queries like Title=t1 OR (Title=t2 AND Date>01.01.2009) OR Title=t3. Tools such as the U2U CAML Query Builder discussed in Chapter 2 can help tremendously in building complex queries.
A Slightly More Complex View of the World
It is time to get serious. If I am to learn the secrets of the cave and defeat both the dragon and my own fear, I need to muster my strength….
At this point, we have a slightly simplified view of the world, so we need to add a bit more complexity to begin getting some tangible results. Your view should look like this:
<View BaseViewID="2"

      DisplayName="Custom View"

      Type="HTML"

      SetupPath="pagesviewpage.aspx"
      WebPartZoneID="Main"

      Url="CustomView.aspx">

  <Toolbar Type="Standard"/>

</View>
You may have added your own toolbar or a query string, but these will not affect our further expansion, so feel free to leave them in.
Basics of View Construction
The visual interface of a view consists of three sections: the header, body, and footer, conveniently named ViewHeader, ViewBody, and ViewFooter. In addition, we need to inform the view about which columns should be included in the view, and this is done with the ViewFields element and its child element, FieldRef.
Each ViewHeader, ViewBody, and ViewFooter element contains view schema CAML just like our freeform toolbar, so you should pick up on the basics quickly.
To investigate this, let’s create an extremely simple view:
<View BaseViewID="2"

      DefaultView="TRUE"

      DisplayName="Custom View"

      Type="HTML"

      SetupPath="pagesviewpage.aspx"

      WebPartZoneID="Main"

      Url="CustomView.aspx"

>

  <Toolbar Type="Standard"/>

  <ViewFields>

    <FieldRef Name="Title"/>

  </ViewFields>

  <ViewHeader>

    <HTML><![CDATA[<table id="testid"><tr><td>My custom view</td></tr>]]></HTML>

  </ViewHeader>

  <ViewBody></ViewBody>

  <ViewFooter>

    <HTML><![CDATA[</table>]]></HTML>

  </ViewFooter>

</View>
As you can see, I have added the ViewFields, ViewHeader, ViewBody, and ViewFooter elements. I have also added a DefaultView attribute to the View root element, but that’s just because it saves me a few clicks when creating the new list.
The ViewFields sections contain FieldRef elements pointing to the columns with which our view will work. When we later look at the Fields CAML element, you should know that the ViewFields element contains the columns through which Fields and other column iterators will iterate. Note that you do not necessarily display all columns in the ViewFields section; the View part of the element refers to our custom view, not the visibility of columns.
![]() Tip If you add or modify the
Tip If you add or modify the ViewFields section of your schema.xml file, you may not get your new fields to appear in the view without re-creating the entire list. To fix this, you can simply set up the fields using the web interface.
At this point, the ViewBody is empty. This element will be more complex later, but for now I just wanted to create the outline so that I can refer to the elements rather than posting the entire view all the time.
Before we get into creating the header, body, and footer, I want to mention a couple of supporting elements and concepts that are important for creating the user experience.
ViewEmpty
When you deploy your list template and create a list off that template, you will not see the “My custom view” table cell. This is because the list does not have any items. SharePoint gives us a dedicated element to use when the list is empty, called ViewEmpty. So, if you want to utilize this functionality, and personally I think you should at least let your users know the list is empty, add the ViewEmpty element to your view and compare your results to Figure 7-7:
<ViewEmpty>

 <HTML><![CDATA[This view does not contain any items]]></HTML>

</ViewEmpty>
Of course, you are free to make this as complex as you like, perhaps adding links for adding new items or detailing information about filters that might prevent your items from appearing.
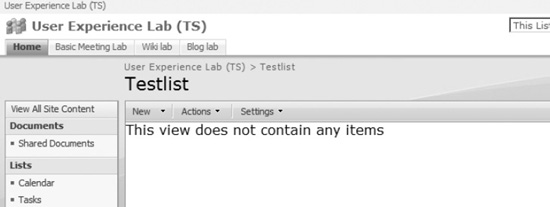
Figure 7-7. View if empty
RowLimit and Other Paging Options
When you create a view, you might want to limit the number of items displayed at a time. For this you would use the RowLimit element. This element is the starting point for a range of paging options, but let’s keep it simple from the start:
<RowLimit>2</RowLimit>This code will limit the number of items in the view to two, which might be useful for showing the top two elements of a view and leaving the remaining items for other views.
If you have set the RowLimit element but the number of items that would otherwise be listed exceeds RowLimit, you have two options. Either you implement paging, meaning people can go the next page or items, or you do not implement paging, meaning there is no way to show the next items in the list.
The latter, no paging, is the simplest option, since all you need to do is add the Paged="False" attribute to your RowLimit element. If you do so, you can also define the RowLimitExceeded element to output information about the existence of more items that will not be shown:
<RowLimit Paged="FALSE">2</RowLimit>

<RowLimitExceeded>

  <HTML><![CDATA[Haha, there are more items here, but I'm not going to show them to you]]></HTML>

</RowLimitExceeded>
Of course, you might opt to not be so cruel, but you get the point.
The other option, implementing paging, requires a bit more effort, but because we are the bold explorers that we are, we shun no hardship to get where we want to go.
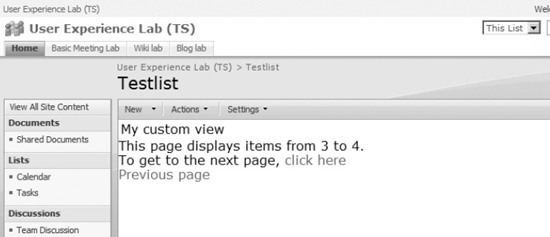
By adding the attribute Paged="True" to our RowLimit element, we need to define the PagedRowSet element as well. The PagedRowSet element is shown at the bottom of the view and introduces us to a useful but slightly confusing query schema element, the GetVar element.
The GetVar element allows us to get values from a variable, and the available variables depend on the context. For example, in the PagedRowSet element, we have four values we can get: PageFirstRow, PageLastRow, NextPageData, and PrevPageData. PageFirstRow and PageLastRow return the number of the first and last item on the current page, respectively. NextPageData and PrevPageData are dynamic strings that you can send to the page to get the next or previous page of items. Take a look at the following code:
<RowLimit Paged="TRUE">2</RowLimit>

<PagedRowset>

  <HTML><![CDATA[This page displays items from ]]></HTML>

  <GetVar Name="PageFirstRow"/>

  <HTML><![CDATA[ to ]]></HTML>

  <GetVar Name="PageLastRow"/>

  <HTML><![CDATA[.<br/> To get to the next page, <a href="?]]></HTML>

  <GetVar Name="NextPageData" />

  <HTML><![CDATA[">click here</a>]]></HTML>

</PagedRowset>
This piece of view schema CAML will render HTML like the following:
This page displays items from 1 to 2. To get to the next page, <a

href="?Paged=TRUE&p_ID=2&View=[GUID OF YOUR VIEW]&PageFirstRow=3">click here</a>Now, you may be tempted to add a link to the previous page to this code. For example:
<HTML><![CDATA[<br/><a href="?]]></HTML>

<GetVar Name="PrevPageData" />

<HTML><![CDATA[">Previous page</a>]]></HTML>
However, before you do that, consider what happens on the first page; you would have a link to the previous page that would link to only ?, since there is no previous page at all. The PrevPageData would be empty.
So, in order to detect whether we should link to the previous page, it makes sense to check whether the PrevPageData contains anything. To do such checks or any check in view CAML, we can use one of several conditional elements. Let’s take a look at how conditional elements work.
Conditional Elements
To render part of the view, such as the link to the previous page of a paged view, only if a specific condition exists, the view schema gives you several options. Table 7-2 lists the conditional elements.
Table 7-2. Conditional Elements in View Schema
| Element | Child Elements | Description |
IfEqual |
Expr1, Expr2, Then, Else |
Compares Expr1 and Expr2 and performs Then if the values are equal. Otherwise, performs Else. |
IfSubString |
Expr1, Expr2, Then, Else |
Checks to see whether Expr1 is contained in Expr2 and, if so, performs Then. Otherwise, performs Else. |
IfNeg |
Expr1, Expr2 |
If Expr1 is a negative value, then Expr1 is displayed. Otherwise, Expr2 is displayed. |
IfNew |
None |
If item is created today, displays view schema contents. |
IfHasRights |
RightsChoices/RightsGroup, Then |
Checks to see whether the current user has certain permissions and, if so, performs Then. |
Switch |
Expr, Case, Default |
Works like a normal Switch/Case. Checks the Expr value against all Case values and performs the Case where the Expr matches. If no Case matches, performs Default. |
FieldSwitch |
Expr, Case, Default |
Same as Switch but Expr is evaluated only once per view display. This is useful if you want to do Switch on a value that does not change during the rendering of the view, such as a column. |
These conditional elements all have their uses, and we will see more examples of how these are used during the course of this chapter. For now, let’s make some code to display only the Previous page link if the PrevPageData is empty. I will use a Switch element for this, but you might as well use IfEqual.
Add the following to your PagedRowset element:
<Switch>

 <Expr>

  <GetVar Name="PrevPageData" />

 </Expr>

 <Case Value=""></Case>

 <Default>

  <HTML><![CDATA[<br/><a href="?]]></HTML>

  <GetVar Name="PrevPageData" />

  <HTML><![CDATA[">Previous page</a>]]></HTML>

 </Default>

</Switch>
In the previous code, we check the value of the PrevPageData variable. If that value is empty (in other words, if Value is ""), we do nothing. Otherwise (if the PrePageData does contain something), we display the CAML that is inside the Default element (see Figure 7-8).
You can of course do the same thing with the Next link; just exchange the GetVar element to check NextPageData instead. That way you remove the Next link from the last page of the row set. For the sake of space, however, I will leave that as an exercise for you.
ViewHeader, ViewBody, and ViewFooter
We are still not seeing any actual data here because we have not added anything to the header, body, and footer elements, at least nothing useful. The time to change that is now upon us.
Your ViewHeader, ViewBody, and ViewFooter are responsible for creating the actual item listings. You use view schema CAML in all of these elements, just like you saw with the other elements this far. Again, let’s start simple, just to get the feel for how we will work.
Replace the ViewHeader you have created with the following code:
<ViewHeader>

  <HTML><![CDATA[My custom view<br/><table border=”1” id="testid"><tr>]]></HTML>

  <Fields>

    <HTML><![CDATA[<td style="font-weight: bold;">]]></HTML>

    <Field/>

    <HTML><![CDATA[</td>]]></HTML>

  </Fields>

  <HTML><![CDATA[</tr>]]></HTML>

</ViewHeader>
What we are doing here is adding a table and starting the first row in the first HTML element. Then we use an element called Fields, which is basically a foreach loop for each column defined in the ViewFields element. Whatever code is placed inside the Fields element is repeated for each column.
Note the use of the element Field. This element will output the column name when used in the header or footer of a view but will output the value of the column if used in the body. Actually, that is not completely true; you can decide what will be rendered to some extent, but we will have to look into that when we investigate fields and columns in Chapter 9. Remember Slartibartfast? When I say Slartibartfast in Chapter 9, remember that Fields almost outputs the column title when used in ViewHeader.
Finally, we finish the table row in the last HTML element.
Next we want to look at the ViewFooter element. The only thing we really need to do is to finish the table that we start in the ViewHeader:
<ViewFooter>

  <HTML><![CDATA[</table>]]></HTML>

</ViewFooter>
Finally, to complete our very simple view, we want to fill the ViewBody with some content. What you need to remember here is that the ViewBody is repeated for each item in the view. As such, we need to start a new table row, run the Fields iterator, and then finish the table row.
Add this to your ViewBody element:
<ViewBody>

  <HTML><![CDATA[<tr>]]></HTML>

  <Fields>

    <HTML><![CDATA[<td>]]></HTML>

    <Field/>

    <HTML><![CDATA[</td>]]></HTML>

  </Fields>

  <HTML><![CDATA[</tr>]]></HTML>

</ViewBody>
Again, the Fields element iterates all the columns in the view, but this time its child Field element outputs the value of the column, not the column name.
That should be it. Build and create a new list based on your list template. You might want to add another FieldRef to the ViewFields section just to better see how your view gets constructed. Figure 7-9 shows a sample output where I have included the Created column in the ViewFields element.
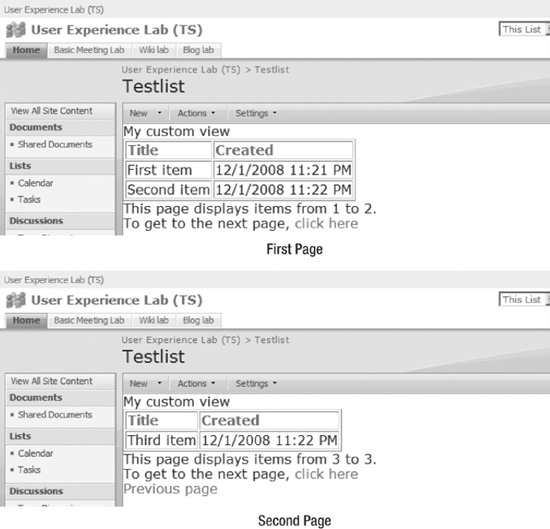
Figure 7-9. Our first view of the world
Yeah, I know, it looks horrible. Never hire me to do design work.
For simply listing the items in a list, this view will suffice, at least when you apply some pretty visual design to it. However, we might want to add a bit of functionality, such as being able to click the title to display the item.
To accomplish this, we would need to check for each column if we are currently on the Title column and, if so, add a link. The simple choice here is to use a Switch.
Why a Switch rather than an IfEquals? Well, we might want to add further column-specific functionality, such as putting a link to a calendar for date/time columns or adding a link to an item in a lookup column.
So, replace your current Fields content with the following code:
<Switch>

  <Expr>

    <Property Select="Name"/>

  </Expr>

  <Case Value="Title">

    <HTML><![CDATA[<td><a href="dispform.aspx?ID=]]></HTML>

    <Column Name="ID"/>

    <HTML><![CDATA[">]]></HTML>

    <Field/>

    <HTML><![CDATA[</a></td>]]></HTML>

  </Case>

  <Default>

    <HTML><![CDATA[<td>]]></HTML>

    <Field/>

    <HTML><![CDATA[</td>]]></HTML>

  </Default>

</Switch>
What we are doing here is switching on Property Name to do something special if that is Title. Remember that we are doing this in the Fields element, meaning the Property element is looking at the columns, not the item.
We also introduce a new element here, Column. The Column element simply gives us the value of a given column of an item, in our case the ID of the item, which we need to pass along to the dispform.aspx page.
However, what if we are not using dispform.aspx as the display form? We saw in the forest of lists that we can set our display form to any form. Hard-coding the URL is not very flexible.
URL
To help solve our little problem, the view schema includes an ill-titled element called URL. The function of the URL element is to return the URL of list forms.
The URL element has two parameters, cmd and NoID. The NoID attribute can be set to false to return the URL without the added ID parameter, but by default it will return the entire string including the ID parameter.
The cmd attribute is used to set which form URL should be returned, either Display, DisplayHead, Edit, New, PreviewDisplay, PreviewEdit, or PreviewNew. The default is Display, so if all you want to do is get the URL of the display form of the current item, all you need to do is add <URL/>.
Knowing this, we can improve our previous code by replacing the first three lines of the Case element:
[…]

<Case Value="Title">

  <HTML><![CDATA[<td><a href="]]></HTML>
   <URL/>

   <HTML><![CDATA[">]]></HTML>

  <Field/>

[…]
And if we wanted to link to the edit form instead, our <URL/> element would be changed to this:
<URL Cmd="Edit"/>The pace quickened. The adrenaline was pumping, keeping me on the tip of my toes all the time. If the dragon didn’t kill me, I would probably die of fatigue, and even if I made it out of this alive, I knew I would never be the same again.
It was darker here; it was almost like the walls moved closer with every step. I could hear something moving long before I could see what it was. Barely alive now but more confident than ever, I had to learn the truth of what…thing…could dwell in a place like this.
Advancing Our Perspective
Now that we know how to create a basic view, we’ll start exploring some more advanced topics. In this section, I will cover sorting, grouping, permissions, and some other topics that may not be used on every view.
You should consider these topics more like teasers than full disclosures of all the available options. As mentioned, going into detail on every single aspect of views would simply take up too much time and would require a completely separate book.
With that in mind, let’s move on to the fun stuff.
Sorting It All Out
We know that we can use the query schema CAML to add static sorting to our view. If you want to do dynamic sorting, however, you need to apply some more effort and learn a few new things.
If you have followed the examples so far, you may have noticed that the Field element in the ViewHeader does not actually render the field title but rather a much more complex link that includes some code to do sorting by clicking the column name. This code is just plain horrible and, besides including nonvalidating attributes, does not work unless we implement some additional JavaScript code.
This makes sense if you work with the out-of-the-box views, but you didn’t buy this book to learn how to leave the user experience alone, now did you? We will look a bit deeper into what actually goes on with the additional code in Chapter 9.
To avoid this approach, we need to modify our column headings in the ViewHeader element a bit and utilize a very useful element called FieldSortParams that handles the creation of the parameters required to sort the list. Exchange your current ViewHeader’s Fields element with this piece of code:
<ViewHeader>

…

<Fields>

 <HTML><![CDATA[<td style="font-weight: bold;"><a href="?]]></HTML>

 <FieldSortParams/>

 <HTML><![CDATA[">]]></HTML>

 <Property Select="DisplayName" HTMLEncode="TRUE"/>

 <HTML><![CDATA[</a></td>]]></HTML>

 </Fields>

</ViewHeader>
A really cool thing about the FieldSortParams is that it automatically alternates between sorting ascending and descending when you click to sort. The first click sorts ascending, and the second click sorts descending, and we don’t have to lift a finger.
Well, actually, we have to lift a finger to click the mouse button....
![]() Caution Although
Caution Although FieldSortParams seems easy to use, remember that what we are doing here is simply linking to ?<FieldSortParams>, which will give you problems if your current page already includes parameters and thus a ?. You will want to add some logic to detect this situation in order to create a stable and flexible link.
![]() Tip Pay attention to the earlier caution; if you ignore it, you will get whacked by chaos and errors.
Tip Pay attention to the earlier caution; if you ignore it, you will get whacked by chaos and errors.
Grouping
Adding grouping to our list is a bit more complex, largely because SharePoint assumes a bit about how we design our views. Check out the sidebar “The Downfall of Fair Play” for more information. Basically, you need to work with tables for your layout.
To add grouping, you need to work with two new elements, the GroupHeader and GroupFooter elements, which will be displayed before and after each group. You also need to modify your Query element to include a GroupBy element, which in turn needs a FieldRef pointing to the column by which you want to group.
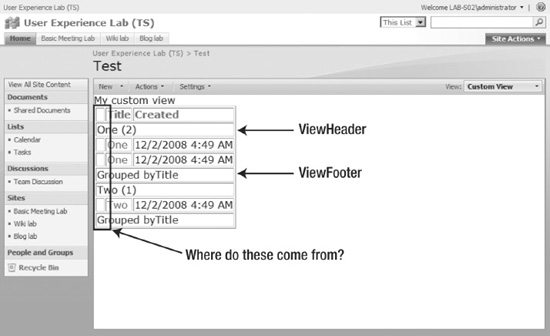
Figure 7-10. An extra TD element?
When you add grouping to your view, SharePoint handles most of the magic required to group your items together. This magic includes the grouping and intragroup sorting as well as counting and other necessary functions. All we need to do is add descriptive headers and footers to our respective GroupXXX elements.
Try adding this to your view, after adding the GroupBy element to your Query element:
<Query>

  <GroupBy>

    <FieldRef Name="Title"/>

  </GroupBy>

</Query>

<GroupByHeader>

  <HTML><![CDATA[<tr><td colspan="3">]]></HTML>

  <GetVar Name="GroupByValue" />

  <HTML><![CDATA[</td></tr>]]></HTML>

</GroupByHeader>

<GroupByFooter>

  <HTML><![CDATA[<tr><td colspan="3"><hr>]]></HTML>

  <HTML><![CDATA[</td></tr>]]></HTML>

</GroupByFooter>
Your resulting view should resemble Figure 7-11.
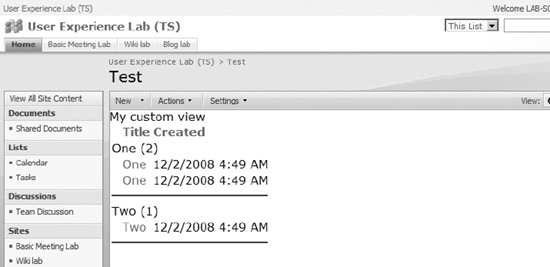
Figure 7-11. Grouping added to a view
![]() Note I’ve removed
Note I’ve removed border="1" from the table in Figure 7-11. I just get so sad when I am constantly reminded of the way GroupHeader and GroupFooter are implemented.
The GroupHeader and GroupFooter elements have a few noteworthy variables we can get by using the GetVar element. The GroupByValue that we used in the previous example returns the group value and the number of items within the group. The GroupByField returns the name of the field used for grouping. Again, finding all the different GetVar variables is a bit of a challenge, and in this case the out-of-the-box SharePoint views are your best bet.
Permissions and Security Trimming
SharePoint 3 is great for security trimming information and links. Compared to previous versions, you no longer see links to items or functions that you cannot access. The truth, however, is that in many cases you, as a developer, need to implement that security trimming yourself.
Let’s say we wanted to add a link to edit an item in our view. You might go ahead and add something like this to your ViewBody:
<HTML><![CDATA[<a href="]]></HTML>

<URL Cmd="Edit"/>

<HTML><![CDATA["> (Edit item)</a>]]></HTML>
This would render a link to editing the item, but that link would be present for everyone, regardless of their permissions. Take a look at Figure 7-12 for how this might appear.
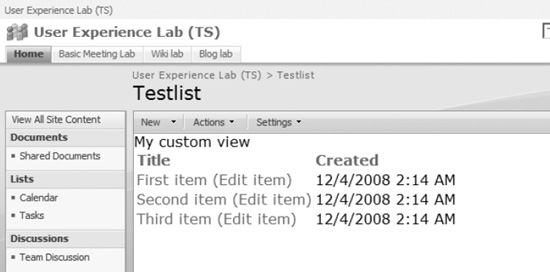
Figure 7-12. Added link to edit item
If a user does not have permissions, however, the user will get the famous “Error: Access is denied” message when they click the link. Although secure enough, this is hardly a great user experience.
To improve this, we can edit the view CAML and use an element called IfHasRights that allows us to show information only if a user has certain permissions. The IfHasRights has two child elements, the RightsChoices and a Then, with the RightsChoices element having additional child elements called RightsGroup.
I think this will be easier to understand if we look at an example:
<IfHasRights>

  <RightsChoices>

    <RightsGroup PermEditListItems="required" />

  </RightsChoices>

  <Then>

    <!-- Your view code here -->

  </Then>

</IfHasRights>
You can have multiple RightsGroup elements, and you can specify multiple permissions in a single RightsGroup. There is a difference; you would use one or the other depending on whether the user must have all or any of the permissions you demand.
If you specify multiple permissions inside a single RightsGroup, then the user must have all of the rights listed in the RightsGroup element:
<RightsChoices>

  <RightsGroup PermOpenItems="required" PermViewListItems="required"/>

</RightsChoices>
If you specify multiple RightsGroup elements, the user must have any of the permissions:
<RightsChoices>

  <RightsGroup PermOpenItems="required"/>

  <RightsGroup PermViewListItems="required"/>

</RightsChoices>
A rule to remember here is that a user must have all PermXXX attributes but can have any RightsGroup element.
One more thing is important here: when you edit your RightsGroup elements in Visual Studio, or any editor that gives you IntelliSense, you will get only two possible attributes in the RightsGroup element, as shown in Figure 7-13.
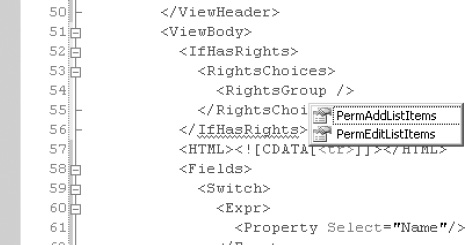
Figure 7-13. Lack of PermXXX attributes in IntelliSense
However, the actual list of permissions you can use to filter is much longer. Rather than list them all here, though, I’ll refer you to the official documentation at http://www.understandingsharepoint.com/url/10030; or you can google SharePoint rightsgroup.
Now it’s time to get back to our Edit item situation. We can now add a more meaningful link that shows up only if the user can actually edit items in the list. Add the following to your ViewBody:
<IfHasRights>

  <RightsChoices>

    <RightsGroup PermEditListItems="required"/>

  </RightsChoices>

  <Then>

    <HTML><![CDATA[<a href="]]></HTML>

    <URL Cmd="Edit"/>

    <HTML><![CDATA["> (Edit item)</a>]]></HTML>

  </Then>

</IfHasRights>
Now, when a user does not have permissions to edit items in the list, no link will appear, and your user will be less confused. Good thing!
Providing an Excerpt
When working with views of lists that contain large amounts of text, it may be useful to be able to limit the amount of text displayed. To help us with this, we have the Limit element and its child attribute, Column. Limit helps us by truncating the value of a column or any piece of text at a certain length. We can also add a MoreText attribute, which will be placed right where the text is truncated.
![]() Caution Although the documentation states that the
Caution Although the documentation states that the MoreText attribute is optional, I have seen a lot of problems when omitting this attribute. If you do not want any text to be appended, leave the attribute in but set it to an empty value: <Limit MoreText="" Len="30">.
In the following example, I have added a column called Description to the list template along with some sample text to the items in the list. Next, I added the following code:
<Case Value="Description">

  <HTML><![CDATA[<td>]]></HTML>

  <Limit MoreText="..." Len="30">

    <Column Name="Description"/>

  </Limit>

  <HTML><![CDATA[</td>]]></HTML>

</Case>
The result might look something like Figure 7-14.
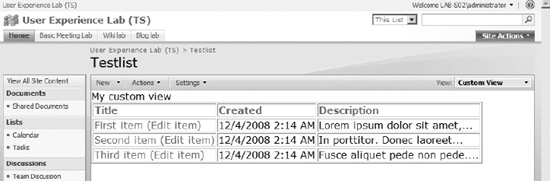
Figure 7-14. Parts of a column
Wrapping It All Up
OK, we’ve come this far, and we are still alive. That has to be good, right? Now that you have seen how to build a view from scratch, reading and understanding the out-of-the-box views is suddenly feasible.
And I would advise you to do so. Explore how the default views are created, see how a particular feature is implemented, and allow your curiosity to grant you knowledge. Try to imitate the behavior of a view without copying the code. Try improving on the default views by adding your own functionality.
With your newfound knowledge, I know that you are now ready to…
Face the Dragon
Finally, the last cavern. I knew what was waiting inside. I was prepared, or I was too tired to care. My weapons were as sharp as my attention. No longer did I fear the inevitable. If I never left this cave alive, I knew that I would go out fighting as best as I could.
I walked inside. I could hear the breathing of the beast that called this place its home. The darkness surrounded me on all sides, but I could easily see the contour of the mighty monster that had dealt death and pain to adventurers before me.
I walked forward, sword in hand, waiting for the dragon to notice me. One step at a time, trying to make as little noise as possible. I could feel the sweat on my brow. I could barely sense the pain in my hand from squeezing my sword too hard.
Suddenly the dragon awoke. The wind generated from the wings spreading was almost enough to knock me off my feet. A mighty roar followed as the beast yawned, its eyes glowing red as a setting sun and staring right at me. It opened its mouth as if to spew the fire that would scorch me to a crisp.
’Hello,’ it said. ’Nice of you to stop by. My name is Nigel, and I live in this cave. Care for a cup of tea? I am afraid the selection is down ever since the local store stopped delivering, but I can surely whip up at least a cup of Earl Grey.’
I was stunned. Was this a trap? Why was the beast taunting me like this? Why wasn’t I dead already?
’You see,’ said Nigel, ’people come here to fight and kill me, but that never happens. I cannot be killed; I am immortal.’
’But…but…what happened to all the others who came before me?’ I asked, still a bit confused.
’Ah, yes, they are no longer of this world, and you will now join them. Your journey has brought you plenty of knowledge, and now you are leaving your old world behind to rise to a new level, a new plane of existence.’
He continued, ’No longer will you wander among the normal people, wondering how things work. You have faced your fears, and you overcame those fears. You will leave this place only to take your place among the enlightened. You have left your life of ignorance and doubt behind.
’Welcome as a true master.’