
C H A P T E R 6
![]()
What Lurks in the Forest of Lists?
Ripping the Guts Out of SharePoint Dragons, Lists, List Templates, and List Forms
This chapter will lead you toward some of the scariest things that exist for SharePoint developers. In order to survive, you will have to gather up whatever courage you can find and prepare yourself to face demons, monsters, and foul CAML language.
We will begin by examining what lists really are, how they work, and why they make up the foundation of SharePoint. That's nothing too scary, so there is no need to fear anything at this point.
Then we'll move on and start examining the list CAML that you need to master in order to control how lists behave and are experienced by the user. Three parts are relevant here: list instances, list templates, and list forms. Each part will be increasingly more complex and likely outside of what you would normally use in a SharePoint solution. You should begin at this point to see where we are going.
During the course of this chapter, you will gain knowledge used to fight the largest of all SharePoint dragons, the beast that has stricken fear into the hearts of developers for many years, the foul creature that eats men and women alive and yields to nothing but pure knowledge, skill, and plenty of practice.
In the next chapter, it will be time to face…views.
You're not scared? Oh, you will be.
Overview of Lists
I mentioned earlier in the book that lists in SharePoint are not much more than database tables on steroids. Although that is true, I would like to elaborate a bit on what I mean by that.
Lists consist of columns, which I will discuss in much more detail in Chapter 9. Lists are the primary storage facility of SharePoint, and most everything is stored in some kind of list. Even libraries, wiki sites, and web portals are just lists of files, articles, and pages.
If you are SQL savvy, it should be easy to understand how the features of SharePoint lists map to database tables. Table 6-1 shows several of the features and the similarities to a database table.
Table 6-1. SharePoint Lists Compared to Database Tables
| SharePoint Terminology | Database Terminology |
| List | Table |
| Item | Row |
| Column | Column, sort of |
| Event receivers | Triggers |
| Field type | Data type |
| View | View |
| List forms | Nothing, really |
Although not exhaustive, this table should make it clear that lists can be compared to database tables.
That being said, plenty of factors differ as well. For instance, the concept of referential integrity does not exist in SharePoint. You can have lookup fields that reference other tables, but there is nothing that prevents you from deleting the referenced items or even lists. Another example is CAML vs. SQL. You do have some SQL ideas in CAML, but CAML is nothing near as powerful for data definition and data manipulation.
So, I might actually rephrase the initial statement a bit: a SharePoint list is like a database table on steroids but with a limp.
The Road Ahead
OK, let's get down to the fun parts, the technical stuff. Lists, being the primary storage facility and being compared earlier to database tables, offer surprising amounts of flexibility and customization options. To understand these options, you need to understand the underlying definitions that create and manipulate lists.
But first, as always, let's look at a cool screenshot and some annotations. That way, you can show the book to your boss and say, “Hey, here's a book that shows how SharePoint lists work,” and your boss will understand. Bosses like that. See Figure 6-1.
You should make sure your boss is happy.
Bj⊘rn the Elder
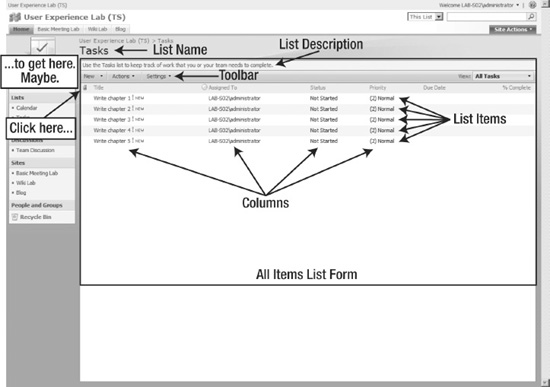
Figure 6-1. A SharePoint list. Note the “Maybe” annotation; it is important.
Now, I am not trying to insult your intelligence by showing you this. As SharePoint developers, we are very familiar with this view, but it might still hold some clues that are important.
The page you see in Figure 6-1 is a list form, the AllItems.aspx form actually, and as you will discover later in this chapter, list forms can be highly customized. In fact, they are nothing more than plain ASP.NET pages, and once you know that, you also know you can make them look and behave just as you like. The same applies to other forms that are associated with the list. When you click an item, you go to the DisplayForm. When you edit an item, well, that would be the EditForm. And if I tell you there is a form called NewForm, I am going to credit you with enough brains to figure out what that form does. I'll talk more about forms later.
Another interesting aspect of Figure 6-1 is that it shows most of the components of a list. You have the columns there, the items, a list form, the list name and description, the toolbar…all these components are defined in the list definition, which is basically just a set of CAML files that tell SharePoint how the list should be created.
The list definition consists of a list template as well as a list instance. Compare this to the object-oriented way of thinking, and the list template is the class, while the list instance is the object. As such, the list template defines how the list should look and behave, while the list instance is the actual storage medium for items in the list.
I will cover both list templates and list instances later as well.
List Instances
You can create lists in several ways. You can provision a list through a feature, through code, in a site definition, or through the web interface (the latter actually invoking code just like we can do ourselves).
The confusing part here may be that there are also different options available for creating lists depending on where you create them. So, although you will see similarities in many of the methods, you should be careful to note the differences as well, since you may not have all the options available in a certain scenario.
To make the playing field a little more complex, there are also different List elements that have widely different meanings depending on which file they reside in. The List element of a site definition configuration instantiates a list, while the List element of a list schema definition creates a template. If you search for documentation on the List element, you must therefore pay attention to which List element you find. This confuses even Microsoft; the SDK and MSDN documentation have plenty of links to the wrong element. If your head is a bit dazed by all this, you are in good company (or bad company, depending on your view of Microsoft). I'll try to clear this up a bit here.
Lists in Site Definitions
Since I have just finished my treatise on site definitions, it makes sense to start investigating lists based on what we find in onet.xml. This is the simplest List element and provides only some attributes and child elements you need to learn. You will not require a life vest to swim here.
If you open the STS folder's onet.xml file again (in [12]TEMPLATESiteTemplatesstsxml) and then go to the configuration element with ID 0, you will see several lists being instantiated in the Lists element, as shown in Figure 6-2. Each List element here creates a list when we provision a site based on said configuration. Let's see how this actually happens.
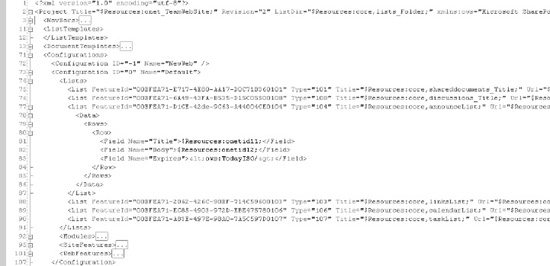
Figure 6-2. Lists section of STS folder's onet.xml configuration ID 0
The List element of onet.xml has several attributes that can be used to customize the list instance.
The first two attributes of the List element are FeatureId and Type. The Type attribute is a reference to a ListTemplate, and the FeatureId attribute is where that ListTemplate is defined. Several list templates ship with SharePoint, such as the Document Library, Custom List, Contacts List, and so on. Each of them is located in a feature. To provision the list, you need to know both the feature ID and the template type. How do you find these values? We'll get to that shortly, but for now there is one thing you should know.
Although many list templates will be defined in features, that is not the case for every one. For instance, the Blog definition's onet.xml file defines ListTemplates right inside the onet.xml file itself, and thus no FeatureId is required. You may define templates in the ListTemplates section of your own onet.xml as well, and in that case you will need the Type attribute only. The downside to this, however, is reusability; you will not be able to use your list templates in sites based on other site definitions.
![]() Tip You should strive to put list templates in features whenever possible.
Tip You should strive to put list templates in features whenever possible.
The Title attribute gives a name to the list. Note that this is different from the list template name. A library list template may be called Document Library, while your actual library in your site may be called Shared Documents.
The Description attribute sets, well, a description for the list. If you refer to Figure 6-1, you see where that description goes in the AllItems.aspx list form. We will explore how this attribute gets displayed in the “List Forms” section later in this chapter.
You should also set the Url attribute, which determines the site-relative URL of the list. The normal practice is to put anything that is not a library inside a virtual directory, usually named Lists. Thus, if your list is called MyList, you might want it placed in http://mysite/Lists/MyList.
![]() Tip When setting the
Tip When setting the Url attribute, rather than explicitly writing the word List as part of the URL, use the resource string $Resources:core,lists_Folder; as such:
Url="$Resources:core,lists_Folder;/MyList"
That way, you do not need to worry about what language pack might be installed and what lists is in Hungarian. You can see an example of how to create and use your own resources in Chapter 3.
You would think that you could enable content types in a site-provisioned list by setting the EnableContentTypes attribute to True. That would be rather self-explanatory, right? Well, it is not.
What you are enabling is the web interface management of content types. This is really important; content types are the coolest thing since the invention of ice, and you should know that they are always enabled and that you can always use them, even if content types are “disabled” as many people believe they are when they click the check box in the Advanced section of the List Settings page.
NO, REALLY, I AM NOT USING CONTENT TYPES!
If you still think you're not using content types, care to bet $5 on that?
Create a new custom list, and don't add anything; just give the list a name, and click OK. Now stop. You haven't done anything to add any content types, right?
Start SharePoint Manager 2007. If you don't have SPM, get it; it is free and one of the best SharePoint tools that exists. It is available free from CodePlex at http://codeplex.com/spm. Go ahead, I'll wait right here.
Ready? Browse to your newly created list in SPM. In the Properties pane, find the property collection ContentTypes, and click the three little dots. You will see something like this:
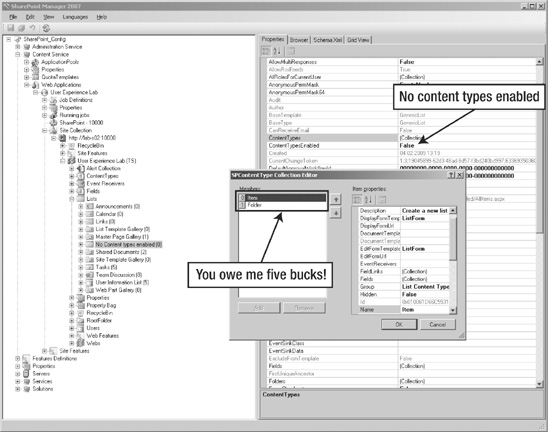
Notice that ContentTypesEnabled is set to False but that you still are given two content types to the list, Item and Folder. Notice also that the form template names are set to ListForm.
So, you are using ContentTypes, no matter how much you don't want to use it.
Now, hand over that $5.
Actually, I'll settle for a nice and honest review of this book on Amazon.
Content types will have to wait until the next chapter for our enlightened presence, but for now, know that the EnableContentTypes turns on the management of content types through the web interface only.
The EmailAlias attribute is documented as being used to set the incoming address for an email-enabled list; however, it doesn't, which is a real shame actually, if only an inconvenience. I will explain more about this in a moment, but first I'll briefly describe what email enabling lists actually means. In short, you can email content to a SharePoint site and have the email and its contents stored in a list.
This functionality is quite cool and is definitely a user experience feature, so I will take a little time to elaborate on this in the “A Deep Dive into Email-Enabled Lists” section a bit later. I highly recommend reading that section because it contains some wonderful nerdy knowledge.
Oh, and yes, I will explain how to email enable custom lists. And if you are a good reader, I will do it with a single line of code. In the meantime, let's continue exploring the other attributes of site List elements.
Let's get back to the problem of the nonfunctioning EmailAlias attribute. If you examine the STS folder's onet.xml file, you will notice that several of the lists in the configuration with ID 0 have EmailAlias set. However, as much as you would think that would email enable the lists, no such thing happens.
To be honest, that is a good thing, because the email aliases are global to the farm. If you had set the alias for one list in one configuration, you would get an error if you tried to ever use the same configuration again.
If you look at how Microsoft creates new lists on the “create new list” page (new.aspx, which in turn inherits Microsoft.SharePoint.ApplicationPages.NewListPage), you will see that even Microsoft manually sets EmailAlias if you fill in the property.
You can safely ignore the EmailAlias attribute; it doesn't do anything except confuse you.
VersioningEnabled and EnableMinorVersions are closely related. Setting VersioningEnabled will allow you to store multiple versions of a file in a document library or an item in a list. If you additionally set EnableMinorVersions, you will also get subversions to each major version; that is, your versioning will be 1.1, 1.2, 1.3, and so on, with the second number being the minor version and the first number being the major version.
Versioning in SharePoint is a really powerful feature that you can use to track changes and make sure you keep a record of those changes in case you want to revert later. Although a thorough examination of versioning is a bit outside the scope of this book, you should know that major versions are considered the published versions while the minor versions are drafts. If you enable versioning, you can have both a published version visible to everyone and a version visible only to you, list managers, and approvers. Once you are done with your edits, you can publish a new major version, which then becomes visible to everyone.
ForceCheckout forces users to check out a document if they want to edit it. This is useful if you have many people potentially working on the same document at the same time.
Basically, checking out a document means that nobody can edit the item until you check the document in again. That prevents situations where two editors modify the same document at the same time. Although useful most of the time, if you forget to check the document in again, it will remain checked out, and nobody will be able to edit the document at all.
Note that you do not need the document to check the document into the library again. If you delete the document on your local hard drive, you can still check the document in to the library by just changing the checked-out status in the library. The version you originally downloaded will then be available again.
QuickLaunchUrl determines to which URL the list name in the QuickLaunch menu should be linked. You must use a relative path here, pointing to a file that actually exists. For example, if you try to set QuickLaunchUrl to http://www.live.com/, it will not work, and the entire link will be removed.
QuickLaunchUrl can be a useful way of setting the link in the QuickLaunch menu, but other methods offer far more flexibility, and I will show you how when we get to list templates later in the chapter.
Remember that “Maybe” annotation from Figure 6-1? Now you know that a link in the QuickLaunch menu might not lead to the All Items view.
RootWebOnly lets you ensure that a list is created only if the site is provisioned as the root site of a site collection. This is useful if you have centrally stored data that needs to exist only once for an entire site, such as global templates, images, or other documents. My preference is to create a separate site definition for the root site of a site collection in any case, so I do not use this much, but that is just me.
A Note on List Instances in Site Definitions
I recommend against using the List element of onet.xml. First, think of reusability. If you create a list instance, you need to replicate the tag for every site in which you intend to provision that list. Putting a list instance in a feature is much more flexible.
Second, using lists in onet.xml is antiquated. It may even be considered obsolete in a future version of SharePoint. The documentation hints at this, stating that the ListInstance element of a feature is the same as the List element previously located in onet.xml.
The List element of onet.xml may or may not be removed at some point because of reusability, but even if it will remain supported, list instances in features are much more flexible.
You may wonder why I did not mention this in the beginning of this section. My question to you then is this: would you have read the information if I had warned you against using the element?
![]() Note No out-of-the-box features actually use the
Note No out-of-the-box features actually use the ListInstance element in WSS, but several features use it in MOSS.
Lists in Features
As I mentioned earlier, there are other ways to create a list using CAML. I strongly recommend using features to provision lists rather than creating lists as part of the site definition, because features provide you with great flexibility and reusability, and all that power is transferred to list provisioning as well.
Now that you know how to create lists in onet.xml, you will see that provisioning list instances in features is a breeze. Of course, if you have no clue how to work with features, it will seem like riding a bicycle with the seat missing, but then again, reading Chapter 2 will alleviate that.
So, let's get on with the show.
To instantiate a list in a feature, you would add the ListInstance element to your elements.xml file in your feature. The ListInstance element resembles the List element from onet.xml, but there are differences. Here's that breeze I was talking about earlier.
![]() Note The nonfunctioning
Note The nonfunctioning EmailAlias has been omitted from the ListInstance element. This is yet more evidence that it actually does not work to set that property through CAML code.
The omission virus also struck EnableContentTypes, ForceCheckout, and the attributes to control versioning. If you want to set these attributes, you need to use a FeatureActivated event handler. I will show you how in Chapter 12.
The ListInstance contains the attributes Description, FeatureId, Id, OnQuickLaunch, QuickLaunchUrl, RootWebOnly, TemplateType, Title, and Url. Of these, only OnQuickLaunch and Id were not covered in the “Lists in Site Definitions” section. Some attributes have changed names and meaning, but you should recognize all of these from the previous section.
In ListInstance, the list template type is now, more logically, specified in the TemplateType attribute. The Id attribute is used to uniquely identify the list instance within this feature. The documentation states that Id is both required, which is false, and that it must be an integer, which is also false. Even if you have no Id, pun intended, you will still get the list created. OnQuickLaunch will allow you to decide whether the list should be added to the QuickLaunch menu when the list is created. You can also set this attribute in the ListTemplate for the list, but if you set the attribute in the ListInstance element, the latter will override the ListTemplate attribute.
See how easy that was? I told you it was a breeze.
With that in mind, let's briefly correlate the attributes of lists in site definitions with list instances in features. Table 6-2 lists the attributes in both elements.
Table 6-2. List vs. ListInstance Attributes
| List | ListInstance |
Description |
Description |
EmailAlias |
Not available |
EnableContentTypes |
Not available |
EnableMinorVersions |
Not available |
FeatureId |
FeatureId |
ForceCheckout |
Not available |
QuickLaunchUrl |
QuickLaunchUrl |
RootWebOnly |
RootWebOnly |
Title |
Title |
Type |
TemplateType |
Url |
Url |
VersioningEnabled |
Not available |
| Not available | OnQuickLaunch |
OK, with that out of the way, I think we should take a break from easy street and take a side trip down a deep, deep path to discover something that is a mystery for many developers, email enabling lists. It is also time to cash in on that promise I made about teaching you how to email enable a custom list with only a single line of code. But first, we need some knowledge.
A Deep Dive into Email-Enabled Lists
![]() Caution Deep water ahead. Wear a life vest at all times.
Caution Deep water ahead. Wear a life vest at all times.
When you set up your SharePoint farm to have incoming email enabled, you can set up certain list types to receive email. What you need to actually make lists able to receive email is to set EmailAlias to the alias part of the incoming email address. The alias would be the part before the @example.com part, such as “documents” in [email protected].
![]() Note In the default web interface management of “Incoming email settings,” there is an “Allow incoming email” radio button. The only purpose of that button is to allow or disallow you from filling in an email alias. There is no “Enable incoming email” property of the list object; when you set
Note In the default web interface management of “Incoming email settings,” there is an “Allow incoming email” radio button. The only purpose of that button is to allow or disallow you from filling in an email alias. There is no “Enable incoming email” property of the list object; when you set EmailAlias to an alias, the list becomes email enabled.
Only lists based on certain list templates can be email enabled, but sadly not the Custom List template that comes out of the box. If you try creating a custom list in your site and then go to configure the email settings, you will find that no such thing exists. It seems that only a few list template types support incoming email to a list. Many an online developer has asked countless questions about this, but the answer is more or less uniform: you can't do it.
But can you really email enable a custom list? Building the SharePoint User Experience's reporter, Bj⊘rn Furuknap, set out to find the real truth behind the mystery of email-enabled custom lists. What he discovered will shock the SharePoint world. Stay tuned to hear the true story of incoming email in SharePoint.
![]() Note At this point, you are free to imagine some really cool documentary intro, perhaps some action shots of me digging into the SharePoint DLLs and, of course, a whole range of nice women, fast cars, and piles of SharePoint books.
Note At this point, you are free to imagine some really cool documentary intro, perhaps some action shots of me digging into the SharePoint DLLs and, of course, a whole range of nice women, fast cars, and piles of SharePoint books.
Hello and good evening. My name is Bj⊘rn Furuknap, and tonight we reveal the shocking truth behind email enabling custom SharePoint lists. During the course of the last two… hours… I have been fighting my way through treacherous terrain far behind enemy lines to bring you knowledge of what really goes on with SharePoint lists and incoming email. What you are about to see will blow your mind, but can this elusive beast be caught on tape? Be prepared as we dive deep into the phenomenon of how to email enable custom lists.
The list templates that can be email enabled are defined by a rather curious piece of code in the Microsoft.SharePoint.dll assembly, in the SPList's CanReceiveEmail property. The code eventually calls an if statement in the SPEmailHandler.HasHandler method that checks whether the template on which the list is based is one of the SPListTemplateType template types that supports email enabling out of the box:
AnnouncementsEventsDocumentLibraryPictureLibraryXMLFormDiscussionBoardBlog
Why only these template types? Actually, there is no technical reason why Microsoft could not allow you to have email-enabled custom lists. The problem arises when you start to think about what a custom list really is. It is custom, right? No predefined columns at all. So, creating a feature to add an email to a list with no columns is rather pointless. At best, you could use the default Item content type column Title to store the subject, but that would not give you much benefit at all.
So, is there any hope of getting a custom list email enabled? Oh yes, in fact, the CanReceiveEmail property reveals a vital clue. Not only does it check for the template types in the previous list, but it also checks whether the list has the Boolean property HasExternalEmailHandler set to true. To understand what this means, we need to dig a bit deeper.
![]() Tip Even though we cannot directly receive email to a custom list without some custom development, we sure as heck can work around the issue. I have written an online article series on business process automation in SharePoint that details how you can use an intermediary announcement list and a simple workflow to put an email into a custom list. The three-part article series is available at
Tip Even though we cannot directly receive email to a custom list without some custom development, we sure as heck can work around the issue. I have written an online article series on business process automation in SharePoint that details how you can use an intermediary announcement list and a simple workflow to put an email into a custom list. The three-part article series is available at http://www.understandingsharepoint.com/url/10001. Or you could just read on to find out how you can email enable custom lists.
If you need your boss to understand what happens when you send an email to the list, tell her or him that you get a new item created in the list. The title of that item is set to the subject of the email, and the body is set to the contents. For document libraries, including the picture library, you can send files directly to the library, and they will be added to the library.
This explanation should reveal an interesting clue to our problem. If incoming email is handled differently in a library than in another type of list, then there must be some functionality determining how incoming email is handled that differs between these list types.
The handling of incoming email is done by a SharePoint timer job that runs every minute. The job itself eventually calls a method, SPIncomingEmailServiceInstance.ProcessEmail, which iterates through the incoming emails to figure out where that email should be placed. It does so by calling a stored procedure, proc_getEmailEnabledListByAlias, which retrieves the list to which the alias is bound, and then gets a handler that will be responsible for storing the email correctly. The following shows the GetHandler function of the SPEmailHandler class:
public static SPEmailHandler GetHandler(SPList list) {

    if (!list.HasExternalEmailHandler)

    {

        switch (list.BaseTemplate)

        {

            case SPListTemplateType.DocumentLibrary:

            case SPListTemplateType.PictureLibrary:

            case SPListTemplateType.XMLForm:

                return new SPDocLibEmailHandler(list);


            case SPListTemplateType.Survey:

            case SPListTemplateType.Links:

            case SPListTemplateType.Contacts:

            case SPListTemplateType.Tasks:

                goto Label_007D;

            case SPListTemplateType.Announcements:
                return new SPAnnouncementsEmailHandler(list);


            case SPListTemplateType.Events:

                return new SPCalendarEmailHandler(list);


            case SPListTemplateType.DiscussionBoard:

                return new SPDiscussionEmailHandler(list);


            case SPListTemplateType.Posts:

                return new SPBlogPostEmailHandler(list);


         }

    }

    else

    {

         return new SPExternalEmailHandler(list);

    }

Label_007D:

    return null;

}
As you can see, there are different types of handlers for the incoming emails, depending on the type of list or library. You will recognize the list template types in the earlier list. Note also that if the list template type is Survey, Links, Contacts, or Tasks, SharePoint will purposely deny any attempt at sending email by returning a null object, which in turn prevents any handling of the email. There's another strange thing, especially when you read on.
If you check the last else bracket in the previous code (snippet), you also see that if no handler can be found, a default SPExternalEmailHandler is returned. So, if there is a defaulthandler called SPExternalEmailHandler, could we utilize that to get our custom list email enabled? Let's see....
The SPExternalEmailHandler class inherits from the SPEmailHandler class. The SPEmailHandler class defines an abstract method called ProcessMessage that will be called for each message in the current batch. The ProcessMessage method is what does the heavy lifting of getting an email message into a list. Although the email handler for libraries is obfuscated in the DLL, we can peek into the other handlers to see what Microsoft was thinking.
![]() Tip I do recommend you take a stroll down the email handler lane with .NET Reflector to see how Microsoft has done its handlers, because you will discover why there are different handlers for each of the different template types. For now, let's keep our goal in view and get our custom list email enabled.
Tip I do recommend you take a stroll down the email handler lane with .NET Reflector to see how Microsoft has done its handlers, because you will discover why there are different handlers for each of the different template types. For now, let's keep our goal in view and get our custom list email enabled.
![]() Caution I am sure you read Chapter 5 and remember this, but just in case you were a bit tired and don't remember: do not touch any of the default files that ship with Windows, including the database tables, stored procedures, database views, or anything else. Just don't.
Caution I am sure you read Chapter 5 and remember this, but just in case you were a bit tired and don't remember: do not touch any of the default files that ship with Windows, including the database tables, stored procedures, database views, or anything else. Just don't.
The important thing for us now is the SPExternalEmailHandler and, more to the point, the ProcessMessage of that handler. That method, through some skipping and jumping, checks all the event receivers for a list. If any of those event receivers is of type SPEventReceiverType.EmailReceived, then that receiver is fired.
“Hang on here,” I can hear you say, “I have worked with list event receivers before, but there is no EmailReceived method to override!”
And if you actually said that, you would be absolutely right (and I would have hearing that would rival Superman). The SPListEventReceiver class has no such method. However, the SPEmailEventReceiver class does. With that knowledge, we can create a receiver to manage adding items to our custom list. Check out Figure 6-3.
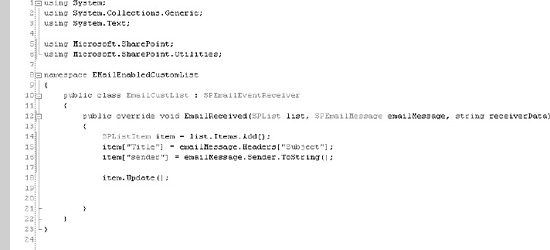
Figure 6-3. Sample EmailEventReceiver code
Great, we are getting close, but I don't smell cigar smoke yet. We still need to connect that event receiver to our list. We might use a feature to this, but heck, since we're already in code land, we might as well create a console application to do the work for us. What you would need to add to the basic console application in Visual Studio, besides the rather obvious reference to Microsoft.SharePoint.dll, would be the following code:
static void Main(string[] args)

{

    string site_name = "http://lab-s02:10000/";

    string list_name = "emailcustomlist";


    using (SPSite site = new SPSite(site_name))

    {

        using (SPWeb web = site.OpenWeb())

        {

            SPList list = web.Lists[list_name];

            list.EventReceivers.Add(

                SPEventReceiverType.EmailReceived,

                "YOUR ASSEMBLY INFO GOES HERE",
                "EMailEnabledCustomList.EmailCustList");

        }

    }

}
Note that in the code you would replace the sitename and listname with information from your site and also replace the “YOUR ASSEMBLY INFO GOES HERE” with your five-part strong name for your assembly. But you knew that.
Once we run this application, something strange and wonderful happens. If you go to your list in the web interface, guess which new setting is available on the List Settings page. If you get tired of guessing, check out Figure 6-4.
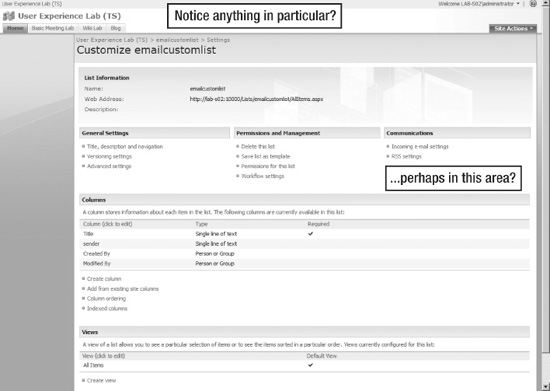
Figure 6-4. Voilá!
We have just solved one of the great mysteries of SharePoint, and with the right knowledge, all it took was a single line of code to register the right event handler. Of course, your actual event handler may be as complex as you need, but you get the point here.
![]() Note If you intend to debug this baby, remember what I said about incoming email handling being done by the timer job. Attach to
Note If you intend to debug this baby, remember what I said about incoming email handling being done by the timer job. Attach to OWSTIMER.exe rather than w3wp.exe if you want to step through your code.
It's time to move on; we have more secrets to discover.
List Templates
Now that you know how to create lists from templates, it is time to start exploring these templates and how you can use them to customize the user experience.
List templates are defined in two ways, either in the site definition onet.xml file or in a feature. By now you probably know what I recommend, and if not, you haven't been paying attention and should go sit in the corner.
The good news is that creating list templates in onet.xml and in features are very much the same. Although there are trade-offs with creating list instances in features, doing the same with list templates carries no such penalties.
The bad news is that list templates can be quite complex. The ListTemplate element itself holds plenty of attributes, but the true complexity begins when we look at the list template definition file schema.xml.
Let's begin.
![]() Note Do not confuse list templates deployed with features with list templates saved from an existing list through the web interface. In this book we are talking only about list templates in the form of definitions of new lists, not saved list templates from the web interface.
Note Do not confuse list templates deployed with features with list templates saved from an existing list through the web interface. In this book we are talking only about list templates in the form of definitions of new lists, not saved list templates from the web interface.
ListTemplate Element
You will find the ListTemplate element in the ListTemplates section of the onet.xml file or in the elements file of a feature. Because the two list templates are similar, I will cover the attributes only once. Also, since complete coverage of all ListTemplate attributes would require too much space, I will focus on the most useful attributes from a user experience perspective.
![]() Tip Quite a lot of the attributes affect the list that is created from the template. Other attributes, such as
Tip Quite a lot of the attributes affect the list that is created from the template. Other attributes, such as Category, affect the list template. Pay attention; the devil resides in the minute details.
AllowDeletion affects the list instance and determines whether the list can be deleted. Some lists, such as the User Information list, will cause serious consequences to your site if deleted, so set this attribute to False if you'd like to prevent that with your lists.
If AllowDeletion is set to False, the link “Delete this list from the list settings” will not be present. Also, attempts to delete the list by other means, such as through code or SharePoint Manager 2007, will fail.
AllowEveryoneViewItems is both useful and overlooked. What it does is allow everyone to view items. Duh. Although that may be obvious, the real usefulness of this attribute requires a bit of a demonstration. Let's break your site, shall we?
- Open your root site in your site collection, and go to the Master Page Gallery. You will find this under Site Settings in the column named Galleries.
- Verify that owners, members, and guests have access to the
default.master. Do this by opening the context menu and clicking “Manage permissions.” - While on the Permissions page for
default.master, go to the Actions menu, and click “Edit permissions.” You will be warned that this may have dire consequences, but we are developers, and we don't listen to such nonsense. - Remove all permissions by selecting all the groups' check boxes and then, from the Actions menu, click “Remove permissions.” Again, ignore any nagging warning; just click OK and verify that no users now have access to the
default.masterfile.
![]() Note If you actually went ahead and did all these steps, I thank you for your blind vote of confidence. The next thing you should do is send all your cash to my PayPal account. Then you should reconsider your policy on trusting strange authors who tell you to do weird things.
Note If you actually went ahead and did all these steps, I thank you for your blind vote of confidence. The next thing you should do is send all your cash to my PayPal account. Then you should reconsider your policy on trusting strange authors who tell you to do weird things.
You may think that removing all permissions on the master page of a site would crash the site horribly. After all, the default.master is used on every page and form. However, since the Master Page Gallery has the AllowEveryoneViewItems attribute set to True, well, everyone can view items.
This even applies to users from other sites. If a user has access only to subsite B but not to root site A, the user can still access items in any list or library of A that has AllowEveryoneViewItems set to True.
You still need at least access to the web application, though, so setting AllowEveryoneViewItems does not allow anonymous access, since anonymous access is granted on the web application level.
Oh, to reverse the permission changes we made earlier, simply go back to the permissions of the item, and select Inherit Permissions from the Actions menu.
BaseType is absolutely required and determines from which of five possible root templates the site template should inherit. These root templates are as follows:
0: Generic list
1: Document library
3: Discussion forum
4: Vote or survey
5: Issues list
These root template types define some very important properties and columns. Although you may get a brief idea of what each type does just by looking at its name, it is important to know where these base types get their settings. The answer is that the base types are defined in the global site definition that we explored in Chapter 4.
If you look into the global site definition at [12]TEMPLATEGLOBALXMLonet.xml, you will find a section that you will not see in any other onet.xml files, the BaseTypes element. Check out Figure 6-5.
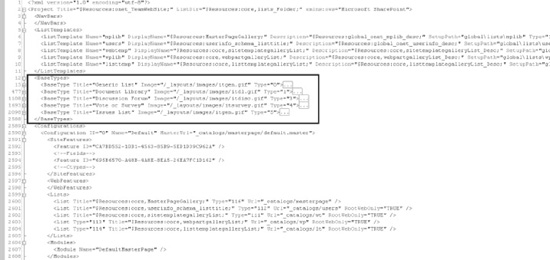
Figure 6-5. BaseTypes element in the global onet.xml
As you can see, there is no BaseType element with Type="2". I do not know why.
If you were to investigate these base types in more detail, you would find a mystery revealed. As you have likely noticed, every item you put into a SharePoint list gets a lot of columns apparently from nowhere. For instance, you have columns such as Author, Modified, Version, the EditControlBlock menu (also known as ECB, which appears when you hover over the title of an item), and so on. All these columns and others get added from the BaseType. We will cover fields and columns in great detail in Chapter 9, but for now, take a look at Figure 6-6 to see how the ECB is actually created.
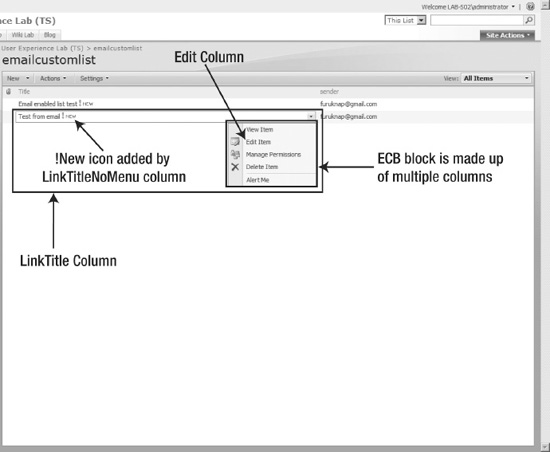
Figure 6-6. The ECB is defined in the global onet.xml file.
Category defines in which of the four columns on the Create page the template should appear. The possible categories are Libraries, Communications, Tracking, and Custom Lists.
If you omit this attribute, your list will be in the Custom Lists column. Also, there is no way to add other categories; the given categories are hard-coded in the Microsoft.SharePoint.ApplicationPages.CreatePage class from which the create.aspx page inherits.
Description simply gives the list template a description to be displayed when hovering over the list template title on the Create page.
DisallowContentTypes may seem similar to the EnableContentTypes attribute of lists but is in fact very different, even beyond the obvious enabling and disallowing differences. DisallowContentTypes actually removes the possibility of managing content types completely. There will not be an option to turn management of content types on at all.
Not just that, but DisallowContentTypes is actually a protected property of the list, meaning that there is no way to change it on a list if it is set once. Be careful with this attribute; there is no way back if you wander down that road.
DisplayName is the title of the list template, meaning the name users will see when they look at the Create page. Note that there is a difference between the Name attribute and DisplayName. The Name attribute is the internal name of the list template and is rarely seen by users.
Setting FolderCreation to True does one thing and one thing only; it adds the link to New Folder on the New toolbar button in the list. This is the same setting as you will find in the Advanced section of the List Settings page. See Figure 6-7.
Note that this in no way affects the ability to add folders to the list by other means. Folders are just items with a specific content type heritage, so as long as you can add items to a list, you can also add folders.
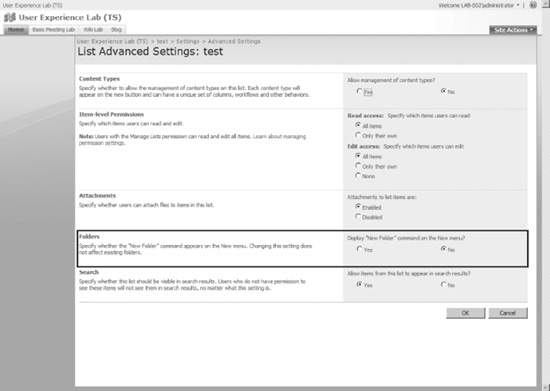
Figure 6-7. Setting New Folder to be visible through the web interface
Hidden and HiddenList may appear similar, and are indeed related, but they affect different objects. The Hidden attribute hides the list template from view on the Create page, while the HiddenList attribute hides the list that is created without affecting the display of the template.
Note that hiding the list template in no way prevents lists from being created by other means. You can still create lists using features or code, or you can simply link directly to the New List creation page using the feature ID and list template parameters, for instance like this: http://lab-s02:10000/_layouts/new.aspx?FeatureId={f8dc6818-6fa9-4a5c-a96b-eeb9b7b078c7}&ListTemplate=10002. This particular link will take you to the Create New List page to create a list based on the list template having an ID of 10002 in the feature with the specific GUID.
If you set both Hidden and HiddenList to True, the list template will not be displayed, and the list will be hidden. An example of this is the User Information list, which, despite that you interact with it on a fairly regular basis, is considered hidden. As you can then surmise, hiding the list does not prevent the list from being manipulated either; it just hides it from interface elements that choose to honor the Hidden attribute, such as the View All Items page.
![]() Note The “
Note The “Hidden and HiddenList set to true” combo also applies to the gallery libraries, such as the Master Page Gallery, List Template Gallery, and Web Part Gallery.
One option that has puzzled me and that I thought would be utterly useless is to have the list template be visible but the list hidden. Thus, you can allow people to create the list, but they will not see it. However, if you intend to create your own separate list management interface for the list, having the list visible for all to see may not be part of your plan.
Image contains a URL, relative to the site, that holds the icon image of the list. You may think this is a waste of time, but consider your users and how much an icon can improve their understanding of what kind of list or library has been created.
![]() Tip You can also place the list icon in the
Tip You can also place the list icon in the [12]TEMPLATELAYOUTSIMAGES folder, since that directory is mapped to the virtual path, /_layouts/images, of every site.
Name is the internal name of the list. Most important, this attribute defines the subdirectory in which SharePoint will search for the Schema.xml file. If you set your Name attribute to MyListTemplate in a feature called MyFeature, SharePoint will search in the [12]TEMPLATE FEATURESMyFeatureMyListTemplate directory for the schema.xml file. For a site template, the same applies, but the schema.xml file should be under the [12]TEMPLATESiteTemplates YourSiteDefinitionNameMyListTemplate folder.
This is not the title of the list template. I repeat: this is not the title of the list template. If I had a dollar for every time I have found developers using Name as the title field, I would have…about $3, but in any case, remember this distinction. The title field of a list template, that is, the name that users will see when selecting a list template, is called DisplayName.
NewPage is also seldom used but is a really cool attribute, especially compared to its sibling EditPage. I will explain EditPage a bit later.
The NewPage attribute is the page that gets displayed when you click the list template title on the Create page. Setting this means that you can create your very own user experience when creating a new list, including gathering additional information, creating a fancy wizard, or pretty much anything you like.
![]() Tip Oh, one thing…
Tip Oh, one thing…SPList objects do not have any property bag like SPWeb and SPListItem have, so you will not be able to store any custom properties or data in the list itself. You still have options for storing custom data about the list, though. For instance, use the RootFolder property of the SPList, which will return to you an SPFolder, which does have a property bag. You can see a practical example of this in the article at http://www.understandingsharepoint.com/url/10007 on my blog.
Is this a best practice? Heck, why not? Microsoft does it all the time to store custom data, so we should be able to do the same. To see this, start SharePoint Manager 2007, and open any of the root folders on your site. Then, expand the Properties node, and you will see a ton of properties that Microsoft sets for you.
Note that you have to do some heavy lifting to create the list. In your code-behind file, you must create the list using code and then customize that list according to your needs. On the default NewPage, Microsoft uses its own class for this, Microsoft.SharePoint.ApplicationPages.NewListPage. Sadly, the NewListPage class is not intended for external use (in other words, by us) and is undocumented. That being said, creating a function to facilitate the creation of a list should not be too much of a problem. A simple SPWeb.Lists.Add() method call should do the trick.
![]() Note I know the documentation states that the
Note I know the documentation states that the NewPage, and its sibling EditPage, should be used to set the name of a custom form that will be used to add new (or edit existing) items on a list.
It doesn't work.
The EditPage attribute would be about the coolest thing since the last ice age if it were a replacement for the List Settings page, but it isn't. Instead, setting this attribute will replace the “Versioning settings” link on the List Settings page.
I am fairly certain that somewhere in Redmond is a developer with a very good idea of why this would be the logical use of the EditPage attribute value. I, on the other hand, am not smart enough to see that kind of logic, so bear with me when I say that this is just the way it is.
Setting the EditPage attribute to a valid and site-relative URL will change the “Versioning settings” link on the List Settings page. Take a look at Figure 6-8.

Figure 6-8. Just so you know I am not crazy. At least not that crazy.
Another factor makes this attribute even worse. You may be thinking that having a page that you can customize however you like, even if it has an awkward link, may be a good thing, but consider this: since you are overriding the “Version settings” link, you must either handle the version settings yourself on that page, in addition to anything else you might want to customize, or lose the item versioning altogether.
Apart from the AlternateHeader attribute of the Project element we covered in Chapter 4, this has to be the most useless SharePoint feature ever, and that includes future versions of SharePoint.
I mentioned OnQuickLaunch earlier during the discussion on lists, and here it is. Setting OnQuickLaunch to either True or False sets the default value for all lists created from the template. You can override this in the ListInstance element. The effect of setting OnQuickLaunch to True is that you will get a link to the list or library in the QuickLaunch menu. The link itself will, by default, link to the default view of the list, and the link text will be the list title. You can override this on the list instance as well by setting the QuickLaunchUrl attribute.
Path and SetupPath work in much the same way as they do for modules. Both let the list template know where to look for the files to be used for list creation, such as forms pages. The difference is that Path is relative to the list template, while SetupPath is relative to the [12]TEMPLATE folder.
The other difference is that Path is actually considered deprecated in WSS 3. As mentioned earlier, SharePoint will look in a subfolder with the same Name as your list template to find the schema.xml file. The same goes for other files as well such as custom list forms.
RootWebOnly ensures that the list can be provisioned only on the root web of the site collection. This is very useful for creating lists that should be available from anywhere in the site collection but need to be provisioned only once. An example of this is the User Information list that is global to all sites in a site collection.
SecurityBits concerns one of those features that was great in theory, namely, the item-level permissions of WSS 3. This is a number, made up of two digits, that specifies permissions on individual items in the folder. However, note that this is not the normal permissions that you can set for groups and users from the “Manage permissions” menu. Rather, SecurityBits specifies an additional, and seriously flawed, security layer.
The two digits represent read and edit permissions. You set each digit to a value representing who you want to have read and edit permissions. Table 6-3 gives you the possible values.
Table 6-3. SecurityBits Digit Values
| Read (First Digit) | Description |
| 1 | Anyone can read an item. |
| 2 | Only the author can read an item. |
| Edit (Second Digit) | Description |
| 1 | Anyone can edit an item. |
| 2 | Only the author can edit an item. |
| 4 | No one can edit an item. |
So, if you want anyone to be able to read and edit items in the list, set SecurityBits to 11. If you want anyone to read but only the author to edit, use 12. If you want a read-only list, set 14.
The thing about SecurityBits, though, is that the value of the feature itself is really limited. What if you have set the read right to 1 but suddenly want your manager to see your new document? You can either let everyone see it or no one except yourself.
I always use normal security and just leave SecurityBits on 11. Managing security can be done with normal permissions, and I fail to see why including another and conflicting security mechanism helps. But you may disagree, so feel free to use it if you think it brings value to your solution.
Type is the attribute identifying the list template within the feature or site definition. The value of the attribute should be an integer that is unique within the feature. When you instantiate a list, the Type attribute would match either the Type attribute or the TemplateType attribute in the list, depending on how you create the list. Figure 6-9 illustrates this.
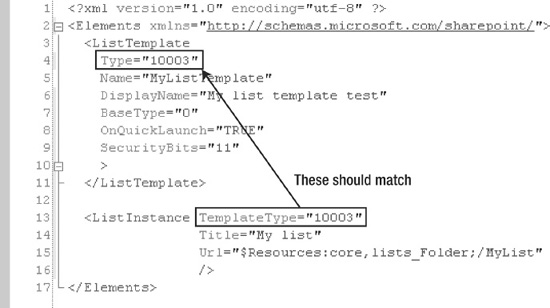
Figure 6-9. List instance TemplateType and list template Type attribute
Microsoft recommends using integers greater than 10,000 for Type to avoid possible conflicts with future list templates from Microsoft. Although there is no technical reason why this should be the case, it doesn't hurt to follow this advice, so keep your Type integers greater than 10,000.
If you have worked extensively with SharePoint lists before, you may know that there are a ton of templates that ship with Microsoft that have Type numbers from 100 to around 300 in addition to a few more.
If Unique is set to True, a list based on this template can be created only once for each site. For example, the User Information list or most of the built-in galleries have this attribute set to True.
There is a quirk here, though. If Unique is set, the list template will not appear on the Create page, regardless of whether an instance of the list exists. I believe Microsoft's motivation is that this attribute should be set only for lists created during site provisioning, and thus, there will not be a need to actually let the user manually create the list.
I think that is sad. I mean, this could have been a great feature. Consider having your users be able to create a list, but only once. This would have been an excellent option for creating a sitewide template library or a common images library or a range of other such lists or libraries.
You can still actually create a list, even through the web interface, but you need to give the users a direct link to the New.aspx page with the FeatureId and ListTemplate parameters set manually. Naturally, you can have only one list instance at a time if the Unique attribute is set to True.
UseRootFolderForNavigation is also a curious little animal that hops around in the forest without anyone even knowing it is there. When I first read the documentation, it took me several hours to find out how to use the attribute.
The simple idea is that you can use a custom welcome page for a list rather than the default view of all the items in the list. I think this is a marvelous idea; rather than having that dreadful list, you can have a starting page with perhaps some detailed instructions, an introduction to a library, a better interface to library navigation such as an Explorer-style tree view, or even a more intuitive preview using Ajax or Silverlight. Now that's a user experience enhancement if I ever saw one.
Sadly, at the time, there were only about five hits on Google for the attribute, and the documentation is at best confusing. I will skip the long story of how I found out (you can read it in my blog at http://www.understandingsharepoint.com/url/10006 if you are really interested), and I will just explain how it works.
You might actually already have seen this in action. The wiki library uses this feature to display a specific wiki page rather than a list of pages when you enter the library. Basically what you need to do, besides setting this attribute to True, is to set the WelcomePage property of the root folder of the list. The above explanation is not very enlightening unless you have done this before.
First, take a look at Figure 6-10. I have opened the root folder of a wiki site in SharePoint Manager 2007. Feel free to follow along if you like.
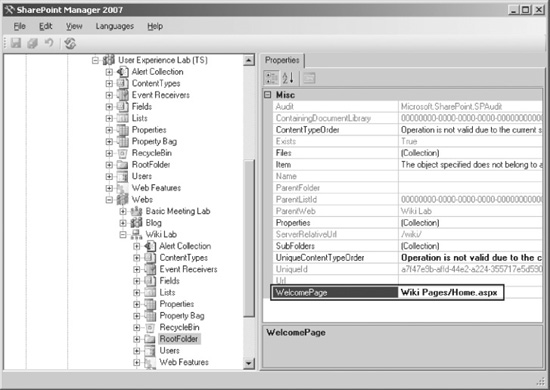
Figure 6-10. WelcomePage property set on wiki site
If you look at Figure 6-10, you will notice that there is a RootFolder located at the root of the site. This folder is the virtual place where files such as default.aspx are stored. There will also be a folder, Lists, that contains subfolders for all the lists of your site, as well as the root Folder objects for all your libraries.
Each of these folders is represented in the object model by an SPFolder object. SPFolder objects are useful for several reasons. As mentioned earlier, SPLists do not have any property bag, so if you want to store custom information about a list, you are out of luck—at least until you remember that there is an SPFolder object for each SPList, meaning you can store the properties in the SPFolder instead.
To use the UseRootFolderForNavigation attribute, however, we will use the WelcomePage property of the list's SPFolder to store the URL to a page that will serve as the front page of our list. The easy choice to set the WelcomePage property is to just use a tool like SharePoint Manager to set the property. However, that is not very scalable and certainly not deployable.
Sadly, there is no CAML way to store SPFolder properties. This means that in order to set the property, we need to use code. For instance, you can use a FeatureActivated event handler to set the property.
OK, that just about completes the ListTemplate attributes. Here is what I would call a good news/bad news situation. The good news is that there is little more you should know about the ListTemplate element. There are no subelements, and the attributes that we have not covered here are either very easy to understand or very unimportant to understand, at least from a user experience point of view.
The bad news is that there is one more thing you must learn in order to create a list template, and that is schema.xml. You may have wondered how the attributes of a list template would be enough to create a list, and the answer is that the ListTemplate element is only one part of the solution.
schema.xml
![]() Caution Before we press on into the forest called
Caution Before we press on into the forest called schema.xml, you must know that somewhere inside the forest lies a cave where a mighty monster lives. We must enter that cave if we are to reach the enlightened peaks of SharePoint knowledge. Very few developers are brave enough to face the monster, and even fewer return with their sanity intact. It is said that at night you can still hear the screams of previous developers as they try to claw their own eyes out of their heads.
It is important that you pay attention to what I say. I have walked this forest many times, and although I cannot protect you inside the cave, I can make sure you don't step outside the safe path.
There is still time to walk away; just close the book, put it in your bookshelf, and never think of it again. If you decide to remain here, though, please make sure you have your affairs in order, that you have written a last will and testament, and that you are wearing clean underwear.
I would like to make our trek as easy as possible. After all, a forest is there to be enjoyed, right? We are going to look at an existing and basic schema.xml to understand how that file is built. To accomplish this, you need to get the proper gear in place:
- Start with the
Featuretemplate from Chapter 3. - Open the
[12]TEMPLATEFEATURESCustomListfolder in Windows Explorer. Copy the entireCustListfolder into your project, under theMyFeaturefolder. Feel free to rename theMyFeaturefolder to something a bit more intuitive, such asMyListTemplate. Do the same to the folder you copied. Take a look at Figure 6-11 for how this looks in my solution.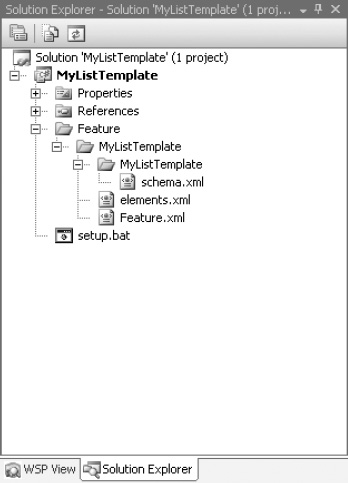
Figure 6-11. Visual Studio solution for
MyListTemplate - Add the following code to the
Elementselement inelements.xml:<ListTemplate
Type="10001"
Name="MyListTemplate"
DisplayName="My list template test"
BaseType="0"
SecurityBits="11"/> Note Make sure the value in the
 Nameattribute matches the name of the subfolder containingschema.xml. TheNameattribute tells SharePoint where to find theschema.xmlfile. - Build and verify that your new list template appears on the Create page of your site.
With that out of the way, you should be ready to start exploring. Open the schema.xml file (see Figure 6-12).
![]() Caution Quickly close the
Caution Quickly close the Views section of the schema.xml file. That is where the beast resides. We are not going in there before we have had plenty of time to prepare.
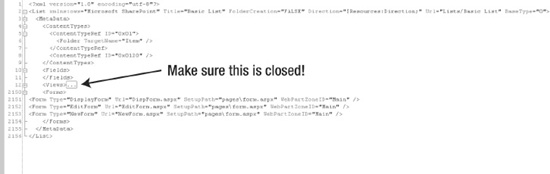
Figure 6-12. Basic schema.xml file
With the Views section closed, you can see that the schema.xml file is not that horrible. The first thing that you should notice is that there is a List root element. This has nothing to do with the List element of the site definition.
There is only a single subelement, MetaData, which in turn contains just four sections. We will get to all of them shortly.
![]() Note There are actually four other possible sections here in the
Note There are actually four other possible sections here in the MetaData section, but these are not important from a user experience view. I wish I could recommend looking in the documentation. Actually, I wish I had more space.
Perhaps if I used shorter words: U may ?: “if dis is all der is to sch.xml, big fuss?”. Ah b patient. C the Vu section?
Nah, that didn't work.
You may be asking yourself, “If this is all there is to schema.xml, what's the big fuss about monsters and dark caves?” Ah, be patient. See that View section? Leave it closed, because inside that element are dragons. For now we should focus on the other elements of the MetaData section.
ContentTypes is the declaration of which content types should be added to the list. Inside the content types are two subelements, although only one is shown here, the ContentTypeRef. A ContentTypeRef is a reference to a content type that is defined elsewhere. In this case we are simply adding the default Item (0x01) and Folder (0x0120) content types. You will investigate content types and learn where the Item and Folder content types are defined in the next chapter.
You may notice that there is a folder subelement in the ContentTypeRef for Item. Although not required, this element specifies an SPFolder under the root folder of the site in which you can place resources or set properties to go with your content type. A document template for the content type is a good example.
The Fields section contains any list columns that should be added to the list on creation. You may find it strange that in the custom list this field is empty. However, recall that there are several global settings that add columns to the list, such as the BaseType of the list template as well as the Item content type. There will be plenty more on fields in Chapter 9, but for now just know that this is where you would add list columns to the list.
![]() Note If you want an example of how this is used in a list template, you can look at the
Note If you want an example of how this is used in a list template, you can look at the PictureLibrary feature. In the folder PicLib resides the schema.xml; just open and enjoy.
You should skip the Views section for now; we will get there in the next chapter. First we must know that we can master the outer parts of schema.xml before we go deeper down and face our demons.
The final element that is part of the custom list schema is Forms. Customizing forms is the most powerful method of enhancing the user experience of lists, basically because forms are the user experience of lists. In fact, this is so important to the user experience that I have dedicated an entire section of this chapter to list forms.
List Forms
I would love to tell you that if you understand list forms, you can work miracles. So I will. If you understand list forms, you can work miracles.
In its most fundamental sense, list forms are what users see when they do not see the front page, application pages, or any other page you have made for them (see Figure 6-13). When users look at a calendar in SharePoint, they're looking at a list form. When a user enters data into a task, then that is a list form. When a user sorts the items in a list, that is still a list form.
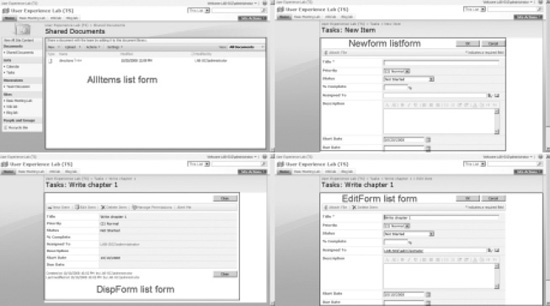
Figure 6-13. Sample list forms
To understand how these forms are built, you must first see how they are defined. The following code shows the list form definitions for the display form for the custom list template.
<Form Type="DisplayForm" Url="DispForm.aspx" SetupPath="pagesform.aspx"

WebPartZoneID="Main" />
The other two forms, NewForm and EditForm, are similar, differing in the Type and Url attributes.
The first thing you should notice is the SetupPath that is pointing to a file, pagesform.aspx. As with all SetupPath attributes, this value is relative to the [12]TEMPLATE directory. So, if you go to [12]TEMPLATEpages, you should find a file called form.aspx. Open it. Or squint at Figure 6-14 if you are not in front of your computer.

Figure 6-14. The form.aspx form
Lo and behold! That looks just like a normal ASPX page, and in fact it is just that. And if it is nothing more than a normal ASP.NET page and we get to define which ASP.NET page it is, that means we can change and modify it as we please.
To create your own list form page, you can just create any web part page you like and include at least one web part zone. Then, in the Forms section of your schema.xml file, add both the form page file name and the web part zone ID:
<Form Type="DisplayForm" Url="DispForm.aspx" Path="MyCustomForm.aspx"

 WebPartZoneID="MyWebPartZoneId" />
I love it when things are easier than I thought.
There is a problem, though—at least if we are to judge by what we have discovered so far. All the default form pages are the same, so how do you get different forms for New, Edit, and Display?
There are a few things to notice here. First, take a look at the PlaceholderMain code in Listing 6-1.
Listing 6-1. Content from form.aspx
<asp:Content ContentPlaceHolderId="PlaceHolderMain" runat="server">

<table cellpadding=0 cellspacing=0 id="onetIDListForm">

 <tr>

  <td>

 <WebPartPages:WebPartZone runat="server" FrameType="None" ID="Main"

Title="loc:Main" />

 <IMG SRC="/_layouts/images/blank.gif" width=590 height=1 alt="">

  </td>

 </tr>

</table>

</asp:Content>
Look at the web part zone there. It has an ID of Main, and our list form tags also referenced Main. That simply cannot be a coincidence. But what does it mean?
There is another clue as well. Remember that all the tags had a reference to the same page? NewForm, DisplayForm, and EditForm all used pagesform.aspx. So, how would the page know which form to display?
Form Templates
To answer all of these questions, we need to dig a bit deeper. I will advance you a bit of your knowledge allowance and tell you that it is all related to content types. And if you are still stubborn enough to claim you do not use content types, then please go back a few pages and put your five bucks where your mouth is. Here is definite proof, again.
You see, a list form is not just made up of the form.aspx page. What happens is that when an item form is opened, either DisplayForm, NewForm, or EditForm, SharePoint checks the content type of the item. Then it checks to see which form templates the content type uses for the different form types. The content type form template is then inserted into the list form to make up the complete form.
Let's start with the Item content type. Quite often this is the content type used when users create custom lists through the web interface. To check which form template Item uses, we must first find the definition for Item. Remember the global site definition from Chapter 4? The single base configuration activated two site features, one of them being the ctypes feature. That ctypes feature holds further clues, so next I want you to open the [12]TEMPLATE FEATURESctypes folder and then open the ctypeswss.xml file, which is the elements file of the ctypes feature (see Figure 6-15).
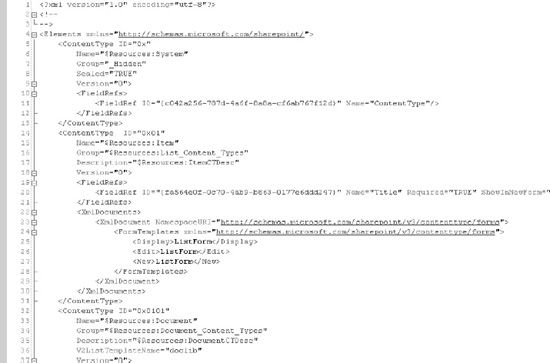
Figure 6-15. ctypeswss.xml feature
The important thing here is the XmlDocuments element in the content type with ID 0x01. That content type is the Item content type, and as you can see, there are three form templates for the three modes of a form, Display, Edit, and New.
I will not go too far into content types here (I still need you to read the next chapter!), but I will reveal that every other content type inherits from the Item content type. And, since all properties are also inherited, the form templates defined in Item will be inherited by child content types if they do not define their own form templates.
![]() Note You may also see that there is a system content type, with ID
Note You may also see that there is a system content type, with ID 0x. Strictly speaking, every content type inherits from System. The only thing System defines is the very existence of an item, the ContentType column, which tells the item or document that it is a content type.
Perhaps this is the creation myth of SharePoint. “In the beginning was System, and System was 0x.”
Finding the form templates is an important step on the way, but we still do not know where these templates live. To find them, you can do what I did and search the entire [12] for the string ListForm, eventually finding the right place, or, if you remember from Chapter 5, you can check to see whether this is actually a control template.
Open the DefaultTemplates.ascx file that is in [12]TEMPLATECONTROLTEMPLATES. Scroll down…keep scrolling…a bit more…there! Did you see it? Around line 104 you will find a RenderingTemplate bearing the wonderfully familiar name of ListForm, just like the form template in the Item content type.
Eureka! We found it!
Not just that, but knowing that we can override the control template (see Chapter 5 if you don't remember) means we can completely customize any content type form to fit our needs. No more editing hundreds of list forms to modify the user experience; we can add or modify everything from a single file, just the way we want. Now you know why I called list forms powerful.
Still, we may want more. What if we do not want to modify everything but just add a nice display form to a news article content type? Well, knowing what we now know and having seen what we have seen, we can simply do something like the following to override the default form templates for our own content type:
<ContentType ID="0x01002ABA7C4C55F148068095A2E536A5069D"

    Name="News article"

    Group="$Resources:List_Content_Types"

    Description="Publish new news article"

    Version="0">

  <XmlDocuments>

    <XmlDocument

      NamespaceURI="http://schemas.microsoft.com/sharepoint/v3/contenttype/forms">

      <FormTemplates

        xmlns="http://schemas.microsoft.com/sharepoint/v3/contenttype/forms">

        <Display>ListForm</Display>

        <Edit>MyOwnEditForm</Edit>

        <New>ListForm</New>
      </FormTemplates>

    </XmlDocument>

  </XmlDocuments>

</ContentType>
Notice the MyOwnEditForm form template.
Of course, we would have to actually create the template, which we would do by creating an .ascx file in the [12]TEMPLATESCONTROLTEMPLATES directory and adding a rendering template with an Id attribute matching our Edit form template name.
Let's take this a bit further with a tip. You can change the form template of a content type even after you have deployed the content type. Not just that, but you can change the form template for a given content type in a given list without affecting every other copy of the content type. To do so, you need to edit the content type on the list using a tool such as SharePoint Manager 2007. You could write your own code to do the exact same thing as well.
The reason why this very cool feature works is that content types get copied to the list when they are deployed. You will explore this more in Chapter 8, but just know that a content type on a list is a copy, not the master. I will demonstrate with a simple exercise:
- Start by creating two identical task lists. If you use the site structure we created in Chapter 1, just add another task list to your root site.
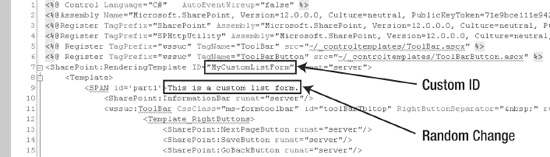
- Create a custom form template to use for one of the task lists:
- Create a new
.ascxfile in[12]TEMPLATECONTROLTEMPLATES. Call it whatever you like; I usedMyCustomListForm.ascx. - Copy the
ListFormrendering template tag fromDefaultTemplates.ascx, including the start and end tags. Remember to include theControl,Assembly, andRegistertags from the start ofDefaultTemplates.ascx. - Edit your new rendering template ID to something else, for instance
MyCustomListForm. Also, make some kind of random change so you know that you are viewing the modified template later. - Save your new
.ascxfile, and do anIISRESETto ensure the new template is picked up.
- Create a new
- Start SharePoint Manager 2007, and navigate to your site and then to your newly created task list.
- Expand the Content Types node, and find the Tasks node.
- In the Properties pane, find the
NewFormTemplateName, and modify the value to match the ID you set for your custom rendering template in step 2c (MyCustomListForm).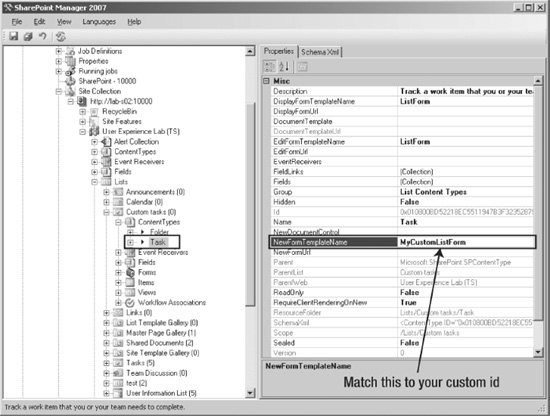
- Click the Save button in SharePoint Manager to save your changes.
- Open your customized task list in SharePoint, and click the New Item button to verify that magic has occurred, or just look at Figure 6-16. You may also want to check that the unmodified task list still has the normal template.
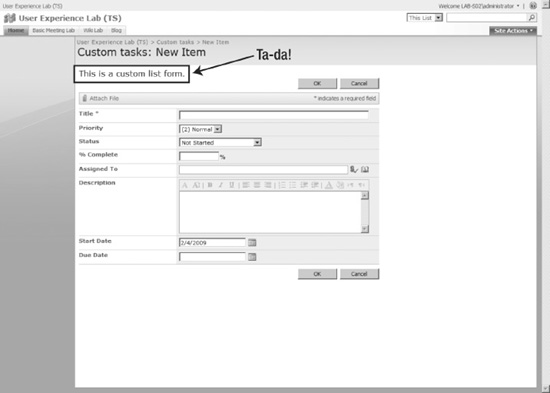
Figure 6-16. Customized tasks list form template
In this exercise, you modified the New form of a specific Task content type in a specific list. In a production environment, you would want to make these changes using code rather than manually setting the list templates. If you plan on going down this path, consider creating a feature or solution both to deploy your custom form template and to set the properties in a FeatureActivated handler.
![]() Caution Modifying a content type on a list after the content type has been deployed is not likely to make Microsoft Support happy, but I am not sure on its policy on this. Heavy customization may also cause a maintenance nightmare unless you create a good management solution.
Caution Modifying a content type on a list after the content type has been deployed is not likely to make Microsoft Support happy, but I am not sure on its policy on this. Heavy customization may also cause a maintenance nightmare unless you create a good management solution.
You can also create custom display form templates to use when showing an item or create a custom edit form to enhance the editing experience.
Now that you have seen how to customize the form templates and you know how to change the list form pages, you have even more tools to create a great user experience.
I would love to take the time to explain every detail on how you can create custom forms or modify existing ones, but I believe your imagination should have some freedom. And I am running out of pages in this book. I do want to share some ideas with you, however.
![]() Note Just to make sure we are clear on this: list form pages are the ASPX pages used to generate the form, such as the default
Note Just to make sure we are clear on this: list form pages are the ASPX pages used to generate the form, such as the default pagesform.aspx. List templates are the content type specifics on how that form should look, such as the ListForm rendering template.
- Start by copying and modifying existing templates and form pages rather than starting from scratch. That way, you can add, change, or remove content and compare the result with the default forms.
- Reflect the form template tags. All the
<SharePoint:…tags come from theMicrosoft.SharePoint.WebControlsnamespace that is easily reflected using .NET Reflector. You can learn much from just reading the source code. - Explore the other form templates as well.
ListFormis just one form template; there are several other form templates as well, such as theDocumentLibraryForm. - Don't go overboard at first. Completely changing the user experience may be tempting, but remember that your users are used to working with SharePoint in a certain manner and may not approve of massive changes.
- Update your SharePoint installation! There are issues with using custom forms and attachments that have been fixed in the infrastructure update.
Preparing for the Final Battle
OK, we have been putting this off long enough. It is time enter the cave of pain to face what has become the worst fear for many developers.
Even Microsoft is scared of this place. The only map we have is the documentation, which lists only “numerous child elements” but no details beyond that. Most books and articles on this subject recommend only copying what others have done, but very few have even attempted to explain what happens inside. Few people have the courage to think of coming where we are about to go.
Before we go inside, however, there are a few final things you can do to prepare. We are armed with plenty of knowledge, but still there are steps to take:
- Inform your loved ones what you are about to do. They may never see you again as you are now.
- Settle your bills, and make sure your life insurance covers fighting mythical monsters.
- Make sure you have 911 on speed dial. Seconds may count if anything goes wrong.
- Get a good cup of strong, black coffee.
- Wear clean underwear.
What lies within? Only what you bring with you.
It is time to face the big, bad monster.