
C H A P T E R 15
![]()
Our Empire United
Wrapping All Our Hard Work into a Single SharePoint Solution
Now we are nearing the end of our empire building, but there are still important tasks to accomplish. We want to wrap all our hard work into a complete SharePoint solution that can be used to set up a complete SharePoint site, including all the custom fields, list templates, lists, content types, and pages we have developed.
Unlike certain MMORPGs I play, however, the end game in this book is far from lacking. We still have more tasks to accomplish, such as adding our own custom navigation and ensuring that everything is set up as expected. Oh, and our story takes a strange turn later, so read on.
Mission Statement
In this chapter, we will create our final pieces of our puzzle and put those pieces together to form a new site. We will create a basic site definition and then add the pieces we have created. We will then add navigation and explore how we can create navigation options that fit our needs.
Creating the Site Definition
After reading Chapter 3, you may know that I am biased toward using features for most of our functionality deployment. Let's take that notion to the extreme by removing any superfluous functionality from our site definition.
Exercise 15-1. Creating a Bare-Bones Site Definition
In this exercise, you will create a site definition containing only what is absolutely required to get the site running.
- In your Solution Explorer, under the
12TEMPLATEfolder, add a new folder corresponding to the four-digit LCID of your language.The LCID defines for which language the site definition will be created. These LCIDs correspond to the language packs you have installed, so check the
[12]TEMPLATEfolder to see which language pack LCIDs are installed. For English, the LCID is 1033. I will be using 1033. - In the
1033folder, create a new folder called XML. - In the XML folder, add a new XML file, and call it something like
webtempEmpireTimes.xml.The important thing about the file name is that it must start with the string webtemp and must end in
.xml. In the previous step, you can change EmpireTimes to whatever you like as long as you adhere to the other two naming rules. Note I will refer to this file as the webtemp file later.
 - Back in your
12TEMPLATEfolder in the Solution Explorer, add a new folder calledSiteTemplates. - Under
SiteTemplates, add a new folder calledEmpireTimes.Unlike with the webtemp file, the naming of this folder is important and should match the configuration we will add to the webtemp file later. You may change this, but you also need to update the webtemp file. I'll talk more about that a bit later in this chapter.
- In the
12SiteTemplateEmpireTimesfolder, add a new folder called XML. - In the new XML folder, add an XML file called
onet.xml.Note I will refer to this file as the onet file later.Look at Figure 15-1 for how the final structure should appear.
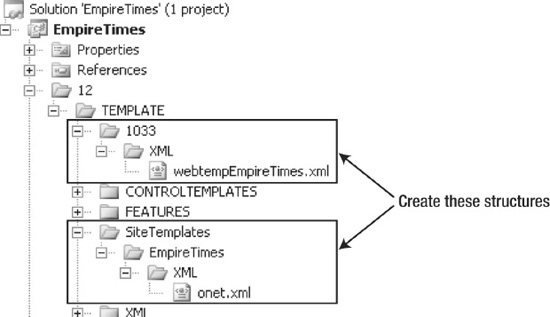
Figure 15-1. Final site definition structure
It's time to add some content to these files.
- In the webtemp file, add the following XML code:
<?xml version="1.0" encoding="utf-8"?>

<Templates xmlns="Microsoft SharePoint">

  <Template Name="EmpireTimes" ID="20000">

    <Configuration

      ID="1"

      Title="Empire times web site"

      Hidden="FALSE"

      Description="Empire times web site, including all our creative effort."

      ImageUrl="/_layouts/images/[image].png"

      DisplayCategory="Empire Times" >

    </Configuration>

  </Template>

</Templates>
The
Templateelement is discussed in Chapter 4, so I will only outline the important bits here.The ID of the single
Templateelement must be unique in your farm and should be greater than 10,000. Microsoft has reserved site template IDs below 10,000 for future expansion. Of course, Microsoft is not very consistent in this. If you have access to MOSS, check out the template ID of the Records Center. It is 14483, so stay away from that number as well if you have MOSS installed.The template Name attribute is what maps to the folder we created to hold the
onet.xmlfile earlier. If you change the folder name, you also need to update the Name attribute of theTemplateelement.Finally, the ID of the
Configurationelement must be unique within aTemplateelement, but not much else. The number is used when you create new site using code where you would address this particular site configuration asEmpireTimes#1.At this point, you can deploy your solution and see your new site definition appear when you go to one of the site creation pages, either from Central Administration or from the root site itself. You may want to do this just to test that the webtemp file is working as expected. Or take a look at Figure 15-2, which shows my result. Don't create a site yet, though, because the lack of content in the onet file will cause the creation to crash.
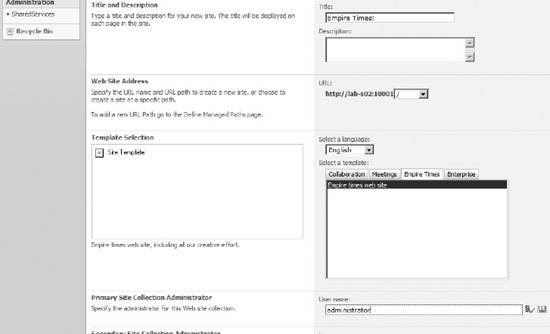
Figure 15-2. Site definition added to the Create site collection page
On to the onet file.
- In your onet
.xmlfile, add the following code. We will expand this code later, so for now it is extremely crude:<?xml version="1.0" encoding="utf-8" ?>
<Project xmlns="http://schemas.microsoft.com/sharepoint/">
<Configurations>
<Configuration ID="1"
Name="EmpireTimesWebSite"
Title="Empire times web site"
>
</Configuration>
</Configurations>
<DocumentTemplates></DocumentTemplates>
<NavBars></NavBars>
</Project>By adding this XML code, we now have a creatable site definition. Of course, it is still empty, so going to the front page will yield a 404 error. We'll add more cool stuff later, but first we should take a look at what we have done up to this point.
![]() Note There are two empty elements here,
Note There are two empty elements here, DocumentTemplates and NavBars. The NavBars element is there for validation only; it is required by the wss.xsd schema. The DocumentTemplates element must exist, but may be empty, for the default Document Library template to work. If the DocumentTemplates element is not present, attempting to create a document library will cause an exception to be thrown.
Oh, and you might want to call me a liar in a little while.
Our site so far really has no content. No default.aspx page, no lists or even list templates, no data, no nothing. It's not very useful, is it?
What we can do, however, is to go to the Site Settings page and activate all the glorious features we have created. Go ahead—do that now.
Not very easy, you say? How do you get to the Site Settings page without the Site Actions menu? Oh, yeah, if you manage to wrangle that _layouts/settings.aspx URL from memory, now all you have to do is remember in which order to activate the different features. Remember that if you do this wrong, your site may be permanently damaged and even at best will simply not work as expected.
There must be a better way. And, knowing me as you do after reading this entire book, you also know that an answer will be presented shortly.
Exercise 15-2. Improving the Site: Step 1
In this exercise, you will add to your site definition and make it easier to implement the EmpireTimes solution.
- Open the onet file. Inside the
Configuration Id="1"element, add a new child element:<ExecuteUrl Url="_layouts/settings.aspx"/>This addition makes sure that when we create a new site, we automatically end up on the Site Settings page of the new site. However, this works only for sites created from an existing site, in other words, from the Create page. If you create a new site collection from the Central Administration web site, you still get sent to the root URL of the new site collection.
We can make this a bit better, however. In Chapter 6, we looked at the
UseRootFolderForNavigationproperty of the list template element. This property relied on theWelcomePageproperty of the folder for a list. If that property is set, links to the root of the list—in other words,http://lab-s02:10000/lists/News—will go to the address stored inWelcomePageinstead of the default view for the list.It turns out that we can use this property on the root folder as well. You can test this by setting the
WelcomePageproperty using SharePoint Manager. Look at Figure 15-3. The effect is that going to the root of the site, as inhttp://lab-s02:10000/, will send the user to the welcome page instead of the normaldefault.aspx.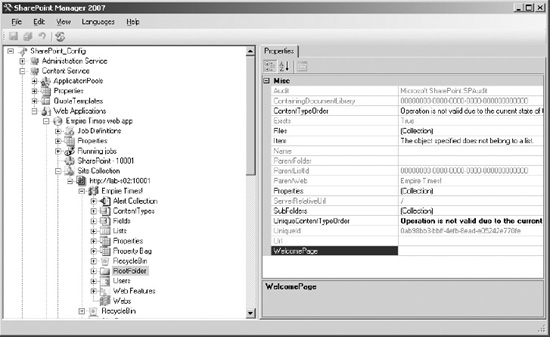
Figure 15-3.
WelcomePageproperty of root folderLet's set this property to a custom page as part of our setup.
- In the
FeatureAddedmethod in yourTimesSetup.csclass, add the following piece of code:// Set custom home page
SPFolder root = web.RootFolder;
root.WelcomePage = "categories.aspx";
root.Update();It's not perfect, but it's better than nothing. We still need a better way of activating features so we do not have to remember the correct order or risk problems related to missing features.
- In your EmpireTimes solution, add a new Feature with Receiver item. Make it web scoped, and name it something like
TimesSetup. As usual, remove all thethrow new Exceptionlines from the methods inTimesSetup.cs. - In the
FeatureActivatedmethod of theTimesSetup.csfile, add the following code:SPWeb web = (SPWeb)properties.Feature.Parent;
Guid g;
g = new Guid("[FEATURE GUID OF TimesArticleCategoriesList]");
web.Features.Add(g);g = new Guid("[FEATURE GUID OF TimesSiteColumns]");
web.Site.Features.Add(g);
g = new Guid("[FEATURE GUID OF TimesContentTypes]");
web.Site.Features.Add(g);
g = new Guid("[FEATURE GUID OF TimesLists]");
web.Features.Add(g);
g = new Guid("[FEATURE GUID OF TimesCategoryPage]");
web.Features.Add(g);Replace the string in the GUID constructors with the feature ID of the respective features.
OK, this at least ensures that we get our features activated in order. Now all we need to do is activate the single
TimesSetupfeature, and all should be well.
In the previous exercise, we made a few improvements so that most of our setup is now done semi-automatically. First, we made sure that when a new site is created from within the site collection, we are sent to the Site Settings page to complete the setup of features and other…features.
Second, we set the WelcomePage property to a custom page. You can, of course, set this to any page, but note that the address is relative to the current site.
With a complex feature dependency scheme like the one we have in our solution, the built-in activation dependencies will not work. One important reason why activation depend- encies will not help is that one of the site-scoped features, the fields feature, depends on a web-scoped feature, specifically, the “Article category” list feature. Site-scoped features cannot depend on web-scoped features.
And even if activation dependencies did work, you will only be warned that you need to activate other features first. The “dependee” features will not get activated when a depending feature is activated. We need to either activate manually or write code as we have done here.
Still, our solution is not elegant or flexible. If you add new features, you need to build and deploy a new assembly. If you change the order of activation, you need to build and deploy the new assembly. These issues, however, can be overcome, for example, by reading the order of features from a config file. I will leave that as an exercise for you, because we have more pressing matters that require our attention.
At this point, we have a site that resembles Figure 15-4 after we have created a new site collection and hit the Activate button on the TimesSetup feature.
Although I know that this is massively impressive and your mind can barely grasp the power you now possess, we still need to do more. For example, we have no navigation yet. Let's fix that.
Exercise 15-3. Improving the Site: Step 2
In this exercise, you will manipulate the built-in QuickLaunch menu and the top navigation bar. You will do this using .NET code because it gives you nice insights into how the navigation works. Plus, it is more flexible to do this through code.
- In the FeatureActivated method of the TimesSetup.cs file, add the following code after any existing code:
// Quicklaunch navigation

SPNavigationNodeCollection quickLaunch = web.Navigation.QuickLaunch;

for (int i = 0; i < quickLaunch.Count; i++)

{

    quickLaunch[0].Delete();

}
This code removes any existing QuickLaunch menu items.
- Continue by adding a root menu item as such:
SPNavigationNode aboutUs = new SPNavigationNode("About us", "/");

quickLaunch.AddAsFirst(aboutUs);
The
SPNavigationNodeconstructor in this case takes two parameters. The first is the text to be linked, and the second is the URL to which the link will go. The constructor may also take a third parameter, a Boolean that is set toTrueto signify that the link is an absolute URL rather than a relative URL.Note If you use a relative URL like we are doing here, SharePoint will check whether the URL goes to an existing page and will throw an exception if the page does not exist.Next we simply add the
SPNavigationNodeto the QuickLaunch menu. But we want more, right? Let's add some child elements. - Add the following code after the previous lines:
SPNavigationNode contact = new SPNavigationNode("Contact form", "/");

aboutUs.Children.AddAsFirst(contact);

SPNavigationNode map = new SPNavigationNode("Map", "/");

aboutUs.Children.Add(map, contact);
Note the use of two different methods for adding the first and second nodes. In the Add method of
SPNavigationNodeCollection, like theChildrenproperty is here, you need to specify both the node to add and the preceding node. Here we add the contact node first, but since it is the first node, we can use theAddAsFirstmethod.The same applies to the
quicklaunchobject we got in step 1. The first item is added withquicklaunch.AddAsFirst, and any subsequent items are added using the Add method. Go ahead and explore this if you like.For now you can build, deploy or upgrade, and then recycle IIS. Yes, you need to recycle IIS to avoid assembly caching. Then deactivate and reactivate the setup feature.
Can't reactivate the feature? Getting errors about already existing features? I know, I know, we have already activated the feature that in turn activated all the other required features of our solution. Not just that, but if you deactivate the features, you still get an error since one of the features, TimesArticleCategoryList, will try to create a list that already exists.
There is a simple fix. Just modify your feature activate code, and check to see whether the feature is already activated:
if (web.Features[g] == null) web.Features.Add(g);
Similarly, for site-scoped features, you can use this:
if (web.Site.Features[g] == null) web.Site.Features.Add(g);
You may wonder why I did not tell you about this right away. Well, it is easier to remember a fix for a problem you experience than just an explanation that something will go wrong if you don't do something.
Now you can try to reactivate your setup feature and see what happens. Back on your front page, you should now see something resembling Figure 15-5.
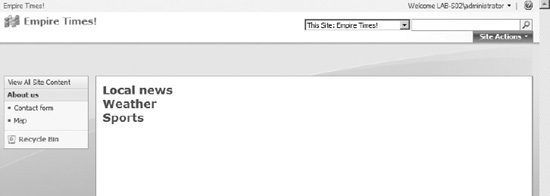
Figure 15-5. QuickLaunch in place
We should move on. Let's see whether you can guess what's up next.
Exercise 15-4. Improving the Site: Step 3
Yeah, that's right campers; it is time to put the final piece of our puzzle in place, the top navigation bar. I can hear you all crying that we are almost finished and there is no more book left. Well, dry your eyes, matey; this ship is coming to port.
- In the
TimesSetup.csfile, in the same place as the previous two exercises, add the following code:SPNavigationNodeCollection topNavigationBar = web.Navigation.TopNavigationBar;
for (int i = 0; i < topNavigationBar.Count; i++)
{
topNavigationBar[0].Delete();
}As for the QuickLaunch example, this simply makes sure we empty any existing items in the menu.
- Continue with this code, which is again rather similar to the previous example:
SPNavigationNode newsNode = new SPNavigationNode("News", "categories.aspx");

topNavigationBar.AddAsFirst(newsNode);
Note that I have linked the News item to the
categories.aspxpage. I'll show you why in a moment. - You'll want more items. Add some! Such as:
// Horizontal items

SPNavigationNode localNews = new SPNavigationNode("Local news", "/");

newsNode.Children.AddAsFirst(localNews);
SPNavigationNode weather = new SPNavigationNode("Weather", "/");
newsNode.Children.Add(weather, localNews);
SPNavigationNode sports = new SPNavigationNode("Sports", "/");
newsNode.Children.Add(sports, weather);The comment is optional; the rest is not.
Note Yes I realize hard-coding links like this is bad practice. I am doing this to show you how to modify the navigation, not to be a saint. That train left the station a long time ago, and the ticket was too expensive for me. - (Optional) Did you know that the menus also support child elements? Try this:
// Child items

SPNavigationNode soccer = new SPNavigationNode("Soccer", "/");

SPNavigationNode golf = new SPNavigationNode("Golf", "/");

SPNavigationNode football = new SPNavigationNode("Football", "/");

sports.Children.AddAsFirst(soccer);

sports.Children.Add(golf, soccer);

sports.Children.Add(football, golf);
Now, for the last time, build, deploy or upgrade, recycle IIS, and then. . .poof! The object reference is not set to an instance of an object. No menu. So close but no cigar. Let's see what went wrong.
Come on, you knew I was kidding, right? We're not done yet. There are still a great many things we should do, but for now, let's fix up the problem we just discovered.
The problem in our case is simple; there is no TopNavigationBar defined in our site. Remember back to our site definition? We left the NavBars element empty. However, in order to add items to the menu, the menu must exist. Now you know why you might want to call me a liar for saying that the empty NavBars element was there for validation only. I feel very ashamed if that makes you feel better.
So, our solution seems simple enough; just modify your site definition NavBars element in the onet file as such:
<NavBars>

  <NavBar ID="1002"/>

</NavBars>
And you would think that everything is in order, right? Wrong. If you modify your site definition, your supportability takes a nosedive that would bring a blush to the face of Stuka pilots.
This is important. Because your site definition in effect is set in stone once you create your first site off that definition, you need to think very carefully what you put into that definition. If you forget a vital element, such as the TopNavigationBar element, you are basically out of luck and must re-create all your sites.
However, for our development environment, we don't care. And, because of our massive developer genius, we know that we can simply delete our site completely, redeploy our fixed onet.xml, create a new site collection, and hit our magic Setup button to get the whole show running again.
But let's really explore brilliance. While in the onet file, add the following element to your single configuration element:
<WebFeatures>

  <Feature ID="[FEATURE ID OF TIMESSETUP FEATURE]"></Feature>

</WebFeatures>
See where this is going?
Exercise 15-5. Marveling at Your Creation
This one is the simplest exercise. This is where you brand yourself with the proverbial crown of glory, raise your hands toward the sky, and feel the rush of success.
1. Delete your current site collection. Create a new site collection based on the EmpireTimes site definition. And now, to make the crowd go wild...
2. Go to the root of your new site. Yeah, just click the link from the site collection creation receipt.
I will let the applause from the audience, along with Figure 15-6, speak for itself.
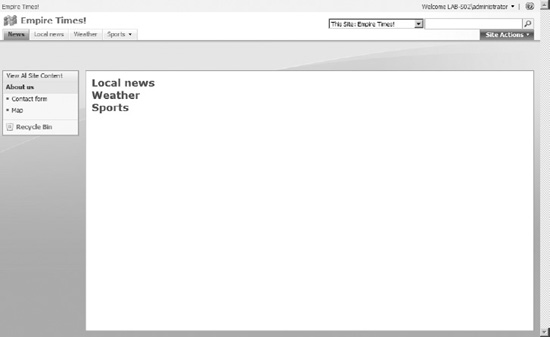
Figure 15-6. Something to make you proud
OK, there are a few details left. And I promised I would explain why I added the categories.aspx URL to the News navigation node.
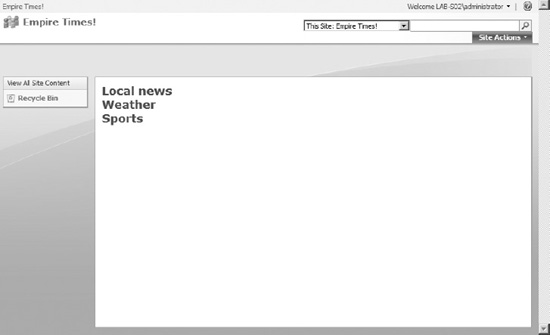
First, though, some more glory. Figure 15-7 shows what your TopNavigationBar looks like with the child menu open.

Figure 15-7. TopNavigationBar open…and another detail
Notice anything in particular? At least two things might spring to mind. The News tab is highlighted. That is because we are on the page to which the News tab links. If you add nodes directly to the TopNavigationBar navigation node collection, you will, as a free bonus, get tab highlighting when you are on the page to which a tab links.
You can try this by modifying your node creation code in TimesSetup.cs as such:
SPNavigationNode newsNode =

 new SPNavigationNode("News", "Lists/Categories/AllItems.aspx");

topNavigationBar.AddAsFirst(newsNode);

SPNavigationNode localNews =

 new SPNavigationNode("Local news", "categories.aspx");

topNavigationBar.Add(localNews, newsNode);

SPNavigationNode weather = new SPNavigationNode("Weather", "/");

newsNode.Children.AddAsFirst(weather);

SPNavigationNode sports = new SPNavigationNode("Sports", "/");

newsNode.Children.Add(sports, weather);
I have put the modified lines in bold. The changes simply remove the link to categories.aspx from the News node and place it on the “Local news” node instead. Now, if you go to the front page, you will get Figure 15-8 as your result. Needless to say, going to the All Items view of the Categories list will highlight the News node.

Figure 15-8. Highlighting of different tab
Figure 15-8 also reveals another feature. Note that in the latest modification we added two nodes directly to the TopNavigationBar node collection, but we added two child elements to the News item and even some grandchild elements to spice up the navigation. Notice that the nodes now are ordered differently than Figure 15-7, for example. That is because the root nodes, News and “Local news,” in our example, get all their child elements added before the next root node. If we add child elements to the “Local news” node, SharePoint will add these to the end of our menu.
To be perfectly honest, and I think I should be after that NavBars prank I pulled, the number of element levels displayed horizontally depends on the StaticDisplayLevels property of the AspMenu control that is added by the default.master page. By default this is set to 2, meaning the first two levels of elements are added as horizontal tabs.
The number of fly-out levels is determined by the MaximumDynamicDisplayLevels property of the same control. So, changing these values to StaticDisplayLevels="1" and MaximumDynamicDisplayLevels="2", we get a result resembling Figure 15-9.
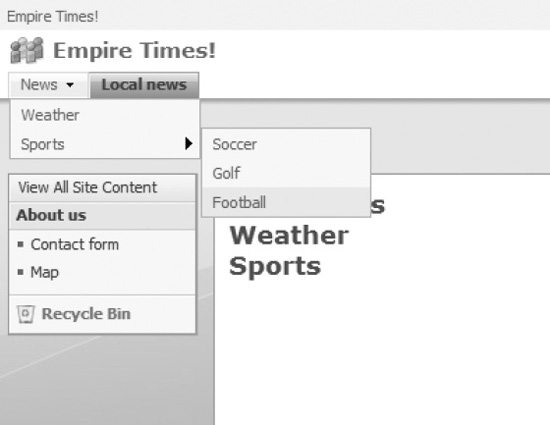
Figure 15-9. Less static, more dynamic
OK, there is one last thing I want to reveal before we end. The highlighting issue is a bit more complex. You see, the highlighting is actually done on the root node if you are on a page from which any of the descendant elements of that node links. For example, if you were to modify the Soccer node to the following code:
SPNavigationNode soccer = new SPNavigationNode("Soccer",

"/Lists/Categories/NewForm.aspx");
then the News node would light up if you were on the NewForm of the Categories page. This is because the Soccer node is a child, or rather a grandchild, of the News node. I have done this; Figure 15-10 shows how this works.
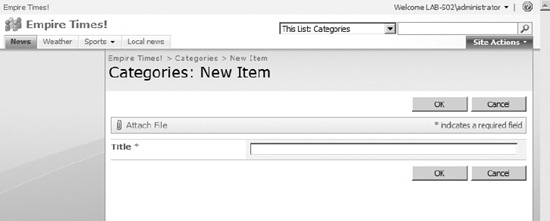
Figure 15-10. Highlighting root node
Of course, you might already know this if you worked extensively with the ASPMenu object before. Yeah, those menus are little more than regular ASP menus.
Enough talk.
Your Empire Is Complete
You're done! Yeah, really. Done. No more. You have created, from scratch, a complete site while learning how to manipulate the user experience in a ton of different ways.
You have explored deep forests. You have traversed mountains and glaciers of ice so cold that any other mortal would succumb. You have fought dragons and monsters in dark, damp caves. You have investigated massive fields of technical challenges down to details so small that quarks look like planets. You have built an empire from scratch, from virtually nothing, until a massive and majestic site emerged. Your empire will stand the test of time.
You want to know what that empire really is? It is your knowledge. The site will be gone when you reinstall your computer. Your knowledge of how you built the site will remain forever.
Congratulations. You are done. Now it is time to get started.
Oh, and by the way, in case you're reading only the last page of this book: there is only one fictional character here (except the dragon, of course). Remember that annoying editor who wanted to prevent you from deleting news articles? Well, since no other character is part of our story, it is logical to assume that the killer is the editor.
Now, the real mystery is to figure out who was killed. Perhaps I need to write a new book….