
P A R T 3
![]()
Administering Microsoft SQL Server 2008
C H A P T E R 7
![]()
Multi-Server Administration
With the number of database servers increasing and the tolerance for errors decreasing in today's organizations, it is has become necessary to define and maintain database standards across the enterprise. One of the problems prior to SQL Server 2008 has been making sure those standards are being followed. As a DBA, you would have to go out to each server and run queries using system tables to ensure that each server was in compliance. You can now use Policy-Based Management to ensure that your standards are being followed. By using central management servers, you can use a single server as an access point to all the servers in the organization. Central management servers enable you to evaluate policies and execute queries against registered server groups with a single click. You can also use the new Dynamic Management Views and functions introduced with SQL dependency reporting to locate object dependencies between servers.
Policy-Based Management
Policy-Based Management is a new feature in SQL Server 2008 that allows you to define and implement policies across the organization. Policy-Based Management was initially called the Declarative Management Framework but was changed before the final release of SQL Server 2008. First, we will show you how to manually create a policy and then move on to some of the more automated ways of creating a policy.
There are a few key terms you should be familiar with when discussing Policy-Based Management:
- Target: Object that is being managed by a policy
- Facet: Group of logical properties that can be applied to a target
- Condition: A check that is evaluated by a policy
- Policy: A condition that is applied to a given set of objects
- Category: Group of policies that help you manage policy enforcement
When you look at the Policy Management node in SQL Server Management Studio, you see three folders: Policies, Conditions, and Facets. The folder structure forms a sort of hierarchy of the objects required to use Policy-Based Management. Facets are required in order to create conditions, and conditions are required in order to create policies.
Manually Creating a Policy
To manually create a policy you must first create a condition, and then you will be able to create a policy that uses that condition. Once you have created a policy, you can then place it in the appropriate category and apply it to one or more targets.
Let's start by creating a condition that will be used in a policy. In this example, we will create a condition that checks to see if a database is using the full recovery model. To create a new condition, right-click the Conditions folder and select New Condition. (The Conditions folder is located under Policy Management in the Management node of the Object Explorer in SQL Server Management Studio.) This will bring you to the Create New Condition dialog box, as shown in Figure 7-1.
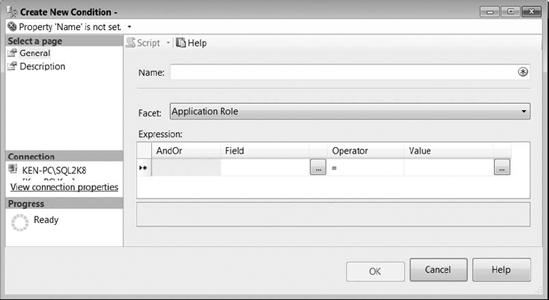
Figure 7-1. Policy-Based Management Create New Condition dialog box
Create the new condition by entering the following information:
- Name: In the Name field, enter Full Recovery Model. Notice that the dialog box title now says “Create New Condition – Full Recovery Model,” and the error displayed under the title bar changes from saying that the name is not set to saying that the ExpressionNode is not set.
- Facet: Before you set the expression, change the Facet field to Database Maintenance by selecting it from the drop-down list.
- Expression: Click the cell in the Field column and select @RecoveryModel from the drop-down list. Leave the equals sign (=) in the Operator column. You can see all the available operators by clicking on the drop-down list. Click the drop-down list in the Value column and select Full. Notice that the Value column changes to reflect the values that are appropriate for the attribute that has been selected in the Field column. For example, if you change the field to @LastBackupDate, a calendar control would be displayed in the Value drop-down list. You can also enter multiple expressions using
AND/ORlogic by selecting the next row and entering the appropriate information. - Description: Optionally you can enter a description by selecting the Description page on the left and entering it in the text box provided. Select the Description page and type a brief description, such as Condition to check to make sure a database recovery model is set to Full.
Once you've entered all the information correctly, the errors are removed from the top of the dialog box, and the status changes to Ready as shown in Figure 7-2.
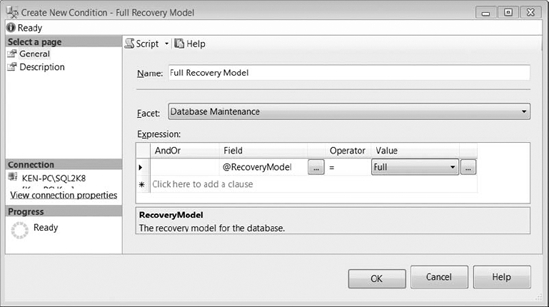
Figure 7-2. Completed Policy-Based Management Create New Condition dialog box
Click OK to finish creating the condition. You should now see the new condition under the Conditions folder in Policy-Based Management.
Now that you have created a condition, you are ready to create a policy that can use the condition. To create a new policy, right-click the Policies folder and select New Policy. (The Policies folder is located under Policy Management in the Management node of the Object Explorer in SQL Server Management Studio.) This will bring you to the Create New Policy dialog box as shown in Figure 7-3.
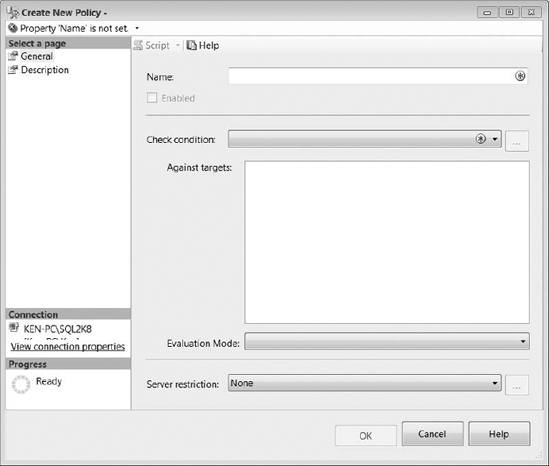
Figure 7-3. Policy-Based Management Create New Policy dialog box
Create the new policy by entering the following information:
- Name: In the Name field enter Full Database Recovery Model. Notice the title now says “Create New Policy – Full Database Recovery Model,” and the error displayed now states that the Condition is not set instead of the Name.
- Check Condition: Set the Check Condition option by clicking the drop-down list and selecting Full Recovery Model. If this is your first time using Policy-Based Management, it should be the only thing in the drop-down you are allowed to select. Once the condition has been selected, you can click the ellipsis next to the drop-down list to edit or review the condition directly from the policy.
- Against Targets: Once the condition has been set, the target is automatically set to Every Database. You can exclude databases by clicking the drop-down menu next to Every and selecting New Condition (see the completed policy later in Figure 7-5). This will allow you to create a condition you can use to exclude certain databases based on given properties exposed in the database facet. For example, you may want to create a condition that will exclude read-only databases from a policy that verifies all databases are using the full recovery model.
- Evaluation Mode: Use this drop-down list to select the evaluation mode. For this example, we will be using On Demand. Selecting On Schedule will enable you to either assign an existing schedule to run the policy or create a new one. Also, selecting On Schedule will allow you to enable the policy by selecting the Enabled check box located directly under the policy name. Only enabled policies will be run by the scheduled job that will be created to check the policies. Valid evaluation modes are On Demand, On Change: Prevent, On Change: Log Only, and On Schedule. The evaluation modes displayed in the drop-down list depend on the facet you are using in the condition. All facets support On Change and On Schedule, but On Change: Prevent relies on the facet being able to use Data Definition Language (DDL) triggers to roll back the transaction. On Change: Log Only relies on the ability of the facet change to be captured by an event.
- Server Restriction: You can create a condition to exclude servers from the policy by using the server facet. For example, you could create a condition that only evaluates the policy on SQL Servers that are running the Enterprise or Standard Edition. For this example, we will not be using a server restriction.
Select the Description page, as shown in Figure 7-4, to configure the remaining options.
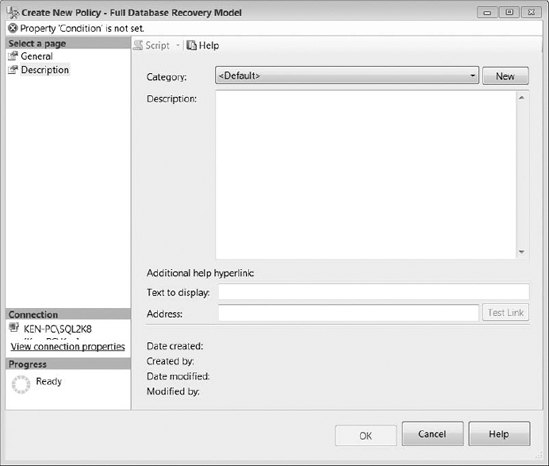
Figure 7-4. Create New Policy dialog box Description page
The remaining options in Figure 7-4 are as follows:
- Category: For this example, we will leave the category set to Default. To change the category, you would click the drop-down menu and select a defined category or click the New button to create a new category. We will show you how to manage categories later in this section.
- Description: Optionally, you can define a description by entering it in the text box provided. Enter a brief description, such as Policy to make sure a database recovery model is set to Full.
- Text to Display: Type the text that will be displayed as a hyperlink when the policy has been violated. For this example, type something such as Choosing a Recovery Model.
- Address: Type the address for the hyperlink. This could be a hyperlink to MSDN explaining why you should use the policy or even to an internal web site that lists the standards for the organization. For this example, type
http://msdn.microsoft.com/en-us/library/ms175987.aspx, which will take you to an article on MSDN about choosing a recovery model. Click the Test Link button to open a browser and validate the link.
Once you have entered all of the information correctly, the errors are removed from the top of the dialog box, and the status changes to Ready. The completed policy is shown in Figure 7-5.
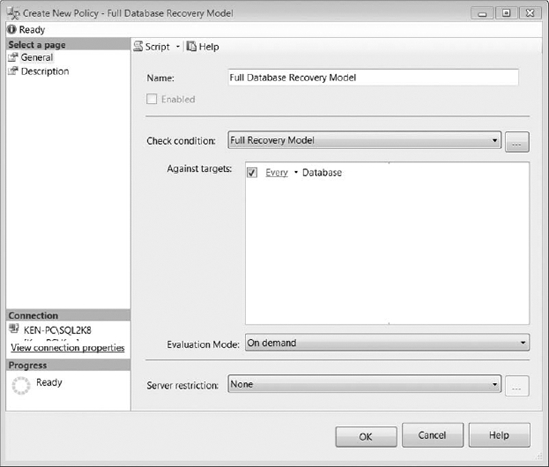
Figure 7-5. Completed Policy-Based Management Create New Policy dialog box
Click OK to finish creating the policy. You should now see the new policy under the Policies folder in Policy-Based Management.
Now that you have created a policy, you are ready to evaluate that policy against the targets. Right-click the policy you just created named Full Database Recovery Model and select Evaluate from the context menu. The policy will be evaluated against the defined targets, and the Evaluate Policies dialog box will be displayed as shown in Figure 7-6. Notice that one of my targets did not comply with the policy and is displayed with a red X, indicating the failure.
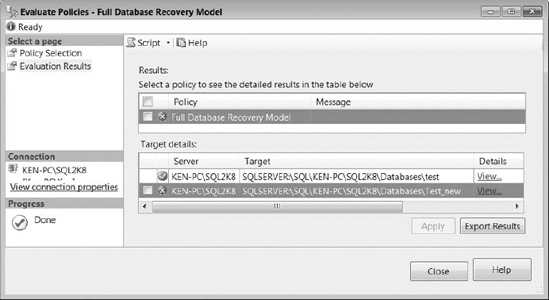
Figure 7-6. Evaluate Policies dialog box
Click on the View hyperlink in the Target Details column to display comprehensive information about why the policy failed. After clicking the View hyperlink, you will be able to see the Results Detailed View dialog box, as shown in Figure 7-7. The Results Detailed View will not only show you the expected value for the condition that was used, you will also be able to see the actual value to determine why the condition failed. You will also see the description you entered for the policy, along with the hyperlink information you defined when creating the policy. Close the Results Detailed View dialog and return to the Evaluate Policies dialog box.
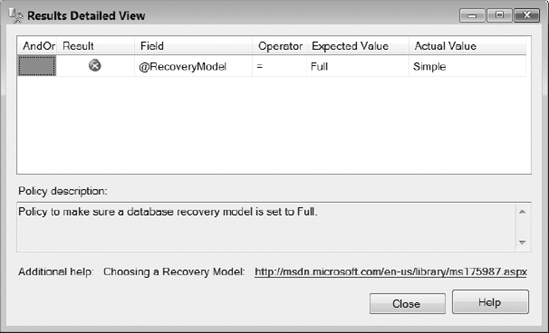
Figure 7-7. Results Detailed View dialog box
Policy-Based Management allows you to fix certain violations by checking boxes next to messages indicating noncompliance in the Evaluate Policies dialog box and selecting Apply. Not all policies can be automatically corrected. For example, there is a predefined policy that you must manually address stating that data and log files for a given database cannot be located on the same drive. There are too many variables involved in moving data files for SQL Server to automatically move them for you. You will know that you cannot automatically correct a policy failure if there is no check box that will allow you to select the policy in violation.
If you have selected policy violations that you wish to automatically correct, then click the Apply button. Your result will be a confirmation box, as shown in Figure 7-8, warning you that all noncompliant selected targets will be modified. Select Yes to accept and apply the changes.
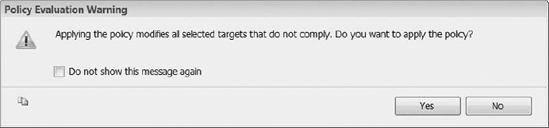
Figure 7-8. Policy Evaluation Warning message box
To manage policy categories, right-click on Policy Management in the SQL Server Management Studio Object Explorer and select Manage Categories from the context menu. This will display the Manage Policy Categories dialog box, shown in Figure 7-9. Here you can add categories and specify whether the database subscriptions to a category will be mandated. If a category is mandated, it will be evaluated against all targets; if not you will have to specifically designate the targets that will be evaluated. All policies must be assigned to a category, and if no category is specifically chosen, the policy will be assigned to the Default category. One thing to note about the Default category is that you cannot remove the Mandate Database Subscriptions check box. All policies that remain in the Default category will be mandated against all targets.
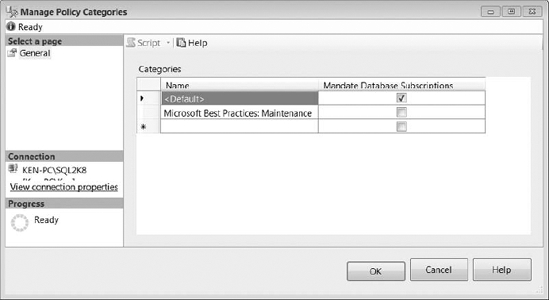
Figure 7-9. Manage Policy Categories dialog box
That's all there is to manually creating and executing a policy. Since Microsoft provides predefined policies, you may never have to manually create a policy, but it is the best way to become familiar with the available options. One other thing that should be noted is that policies are stored in the msdb database, so once you have created a new policy, you should make sure the msdb is backed up.
Exporting Current State As Policy
Many policies can be exported based on the current state of a facet. Once you have configured the facet, you can export the current state of the facet as a policy. This section will walk you through exporting a Surface Area Configuration policy using the current state.
If you are familiar with SQL Server 2005, you may have noticed that the Surface Area Configuration tool is not available when you install SQL Server 2008. The configuration of the Database Engine features are now managed using the Surface Area Configuration facet in Policy-Based Management. In SQL Server Management Studio, right-click on the server instance you would like to configure and select Facets from the context menu. This will bring up the View Facets dialog box. Change the Facet option to Surface Area Configuration, as shown in Figure 7-10.
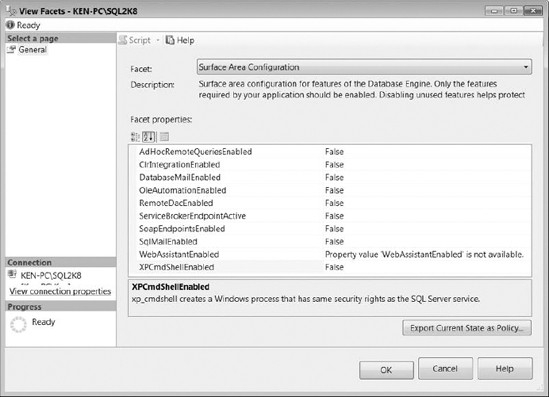
Figure 7-10. The View Facets dialog box displays available facets for an object.
From the View Facets dialog, you can configure the values and select OK to apply the new configurations. You can also export the current configurations as a policy to the local server or to a file that you can import and apply to multiple servers across the organization. Click on the Export Current State as Policy button on the View Facets dialog box to bring up the Export as Policy dialog box, shown in Figure 7-11.
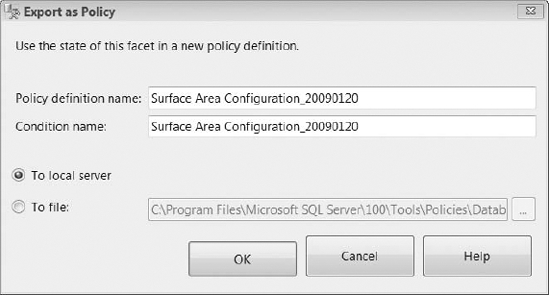
Figure 7-11. Export as Policy dialog box
The Export as Policy dialog box allows you to name the policy and condition that will be created. By default, the policy and condition name will be FacetName_YYYYMMDD. For this demonstration, save the policy to the local server and click OK. Click OK again to close the View Facets dialog box.
You should now be able to see the new policy and condition that was created in the Policy Management node in SQL Server Management Studio. You can manage and evaluate the policy using the same methods as if you created it manually. You can use other objects to export current state as policy as well. For example, if you right-click on a database and select Facets, it will bring up the View Facets dialog box with a drop-down list of available facets for the database object.
Importing a Predefined Policy
We mentioned earlier that you could import predefined policies provided by Microsoft that correspond with Best Practice Analyzer rules and default settings in the Surface Area Configuration tool. Microsoft provides these policies in the form of XML files as a part of the normal installation process. The XML files are located in the Polices folder in the Tools directory where you installed SQL Server. Importing a predefined policy is nice because it not only creates the policy, but all the conditions required as well. You also know that the policy is based on Microsoft best practices and has been tested by someone other than yourself. You may also want to create your own custom policies and deploy them as well. This section will walk you through the steps required to import a policy.
For this example, we will be importing a policy that checks to make sure the data and log files are not stored on the same drive. Right-click on the Policies folder located under the Policy Management node in SQL Server Management Studio, and then select Import Policy from the context menu. This will open the Import dialog box, as shown in Figure 7-12.
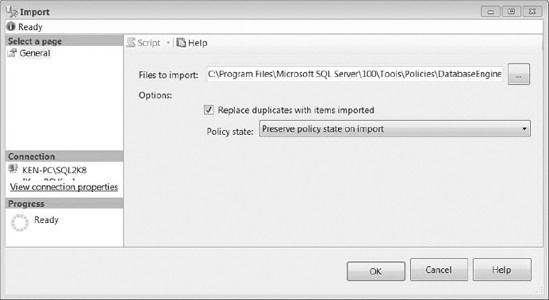
Figure 7-12. Import dialog box
From the Files to Import field, click the ellipsis to navigate to the C:Program FilesMicrosoft SQL Server100ToolsPoliciesDatabaseEngine1033 directory and select the Data and Log File Location.xml file. (If you made custom installation changes, your files may be in a different directory). Select the Replace Duplicates with Items Imported check box to overwrite any policies and conditions that have the same name of the policy you are importing. You can choose to preserve the state of the policy being imported, enable the policy on import, or, disable the policy on import. For this example, select Preserve Policy State on Import and select OK to import the policy.
You can now see the new policy and the conditions that were created under the Policy Management node in SQL Server Management Studio. The new policy is called Data and Log File Location (see Figure 7-13). The policy uses two conditions: one that checks to make sure the files are on separate logical drives (called Data and Log Files on Separate Drives), and one that places a server restriction on the policy (called Enterprise or Standard Edition). As you can see in Figure 7-13, you can use a condition as a check condition or a server restriction. By placing a server restriction on the policy, it will only be evaluated against servers that meet the condition defined for the restriction.
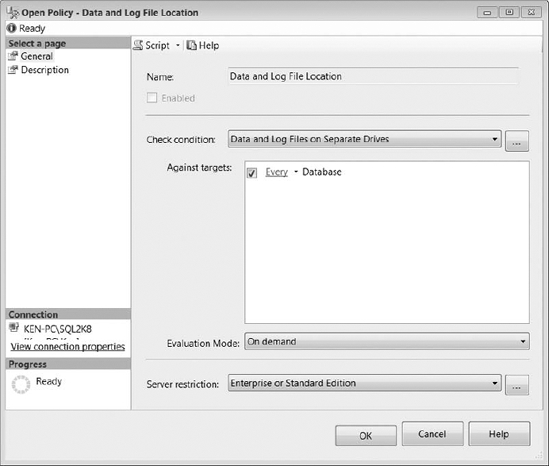
Figure 7-13. Data and Log File Location Policy General Tab
As you can see, importing a predefined policy is an easy way to make sure your servers are using Microsoft best practices or standards that you have implemented within your organization. You can see the final policy in Figures 7-13 and 7-14. Figure 7-13 shows the general options that were automatically created when you imported the policy.
All the category, description, and hyperlink information is also prepopulated with the policy, as shown in Figure 7-14, making it easy to reference the documentation as to why this policy should be implemented.
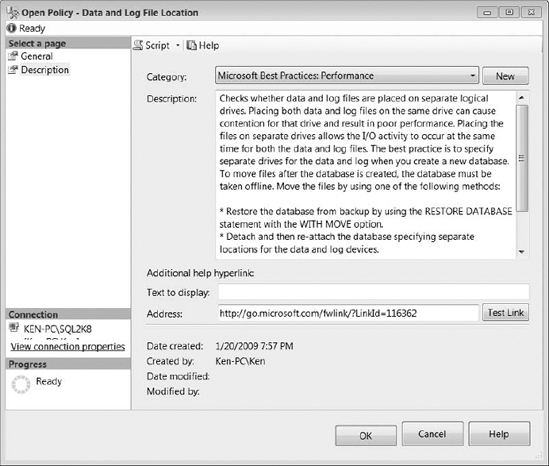
Figure 7-14. Data and Log File Location Policy Description Tab
Central Management Servers
Central management servers are new in SQL Server 2008 and are the hub of multi-server administration. Central management servers provide you with a central location to execute multi-server queries and evaluate policies against defined server groups. Central management servers are managed using the Registered Servers window in SQL Server Management Studio. A central management server is a designated database instance that maintains a collection or grouping of SQL Servers, much like registered server groups.
Creating a Central Management Server
You must designate a SQL Server 2008 instance as a central management server, but you can register and manage previous versions of SQL Server with the central management server, including the ability to evaluate policies. The central management sever maintains the information needed to connect to each server. Windows authentication is the only method of connecting to each registered server, which means that no usernames or passwords are stored on the central management server. Using Windows authentication also means that you may have different levels of security access on each server, depending on how your account is configured on that individual server.
Let's start by configuring a SQL Server 2008 instance as a central management server. Right-click on the Central Management Servers folder located in the Registered Servers window in SQL Server Management Studio, and select Register Central Management Server from the context menu. This will bring you to the New Server Registration dialog box, as shown in Figure 7-15.
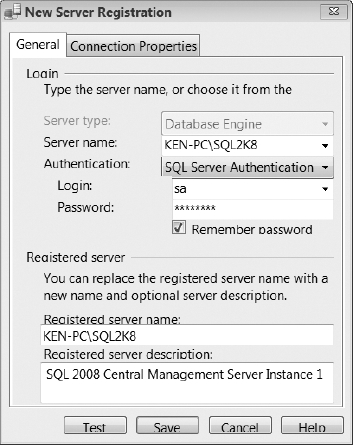
Figure 7-15. Dialog box used to create a central management server
Enter the name of the SQL Server instance that will be designated as the central management server, along with the appropriate connection information in the New Server Registration dialog box. Notice that you can use SQL Server authentication to create the central management server; the Windows authentication rule only applies to the registered servers being managed by the central management server. Click Test to test the connection. If the connection is successful, click Save to create the central management server.
The next thing you need to do is create a server group to organize the servers you will be registering and managing. Right-click on the central management server you just created and select New Server Group from the context menu. This will bring up the New Server Group Properties dialog box, as shown in Figure 7-16. Enter Production as the group name and enter a group description, such as Production SQL Server Group. Click OK to close the dialog box and create the group.
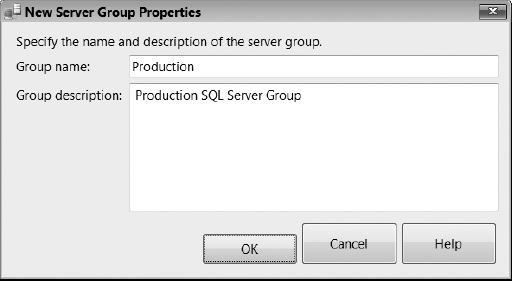
Figure 7-16. New Server Group Properties dialog box
Now we need to add a few servers to the group in order to take advantage of the centralized management features offered by the central management server. Right-click on the Production group you just created and select New Server Registration from the context menu. This will open the New Server Registration dialog box, as shown in Figure 7-17. This is similar to the dialog box that was used to register the central management server with one small exception: The Authentication selection is preset to Windows Authentication and cannot be changed. Click Test to test the connection. If the connection is successful, click Save to complete the registration. We will repeat the process a couple of times to add a few servers to the Production group in order to demonstrate the benefits of using a central management server.

Figure 7-17. Dialog box used to register a server to be managed by a central management server
![]() Note A central management server cannot be registered to be a part of its own group.
Note A central management server cannot be registered to be a part of its own group.
You can see the final central management server configuration we have created for this example in Figure 7-18. We are using an instance of SQL Server 2008 named KEN-PCSQL2K8 as the central management server. There are three registered instances of SQL Server in the Production group, each a different version:
- KEN-PC is running an instance of SQL Server 2005 Developer Edition.
- KEN-PCSQL2K is running an instance of SQL Server 2000 Developer Edition.
- KEN-PCSQLEXPRESS1 is running an instance SQL Server 2008 Express Edition.
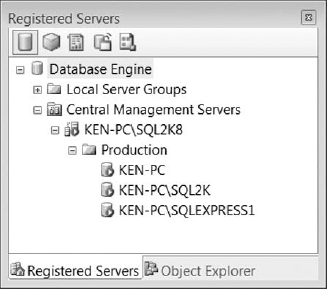
Figure 7-18. Sample central management server configuration
Right-clicking a server group provides you with a couple of options you can execute against all the servers in the group. Two options that are particularly interesting are New Query and Evaluate Policies. Being able to run a single query against multiple servers and having the ability to evaluate policies from a single location, regardless of the version and edition of SQL Server, is where the true power lies in central management servers.
Running Multi-Server Queries
One of the appealing new features in SQL Server 2008 is the ability to execute a single query against multiple servers. This can save many hours of mundane work during your career as a DBA. How many times have you written a script that you needed to run on each of your servers? You would not only waste time running the script on each server, but if you needed a centralized result set, you would have to manually combine the results as well. Multi-server queries are not just for selecting data either—think about it from a deployment perspective. For example, you can push a new stored procedure to all the servers in a given group. For that matter, you could even create a new database on every server in the group just by running a single statement. Any script you can write that is compatible with the different versions and editions of all the instances in the group is fair game for execution as a multi-server query.
To run a multi-server query, right-click on a server group and select New Query from the context menu. We will be using the Production group created in the previous section. Clicking New Query from the context menu will open a new query editor window. Your status bar should be a light shade of pink instead of the yellow color that is normally displayed. The status bar will also show the number of servers that the query will execute against by displaying the number of connections made and the number of servers in the group. For example, if you have four servers in a group, you should see Connected (4/4) in the status bar if you are able to make a connection to all four servers. Another interesting thing that happens is that the database drop-down menu is limited to only the databases that are shared by all the servers in the group.
Now we are ready to execute a query. We will execute a simple query to return the name of all the user databases in the server group. For example:
Select name From sysaltfiles Where dbid > 4
Since we have a SQL 2000 instance in the group, we will use the sysaltfiles table instead of the sys.sysaltfiles table that was not available until SQL 2005. Figure 7-19 shows a result set after executing the query against a group of servers.
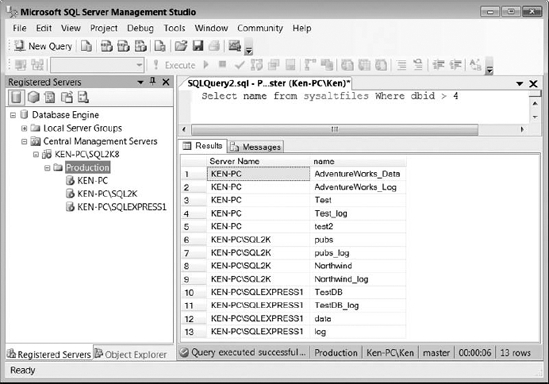
Figure 7-19. Multi-server query result set
If you look at the status bar in Figure 7-19, you can see a couple of interesting data elements. The status bar shows the name of the group the query is executing against, the user who is executing the query, and the database the query will be executed against. You also may have noticed that the query includes the name of each server as a part of the result set, even though we did not specifically add it to the query.
You can also run multi-server queries using local server groups by registering the servers and running a query against a specific group. The benefit of using a local server group to run a multi-server query is that you can include the central management server in the local server group. Remember that a central management server cannot be a part of the group it is managing, so there is no way to include the server that is managing the groups in the result set. Another benefit to using local server groups to run multi-server queries is that you can register the servers using Windows authentication or SQL Server authentication. The downside to using local server groups is that the groups that are created are local to each DBA. A central management server allows DBAs to share a common registered server group.
Configuring Multi-Server Query Options
Multi-server query results have three configurable options. Adding the server name to the results is one of them, and you've seen that option already in Figure 7-19. The complete list of options is as follows:
The default configuration is to add the server name and merge the results. To change the multi-server result options, follow these steps:
- Select Options from the Tools Menu in SQL Server Management Studio.
- Navigate to Multiserver Results options using the tree menu in the Options dialog box. Expand the Query Results node, expand the SQL Server node and then select Multiserver Results, as shown in Figure 7-20.
- Change the options to the desired configuration and click OK.
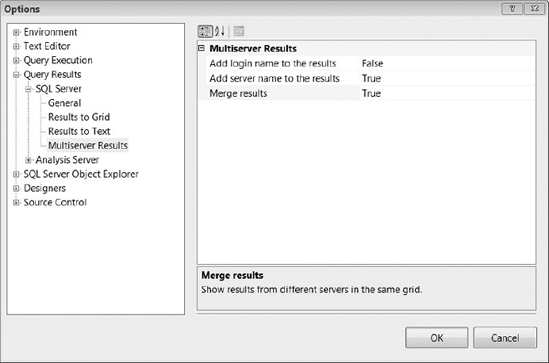
Figure 7-20. Multiserver Results configuration options
If the result set is being merged, the column headers are derived from the first server that returns the results. If a result set is returned by a subsequent server that does not have the same number of columns or the column names do not match, an error will be returned indicating that the result sets cannot be merged. Also, if one of the servers is missing an object used in the query, the result sets cannot be merged and an error is returned.
If you do not merge the results, each result set will have its own schema and column set, meaning the number of columns or column names do not have to match. You will, however, receive an error if one of the objects in the query does not exist on one of the servers in the group. Since each result set is individually returned, this is more of an informational message indicating that the server does not contain the object and does not stop the query from executing on the remaining servers.
Evaluating Policies
You can evaluate policies against registered servers or an entire server group using central management servers. The great thing about evaluating policies against multiple servers is that you can simply click a check box to apply the necessary changes to the noncompliant servers.
![]() Note Only certain policies will be valid with each version. For example, since Database Mail was introduced in SQL Server 2005, it would not be a valid to perform a check on a SQL 2000 server that required Database Mail to be enabled. You may want to add a server restriction on policies that are version or edition specific to prevent excessive failures.
Note Only certain policies will be valid with each version. For example, since Database Mail was introduced in SQL Server 2005, it would not be a valid to perform a check on a SQL 2000 server that required Database Mail to be enabled. You may want to add a server restriction on policies that are version or edition specific to prevent excessive failures.
To evaluate a policy against multiple servers, right-click on a server group and select Evaluate Policies from the context menu. We will be using the Production group created in the “Creating a Central Management Server” section earlier in this chapter. This will bring up the Evaluate Policies dialog box, as shown in Figure 7-21. Notice that the group name that we will be evaluating is displayed in the title of the dialog box; in our case the title is Evaluate Policies - Production.
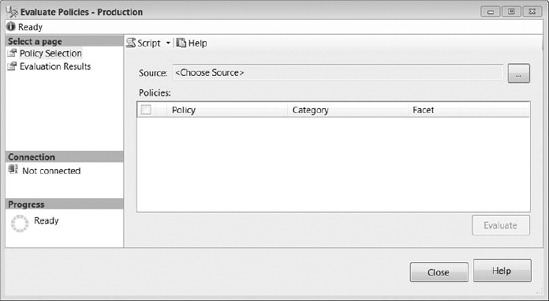
Figure 7-21. Evaluate Policies dialog box
Now you need to choose the source for the policy or policies you would like to evaluate. Click the ellipsis next to the Source field to bring up the Select Source dialog box shown in Figure 7-22.
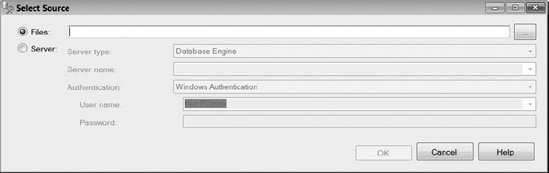
Figure 7-22. Select Source dialog box
As you can see in Figure 7-22, you have the ability to use files or a server that contains policies as a source to obtain the policy information to evaluate. If you choose to use a server as the source, you can enter the connection information for any server that contains a valid policy. (The policies will be displayed in the Evaluate Policies dialog box, as shown in Figure 7-25.) If you read the “Policy-Based Management” section at the beginning of this chapter, you know that Microsoft provides several predefined policy files we can also use. In the Select Source dialog, select the ellipsis next to the Files text box to open the Select Policy dialog box, as shown in Figure 7-23.
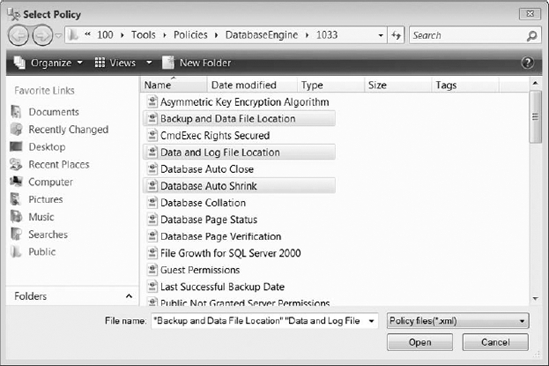
Figure 7-23. Select Policy dialog box
One nice feature is that you are allowed to select multiple policy files to evaluate. Navigate to the C:Program FilesMicrosoft SQL Server100ToolsPoliciesDatabaseEngine1033 directory if you are not already there, and then select a couple of polices you would like to evaluate by holding the Ctrl key and clicking each policy. Figure 7-23 shows the policies we have selected. Once you have selected the policies, click Open to return to the Select Source dialog box. You should now see the files you selected in the Files text box. Click OK to close the Select Source dialog box and load the policies. This will open the Loading Policies dialog box, displayed in Figure 7-24.
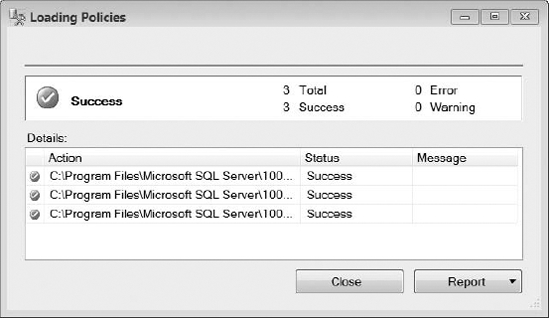
Figure 7-24. Loading Policies dialog box
Once you have successfully loaded the policies, click Close to return to the Evaluate Policies dialog box, which will now show all the policies you included in the Select Source dialog box (see Figure 7-25).
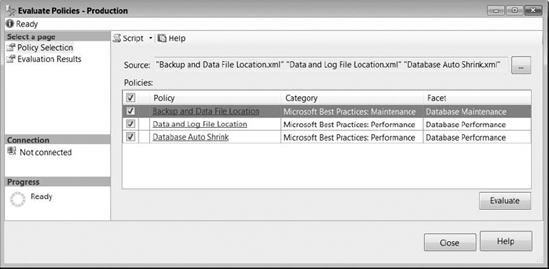
Figure 7-25. Evaluate Polices dialog box with selected policies
You can review each policy configuration and description by selecting the policy name link from the Policy column. Make sure each policy that you would like to evaluate is checked and click Evaluate. This will evaluate each policy and take you to the Evaluate Policies results page, as shown in Figure 7-26.

Figure 7-26. Policy evaluation results
Each policy that succeeds against all the servers will be indicated with a green check mark, and any policy that has a noncompliant server will be displayed with a red X. If you select a specific policy, you can see the results in the Target details table. Also, certain policies that contain failures have a check box beside them. This check box indicates that SQL Server can automatically apply changes to the server that will make them compliant with the policy. If you select the check box beside the policy, it will automatically check all the noncompliant servers. You can uncheck any server you do not wish to be affected by the changes and click Apply. Click Close to exit the evaluation. There you have it—in just a few clicks, you are able evaluate and manage policies across multiple servers in the organization.
SQL Dependency Reporting
Another issue that you face when administering SQL Server instances across an organization is determining object dependencies between servers and databases. If you have to make changes to objects in a database, it is hard to establish a list of items that may be affected (especially if the referencing objects are on another server). SQL Server 2008 introduces a new catalog view and two new dynamic management functions that can be used to help determine object dependencies:
sys.sql_expression_dependencies: You can use thesys.sql_expression_dependenciescatalog view to report dependency information for a given database. Cross-database entities are returned only when a valid four-part or three-part name is specified.sys.dm_sql_referenced_entities: You can use thesys.dm_sql_referenced_entitiesdynamic management function to return one row for each user-defined entity referenced by name in the definition of the specified referencing entity. The result set is limited to the entities that are referenced by the specified referencing entity.sys.dm_sql_referencing_entities: You can use thesys.dm_sql_referencing_entitiesdynamic management function to return one row for each user-defined entity in the current database that references another user-defined entity by name.
First, let's look at a couple of queries that can help you determine object dependencies between SQL Server instances. We have created a stored procedure called CrossServerSelect on the SQL Server 2008 instance named KEN-PCSQL2K8 that references the Person.Address. table in the AdventureWorks database located on the default SQL Server instance named KEN-PC. The CrossServerSelect stored procedure executes a simple query using the four-part naming convention, as shown in Listing 7-1.
Listing 7-1. CrossServerSelect Stored Procedure Definition
Create Procedure CrossServerSelect

AS


Select Distinct City

FROM [KEN-PC].AdventureWorks.Person.Address

GO
Now we know there is an object on the KEN-PCSQL2K8 instance that references the KEN-PC instance. Let's look at a couple of ways you can identify that dependency. One way is to use the sys.sql_expression_dependencies catalog view, as shown in Listing 7-2. This code should be executed from the context of the database that contains the object that is doing the referencing. In this case, that is the Test database on the KEN-PCSQL2K8 instance. The results of Listing 7-2 can be seen in Figure 7-27.
Listing 7-2. Returns All Referencing Dependencies in the Current Database
SELECT @@SERVERNAME LocalServer,

               OBJECT_NAME (referencing_id) referencing_object_name,

               referenced_server_name,

               referenced_database_name,

               referenced_schema_name,

               referenced_entity_name

FROM sys.sql_expression_dependencies

Figure 7-27. Results of all referencing dependencies in the current database
Another way to display cross-server dependencies is by using the sys.dm_sql_referenced_entities dynamic management function, as shown in Listing 7-3. You are required to provide the sys.dm_sql_referenced_entities function with two parameters: the referencing entity name and the referencing class. The object name we will be using is the dbo.CrossServer-Select stored procedure created earlier in this section. The referencing class can be one of three types: OBJECT, DATABASE_DDL_TRIGGER, or SERVER_DDL_TRIGGER. In this case, we are using the OBJECT class. We are executing the code in Listing 7-3 against the Test database on the KEN-PCSQL2K8 instance. The results of Listing 7-3 can be seen in Figure 7-28.
![]() Note You are required to provide the schema name along with the referencing entity name if you are using the
Note You are required to provide the schema name along with the referencing entity name if you are using the OBJECT class.
Listing 7-. Returns Entities Referenced by the dbo.CrossServerSelect Object
SELECT @@SERVERNAME LocalServer,

               referenced_server_name,

               referenced_database_name,

               referenced_schema_name,

               referenced_entity_name

FROM sys.dm_sql_referenced_entities ('dbo.CrossServerSelect','OBJECT')
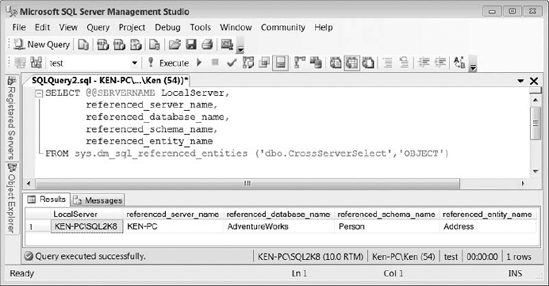
Figure 7-28. Results of entities referenced by the dbo.CrossServerSelect object
Now that you have seen how to display dependencies between servers, let's look at an example using the sysjobshistory table in the msdb database that doesn't require you to have multiple instances or any special setup configurations. Let's start by taking a look at all of the objects that reference the sysjobshistory table by running the code in Listing 7-4. The results of Listing 7-4 are shown in Figure 7-29.
Listing 7-4. Returns Objects That Reference the sysjobshistory Table by Using the sys.sql_expression_dependencies Catalog View
USE msdb

GO


SELECT OBJECT_NAME(referencing_id) AS referencing_entity_name,

                referenced_database_name AS database_name,

                referenced_schema_name,

                referenced_entity_name

FROM sys.sql_expression_dependencies

WHERE referenced_entity_name = 'sysjobhistory'
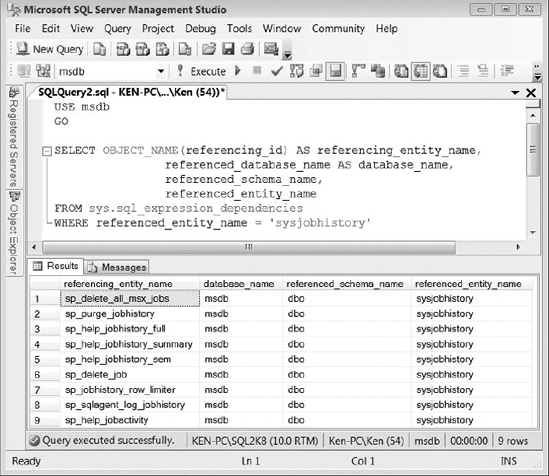
Figure 7-29. Results of objects that reference the sysjobshistory table by using the sys.sql_expression_dependencies catalog view
In this case you could also use the sys.dm_sql_referencing_entities function, as shown in Listing 7-5, since you are only returning referencing entities in the current database. The sys.dm_sql_referencing_entities function does not have a column to display the referenced object or database. There is no need to have a column for the referenced object, since you are supplying the referenced object name as a parameter. There is no referenced database column because the sys.dm_sql_referencing_entities function only returns dependencies for the current database. The results of Listing 7-5 are shown in Figure 7-30.
Listing 7-5. Returns Objects That Reference the sysjobshistory Table by Using the sys.dm_sql_referencing_entities Dynamic Management Function
USE msdb

GO


SELECT referencing_entity_name

FROM sys.dm_sql_referencing_entities ('dbo.sysjobhistory','OBJECT')
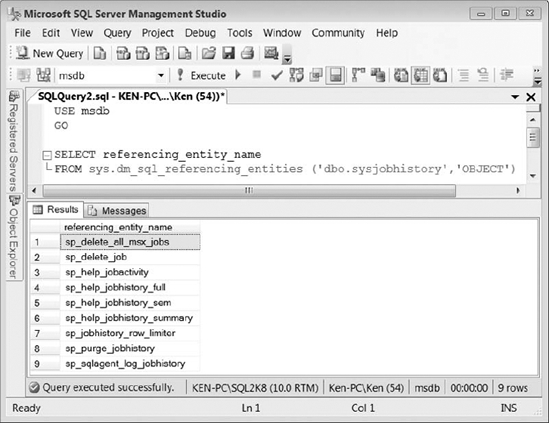
Figure 7-30. Results of objects that reference the sysjobshistory table by using the sys.dm_sql_referencing_entities dynamic management function
It is important to note that the new functionality provided by dependency reporting will not catch everything. You must use the proper three- or four-part notation when referencing the object. Let look at an example using the sp_help_job function in the msdb database. If you run the code in Listing 7-6, you can see there are seven entities referenced by the sp_help_job procedure. The results can be viewed in Figure 7-31.
Listing 7-6. Returns Entities Referenced by the sp_help_job Procedure
USE msdb

GO


SELECT referenced_schema_name,

               referenced_entity_name,

               referenced_minor_name

FROM sys.dm_sql_referenced_entities ('dbo.sp_help_job','OBJECT')
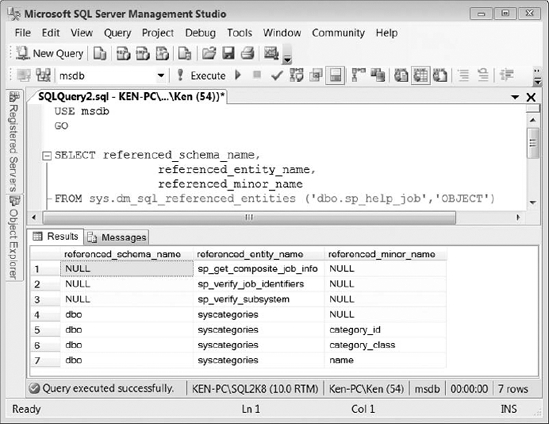
Figure 7-31. Results of the entities referenced by the sp_help_job procedure
Now let's review a couple of lines in the sp_help_job stored procedure by executing sp_helptext ‘sp_help_job’. If you look at the code block starting on line 238 (shown in Figure 7-32), you will see that sp_help_job executes the sp_get_composite_job_info stored procedure. If you refer to Figure 7-31, you will see that it is the first line in the result set.
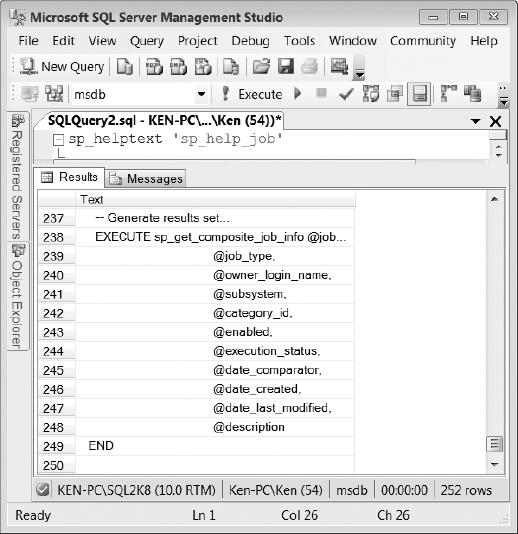
Figure 7-32. Lines 237–250 of the sp_help_job stored procedure executes the sp_get_composite_job_info stored procedure.
Now look at line 142 of the code shown in Figure 7-33. You can see that the sp_help_job stored procedure is calling the sp_help_jobserver stored procedure using dynamic SQL. If you look back at the dependency results displayed in Figure 7-31, because sp_help_jobserver is called using dynamic SQL, it is not displayed as a dependency of the sp_help_job stored procedure.
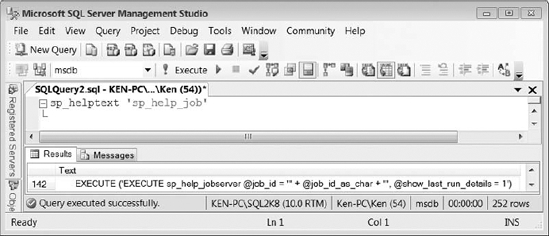
Figure 7-33. Line 142 of the sp_help_job stored procedure executes the sp_help_jobserver stored procedure using dynamic SQL.
Summary
This chapter has shown you many of the new features in SQL Server 2008 that will help you manage all of your database servers from a central environment. You can use Policy-Based Management to ensure that policies and procedures are being followed and use a central management server to easily evaluate those policies. Central management servers also ease routine administrative tasks by allowing you to execute queries and scripts against server groups. Finally, we discussed the benefits of SQL dependency reporting when moving or making schema changes to database objects. Implementing these new features requires a little more setup and research than you may have done with previous versions of SQL Server, but taking a little more time in the beginning will save a lot of time in the long run.