
C H A P T E R 9
![]()
Administering Database Objects
The purpose for every SQL Server installation is the necessity of a database; however, simply creating a database will not make an application work. Many objects work in concert to provide a positive user experience when interacting with a database. If you look at the Object Explorer in SQL Server Management Studio, you will see there are several objects and features available to aid you in administering the database. SQL Server even has its own set of system databases that manage data within SQL Server itself. This chapter will walk you through many of these objects and features and explain the impact each one has on you as a DBA.
Database 101
Before we talk about administering objects, let&s briefly review the database itself. A database is made up of two or more physical files (one data and one log). Here are some key things to keep in mind about those files:
- The data files contain the actual data that is stored in the database and the objects required to support the data.
- The log files contain information needed to recover transactions.
- The data files are stored in logical containers called filegroups.
When you create an object in a database, you can specify the filegroup where the object will be created. If you do not specify a filegroup when creating an object, it will belong to the default filegroup. One filegroup can contain multiple data files, which allows you to spread data processing over multiple disks. For example, if you create a new filegroup and place two data files in the filegroup that are located on separate disks, any object created on that filegroup will be able to take advantage of using multiple disks to service requests. Filegroups are also often used to move indexes or large tables to a separate physical disk in order to increase query performance.
Working with System Databases
The first thing you come across when opening the Databases folder in the Object Explorer (shown in Figure 9-1) is a folder called System Databases. This folder is where you can find the databases that SQL Server uses to store the internal system information necessary for the operation of SQL Server itself. It is important to have an understanding of each system database. I find myself using them often to write queries to help with administration tasks. Actually, one of the questions I always ask when interviewing DBAs is to name all of the system databases and describe each of their functions. Because there is a hidden system database, the interview question even has built-in extra credit points.
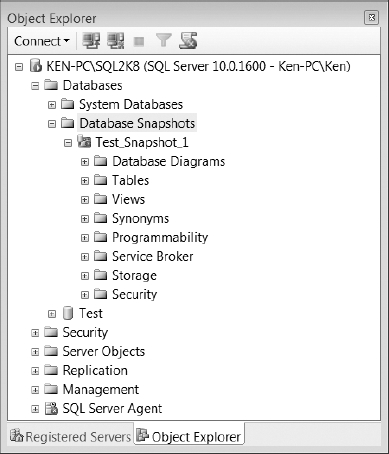
Figure 9-1. SQL Server Management Studio Object Explorer (Expanded Databases)
![]() Caution You should not manually alter the system databases, with the exception of adding custom configuration items to the model database. Certain changes to the system databases could cause major issues within SQL Server.
Caution You should not manually alter the system databases, with the exception of adding custom configuration items to the model database. Certain changes to the system databases could cause major issues within SQL Server.
The following list provides a brief description of each of the system databases:
master: Themasterdatabase contains all of the system information that pertains to an instance of SQL Server, such as logins, database names, and file locations.model: Themodeldatabase is used as a template when creating a new database. Any changes applied to themodeldatabase will be reflected in any user database that you create after the changes have been made.msdb: Themsdbdatabase is used to store configuration and logging information by features, such as SQL Server Agent, Service Broker, Database Mail, log shipping, and backups.tempdb: Thetempdbdatabase is used to store temporary objects created by SQL Server when generating result sets. Thetempdbis recreated every time SQL Server is restarted. If you ever want to find out how long SQL Server has been running, you can just select thecreate_datefor thetempdbfromsys.databases, as shown in the following query:Select create_date AS SystemUpSince From sys.databases Where name = 'tempdb'- Resource: This is a read-only database containing system objects that appear in the sys schema of every database. The Resource database is overwritten during the upgrade process to update the system objects.
You cannot see the Resource database from SQL Server Management Studio, but the data files are called mssqlsystemresource.mdf and mssqlsystemresource.ldf and are located in the C:Program FilesMicrosoft SQL ServerMSSQL10.InstanceNameMSSQLBinn folder for a default installation. If you are one of those people who would like to see the data that is stored in the Resource database, just make a copy of the data files, rename them, and restore them with a name like ResourceTest.
Working with Database Snapshots
The next folder you see under Databases in the Object Explorer is Database Snapshots. Database snapshots were introduced in SQL Server 2005 and provide you with the ability to create a read-only copy of a database at a given point in time. Any transactions that are uncommitted at the time you create a snapshot will not be included in the database snapshot. You can create multiple snapshots of a source database, but those snapshots must reside on the same instance as the source database.
A database snapshot only contains the data pages that have changed in the source database since the snapshot was created. It contains the original copies of those pages in order to give the effect of a read-only view. The file that is created to hold the changed data pages when the snapshot is created is known as a sparse file. A database snapshot sparse file will start out very small and will grow larger as changes are made to the source database.
A database snapshot can never be any bigger than the size of the source database at the time the snapshot was created. Since the snapshot only contains changed pages, it relies on the source database to provide the pages that have not changed; if the source database is unavailable, then so is the snapshot. A source database that contains a snapshot cannot be dropped, detached, or restored until all of the snapshots have been dropped.
You can use database snapshots for things such as reporting solutions and reverting the source database back to the time the snapshot was taken. Using a snapshot as a reporting solution is very helpful when using database mirroring, as stated in the “Database Mirroring” section in Chapter 3. You can create a database snapshot on all the database recovery models, but database snapshots are only available in the Enterprise Edition of SQL Server.
Creating a Database Snapshot
To create a database snapshot, you must issue the CREATE DATABASE command with the AS SNAPSHOT OF clause; you cannot create a database snapshot using the SQL Server Management Studio GUI. Any user who has the right to create a database can create a database snapshot.
Before you create a database snapshot, you need to know the logical files names for every data file in the source database. You can get the logical file name by executing the following query against the source database:
SELECT name FROM sys.database_files WHERE type <> 1
Listing 9-1 shows the syntax for creating a new database snapshot against the AdventureWorks database. Following are the parameters used in that script:
Test_Snapshot_1 is the name of the new database snapshot.
AdventureWorks_Data is the logical file name of the data file in the AdventureWorks database.
FileName is the name of the snapshot file that will hold the changed data files. You can use any file name, extension, and location that you like for the snapshot file.
AdventureWorks is the source database name following the AS SNAPSHOT OF clause.
Listing 9-1. Syntax Used to Generate a Database Snapshot
CREATE DATABASE Test_Snapshot_1

 ON

(Name = AdventureWorks_Data,

 FileName = 'C:Test_Data.ss')

 AS SNAPSHOT OF AdventureWorks
To create a database snapshot with multiple filegroups, you need to supply the Name and FileName parameters for each filegroup, as shown in Listing 9-2.
Listing 9-2. Syntax Used to Generate a Database Snapshot Using Multiple Filegroups
CREATE DATABASE <Snapshot Name>

 ON

(Name = <Logical_FileName_1>,

 FileName =<Snapshot File Location 1>),

(Name =<Logical_FileName_2>,

 FileName =<Snapshot File Location 2>)

 AS SNAPSHOT OF <DatabaseName>
Viewing and Querying a Snapshot
Once you have created a snapshot, you can view it in the Database Snapshots folder under the Databases node in the SQL Server Management Studio Object Explorer (refer to Figure 9-1).
You can now query the snapshot as if it were any other database. Notice that if you query sys.database_files as shown in Figure 9-2, the physical file names are actually the source database file names and not the snapshot file names created back in Listing 9-1. Querying the snapshot gives the effect of querying an exact copy of the source database at the time you created the snapshot.
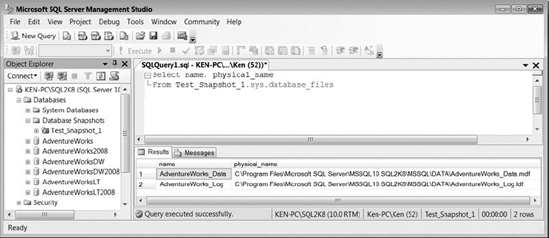
Figure 9-2. Querying sys.database_files from the snapshot returns the source database&s metadata.
Since querying the snapshot returns metadata about the source database, you have to query the master database (as shown in Listing 9-3) to return the metadata for the snapshot.
Listing 9-3. Query to View the Snapshot Metadata
SELECT B.name DatabaseName,

               A.name LogicalName,

               B.database_id,

               B.source_database_id,

               A.physical_name

FROM master.sys.master_files A

            JOIN master.sys.databases B

           ON A.database_id = B.database_id
You can see the result set of Listing 9-3 in Figure 9-3. Notice that the snapshot database name Test_Snapshot_1 has a value of 6 for the source_database_id, which references the database_id of the AdventureWorks database.
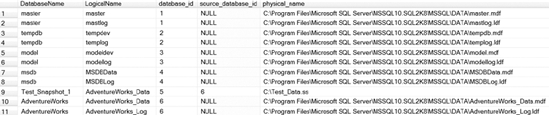
Figure 9-3. The result set from querying metadata for a snapshot database
To drop a snapshot, all you need to do is issue the DROP DATABASE command using the same syntax you would use to drop any database. Run the following statement to drop the Test_Snapshot_1 database snapshot used in this section:
DROP DATABASE Test_Snapshot_1
Reverting a Database to a Database Snapshot
You can revert a source database to the state it was in at the time a snapshot was taken using the RESTORE DATABASE statement with the FROM DATABASE_SNAPSHOT clause. Reverting a database is a quick way to roll back major changes to the source database. For example, you may want to create a database snapshot prior to running vendor-supplied upgrade scripts. Reverting a database due to an error will often be faster than restoring the entire database because only the changed pages will have to be overwritten. Reverting a database does not, however, replace the need for a good database backup. If the source database becomes corrupt, you will not be able to revert it using a snapshot.
When a source database is restored using a snapshot, the updated data files on the source database are overwritten using the data pages from the snapshot sparse file. The log file in the source database is then overwritten and re-created.
Before you revert a database to a snapshot, you should do the following:
- Make sure the source database does not contain read-only or compressed filegroups.
- Make sure all the files are online that were online when the snapshot was created.
- Delete all snapshots of the source database, except the one you are reverting to.
Once you decide to revert a source database to a snapshot, you will need the source database name and the name of the snapshot. You can get the database names by running the query that was shown in Listing 9-3. While you are gathering the database names, you should also verify that the snapshot you are reverting to is the only snapshot with the source_database_id of the database you will be reverting. Then use the syntax shown in Listing 9-4 to revert your database. The listing reverts the AdventureWorks database to a snapshot named Test_Snapshot_1. If you have already dropped the snapshot we created in the previous section, you can re-create it by running the code in Listing 9-1.
Listing 9-4. Syntax Used to Revert a Database to a Database Snapshot
USE master

GO

RESTORE DATABASE AdventureWorks FROM DATABASE_SNAPSHOT = 'Test_Snapshot_1'
![]() Note Reverting a database breaks the log backup chain, so you need take a full backup of a database once it has been reverted. If you do not take a full backup of the database before you try to take a transaction log backup, you will receive an error message stating that the
Note Reverting a database breaks the log backup chain, so you need take a full backup of a database once it has been reverted. If you do not take a full backup of the database before you try to take a transaction log backup, you will receive an error message stating that the BACKUP LOG cannot be performed because there is no current database backup.
Working with Tables
The remaining objects discussed in this chapter are database objects, and they are located in folder structures under each individual database (with the exception of logon triggers, which we will discuss in the “Working with Triggers” section later in this chapter). As you expand a database, you will encounter the Tables folder. A table is the most important object in the database because it allows you to store data in a logical, structured manner that can be retrieved and processed as needed. You can create up to 2 billion tables per database, and each table can have up to 30,000 columns. The number of rows each table can have is only limited by the available disk space on the server.
Default Constraints
You can define default constraints on columns within a table in order to insert a predefined value into those columns whenever a specific value is not provided. Each column can have only one default constraint. You can create the default when you create a table, or you can add it later using the ALTER TABLE statement. You cannot alter a default. To “change” a default, you must drop the existing constraint and create a new one.
To create a default on a column when you create a table, you can specify the constraint following the column definition. In Listing 9-5, we are creating a table called Orders with an OrderID and an OrderDate column. The OrderDate column has a default named DF_Orders_OrderDate. The column will be given the value of getdate() whenever a value is not otherwise specified.
Listing 9-5. Syntax to Create a Default on a Column When Creating a Table
USE AdventureWorks2008

GO


CREATE TABLE Orders

(OrderID int identity,

 OrderDate DateTime NOT NULL

   CONSTRAINT [DF_Orders_OrderDate] DEFAULT (getdate()) )
If you want to add a default to a column in a table that already exists, you can use the ALTER TABLE statement, as shown in Listing 9-6. You will end up with the exact same table by running the code in Listing 9-5 or Listing 9-6.
Listing 9-6. Syntax to Create a Constraint on a Preexisting Column
USE AdventureWorks2008

GO


--Drop the table if it currently exists

IF OBJECT_ID('dbo.Orders', 'U') IS NOT NULL

  DROP TABLE dbo.Orders;


--Create the Orders table

CREATE TABLE Orders

(OrderID int identity ,

 OrderDate DateTime NOT NULL)


--Alter the Orders table to add the default constraint

ALTER TABLE dbo.Orders

ADD CONSTRAINT [DF_Orders_OrderDate]

DEFAULT (getdate()) FOR OrderDate
You can also use the ALTER TABLE statement to add a new column with a default value, as shown in Listing 9-7. You can use the WITH VALUES clause to apply the default to any existing row in the table. If the WITH VALUES clause is not used, all of the preexisting rows will contain a NULL value, and the default will only be applied to new rows.
Listing 9-7. Syntax to Add a Column to a Table with a Default Using the ADD VALUES Clause
USE AdventureWorks2008

GO


--Drop the table if it currently exists

 IF OBJECT_ID('dbo.Orders', 'U') IS NOT NULL

  DROP TABLE dbo.Orders;
--Create the Orders table
CREATE TABLE Orders
(OrderID int NOT NULL)
--Insert 3 records into the Orders table
INSERT INTO Orders (OrderID)
VALUES(1),(2),(3)
--Alter the table to add the default
ALTER TABLE dbo.Orders
ADD OrderDate Datetime NULL
CONSTRAINT [DF_Orders_OrderDate]
DEFAULT (getdate()) WITH VALUES
--Select to see the default was applied to the existing rows
SELECT OrderID, OrderDate FROM Orders
As you can see in Figure 9-4, the new default was applied to all three existing columns, giving each row the exact same OrderDate. If you remove the WITH VALUES clause from Listing 9-7, all of the order dates would be NULL. If you define the new OrderDate column as NOT NULL, you do not have to specify the WITH VALUES clause as it will be implied.
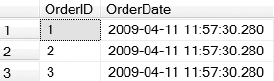
Figure 9-4. Result set returned from Listing 9-7
You can drop a default constraint by using the ALTER TABLE statement with the DROP CONSTRAINT clause, as shown in Listing 9-8.
Listing 9-8. Code Used to Drop a Default Constraint
ALTER TABLE Orders DROP CONSTRAINT DF_Orders_OrderDate
Primary Key Constraints
A primary key is a column or set of columns that can be used to uniquely identify a row in a table. If you use multiple columns to create a primary key, it is referred to as a composite key. Data can be repeated in each individual column in the composite key as long as all of the data elements that make up the composite key are unique for each row in the table.
You can create the primary key when you create the table, or create it later using the ALTER TABLE statement. When you create a primary key, SQL Server automatically creates a unique index to enforce that uniqueness. The unique index will be clustered unless you specify nonclustered, or if there is already a clustered index on the table.
To create a primary key on a column when creating a table, you need to specify the PRIMARY KEY keyword following the column definition. Optionally, you can specify CLUSTERED or NONCLUSTERED to determine the type of index that will be generated. You also have the option to specify the name of the constraint that will be created by using the CONSTRAINT keyword followed by the name of the constraint. If you do not name the constraint, you will be at the mercy of SQL Server and will end up with an auto-generated name like PK__Orders__C3905BAF52793849. Listing 9-9 shows the syntax for creating a primary key when creating a table.
Listing 9-9. Syntax for Creating a Primary Key When Creating a Table
USE AdventureWorks2008

GO


--Drop the table if it currently exists

IF OBJECT_ID('dbo.Orders', 'U') IS NOT NULL

  DROP TABLE dbo.Orders;


--Create the Orders table

CREATE TABLE Orders

(OrderID int NOT NULL CONSTRAINT PK_ORDERS PRIMARY KEY CLUSTERED)
To create a primary key after a table has been created, you can use the ALTER TABLE statement. Listing 9-10 shows how to create a composite key on a table after the table has already been created. Since the OrderID will be repeated for each ProductID contained in the Order- Details table for a single order, you can uniquely identify the order using the OrderID and the ProductID combined.
Listing 9-10. Syntax to Create a Composite Key Using the ALTER TABLE Statement
USE AdventureWorks2008

GO


--Drop the table if it currently exists

IF OBJECT_ID('dbo.OrderDetails', 'U') IS NOT NULL

  DROP TABLE dbo.OrderDetails;


--Create the OrderDetails table

CREATE TABLE OrderDetails

(OrderID int NOT NULL,

 ProductID int NOT NULL)


--Alter the OrderDetails table to add a composite key

ALTER TABLE OrderDetails

ADD CONSTRAINT PK_Order_Details PRIMARY KEY CLUSTERED

(OrderID,

 ProductID)
To remove a primary key from a table, you need to issue the ALTER TABLE statement with the DROP CONSTRAINT keywords followed by the name of the primary key, as shown in Listing 9-11.
Listing 9-11. Syntax to Remove a Primary Key Constraint
ALTER TABLE OrderDetails DROP CONSTRAINT PK_Order_Details
Unique Constraints
You can use a unique constraint to maintain distinct values in a column or set of columns that do not participate in the primary key. As with a primary key, when you create a unique constraint, SQL Server automatically creates a unique index to ensure the column values are distinct. Unlike with a primary key, you can define multiple unique constraints per table. You can also define a unique constraint on one or more columns that accept NULL values; however, if you define a unique constraint on single column, that column can accept only one NULL value.
To create a unique constraint on a column when creating a table, you need to specify the UNIQUE keyword following the column definition. Optionally, you can specify CLUSTERED or NONCLUSTERED to determine the type of index that will be generated; NONCLUSTERED is the default. Remember, you can have only one clustered index per table, so if you are using a clustered index for your primary key, the index on the unique constraint must be nonclustered. You also have the option to specify the name of the constraint by using the CONSTRAINT keyword followed by the name of the constraint. Listing 9-12 shows the syntax for creating a unique constraint when creating a table.
Listing 9-12. Syntax for Creating a Unique Constraint When Creating a Table
USE AdventureWorks2008

GO


--Drop the table if it currently exists

IF OBJECT_ID('dbo.Orders', 'U') IS NOT NULL

  DROP TABLE dbo.Orders;


--Create the Orders table

CREATE TABLE Orders

(OrderID int NOT NULL CONSTRAINT PK_ORDERS PRIMARY KEY CLUSTERED,

 OrderNumber int NULL CONSTRAINT UQ_ORDER_NUMBER UNIQUE NONCLUSTERED)
To create a unique constraint after you have already created a table, you can use the ALTER TABLE statement. Listing 9-13 shows how to create a unique constraint using multiple columns on an existing table.
Listing 9-13. Syntax to Create a Unique Constraint Using the ALTER TABLE Statement
USE AdventureWorks2008

GO


--Drop the table if it currently exists

IF OBJECT_ID('dbo.OrderDetails', 'U') IS NOT NULL

  DROP TABLE dbo.OrderDetails;
--Create the OrderDetails table
CREATE TABLE OrderDetails
(OrderID int NOT NULL CONSTRAINT PK_ORDERDETAILS PRIMARY KEY CLUSTERED,
OrderNumber int NULL,
CustomerNumber int NOT NULL)
--Alter the OrderDetails table to add the unique constraint
ALTER TABLE OrderDetails
ADD CONSTRAINT UQ_ORDER_CUSTOMER_NBR UNIQUE
(OrderNumber,
CustomerNumber)
To remove a unique constraint from a table, you need to issue the ALTER TABLE statement with the DROP CONSTRAINT keywords followed by the name of the unique constraint, as shown in Listing 9-14.
Listing 9-14. Syntax to Remove a Unique Constraint
ALTER TABLE OrderDetails DROP CONSTRAINT UQ_ORDER_CUSTOMER_NBR
Foreign Key Constraints
You can create a foreign key to enforce a relationship between the data in two tables. Say that you have an Orders table and an OrderDetails table. When a customer places an order, you insert one record into Orders. Then, for each line item, you place a record into OrderDetails. Naturally you would want each line item in OrderDetails to contain the order number, so that you could refer to the order record for any given line item. That order number in OrderDetails is an example of a foreign key. By defining such a relationship explicitly, you enable SQL Server to ensure that each order number in the child table OrderDetails represents a valid order in the parent table Orders.
![]() Note You cannot change a primary key or unique constraint while it is being referenced by a foreign key constraint; you have to remove the foreign key first.
Note You cannot change a primary key or unique constraint while it is being referenced by a foreign key constraint; you have to remove the foreign key first.
To create a foreign key you can use the ALTER TABLE statement. You can use the NO CHECK option to force the creation of the foreign key, even if the existing data does not meet the foreign key requirements. All data entered after the foreign key is created will then be forced comply with the constraint. Listing 9-15 uses the ALTER TABLE statement to create a foreign key constraint on the OrderID column in the OrderDetails table that references the OrderID column in the Orders table.
You can specify the CASCADE option to apply any updates or deletes made to the Orders table to the OrderDetails table. For example, if an order is deleted from the Orders table, all of the records in the OrderDetails table that reference that OrderID will be deleted as well.
Listing 9-15. Creating a Foreign Key Constraint Between Two Tables
USE AdventureWorks2008

GO


--Drop the tables if they currently exist

IF OBJECT_ID('dbo.OrderDetails', 'U') IS NOT NULL

  DROP TABLE dbo.OrderDetails;


IF OBJECT_ID('dbo.Orders', 'U') IS NOT NULL

  DROP TABLE dbo.Orders;


--Create the tables

CREATE TABLE Orders

(OrderID int NOT NULL CONSTRAINT PK_ORDERS PRIMARY KEY CLUSTERED,

OrderNumber int NULL CONSTRAINT UQ_ORDER_NUMBER UNIQUE NONCLUSTERED)


CREATE TABLE OrderDetails

(OrderDetailID int IDENTITY (1,1) NOT NULL

CONSTRAINT PK_ORDER_DETAILS PRIMARY KEY CLUSTERED,

OrderID int NOT NULL,

ProductID int NOT NULL)


--Add the foreign key constraint

ALTER TABLE OrderDetails WITH NOCHECK

ADD CONSTRAINT FK_OrderDetails_Orders FOREIGN KEY(OrderID)

REFERENCES Orders (OrderID)

ON UPDATE CASCADE

ON DELETE CASCADE
The script from Listing 9-15 creates the tables shown in Figure 9-5 with a one-to-many relationship between the Orders and the OrderDetails tables.
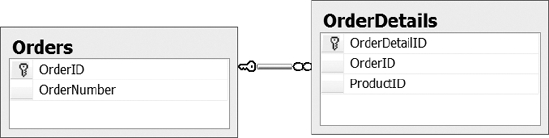
Figure 9-5. Foreign key relationship between the Orders and OrderDetails tables
You can disable a foreign key when you want to perform certain operations, such as inserts and deletes that the foreign key would cause to fail. Execute the ALTER TABLE statement with the NOCHECK CONSTRAINT keywords followed by the constraint name. Optionally, you can use the ALL keyword to disable all constraints on a table at once. Re-enable the constraints by changing the NOCHECK keyword to CHECK and reissuing the statement. Listing 9-16 shows the syntax to disable and enable constraints.
![]() Note You can disable only foreign key and check constraints using the
Note You can disable only foreign key and check constraints using the NOCHECK keyword. Any other constraints, such as primary key and unique constraints, will still be enabled.
Listing 9-16. Syntax Used to Disable/Enable Constraints
--Disable the FK_OrderDetails_Orders constraint on the OrderDetails table

ALTER TABLE OrderDetails NOCHECK CONSTRAINT FK_OrderDetails_Orders


--Disable the all constraints on the OrderDetails table

ALTER TABLE OrderDetails NOCHECK CONSTRAINT ALL


--Enable the FK_OrderDetails_Orders constraint on the OrderDetails table

ALTER TABLE OrderDetails CHECK CONSTRAINT FK_OrderDetails_Orders


--Enable the all constraints on the OrderDetails table

ALTER TABLE OrderDetails CHECK CONSTRAINT ALL
To remove a foreign key constraint from a table, issue the ALTER TABLE statement with the DROP CONSTRAINT keywords followed by the name of the foreign key constraint, as shown in Listing 9-17.
Listing 9-17. Code to Remove a Foreign Key Constraint
ALTER TABLE dbo.OrderDetails DROP CONSTRAINT FK_OrderDetails_Orders
Check Constraints
You can use a check constraint to help enforce domain integrity by validating or checking the data that is being inserted into a column before accepting the value. For example, you can use a check constraint to verify that a valid range of dates are being inserted into a column. You can use any logical expression that returns True or False to create a check constraint.
The code in Listing 9-18 creates a check constraint on a table named CustInfo on the DateOfBirth column to verify that any date of birth is greater than 1/1/1900 and less than the current date.
Listing 9-18. Syntax to Create a Check Constraint When Creating a Table
USE AdventureWorks2008

GO


--Drop the table if it currently exists

IF OBJECT_ID('dbo.CustInfo', 'U') IS NOT NULL

  DROP TABLE dbo.CustInfo;


CREATE TABLE CustInfo

(CustID int IDENTITY(1,1) PRIMARY KEY,

 DateOfBirth DATE

 CONSTRAINT ValidDateOfBirth

 CHECK (DateOfBirth > '1/1/1900' AND DateOfBirth < getdate()))
Now if you try to run the query INSERT INTO CustInfo (DateOfBirth) VALUES ('1/1/1899') to insert a date that is out of the valid date range defined by the check constraint in Listing 9-18, you will get the error message shown in Figure 9-6.

Figure 9-6. Error message returned when trying to insert an out-of-range date as defined by the check constraint in Listing 9-18
![]() Note A
Note A NULL value evaluates to Unknown instead of True or False, so if you try to insert a NULL value into a column with a check constraint, the insert will succeed.
To create a check constraint on a table that has already been created, use the ALTER TABLE statement, as shown in Listing 9-19. The WITH NOCHECK option will allow the check constraint to be applied even if there are current records in the table that do not meet the requirements of the constraint.
Listing 9-19. Syntax to Create a Check Constraint Using the ALTER TABLE Statement
USE AdventureWorks2008

GO


--Drop the table if it currently exists

IF OBJECT_ID('dbo.CustInfo', 'U') IS NOT NULL

  DROP TABLE dbo.CustInfo;
--Create the table
CREATE TABLE CustInfo
(CustID int IDENTITY(1,1) PRIMARY KEY,
DateOfBirth DATE)
--Alter the table to add the check constraint
ALTER TABLE CustInfo WITH NOCHECK
ADD CONSTRAINT ValidDateOfBirth
CHECK (DateOfBirth > '1/1/1900' AND DateOfBirth < getdate())
You also have the ability to disable check constraints to allow you to perform certain operations. You can disable check constraints using the same syntax as disabling foreign key constraints. For the exact syntax, see the previous “Foreign Key Constraints” section. To remove a check constraint from a table, you need to issue the ALTER TABLE statement with the DROP CONSTRAINT keywords followed by the name of the check constraint, as shown in Listing 9-20.
Listing 9-20. Syntax for Removing a Check Constraint
ALTER TABLE CustInfo DROP CONSTRAINT ValidDateOfBirth
Sparse Columns
The sparse column feature is new in SQL Server 2008. You can declare a column using the sparse keyword, and anytime a NULL value is entered in the column, that NULL value will not use any disk space. Sounds good, right? But there is a catch.
Sparse columns require an extra 4 bytes of storage for each non-NULL, fixed-length value in the table. So while they require zero bytes to store a NULL value, they require extra space to store non-NULL values. Therefore, it is very important to have a reasonable ratio of NULL to non-NULL values. Otherwise, use of the sparse columns feature will end up costing you disk space rather than saving it.
The fewer bytes a data type requires, the higher the percentage of NULL values you will need in the column in order to save space via the sparse columns feature. There is a table in SQL Server Books Online you can use to determine the estimated space savings per data type (see “Using Sparse Columns” at http://msdn.microsoft.com/en-us/library/cc280604.aspx).
Sparse columns must allow NULL values and cannot include the following data types:
- Geography
- Geometry
- Image
- ntext
- Text
- Timestamp
- User-defined data types
Let&s look at the sample code in Listing 9-21. Address Lines 1 and 2 are required, so you cannot define them as sparse columns. Address Lines 3 and 4 are not required, but they are often used and would not be good candidates for sparse columns. However, Address Lines 5 and 6 are rarely populated, so you can define them as sparse and benefit from the disk savings.
Listing 9-21. Syntax for Creating a Table Using Sparse Columns
USE AdventureWorks2008

GO


--Drop the table if it currently exists

IF OBJECT_ID('dbo.CustInfo', 'U') IS NOT NULL

  DROP TABLE dbo.CustInfo;


--Create the table

CREATE TABLE CustInfo

(CustID INT PRIMARY KEY,

Addr_Line1 VARCHAR(100) NOT NULL,

Addr_Line2 VARCHAR(100) NOT NULL,

Addr_Line3 VARCHAR(100) NULL,

Addr_Line4 VARCHAR(100) NULL,

Addr_Line5 VARCHAR(100) SPARSE NULL,

Addr_Line6 VARCHAR(100) SPARSE NULL)
If you want to add the SPARSE option to a column in a table that already exists, you can use the ALTER TABLE statement. Listing 9-22 shows how to use the ALTER TABLE statement to change the Addr_Line4 column in the CustInfo table to a sparse column. If you want to drop the SPARSE option from a column, all you need to do is change the ADD keyword to DROP, as shown in Listing 9-23.
Listing 9-22. Syntax for Adding the SPARSE Option to a Column Using the ALTER TABLE Statement
ALTER TABLE CustInfo ALTER COLUMN Addr_Line4 ADD SPARSE
Listing 9-23. Syntax for Dropping the SPARSE Option from a Column Using the ALTER TABLE Statement
ALTER TABLE CustInfo ALTER COLUMN Addr_Line4 DROP SPARSE
Compression
You can enable compression on tables and indexes in SQL Server 2008 to reduce the disk space needed to store the data in those tables and indexes. Table and index compression is only available in the Enterprise and Developer Editions of SQL Server. You can implement two different levels of compression: row-level compression and page-level compression.
Row-level compression works by reducing the metadata required to store the data itself. Row-level compression also reduces the amount of storage by using variable length storage for fixed length data types, including numeric data types. For example, a column with a data type int may require 1 byte to store the number 1 and 2 bytes to store the number 1,000 instead of requiring 4 bytes of storage for every single value.
Page-level compression works by implementing row-level compression along with two other techniques called prefix compression and dictionary compression. Prefix compression works by identifying a common value for the data in each column that can be used to reduce storage requirements. The value is then replaced by a pointer to the value that is stored in the compression information structure stored immediately after the page header. Dictionary compression also replaces values on the page with a pointer to a common value in the compression information structure. The main difference is that dictionary compression is not limited to a single column; it looks for common values on the entire page. Page compression does not occur immediately, as there would be no benefit in compressing a nearly empty page.
There are a few things to keep in mind when using data compression. Data compression requires less input and output (IO) because it requires fewer disk reads to access the data. However, data compression will increase the CPU because SQL Server now has to compress and uncompress the data. Page-level compression provides a higher compression ratio than row-level compression, but you may see higher levels of CPU utilization when using pagelevel compression. Deciding whether to use row-level, page-level, or no compression at all is entirely dependent on how each option affects your environment. You could see drastic space savings and increased performance by enabling compression; however, if you are already CPU bound, you may hinder performance by enabling compression.
You can use the sp_estimate_data_compression_savings stored procedure to determine the estimated space you will save by enabling row or page compression, as shown in Figure 9-7.
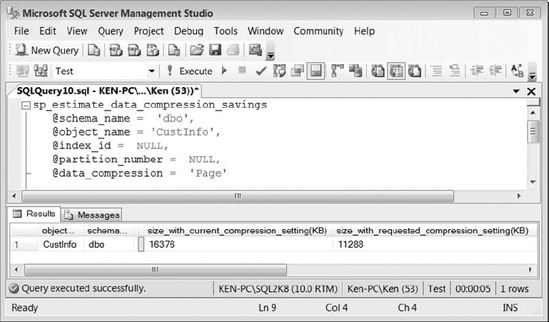
Figure 9-7. Estimated savings using page compression on the CustInfo table
To create a compressed table, you need to specify the compression type (row or page) you would like following the table definition. Listing 9-24 shows the correct syntax to create a table with page compression.
Listing 9-24. Syntax to Enable Page Compression When Creating a Table
USE AdventureWorks2008

GO


--Drop the table if it currently exists

IF OBJECT_ID('dbo.CustInfo', 'U') IS NOT NULL

  DROP TABLE dbo.CustInfo;


--Create the table with page compression

CREATE TABLE Orders

(OrderID int identity,

OrderDate DateTime NOT NULL)

WITH (DATA_COMPRESSION = PAGE)
To add compression or change the existing compression on a table, you can use the ALTER TABLE statement to rebuild the current pages with the selected compression type. Listing 9-25 changes the compression to row-level compression for the Orders table. To remove compression, all you need to do is change the value to DATA_COMPRESSION = NONE.
Listing 9-25. Syntax to Add or Change the Compression on an Existing Table
ALTER TABLE Orders

REBUILD WITH (DATA_COMPRESSION = ROW)
Partitions
You can use partitioning to increase query performance and decrease maintenance time on large tables by working with subsets of data without altering the presentation layer. You must be running the Enterprise or Developer Edition of SQL Server in order to take advantage of partitioned tables and indexes. In order to implement table partitioning, you must first create a partition function, then create a partition scheme, and finally create a table that uses the partition scheme.
Listing 9-26 shows the syntax needed in order to create a partitioned table.
Listing 9-26. Syntax to Create a Partitioned Table
USE AdventureWorks2008

GO


--Create partition function

CREATE PARTITION FUNCTION SamplePartitionFunction (Datetime)

AS RANGE RIGHT FOR VALUES ('1/1/2000'),

GO
--Create partition scheme
CREATE PARTITION SCHEME SamplePartitionScheme
AS PARTITION SamplePartitionFunction
TO ([PRIMARY], [PRIMARY]);
GO
--Create partition table
CREATE TABLE SamplePartitionTable
(ID INT NOT NULL,
SomeDateColumn DATETIME)
ON SamplePartitionScheme (SomeDateColumn);
GO
--Insert sample data
INSERT INTO SamplePartitionTable
VALUES (1,'1/1/1999'), (2,'1/15/1999'), (3,'1/21/1999'),
(4,'1/1/2000'), (5,'1/20/2006')
--Query the sys.partitions table to show the inserted rows for each partition
SELECT partition_number, rows
FROM sys.partitions
WHERE object_id = OBJECT_ID('SamplePartitionTable')
Figure 9-8 shows the results returned from querying the sys.partitions table. Notice that the second partition has two rows. You can use the LEFT or RIGHT keyword when creating the function to determine which filegroup will contain the value specified as the divisor. If no value is specified, the value will reside in the left filegroup. Since we specified RANGE RIGHT for the divisor value 1/1/2000, it was inserted into the second partition.
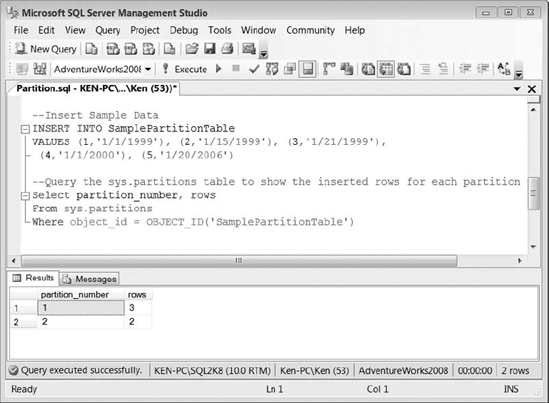
Figure 9-8. Results of Listing 9-26
You create a partition function to specify how the rows in the table will be divided or partitioned based upon the values in the partitioning columns. The scheme actually assigns the partitions defined using the partition function to a specific filegroup. You can assign each partition to the same filegroup, but using multiple filegroups gives you the added ability to create a backup of each partition separately by performing a filegroup backup. At the very minimum, you must define enough filegroups in the partition scheme to hold the partitions defined by the partition function, but you can also add extra filegroups that will be marked next for use if the function is altered to create extra partitions. You must have one more filegroup defined in the partition scheme than the number of ranges defined in the partition function. For example, if you define a single range in the partition function, the rows will be divided into two filegroups.
Temporary Tables
Temporary tables are like regular tables, except they are stored in the tempdb and automatically dropped after they have been used. There are two types of temporary tables, local and global. Local temporary tables are defined using a pound sign (#) in front of the table name and is visible only to the session that created it. As soon as the session is disconnected, the temporary table is deleted. Global temporary tables are defined using double pound signs (##) in front of the table name and are visible to all the users in the database. Global temporary tables will be deleted as soon as your session is disconnected and all other sessions using the table have disconnected as well.
You will often find DBAs using temporary tables in administrative scripts. For example, you can run the following script to insert the contents of the error log into a temporary table, and then filter your results to entries that contain an error. If you were just using the sp_read-errorlog stored procedure, you would have to scroll through all the results and manually look for entries containing an error.
--Create the temp table

CREATE TABLE #Temp

(LogDate DateTime,

 ProcessInfo varchar(255),

 Txt varchar(Max))


--Insert the data from the error log

INSERT INTO #Temp

EXEC sp_readerrorlog


--Select only txt containing err

SELECT * FROM #Temp

WHERE Txt LIKE '%err%'


--Drop temp table

DROP TABLE #Temp
![]() Caution Global temporary tables can cause major application issues. For example, if you define a global temporary table in a stored procedure that is called multiple times before the global temporary table has been deleted, it will cause the next
Caution Global temporary tables can cause major application issues. For example, if you define a global temporary table in a stored procedure that is called multiple times before the global temporary table has been deleted, it will cause the next CREATE statement to fail.
Working with Views
Views are virtual tables that represent the result set of a select statement from one or more tables or other views. In most cases, that is unless a view is indexed, a view is basically a predefined query that is stored and executed whenever the view is referenced in a query.
You can use a view to limit user access to sensitive information in the underlying table. For example, you can create a view that only includes a subset of columns in a table and give the user access to the view instead of the underlying table. You can also use a WHERE clause to limit the rows of data that are returned, ensuring the user can see only specific rows.
There are a few limitations you need to be aware of when creating a view. A SELECT statement in a view cannot include any of the following:
- A
COMPUTEorCOMPUTE BYclause. - An
ORDER BYclause without also including theTOPclause. The workaround for this is to select the top 100 percent, as in the following query:SELECT TOP 100 PERCENT FROM <table> ORDER BY <columns>. - The
INTOkeyword used to create a new table. - The
OPTIONclause. - A reference to a temporary table or table variable.
The example in Listing 9-27 creates a view that shows the name and department description of all the employees in a single department. As you can see in the example, we are able to use the view to hide the employee&s social security number. We are also able to provide more user-friendly column names by using an alias. The WITH ENCRYPTION option prevents the view definition from being displayed. You should be careful when using the encryption option because you will not be able to retrieve the definition from the database if you need it.
Listing 9-27. Sample Code Used to Create an Encrypted View
USE AdventureWorks2008

GO


CREATE TABLE Employee

(EmpID int NOT NULL CONSTRAINT PK_EMP PRIMARY KEY CLUSTERED,

EmpFirstName Varchar(50),

EmpLastName Varchar(50),

EmpSSN Varchar(9),

DepartmentID int)

GO


CREATE TABLE Department

(DepartmentID int NOT NULL CONSTRAINT PK_DEPT PRIMARY KEY CLUSTERED,

DepartmentDscr Varchar(50))

GO


CREATE VIEW vMarketingEmployees

WITH ENCRYPTION

AS

SELECT dbo.Employee.EmpFirstName AS FirstName,

       dbo.Employee.EmpLastName AS LastName,

       dbo.Department.DepartmentDscr AS Department

FROM  dbo.Department INNER JOIN

      dbo.Employee ON dbo.Department.DepartmentID = dbo.Employee.DepartmentID

WHERE dbo.Department.DepartmentID = 1
Let&s say you found out that the Marketing department is actually DepartmentID 2 instead of 1. You can use the ALTER VIEW statement shown in Listing 9-28 to make the changes. While making the changes, you also decide to remove the encryption option. All you have to do to remove the encryption is not to specify the option when running the ALTER VIEW statement.
Listing 9-28. Syntax Used to Alter an Existing View
USE AdventureWorks2008

GO


ALTER VIEW vMarketingEmployees

AS

SELECT dbo.Employee.EmpFirstName AS FirstName,

       dbo.Employee.EmpLastName AS LastName,

       dbo.Department.DepartmentDscr AS Department

FROM  dbo.Department INNER JOIN

      dbo.Employee ON dbo.Department.DepartmentID = dbo.Employee.DepartmentID

WHERE dbo.Department.DepartmentID = 2
To remove a view from the database, all you have to do is issue the DROP VIEW statement followed by the view name, as shown in Listing 9-29.
Listing 9-29. Syntax to Remove a View from the Database
DROP VIEW vMarketingEmployees
Partitioned Views
Distributed partitioned views are those that reference data across multiple servers and combine the data to the user as a single result set. You can use distributed partitioned views to form a federation of database servers, which are separately managed servers used to spread the processing load for a single application across multiple servers. Listing 9-30 shows an example of a distributed partitioned view.
![]() Note You can create a local partitioned view by referencing only tables on the same server; however, creating partitioned tables is the preferred method for locally partitioning data.
Note You can create a local partitioned view by referencing only tables on the same server; however, creating partitioned tables is the preferred method for locally partitioning data.
Listing 9-30. Common Syntax Used in a Distributed Partitioned View
CREATE VIEW vDistributedSample

AS

SELECT col1, col2, col3 FROM Server1.DBName.dbo.TableName

UNION ALL

SELECT col1, col2, col3 FROM Server2. DBName.dbo.TableName

UNION ALL

SELECT col1, col2, col3 FROM Server3.DBName.dbo.TableName
Updateable Views
You can use a view to insert, update, and delete data in the underlying tables as long as certain conditions are met:
- All the columns being modified must be in the same base table.
- The columns must also directly reference the base table; you cannot modify computed columns or columns that are derived from or affected by aggregate functions.
- If the
WITH CHECKoption is specified, as shown in Listing 9-31, the view cannot be updated in any way that would cause the updated record to disappear from the result set.
For example, given the view created in Listing 9-31, you could not run an UPDATE statement to set the DepartmentID = 2.
Listing 9-31. Syntax to Create an Updatable View Using the WITH CHECK Option
USE AdventureWorks2008

GO


--Drop the view if it currently exists

IF OBJECT_ID('dbo.vMarketingEmployees', 'V') IS NOT NULL

  DROP VIEW dbo.vMarketingEmployees;


GO


--Create a view using the WITH CHECK option

CREATE VIEW vMarketingEmployees

AS

SELECT dbo.Employee.EmpFirstName AS FirstName,

       dbo.Employee.EmpLastName AS LastName,

       dbo.Department.DepartmentID,

       dbo.Department.DepartmentDscr AS Department

FROM  dbo.Department INNER JOIN

      dbo.Employee ON dbo.Department.DepartmentID = dbo.Employee.DepartmentID

WHERE dbo.Department.DepartmentID = 1

WITH CHECK OPTION
If you look at Figure 9-9, you can see that trying to change DepartmentID fails, since it will violate the CHECK OPTION constraint, but changing Department is successful.
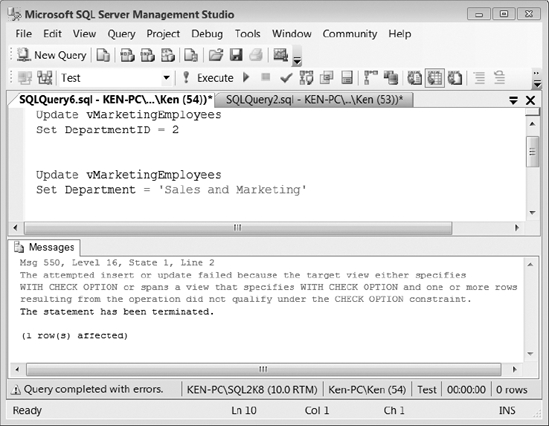
Figure 9-9. Results of updating a view that uses the WITH CHECK option
Indexed Views
If you have a process-intensive view that is run often, you can improve performance and reduce the processing time needed to execute the view by creating an index on the view. The first index you create on a view must be a unique clustered index, which causes the result set of the view to be stored in the database. Thereafter, you can create nonclustered indexes.
Listing 9-32 shows an example of creating an indexed view. Notice the WITH SCHEMABINDING clause in the CREATE VIEW statement. If you plan to create an index on a view, then you must first create the view using that clause, which prevents any changes to the underlying tables referenced by the view that would affect the view definition. An indexed view is essentially a stored result set returned by the view, so SQL Server does not have to process the query each time the view is referenced. By creating the view WITH SCHEMABINDING, SQL Server can ensure that no underlying changes to the data will invalidate the stored results.
There are several other requirements that must be met in order to create an indexed view. For the specific requirements, refer to the topic “Creating Indexed Views” in SQL Server Books Online.
Listing 9-32. Syntax to Create an Indexed View
USE AdventureWorks2008

GO


CREATE VIEW vEmployees

WITH SCHEMABINDING

AS

SELECT dbo.Employee.EmpFirstName AS FirstName,

       dbo.Employee.EmpLastName AS LastName,

       dbo.Department.DepartmentID,

       dbo.Department.DepartmentDscr AS Department

FROM  dbo.Department INNER JOIN

      dbo.Employee ON dbo.Department.DepartmentID = dbo.Employee.DepartmentID

GO

--Create an index on the view

CREATE UNIQUE CLUSTERED INDEX IDX_vEmployee_Dept

 ON vEmployees (DepartmentID);

GO
Indexed views are best suited for situations where the underlying data is rarely updated; because as the data is updated in the base tables, the data must also be updated in the indexed view to reflect the changes. If the data is frequently updated, maintaining the index could actually lead to performance issues instead of performance gains. There are many caveats to using indexed views that could lead to an administrative headache, so you shouldn&t go around creating indexes on all your views. However, there are certain situations, especially in a data warehouse environment, where indexed views can provide an enormous performance benefit.
You can create an indexed view in any edition of SQL Server 2008, but you receive some extra benefits when you are running the Enterprise Edition. In the Enterprise Edition, the query optimizer can automatically take advantage of an index created on a view, even if the view is not specifically referenced in a query.
Working with Synonyms
You can create a synonym in SQL Server that references a base object, and then reference the synonym to perform operations on the base object. You can use a synonym in place of a threeor four-part naming convention. You can also use a synonym to reference objects on a linked server, thereby masking the server name. If the database on the linked server is moved, all you need to do is change the synonym instead of having to change every object where the linked server is referenced.
Following is a list of rules you need to know when using synonyms:
- You can use a synonym to reference the base object in the following query contexts:
- You cannot reference a synonym that is located on a linked server.
- You cannot use a synonym in a Data Definition Language (DDL) statement, such as an
ALTER TABLEcommand. - Synonyms are not schema bound; therefore, they cannot be referenced by schemabound objects such as these:
CHECKconstraints- Computed columns
- Defaults
- Rules
- Schema-bound views and functions
To create a synonym, right-click on the Synonyms folder located under the database where you would like to create the synonym and select New Synonym from the context menu. This will bring up the New Synonym dialog box, as shown in Figure 9-10.
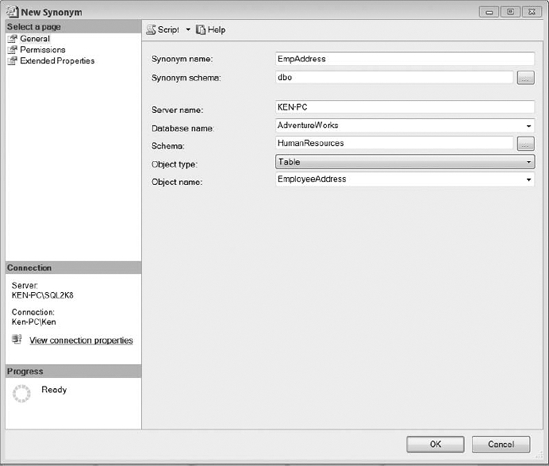
Figure 9-10. New Synonym dialog box
Next, fill in the fields and choose an object type from the drop-down list. Following are the components of a synonym definition:
Synonym Name is the name of the synonym that will be created.
Synonym Schema is the name of the schema where the synonym will be created.
Server Name is either the local server name or the name of a linked server containing the base object.
Database Name is the name of the database containing the base object.
Schema is the name of the schema where the base object is located.
Object Type defines the base object type (view, table, stored procedure, or function).
Object type is a drop-down selection in Figure 9-10.
Object Name is the name of the base object.
Figure 9-10 creates a synonym called EmpAddress that references the HumanResources. EmployeeAddress table in the AdventureWorks database on a linked server called KEN-PC. The results of querying the EmpAddress synonym can be seen in Figure 9-11.
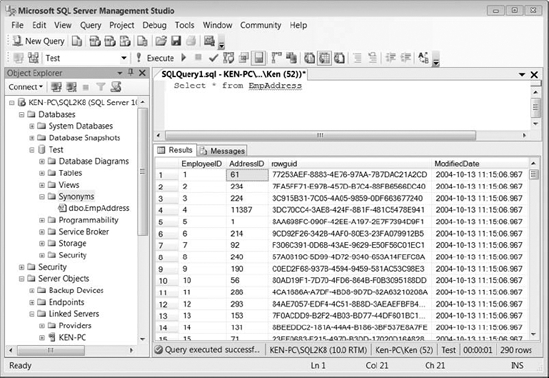
Figure 9-11. Result set returned by querying the EmpAddress synonym
You can also use T-SQL to create a synonym. The following statement is the equivalent to the parameters provided to create the EmpAddress synonym back in Figure 9-10.
CREATE SYNONYM [dbo].[EmpAddress]

FOR [KEN-PC].[AdventureWorks].[HumanResources].[EmployeeAddress]
You do not need permissions on the base object in order to create a synonym. For that matter, the base object does not even need to exist to create a synonym; all of the security and existence checks are deferred until runtime. Also, the permissions that you set on a synonym apply only to the synonym and not to the base object. For example, when you grant Select permission to a synonym, you are giving permission to query the synonym itself, and not to query the underlying object. You can query the sys.synonyms catalog view to return the metadata about the synonym, including the base object name.
To drop a synonym, all you need to do is execute the DROP SYNONYM command followed by the synonym name or right-click the synonym and select Delete from the context menu.
DROP SYNONYM [schema].SynonymName
You can drop a synonym even if other objects are referencing it. You will not encounter an error until executing the object that references the synonym.
Working with Stored Procedures
You can find stored procedures, along with the rest of the objects discussed in this chapter, under the Programmability folder for each database in Object Explorer. Stored procedures are routines saved in the database that contain business logic used to perform predefined actions and return information about the action that was performed. If you can write a set of code to run in a batch statement, you can most likely encapsulate the code in a stored procedure. A stored procedure can accept input parameters; perform a number of actions using both DDL and Data Manipulation Language (DML) statements, and return output to the client in the form of a scalar value, one or more result sets, or output parameters. A stored procedure can also return an execution status indicating the success or failure of the procedure.
Stored procedures provide many benefits when executing T-SQL including code reusability. You can code logic in stored procedures and call the stored procedure from any application that requires the same information. Stored procedures also provide a layer of abstraction from the application. You can easily change the code within the stored procedure without having to make any changes to the application. You also reduce the network traffic that is sent between the client and the database server. Instead of sending an entire query or batch of code over the network, you will only need to send a single line to execute the procedure. Stored procedures often lead to a performance increase because the query optimizer compiles a query plan for the stored procedure the first time it is executed, and the query plan is then reused for subsequent executions. The reason I say a compiled query plan often leads to increased performance is because in some cases the query plan that the query optimizer chose when the stored procedure was first executed may not be the best plan for subsequent executions with different parameters and actually causes a performance hit. Stored procedures enhance security by allowing you to grant rights to execute the procedure instead of giving access directly to the base tables. Also, by using parameterized queries, you reduce the chances of a SQL injection attack. Keep in mind that just because you use a stored procedure does not mean you are immune to a SQL injection attack. Bad coding techniques, such as dynamic SQL, are prone to a SQL injection no matter where the code is encapsulated.
When you create a stored procedure, you should not use the sp_ naming convention because this prefix is designated for SQL Server system stored procedures. If you create a procedure with the sp_prefix, it may conflict with a current or future system stored procedure. Listing 9-33 shows how to create a simple stored procedure that accepts a group name as a parameter and returns all the departments in that group.
Listing 9-33. Syntax to Create and Execute a Stored Procedure That Accepts a Parameter and Returns a Result Set
USE AdventureWorks2008

GO


CREATE PROCEDURE dbo.DepartmentNameByGroup_Select (@GroupName nvarchar(50))

AS

SELECT DepartmentID,

           Name AS DepartmentName

FROM HumanResources.Department

WHERE GroupName = @GroupName


GO

--Execute the stored procedure

EXEC dbo.DepartmentNameByGroup_Select 'Executive General and Administration'
You can see the results of Listing 9-33 in Figure 9-12. You would typically create a stored procedure like the one in Listing 9-33 to bind to a drop-down list in an application.
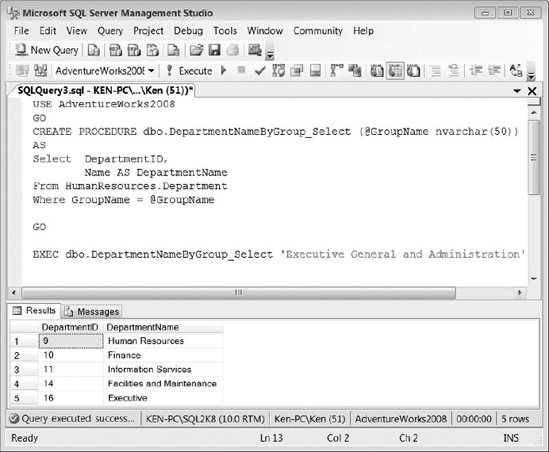
Figure 9-12. Stored procedure execution results using the code in Listing 9-33
You can use an output parameter to capture and return a single value to the code that calls the stored procedure. However, you can have multiple output parameters within a single stored procedure. The following example in Listing 9-34 alters the stored procedure that we created in Listing 9-33 to add an output parameter named @DepartmentCount that is used to hold the number of departments for the group being returned. (Notice the OUTPUT clause in the parameter definition.)
When you run a procedure with an output variable, you must define a variable in the calling code to hold the return value. In Listing 9-34, we have defined a variable called @NbrOfDepartments. That is the variable that receives the value from the procedure&s output parameter.
You must also use the OUTPUT clause following the variable that will be used to capture the return value, or you will end up with a NULL variable in the calling code. So you must use the keyword OUTPUT in the parameter definition, as well as when actually passing the parameter to the procedure.
Listing 9-34. Syntax to Alter the Stored Procedure Created in Listing 9-33 to Use an Output Parameter
USE AdventureWorks2008

GO

ALTER PROCEDURE dbo.DepartmentNameByGroup_Select

 (@GroupName nvarchar(50),

  @DepartmentCount int OUTPUT)

AS

SELECT DepartmentID,

           Name AS DepartmentName

FROM HumanResources.Department

WHERE GroupName = @GroupName

GROUP BY DepartmentID,

         Name;


SELECT @DepartmentCount=COUNT(1)

FROM HumanResources.Department

WHERE GroupName = @GroupName;

GO


--Execute the stored procedure

DECLARE @NbrOfDepartments int


EXEC dbo.DepartmentNameByGroup_Select

     'Executive General and Administration',

     @NbrOfDepartments OUTPUT


SELECT 'There Are ' +

CAST(@NbrOfDepartments as varchar(50)) +

' Departments In This Group.'
As you can see in Figure 9-13, the code from Listing 9-34 contains two result sets. The output parameter has no visual effect on the first result set; you can only see the output returned from the stored procedure by specifying the variable used to capture the output in a second query.
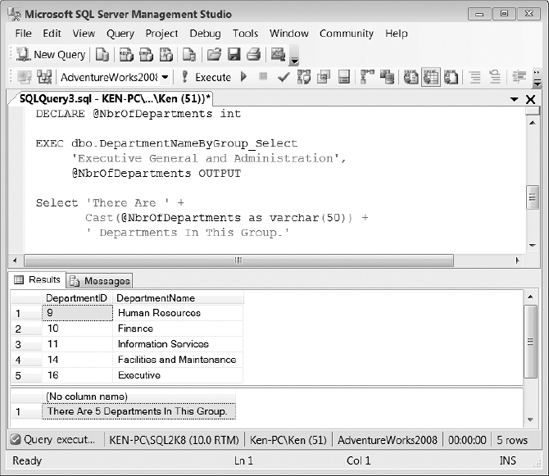
Figure 9-13. Stored procedure execution results using the code in Listing 9-34
You can also use the RETURN clause to return information to the code that calls a stored procedure. The RETURN clause is more limited than using output parameters in that you can only have a single RETURN clause per stored procedure that returns an integer value. The RETURN clause also immediately stops the execution of a stored procedure and returns control to the calling code.
Listing 9-35 alters the stored procedure created in Listing 9-33 to use the RETURN clause to return the number of departments for a group. Notice that now we are setting the @NbrOfDepartments variable equal to the results of the stored procedure instead of using it as a parameter as we did with the output parameters. The result set is exactly the same as what was shown in Figure 9-13.
Listing 9-35. Syntax to Alter the Stored Procedure Created in Listing 9-33 to Use the RETURN Clause
USE AdventureWorks2008

GO

ALTER PROCEDURE dbo.DepartmentNameByGroup_Select

 (@GroupName nvarchar(50))

AS
SELECT DepartmentID,
Name AS DepartmentName
FROM HumanResources.Department
WHERE GroupName = @GroupName
GROUP BY DepartmentID,
Name;
RETURN (SELECT COUNT(1)
FROM HumanResources.Department
WHERE GroupName = @GroupName);
GO
--Execute the stored procedure
DECLARE @NbrOfDepartments int
EXEC @NbrOfDepartments =
dbo.DepartmentNameByGroup_Select 'Executive General and Administration'
SELECT 'There Are ' +
CAST(@NbrOfDepartments as varchar(50)) +
' Departments In This Group.'
Because a stored procedure&s query plan is cached, you may find yourself needing to recompile a stored procedure in order to benefit from recent changes to your database, such as an added index. A stored procedure is automatically recompiled the first time it is run after SQL Server is restarted as well as when the structure of an underlying table is changed, but adding an index does not force a recompile.
You can use the sp_recompile system stored procedure to force a stored procedure to produce a new query plan the next time it is executed (see Listing 9-36). The sp_recompile procedure takes an object name as an input parameter. If you pass in the name of a stored procedure, it will be recompiled the next time it runs; if you pass in the name of a table, any stored procedure that runs against that table will be recompiled.
Listing 9-36. Syntax to Force the dbo.DepartmentNameByGroup_Select Stored Procedure to Generate a New Execution Plan
USE AdventureWorks2008

GO

EXEC sp_recompile 'dbo.DepartmentNameByGroup_Select'

GO
To remove a stored procedure from the database, you can issue the DROP PROCEDURE statement followed by the procedure name, as shown in Listing 9-37.
Listing 9-37. Syntax to Drop a Stored Procedure from the Database
DROP PROCEDURE dbo.DepartmentNameByGroup_Select
You also have the option to execute a stored procedure automatically whenever SQL Server starts by using the sp_procoption system stored procedure. In order to enable a stored procedure for auto execution, it must exist in the master database and cannot contain input or output parameters. The code in Listing 9-38 shows the syntax to enable a stored procedure for auto execution. In order to disable auto execution on the stored procedure, change the @OptionValue to off.
Listing 9-38. Syntax to Enable Stored Procedure Execution on SQL Server Startup
sp_procoption @ProcName = 'uspSystemMaintenance',

                        @OptionName = 'startup',

                        @OptionValue = 'on'
Working with Functions
A user-defined function is a saved routine that can accept parameters and return a value based on programming logic. There are two types of user-defined functions in SQL Server, scalar-valued functions and table-valued functions. Table-valued functions are further classified as inline functions or multi-statement functions.
Scalar-Valued Functions
You can create a scalar-valued function to return a single value of the data type that is defined following the RETURNS clause. The RETURNS clause is used in the function definition to mandate the data type used by the RETURN statement in the body of the function. You cannot create a function that returns a value of types text, ntext, image, cursor, or timestamp. The example in Listing 9-39 uses a scalar-valued function to return a running balance of all the orders that were placed for a certain customer.
Listing 9-39. Sample Scalar-Valued Function to Return a Running Balance
--Create sample tables

CREATE TABLE CustOrders

(OrderID int PRIMARY KEY,

 CustID int,

 InvoiceAmt float)


CREATE TABLE Customers

 (CustID int PRIMARY KEY,

 CustName varchar(50))


--Insert sample data

INSERT INTO Customers

VALUES (1,'Ken Simmons'),(2,'Sylvester Carstarphen')
INSERT INTO CustOrders
VALUES (1,1,500.25),(2,1,124.73),(3,1,42.86),(4,2,120.80),(5,2,12.74)
GO
--Create function to return running balance
CREATE FUNCTION dbo.udf_RunningSalesBalance
(@CustID int,
@OrderID int)
RETURNS float
AS
BEGIN
RETURN (SELECT SUM(InvoiceAmt)
FROM CustOrders
WHERE CustID = @CustID OrderID <= @OrderID)
END
GO
--Query the new function
SELECT OrderID,
CustName,
InvoiceAmt,
dbo.udf_RunningSalesBalance(Customers.CustID, OrderID) RunningSales
FROM Customers JOIN
CustOrders ON Customers.CustID = CustOrders.CustID
You can see the results returned from querying the scalar function from Listing 9-39 in Figure 9-14. As you can see in the RunningSales column, by passing in the CustID and the OrderID to the scalar function, you can do a SUM on the InvoiceAmt where the CustID equals the CustID, and the OrderID is less than or equal to the OrderID. This calculation is performed for each row in order to return a running balance.
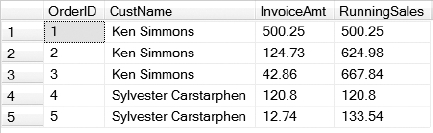
Figure 9-14. Result set returned by the scalar function created in Listing 9-39
Table-Valued Functions
Table-valued functions can be used to provide similar functionality to views and stored procedures, but table-valued functions provide some interesting benefits. Like a view, an inline table-valued function returns a result set based on a single query; but, inline table-valued functions can accept parameters and views cannot. Multi-statement table-valued functions can be used to encapsulate programming logic like stored procedures, but unlike stored procedures, you can reference multi-statement table-valued functions in the FROM clause of a SQL statement.
The following example in Listing 9-40 shows how to create an inline table-valued function that can accept parameters and be used in the FROM clause of a SQL statement. The function uses the Customers and CustOrders tables that were created in Listing 9-39.
Listing 9-40. Syntax to Create an Inline Table-Valued Function
CREATE FUNCTION dbo.udf_TotalSalesByCustomer (@CustID int)

RETURNS TABLE

AS

RETURN

(

 SELECT Customers.CustID,

            CustName,

            SUM(InvoiceAmt) TotalSales

 FROM Customers JOIN

           CustOrders ON Customers.CustID = CustOrders.CustID

 WHERE Customers.CustID = @CustID

 GROUP BY Customers.CustID,

          CustName

)

GO


--Query the inline table-valued function with CustID 1

SELECT A.CustID,

           A.CustName,

           CustOrders.OrderID,

           CustOrders.InvoiceAmt,

           A.TotalSales

FROM dbo.udf_TotalSalesByCustomer(1) A

     JOIN CustOrders ON A.CustID = CustOrders.CustID
You can see the results of Listing 9-40 in Figure 9-15. By giving the function an alias (in this case A), you can reference the results throughout the query. Being able to reference the output returned by the function gives you the ability to do things such as JOIN the CustOrders table with the function and display the columns returned by the function in the SELECT statement.
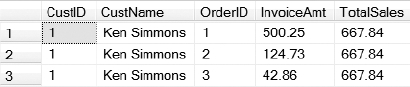
Figure 9-15. Result set returned by the inline table-valued function created in Listing 9-40
The syntax for creating a multi-statement table-valued function is much like creating a scalar function, except you use a table variable to return a result set instead of returning a single value. You need to define the table variable that will be used to return the result set from a multi-statement table-valued function following the RETURNS clause. The function in Listing 9-41 uses logic to check if the customer has ordered more than $500 worth of merchandise. If so, a result set is returned applying a 10% discount to all of the orders for that customer.
Listing 9-41. Syntax Used to Create a Multi-Statement Table-Valued Function
CREATE FUNCTION dbo.udf_CustomerDiscount (@CustID int)

RETURNS @CustDiscount TABLE

          (OrderID int,

           InvoiceAmt float,

           InvoiceAmtWithDiscount decimal(10,2))

AS

BEGIN

  IF (SELECT SUM(InvoiceAmt)

      FROM CustOrders

      WHERE CustID = @CustID) > 500


      BEGIN

         INSERT INTO @CustDiscount

         SELECT OrderID, InvoiceAmt, InvoiceAmt * .9

         FROM CustOrders

         WHERE CustID = @CustID

      END

  ELSE

    BEGIN

         INSERT INTO @CustDiscount

         SELECT OrderID, InvoiceAmt, InvoiceAmt

         FROM CustOrders

         WHERE CustID = @CustID

    END


 RETURN


END


GO


--Query the multi-statement table-valued function

SELECT * FROM dbo.udf_CustomerDiscount(1)
You can view the results of Listing 9-41 in Figure 9-16. You can see that since customer 1 has more than $500 worth of merchandise, the discount is applied to the InvoiceAmtWith Discount column. If you execute the same multi-statement table-valued function for customer 2, the discount will not be reflected in the InvoiceAmtWithDiscount column, since they have ordered less than $500 worth of merchandise.
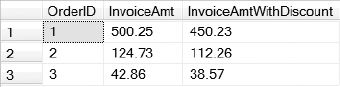
Figure 9-16. Result set returned by the multistatement table-valued function created in Listing 9-41
To alter a function, you use the same syntax as creating a function, except you will need to change the CREATE keyword to ALTER. To drop an existing function, you need to issue the DROP FUNCTION statement followed by the function name, as shown in Listing 9-42.
Listing 9-42. Syntax to Drop a User-Defined Function from the Database
DROP FUNCTION dbo.udf_CustomerDiscount
Working with Triggers
A trigger is a procedure that is stored and executed in response to an event that occurs in SQL Server. There are three different types of triggers you can create: DML triggers, DDL triggers, and logon triggers. You can create multiple triggers of the same type on the same event. For example, you can create multiple triggers that fire on the same INSERT event on a single table. Using triggers is a good way to make sure something always happens automatically whenever a specific event occurs. On the downside, we have seen some strange error messages generated by triggers when trying to perform common DBA tasks. The reason we say strange is that if you are not aware of a trigger and you try to insert data into a table, you can receive a message that was generated by the trigger that has nothing to do with an INSERT statement at all. We have seen DBAs try to track down these messages without even considering that the table in question had a trigger, resulting in a lot of extra work.
DML Triggers
DML triggers are fired when an INSERT, UPDATE, or DELETE statement is executed against a table or view. You can configure DML triggers to fire after or instead of an event, although you can only define an INSTEAD OF trigger on a view. You can create only one INSTEAD OF trigger on a table, but you can create multiple AFTER triggers. You can control which AFTER trigger will execute first and last by using the sp_settriggerorder system stored procedure; the remaining triggers will fire in random order. If you define a DML trigger to execute after an event (which is the default behavior), it will only be fired on the successful completion of the event. Even if you execute a DML statement that does not affect any rows, any associated DML trigger is still fired. You can access rows that are changed in the base table using the inserted and deleted logical tables that are available in every DML trigger. The deleted table holds the rows that are removed from the base table, while the inserted table holds the rows that have been inserted or updated.
The example in Listing 9-43 creates a trigger that will fire when an UPDATE or DELETE statement is executed against the Store table in the AdventureWorks2008 database. The trigger checks the inserted and deleted tables to make sure the statement did not impact more than one record. If more than one record is updated or deleted, the statement is rolled back and the user receives an error message. Thus if you execute the UPDATE statement in Listing 9-43 without the WHERE clause, the trigger will roll back the transaction because you are trying to update every row in the table. If you uncomment the WHERE clause, the UPDATE statement will only affect one row and complete successfully.
Listing 9-43. Syntax to Create a DML Trigger That Prevents Updating or Deleting More Than One Row in a Table at a Time
USE AdventureWorks2008

GO


CREATE TRIGGER Sales.ModificationCheck

ON Sales.Store

AFTER UPDATE, DELETE

AS

IF (SELECT COUNT(*) FROM inserted ) > 1 OR

    (SELECT COUNT(*) FROM deleted) > 1

    BEGIN

       RAISERROR('You may only modify one row at a time.',10,1);

       ROLLBACK TRANSACTION

    END

GO


--Try to update multiple rows

UPDATE Sales.Store

SET Name = Name + '_1'

--WHERE Sales.Store.BusinessEntityID = 292
DDL Triggers
DDL triggers are fired in response to CREATE, ALTER, DROP, GRANT, DENY, REVOKE, or UPDATE STATISTICS statements. You can create DDL triggers in the context of a single database or an entire server instance. You cannot configure a DDL trigger to run instead of the event; they are only fired after the event. DDL triggers are a good way to prevent certain actions, such as a user dropping a table without first disabling the trigger. You can also use a DDL trigger to log alterations to the database or to perform an action, such as sending an email informing you of a change. Instead of using the inserted and deleted tables, you can access data about the changes being made using the EVENTDATA() function. That information is returned in XML form.
The example in Listing 9-44 creates a DDL trigger on the AdventureWorks2008 database that will not allow you to drop a table between the hours of 8:00 AM and 10:00 PM.
Listing 9-44. Syntax to Create a DDL Trigger That Prevents Dropping a Table Between the Hours of 8:00 AM and 10:00 PM
USE AdventureWorks2008

GO


CREATE TRIGGER DropTableCheck

ON DATABASE

FOR DROP_TABLE

AS

DECLARE @EventData AS Varchar(1000)

SELECT @EventData= EVENTDATA().value

('(/EVENT_INSTANCE/TSQLCommand/CommandText)[1]','nvarchar(max)')


DELCARE @Msg Varchar(1000)


IF (SELECT CAST(GETDATE() AS TIME)) > '08:00' AND

    (SELECT CAST(GETDATE() AS TIME)) < '22:00'

     BEGIN

       SET @Msg = 'The Command - "' + @EventData +

           '" is not allowed. You must drop tables during the maintenance window.'

       RAISERROR (@Msg,10, 1)

       ROLLBACK TRANSACTION

     END

GO


--Create a sample table

CREATE TABLE VeryImportantTable

(ID INT)

GO


--Try to drop the table

DROP TABLE VeryImportantTable
Logon Triggers
Logon triggers are fired in response to the LOGON event that occurs after a user is authenticated and before the actual connection is established to SQL Server. When you create a logon trigger, it applies to an entire SQL Server instance and is stored in the master database. Logon triggers are the only objects in this chapter that are not located somewhere under the Databases node in Object Explorer. You can find logon triggers in the Triggers folder under the Server Objects node. As with DDL triggers, logon triggers can only be fired after the event has occurred; however, logon triggers do not fire if a login attempt fails. Because the user is not actually connected when the logon trigger fires, any error messages and print statements that occur in the logon trigger are sent to the error log. As with DDL triggers, logon triggers also use the EVENTDATA() function to return information about the event.
The following sample in Listing 9-45 creates a logon trigger that only allows local logins or logins from a specific host. The Print statement will record the failed login attempt in the SQL Server error log.
Listing 9-45. Syntax to Create a Logon Trigger
CREATE TRIGGER HostCheck

ON ALL SERVER

FOR LOGON

AS

BEGIN

  DECLARE @ClientHost Varchar(1000)

  SET @ClientHost = EVENTDATA().value

  ('(/EVENT_INSTANCE/ClientHost)[1]', 'varchar(50)')


  IF @ClientHost NOT IN ('<local machine>','192.168.0.101')

     BEGIN

       Print 'Logon blocked for ' + @ClientHost

       ROLLBACK TRANSACTION

  END

END

GO
Working with the Common Language Runtime
The common language runtime (CLR) allows you to write stored procedures, triggers, userdefined functions, user-defined types, and user-defined aggregates using a .NET programming language that can be managed and executed from SQL Server. The purpose of this section is not to teach you how to write CLR code, but to discuss the management implications of using CLR in your environment.
Before you can implement CLR, you need to enable CLR integration by using the sp_configure system procedure, as shown in Listing 9-46. To disable CLR, change the value following the 'clr enabled' parameter from 1 to 0.
Listing 9-46. Syntax to Enable CLR Integration Functionality
sp_configure 'show advanced options', 1;

GO

RECONFIGURE;

GO

sp_configure 'clr enabled', 1;

GO

RECONFIGURE;

GO
CLR is not supported with lightweight pooling enabled because certain features will not work while running in fiber mode. To disable lightweight pooling, run the script shown in Listing 9-47.
Listing 9-47. Syntax to Disable Lightweight Pooling
sp_configure 'show advanced options', 1;

GO

RECONFIGURE;

GO

sp_configure 'lightweight pooling', 0;

GO

RECONFIGURE;

GO
CLR is implemented in SQL Server in the form of assemblies. An assembly is a compiled DLL file that is hosted within SQL Server. In order to use an assembly, you must first register it in SQL Server using the CREATE ASSEMBLY statement, as shown in Listing 9-48. To load a new version of an assembly, just change the CREATE keyword to ALTER.
Listing 9-48. Syntax Used to Register an Assembly in SQL Server
CREATE ASSEMBLY CLRProcDemo

FROM 'C: CLRProcDemo.dll'

WITH PERMISSION_SET = EXTERNAL_ACCESS
You can specify three different security levels when registering an assembly: SAFE, EXTERNAL_ACCESS, and UNSAFE. SAFE is the default setting that will be applied to an assembly if the permission set is not explicitly specified. The SAFE permission set is the most restrictive, allowing only internal computations and local data access. The EXTERNAL_ACCESS permission set has the same local data access as the SAFE permission set, but the EXTERNAL_ACCESS permission set can also access external resources, such as registry keys and files. The UNSAFE permission set gives an assembly unrestricted access to internal and external resources.
If you create an assembly with a permission set other than SAFE, you have to perform one of two actions in order to run the assembly. You can either set the TRUSTWORTHY database property to ON by running the statement ALTER DATABASE DatabaseName SET TRUSTWORTY ON, or sign the assembly with a strong key. Microsoft recommends that you sign the assembly with a strong key instead of setting the TRUSTWORTHY property to ON. To sign the assembly with a strong key, you need to create an asymmetric key from the assembly, create a login from the asymmetric key, and then grant UNSAFE or EXTERNAL_ACCESS to the login, as shown in Listing 9-49.
Listing 9-49. Syntax Used to Sign an Assembly with a Strong Key
USE master

GO

CREATE ASYMMETRIC KEY CLRProcDemoKey FROM EXECUTABLE FILE = 'C: CLRProcDemo.dll'

CREATE LOGIN CLRDemoLogin FROM ASYMMETRIC KEY CLRProcDemoKey

GRANT EXTERNAL ACCESS ASSEMBLY TO CLRDemoLogin

GO
Once you have registered the assembly, you can now create an object in SQL Server that references the assembly (see Listing 9-50). The AssemblyName is the name that was used to register the assembly in SQL Server. In this case, the AssemblyName is CLRProcDemo that was created in Listing 9-48. The ClassName and MethodName actually come from the DLL internally and are dependent on the names that were used within the DLL. Once you have created the procedure, you can execute it just as if it were any other stored procedure in SQL Server.
Listing 9-50. Syntax to Create a Stored Procedure That References an Assembly
CREATE PROCEDURE TestCLRStoredProc

AS

EXTERNAL NAME AssemblyName.ClassName.MethodName
To remove an assembly from the database, you can issue the DROP ASSEMBLY statement followed by the assembly name, as shown in Listing 9-51.
Listing 9-51. Syntax to Remove an Assembly from a Database
DROP ASSEMBLY CLRProcDemo
Summary
This chapter has covered creating and managing many of the database objects available in SQL Server 2008. You can perform most of the code listed in the chapter using the SQL Server GUI, but it is important to understand what is actually going on under the hood. Whenever we use the GUI, we always generate the SQL script to a new query window so we can review the code before actually applying it to the database. Now that we have discussed administering database objects, the next chapter will focus on how to create indexes to provide optimal performance and reduce the overhead needed to access the data in the database. Knowing when and how to use database objects and having the proper indexes will provide a better experience for both you and the end users.