
C H A P T E R 11
![]()
Managing Backups
Understanding backups is extremely important for every database administrator (DBA)—it can make or break your career. If you need to restore a database, you can be a hero in a matter of minutes. On the other hand, if you don't have a good backup to restore, you may end up looking for a new job. In our opinion, having the knowledge to properly back up and restore a database is the most important skill a DBA can possess. That being said, we think backing up a database is often the most easily overlooked skill. It's easy to set up a maintenance plan or backup job and think you are covered—a kind of set-it-and-forget-it mentality. The problem with this attitude is that a backup is something you do not know is being performed incorrectly until you need to use it, which is not the best time to find out. There are several backup options available in SQL Server 2008 that you should master in order to make sure you don't find yourself trying to explain why you can't restore a database everyone thought was being backed up.
Recovery Models
The first thing you need to be aware of when determining a backup strategy is the database recovery model. A database recovery model determines how transactions are logged and therefore impacts the type of backup operations that can be performed on a database. You can set a database to use one of three different recovery models that provide different levels of transaction protection.
- Full: The full recovery model provides the highest level of data protection by logging all transactions. It is usually the preferred recovery model for all production databases. The full recovery model also gives you the most flexibility in your backup strategy by allowing you to perform any type of backup available in SQL Server.
- Bulk-logged: The bulk-logged recovery model is much like the full recovery model except that certain operations are minimally logged, reducing the space that would be required to store the entire transaction in the log file. You will also receive performance gains on bulk operations, since only the end result is logged and not the entire operation. As with the full recovery model, you can also perform any type of backup for a database that is bulk-logged. The limitation is that you may not be able to do a pointin- time recovery (which you will see in the next chapter) if a bulk operation has been performed. The following are considered bulk operations and are minimally logged when using the bulk-logged recovery model.
- Simple: The simple recovery model does not offer any form of logged data protection and is generally not used in production environments that require point-in-time recovery since the last full backup. The transaction log only holds the data until a checkpoint has occurred and the data is written to disk. For this reason, you cannot perform transaction log backups on a database that is using the simple recovery model. As with the bulk-logged recovery model, bulk operations are also minimally logged using the simple recovery model.
You can also use sort of a hybrid method between the full and bulk-logged recovery models. You can set the database to use the full recovery model, and then change it to use bulk-logged when performing specific bulk operations that may not perform well using the full recovery model. You should back up the log before switching to the bulk-logged recovery model, and then back up once again after switching back to the full recovery model. This will minimize the logs that cannot be restored using the point-in-time recovery option.
To check the current recovery model, you can use the DATABASEPROPERTYEX system function using the RECOVERY parameter, as shown in Listing 11-1. To change a database recovery model, you can use the ALTER DATABASE statement specifying FULL, BULK_LOGGED, or SIMPLE, also shown in Listing 11-1.
Listing 11-1. Code to View and Change the Database Recovery Model
USE master

GO


--Select the database recovery model

SELECT DATABASEPROPERTYEX('AdventureWorks2008','RECOVERY'),


--Change the database recovery model

ALTER DATABASE AdventureWorks2008 SET RECOVERY FULL;
Backup Architecture
Backups are grouped into logical containers known as media sets. A media set is one or more tapes or disk files that contain an ordered collection of backups. A media set must be either completely on tape or completely on disk. You can't create a media set that spans multiple device types. A new media set is created the first time a backup is performed or by using the FORMAT option in the BACKUP statement. The FORMAT option deletes the old media header and creates a new header for the media set. The header contains information about the media type and media family.
Media family refers to the type of device that was used to create the media set. If you use multiple backup devices in a media set, your backup set will contain multiple media families. For example, if you back up your database to two disk files, the media set will contain two media families that are both marked as disk devices.
Media sets are made up of one or more backup sets. A backup set consists of all the information gathered during an individual backup process. Each time a successful backup is performed, a backup set is added to the media set. The backup set is evenly distributed across all the devices that make up the media set.
Look at the sample code in Listing 11-2. The BACKUP command creates a media set named AdventureWorks2008_MediaSet that contains two disk devices, meaning the media set contains two media families. Each time the BACKUP command is executed, a backup set is evenly written across the two devices. The illustration shown in Figure 11-1 assumes you have executed the BACKUP command three times to create three backup sets.
Listing 11-2. Code to Create a Media Set with Multiple Devices
USE master

GO

BACKUP DATABASE [AdventureWorks2008] TO

DISK = 'C:BackupAdventureWorks2008_1.bak',

DISK = 'D:BackupAdventureWorks2008_2.bak'

WITH MEDIANAME = 'AdventureWorks2008_MediaSet'

GO
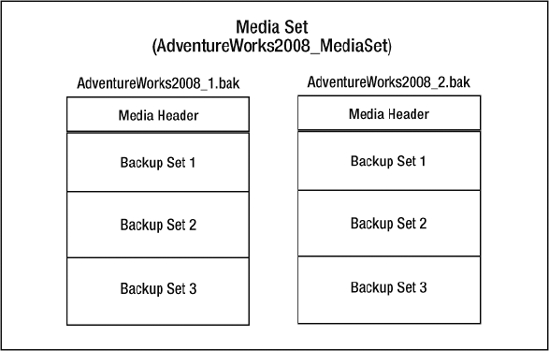
Figure 11-1. AdventureWorks2008 backup media set created by the code in Listing 11-2
Most of the time this architecture goes unnoticed because a database is backed up to a media set on a single disk to a single file; so we tend to think of it as just a backup file. If you think of backups in terms of backup sets, media sets, and media families, it will make a lot more sense when reviewing many of the backup options available in SQL Server.
Backup Types
Not every backup must be of your entire database. SQL Server supports numerous options for backing up all or part of your database. Most backup strategies begin with what is termed a full backup. Other backup types, such as the differential backup and the transaction log backup, meet specific needs and help keep your backups manageable.
Full Backups
A full backup captures the entire database, including part of the transaction log, so the database may be completely restored to a consistent state at the point in time when the full backup completed. Any uncommitted transactions that were open at the time the backup completed will be rolled back in the event of a restore. The full backup also serves as a base for subsequent differential and log backups. You can't take differential or log backups on a database if you have never taken a full backup. Typically, you will take a full backup once a day if the database size is within reason, and then supplement with transaction log backups throughout the day. If the database is too large to create daily backups in a timely fashion, you can take less frequent full backups, perhaps on a weekly basis, and then supplement with differential backups throughout the week. No matter what strategy you choose, it all begins with a full backup of the database.
SQL Server only backs up the data pages in the database that have currently been used, so the full backup will generally be smaller than the size of the database. You can use the sp_ spaceused system stored procedure to estimate the size of a full backup by subtracting the unallocated space from the database size. For example, the size of the full backup for AdventureWorks2008 (as shown in Figure 11-2) would be roughly 183 MB (198.00 MB – 15.45 MB = 182.55 MB).
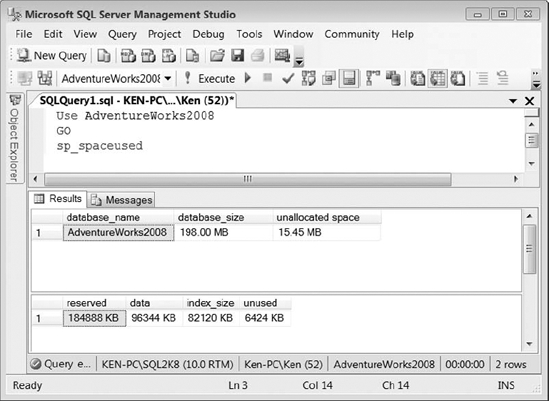
Figure 11-2. Results of the sp_spaceused system stored procedure used to estimate the size of a full backup
The basic syntax to create a full database backup is shown in Listing 11-3. There are several other options you can specify when creating a full backup. We will discuss the individual options later in this chapter in the “GUI Backup Interface” section.
Listing 11-3. Basic Syntax to Create a Full Database Backup
BACKUP DATABASE AdventureWorks2008

TO  DISK = 'C:BackupsAdventureWorks2008.bak'
Differential Backups
A differential backup captures all changes that have occurred in the database since the last full backup. The differential backup uses a bitmap page that contains a bit for every extent to keep track of the changes. The bit is set to 1 in the bitmap page for each changed extent since the last full backup referred to as the differential base. Each subsequent differential backup following a full backup contains all changes made since the last full backup, not just the changes made since the last differential. This means that over time, the differential backup can become as large as the full backup itself. In order to benefit from the speed advantage and space savings of differential backups, you should make sure to schedule your full backups in short enough intervals to serve as a new differential base, so the differential backup remains significantly smaller than the full backup. Figure 11-3 uses the backup history tables to show the relationship between a differential backup and its base full backup. Notice that the differential_base_guid for backup_set_id 38 and 41 are the same as the backup_set_uuid for backup_set_id 35, which is the full database backup that serves as the differential base.

Figure 11-3. Relationship between a differential backup set and its base full backup
Differential backups work well when creating a backup plan for a large database with infrequent changes. Instead of having to create a full daily backup that would capture mostly the same data, you can create a full weekly backup and supplement with daily differential backups while using transaction log backups throughout the day. Listing 11-4 shows the basic syntax used to create a differential backup.
Listing 11-4. Basic Syntax to Create a Differential Database Backup
BACKUP DATABASE AdventureWorks2008

TO  DISK = 'C:BackupsAdventureWorks2008_diff.bak'

WITH  DIFFERENTIAL

GO
Transaction Log Backups
If you are using the full or the bulk-logged recovery model you must schedule regular transaction log backups. Routine transaction log backups not only provide the highest level of data protection, they also truncate the inactive portions of the log and enable you to reuse the log space for new transactions. If you never back up your transaction logs, the logs will never be truncated and will ultimately grow out of control. Beginning with SQL Server 2005, you can now make concurrent full database backups and transaction log backups. In previous versions, the transaction log backup would wait for the full backup to complete before proceeding. You cannot make transaction log backups using the simple recovery model because SQL Server automatically truncates the log on checkpoint.
Each transaction log backup only contains the new log records that were not backed up in the previous transaction log backup. A succession of uninterrupted transaction log backups forms a log chain that allows you to restore to a point in time within the log chain. SQL Server assigns each transaction log backup a log sequence number (LSN) that it uses to maintain the log chain. Once the log chain is broken for any reason, such as a missing backup file or data corruption, you cannot restore any further transactions in the chain until you take a full or differential database backup to serve as a new base for the chain. The code in Listing 11-5 shows the basic syntax used to back up the AdventureWorks2008 transaction log. Typically, transaction log backups use the file extension .trn, but this is not required.
Listing 11-5. Basic Syntax Used to Back Up a Transaction Log
BACKUP LOG AdventrueWorks2008

TO DISK = 'C:BackupsAdventureWorks2008.trn'
SQL Server records every successful backup in the SQL Server error log and the system event log. If you are taking many recurring transaction log backups, this can add a lot of extra information in the error log files, making them harder to manage and to find useful information. You can disable SQL Server logging successful backup messages by adding the -T3226 trace flag to the SQL Server startup parameters. To add the trace flag, open the SQL Server Configuration Manager, right-click the SQL Server service for the appropriate instance, and select Properties from the context menu. Select the Advanced tab and enter the trace flag in the startup parameters text box using a semicolon as a separator (see Figure 11-4).
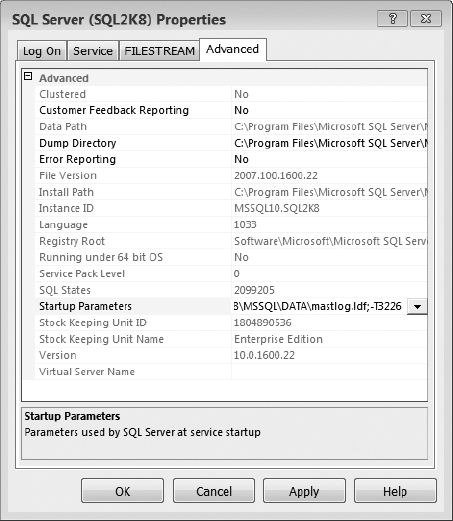
Figure 11-4. SQL Server Properties dialog Advanced tab
Partial Backups
Partial backups were introduced in SQL Server 2005 to provide an alternative way to back up large databases that contain read-only filegroups. Partial backups are similar to full backups except that they are designed to back up only the primary filegroup, any read/write filegroups, and any read-only filegroups that are optionally specified. If you create a partial backup of a read-only database, only the primary filegroup will be included in the backup.
Just as with full backups, you can also create a differential partial backup that uses a partial backup as a differential base. The differential partial backup will then only contain the changed extents since the last partial backup. If your last partial backup included any optional read/write filegroups, you must also include them in the differential partial backup. You cannot create a differential partial backup that uses a full backup as a differential base.
SQL Server does not support partial backups using the SQL Server Management Studio GUI. You must use T-SQL in order to create a partial backup. Listing 11-6 shows the syntax used to create a partial backup and a differential partial backup of the AdventureWorks2008 database.
Listing 11-6. Syntax Used to Create a Partial Backup and a Differential Partial Backup
--Partial backup

BACKUP DATABASE AdventureWorks2008

READ_WRITE_FILEGROUPS -- [ , <optional_filegroups> ]

TO DISK = 'C:BackupsAdventureWorks2008_part.bak'


--Differential partial backup

BACKUP DATABASE AdventureWorks2008

READ_WRITE_FILEGROUPS -- [ , < optional_filegroups> ]

TO DISK = 'C:BackupsAdventureWorks2008_part_diff.bak'

WITH DIFFERENTIAL
File Backups
File backups allow you to create a backup that contains individual files or filegroups. File backups give you the flexibility to take backups of large databases based on usage patterns. For example, you may have a set of tables that is only updated once a month in one filegroup and frequently updated tables in another. You may also want to use file backups if you have multiple filegroups on separate disks. If a single disk fails, you will only need to restore the file backup for files contained on a single disk instead of the entire database.
Unless your database is in Simple mode, you also need to make sure you are backing up the transaction log when working with file backups. In order to completely restore a database using file backups, you must have the appropriate transaction log backups as well. All of the file backups plus the transaction log backups taken since the first file backup are equivalent to a full backup. You can also create a differential file backup to increase recovery time that will only contain the changed extents since the last full file backup. Listing 11-7 shows the syntax to create a full and differential file backup using both files and filegroups.
![]() Note You can create a file backup on a database using the simple recovery model; however, you must back up all the read/write filegroups at the same time so that you can restore the database to a consistent point in time. The easiest way to back up all the read/write filegroups at the same time is by using the
Note You can create a file backup on a database using the simple recovery model; however, you must back up all the read/write filegroups at the same time so that you can restore the database to a consistent point in time. The easiest way to back up all the read/write filegroups at the same time is by using the READ_WRITE_FILEGROUPS option in the BACKUP statement, which creates a partial backup as discussed in the previous section. Basically, the simplest way to perform a file backup of a database that is in Simple mode is not to perform a file backup (which would require you to list out each individual filegroup), but rather to perform a partial backup instead.
Listing 11-7. Syntax Used to Create a File Backup and a Differential File Backup Using Files and Filegroups
--Backup the AdventureWorks2008_data file in the PRIMARY filegroup

BACKUP DATABASE AdventureWorks2008

FILE = 'AdventureWorks2008_Data'

TO  DISK = 'C:BackupsAdventureWorks2008_Data.bak'

GO


--Backup the PRIMARY filegroup

BACKUP DATABASE AdventureWorks2008

FILEGROUP = 'PRIMARY'

TO DISK = 'C:BackupsAW2008_PRIMARY.bak'

GO


--Create a differential backup of the PRIMARY filegroup

BACKUP DATABASE AdventureWorks2008

FILEGROUP = 'PRIMARY'

TO DISK = 'C:BackupsAW2008_PRIMARY_diff.bak'

WITH DIFFERENTIAL
Copy-Only Backups
You can create a copy-only backup to perform a full or transaction log backup; this is independent of the normal backup sequence that is maintained using standard backup operations. Copy-only backups were introduced in SQL Server 2005 to enable you to backup a database without interfering with the normal backup and restore routine. For example, you cannot use a copy-only full backup as a differential base because the differential backup ignores the fact that the copy-only backup was made, and the differential is based on the last full backup that was made without using the copy-only option. A transaction log copy-only backup allows you to create a backup of the transaction log without breaking the log sequence number or truncating the transaction log. As with any other transaction log backup, you cannot create a copy-only log backup of a database using the simple recovery model. The code in Listing 11-8 shows the syntax for creating a full and transaction log copy-only backup of the AdventureWorks2008 database. As you can see, creating a copy-only backup is just a matter of adding the COPY_ONLY option to the WITH clause of the BACKUP statement.
Listing 11-8. Syntax Used to Create Copy-Only Backups
USE master

GO


--Create a copy-only full backup

BACKUP DATABASE AdventureWorks2008

TO  DISK = 'C:AdventureWorks2008.bak'

WITH  COPY_ONLY

GO
--Create a copy-only log backup

BACKUP LOG AdventureWorks2008

TO  DISK = 'C:AdventureWorks2008.trn'

WITH  COPY_ONLY

GO
![]() Note SQL Server 2008 introduces the ability to create a copy-only database backup using the GUI. In SQL Server 2005, the only way to create a copy-only backup is by using T-SQL.
Note SQL Server 2008 introduces the ability to create a copy-only database backup using the GUI. In SQL Server 2005, the only way to create a copy-only backup is by using T-SQL.
Backup Compression
Backup compression is a long-awaited feature that was added in SQL Server 2008. Prior to SQL Server 2008, you had to purchase third-party tools in order to achieve backup compression. You can only create a compressed backup using the Enterprise Edition of SQL Server 2008; however, restoring a compressed backup is supported in all editions of SQL Server 2008.
By default, backup compression is turned off at the server level. To change the default configuration for backup compression, you can use the sp_configure stored procedure with the ‘backup compression default’ parameter. You can specify value of ‘1’ to enable the default behavior for all backups to be compressed and specify ‘0’ to disable default compression. You can run the code in Listing 11-9 to enable default compression.
Listing 11-9. Code to Enable Default Compression
USE master

GO


EXEC sp_configure 'backup compression default', '1';

RECONFIGURE WITH OVERRIDE;
You can override the default behavior for backup compression by specifying WITH COMPRESSION or WITH NO_COMPRESSION when issuing the backup statement. Listing 11-10 shows the syntax to create a backup on the AdventureWorks2008 database both with and without compression.
Listing 11-10. Syntax to Create a Backup with and Without Compression
USE master

GO


PRINT '----------AdventureWorks2008 With Compression----------'
--Create a full backup with compression

BACKUP DATABASE AdventureWorks2008

TO  DISK = 'C:BackupsAdventureWorks2008_C.bak'

WITH  COMPRESSION


GO


PRINT Char(13) + '----------AdventureWorks2008 No Compression----------'


--Create a full backup with no compression

BACKUP DATABASE AdventureWorks2008

TO  DISK = 'C:BackupsAdventureWorks2008_NC.bak'

WITH  NO_COMPRESSION


GO
As you can see in Figure 11-5, a backup using compression completes more quickly because the backup file is smaller and requires less IO. The compressed backup completed in 8.192 seconds averaging 22.045 MB per second, while the non-compressed backup completed in 13.209 seconds averaging only 13.672 MB per second.
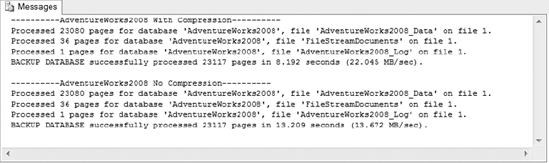
Figure 11-5. Backup results using compression vs. no compression
The increased backup speed also increases the CPU required to process the backup, which could impact other operations on the server while the backup is being performed. If a compressed backup has a negative impact on concurrent processes, you can use the Resource Governor to limit the CPU used by the backup process. (We will cover the Resource Governor in Chapter 16.)
There are a couple of factors that determine the amount of space you will save by using backup compression. For example, text data compresses a lot more than the other data types, and encrypted data hardly compresses at all. Also, if you are using compressed tables, you will not benefit much by using backup compression. The backupset table in the msdb holds the backup size and the compressed backup size, so you can determine the amount of space you are actually saving by using backup compression. Listing 11-11 shows a sample query you can use to determine the amount of compression you are achieving by using backup compression.
Listing 11-11. Code to Determine the Compression Percentage per Backup
SELECT database_name,

       backup_finish_date,

       1 - (compressed_backup_size/backup_size) PercentCompressed

FROM msdb.dbo.backupset

WHERE backup_size > compressed_backup_size
Logical Backup Devices
You can create a logical backup device that points to a physical backup device, which enables you to back up and restore using the logical name instead of the actual physical device. This is useful for providing an abstraction layer between backup scripts and the actual physical backup devices. For example, if you need to change the location for your backups, instead of changing every script, all you need to do is delete the old logical backup device and create a new one that points to the appropriate location.
To create a logical backup device, you can use the sp_addumpdevice system stored procedure. The code in Listing 11-12 creates a logical backup device named AdventureWorks BackupDevice that points to the physical backup device C:BackupAdventureWorks2008.bak. To drop a logical backup device, you can execute the sp_dropdevice system stored procedure followed by the name of the device (also shown in Listing 11-12).
Listing 11-12. Code to Add and Remove a Logical Backup Device Using T-SQL
USE master

GO

--Add logical backup device

EXEC sp_addumpdevice

        @devtype ='disk',

        @logicalname ='AdventureWorksBackupDevice' ,

        @physicalname ='C:BackupAdventureWorks2008.bak'

GO


--Remove logical backup device

EXEC sp_dropdevice 'AdventureWorksBackupDevice'

GO
You can also add a logical backup device using the SQL Server Management Studio GUI. Expand the Server Objects node in the Object Explorer, right-click on the Backup Devices folder, and select New Backup Device from the context menu. This will bring you to the Backup Device dialog box, as shown in Figure 11-6. Enter the logical device name, device type, and physical location, and then select OK to create the device.
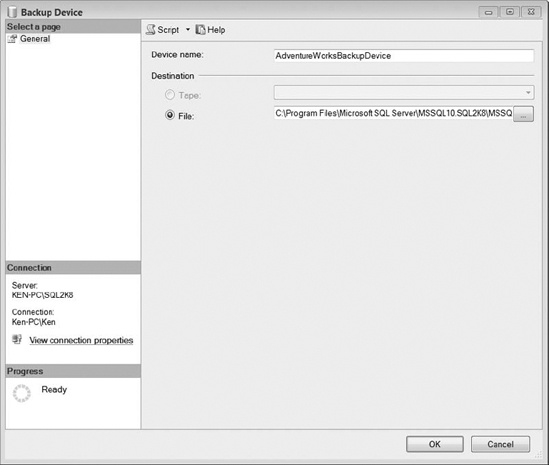
Figure 11-6. Backup Device dialog General section
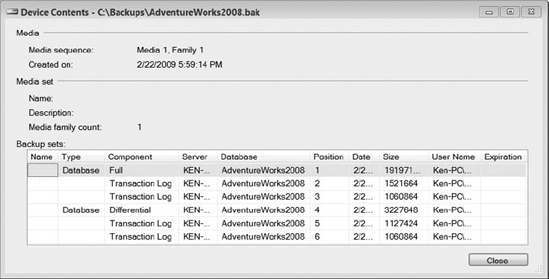
Once you create the backup device, the next time you open the Backup Device dialog box, you will see a Media Contents page. You can open the Backup Device dialog box again by double-clicking the appropriate device in the Backup Devices folder. The Media Contents page displays all of the backup sets that are contained in the logical backup device, as shown in Figure 11-7. We have taken two full backups before opening the dialog box again for demonstration purposes.
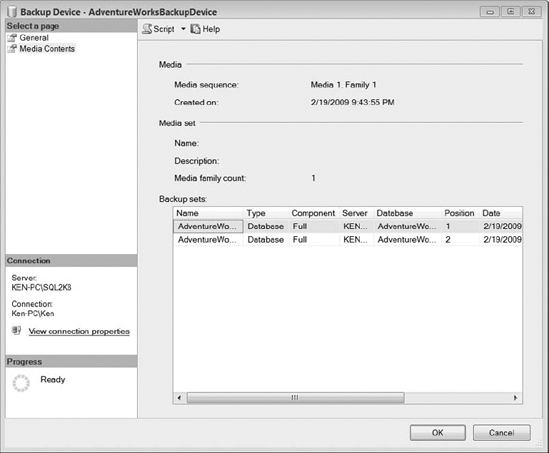
Figure 11-7. Backup Device dialog Media Contents section
You can query the sys.backup_devices catalog view to display a list all of the current logical backup devices, along with the physical device type and location. Figure 11-8 shows the results for the backup device we created in this section.
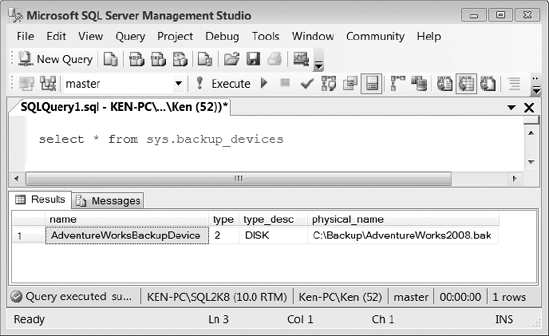
Figure 11-8. Results returned from the sys.backup_devices catalog view
The GUI Backup Interface
The GUI-based, Back Up Database dialog is the best place to review all of the backup choices because they are grouped logically and broken out into two pages: General and Options, as shown in Figures 11-9 and 11-10.
If you are unsure how certain configuration changes affect the BACKUP command, you can generate a script with the selected configuration and analyze the output. Using the GUI interface will also prevent you from creating a BACKUP command that contains certain logical errors. For example, you are not given the option to create a transaction log backup on a database that is using the simple recovery model.
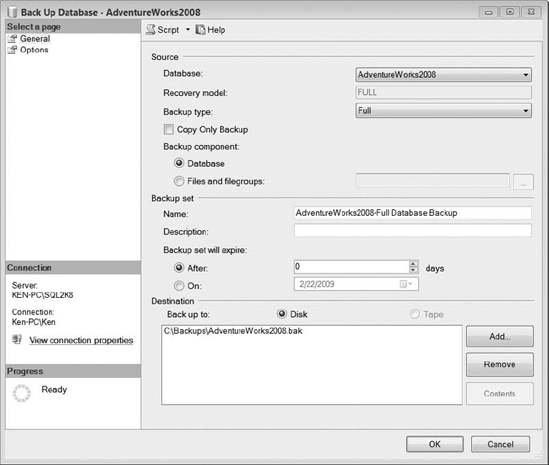
Figure 11-9. Back Up Database dialog box General section
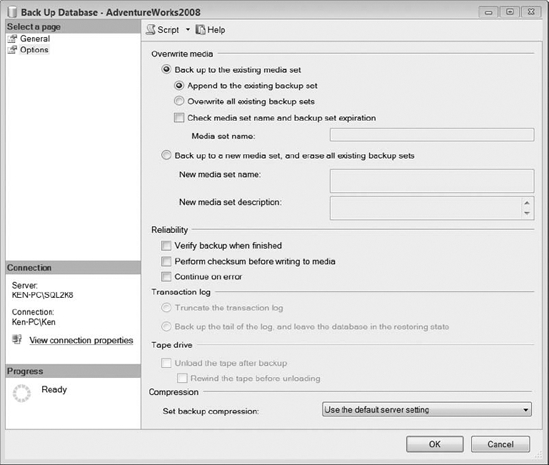
Figure 11-10. Back Up Database dialog box Options section
The General page, shown in Figure 11-9, consists of three areas: Source, Backup Set, and Destination. Let's take a look at the specific configurations available in each:
- Database: Drop-down list containing the databases available to back up.
- Recovery Model: Read-only text box that displays the recovery model for the selected database. This will affect the type of backups that can be performed.
- Backup Type: Drop-down that lists the available backup types based on the recovery model for the selected database.
- Copy Only Backup: Check box used to create a copy-only backup. Selecting this option will add the
WITH COPY_ONLYclause to theBACKUPcommand. - Backup Component: Option buttons that determine whether you will back up the entire database or only a specific file or filegroup.
- Name: The logical name given to the backup set. SQL Server will automatically suggest a name based on the options selected in the Source area.
- Description: Logical description that can be given to the backup set.
- Backup Set Will Expire: Option that determines when the backup set can be overwritten using the
INIToption. You can specify a date the backup set will expire or enter a number of days to retain the backup set. A backup set will never expire if you enter a value of 0 in the number of days. - Back Up To: Option that determines if you will back up to disk or tape.
- Add button: Displays the Select Backup Destination dialog box shown in Figure 11-11 that allows you to add a backup file or device to the backup set. You can add up to 64 devices for a single backup set.
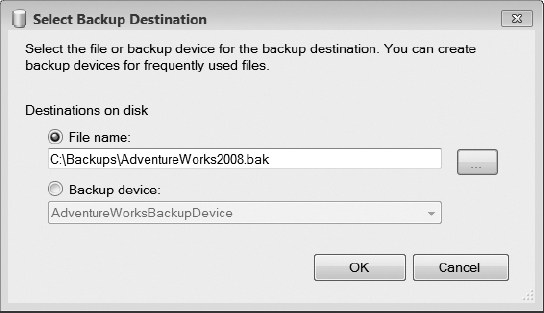
Figure 11-11. Select Backup Destination dialog box
- Remove button: Removes the highlighted backup device from the backup set.
- Contents button: Displays the Device Contents dialog box shown in Figure 11-12, which contains information about the media content for the highlighted backup device.
The Options page (shown earlier in Figure 11-10) consists of five areas: Overwrite Media, Reliability, Transaction Log, Tape Drive, and Compression. Let's take a look at the specific configurations available in each:
- Back Up to the Existing Media Set: This option adds the
NOFORMATclause to theBACKUPstatement to ensure that the media header is not overwritten. - Append to the Existing Backup Set: This option adds the
NOINITclause to theBACKUPstatement to instruct the backup to append the backup set to the existing media set. - Overwrite All Existing Backup Sets: This option adds the
INITclause to theBACKUPstatement that instructs the backup to overwrite the existing backup sets. - Check Media Set Name and Backup Set Expiration: This option adds the
NOSKIPclause to theBACKUPstatement that forces the backup to check the expiration date for the backup set before it is allowed to be overwritten. You can optionally add a media set name when this option is checked. This will add theMEDIANAMEclause to theBACKUPstatement that forces the existing media set name to match the entered media set name before the backup will successfully complete. - Back Up to a New Media Set, and Erase All Existing Backup Sets: This option adds the
FORMATclause to theBACKUPstatement in order to overwrite the media header and theINITclause to overwrite the backup sets. TheSKIPoption will also be added to theBACKUPstatement when this option is selected to bypass the validation checks for media name and expiration. TheSKIPoption is not required because it is always the default behavior whenever theFORMATclause is used. - New Media Set Name: This option adds the
MEDIANAMEclause to theBACKUPstatement that will be used for the new media set. - New Media Set Description: This option adds the
MEDIADESCRIPTIONclause to theBACKUPstatement to provide a description for the media set. - Verify Backup When Finished: This option will actually create a
RESTORE VERIFYONLYstatement following theBACKUPcommand that verifies the backup contents are readable. - Perform Checksum Before Writing to Media: This option adds the
CHECKSUMclause to theBACKUPstatement that will verify the checksum and torn page information before writing each page to disk. A checksum will also be created for the entire backup. This option will add additional overhead to the backup operation. - Continue on Error: This option adds the
CONTINUE_AFTER_ERRORclause to theBACKUPstatement that instructs the backup to continue if checksum or torn page errors are detected. The default option isSTOP_ON_ERROR. - Truncate the Transaction Log: This option is only available for transaction log backups. This instructs the backup to truncate the transaction log after the backup has completed. Selecting this option does not add anything to the
BACKUPstatement because this is the default behavior for transaction log backups. - Backup the Tail of the Log, and Leave the Database in the Restoring State: This option is only available for transaction log backups. This option will add the
NO_TRUNCATEclause to theBACKUPstatement that causes theBACKUPstatement to back up the log regardless of the state of the database and does not truncate the log. This will also add theNORECOVERYclause to theBACKUPstatement that leaves the database in a restoring state after the backup has completed. This option is generally used to back up the tail of the transaction log on a damaged database before performing a restore. - Unload the Tape After Backup: This option adds the
UNLOADclause to theBACKUPstatement that is used automatically to unload a tape after a backup completes. - Rewind the Tape Before Unloading: This option adds the
REWINDclause to theBACKUPstatement that is used automatically to rewind a tape before unloading after a backup completes. - Set Backup Compression: This option allows you to accept the default server setting for compressed backups or to override the default setting by specifically choosing to compress or not compress the backup. If the default setting is chosen, nothing will be added to the
BACKUPstatement. If you choose the Compress Backup option, theCOMPRESSIONclause will be added to theBACKUPstatement. If you choose the Do Not Compress Backup option, theNO_COMPRESSIONclause will be added to theBACKUPstatement.
Another option that is always added by default when using the GUI is the STATS option. The STATS option is used to show backup progress. You can specify a percentage to report. For example STATS = 20 will display a message for roughly every 20% of the backup that has completed. If you specify the STATS option without an assigned percentage, you will receive messages at 10% intervals.
Backups from T-SQL
Anything you can do in the GUI, you can do using T-SQL. Actually, the only way to specify certain options and perform certain types of backups is by using T-SQL. Using the GUI is a good way to perform a quick backup or script out a BACKUP command that you can tweak a little using T-SQL to get exactly what you are looking for. I always script out my BACKUP statements that are generated by the GUI and review them before actually executing the command in order to make sure the statement is doing exactly what I am expecting. The complete syntax for creating a database backup is shown in Listing 11-13.
Listing 11-13. Complete Syntax Used for Creating Database Backups
--BACKUP STATEMENTS


--Backup database

BACKUP DATABASE { database_name | @database_name_var }

 TO <backup_device> [ ,...n ]

 [ <MIRROR TO clause> ] [ next-mirror-to ]

 [ WITH { DIFFERENTIAL | <general_WITH_options> [ ,...n ] } ]

[;]


--Backup files or filegroups

BACKUP DATABASE { database_name | @database_name_var }

 <file_or_filegroup> [ ,...n ]

 TO <backup_device> [ ,...n ]

 [ <MIRROR TO clause> ] [ next-mirror-to ]

 [ WITH { DIFFERENTIAL | <general_WITH_options> [ ,...n ] } ]

[;]


--Partial backup

BACKUP DATABASE { database_name | @database_name_var }

 READ_WRITE_FILEGROUPS [ , <read_only_filegroup> [ ,...n ] ]

 TO <backup_device> [ ,...n ]

 [ <MIRROR TO clause> ] [ next-mirror-to ]

 [ WITH { DIFFERENTIAL | <general_WITH_options> [ ,...n ] } ]

[;]


--Transaction log backup

BACKUP LOG { database_name | @database_name_var }

 TO <backup_device> [ ,...n ]

 [ <MIRROR TO clause> ] [ next-mirror-to ]

 [ WITH { <general_WITH_options> | <log-specific_optionspec> } [ ,...n ] ]

[;]


--BACKUP DESTINATION OPTIONS
<backup_device>::=

 {

 { logical_device_name | @logical_device_name_var }

 | { DISK | TAPE } =

 { 'physical_device_name' | @physical_device_name_var }

 }


<MIRROR TO clause>::=

 MIRROR TO <backup_device> [ ,...n ]


<file_or_filegroup>::=

 {

 FILE = { logical_file_name | @logical_file_name_var }

 | FILEGROUP = { logical_filegroup_name | @logical_filegroup_name_var }

 }


<read_only_filegroup>::=

FILEGROUP = { logical_filegroup_name | @logical_filegroup_name_var }


--WITH OPTIONS


--Backup set options

 COPY_ONLY

 | { COMPRESSION | NO_COMPRESSION }

 | DESCRIPTION = { 'text' | @text_variable }

 | NAME = { backup_set_name | @backup_set_name_var }

 | PASSWORD = { password | @password_variable }

 | { EXPIREDATE = { 'date' | @date_var }

 | RETAINDAYS = { days | @days_var } }


--Media set options

 { NOINIT | INIT }

 | { NOSKIP | SKIP }

 | { NOFORMAT | FORMAT }

 | MEDIADESCRIPTION = { 'text' | @text_variable }

 | MEDIANAME = { media_name | @media_name_variable }

 | MEDIAPASSWORD = { mediapassword | @mediapassword_variable }

 | BLOCKSIZE = { blocksize | @blocksize_variable }


--Data transfer options

 BUFFERCOUNT = { buffercount | @buffercount_variable }

 | MAXTRANSFERSIZE = { maxtransfersize | @maxtransfersize_variable }


--Error management options

 { NO_CHECKSUM | CHECKSUM }

 | { STOP_ON_ERROR | CONTINUE_AFTER_ERROR }
--Compatibility options

 RESTART


--Monitoring options

 STATS [ = percentage ]


--Tape options

 { REWIND | NOREWIND }

 | { UNLOAD | NOUNLOAD }


--Log-specific options

 { NORECOVERY | STANDBY = undo_file_name }

 | NO_TRUNCATE
Using Encryption
When you are using encryption in SQL Server, it is extremely important to back up any encryption keys and certificates and store them in a secure offsite location. For example, if you are using transparent data encryption, you cannot restore the encrypted database on a new system without having the encryption key. There is no back door. You can't attach the data files or restore the database, period. There are three objects you should back up when using encryption in SQL Server: the service master key, the database master key, and any certificates used for encryption.
The service master key is the root encryption key for the entire instance of SQL Server. SQL Server automatically creates the service master key the first time it is needed to encrypt another key. You should back up the service master key and keep it and the encryption password in a secure offsite location. The code to back up the service master key is shown in Listing 11-14.
Listing 11-14. Code to Backup the Service Master Key
BACKUP SERVICE MASTER KEY

TO FILE = 'c:service_master_key'

ENCRYPTION BY PASSWORD = '3ncrypti0nP@$$w0rd'

GO
The next thing you need to back up is the database master key. SQL Server uses the database master key to encrypt other keys and certificates within the database. If the key is accidently deleted, SQL Server will not be able to decrypt any objects created using that key. Therefore, you should back up the database master key and store it in a secure offsite location. You should also keep a local copy for immediate use. If you encrypted the database master key using a password, you will first have to open the key before backing it up. If you encrypted the database master key using the service master key, you do not have to open the key prior to backing it up. The code to back up the database master key for the master database is shown in Listing 11-15.
Listing 11-15. Code to Back Up the Database Master Key
USE master

GO

--Open the master key (This is not required if the master key

-- is encrypted using the service master key.)

OPEN MASTER KEY DECRYPTION BY PASSWORD = 'M@$t3r_K3y_3ncrypti0nP@$$w0rd '


--Back up the database master key

BACKUP MASTER KEY

TO FILE = 'c:database_master_key'

ENCRYPTION BY PASSWORD = '3ncrypti0nP@$$w0rd'

GO
Finally, you need to back up any certificates and store them in a secure offsite location. The code in Listing 11-16 shows the syntax used to back up a certificate along with the private key.
Listing 11-16. Code to Back Up a Certificate and the Private Key
USE master

GO


BACKUP CERTIFICATE TestCert

TO FILE = 'C:TestCert.cer'

WITH PRIVATE KEY

         (FILE = 'C:TestCertKey.pvk',

         ENCRYPTION BY PASSWORD = '3ncrypti0nP@$$w0rd'),

GO
Backing Up the System Databases
You need to make sure you include the system databases as a part of your backup strategy. If you have to rebuild a server, you will be able to use the system database backups to restore any custom configurations, including jobs, logins, and so on. We generally include the system databases in a full daily backup routine and take special one-off backups after certain information in the database changes.
Following are the system databases and some things that you need to know about backing them up:
master: Themasterdatabase uses the simple recovery model, and you can only perform full database backups of themasterdatabase. You should back up this database whenever certain operations cause it to be updated, including the following:msdb: Themsdbdatabase uses the simple recovery model by default, but it can be configured to use any recovery model. For example, you can change the recovery model of themsdbto full and take advantage of transaction log backups if you are highly dependent on information that is stored in this database. The information in themsdbdatabase changes often because it logs historical information for items like backups, SQL Agent jobs, and database mail. At minimum, you should take a full backup of themsdbafter making configuration changes, including the following:- Adding and removing SQL Agent jobs
- Adding and removing maintenance plans
- Importing SSIS packages
- Adding and removing Policies and central management servers
- Configuring log shipping
- Configuring database mail
- Configuring operators and alerts
model: This database uses the full recovery model by default, but it can be configured to use any recovery model. Remember, since themodeldatabase serves as a template for all new user databases, if you change the recovery model in themodeldatabase, any newly created databases will be created with this recovery model as well. You only need to perform full database backups of themodeldatabase whenever you make custom configuration changes. Even though the recovery model is set to full, there is no activity in themodeldatabase to warrant transaction log backups.tempdb: The recovery model for thetempdbis simple and cannot be changed. Every time you restart SQL Server, thetempdbis recreated, and any data stored in it is lost. Since the tempdb is recreated every time SQL Server is restarted, you are not allowed to perform any type of backup operations on it.Resource: This is a read-only database and is not visible in SQL Server Management Studio. TheResourcedatabase is only updated whenever service packs are applied to SQL Server. You cannot back up theResourcedatabase using a SQL Server backup operation. To backup this database, you must perform a file-based backup operation by copying the mssqlsystemresource.mdf file to your backup location. Unlike other data files, you do not have to stop the SQL Server service in order to copy theResourcedata files.
Backup History
SQL Server maintains a set of tables that hold the backup history that is performed on each server instance in the msdb database. You can use these tables to gather useful information, such as the last time a backup was performed on each database. The backup history tables include the following:
- backupfile: Contains information about the data and log files for a database backup.
- backupfilegroup: Contains information about every filegroup in a database when the backup was performed.
- backupmediafamily: Holds one row for each media family, including the logical device name, physical device name, and device type.
- backupmediaset: Holds one row for each backup media set. Each media set can have multiple media families.
- backupset: Holds a single row for each backup set created by a successful backup operation. The backupset table holds information like the database name, the backup start and end times, and log sequence numbers at the time of backup.
After a while of capturing backup information, the backup history tables can become rather large depending on the number and frequency of backups performed. We have seen the msdb grow to a fairly substantial size because of the amount of data stored in the backup history tables. Microsoft provides the sp_delete_backuphistory system stored procedure that you can use to limit the amount of history stored in these tables. The sp_delete_backuphistory procedure enables you to enter a date/time parameter that will remove all data created before a certain date or time. For example, the statement Exec msdb.dbo.sp_delete_backuphistory ‘1/1/2009’ will remove all the records from the backup history tables in the mdsb that were created before January 1, 2009.
![]() Caution If your
Caution If your msdb database already contains a lot of data in the history tables, it is best to delete the data for smaller date ranges and test the impact on the server instead of trying to remove several months or years all at once.
Listing 11-17 shows a script you can use to keep a specified amount of history in the database without deleting all of the history at once. If you have a lot of history in your backup tables, you should start deleting the data in smaller chunks until you see the impact that removing the data has on your server. We maintain six months of history and never delete more than three months of history each time the script is executed. Let's say you schedule this script to run once a week. Every week you will delete three months of history until you eventually delete all the backup data you have built up prior to implementing this script and only have to delete a single week of backup history.
Listing 11-17. Script to Remove Backup History in the msdb in Three-Month Intervals While Maintaining Six Months of History
USE msdb

GO


--Keep 6 months of history, but never delete more than 3 months at a time.

Declare @dte Datetime

SET @dte = (SELECT MIN(backup_start_date) FROM backupset WITH (nolock))

SET @dte = (SELECT dateadd(mm,3,@dte))


IF (dateadd(mm,-6,getdate()) < @dte )

 SET @dte = dateadd(mm,-6,getdate())


PRINT @dte


EXEC sp_delete_backuphistory @dte
If you want to remove all the backup history for a specific database, you can execute the sp_delete_database_backuphistory system stored procedure followed by the database name. For example, the statement Exec msdb.dbo.sp_delete_database_backuphistory ‘AdventureWorks2008’ will remove all the records from the backup history tables in the msdb for the AdventureWorks2008 database.
Summary
Okay, we have gone over several backup options available in SQL Server 2008, but that is only the half of it. The next chapter will tie it all together when we discuss the restore options and other restore considerations. While knowing all the restore options so that you can quickly recover a database is important, making sure you have a good backup is even more important. You can memorize every restore command there is, but if you don't have a good backup then they won't do you any good.