
A P P E N D I X C
![]()
Page Rendering and Altering
One of the fundamental changes in Drupal 7 is how the HTML appearing in the browser is assembled. For example, in previous Drupal versions, the content of a block was returned as an HTML string. Then, the theme_block() function put this HTML in a template together with the subject, returned a somewhat bigger HTML string, and concatenating several of these together yielded the HTML for one region.
In Drupal 7, on the other hand, the content of the block is returned as an array from the block callback. Then it gets put inside an array and so on. The end result is a gigantic, multi-dimensional array fed to the drupal_render() function, which ultimately produces the HTML string the browser gets. But before it does this it allows us to interact with the whole content of the page in much richer ways than we could when it was just strings passed around.
Let's review this huge page array for the default home page with every block disabled first. Later we will walk the code flow to see how it's assembled.
To see the page array I installed the Devel module to get the pretty printed arrays, as shown in Figure C–1.
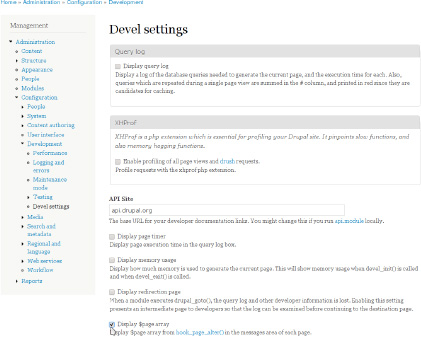
Figure C–1. Enabling Devel module's “Display $page array” option to see how the page looks to hook_form_alter()
Next, disable every block (aside from Management, which is not accessible for anonymous), as shown in Figure C–2.
![]() Note After disabling all blocks, you will need to use the path ‘
Note After disabling all blocks, you will need to use the path ‘user’ to log back into your Drupal site.
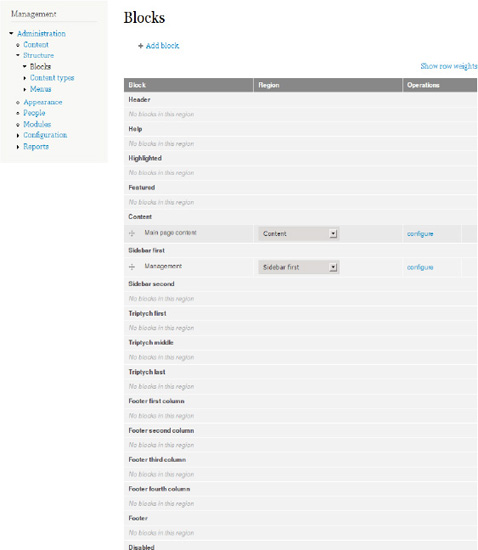
Figure C–2. The blocks administration page
After this preparation we can finally take our first look at a really bare bones page and its page array, as shown in Figure C–3.
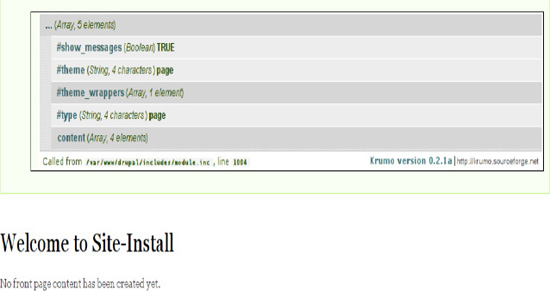
Figure C–3. Page array as displayed by Devel module for a page with no content or sidebar blocks— the bare minimum
The structure of the array may be familiar to you from looking at form arrays: there are properties marked with the # sign and then the children, in this case the only child is content. One property I would like to draw your attention to is the element #type, which is page, meaning that the children of this element will be themed by the page template (see Chapters 15 and 16, on Theming). Let's peek into the content, as shown in Figure C–4.
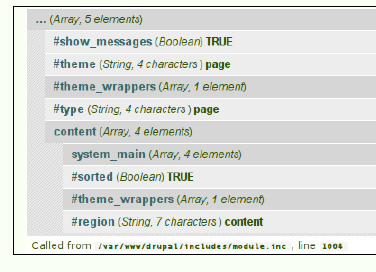
Figure C–4. Inside the content child of the page array
It's the same again: more properties and one child element—let's open that child, system_main, and hopefully we find something useful in there, in Figure C–5.
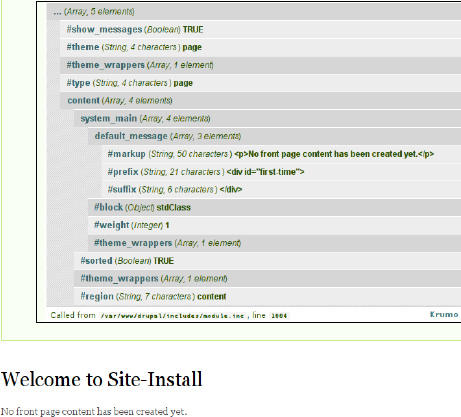
Figure C–5. Drilling down through child render elements content and system_main to default_message
Well, no such luck, so we opened its child element, the default_message array, too. And there it ends: we see the message “No front page content has been created yet.” in the #markup property. Although there is no #type property here, that just means the #type is markup, meaning the HTML equivalent of this element is simply contents of the #markup property.
The only thing left closed is the #theme_wrappers arrays, so let's look into them (see Figure C–6).
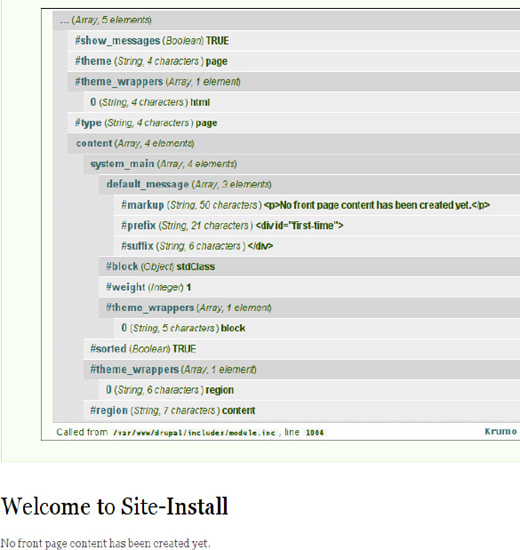
Figure C–6. Most basic page array with every element and property expanded
If you start from the message you see how it's wrapped first in a block theme wrapper, then in a region theme wrapper, then in a page, and then finally in the html theme wrapper. Now that we have seen such a page array in its entirety, let's see the actual code flow—and the places where we can intervene.
Step 1: The Router Item
After Drupal has been bootstrapped, the last thing index.php does is call menu_execute_active_handler(). This retrieves the router item from the menu_router based on the current path. There is an important chance here to intervene, hook_menu_item_alter(). This allows you to change anything about the menu item, such as changing the access callback based on the IP of the current user. You could relax some access control for people logging in from the office. Or you might want to provide access to only those who have used a path alias for a node and not to those who have used node/[nid]. Such can be used to implement simple token-based access by creating a random path alias and sending it to the user.
Once the access control has passed, the menu system will call the page callback, which puts together the main content. hook_menu_item_alter() can be useful to change which page callback is fired. For example, the router system only allows per node page callbacks or a single one for every node. But, you might want a different page per node type. Or if you run the Organic Groups module (drupal.org/project/og), then entirely different pages might be necessary for different groups. All this becomes possible through hook_menu_item_alter().
Step 2: The Page Callback Is Fired
Almost the whole book is basically about what this can do. The page callback might load entities, view them, and create lists, tables, etc., but at the end of the day it just returns a renderable array. For example, the default home page returns this:
$build['default_message'] = array(

    '#markup' => "<p>No front page content has been created yet.</p>",

    '#prefix' => '<div id="first-time">',

    '#suffix' => '</div>',

);
We have seen this before, haven't we?
Step 3: The Delivery Callback
Now you are back in menu_execute_active_handler(). The next callback to fire is the delivery callback, which defaults to drupal_deliver_html_page(). As the name suggests, by default you are delivering the page callback results in HTML.
![]() Note The strict use of the term “page callback result” is important because “page” contains the return of page callback, the blocks, and everything else (as we will soon see).
Note The strict use of the term “page callback result” is important because “page” contains the return of page callback, the blocks, and everything else (as we will soon see).
You could deliver in JSON or deliver parts of the page callback results in JSON. Core does not use this capability a lot, but overlay has an interesting case. When a form submit instructs Drupal to close the overlay on the next page, it's faster to display just the styles and scripts to close the overlay instead of displaying the whole page needlessly. So here's a delivery callback to display nothing:
function overlay_deliver_empty_page() {

  $empty_page = '<html><head><title></title>' . drupal_get_css() . drupal_get_js() .

'</head><body class="overlay"></body></html>';

  print $empty_page;

  drupal_exit();

}
You can use hook_menu_item_alter() to change the delivery callback—you have already seen how altering the access or the page callback can be useful, now you see the usefulness of altering the delivery callback.
Let's presume that drupal_deliver_html_page() was chosen (that's the case almost always anyway) and let's check what that function does. It handles page not found or access denied cases, and, most importantly, it calls drupal_render_page().
Step 4: drupal_render_page()
The name is very deceiving: this function does a lot more than merely render the page. Remember, so far you only have the page callback result, not the whole page—so this function builds the page. With just a little exaggeration, all that's fun and powerful in Drupal 7 is fired from this function. (The field API is powerful but tedious.)
First, hook_page_build() is called, which allows other modules to add to the page array—because here you build that. Your modules can add to the page array, also. Second, hook_page_alter() is fired.
Step 5. hook_page_alter()
This is the hammer that makes all problems look like a nail. If you have ever seen a “dynamic hammer,” some special forces use for breaching a door, well this is it.
For example, if you want to move the node links into a block called “Article tools,” then it's next to impossible in Drupal 6. The links are bolted to the node, and it's a lot easier to write code that re-displays the links in a block than it is to move them. Of course this is a lot of code to duplicate and might cause expensive operations to repeat. In Drupal 7 we have an excellent hammer to drive that bolt out, and we can just move the link without much ado. Most of the example actually will be making sure the result looks like a block (note that this example only works if you have a region called sidebar_first like the default theme Bartik does):
function dgd7_page_alter(&$page) {

  if ($node = menu_get_object()) {

    // Create an HTML string out of the links so it can be checked for emptiness

    $links = drupal_render($page['content']['system_main']['nodes'][$node->nid]['links']);

    // Remove from the original place.

    unset($page['content']['system_main']['nodes'][$node->nid]['links']);

    // The rest of this code puts $links in a block if it's not empty.

    if ($links) {

      $page['sidebar_first']['dgd7_tools']['#markup'] = $links;

      $page['sidebar_first']['dgd7_tools']['#block'] = (object) array(

        'module' => 'dgd7',

        'delta' => 'dgd7_tools',

        'subject' => t('Article tools'),

        'region' => 'sidebar_first',

      );
      $page['sidebar_first']['dgd7_tools']['#theme_wrappers'][] = 'block';

    }

  }

}
Another example is changing fixed lists in Drupal core. Let's say you wanted to insert an advertisement or public service announcement into the middle of an aggregator items list or the comments of a node. This is quite tricky in previous versions of Drupal—you would probably need to display the ad from a template, which counts how many times the comment or the item was displayed—but in Drupal 7 it's again just trivial: you put it in place and that's it:
function dgd7_page_alter(&$page) {

  if ($node = menu_get_object()) {

   $comments = &$page['content']['system_main']['nodes'][$node->nid]['comments']['comments'];

   $comments['ad'] = dgd7_get_ad();

   // The first comment weight is 0, the second is 1, go between them.

   unset($comments['#sorted']);

   $comments['ad']['#weight'] = 0.5;

 }

}


function dgd7_get_ad() {

 return array('#markup' => t('Hello I am an ad!'));

}
And so we finally arrived to the point where the page array has been completed: it has started life as the page callback result, got additional pieces like blocks in hook_page_build(), and got the details put in place by hook_page_alter(). With all this said and done, you have an array that is ready to be rendered, and so drupal_render() is called. This is where the array will turn into HTML.
Step 6. drupal_render()
This is a recursive function called on every child of the page array. So you start with running drupal_render($page), then continue with drupal_render($page['content']), then with drupal_render($page['content']['system_main']), and finally with drupal_render($page['content']['system_main']['default_message']). If there would be siblings, the siblings are called first before the children (this is called breadth-first traversal of the page tree).
Let's just focus on one call of drupal_render(). First there is an access check. Every small or big piece can have access control in Drupal 7. Then the cache is checked. Again, no matter how small or big the part of the page you are looking at, the HTML string resulting from the rendering of it can be cached easily. To utilize this, the #cache argument needs to be set. This is an associative array, the keys will be familiar if you are familiar with cache_set: key, bin, expire (while cache_set takes a data argument as well, that's obviously the HTML string itself). So for example:
$element['#cache']  = array(

  'cid' => 'foo:bar',

  'bin' => 'cache_something',

  'expire" => 900,

);
Now, creating the cache id (cid) from multiple parts is quite common—even this small example contained ‘foo:bar’. Instead of specifying the cid key directly, you can supply an array of keys instead:
$element['#cache']  = array(

  'keys' => array('foo', 'bar'),

  'bin' => 'cache_something',

  'expire' => 900,

);
The advantage of course is the easier manipulation of keys in hook_page_alter(). Finally, you can set a ‘granularity,’ which is a binary combination (Why not an array? Good question! We will fix that in Drupal 8) of flags: DRUPAL_CACHE_PER_ROLE, DRUPAL_CACHE_PER_USER, DRUPAL_CACHE_PER_PAGE. For example:
$element['#cache']  = array(

  'keys' => array('foo', 'bar'),

  'granularity' => DRUPAL_CACHE_PER_ROLE | DRUPAL_CACHE_PER_PAGE,

  'bin' => 'cache_something',

  'expire' => 900,

);
This means the element is different per role and per page—but it's not different for every user, which means that the cache table is not bloated much and the chance for a miss is much higher.
If you had a cache miss, then you come to the array of #pre_render functions. It is a similar array of callbacks like form #process callbacks.
One possible scalability tactic is to work as little as possible while creating the page and instead move the costly work into #pre_render and also the previously described caching possibility. This is particularly useful for complicated queries. It's so useful that there is a helper function for this called drupal_render_cache_by_query(). This functions sets up #cache based on the query and #pre_render properties for you. Here is a slightly simplified example from forum.module:
function forum_block_view($delta = '') {

  $title = t('Active forum topics'),

  $query = db_select('forum_index', 'f')

    ->fields('f')

    ->addTag('node_access'),

    ->orderBy('f.last_comment_timestamp', 'DESC')

    ->range(0, variable_get('forum_block_num_active', '5'));

  $block['subject'] = $title;

  // Cache based on the altered query. Enables us to cache with node access enabled.

  $block['content'] = drupal_render_cache_by_query($query, 'forum_block_view'),

  $block['content']['#access'] = user_access('access content'),

  return $block;

}


function forum_block_view_pre_render($elements) {

  $result = $elements['#query']->execute();

  if ($node_title_list = node_title_list($result)) {

        $elements['forum_list'] = $node_title_list;

        $elements['forum_more'] = array('#theme' => 'more_link', '#url' => 'forum', '#title'

=> t('Read the latest forum topics.'));

  }

  return $elements;

}
See how the query is only executed in the pre_render? Remember, #pre_render only fires after caching, so this means the query will not be sent to the database unless there is a cache miss. You can do this with any DBTNG query.
The next steps will actually create HTML, with the results saved in $element['#children']. If #theme is defined, then that's the function that will produce HTML. Next up, if $element['#children'] is empty, then you iterate the actual children of the element—remember, child keys do not start with # – call drupal_render() on them and append the result to $element['#children']. Next the #theme_wrapper theme hooks—if there are any—get a chance to wrap the element into HTML. It's most likely those also change $element['#children'].
You are almost done! You have the children of the element finally in an HTML form in $element['#children']. Next, #post_render functions fire; typically these are used to do some sort of string filtering on the resulting HTML.
The almost last step is to add any JS and CSS required for the element by processing #states and #attached. The #attached property allows you to add libraries, JS, and CSS to a render array, and it's explained in the doxygen of drupal_process_attached() (which you can see at api.drupal.org/drupal_process_attached).
Finally, #prefix and #suffix are prefixed and appended to $element['#children'], and this is the return value of drupal_render(). Also, this is what gets stored in the render cache.
To sum up, for every child of an element passed into drupal_render(), either the function defined in #theme or a recursive call to drupal_render() turns it into HTML. This is how an entire Drupal page can be one large renderable array that you can modify, before rendering, with hook_page_alter().
![]() Tip For more resources on page rendering and altering, including an effort led by Bryan Hirsch to fully document the Render API, visit
Tip For more resources on page rendering and altering, including an effort led by Bryan Hirsch to fully document the Render API, visit dgd7.org/render.