
I hope that during the course of this book you have learned a lot about programming XNA and Silverlight for Windows Phone 7. There is an additional bonus from having gained all this experience: You have also learned a substantial amount of information about creating XNA games for Windows and the Xbox 360, and about creating Silverlight games and applications for the full browser-based version of Silverlight.
Both of these technologies have differences when run on Windows Phone 7 compared with the other platforms, but the fundamentals are the exactly the same. XNA games can be ported to run in Windows very easily; while Silverlight games take a little more time, they are still quite portable with some effort.
This chapter examines both XNA and Silverlight, and you will learn what is involved in transferring projects from Windows Phone 7 onto the desktop. The chapter won't include any in-depth learning of the PC versions of the environments, but will be enough to get you started. If you decide you need to know more at the end, there are plenty of online references and other books that you can use to extend your knowledge in these areas.
The example projects that accompany this chapter are all copies taken from previous chapters and modified to work in the new target environment. Each of them will be covered in more detail in the appropriate section of the chapter.
Before we start, it is important to clarify that the free Express version of Visual Studio can create Windows and Xbox 360 versions of XNA games, but it does not have the ability to create desktop versions of Silverlight applications: the full Visual Studio Professional application is required for this.
Let's begin then with XNA. XNA supports two different profiles—sets of features that are supported by the underlying API. The first profile, Reach, limits the features to those that are available for Windows Phone 7, Windows, and the Xbox 360. The second profile is the HiDef profile, which provides additional functionality that is not available to Windows Phone 7 (programmable vertex and pixel shaders for advanced graphics techniques, for example).
The active profile can be selected by opening the Project Properties page for your XNA game. For Windows Phone 7 projects, this will be locked into the Reach profile; once we have transferred projects across to Windows, they will default to HiDef. You can switch the Windows project profile back to Reach if you want to reduce the chance of adding any functionality that the phone is unable to support.
Because the HiDef profile is a superset of Reach, the majority of the core API that we have been using can be converted directly over to Windows. A few features are different or missing, including these:
Nearly everything else is identical, however, and can be transferred across to Windows without too much effort.
Note
This chapter will focus on transferring content to run in Windows rather than on the Xbox 360. Getting things up and running on the Xbox 360 involves a very similar process, however, so you should be able to make a good start with Xbox 360 project translation if you need to after reading this chapter. The Xbox 360 supports the HiDef profile, just like Windows.
Fortunately for us, Microsoft has simplified this process about as much as it could have. Once you have developed your Windows Phone 7 XNA project, the Visual Studio will create a Windows version with just a couple of mouse clicks.
Let's walk through the steps needed to accomplish this; we will start with something simple. All the way back in Chapter 2 we used an example project called FirstXNAProject, which simply displayed a smiley-face sprite that gradually moved down the screen. We will use this as the basis for our for Windows XNA project conversion.
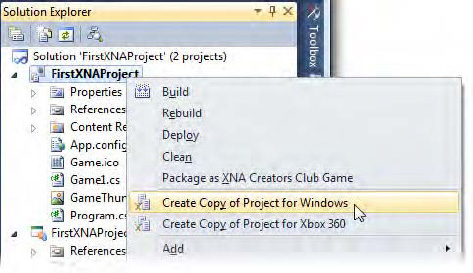
Reopen the project in Visual Studio (or, if you prefer, make a copy and open that so that the original project is not disturbed). Once it has opened, right-click the main game project and select Create Copy of Project for Windows from the context menu, as shown in Figure 16-1.
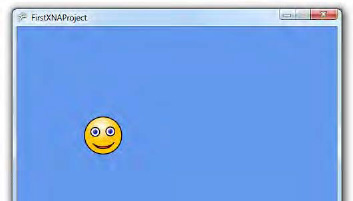
The result of this operation will be that a new project appears in your solution, named Windows Copy of FirstXNAProject. To run the project, right-click it and select Set as StartUp Project from the context menu; the project title will become bold to indicate that it is the project that will run when you begin debugging. Start the project running, and after a few seconds the project will appear, but this time running directly inside a Windows window, rather than in the emulator. Figure 16-2 shows the results.
Note
If the Windows Phone 7 emulator is not running when you launch the project, you might find that it opens, even though you are not running the phone version of the game. You can simply minimize it to get it out of the way.
There—that was easy! There is a little more to it than this once we start to get into more complex projects, but that is the heart of the conversion process. You can switch back and forward between the two target platforms just by setting the appropriate startup project in Solution Explorer.
At this stage, you have three projects in your solution: the main game project for Windows Phone 7, the main game project for Windows, and the Content project. There is a lot of sharing going on between these projects. The more obvious sharing is of the Content project, which is used by both of the game projects.
Less obvious is the fact that the copy of the project created for Windows is really only a copy of the project file. The source code files within are not copied and are being shared between the two game projects. If you begin making changes to the Windows version, you are also changing the Windows Phone 7 version, as they are using the same source code files. Don't spend a lot of time fixing the source code for one platform only to find that you have destroyed the code for the other!
Tip
If you want to temporarily remove one of the two projects from your solution with a view to adding it back in later on, right-click the project and select Unload Project from the context menu. The project will remain inside Solution Explorer marked as Unavailable, but will otherwise be completely ignored. To restore it later on, right-click it again and select Reload Project.
Before spending any more time working on projects that have been converted in this way, you should decide whether you want to try to maintain a single source code base that works for both platforms (which is entirely feasible, as discussed in a moment), or whether you want to branch the source code and create two completely separate projects, each with its own independent source code. This decision will be dictated by how much additional development you intend to do on your game; it would be counterproductive to have to make every change twice if this can be avoided.
If you do decide to try to get the same source code working on both platforms, you will need to use a handy feature of the C# compiler called conditional compilation. By adding special compiler directives to your source code, you can instruct the compiler to build sections of your code only if certain conditions are met, and to completely ignore it if they are not met.
This allows us to very easily create alternative code paths for the Windows Phone 7 and Windows versions of the project, even though they share the same source files. The Windows Phone 7 project file declares a compilation constant named WINDOWS_PHONE, while the Windows project instead declares a constant named WINDOWS. By checking for one or other of these, the compiler can include code that is relevant just to the appropriate project type.
Listing 16-1 shows how this is used. The #if directive begins a block of code that will only be compiled if the WINDOWS_PHONE constant is defined. The block is terminated with a corresponding #endif. This example contains an alternative code path for non-Windows Phone 7 platforms.
Example 16.1. Conditional compilation for Windows Phone 7 or other platforms
#if WINDOWS_PHONE
        // Execute code for Windows Phone 7
        DoWP7Stuff();
#else
        // Execute code for non-Windows Phone 7
        DoNonWP7Stuff();
#endif
In addition to #if and #endif, the #elif operator can be used for "else/if" logic. Listing 16-2 shows separate code paths for Windows Phone 7, Windows. and Xbox 360.
Example 16.2. Multiple alternate compilation code paths
#if WINDOWS_PHONE
        // Execute code for Windows Phone 7
        DoWP7Stuff();
#elif WINDOWS
        // Execute code for Windows
        DoWindowsStuff();
#elif XBOX
        // Execute code for Xbox 360
        DoXboxStuff();
#endif
Note
Visual Studio will automatically gray out conditional code that will not be included by the current project. Switching between the same source file in the various projects will change this highlighting, but each source file can only be opened from within one project at a time, so the existing source code window will need to be closed before it can be reopened in another project.
Clearly this conditional compilation approach introduces an increased level of code volume and complexity, and this complexity is one of the things that should be factored into your decision about whether to maintain a single code base for multiple platforms.
In this chapter, we will focus on using a single code base with conditional compilation so that the source code can run on both the phone and on Windows.
When running XNA games on Windows Phone 7, the runtime environment always looked for a class within the project that derived from Microsoft.Framework.Xna.Game. When one was found, this class would be used to host the game.
In Windows, the program launches in a different way. The runtime looks for a static class named Program and calls its Main method to initiate the game. This class by default uses conditional compilation so that it is entirely omitted when running under Windows Phone 7, but it is an integral part of the game in Windows.
If you have renamed your main game class from the default name Game1, you will find that the class does not compile in the Windows environment. This is because it is still referring to the game class using its original name. The two references to Game1 within the class will need to be modified to use the actual game class name for compilation to succeed.
There are several adjustments that need to be made in terms of the display when moving a project from Windows Phone 7 to Windows. Clearly, the two platforms have very different display devices and capabilities and you will need to make provision for these in order for your game to integrate nicely into both environments.
The Windows version of the project runs in a tall, thin window; a window whose client area has a width of 480 pixels and a height of 800 pixels—exactly the size of the Windows Phone 7 screen.
The window is sized in this way because these are the dimensions specified for the graphics.PreferredBackBufferWidth and graphics.PreferredBackBufferHeight properties in the Game1 class constructor. By setting these dimensions to different values for the Windows version of the game, we can get a more appropriate window size. Listing 16-3 includes code for both Windows Phone 7 and Windows, using a 1024 × 768 pixel window for the latter. You can find this code in the FirstXNAProject example accompanying this chapter.
Example 16.3. Setting up different window sizes for each platform
// Set backbuffer size and orientation
#if WINDOWS_PHONE
        _graphics.PreferredBackBufferWidth = 480;
        _graphics.PreferredBackBufferHeight = 800;
#else
        _graphics.PreferredBackBufferWidth = 1024;
        _graphics.PreferredBackBufferHeight = 768;
#endif
This size feels much more comfortable in Windows now, but has resulted in a differently sized window, which is therefore able to display fractionally less content on the y axis, and considerably more on the x axis than the original portrait-oriented Windows Phone 7 display.
You will almost certainly have to make adjustments to your game to compensate for these differences if you use this phone orientation. If nothing else, you will want to center the graphics horizontally to stop them from appearing along the left edge of the window.
In games using matrix rendering rather than sprites, the impact of this change might not be as great because the abstract coordinate system will adjust to match the new window size. There will still be considerably more space available at each side of the window, though, which might result in unexpected graphics appearing.
If your Windows Phone 7 game uses landscape orientation, the effect of the new window size will be much less significant as the Windows monitor is very likely to be using the same orientation. A window that is 800 × 480 pixels feels much more comfortable in Windows than one that is 480 × 800 pixels.
A very common feature of Windows games is the ability to run in full screen mode, where the game takes over the entire display rather than running inside a floating window. Full screen mode is handled in Windows in the same way as the phone—by setting the graphics.IsFullScreen property to true in the class constructor.
You will find this instruction inside this chapter's FirstXNAProject example, commented out. You can uncomment it to see its effects, but before you do, note that when the game is running in full screen mode, there is no Close Window button to use to leave the game and return to Windows. The keyboard shortcut Alt+F4 is the answer here because it closes the active window; use it when the game is running to close its window down.
Warning
Be very careful when using breakpoints in a game running in full screen mode. The breakpoint will fire, but the game window will continue to display over the whole screen, making it difficult to proceed. It is strongly advisable to run the game in windowed mode when you are debugging it.
Once your game is running, if you decide to switch between full screen and windowed mode, you can just call the graphics.ToggleFullScreen method and XNA will take care of everything for you.
When the game runs in full screen mode, Windows will automatically stretch it to fill the whole monitor. This can be very useful, but can also result in the graphics being stretched if the aspect ratio of the monitor doesn't match that of the window.
Something you might want to do is to run the game at the native screen resolution being used by Windows. At the time the game class constructor is running, nothing is available to provide this information, but we can defer the setting of the resolution until a moment later, by which time the desktop width and height can be retrieved.
This is achieved instead by setting up an event handler for the _graphics object's PreparingDeviceSettings event. When that event fires, the back buffer size can be set to match the size of the current display mode, as shown in Listing 16-4.
Example 16.4. Setting the window size to match the size of the desktop
public Game1()
  {
      _graphics = new GraphicsDeviceManager(this);
      Content.RootDirectory = "Content";

      // Frame rate is 30 fps by default for Windows Phone.
      TargetElapsedTime = TimeSpan.FromSeconds(1.0f / 30);

      // Set backbuffer size and orientation
#if WINDOWS_PHONE
      _graphics.PreferredBackBufferWidth = 480;
      _graphics.PreferredBackBufferHeight = 800;
#else
      // Instead of setting a fixed size, use the size of the Windows desktop
      _graphics.PreparingDeviceSettings += new
          EventHandler<PreparingDeviceSettingsEventArgs>(_graphics_PreparingDeviceSettings);
#endif

      // Switch to full screen mode
      _graphics.IsFullScreen = true;
  }

  // Set the window size to match the desktop resolution
  void _graphics_PreparingDeviceSettings(object sender, PreparingDeviceSettingsEventArgs e)
  {
      e.GraphicsDeviceInformation.PresentationParameters.BackBufferHeight =
                        e.GraphicsDeviceInformation.Adapter.CurrentDisplayMode.Height;
      e.GraphicsDeviceInformation.PresentationParameters.BackBufferWidth =
                        e.GraphicsDeviceInformation.Adapter.CurrentDisplayMode.Width;
  }
Be aware when setting the resolution in this way that you have no idea what size your window will actually end up being. You will need to ensure that your rendering code is resolution-independent to ensure that the game continues to be playable on all different screen modes.
In a finished game, it is worth considering providing options to give the user a choice of window sizes and control over whether the game will display in full screen mode or not.
XNA's default behavior in Windows is to hide the mouse cursor when it is over the game window. This might be what you want in full screen mode (though it also might not), but in windowed mode it can be quite distracting—when the user moves the cursor across the window to click the window's Close button, the cursor suddenly vanishes!
Its behavior is easy controlled using the IsMouseVisible property provided by the XNA Game class. You can therefore simply change this property in your constructor or elsewhere in your game to control the cursor visibility, as shown in Listing 16-5.
The majority of Windows users will not have access to a touch screen, but the mouse can be used to provide most of the interaction that the touch screen can provide. The loss of multitouch input is offset by having multiple mouse buttons, and the mouse wheel available to most users.
On the other hand, all your users will have keyboards, whereas only a minority of Windows Phone 7 users will have this hardware available.
This section explores the differences in input methods between the two environments.
When we wanted to read raw touch input from the screen in our Windows Phone 7 projects, we used the TouchPanel class (refer to Chapter 4 if you need to refresh your memory on this subject). The TouchPanel class is available when running on Windows so the code still compiles, but unless you have a capable touch-screen monitor running under Windows 7, it reports a MaximumTouchCount of 0 and never returns anything from its GetState function.
Assuming that we decide to use mouse input as an alternative to touch input, the best way to obtain this data in a Windows game is by using the Mouse class.
This class contains a static method named GetState that returns a MouseState object containing all sorts of details about the mouse. These include the following:
The mouse position relative to the window, using the
XandYproperties. This will be available regardless of which mouse buttons are pressed, and at all times, even if the mouse cursor is outside the game window.The state of the
LeftButton,MiddleButton, andRightButton. The available state values areReleasedwhen the button is up, andPressedwhen it is down.Support for the state of two additional mouse buttons via the
XButton1andXButton2properties (though many mice will not have sufficient buttons to support this, and exactly which buttons they correspond to will vary from one mouse to the next).A
ScrollWheelValuethat contains the cumulative distance that the mouse wheel has been scrolled. This is not incremented or decremented by values of 1, but uses larger values (typically 120 for each unit that the wheel is scrolled).
The capabilities are very different from the multitouch values that the TouchPanel class provides, and if your game is doing anything more complex than simple single-point interaction, you might need to invest some thought and time into remapping the control mechanism into the Windows environment.
The Mouse class is available and functional inside the Windows Phone 7 environment, too, so if its capabilities are suitable, you might be able to use the same code in both places. Windows Phone 7 treats the primary contact point as if it were the left mouse button.
There are several useful TouchPanel features that you will lose as a result of using Mouse on the device, however, as they are not offered by the MouseState class. They include the ability to tell whether the touch state is Pressed, Moved, or Released; and the TryGetPreviousLocation method. Also note that the X and Y position properties will always return the last known position unless contact is currently being made with the phone's screen.
The TouchPanel example project that accompanies this chapter has been copied from the project with the same name in Chapter 4 and modified to additionally support Windows. As you will see if you look through the source code, the touch processing code in the TouchPanelGame.Update method needed to be completely rewritten to support the use of the Mouse class.
Note
This project uses a Windows version of the GameFramework project that we built up through the XNA chapters. We will cover the conversion of this project to the Windows environment shortly, so just ignore it for the time being.
The high-level TouchPanel gestures are not supported in the Windows environment. The code will compile and run without any problems, but no gestures will be returned by the IsGestureAvailable or ReadGesture class members.
Now for a little good news: keyboard input is handled exactly the same way in Windows as it is in Windows Phone 7. The Keyboard.GetState function is used to return information about keys that are pressed, and the data is formatted just the same as on the phone.
Windows games have an input mechanism that Windows Phone 7 does not, however, and that is the ability to use Xbox 360 game controllers for input. Input from these controllers is provided using the GamePad class.
Data is obtained by calling the static GamePad.GetState function, which is called passing in the index of the player whose gamepad values are to be returned. For single-player games, just pass PlayerIndex.One. The function returns a GamePadState object.
The first thing you need to do with this returned object is check whether it is actually receiving data from a connected gamepad. Its IsConnected property will return this piece of information; if it returns false, the rest of the state object will be entirely empty and another input mechanism must be sought.
If the device is connected, it offers a wealth of controller information:
The
Buttonsproperty returns aGamePadButtonsobject, which in turn has properties to allow the state of each individual button to be checked. These button properties areA,B,Back,BigButton,LeftShoulder,LeftStick,RightShoulder,RightStick,Start,X, andY. That should be enough buttons for anyone.The
DPadproperty returns aGamePadDPadobject, with properties to query the state of the directional pad:Down,Left,Right, andUp.The
ThumbSticksproperty returns aGamePadThumbSticksobject, with properties for the controller's thumb sticks. Two properties are available,LeftandRight, corresponding to the left and right stick. They each return aVector2, allowing proportional values to be read rather than simple pressed or released values.The
Triggersproperty returns aGamePadTriggersobject, allowing the state of the trigger buttons to be read. They are obtained from theLeftandRightproperties, and are once again proportional values, returned as afloat.
The class also offers two methods, IsButtonDown and IsButtonUp, which allow a specific button's state to be checked. This will sometimes be more useful than the GamePadButtons properties, as passing the button as a parameter allows it to be easily reassigned by the player.
Note
The GamePad class will compile in the Windows Phone 7 environment, and in fact is used in all XNA projects to check for the state of the Back button. This is the only button that will return any values on the device, however.
Unlike Windows Phone 7, Windows is an open operating system and allows full access to its underlying file system. There is therefore no concept of isolated storage when running in Windows.
File access is instead performed using the normal System.IO namespace, exactly as it would be in another game.
XNA games in Windows also have no access to the IsolatedStorageSettings class that we used in the game framework to save and reload our game settings. This was a very useful class to have around, and we will need to replicate its behavior when running in Windows – this issue will be addressed in a moment.
Windows is a fully multitasking operating system with none of the memory or processing constraints that the phone has to work within, so it does not have any concept similar to that of tombstoning.
When a Windows application is put into the background, it continues running exactly as it would have in the foreground. There is no need to maintain application state when the game deactivates or to perform any other similar processing.
Most of the example projects that we created during the course of the XNA section of this book relied on the GameFramework project, which provides a useful set of additional features in addition to those offered natively by XNA. To get our projects running both on the phone and on Windows, we will need to create a version of this library that works in Windows, too.
This turns out to be a simple process for the most part, and allows us to transfer the phone's projects into Windows without too much effort.
In this section we will look at the steps involved in getting GameFramework working in both environments.
As mentioned in the "Isolated Storage" section a moment ago, there is no IsolatedStorageSettings class in the Windows version of XNA, so we will need to find an alternative method for Windows to use for storing settings in the GameFramework.SettingsManager class.
This functionality is not too tricky to replicate. First of all, when compiling for Windows, the class will provide a dictionary into which string values can be written. Two new functions are then provided that allow the contents of this dictionary to be translated into an XML document and written to disk, or to be read back from the XML and placed back into the dictionary.
The API for the class can remain identical across the two platforms, removing any need for the games using the class to have to cater separately for each target environment.
First there is the settings dictionary. This dictionary is declared as a class-level variable, as shown in Listing 16-6, set to compile only under Windows. Alongside it we declare a file name to use when reading and writing the settings. No path is specified, so this will be created in the same directory as the game's executable.
Example 16.6. Creating a Dictionary to store the game's settings
#if WINDOWS
    // Declare a dictionary into which all of our settings will be written
    private Dictionary<string, string> _settings = new Dictionary<string, string>();
    // The name of the file in which the settings will be stored
    private const string FileName = "Settings.dat";
#endif
Following on from this is a minor change to the class constructor. So that any previously stored settings are available as soon as the class is queried, they must be reloaded. The constructor handles it to ensure that values are always available to the class. Listing 16-7 shows the new constructor; we will look at the LoadSettings function shortly.
Example 16.7. The modified SettingsManager class constructor
internal SettingsManager(GameHost game)
    {
        // Store the game reference
        _game = game;

#if WINDOWS
        // Load any existing stored settings
        LoadSettings();
#endif
    }
The next change that the class needs relates to putting values into the dictionary and getting them back out again. Although there are multiple overloads of SetValue and GetValue, only one overload for each function actually interacts with the settings, so this is the only one that we need to modify.
SetValue is enhanced as shown in Listing 16-8 so that it will work for both Windows Phone 7 games and Windows games. The Windows code is virtually identical to that of Windows Phone 7, except that it uses the class's _settings dictionary instead of IsolatedStorageSettings.
Example 16.8. Creating or updating settings values
public void SetValue(string settingName, string value)
    {
        // Convert the setting name to lower case so that names are case-insensitive
        settingName = settingName.ToLower();

#if WINDOWS_PHONE
        // Does a setting with this name already exist?
        if (IsolatedStorageSettings.ApplicationSettings.Contains(settingName))
        {
            // Yes, so update its value
            IsolatedStorageSettings.ApplicationSettings[settingName] = value;
        }
        else
        {
            // No, so add it
            IsolatedStorageSettings.ApplicationSettings.Add(settingName, value);
        }
#else
        // Does this setting already exist in the dictionary?
        if (_settings.ContainsKey(settingName))
        {
            // Update the setting's value
            _settings[settingName] = value;
        }
        else
        {
            // Add the value
            _settings.Add(settingName, value);
        }
        // Save the settings
        SaveSettings();
#endif
    }
One final change is present in this piece of code in addition to the change of dictionary, however: it makes a call to SaveSettings each time a value is updated. This ensures that the settings are always retained from the moment they are modified, mirroring the behavior on the phone. We will look at the SaveSettings function shortly.
The code for GetValue is similarly modified, reading from either the _settings dictionary or IsolatedStorageSettings as appropriate. This is repeated, too, for the ClearValues and DeleteValue functions, both of which also call SaveSettings to ensure that their changes are immediately reflected to the data file on disk.
Finally we arrive at SaveSettings and LoadSettings, whose responsibilities are to ensure that the data is stored for later use, and then read back in for subsequent interrogation. They operate using an XML file, into which all the defined values are placed.
The code within these functions is not particularly interesting, using exactly the same techniques that we used for saving and restoring the high scores inside the HighScores class, so please take a look in the project's source code if you want to see how they are implemented.
With these changes in place, the class operates identically (from the client's perspective) under both environments. If you scan through the code for the class, the conditional compilation statements scattered throughout do make the code harder to read, but the overall functionality is worth that increase in complexity if you want to be able to target both platforms.
Although in Windows Phone 7 we need to deal with the Launching, Closing, Deactivated, and Activated events, in Windows, we don't particularly need to worry about any of these as there is no application life cycle as such.
It is likely that you will have taken advantage of the Launching event to initialize your game, however, so it is important that its event still fires when running under Windows so that the initialization still completes properly.
Instead of setting up the event handlers, the GameHost class constructor simply calls into the virtual GameLaunching function when running under Windows. This is the same path that a newly launched game would take on the phone, resulting in the same startup behavior.
All the rest of the life cycle code can be excluded from this class as it is not needed in Windows.
A small and simple change is required to the HighScores class to instruct it to read and write its score data to a file using the System.IO namespace instead of using isolated storage. As the class already stores its content in an XML document, no additional modifications are necessary.
There are no other changes required to the game framework. The rest of the project works identically in both environments.
The biggest changes that you will find you need to make when getting your games running for Windows will almost certainly be in the area of the organization of your display (taking the Windows display orientation and screen resolutions into account) and input (using Mouse and Keyboard instead of TouchPanel). You should find that the rest of your game will work as expected without any changes being required.
XNA's trial mode does not function in Windows so it cannot be used to allow the player to switch between an evaluation or full copy of the game. You will need to implement this functionality yourself.
The easiest way to do this by far is to create two different versions of the game: one a trial version (with whichever features are being excluded completely removed from the game), and the second a full version with all the missing features restored. Your users can then evaluate the trial version before purchasing, at which point you provide them with the full version.
Without the Windows Phone Marketplace, you will need to implement your own purchase system. One simple option is to use an online credit card–processing service such as PayPal and to send out full versions of the game each time you are notified of a purchase.
The lack of a Windows Phone Marketplace equivalent for Windows also means that you have no centralized channel through which to distribute your game. Instead, you will need to create your own channels via a web site or online software portal, for example.
One advantage of being in control of the distribution yourself, however, is that you do not have to undergo any kind of submission process before you can release your software. When you decide that it is ready, you can distribute it immediately.
Two of the more complex example projects have been re-created for Windows to show how little effort is generally required in getting them up and running.
Let's see what was involved in converting these projects across. Both of the example projects can be found set up to run in Windows in this chapter's accompanying downloads.
FireAndSmoke was a project that we used back in Chapter 8 to demonstrate particle effects. It runs in landscape orientation, so it should convert fairly easily to the default Windows landscape screen orientation; and has no interaction at all, removing the need to change any input processing code.
Only one change was required during the conversion of the project: to simply set a more appropriate default screen resolution—1024 × 768 pixels instead of the phone's 800 × 480.
With this change made, the project runs very nicely under both Windows and Windows Phone 7.
This project was developed in Chapter 8 and then updated in Chapter 10 to add tombstoning support. We will leave all this in place in the conversion to Windows so that the functionality remains when compiling for the phone.
Three changes were required during the conversion of the project. The first was to set a more appropriate default screen resolution, just as we did for the FireAndSmoke project.
The second change, the only one of any substance, was to the way the camera mode is changed. On the phone, the TouchPanel class is used to detect taps to the screen, but in Windows we need to use the Mouse class instead. However, the Mouse class only tells us whether the button is up or down, and doesn't directly provide a way to tell whether the button has been pressed down since the last update. As a result, simply checking the left button state would cause the camera to constantly and rapidly cycle through all the different modes when the button was held down, making it very difficult for the user to simply move to the next mode.
We can replicate the "just pressed" behavior by storing the state of the mouse from the previous update and comparing it with the state for the current update. If it was up previously but is down now, it has just been pressed, and we can move to the next camera mode; otherwise, the camera mode is not altered.
Listing 16-9 shows the first part of this modification. It declares a class-level variable to hold the mouse state from the previous update. We begin by setting the current state into it, so there is always a valid set of data contained within the variable even during the first call to Update.
Example 16.9. Storing the previous state of the mouse
#if WINDOWS
    // Track the previous mouse state so we can tell when the button pressed state changes
    private MouseState lastMouseState = Mouse.GetState();
#endif
The remainder of the code is shown in Listing 16-10. It checks the current state of the left mouse button and compares it with the previous state, indicating that the camera should be updated only if the button has just been pressed.
Example 16.10. Checking to see whether the camera mode should be updated
bool toggleCamera = false;

#if WINDOWS_PHONE
        // Has the user touched the screen?
        TouchCollection tc = TouchPanel.GetState();
        if (tc.Count == 1 && tc[0].State == TouchLocationState.Pressed) toggleCamera = true;
#else
        // Was the mouse up last time, but is down now?
        MouseState thisMouseState = Mouse.GetState();
        if (lastMouseState.LeftButton == ButtonState.Released &&
                                           thisMouseState.LeftButton == ButtonState.Pressed)
        {
            // Yes, so change camera
            toggleCamera = true;
        }
        // Store the new mouse state for next time
        lastMouseState = thisMouseState;
#endif
The final change to the project is a cosmetic one that is present only to make the project look better. When we ran on the phone, we instructed the PaperPlaneObject class to add a new vapor particle only every three updates. This provided a reasonable balance between display complexity and performance; adding more particles caused the game to slow down when running on the device.
Windows PCs tend to have significantly more graphical power than the phone, so we can happily add a particle every update. This results in a much thicker and more voluminous vapor trail.
Everything else works as required without needing to be changed.
If you decide that you want to target both platforms, you know now that it is a feasible goal. The primary piece of advice that I can offer is to simply test your game in both environments as often as you can throughout its development. The sooner you try things out, the quicker you can spot problems and correct them before you build too much additional complexity on top of them.
The conversion of a Silverlight project from Windows Phone 7 into the general Silverlight environment is unfortunately not quite as straightforward as it is for XNA. Although a fair bit more effort is required, however, it is still possible to get your project moved across relatively unscathed.
Browser-based conversions can provide a great way of demonstrating your game. What better way to tell people about it than to actually allow them to play it? You might also choose to develop the Silverlight version as a game in its own right, separate from the Windows Phone 7 version.
Because the assembly references and classes used by Silverlight in the browser are a bit different from the phone, it is not really possible to get a single source code base running in both environments. Instead you will need to create a new project and import the functionality in from the original source files, modifying them as you go for the new environment.
You will take a brief tour through the process required to transfer your Windows Phone 7 Silverlight games into the browser using Visual Studio 2010 Professional or above. We will only focus on this specific area; for additional information about how to package up and deploy your Silverlight game to a web site or details about additional Silverlight features, please look online or refer to a source of information dedicated to this subject.
We will transfer in three projects from the Silverlight section of this book: the ColorFade project from Chapter 11, the GameNavigation project from Chapter 13, and the DiamondLines project from Chapter 12. All use the SLGameFramework project, which we will transfer, too. (The converted projects can be found in the download for this chapter.)
Both versions of Silverlight are based on the same principles and (for the most part) the same underlying API and feature sets.
Silverlight on Windows Phone uses the Silverlight 3 runtime, but has various additions not present in Silverlight 3 for the browser. One such example is the CompositeTransform class that we have been using to manipulate our sprites in the SLGameFramework project. For this reason, it is advisable to create your Silverlight projects for the browser using Silverlight 4 instead of Silverlight 3 so that these features are available in both environments.
To help identify the exact discrepancies between the two environments, Microsoft has published a document covering all the differences in detail. You can visit http://tinyurl.com/sldifferences to read it.
Generally the easiest way to begin converting your Windows Phone 7 project is to create a brand new Silverlight project and copy the source code and data files in. Initiating your project in this way ensures that the project is configured properly for browser use, including all the necessary references. It also allows a web project to be created, inside which your game will be hosted, ready to be displayed by the browser.
In this section you will walk through the steps required to create a new application and then import the ColorFade project that you first looked at in Chapter 11 so that it runs in the browser. Feel free to follow along with these steps if you like, or just take a look at the ColorFade project that accompanies this chapter to see the end result.
To create a new project, use the Silverlight Application template, as shown in Figure 16-3. Use the same name for your application as you used for the Windows Phone 7 application. In this case, we will use the name ColorFade.

Once you have selected a location for your project and clicked the OK button, the New Silverlight Application window will appear, shown in Figure 16-4. It can be used to set the parameters for the project that you are creating.
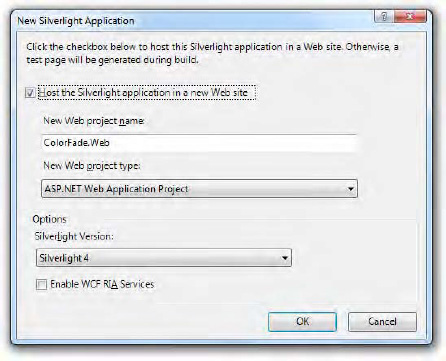
Unless you have specific requirements to the contrary, keep all the options set as shown in the screenshot. This will create a Silverlight 4 project (as mentioned earlier) and will host it in the ASP.NET Development Server. This is a lightweight web server designed specifically for hosting .NET debug sessions, and removes the need to install and configure IIS for development and debugging.
The IDE will open with two projects in the new solution: one for the actual Silverlight application, and the other for the ASP.NET Development Server web site. The latter of these projects can be ignored for our purposes as it is already configured to launch the Silverlight application in the default browser. We will concentrate instead on the main application project.
This project contains a similar set of source files to those we saw when developing for the phone, and they have very similar initial content, too. App.cs contains the code required to start up the project, and MainPage.xaml contains an empty page—though it is actually completely empty this time, whereas on the phone we were given a simple control layout by default.
We could run the project at this stage to see how it looks in the browser, but all it does at the moment is display a white rectangle on a white background. This makes it kind of hard to see whether it is working!
To resolve this issue, click into the main area of the MainPage.xaml page designer and set a color for the Background property of the Grid that is filling the page—any color will do as long as it's not white. With this done, start the project running. After a few seconds, your browser should appear, and it will then display your colored rectangle. Success!
The rectangle will, however, be displayed so that it completely fills the entire browser client area. This is because the Width and Height properties of the page have both been set to Auto. This can be very useful as it allows the content and the user interface to automatically adapt to the available space, but for the purposes of our games it would be much more useful to fix the page to the same screen area that the phone uses.
Try changing the Width property of the page (not the Grid) value to 480 and the Height to 800, and then run the project again. Now the colored rectangle appears at the defined size, ready for us to start putting some content inside it.
Silverlight in the browser uses a different method to display multiple pages of data. If you look carefully at the MainPage code that has been created in our sample project, you will find that it is not actually a page at all, but instead a UserControl.
Silverlight in the browser can display one single top-level element at any time. This is called the root visual, and is set into the application's App object. If you take a look in App.xaml.cs, you will find the code from Listing 16-11. It is this piece of code that actually causes the contents of MainPage to appear in the browser.
Example 16.11. Setting the Silverlight root visual
private void Application_Startup(object sender, StartupEventArgs e)
    {
        this.RootVisual = new MainPage();
    }
This approach is clearly different from the one we used on the phone. Silverlight offers a control class named Frame, however, which provides exactly the navigation model that we used on the phone. It can navigate to a Page contained within the application using its Navigate method, has GoBack and GoForward methods, and has CanGoBack and CanGoForward properties—all exactly the same as the NavigationService object on the phone.
To take advantage of these navigation functions, we will place a Frame control onto MainPage. All our application pages will then be displayed inside this page, avoiding the need to change any structures of our converted projects.
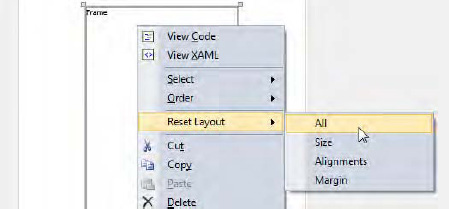
Delete the existing Grid control from MainPage, and then add a new Frame control from the Toolbox. Right-click the Frame and select Reset Layout/All from the context menu, as shown in Figure 16-5. It will remove all configuration from the Frame so that it completely fills its container: the MainPage user control.
Change the Frame's name so that it is called mainFrame instead of the default frame1. This is all we need within the XAML to host our content.
We have a slight naming issue to deal with next. The page we have been working on is called MainPage, but we have also been using a class with this name in our Windows Phone 7 projects to actually store the content of the main page. To resolve this naming collision, we will rename the MainPage class in the new Silverlight project to HostPage instead. This then clearly has the role of hosting the pages rather than providing the content for one.
The class can be renamed by first right-clicking the MainPage.xaml file in Solution Explorer and selecting Rename from the context menu. Enter the new name, HostPage.xaml, and the .xaml file itself and the .xaml.cs code file will both be renamed accordingly.
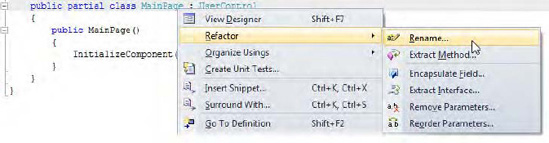
This procedure has only affected the file names, however, not the name of the class defined in the code. To complete the rename operation, open the code behind the page, right-click the name MainPage in the class declaration, and select Refactor/Rename, as shown in Figure 16-6. Enter the new name, HostPage, and click OK to complete the renaming of the class.
Our project now contains a single UserControl named HostPage, inside which an empty Frame resides. The next step is to add the source files from our Windows Phone 7 project.
The only page in the original ColorFade project is MainPage, so we copy across the MainPage.xaml and MainPage.xaml.cs files, putting them into the new project's directory along with the existing source files. MainPage.xaml can then be added into the project.
Several compilation errors appear at this stage due to differences between the two Silverlight environments. We can fix them up as follows:
In
MainPage.xaml, change the type of the root node fromphone:PhoneApplicationPagetonavigation:Page(don't forget to change the element terminator at the end of the file, too).Add the
navigationnamespace to the root node. This is most easily obtained by adding a new item to the project of type Silverlight Page and then copying the line that beginsxmlns:navigationfrom the new page back intoMainPage. The new page can then be deleted.Remove the
SupportedOrientations,Orientation, andshell:SystemTray.IsVisibleattributes from the XAML root node because they are only supported in Windows Phone 7.Remove the
xmlns:phoneandxmlns:shellnamespace declarations from the root node.Remove the
FontFamily,FontSize, andForegroundattributes from the root node.Remove the two
Styleattributes from theTextBlockcontrols within the page.In the code behind, remove the using
Microsoft.Phone.Controlsstatement.Modify the class declaration in the code behind so that the class derives from
Pageinstead ofPhoneApplicationPage.
This is quite a lot of effort for a single simple page and clarifies why a single code base for both Silverlight environments is not practical. After completing these steps, your project should compile without errors, though it still shows nothing when run because we just get to see the empty frame.
To actually display MainPage, we simply need to tell the frame to navigate there. Modify the HostPage class constructor to contain the code shown in Listing 16-12.
Example 16.12. Instructing the Frame to navigate to MainPage
public HostPage()
    {
        InitializeComponent();

        // Navigate to MainPage
        hostFrame.Navigate(new Uri("/MainPage.xaml", UriKind.Relative));
    }
Now when you run the application, the browser window appears and displays the contents of MainPage.
These are the basic steps that need to be performed to transfer your pages across to Silverlight from the phone. Once you have followed these steps, the majority of the XAML layout and the code behind the page should work with little or no modification (unless you are calling in to any Windows Phone 7 libraries, in which case they will need to be redesigned or refactored).
The amount of effort involved is great enough that you will not want to have to repeat the steps on a regular basis. For this reason, a sensible strategy for putting a demonstration game into Silverlight is to focus just on the main game content and leave all the navigation, high scores, and so on behind. This results in a much simpler task.
Another strategy that is worth adopting if you plan to target both environments is to put as little content into the game's Page classes as possible. Simple non-page classes will copy in to the Silverlight environment with little or no modification required at all, so getting as much content into such classes as possible will reduce the overall amount of effort, particularly if you want to regularly update the browser-based Silverlight application to match changes you have made to the Windows Phone 7 version.
As promised, here are two more simple conversions of Windows Phone 7 Silverlight examples that we created earlier. Neither of these has had any presentation attention lavished upon them, so they look extremely basic, but they demonstrate the direct conversion results that are achieved when converting into the browser-based Silverlight environment.
Both of the example projects can be found in the download that accompanies this chapter.
The Navigation project demonstrates how navigation within a Frame control works when running in the browser. When you launch the project, the simple game framework menu will appear just as it did on the phone. Clicking the buttons will navigate between the different pages.
Note that each time you click a button, the browser's navigation history is updated. This allows you to use the browser's Back button to return to the previous page, just like on the phone. Also observe that the stack is manipulated in exactly the same way as on the phone when navigating between non-menu pages; click the End Game button in the "Game" page and you will be sent to the "High scores" page, but clicking Back here returns you to the menu, not to the "Game" page.
Also note that state is maintained between the pages in exactly the same way as on the phone. If you click the Back button from the game page, the menu offers the Resume Game button, and clicking it will return you to the game. The state is maintained despite the browser navigation that is taking place.
If you click to start a new game while an existing game is active, you will notice that the MessageBox call works perfectly well in the browser-based Silverlight, too.
In practice, including navigation in a game that you are converting to the browser might be more than you really need, especially if you simply want to give the player an idea of what the game has to offer. It might be more sensible to launch straight into the game and not worry about including the overheads of high score tables and so on. Once you have convinced the players that your game is worth further investigation, they can take advantage of all these features in the full version on the phone.
Apart from the changes described for converting project pages from the Windows Phone 7 Silverlight environment into the browser environment, there are no code changes to this project at all.
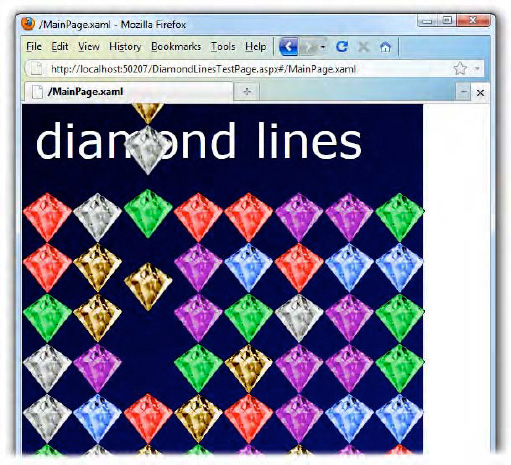
To demonstrate getting a game up and running, let's convert the DiamondLines example from Chapter 12. This demonstrates the use of the SLGameFramework, Sprite control, storyboards and animation, user interaction, and (of course) results in a playable game at the end (even if it is very basic).
As you will see if you open and launch the project, it performs very nicely in the browser. The higher specification of a PC results in a very smooth experience. The storyboard animation really helps as it allows the graphics to move as quickly as the PC can animate them, but still ensure that they move at the correct speed, resulting in predictable and very smooth animation.
Figure 16-7 shows a screenshot of the game running inside Mozilla Firefox.
Once again, the changes required to get this running were no more than described for converting pages earlier on. Despite the game using just a single page (MainPage, in which the game is displayed) we still use the HostPage approach here, both because it simplifies the import of the existing page and because it allows us to more easily add in navigation support later should we want to.
This brings us to the end of this chapter and to the end of the book. I sincerely hope that you have found it useful and informative, but more than anything I hope that it inspires you to open Visual Studio, plug in your phone, and get started creating your own games.
Windows Phone 7 is an exciting and powerful environment for gaming, with massive potential for creating original and inventive styles of gameplay. Let your imagination run free. Who knows where it will take you? I wish you many happy days of writing games for Windows Phone 7 devices!
Please do let me know about the games that you create. I would also love to hear any feedback that you have about this book. You can contact me by sending e-mail to [email protected].