
C H A P T E R 3
a4j:* Tags, Features and Concepts
In previous chapters we covered the RichFaces <a4j:ajax> tag, which extends and upgrades the standard <f:ajax> tags with more features and options. In this chapter we are going to continue covering a4j:* library tags, features, and concepts. We will cover additional tags that fire an Ajax request, such as <a4j:poll>, <a4j:jsFunction>, advanced rendering options using the <a4j:outputPanel> component, advanced execute options, and numerous upgrades to the standard Ajax client queue.
Sending an Ajax Request
In this section you will learn how to use three new RichFaces components to send an Ajax request: <a4j:commandButton> (and <a4j:commandLink>) is a button with built-in Ajax behavior; <a4j:jsFunction> allows you to send an Ajax request from any HTML event or JavaScript function; and <a4j:poll> enables you to periodically send an Ajax request.
Using <a4j:commandButton> and <a4j:commandLink>
Adding Ajax behavior to a JSF button or link is not very difficult and looks as shown in Listing 3-1 when using a button.
Listing 3-1. Adding Ajax behavior to a JSF button
<h:form>

...

   <h:commandButton value="Send">

     <f:ajax event="click" render="out"/>

   </h:commandButton>

</h:form>
And using a link instead of a button, it is virtually identical, as shown in Listing 3-2.
Listing 3-2. Using a link instead of a button
<h:form>

...

   <h:commandLink value="Send">

     <f:ajax event="click" render="out"/>

   </h:commandLink>

   <h:outputText id="out"/>

</h:form>
In both examples, when a button is clicked an Ajax request will be fired and a component with id out will be rendered. In most cases you have a number of input fields and then a button to submit them, as shown in Listing 3-3.
Listing 3-3. Shows that you have a number of input fields and then a button to submit them
<h:form>

   <h:panelGrid columns="2">

      <h:outputText value="Name:"/>

      <h:inputText value="#{bean.name}"/>

      <h:outputText value="Echo:"/>

      <h:outputText id="echo" value="#{bean.name}"/>

      <h:outputText value="Count:"/>

      <h:outputText id="count" value="#{bean.count}"/>

   </h:panelGrid>

   <h:commandButton value="Submit" action="#{bean.countAction}">

     <f:ajax event="click" render="echo count"/>

   </h:commandButton>

</h:form>
The managed bean code is shown in Listing 3-4.
Listing 3-4. The managed bean code
@ManagedBean

@RequestScoped


public class Bean {


   private String name;

   private Integer count;


   public void countAction (){

      count = name.length();

   }

   // getters and setters

}
When you run the above example, it's not going to work because we forgot to modify the execute attribute on the <f:ajax> behavior. If you remember from Chapter 2, the default execute value for <f:ajax> is @this. @this means only this (current) component will be executed and the input components will not. To fix it, we have to add execute attribute as shown in Listing 3-5.
Listing 3-5. Adding execute attribute
<h:form>

   <h:panelGrid columns="2">

      <h:outputText value="Name:"/>

      <h:inputText value="#{bean.name}"/>

      <h:outputText value="Echo:"/>

      <h:outputText id="echo" value="#{bean.name}"/>

      <h:outputText value="Count:"/>

      <h:outputText id="count" value="#{bean.count}"/>

   </h:panelGrid>

   <h:commandButton value="Submit" action="#{bean.countAction}">

     <f:ajax event="click" execute="@form" render="echo count"/>

   </h:commandButton>

</h:form>
![]() Tip The default value for
Tip The default value for execute in <f:ajax> behavior is @this. Also, we recommend always setting the event attribute, even if using a default value, to reduce errors and make the code more readable.
RichFaces makes it easier to use a button or link with Ajax support by providing button and link components with built-in Ajax: <a4j:commandButton> and <a4j:commandLink>. Listing 3-6 shows an example we saw earlier.
Listing 3-6. Example
<h:form>

...

   <h:commandButton value="Send">

     <f:ajax event="click" render="out"/>

   </h:commandButton>

</h:form>
When using the RichFaces <a4j:commandButton>, the example would look like Listing 3-7.
Listing 3-7. Example when using the RichFaces <a4j:commandButton>
<h:form>

...

   <a4j:commandButton value="Send" render="out"/>

</h:form>
We went from three to just one line of code. It looks simpler and cleaner. There is one more difference we need to tell you about. Let's rewrite this example using the <a4j:commandButton>, as shown in Listing 3-8.
Listing 3-8. Example using the <a4j:commandButton>
<h:form>

   <h:panelGrid columns="2">

      <h:outputText value="Name:"/>

      <h:inputText value="#{bean.name}"/>

      <h:outputText value="Echo:"/>

      <h:outputText id="echo" value="#{bean.name}"/>

      <h:outputText value="Count:"/>

      <h:outputText id="count" value="#{bean.count}"/>

   </h:panelGrid>

   <a4j:commandButton value="Submit" render="echo count" action="#{bean.countAction}"/>

</h:form>
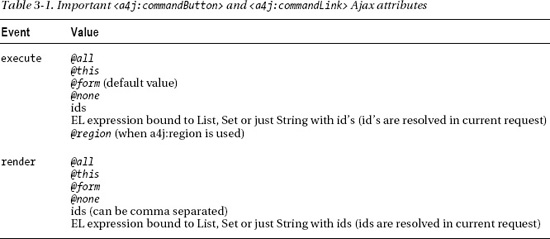
If you run the example in Listing 3-8, it will work as expected and notice that we didn't have to specify the execute attribute. Because it is so common when using a button to also execute input fields inside the form, the execute in the <a4j:commandButton> (and <a4j:commandLink>) is set by default to @form. You can always overwrite the default value by using either a predefined value such as @all, ids, or EL, as shown in Table 3-1. We also don't need to set the event attribute. <a4j:commandButton> uses the click event by default.
![]() Tip The
Tip The <a4j:commandButton> and <a4j:commandLink> execute is set to @form.
The following Ajax attributes are available to use with <a4j:commandButton> and <a4j:commandLink> tags: onbegin, onbeforedomupdate, oncomplete, bypassUpdates, limitRender, data, and status.
![]() Note
Note <a4j:commandLink> works exactly the same as <a4j:commandButton>, but instead of a button it will render a link.
Ajax Request from any Event or JavaScript Function Using <a4j:jsFunction>
So far we covered two ways to fire an Ajax request: first using a <a4j:ajax> behavior, and next using either <a4j:commandButton> or <a4j:commandLink>. <a4j:ajax> (and <f:ajax> on which it's based) is a behavior and is always attached based on some event to another UI component, such as a button, select, and so forth. It's never used by itself. <a4j:commandButton> is a button with built-in Ajax behavior and <a4j:commandLink> is a link with built-in Ajax behavior. All provide a specific functionality. But let's say we would like to fire an Ajax request from an HTML tag, not a JSF component. We can't use <a4j:ajax>—it's a behavior and has to be attached to another JSF component. This is where <a4j:jsFunction> is useful. It allows you to fire an Ajax request from any JavaScript event or function.
To see how <a4j:jsFunction> works, let's take an example we saw in the previous section, as shown in Listing 3-9.
Listing 3-9. Shows how <a4j:jsFunction> works
<h:form>

   <h:panelGrid columns="2">

      <h:outputText value="Name:" />

      <h:inputText value="#{bean.name}" />

      <h:outputText value="Echo:" />

      <h:outputText id="echo" value="#{bean.name}" />

      <h:outputText value="Count:" />

      <h:outputText id="count" value="#{bean.count}" />

   </h:panelGrid>

   <a4j:commandButton value="Submit" render="echo, count"

      action="#{bean.countAction}" />

</h:form>
Instead of using <a4j:commandButton>, let's use <a4j:jsFunction> to fire an Ajax request, as shown in Listing 3-10.
Listing 3-10. Using <a4j:jsFunction> to fire an Ajax request
<h:form>

   <h:panelGrid columns="2">

      <h:outputText value="Name:" />

      <h:inputText value="#{bean.name}" />

      <h:outputText value="Echo:" />

      <h:outputText id="echo" value="#{bean.name}" />

      <h:outputText value="Count:" />

      <h:outputText id="count" value="#{bean.count}" />

   </h:panelGrid>

   <input type="button" value="Submit" onclick="sendAjaxRequest();"/>


   <a4j:jsFunction name="sendAjaxRequest" execute="@form"

      action="#{bean.countAction}" render="echo, count"/>

</h:form>
The execute attribute of <a4j:function> is set to @this according to the JSF default value, so there we explicitly changed it to @form to have all the inputs processed.
Listing 3-10 shows the changes we made. First, we replaced <a4j:commandButton> with a regular HTML button; next, we defined <a4j:jsFunction>. Notice that the button also has a click event that calls a sendAjaxRequest() JavaScript function. This function is defined by <a4j:jsFuction> and it's just a standard JavaScript function. If we look at the rendered code, the function we are calling looks like Listing 3-11.
Listing 3-11. This function is defined by <a4j:jsFuction>
<script type="text/javascript">

   sendAjaxRequest=function(){RichFaces.ajax("j_idt5:j_idt11",null, {"incId":"1"} )};

</script>
Without <a4j:jsFunction> we would have to type something similar by hand. <a4j:jsFunction> looks just like any other control that fires an Ajax request: there is an execute attribute, there is an action attribute, and there is a render attribute. Everything we learned about these attributes applies here as well. What you get is the ability to fire a standard Ajax request from any HTML tag, based on any event that tag supports.
![]() Tip The
Tip The <a4j:jsFunction> execute attribute default value is @this.
In Listing 3-11 we called sendAjaxRequest() directly from the click event. We can as easily invoke sendAjaxRequest() from another JavaScript function, which would allow us to invoke any other logic before firing the request, as shown in Listing 3-12 (changes are in bold).
Listing 3-12. Shows how to easily invoke sendAjaxRequest() from another JavaScript function
<h:form>

   <h:panelGrid columns="2">

      <h:outputText value="Name:" />

      <h:inputText value="#{bean.name}" />

      <h:outputText value="Echo:" />

      <h:outputText id="echo" value="#{bean.name}" />

      <h:outputText value="Count:" />

      <h:outputText id="count" value="#{bean.count}" />

   </h:panelGrid>

   <input type="button" value="Submit" onclick="doAjax();"/>

   <a4j:jsFunction name="sendAjaxRequest" execute="@form"

      action="#{bean.countAction}"  render="echo, count"/>

   <script>

      function doAjax () {

         // do something here

         sendAjaxRequest();

         }

   </script>

</h:form>
There is one more case where <a4j:jsFunction> is very useful. You may call the function to get values from the server, serialize them, and pass to the client using the data attribute. You can then use the data received in some client-side function. An example is shown in Listing 3-13, where the data received from the server is shown in an alert window with an oncomplete event.
Listing 3-13. The data received from the server is shown in an alert window
<h:form>

   <input type="button" value="Update" onclick="updateName('Joe'),"/>

   <a4j:jsFunction name="updateName" render="showname"

      data="#{jsFunctionNameBean.greeting}" oncomplete="alert(event.data)">

      <a4j:param name="param1" assignTo="#{jsFunctionNameBean.name}"/>

   </a4j:jsFunction>

   <h:outputText id="showname" value="#{jsFunctionNameBean.greeting}"/>

</h:form>
The managed bean is shown in Listing 3-14.
Listing 3-14. The managed bean
@ManagedBean (name="jsFunctionNameBean")

@RequestScoped

public class JSFunctionNameBean {


   private String name; // setter and getter


   public String getGreeting () {

      return "Hello "+this.name;

   }

}
In this example, the value of #{jsFunctionNameBean.greeting} property gets serialized after the name is set on the server-side, it is then passed back to the client and displayed using JavaScript alert. In a real application you may want to bring any additional data from the server and call some real post-processing JavaScript handlers function. This is very useful if you need to pass some inputs to the server, get a result back, and then process the result with the oncomplete script.
In the next section we will see how to pass parameters to the JavaScript function created with <a4j:jsFunction> and, in turn, send them to the server. Then, we will see an alternative way to send an Ajax request from any HTML event or JavaScript script using a standard JSF programmatic Ajax approach.
Passing Parameters with <a4j:param>
Let's look at another example where an Ajax request is not fired directly from a JSF component, but from an HTML tag when a mouse is placed over the name of a drink, as shown in Figure 3-1.
Figure 3-1. Using <a4j:jsFunction> with <a4j:param>
Listing 3-15 shows the JSF code.
Listing 3-15. The JSF code
<table border="1">

   <tr>

      <td onmouseover="setdrink('Espresso')"

         onmouseout="setdrink('')">Espresso</td>

      <td onmouseover="setdrink('Cappuccino')"

         onmouseout="setdrink('')">Cappuccino</td>

      <td onmouseover="setdrink('Tea')"

         onmouseout="setdrink('')">Tea</td>

   </tr>

</table>

<h:outputText id="drink" value="I like #{jsFunctionDrinkBean.drink}" />


<h:form>

   <a4j:jsFunction name="setdrink" execute="@form" render="drink">

      <a4j:param name="param1" assignTo="#{jsFunctionDrinkBean.drink}" />

   </a4j:jsFunction>

</h:form>
The managed bean code is shown in Listing 3-16.
Listing 3-16. The managed bean code
@ManagedBean (name="jsFunctionDrinkBean")

@RequestScoped

public class JSFunctionDrinkBean {


   private String drink;

   // setter and getter

}
We no longer fire a request from a JSF component; the Ajax request is fired from HTML tag when we place the mouse over the table row (onmouseover event) and is also fired when we move the mouse out (onmouseout event). When one of these events occurs, a call to setdrink(..) is made. setdrink is a JavaScript function defined by <a4j:jsFuction>, which in turn fired the Ajax request and could also do partial page rendering.
You will notice one difference from the previous example; our JavaScript function defined by <a4j:jsFunction> takes a parameter, either the name of the drink or an empty string. We somehow have to pass it to the bean, set it to the drink attribute, and then render it. This is done via the <a4j:param> tag. Parameters will be passed in the same order as defined inside the <a4j:jsFunction> tag.
The <a4j:param> is very similar to the standard <f:param>, but with one major and very helpful difference. When using <f:param>, the value is added to the request and then has to be retrieved from the request with this link of code. Listing 3-17 shows a very simple example using <f:param>.
Listing 3-17. Using the <f:param> value to the request
<a4j:commandButton>

   <f:param name="firstName" value="Tammy"/>

</a4j:commandButton>
To get the value inside the bean, we can use something like the following:
String value = FacesContext.getCurrentInstance().getExternalContext()

   .getRequestParameterMap().get("firstName");
Going back to <a4j:param>, it adds a parameter to the request in the same fashion, but also does the assignment automatically. In other words, it will set the value into the bean property, assuming it has a setter method. It's just an upgraded version of <f:param> where you don't have to do anything to get the value. Listing 3-18 shows an example using <a4j:param>.
Listing 3-18. Using <a4j:param> instead of <f:param>
<a4j:commandButton>

   <a4j:param name="firstName" value="Tammy" assignTo="#{paramBean.firstName}"/>

</a4j:commandButton>
The firstName property, with getter and setter needs present inside the managed bean, is shown in Listing 3-19.
Listing 3-19. The managed bean
@ManagedBean

@RequestScoped

public class ParamBean {


   private String firstName;


   public String getFirstName() {

      return firstName;

   }

   public void setFirstName(String firstName) {

      this.firstName = firstName;

   }

}
When defining a JavaScript function with <a4j:jsFunction>, which takes a parameter, then <a4j:param> is used to define and assign the parameter to a bean property. In case you need to pass more than one parameter, you can include as many <a4j:param> tags as you need, as shown in Listing 3-20.
Listing 3-20. Including as many <a4j:param> tags as you need
<a4j:jsFunction>

   <a4j:param name="param1" assignTo="#{someBean.value1}" />

   <a4j:param name="param2" assignTo="#{someBean.value2}" />

   <a4j:param name="param3" assignTo="#{someBean.value3}" />

</a4j:jsFunction>
The name has to be in the form of param1, param2, and param3.
We've shown how to pass parameters from the server side back and forth (as parameters encoded from server-side EL expressions or just string constants). But it's actually possible to pass pure client-side parameters. This means you can pass a result of a JavaScript function or JavaScript expression using <a4j:param> when the noEscape attribute is set to true. Listing 3-21 shows such example.
Listing 3-21. Passing a result of a JavaScript function or JavaScript expression using <a4j:param>
<a4j:commandButton value="Set position" >

   <a4j:param noEscape="true" value="(jQuery(window).width()/2)-250"

assignTo="#{someBean.left}"/>

   <a4j:param noEscape="true" value="(jQuery(window).height()/2)-150"

assignTo="#{someBean.top}"/>

</a4j:commandButton>
![]() Tip You can also use
Tip You can also use <a4j:param> with non-Ajax action components such as <h:commandButton>, and GET components such as <h:button>.
Programmatic Ajax in JSF 2
JSF 2 does offer a way to send an Ajax request programmatically from the client (available request parameters for sending Ajax request programmatically are listed in Table 3-2). In order to do it, we first need to load the JavaScript library shown in Listing 3-22. (When using the <f:ajax> behavior, or any RichFaces tag, JavaScript libraries are loaded automatically.)
Listing 3-22. Loading the JavaScript library
<h:head>

   <h:outputScript name="jsf.js" library="javax.faces"/>

<h:/head>
Firing an Ajax request would look like Listing 3-23.
Listing 3-23. Firing an Ajax request
<h:form id="form">

   <h:panelGrid>

      <h:commandButton id="button" value="Update"

         onclick="jsf.ajax.request(this,event, {render:'form:out'}); return false;" />

      <h:outputText value="#{manualAjax.now}" id="out" />

   </h:panelGrid>

</h:form>
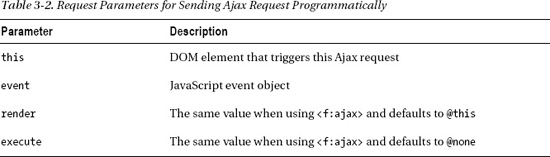
![]() Note
Note render has to point to a client id, not a component id.
Listing 3-24 shows another example using <h:inputText>.
Listing 3-24. Example using <h:inputText>
<h:form id="form2">

   <h:panelGrid>

      <h:inputText value="#{manualAjax.text}"

         onkeyup="jsf.ajax.request(this, event, {render:'form2:out'});

            return false;" />

      <h:outputText value="#{manualAjax.text}" id="out" />

   </h:panelGrid>

</h:form>
We believe it's simpler to use <a4j:jsFuction> because you don't have to manually write any JavaScript code and you get all the extra features and functionality that are also available in a4j:ajax behavior.
The following Ajax attributes are available to use with <a4j:jsFunction>: onbegin, onbeforedomupdate, oncomplete, bypassUpdates, and limitRender, data, and status.
<a4j:jsFunction> might look like a very simplistic tag. Although it's simple to use, it's actually very powerful. Like any JSF component that exposes client events (almost all components do), <a4j:jsFunction> can be used with those events to fire an Ajax request. Take any HTML tag and <a4j:jsFunction> can be used to fire an Ajax request based on some tag event. In theory, anywhere <a4j:ajax> is used, <a4j:jsFunction> can replace it because when the markup is rendered, the JavaScript that <a4:ajax> renders is very similar to what <a4j:jsFunction> renders. You can look at <a4j:jsFuction> as a lower level or foundation tag for all Ajax firing tags and behaviors.
Polling with <a4j:poll>
<a4j:poll> works in an almost identical fashion to all the other action components we have discussed, but instead of having to click or type something to send a request, the component will periodically send (poll) an Ajax request to the server. You can easily specify which components to update via the render attribute and which action or actionListener to invoke. All the core Ajax concepts we covered so far apply to this component as well. Let's walk through an example where you see the server time running. You will also be able to stop and start the clock.
When the page is loaded, the application will look as shown in Figure 3-2.
Figure 3-2. Using <a4j:poll>
When the page is loaded for the first time, the clock is off. You can then use the buttons to start or stop the clock. Before we start, it's important to keep in mind that the default value for execute is @this when using the <a4j:poll> component.
Listing 3-25 shows the JSF page.
Listing 3-25. Shows the JSF page
<h:form>

   <a4j:poll id="poll" interval="500" enabled="#{clockBean.enabled}"

      render="clock" />

   <h:panelGrid columns="2">

      <h:panelGrid columns="2">

         <a4j:commandButton value="Start Clock"

            action="#{clockBean.startClock}"

            render="poll" />

         <a4j:commandButton value="Stop Clock"

            action="#{clockBean.stopClock}"

            render="poll" />

      </h:panelGrid>

      <h:outputText id="clock" value="#{clockBean.now}" />

   </h:panelGrid>

</h:form>
It has a couple of important attributes: interval defines how often a request will be sent to the server (in milliseconds), and enabled determines whether the component will send a request depending on whether it's set to true or false. You need to be able to stop or start the polling when some condition happens.
When the page is loaded for the first time, enabled is evaluated to false, and thus the poll is disabled. When the Start Clock button is clicked, the startClock method will set enabled to true, which enables the polling. <a4j:poll> polls the server every 500 milliseconds (half a second) and updates the component that displays the time. When the Stop Clock button is clicked, enabled is set to false, which disables the polling.
Whenever you enable or disable the component in runtime, you need to render the component. This is needed so the new value for enabled is read and the JavaScript is updated in the browser to either start or stop polling.
Also notice we place <a4j:poll> inside the same form as the buttons. Placing <a4j:poll> inside the same form is fine because by default its execute is set to @this. Even if we had other input component inside the form, they would be sent to the server but they wouldn't be processed on the server. You could place <a4j:poll> inside its own form and submit less data to the server. Our example is rather simple, and although <a4j:poll> can be placed in the same form, the concept can be applied to a larger application.
Listing 3-26 shows the managed bean.
Listing 3-26. The managed bean
@ManagedBean

@RequestScoped

public class ClockBean {


   private boolean enabled; // getter and setter


   public java.util.Date getNow() {

      return new java.util.Date();

   }

   public void stopClock() {

      enabled = false;

   }

   public void startClock() {

      enabled = true;

   }

}
The following Ajax attributes are available to use with <a4j:poll>: onbegin, onbeforedomupdate, oncomplete, bypassUpdates, and limitRender, data, and status.
Advanced Partial View Rendering Options
In this section you are going to learn about advanced rendering features available in RichFaces. We will first cover the auto-rendered panel—whose content is automatically rendered on any Ajax request—and then show you how to limit rendering to only components shown in the current render attribute.
Auto-Rendered Areas with <a4j:outputPanel>
To render a component or a set of components, we use the render attribute. render attributes can take any of the following values: @all, @this, @form, @none, ids, and EL expressions bound to Set, List, or String with ids. RichFaces adds an important feature when using EL, the ids are resolved in the same request. We covered this feature in Chapter 2. One more thing you get with RichFaces is the ability to separate ids with a comma (versus just a space in JSF 2), as follows:
render="id1, id2, id3"
Using render with ids is definitely sufficient but can get rather complicated if there are some components that need to be rendered on every request. If we also assume that there are numerous components that send an Ajax request, we would need to specify components to be rendered on every such component or behavior. RichFaces solves this problem by making available a special <a4j:outputPanel> component, which when used, all components inside the panel are always rendered on any Ajax request without the need to point to the panel or the components inside via render.
Listing 3-27 shows an example using <a4j:outputPanel>. By itself, <a4j:outputPanel> is not much different than <h:panelGroup>. However, to make this panel and everything inside of it auto-rendered, we set a special ajaxRendered="true" attribute, as shown in Listing 3-27.
Listing 3-27. Setting a special ajaxRendered="true" attribute
<h:form>

   <a4j:commandButton value="Update time" />

   <a4j:outputPanel ajaxRendered="true">

      <h:outputText value="#{clockBean.now}" />

   </a4j:outputPanel>

</h:form>
Notice that <a4j:commandButton> doesn't have the render attribute, however time is still rendered because we use <4j:outputPanel ajaxRendered="true">, which again, marks the entire panel as an auto-rendered area.
Another common place where <a4j:outputPanel> is used is to wrap components is on a page that is not rendered on the initial page display, but rendered after the Ajax request. This is also a common problem some users run into when starting with JSF and Ajax. Let's take the Seven Wonders of the World example shown in Figure 3-3.
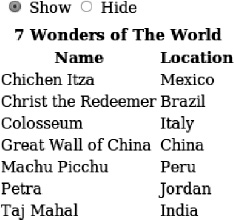
Figure 3-3. Show or hide the Seven Wonders of the World list
There are two buttons at the top, to hide or show the table. When the page is rendered for the first time, the table is not rendered (hidden). Then, selecting Show should render the table.
The JSF page is shown in Listing 3-28.
Listing 3-28. Showing the JSF page
<h:form>

   <h:panelGrid>

      <h:selectOneRadio value="#{dynamicUpdateBean.display}">

         <f:selectItem itemLabel="Show" itemValue="true" />

         <f:selectItem itemLabel="Hide" itemValue="false" />

         <a4j:ajax execute="@this" render="wonderList" />

      </h:selectOneRadio>

   </h:panelGrid>


   <h:dataTable id="wonderList" value="#{wonderListBean.list}"

      var="wonder" rendered="#{dynamicUpdateBean.display}">

      <f:facet name="header">7 Wonders of The World</f:facet>

      <h:column>

         <f:facet name="header">Name</f:facet>

         <h:outputText value="#{wonder.name}" />

      </h:column>

      <h:column>

          <f:facet name="header">Location</f:facet>

          <h:outputText value="#{wonder.location}" />

      </h:column>

   </h:dataTable>

</h:form>
In Listing 3-28, #{dynamicUpdateBean.display} is set to false when the page is rendered for the first time, and thus the table is not displayed. When selecting the Show button, we use Ajax request to set #{dynamicUpdateBean.display} to true and then render the table. If you run this code, the table will not be shown. As we mentioned earlier, this is a common stumbling block for users who are starting to use JSF and Ajax. The root of the problem is that we tried to re-render a component not previously rendered in the page. Before we explain this problem, Listing 3-29 shows the Wonder class.
Listing 3-29. Shows the Wonder class
public class Wonder {


   private String name;

   private String location;


   public Wonder(String name, String location) {


      this.name = name;

      this.location = location;

   }

   // Getters and setters

}
Listing 3-30 shows the managed bean that holds the list of wonders.
Listing 3-30. The managed bean that holds the list of wonders
@ManagedBean

@RequestScoped

public class WonderListBean {


   private ArrayList <Wonder> list;


   public ArrayList<Wonder> getList() {

        return list;

   }

   @PostConstruct

   public void init () {

      list = new ArrayList <Wonder>();

      list.add(new Wonder("Chichen Itza", "Mexico"));

      list.add(new Wonder("Christ the Redeemer", "Brazil"));

      list.add(new Wonder("Colosseum", "Italy"));

      list.add(new Wonder("Great Wall of China", "China"));

      list.add(new Wonder("Machu Picchu", "Peru"));

      list.add(new Wonder("Petra", "Jordan"));

      list.add(new Wonder("Taj Mahal", "India"));

   }

}
When the page was rendered for the first time, the table component wasn't rendered. In other words, no markup was sent to the browser. When we select Show, we send an Ajax request and set #{dynamicUpdateBean.display} to true. We also render the table (render="wonderList"). Table markup is sent to the browser. Now, the problem is that RichFaces doesn't know which browser DOM node to update with the table content simply because no such node existed before.
Ajax updates are done based on ids. When some markup is rendered and sent to the browser, it comes with an id. JavaScript is responsible for updating the DOM and will try to locate a node with exactly the same id. If such an id is found, then the new content will replace the old content in the DOM and we get an Ajax update. If such a node isn't found, as in our case, then the new content is simply ignored.
The solution is to create a placeholder for a table that is always rendered. Then, instead of updating (rendering) the table, we will render the placeholder. Anything inside the placeholder will always be updated without any problems. If we use <a4j:outputPanel>, we actually get two features at once. We first get a placeholder, but we also don't need to render the table anymore as <a4j:outputPanel ajaxRendered="true"> is an auto-rendered panel. Listing 3-31 shows this using <a4j:outputPanel>.
Listing 3-31. Using <a4j:outputPanel>
<h:form>

   <h:panelGrid>

       <h:selectOneRadio value="#{dynamicUpdateBean.display}">

       <f:selectItem itemLabel="Show" itemValue="true" />

       <f:selectItem itemLabel="Hide" itemValue="false" />

           <a4j:ajax execute="@this"/>

       </h:selectOneRadio>

   </h:panelGrid>

   <a4j:outputPanel ajaxRendered="true" layout="block">

      <h:dataTable id="wonderList" value="#{wonderListBean.list}"

         var="wonder" rendered="#{dynamicUpdateBean.display}">

          ...

      </h:dataTable>

   </a4j:outputPanel>

</h:form>
If you look at the page code, using the Firebug Firefox plug-in (http://getfirebug.com) for example, you will see that <a4j:outputPanel> renders a span HTML tag. If we didn't want to use an auto-rendered panel, then we can still use <a4j:outputPanel> with an id, but will have to render it as shown in Listing 3-32.
Listing 3-32. Using <a4j:outputPanel> with an id
<h:form>

   <h:panelGrid>

       <h:selectOneRadio value="#{dynamicUpdateBean.display}">

       <f:selectItem itemLabel="Show" itemValue="true" />

       <f:selectItem itemLabel="Hide" itemValue="false" />

           <a4j:ajax execute="@this" render="wonderPanel"/>

       </h:selectOneRadio>

   </h:panelGrid>

   <a4j:outputPanel id="wonderPanel" layout="block">

      <h:dataTable id="wonderList" value="#{wonderListBean.list}"

         var="wonder" rendered="#{dynamicUpdateBean.display}">

          ...

      </h:dataTable>

   </a4j:outputPanel>

</h:form>
Listing 3-33 replaces <a4j:outputPanel> with <h:panelGrid> as a placeholder and works exactly the same.
Listing 3-33. Replacing <a4j:outputPanel> with <h:panelGrid>
<h:form>

   <h:panelGrid>

       <h:selectOneRadio value="#{dynamicUpdateBean.display}">

       <f:selectItem itemLabel="Show" itemValue="true" />

       <f:selectItem itemLabel="Hide" itemValue="false" />

           <a4j:ajax execute="@this" render="wonderPanel"/>

       </h:selectOneRadio>

   </h:panelGrid>

   <h:panelGrid id="wonderPanel">

      <h:dataTable id="wonderList" value="#{wonderListBean.list}"

         var="wonder" rendered="#{dynamicUpdateBean.display}">

          ...

      </h:dataTable>

   </h:panelGrid>

</h:form>
There is one more feature worth mentioning. <a4j:outputPanel> can also be used for layout. It comes with a layout attribute that can be set to either block to render a <div> tag, inline to render a <span> tag (default). Listing 3-34 shows an example using the block value.
Listing 3-34. Shows an example using the block value
<a4j:outputPanel layout="block">

…

</a4j:outputPanel>
![]() Note Similar to
Note Similar to <h:panelGroup>, <a4j:outputPanel> can produce <span> or <div> elements according to the layout attribute. <span> is encoded by default. It's important to have it defined as a block when using block HTML elements, such as <div> and <table>, in order to have valid HTML encoded.
Using the limitRender Attribute to Turn off Auto-Rendered Panels
The auto-rendered panel is a good feature to have, as it makes it easier to mark parts of the page that should always be rendered. You no longer need to point to components with render. However, there might be a situation where a particular Ajax action on a page should not update the auto-rendered panels but be limited to only what is set in the current render. We are trying to see how to turn off auto-rendered panels in a specific case. We are going to use the page shown in Figure 3-4.
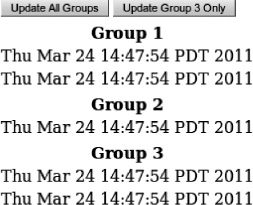
Figure 3-4. Turning off auto-rendered panels
The JSF page is shown in Listing 3-35.
Listing 3-35. The JSF page
<h:form>

   <h:panelGrid columns="2">

      <a4j:commandButton value="Update All Groups" render="group1, group2" />

      <a4j:commandButton value="Update Group 1 and 2 Only" render="group1, group2"

         limitRender="true" />

   </h:panelGrid>

   <h:panelGrid columns="1" id="group1">

      <f:facet name="header">Group 1</f:facet>

      <h:outputText value="#{timeBean.time1}" />

      <h:outputText value="#{timeBean.time2}" />

   </h:panelGrid>

   <h:panelGrid columns="1" id="group2">

      <f:facet name="header">Group 2</f:facet>

      <h:outputText value="#{timeBean.time3}" />

   </h:panelGrid>

   <a4j:outputPanel ajaxRendered="true" layout="block">

      <h:panelGrid id="group3">

         <f:facet name="header">Group 3</f:facet>

         <h:outputText value="#{timeBean.time4}" />

         <h:outputText value="#{timeBean.time5}" />

      </h:panelGrid>

   </a4j:outputPanel>

</h:form>
In Listing 3-5, when the Update All Groups button is clicked, all the clocks are rendered (updated). Group 1 and Group 2 are updated via ids, as the button has render="group1, group2". Group 3 is updated because it is inside an auto-rendered panel. If the second button is clicked (Update Groups 2 and 3 only), then only Group 1 and Group 2 are rendered. Group 3, which is inside the auto-rendered panel, is not updated. The reason it's not updated is because use limitRender="true" is in the second button. What this means is to limit rendering only to a component set in the current render attribute (in our case it's Group1 and Group2). Another way to look at it is we turned off all auto-rendered panels for this particular button. This is a handy feature and gives you further flexibility and control in customizing what to render.
![]() Note
Note limitRender="true" can also be used to turn off auto rendering of <rich:message> and <rich:messages> components.
Advanced Execute Options
In this section you are going to learn about a number of advanced execute options available in RichFaces. We will first learn about the RichFaces <a4j:region> tag, which allows you to define what to execute in a more declarative way and then learn how to skip phases in the JSF lifecycle when doing validation.
Defining Execute Regions with <a4j:region>
When sending an Ajax request it's always important to keep in mind what is going to be processed or executed on the server. As we know, when using <f:ajax> or <a4j:ajax> the execute attribute defaults to @this (other values execute can be set to are: @all, @form, @none, id's, EL expressions similar to used in render). When using RichFaces <a4j:poll> or <a4j:jsFunction>, the execute attribute also defaults to @this. But, when using <a4j:commandButton> or <a4j:commandLink>, the execute attribute sets to the @form value. Why did RichFaces change the default value? In the majority of cases, a button or link are used inside a form to perform a complete form submit. You will enter information and click a button or a link to submit. As you have just entered input, you need to process that input as well. If execute was set to the default value of @this, we would need to include every input component inside the form to be executed as well, or set execute to @form (or parent container id). Having the <a4j:commandButton> and <a4j:commandLink> execute attribute default to @form, makes development easier.
RichFaces adds another feature that makes marking what to execute simpler. RichFaces adds <a4j:region> and the @region keyword. Listing 3-36 shows a JSF that will not work, as <a4j:ajax> nested inside <h:commandButton> doesn't have the execute attribute set.
Listing 3-36. Shows a JSF that will not work
<h:form>

   <h:panelGrid>

      <h:selectOneMenu id="type" value="#{flowerRegionBean.type}">

         <f:selectItem itemValue="Roses" itemLabel="Roses" />

         <f:selectItem itemValue="Tulips" itemLabel="Tulips" />

         <f:selectItem itemValue="Irises" itemLabel="Irises" />

      </h:selectOneMenu>

      <h:selectOneMenu id="size" value="#{flowerRegionBean.size}">

         <f:selectItem itemValue="Small" itemLabel="Small" />

         <f:selectItem itemValue="Large" itemLabel="Large" />

         <f:selectItem itemValue="Extra Large" itemLabel="Extra Large" />

      </h:selectOneMenu>

      <h:selectOneMenu value="#{flowerRegionBean.vase}">

         <f:selectItem itemValue="Standard vase" itemLabel="Standard vase" />

         <f:selectItem itemValue="Premium vase" itemLabel="Premium vase" />

         <f:selectItem itemValue="No vase" itemLabel="No vase" />

      </h:selectOneMenu>

      <h:commandButton value="Buy Flowers!">

         <a4j:ajax event="click"/>

      </h:commandButton>

   </h:panelGrid>

   <a4j:outputPanel ajaxRendered="true" layout="block">

      <h:panelGrid>

         <h:outputText value="#{flowerRegionBean.type}" />

         <h:outputText value="#{flowerRegionBean.size}" />

         <h:outputText value="#{flowerRegionBean.vase}" />

      </h:panelGrid>

   </a4j:outputPanel>

</h:form>
The managed bean is shown in Listing 3-37.
Listing 3-37. The managed bean
@ManagedBean

@RequestScoped

public class FlowerRegionBean {


   private String type;

   private String size;

   private String vase;


   // getters and setters

}
To make this work, we would either have to list all input components in execute attribute or set an ID on the panel grid and point execute to it. The alternative approach, which is more declarative in nature, is to use <a4j:region>. Therefore, to make the example in Listing 3-37 work, all we need to do is wrap input components and the button inside <a4j:region>, as shown in Listing 3-38.
Listing 3-38. Wrap input components and the button inside <a4j:region>
<h:form>

   <a4j:region>

      <h:panelGrid>

         …

         <h:commandButton value="Buy Flowers!">

            <a4j:ajax event="click" />

         </h:commandButton>

      </h:panelGrid>

   </a4j:region>

   <a4j:outputPanel ajaxRendered="true">

      <h:panelGrid>

         <h:outputText value="#{flowerRegionBean.type}" />

         <h:outputText value="#{flowerRegionBean.size}" />

         <h:outputText value="#{flowerRegionBean.vase}" />

      </h:panelGrid>

   </a4j:outputPanel>

</h:form>
This approach is more declarative, as you no longer need to specify which IDs to execute. Any Ajax request from within the region and all input components inside the region will be executed (unless other Ajax components or behaviors specify what components to execute explicitly, in which case they will override the region). When using a region, you can also use the @region keyword, as follows:
<a4j:ajax event="click" execute="@region"/>
This indicates to execute everything inside the region and is optional. Even if we don't specify @region, as we did in our example, the region is executed by default.
Skipping Model Updates During Validation
Validating an input field only when the user tabs out or clicks elsewhere is a popular technique that can easily be done with Ajax using the blur event. Listing 3-39 shows an example.
Listing 3-39. Validating an input field with Ajax using the blur event
<h:form>

   <h:panelGrid columns="3">

      <h:outputText value="Name:" />

      <h:inputText id="name" value="#{bypassUpdatesBean.name}" >

         <a4j:ajax event="blur" render="nameMessage"/>

      </h:inputText>

      <h:message for="name" id="nameMessage"/>


      <h:outputText value="Email:" />

      <h:inputText id="email" value="#{bypassUpdatesBean.email}" >

         <a4j:ajax event="blur" render="emailMessage" />

      </h:inputText>

      <h:message for="email" id="emailMessage"/>


      <h:outputText value="Age:" />

      <h:inputText id="age" value="#{bypassUpdatesBean.age}" >

         <a4j:ajax event="blur" render="ageMessage" />

      </h:inputText>

      <h:message for="age" id="ageMessage"/>

   </h:panelGrid>

   <h:commandButton value="Submit" action="page2"/>

</h:form>
Each input field has an Ajax behavior attached to its blur event. After the input has been entered and the user clicks elsewhere or tabs out, an Ajax request will be sent. Validation constraints are defined using Bean Validation annotations inside the managed bean, as shown in Listing 3-40. Now, once the entire form has been filled and validated, there is button to submit in order to invoke the application logic to do something with the input, such as add a new record.
Listing 3-40. Validation constraints are defined using Bean Validation annotations inside the managed bean
@ManagedBean

@RequestScoped

public class BypassUpdatesBean {


   @Length (min=3, message="Name must be at least {min} characters long")

   private String name;


   @Email(message="Invalid email address")

   private String email;


   @Min(value=1, message="Age must be greater than 0")

   private Integer age;


   // Getters and setters

}
Let's look closely at what happens when a blur event occurs. When a blur event occurs, an Ajax request is sent to the server and the component's data is validated. If we look at what phases we pass when this request is sent, then we would see the following (also, at the end of this section, read how to create a phase tracker):
- Restore View
- Apply Request Values
- Process Validations
- Update Model Values
- Invoke Application
- Render Response
Now, is it really necessary to go through Update Model and Invoke Application phases when only validating? The answer is no. No action is called and when the submit button is clicked, we then go through all the phases as expected. So, when validating, we really just need to get to Process Validations and we can safely jump to Render Response from there. If validation fails, we will go to Render Response anyway, but we would like to go to Render Response even if the value is valid.
If you look closely at the JSF page is Listing 3-41, you will notice that each <a4j:ajax> has an extra attribute: bypassUpdates="true".
Listing 3-41. Notice that each <a4j:ajax> has an extra attribute: bypassUpdates="true"
<h:form>

   <h:panelGrid columns="3">

      <h:outputText value="Name:" />

      <h:inputText id="name" value="#{bypassUpdatesBean.name}" >

         <a4j:ajax event="blur" render="nameMessage" bypassUpdates="true"/>

      </h:inputText>

      <h:message for="name" id="nameMessage"/>


      <h:outputText value="Email:" />

      <h:inputText id="email" value="#{bypassUpdatesBean.email}" >

         <a4j:ajax event="blur" render="emailMessage" bypassUpdates="true"/>

      </h:inputText>

      <h:message for="email" id="emailMessage"/>


      <h:outputText value="Age:" />

      <h:inputText id="age" value="#{bypassUpdatesBean.age}" >

         <a4j:ajax event="blur" render="ageMessage" bypassUpdates="true"/>

      </h:inputText>

      <h:message for="age" id="ageMessage"/>

   </h:panelGrid>

   <h:commandButton value="Submit" action="page2"/>

</h:form>
This attribute does exactly what we want. It will take use to Process Validations and then jump to Render Response even if the value is valid. We will pass through the following phases:
- Restore View
- Apply Request Values
- Process Validations
- Render Response
![]() Tip Use
Tip Use bypassUpdates to optimize the JSF lifecycle during form validation.
Creating a Phase Tracker
Listing 3-42 shows an example of a simple phase tracker. When registered in a JSF configuration file, it will output what JSF phases have passed during a JSF request.
Listing 3-42. An example of a simple phase tracker
package org.richfaces.book.utils.PhaseTracker

public class PhaseTracker implements javax.faces.event.PhaseListener{


   public void afterPhase(PhaseEvent e) {
      e.getFacesContext().getExternalContext().log("after "+e.getPhaseId());

   }

   public void beforePhase(PhaseEvent e) {

      e.getFacesContext().getExternalContext().log("before "+e.getPhaseId());

   }

   public PhaseId getPhaseId() {

      return PhaseId.ANY_PHASE;

   }

}
Listing 3-43 shows a phase tracker registration in a JSF configuration file.
Listing 3-43. A phase tracker registration in a JSF configuration file (faces-config.xml)
<lifecycle>

  <phase-listener>org.richfaces.book.utils.PhaseTracker</phase-listener>

</lifecycle>
While running with the phase tracker, Listing 3-44 shows the output when validation error occurs.
Listing 3-44. Shows the output when validation error occurs
Apr 5, 2011 4:24:33 PM org.apache.catalina.core.ApplicationContext log

INFO: before RESTORE_VIEW 1

Apr 5, 2011 4:24:33 PM org.apache.catalina.core.ApplicationContext log

INFO: after RESTORE_VIEW 1

Apr 5, 2011 4:24:33 PM org.apache.catalina.core.ApplicationContext log

INFO: before APPLY_REQUEST_VALUES 2

Apr 5, 2011 4:24:33 PM org.apache.catalina.core.ApplicationContext log

INFO: after APPLY_REQUEST_VALUES 2

Apr 5, 2011 4:24:33 PM org.apache.catalina.core.ApplicationContext log

INFO: before PROCESS_VALIDATIONS 3

Apr 5, 2011 4:24:33 PM org.apache.catalina.core.ApplicationContext log

INFO: after PROCESS_VALIDATIONS 3

Apr 5, 2011 4:24:33 PM org.apache.catalina.core.ApplicationContext log

INFO: before RENDER_RESPONSE 6

Apr 5, 2011 4:24:33 PM org.apache.catalina.core.ApplicationContext log

INFO: after RENDER_RESPONSE 6
Controlling Traffic with Client Queue
JSF 2 comes with a built-in Ajax client queue. There is nothing you need to do; the queue is there by default on every page. It's a page level queue and is used by all components. The standard queue provides basic functionality. It will automatically queue requests and ensure that the last Ajax request will finish before a new one is sent. Let's trace the events when using standard Ajax queue, as follows:
- The button is clicked.
- An Ajax request is sent to the server; let's call the request A1.
- While request A1 is being executed, the same button or any other control is activated three times.
- Three requests are now queued.
- Once A1 request comes back, the first request in the queue is sent. Two are left in the queue.
- Two requests are now queued.
RichFaces adds additional functionality on top of the standard JSF 2 queue, such as the following:
- Event combining from the same and different components
- Request delay
- Ignoring “stale” responses
- Defining named and unnamed (view, form) queues
- Overwriting queue settings by individual components
It's very important to note that the RichFaces queue doesn't replace an existing JSF 2 queue, it uses the same queue and only upgrades the queue with additional features and advanced functionality.
![]() Note The Ajax client queue only work for Ajax requests. It is not used for regular (non-Ajax) requests.
Note The Ajax client queue only work for Ajax requests. It is not used for regular (non-Ajax) requests.
Let's start with how a queue is defined. A queue is added with the <a4j:queue> tag and is configured in the following ways:
- View-level queue (unnamed). A queue is defined outside any forms. All components use the same queue settings.
- Form-level queue (unnamed). A queue is defined inside a form. All components inside the form use this queue setting. Overwrites queue settings defined at view-level queues.
- Queue is given a name (named). Any components that need to use this queue must reference the queue by its name. In this case, default queues (view and form) are ignored for controls that referenced it. Overwrites queue settings defined at view-level and form-level queues.
Listing 3-45 shows a view-level queue.
Listing 3-45. Shows a view-level queue
<a4j:queue/>

<h:form>

...

</h:form>

<h:form>

     ...

</h:form>
Listing 3-46 shows a form-level queue.
Listing 3-46. Shows a form-level queue
<h:form>

<a4j:queue/>

...

</h:form>

<h:form>

<a4j:queue/>

...

</h:form>
Listing 3-47 shows one view-level queue and one form-level queue. Components within form "form1" will use the queue inside the form. All other components, including inside form "form2", will use the view-level queue.
Listing 3-47. Shows one view-level queue and one form-level queue
<a4j:queue/>

<h:form id="form1">

<a4j:queue/>

...

</h:form>

<h:form id="form2">

...

</h:form>
Listing 3-48 shows a named queue. When using a named queue, components have to reference the queue via its name. This is done with a special tag called <a4j:attachQueue>.
Listing 3-48. Shows a named queue
<a4j:queue name="ajaxQueue" />

<h:form>

   <a4j:commandButton>

       <a4j:attachQueue name="ajaxQueue"/>

    </a4j:commandButton>

</h:form>
<a4j:attachQueue> provides the same attributes as <a4j:queue> does(described later). They should be used to redefine queue settings for specific components.
The <a4j:attachQueue> tag is also used to overwriting unnamed queue settings. In that case, the name attribute should be omitted.
![]() Tip A queue defined with a name on a page will not be used by components that don't explicitly reference this named queue.
Tip A queue defined with a name on a page will not be used by components that don't explicitly reference this named queue.
Let's review how the standard queue works and then show what extra features RichFaces adds to the queue. The standard JSF queue will queue all events and will not send the next request until the one executing on the server returns. That's pretty good functionality out-of-the-box, but you are still missing a number of features.
![]() Note If you want to see how the standard JSF 2 queue works switch all Ajax requests to be sent with
Note If you want to see how the standard JSF 2 queue works switch all Ajax requests to be sent with <f:ajax> behavior.
Combining Events from the Same Component
One of the features that RichFaces adds on top of the standard queue is the ability to combine events from the same component. If a particular button is clicked multiple times (while there is another request on the server), all events from this button will be “combined.” In other words, when the request executing on the server completes, only one request will be sent to process multiple clicks done during that time. This is the behavior you usually want. If the same button is clicked seven times, you will want only one request to be sent.
Let's look at an example in Listing 3-49, which shows two buttons. Each button updates the time in its column, and when an Ajax request is sent, the appropriate status is shown in the upper-right corner of the browser.
Listing 3-49. Shows two buttons
<a4j:status name="action1Status" startText="Button A"

   startStyle="background-color: #ffA500;

   font-weight:bold;

   position: absolute;

   right: 5px;

   top: 1px;

   width: 140px;" />

<a4j:status name="action2Status" startText="Button B"

   startStyle="background-color: #FF0000;

   font-weight:bold;

   position: absolute;

   right: 5px;

   top: 1px;

   width: 120px;" />


<a4j:queue/>


<h:form>

   <h:panelGrid columns="2" border="1">

      <a4j:commandButton value="Button A" action="#{queueBean.action1}"

         render="now1" status="action1Status"/>

      <a4j:commandButton value="Button B" action="#{queueBean.action2}"

         render="now2" status="action2Status"/>

      <h:outputText id="now1" value="#{queueBean.now1}" />

      <h:outputText id="now2" value="#{queueBean.now2}" />

   </h:panelGrid>

</h:form>
The rendered page is shown in Figure 3-5.

Figure 3-5. Using the RichFaces queue
The managed bean is rather simple and shown in Listing 3-50. One thing to point out, we put both actions to sleep to give us a more “real world” scenario.
Listing 3-50. The managed bean
@ManagedBean

@RequestScoped

public class QueueBean {


   public Date getNow1 (){

      return (new Date ());

   }

   public Date getNow2 (){

      return (new Date ());

   }

   public void action1 () {

      try {

         Thread.sleep (4000);

      } catch (InterruptedException e) {

         e.printStackTrace();

      }

   }

   public void action2 () {

      try {

         Thread.sleep (1000);

      } catch (InterruptedException e) {

         e.printStackTrace();

      }

   }

}
Now that we have the code down, let's examine how the queue works. Because it's a RichFaces application and we use RichFaces components, we get some extra features.
If you click Button A once, a request—let's call it A1—will be sent to the server and it will take 4 seconds for it to complete. If you click Button A again within the 4 seconds (A2), the new event will be queued and only be sent when request A1finishes executing on the server. This is nothing new, you get this functionality from the standard queue. Table 3-3 shows the sequence of events.

A2 will be fired only when request A1 completes.
Let's do something similar, but while request A1 is executing on the server, we will click the button multiple times. Because the same button is clicked, each new event or click will overwrite (or combine) with the currently queued event. No matter how many times you click the button, only one event will be sent to the server. This feature will prevent flooding the server with identical requests. The sequence of events is shown in Table 3-4.
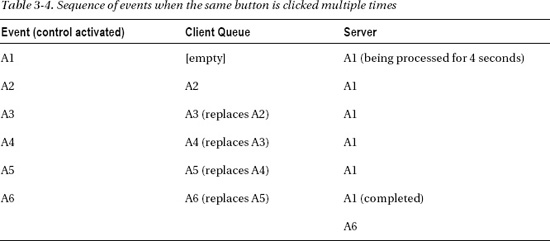
Once request A1 completes, request A6 will be sent and the client queue is now empty.
![]() Tip Events from the same component are “combined” together.
Tip Events from the same component are “combined” together.
There is also a second button. Let's trace the events when we mix clicking both buttons, shown in Table 3-5.
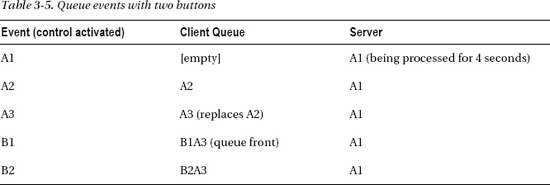
Notice that something different happened here. As long as we were clicking Button A, those events were combined. Once we clicked Button B and the last event in the queue was from A, events no longer could be combined and that event was added to the queue. What this means is that events can be combined as long as the event just activated and the event last in queue are from the same component.
RichFaces queue features are there even though we didn't place the <a4j:queue> tag on the page. In fact, you get a queue on every page automatically. RichFaces provides this application-wide on all pages with the context parameter, as shown in Listing 3-51.
Listing 3-51. RichFaces provides this application-wide on all pages with the context parameter
<context-param>

   <param-name>org.richfaces.queue.global.enabled</param-name>

   <param-value>true</param-value>

</context-param>
When defining some of the queues we mentioned earlier—view-level, form-level and component mapped—all are just overwriting a queue with a bigger scope. If at some point you need to set any attributes on this global queue, the name of the queue is org.richfaces.queue.global, and setting attributes would look like the following:
<a4j:queue name="org.richfces.queue.global" requestDelay="2000">
Setting a Delay
You can set a delay on a queue by using the requestDelay attribute (set to 4 seconds in the following sample):
<a4j:queue requestDelay="4000">
This means that every request will be queued and delayed by 4 seconds before sending. Note that this is a view-level queue and so all the controls will be delayed by 4 seconds. Another way to look at a delay is that it is the time to wait for new requests to be fired from the same component and for this new event to replace the one that has been queued. Let's trace events with Table 3-6.
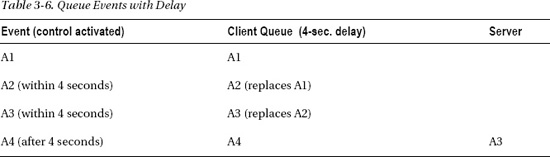
For event A4 to be fired, two things need to happen: the previous request from the server has to finish and the A4 delay time has to pass.
We told you that each component can overwrite either view-level or form-level queue settings by using the <a4j:attachQueue> behavior. Right now our delay is view-level. For the second button, let's overwrite the delay and set it to 0, as shown in Listing 3-52.
Listing 3-52. Overwrite the delay and set it to 0
<a4j:commandButton value="Button B" action="#{queueBean.action2}" render="now2"

         status="action2Status">

   <a4j:attachQueue requestDelay="0"/>

</a4j:commandButton>
Button A will use the view-level queue and each event will be delayed 4 seconds. Button B will still use the view-level queue but overwrites the delay by setting it to 0.
In Table 3-6, we used only one component. Let's see what happens if we now use two buttons. Let's say we queued A1, and within the delay period of 4 seconds, we clicked Button B. What will happen is shown in Table 3-7: event A1 will fire immediately, without waiting for its delay period to pass.
If you didn't have this book, your first reaction might have been to think it's a bug. But, it's not a bug. The reason event A1 was sent without waiting for its delay to pass is because B1 cannot be combined with A1, and as there are no more events queued that can be combined with A1, A1 fires immediately. To reinforce, a delay could be used to wait for the same events (from the same component) to be combined.

Combining Events from Different Components
We showed that events from the same component (when queued) are combined. It's also possible to combine events from different components by placing them in the same request group using the requestGroupingId attribute. As this setting applies to individual components, we use the <a4j:attachQueue> tag to set that parameter, as shown in Listing 3-53.
Listing 3-53. Use the <a4j:attachQueue> tag to set that parameter
<a4j:commandButton value="Button A" action="#{queueBean.action1}"

 render="now1"

   status="action1Status">

   <a4j:attachQueue requestGroupingId="ajaxGroup" />

</a4j:commandButton>


<a4j:commandButton value="Button B" action="#{queueBean.action2}"

 render="now2"

   status="action2Status">

   <a4j:attachQueue requestGroupingId="ajaxGroup" requestDelay="0" />

</a4j:commandButton>
Once we update both buttons to belong to the same request group, let's trace the sequence in Table 3-8.
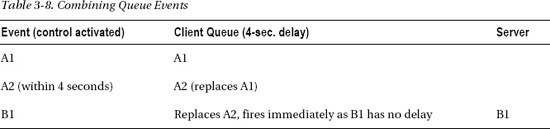
Events A1 and A2 are combined because they are from the same component. When we queue the event, B1, it combines (or replaces) A2, as both buttons are now in the same request group id. Now, B1 fires immediately, as it doesn't have any delay. If we were to put a delay for 1 second (1000ms), for example, then B1 would replace A2 and fire after 1 second.
Ignoring “Stale” Responses
Let's review an example we saw earlier where a lowercase string is converted to an uppercase string. In the earlier example, we invoked the action after clicking a button. This example is slightly updated; we now invoke the action on the keyup event. The JSF page is shown in Listing 3-54.
Listing 3-54. The JSF page
<h:form>

   <a4j:status startText="Working..."

      startStyle="background-color: #ffA500;

      font-weight:bold;

      position: absolute;

      left: 520px;

      top: 1px;

      width: 100px;" />


   <a4j:queue requestDelay="500"/>

   <h:panelGrid>

      <h:panelGrid>

         <h:outputText value="Enter lower case text to convert to upper

            case:" />

         <h:inputText value="#{queueIgnoreOldBean.text}" >

            <a4j:ajax event="keyup" render="upper"

               listener="#{queueIgnoreOldBean.upperCase}"/>

         </h:inputText>

      </h:panelGrid>

      <h:outputText id="upper" value="#{queueIgnoreOldBean.text}" />

   </h:panelGrid>

</h:form>
Notice that we put a delay of a half second before sending the Ajax request. This will allow us to “combine” events. Or in other words, wait for the user to enter more letters.
The managed bean is shown in Listing 3-55.
Listing 3-55. The manage bean
@ManagedBean

@RequestScoped

public class QueueIgnoreOldBean {

   private String text;


   // Getter and setter


   public void upperCase(AjaxBehaviorEvent event) {

      try {

         Thread.sleep(2500);

      } catch (InterruptedException e) {

         e.printStackTrace();

      }

      setText(text.toUpperCase());

   }

}
Let's say we type the word “dog.” A request will be sent, it takes 2.5 seconds for the action to be executed, at which point we should see the word DOG rendered in the page. Let's repeat this again, but when the request is being executed on the server, quickly delete “dog” and type “cat.”
The result that you will see is that first DOG will be rendered and then CAT will be rendered. Now the question is, does it make sense to render DOG if the user has changed the input to “cat?” The answer will depend, but in most cases there is no more need to show DOG because the user typed “cat.” DOG is in this case is a “stale” response. Whether you want to render DOG or not is up to you. Luckily, RichFaces provides a queue feature that allows you to ignore “stale” responses. The RichFaces queue provides an ignoreDupResponse attribute that allows you to do just that. When set to true, it will ignore duplicate responses from the same component. What does duplicate mean? Duplicate means that if a request is currently being executed and another request from the same component (or components grouped by requestGroupingId) is queued, then it will ignore the original response or DOM update. It's important to understand that the request will execute on the server (we can't stop it there), only the DOM update will be dropped or ignored.
To ignore a “stale” response, we add the ignoreDupRepsonses attribute to the queue, as follows:
<a4j:queue requestDelay="500" ignoreDupResponses="true"/>
Let's run the page again. Enter “dog,” and while the request is being executed (status is shown), quickly delete and type “cat.” You should now see only CAT rendered. The original response (DOG) finished, but we decided to ignore this DOM update.
It's important to keep in mind that RichFaces provides a great number of advanced features, but it just upgrades the standard JSF 2 queue.
More a4j:* Tags and Features
This section will cover more a4j:* tags and features, such as how to show status during an Ajax request, how to display Ajax request/response logging information, and a simpler way to invoke action listeners.
Showing Ajax Status with <a4j:status>
Many web sites that use Ajax show an Ajax request status such as a moving animated image or a “Loading…” message at the top of the screen. Some block the entire page while the Ajax request is being executed. There are a number of reasons why it might make sense to show an Ajax request status. As there is no full page refresh, the user might not even be aware that a request is being executed. Showing the status indicates that something is happening—and perhaps the user won't click the button or link again. Well, as you probably know by now, there is no such thing as “perhaps” in web development. Another usage is to block the screen while the Ajax request is being executed in order to prevent the user from clicking any actions until the Ajax request is complete. Without debating this any further, it's up to you if you want to show the Ajax status. Our job is to show you how to use a <a4j:status> component in RichFaces. This component is used to show an Ajax request status.
The following are three ways define <a4j:status>:
- Status per view (page). Status is placed outside any form. Any component that fires an Ajax request on this page will activate this status.
- Status per form. Status is placed inside a form. Any component within that form that fires an Ajax request will activate this status (view status will not be activated).
- Named status. Status is given a name and components that fire an Ajax request must refer to that status by name. If no component references this status, the status will not be shown.
So, how do you define what the component shows? The simplest way is to use two attributes named startText and stopText. startText shows any text when the request is being executed on the server, and stopText is the text shown when there is no active Ajax request. A third attribute, errorText, is available to display text in case of server error.
The following three figures show Ajax at different steps. To keep the example simple but still demonstrate the full power of <a4j:status>, we are going to take and convert a string entered in uppercase.
Figure 3-6 shows the page after it was just loaded; however, stopText is already displayed because there is no active Ajax request.
Figure 3-6. No active Ajax request; page just loaded
![]() Tip To avoid showing status when no Ajax request is active, simply don't set
Tip To avoid showing status when no Ajax request is active, simply don't set stopText property (or stop facet).
Figure 3-7 shows when there is an active request on the server.
Figure 3-7. During active Ajax request
Figure 3-8 shows after the request is done.
Figure 3-8. After Ajax request is completed
The JSF page is shown in Listing 3-56.
Listing 3-56. The JSF page
<h:form>

   <h:panelGrid>

      <h:panelGrid columns="3">

         <h:inputText value="#{ajaxStatusBean.text}" />

         <a4j:commandButton value="Convert" action="#{ajaxStatusBean.upperCase}"

            render="upper"/>

         <a4j:status startText="Working..." stopText="Done" />

      </h:panelGrid>

      <h:outputText id="upper" value="#{ajaxStatusBean.text}" />

   </h:panelGrid>

</h:form>
In Listing 3-56, the status is placed inside the form, thus any other component activated inside this form will invoke (show) this status as well.
The managed bean is shown in Listing 3-57.
Listing 3-57. The manage bean
@ManagedBean

@RequestScoped

public class AjaxStatusBean {


   private String text;


   public void upperCase () {

      try {

         Thread.sleep (3000);

      } catch (InterruptedException e) {

         e.printStackTrace();

      }

      setText(text.toUpperCase());

   }

   public String getText() {

      return text;

   }

   public void setText(String text) {

      this.text = text;

   }

}
The bean is rather simple. The only thing you will notice is that we put the action to sleep for 3 seconds. Without this, the action is executed very fast and it's difficult to see the status. So, this is really only done to “mimic” a more realistic example.
Seeing the text “Done” is not something you would expect when the page first loads. It's perfectly fine not to use it at all and only define startText. When the page loads for the first time, nothing will be displayed and when Ajax is activated, startText content will be displayed.
<a4j:status startText="Working..."/>
You can also style the label shown with startStyle attribute (stopStyle also available), as follows:
<a4j:status startText="Working..." startStyle="background-color:#ffA500"/>
You are not limited to displaying the status next to the button or link; using the style attribute you can specify absolute positioning for the status. Let's move the status outside the form; this means that any component on the page will activate this status and that we are moving the status to display at the very top of the browser window, as shown in Figure 3-9.

Figure 3-9. Using absolute positioning for Ajax status
The code is shown in Listing 3-58.
Listing 3-58. The code for the Ajax status
<a4j:status id="ajaxStatus" startText="Working..."

          startStyle="background-color: #ffA500;

          font-weight:bold;

          position: absolute;

          left: 520px;

          top: 1px;

          width: 100px;" />

<h:form>

   <h:panelGrid>

      <h:panelGrid columns="3">

         <h:inputText value="#{ajaxStatusBean.text}" />

         <a4j:commandButton value="Convert"

            action="#{ajaxStatusBean.upperCase}"

            render="upper" />

      </h:panelGrid>

      <h:outputText id="upper" value="#{ajaxStatusBean.text}" />

   </h:panelGrid>

</h:form>
Right now any component will show this status. Let's update the page so that the status is shown only when we click the Convert button. We first need to give the status a name, as shown in Listing 3-59. Note that we are setting the name, not the id.
Listing 3-59. Giving the status a name
<a4j:status id="ajaxStatus" name="ajaxStatus" startText="Working..."

          startStyle="background-color: #ffA500;
          font-weight:bold;

          position: absolute;

          left: 520px;

          top: 1px;

          width: 100px;" />
Next we need to update <a4j:commandButton> to reference that status, using the status attribute as follows:
<a4j:commandButton value="Convert"

   action="#{ajaxStatusBean.upperCase}" render="upper"

   status="ajaxStatus"/>
The status will be shown only when this button is activated. No other component anywhere on the page will activate this status. Again, this is called a named status.
![]() Note Any RichFaces components that sends an Ajax request can show (activate)
Note Any RichFaces components that sends an Ajax request can show (activate) <a4j:status>. A named status will not be shown if no component references it by name.
So far so good, but you might have noticed that if we use the startText and stopText attribute then we are limited to displaying only text. It's possible to display rich content, other components for example, if we use facets defined on the <a4j:status> tag: start, stop, and error. You probably already guessed how they work—identical to startText, stopText, and errorText, but allow you to display any content inside them. Listing 3-60 shows an example using the start facet with an image.
Listing 3-60. An example using the start facet with an image
<h:form>

   <h:panelGrid>

      <h:panelGrid columns="3">

         <h:inputText value="#{ajaxStatusBean.text}" />

         <a4j:commandButton value="Convert" action="#{ajaxStatusBean.upperCase}"

            render="upper" />

         <a4j:status>

            <f:facet name="start">

               <h:graphicImage value="/status/ajax-loader.gif" />

            </f:facet>

         </a4j:status>

      </h:panelGrid>

      <h:outputText id="upper" value="#{ajaxStatusBean.text}" />

   </h:panelGrid>

</h:form>
The result is shown in Figure 3-10.
Figure 3-10. Showing the Ajax status with an image
Showing a Popup During an Ajax Request
<a4j:status> comes with two events that can be used to invoke any JavaScript onstart and onstop events. Using <a4j:status> onstart and onstop events with the combination of the <rich:popupPanel> component, we can block the page during an Ajax request. This could be used so that the user won't click any other buttons or links on the page when an Ajax request is being executed.
Using the <a4j:status> API with <rich:popupPanel> is shown in Listing 3-61. With onstart, we show a popup panel, and with onstop, we hide the popup panel. <rich:popupPanel> can also be configured as a non-blocking popup. We will cover this component in Chapter 6.
Listing 3-61. Using the <a4j:status> API with <rich:popupPanel>
<h:form>
<h:panelGrid>
<h:panelGrid columns="3">
<h:inputText value="#{ajaxStatusBean.text}" />
<a4j:commandButton value="Convert"
action="#{ajaxStatusBean.upperCase}"
render="upper" />
<a4j:status onstart="#{rich:component('statusPanel')}.show();"
onstop="#{rich:component('statusPanel')}.hide();" />
</h:panelGrid>
<h:outputText id="upper" value="#{ajaxStatusBean.text}" />
</h:panelGrid>
</h:form>
<rich:popupPanel id="statusPanel" header="Converting">
<h:outputText value="Please wait.." />
</rich:popupPanel>
The result is shown in Figure 3-11.
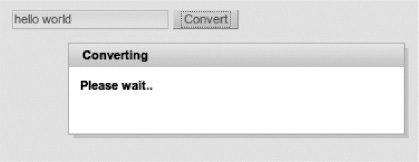
Figure 3-11. Popup panel is opened on Ajax request with <a4j:status> JavaScript API
<a4j:status> also comes with JavaScript API listed in Table 3-9.
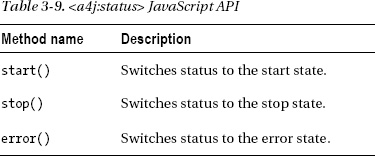
JavaScript API is useful when you need to utilize the same status for non-Ajax requests (by invoking start() on the <h:commandButton> click, for example), or to show it during any time-consuming JavaScript activities.
Displaying Logging and Debugging Information with <a4j:log>
<a4j:log> is a client-side utility for Ajax logging and debugging. It generates JavaScript that opens a debug window, logging client processing information such as requests, responses, and DOM changes.
To use it, just place <a4j:log/> tag on a page, as follows:
<a4j:log />
It shows output when an Ajax request is fired, so let's use it with a button with the current time, as shown in Listing 3-62.
Listing 3-62. A button with the current time
<h:form id="form">

   <h:panelGrid>

      <a4j:commandButton id="Update" value="Update" render="time"/>

      <h:outputText value="#{logBean.now}" id="time"/>

   </h:panelGrid>

   <a4j:log />

</h:form>
When the page is rendered and the button is clicked, you will see the output shown in Figure 3-12.
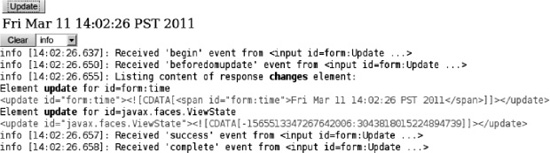
Figure 3-12. Output from <a4j:log> component
Selecting the debug level and hitting the Update button will produce a more verbose output, as shown in Figure 3-13.
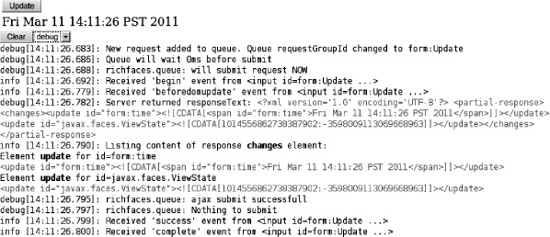
Figure 3-13. Output from <a4j:log> component with debug level selected
In case there is an error, such as server not running, you might see output like Figure 3-14.
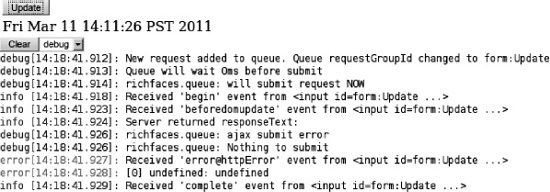
Figure 3-14. Output from <a4j:log> component when server error occurs
If you want to set a log level during development, then the level attribute can be used, as follows:
<a4j:log level="DEBUG"/>
The level attribute can be set to the following values:
- ERROR
- DEBUG
- INFO
- WARN
- ALL (the default setting, logs all data)
The default behavior is for the log to be rendered inside the page. As an alternative, the log can be opened in a popup window. To do that, set the mode attribute to popup, as follows:
<a4j:log mode="popup"/>
To open the popup, press Ctrl+Shift+L. To reconfigure the hot key combination, set the hotkey attribute to a new letter; for example hotkey="D" will open the popup when pressing Ctrl+Shift+D.
![]() Note The log is automatically updated after each Ajax request. It does not need to be explicitly re-rendered.
Note The log is automatically updated after each Ajax request. It does not need to be explicitly re-rendered.
Using <a4j:actionListener>
<a4j:actionListener> is a small upgrade over the standard <f:actionListener> in JSF. Using <a4j:actionListener>, it's possible to define a listener method inside a managed bean and reference it using a standard method-binding expression, as shown in Listing 3-63.
Listing 3-63. Defining a listener method inside a managed bean
<a4j:commandButton value="Update (a4j:actionListener)" render="out">

   <a4j:actionListener listener="#{actionListenerBean.listener}"/>

</a4j:commandButton>
Inside a managed bean, the listener would be defined like Listing 3-64.
Listing 3-64. Defining the listener inside the managed bean
public void listener (ActionEvent event){

  FacesContext.getCurrentInstance()

     .addMessage(null, new FacesMessage("a4j:actionListener - listener

        invoked at "+new Date()));

}
Defining the listener inside the managed bean would give you access to other bean properties and methods.
![]() Tip Using the
Tip Using the <a4j:actionListener> is a good way to add multiple listeners to a component.
As you probably know, there are two ways to define an action listener with a JSF standard <f:actionListener> tag. Both are a little more complicated than using the <a4j:actionListener> we just showed. The first one is using binding, as shown in Listing 3-65.
Listing 3-65. Define an action listener using binding
<a4j:commandButton value="Update (binding)" render="out">

   <f:actionListener binding="#{actionListenerBean.anotherListener}"/>

</a4j:commandButton>
Inside a managed bean, you need to define an inner anonymous class for this listener, as shown in Listing 3-66. In this case, you also get access to bean properties and methods from within the anonymous inner class.
Listing 3-66. Define an inner anonymous class for this listener
public ActionListener getAnotherListener () {

   return new ActionListener (){

      public void processAction (ActionEvent event){

         FacesContext.getCurrentInstance()

            .addMessage(null, new FacesMessage("binding - listener invoked at

               "+new Date()));

         }

      };

}
The last option, and probably the least popular, is to implement in the interface. We will show it to you so that you can compare all three methods. Listing 3-67 shows the interface. Note that the class is not registered as a managed bean.
Listing 3-67. Shows the interface
public class YetAnotherListener  implements javax.faces.event.ActionListener{

   public void processAction(ActionEvent event) throws
      AbortProcessingException {

         FacesContext.getCurrentInstance()

            .addMessage(null, new FacesMessage("Interface - listener invoked
                at "+new Date()));

      }

}
Using this on a page is shown in Listing 3-68. Notice that we use the type attribute, which takes the full class name as a string, not a value expression. Using this approach you don't have access to properties from this page.
Listing 3-68. Use the type attribute which takes the full class name as a string
<a4j:commandButton value="Update (Interface)" render="out">

   <f:actionListener

      type="org.richfaces.book.actionlistener.YetAnotherListener"/>

</a4j:commandButton>
Now that you have seen all three approaches, using <a4j:actionListener> appears to be the most straightforward. You simply define a listener inside a managed bean and reference it via a standard method-binding expression.
![]() Tip The
Tip The <a4j:actionListener> tag supports all <f:actionListener> tag attributes and features.
Summary
This chapter covered some of the most important upgrades that RichFaces adds on top of standard JSF. In this chapter we showed you additional RichFaces components for sending an Ajax request, such as <a4j:commandButton>, <a4j:commandLink>, <a4j:poll>, and <a4j:jsFunction>. We then covered advanced rendering options such as using the <a4j:outputPanel> component and the limitRender attribute.
When deciding what part of the JSF view to execute, RichFaces adds another advanced option by providing the <a4j:region> component. RichFaces greatly upgrades the standard JSF queue with advanced features and flexible customization options. As we continue the RichFaces journey in the next chapter, we are going to introduce you to rich components or the rich:* tag library.