
Chapter 4
Connect to the Network
We live in a connected world. Wireless Internet (Wi-Fi) access has become the rule, not the exception—and chances are you’re already using Wi-Fi at your home or office. You can use it to connect your iPhone to the Internet. And, since your iPhone also has a 3G cellular radio, you can also connect to the Internet anywhere you have cellular data coverage—a much wider area than Wi-Fi networks.
In this chapter, we’ll talk about the differences between the two types of connections for your iPhone: Wi-Fi (wireless local area network) and 3G (cellular service—the wide area data network used by your mobile phone). We’ll show you all the ways to get connected or disconnected from these two types of networks. For example, there will be times you will want to disable or turn off your 3G connection and only use Wi-Fi to save money in data connection charges.
We will also show you how to get ready for traveling internationally with your iPhone—what you need to do before, during, and after your trip so you don’t get surprised with a very large phone bill when you return home.
We will also show you how to use Internet Tethering, the ability to make your iPhone become an Internet hub for your laptop, whether it’s a PC or Mac. This is a great feature to use when you don’t have any other way to connect your laptop to the Internet.
Finally, if you work at an organization with a VPN (Virtual Private Network), we will show you how to get connected to that network.
What Can I Do When I’m Connected to a Wi-Fi or 3G Network?
Here are some of the things you can do when connected to a Wi-Fi or 3G network:
- Access and download apps (programs) from the App Store.
- Access and download music, videos, podcasts, and more from the iTunes app on your iPhone.
- Browse the web using Safari.
- Send and receive email messages.
- Use social networking sites that require an Internet connection like Facebook, Twitter, and so on.
- Play games that use a live Internet connection.
- Do anything else that requires an Internet connection.
Wi-Fi Connections
Every iPhone comes with Wi-Fi capability built in, so let’s take a look at getting connected to the Wi-Fi network. Things to consider about Wi-Fi connections include the following:
- There is no additional cost for network access and data downloads (if you are using your iPhone in your home, office, or a free Wi-Fi hotspot).
- Wi-Fi tends to be faster than a cellular data 3G connection.
- More and more places, including some airplanes, provide Wi-Fi access, but you may have to pay a one-time or monthly service fee.
NOTE: iPhone has support for the faster, longer range 802.11n standard. However, it only supports 802.11n on the more crowded 2.4 MHz band, not the less crowded 5 MHz band. If you want to use iPhone with your 802.11n Wi-Fi router, make sure it’s either a dual-band router or set the router to 2.4 MHz.
Connecting to a Wi-Fi Network
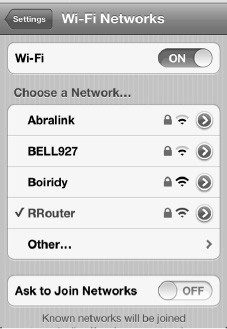
To set up your Wi-Fi connection, follow these steps:
- Tap the Settings icon.
- Tap Wi-Fi near the top.
- Make sure the Wi-Fi switch is set to ON. If it is currently OFF, then tap it to turn it ON.
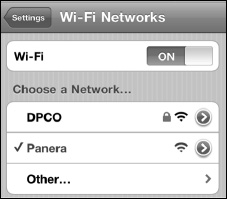
- Once Wi-Fi is ON, the iPhone will automatically start looking for wireless networks.
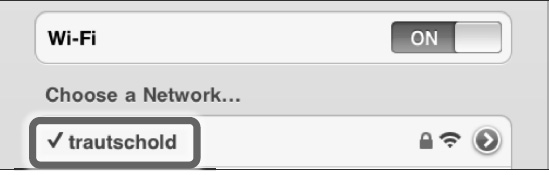
- The list of accessible networks is shown below the Choose a Network... option. This screenshot shows that we have one network available.
- To connect to any network listed, just touch the network name. If the network is unsecure (does not have a Lock icon), you will be connected automatically.
Connecting at a Public Wi-Fi Hotspot with Web Login
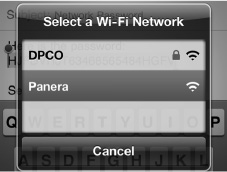
In some locations where they offer free Wi-Fi networks, such as coffee shops, hotels, or restaurants; you will see a pop-up window appear as soon as your iPhone comes into contact with the network. In these cases, simply tap the network name. You may be brought to a Safari browser screen to complete your login to the network:
- If you see a pop-up window similar to the one shown, tap the network name you wish to join. In the case to the right, we tap the Panera network.
- In some cases, you may see a Safari window pop up, which can be quite confusing because it is so small on your iPhone’s screen. You need to use the double-tap or pinch-open gesture (see the Quick Start Guide for help) to zoom in on the Web page. You are looking for a button that says Login, Agree, or something similar. Tap that button to complete the connection.
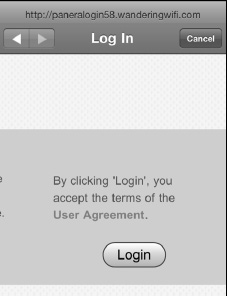
NOTE: Some places, like coffee shops, use a web-based login instead of a username/password screen. In those cases, when you click the network (or try to use Safari), your iPhone will open a browser screen, and you’ll see the web page along with your login options.
Secure Wi-Fi Networks—Entering a Password
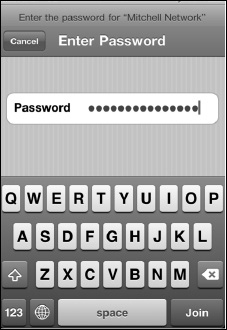
Some Wi-Fi networks require a password to connect. This is set when the network administrator creates the wireless network. You will have to know the exact password, including whether it is case-sensitive.
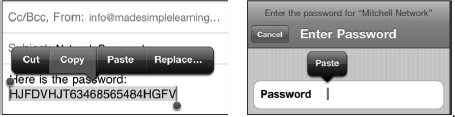
If the network does require a password, then you will be taken to the Enter Password screen. Type the password exactly as given to you and press the Enter key on the on-screen keyboard (which is now labeled Join).
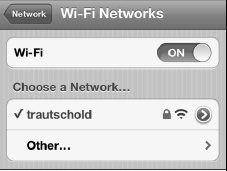
On the Network screen, you’ll see a Checkmark icon showing that you are connected to the network.
TIP: You can paste into the password dialog; so for longer, random passwords, you can transfer them to your iPhone (in an email message) and just copy and paste them. Just remember to delete the email immediately afterwards, so you can keep things secure. Tap and hold the password in the mail message, select it, and then tap Copy. In the Wi-Fi network Password field, tap and then select Paste.
 .
.
Switching to a Different Wi-Fi Network
At times you may want to change your active Wi-Fi network. This might occur if you are in a hotel, apartment, or other place where the network selected by the iPhone is not the strongest network, or you want to use a secure network instead of an unsecure one.
To switch from the currently selected Wi-Fi network, tap the Settings icon, touch Wi-Fi, and then touch the name of the Wi-Fi network you want to join. If that network requires a password, you’ll need to enter it to join.
Once you type the correct password (or if you touched an open network), your iPhone will join that network.
Verifying Your Wi-Fi Connection
It is easy to see if you are connected to a network (and which one) by looking next to the Wi-Fi setting in your main Settings screen. Follow these steps to check your Wi-Fi connection status:
- Tap your Settings icon.
- Look next to the Wi-Fi option at the top:
- If you see Not Connected, you do not have an active Wi-Fi connection.
- If you see some other name, such as Panera, then you are connected to that Wi-Fi network.
Advanced Wi-Fi Options (Hidden or Undiscoverable Networks)
Sometimes you may not be able to see the network you want to join because the name has been hidden (the SSID is not being broadcast) by the network administrator. Next, you will learn how to join such networks on your iPhone. Once you have joined such a network, you will join that network automatically the next time you come into contact with it—with no prompt from your iPhone. You can also tell your iPhone to ask every time it joins a network; we will show you how to do that, as well. Sometimes you may want to erase or forget a network. For example, perhaps you were at a one-time convention and want to get rid of the associated network—you’ll learn how to do that, too.
Why Can’t I See the Wi-Fi Network I Want to Join?
Sometimes, for security reasons, people don’t make their networks discoverable (they hide the network name, called the SSID), and you have to manually enter the name and security options to connect to it.
As you can see, your list of available networks includes Other.
- Tap the Other button, and you can manually enter the name of a network you would like to join.
- Type in the Wi-Fi network Name.
- Tap the Security tab.

- Choose which type of security is being used on that network. If you are unsure, you’ll need to find out from the network administrator.
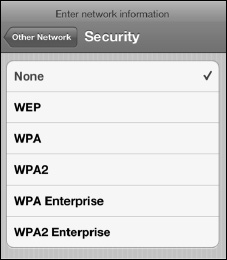
When you have the information you need, enter it along with the proper password, and this new network will be saved to your network list for future access.
Reconnecting to Previously Joined Wi-Fi Networks
The nice thing about the iPhone is that, when you return to an area with a Wi-Fi network you previously joined (whether it was an open or a secure, password-protected, network), your iPhone will automatically join the network again without asking you first. However, you can turn off this automatic-joining feature, as described in the next section.
The Ask to Join Networks Main Switch
There is a main Ask to Join Networks switch, which is set to ON by default. Known networks are joined automatically, but this only takes effect if no known networks are available. With this switch set to ON, you will be asked to join visible Wi-Fi networks. If networks are available that are not known to you, you will be asked before being connected.
If the switch is set to OFF, you will have to manually join unknown networks.
Why might you want to turn off this feature?
Doing so could be a good security measure if, for example, you don’t want your kids to be able to join a wireless network on the iPhone without your knowledge.
It can also be annoying if your iPhone is continuously popping up the Join Network connector screen in areas where you don’t want to join Wi-Fi, such as when traveling through a place with many hotspots.

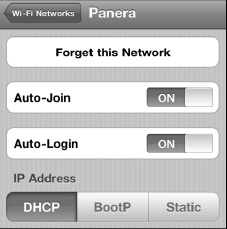
Ask to Join and Ask to Login Switch on Each Network
Sometimes, you may find that a particular Wi-Fi network has additional switches that override the main Ask to Join Networks switch. Tap the little blue Arrow icon ![]() next to the network name to see details about this Wi-Fi network. Auto-Join and Auto-Login are set to ON by default.
next to the network name to see details about this Wi-Fi network. Auto-Join and Auto-Login are set to ON by default.
To disable Auto-Join or Auto-Login, tap each switch to set it to OFF.
Forget (or Erase) a Network
If you find that you no longer want to connect to a network on your list, you can Forget it—i.e., take it off your list of networks. Follow these steps to do so:
- Tap the Settings icon.
- Tap Wi-Fi to see your list of networks.
- Tap the small blue Arrow
 next to the network you want to forget in order to see the screen shown here.
 - Tap Forget this Network at the top of the screen.
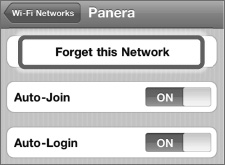
- You will be prompted with a warning. Just touch Forget and the network will no longer show up on your list.

Cellular Data Connection
Your iPhone can also connect to the cellular data network—the same network you connect to with other mobile phones. Here are things to consider about cellular data connections:
- They provide wider availability than a Wi-Fi connection—you can connect to 3G in a car or away from a city, whereas Wi-Fi is not typically available in these locations.
- There are extra monthly service fees for access to the cellular data network.
NOTE: Check with your local wireless carrier for iPhone data plan pricing in your country.
Select and Monitor Your Cellular Data Usage
When you purchased your iPhone, you had to select a cellular data plan from your wireless carrier. For the iPhone in the US, you can currently choose between AT&T, Verizon, and Sprint. If you selected one plan and now wish to try another plan, contact your carrier—you may be allowed to switch data plans.
TIP: Saving Money on Data Charges
You might be able to save yourself some money with cellular data plan charges by doing the following:
- Always use Wi-Fi when possible.
- Start with a lower cost cellular data plan (e.g., US $15 for 200MB on AT&T – as of publishing time).
- Monitor your cellular data usage throughout the month to make sure you are not going to exceed the lower cost data plan.
You may find that you can live with the lower cost plan if you use Wi-Fi for most of your data needs.
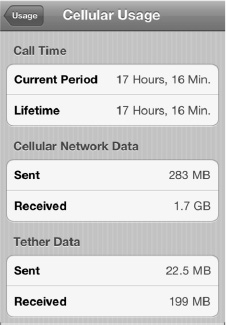
Follow these steps to check your current cellular data usage:
- Tap the Settings icon.
- Tap General.
- Tap Usage.
- Scroll to the bottom and tap Cellular Usage.
- Your total data usage will be the sum of the Sent and Received valuesIf you want to clear out the statistics, tap the Reset Statistics button at the bottom of the screen.
NOTE: The iPhone will notify you when you have 20%, 10%, and 0% left on your monthly data plan. It will also give you the option of renewing that plan or upgrading to a higher data plan, if available.
International Travel: Things to Do Before You Go
Depending on which country you are visiting and your current iPhone voice and data plan, you may be well prepared for international travel. However, it is quite likely that your basic iPhone data and phone plans will either not work or cause you to spend a lot more money on data and voice roaming charges.
We always recommend that you call your phone service provider well in advance of a trip to see whether there is an international feature you can turn on for your iPhone as you travel.
Avoiding a Shockingly Large Bill
One thing you want to avoid when traveling is returning home to an unusually high voice or data roaming charge phone bill. For example, we have heard of people who returned home after a trip abroad to find a phone bill totaling $1,000 or more in a single month’s data and voice roaming charges. In the sections that follow, we will show you how to take steps before, during, and after your trip to help avoid surprise charges.
These simple steps can help you ensure that your iPhone will successfully and economically connect to the local country’s network—no matter where you might be in the world.
Step 1: Call Your Phone Company
You should contact the phone company that supplies your iPhone before you leave home. When you call, you should check the following things:
- Learn about any voice and data roaming charges you might incur when traveling. Be specific about each country you plan to visit.
- Check on any temporary international rate plans that you might be able to activate before you leave. Sometimes, these special plans will cost an additional US $10 or $20 up front, but save you hundreds in additional charges.
- If you use email, SMS Text, MMS or picture messaging, web browsing, and any other data services, then you will also want to specifically ask about whether any of these services are charged separately when traveling abroad. Usually, text and picture messaging are additional charges.
You might be able to find some information on your phone company’s web site, but usually you need to call them.
Step 2: Check If You Can Use an International SIM Card
In some cases, your iPhone wireless company won’t offer special deals on international data roaming plans—or its rates will be unreasonably high. In these cases, you may want to ask your phone company to unlock your iPhone, so you can insert a SIM card purchased in the country you’re visiting.
NOTE: Apple sells an unlocked, SIM-free iPhone in many countries, including the US, Canada, and the UK. If you are a frequent traveler, an officially unlocked iPhone might be something to consider.
Inserting a local SIM card will eliminate or greatly reduce data and voice roaming charges. However, you should carefully check the cost of placing and receiving international calls on that SIM card.
Using an international SIM card might save you hundreds of dollars, but it’s best to do some web research or try to talk to someone who has recently traveled to the same country for advice before settling on that approach.
TIP: If you are going to a country without a good rate plan and your carrier will not unlock your iPhone, you might want to consider renting or purchasing a local cell phone. You may be able to rent a phone for about US $30 / week with much lower voice calling rates. Many cell phone rental companies exist, such as Travel Cell, Mobal, and Cellular Abroad. (Do a web search for “International Cell Phone Rental” to find more information.)
You may also want to do a web search for traveling to countries X, Y, and Z with your iPhone.
TIP: Put a paperclip in your luggage—if you lose the SIM removal tool that came with your unlocked iPhone, you will need it to remove and replace the SIM card in your iPhone.
Step 3: Do Any Data Intensive Stuff Prior to Leaving
You should do all your data-intensive activities before you leave your home country, if possible. If you have a lot of apps that need updating, do that before you leave. Also, look for and add any apps that you might need before your trip. You should also download any large files, such as movies, videos, or music before you leave.
Flying on an Airplane: Airplane Mode
Often when you are flying on an airplane, the flight crew will ask you to turn off all portable electronic devices for takeoff and landing. Then, when you get to a certain altitude, the crew will say that “all approved electronic devices” can be turned back on.
If you need to turn off your iPhone completely, press and hold the Power button on the top-right edge, and then Slide to Power Off with your finger.
In order to enable Airplane Mode, follow these steps:
- Tap the Settings icon.
- Set the switch next to Airplane Mode in the top of the left column to ON.
- Notice that the Wi-Fi is automatically turned OFF and that your phone will not work.
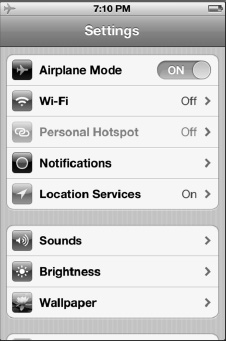
TIP: Some airlines have in-flight Wi-Fi networks. On those flights, you may want to turn your Wi-Fi back ON at the appropriate time.
You can turn your Wi-Fi connection OFF or ON by following these steps:
- Tap the Settings icon.
- Tap Wi-Fi near the top of the screen.
- To enable the Wi-Fi connections, set the switch next to Wi-Fi in the top of the page to ON.
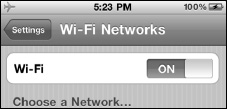
- To disable Wi-Fi, set the same switch to OFF.
- Select the Wi-Fi network and follow the steps given by the flight attendant to get connected.
International Travel: When You Arrive
Once you’ve completed the steps described so far to prepare for your trip, you will need to address some additional issues when you get to your destination. The next sections explain the things you need to keep in mind after you arrive at your destination.
Step 1: Make Sure the Time Zone Is Correct
When you arrive, you will need to make sure your iPhone is displaying the correct local time. Usually, your iPhone will auto-update your time zone when you arrive at a new destination. If it doesn’t, you can manually adjust the time zone (see the “Setting Your Date and Time” section in Chapter 1: “Getting Started”).
Step 2: Buy and Insert Your International SIM Card
NOTE: This step will only work if the carrier in the country you’re visiting offers an iPhone, and your iPhone has been unlocked. Currently, the US carrier AT&T will not unlock iPhone devices. Your fallback plan, especially if you need to make a lot of local in-country calls, is to rent or buy an inexpensive pre-paid mobile phone and reserve your iPhone use for Wi-Fi connections only.
If you have determined that you can use an international SIM card, then you should purchase and insert it when you arrive. We show you how to remove the SIM card tray in Chapter 1. You need to use Apple’s SIM removal tool or a paperclip to remove this card.
CAUTION: The iPhone uses a MicroSIM, where as many other phones use a MiniSIM. This means you’ll most likely need to find an international carrier that also has the iPhone available on their network.
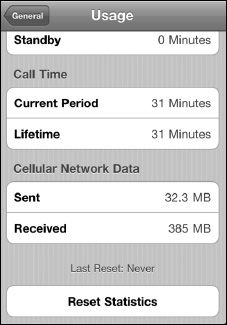
Step 3: Reset Your Data Usage When You Land
As soon as you land, you should reset your data usage on your iPhone. This will allow you to keep close track of the amount of wireless data you are using overseas. For example, if you purchased a 20 MB plan, you want to make sure you don’t go over that amount. A brief test using Maps for about 1 minute in the car resulted in almost 1 MB of data usage. So be careful and try not to use extremely data-intensive apps such as Maps while roaming.
We explained exactly how to reset your usage earlier in this chapter’s“ Select and Monitor Your Cellular Data Usage” section.
TIP: Once you reset your usage, you will want to return to this screen from time to time to see your current usage. You have to add the Sent and Received values together to get your total usage. If your data usage was 417 MB total—that would cost $8,340 at the $20/MB rate in effect without an international data plan!
Step 4: Turn Off Data Roaming If It’s Too Expensive
If you were unable to find an international SIM card—or if you were unable to find the cost of data roaming from your local phone company—then you might want to turn off the data roaming altogether.
This won’t stop you from using Wi-Fi; however, it will make sure you don’t get any nasty surprises from checking email or accidentally launching a data hungry app while you’re away.
NOTE: Data Roaming is usually set to OFF by default, but it always makes sense to double-check—just in case—before you leave on a trip.
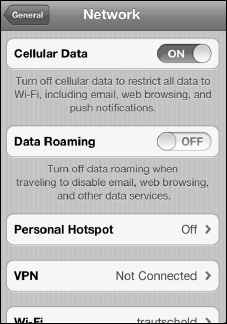
Follow these steps to set Data Roaming to OFF:
- Tap the Settings icon.
- Tap General.
- Tap Network.
- Set the switch next to Data Roaming to OFF.
Setting the Data Roaming value to OFF should help you avoid any potentially exorbitant data roaming charges. (You still need to worry about voice roaming charges, but at least you can control those by watching how much you talk on your phone.)
The nice part about setting the Cellular Data to ON and Data Roaming to OFF is that you can still enjoy all your data services until the time you leave your home country and immediately when you return—without making any other changes. Of course, you can also use your Wi-Fi network connection any time.
Step 5: Use Wi-Fi When Possible
One good way to save money on cellular data plans is to use local Wi-Fi networks whenever possible, especially when you are going to browse the Web or download large amounts of email or large apps.
TIP: You may be able to find free Wi-Fi networks at Internet cafés, regular coffee shops, public libraries, some hotel lobbies, and Apple retail stores.
International Travel: Returning Home
As you did when you arrived at your travel destination, you will need to make a few changes to your iPhone’s settings once you arrive back home before your device will work as expected.
Step 1: Make Sure the Time Zone Is Correct
When you return to your home country, you will need to verify your iPhone is displaying the correct local time. Usually, your iPhone will auto-update your time zone when you arrive back home. However, if it doesn’t, you can manually adjust the time zone (see the “Setting Your Date and Time” section in Chapter 1: “Getting Started”).
Step 2: Turn Off Your Special International Rate Plan
The final step is optional. If you have activated some sort of special international roaming rate plan with your iPhone wireless company, and you do not need it anymore, then contact the company to turn it off to save yourself some money.
Using all the steps we describe before, during, and after your trip should help you be able to use your iPhone successfully and economically as you travel internationally.
Personal Hotspot
One of the nice features on your iPhone is that you can use it to connect your laptop—PC or Mac—to the Internet. This feature is called Personal Hotspot, and it’s very useful if you happen to be traveling away from a Wi-Fi network, but are still within wireless cellular data coverage with your iPhone. This greatly expands the places that you can use your laptop to connect to the Internet.
Personal Hotspot vs. Tethering
Connecting your laptop or other device to the Internet over your iPhone’s data plan used to be called tethering, and it only worked via Bluetooth or by plugging in the USB Dock cable.
Personal Hotspot is similar to tethering; but instead of using Bluetooth or USB, it turns your iPhone into a small, portable Wi-Fi router that can connect multiple devices to the Internet. For example, you might connect your laptop, your friend’s laptop, and your iPad. (The exact number of devices that can connect over Personal Hotspot will depend on your carrier, but it’s typically four or five.)
TIP: Old-style tethering over Bluetooth and the USB Dock cable are still available options if, for some reason, you don’t want to use the Personal Hotspot feature.
Step 1: Contact Your Phone Company
Internet tethering may require a separate plan to be purchased and activated from your phone company. Call your phone company or check on its web site to turn on the Mobile Hotspot or Tethering plan.
TIP: You may be able to save yourself some money by turning off the Personal Hotspot or Tethering plan when you no longer need it. Check with your phone company to find out if there are any penalties or hidden charges for turning off the Tethering plan at a later date.
Step 2: Enable Personal Hotspot on Your iPhone
After you have purchased or activated the Personal Hotspot or Mobile Hotspot from your phone company, you are ready to set it up on your iPhone:
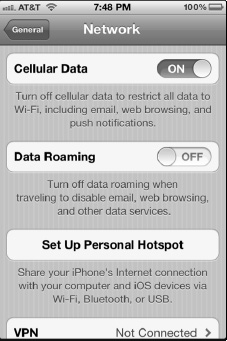
- Tap the Settings icon.
- Tap General.
- Tap Network.
- Scroll down and tap Set Up Personal Hotspot. (If you have already set this up, or if it was set up for you, then you will see Personal Hotspot instead.)
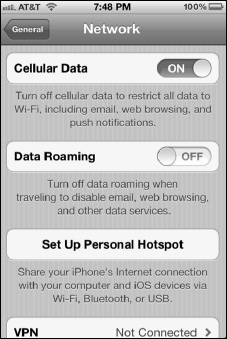
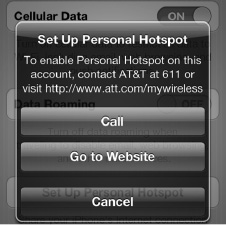
- If you have not yet set up the plan—or the plan you purchased has not yet been activated on your iPhone—you will see a pop-up message similar to this one. If you did purchase the plan, then you may need to wait a little while for the plan to be activated.
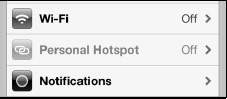
- If your plan has been activated, you should see the Personal Hotspot option right on the main Settings screen. Tap it.
- Tap the switch next to Personal Hotspot to set it to ON.
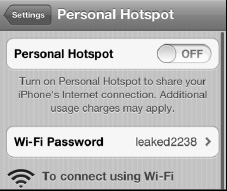
- Your iPhone will automatically generate a Wi-Fi Password for you. If you’re okay with this password, skip ahead to the next section.
- If you want to change the password, tap Wi-Fi Password.
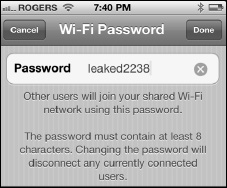
- Enter your new Password. Make sure it contains at least eight characters. A mixture of numbers, uppercase and lowercase letters, and punctuation is best.
Step 3: Connect to Your iPhone Personal Hotspot
Your iPhone is now a small, mobile Wi-Fi router; and you can connect your Mac or Windows PC, your iPad, or any other Wi-Fi enabled device to your iPhone exactly as you connect to your home, business, or school Wi-Fi network. Follow these steps to do so:
- Check for available Wi-Fi networks on your device.
- Click the name of your iPhone.
- Enter the Wi-Fi Password.
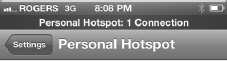
If everything works properly, you’ll see a blue bar appear on the top of your iPhone, along with the number of devices connected.
Step 4: Set Up Networking on Your Computer
After you have connected your iPhone to your computer, your Windows or Mac computer should recognize your iPhone as a new Internet connection and help you set it up automatically. If your computer does not recognize the iPhone immediately, then go into your Network settings on your computer and look for the iPhone as an available connection type.
VPN: Virtual Private Network
Your organization may have what is called a VPN, or Virtual Private Network. A VPN allows you to securely connect your iPhone, laptop, or other device to the corporate network.
Getting Connected
In order to get connected, you need to determine the type of VPN and specific login instructions from your organization’s help desk or network administrator. Then, you will type these login details into the VPN area in the Settings app on your iPhone.
TIP: You can probably save yourself a call to the help desk and skip Step 1 if you have already set up your computer to connect to the VPN. This is because your iPhone will most likely use the same VPN login credentials as your computer.
Also, some carriers may require a business account in order to use a VPN over their 3G network. If all your settings look correct and the VPN is still not working, check with your carrier.
Step 1: Contact Your Organization’s Help Desk
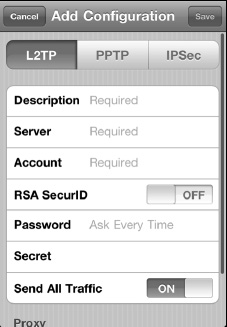
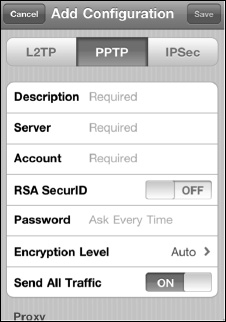
You need to ask your help desk or VPN administrator for the details about how to log into the VPN. Your iPhone can currently connect with the following types of VPNs: L2TP, PPTP, and IPSec (Cisco). You also need to know if your VPN uses a Proxy and whether the configuration is manual or automatic.
Step 2: Set Up the VPN Connection on Your iPhone
Armed with the login instructions and type of VPN connection, you are ready to connect with your iPhone:
- Tap the Settings icon.
- Tap General.
- Tap Network.
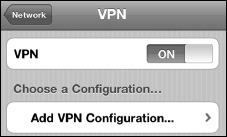
- Scroll down to the bottom of the screen and tap VPN.
- On the VPN screen, tap the switch next to the VPN option to set it to ON. You should then be taken to the Add Configuration screen. If not, then tap Add VPN Configuration at the bottom to set up a new VPN connection.
- The Add Configuration screen is where you set up your VPN login details, using the information from your help desk or VPN administrator.
- If your VPN is an L2TP type, then you would use the screen shown here. Scroll to the bottom and enter the Proxy information as required.
- If your VPN is a PPTP type, then you would tap PPTP at the top and use the screen shown here. Scroll to the bottom and enter the Proxy information as required.
- If your VPN is an IPSec (Cisco) type, then you would tap IPSec and use the screen shown here. Scroll to the bottom and enter the Proxy information as required.
- When you are done with your setup, tap the Save button in the upper-right corner.
- If you have trouble logging in, make sure you are in a strong wireless coverage area and verify you have typed all your login credentials correctly. It can be difficult when passwords disappear as you type them. You may want to try re-typing passwords and server information before calling the help desk.

Knowing When You Are Connected to a VPN Network
You will see a small VPN icon ![]() just to the right of your network connection status display. You will know that you are securely connected to the VPN network only when you see this icon.
just to the right of your network connection status display. You will know that you are securely connected to the VPN network only when you see this icon.
Switching VPN Networks
You may have several VPN networks to which you need to connect. You can select between different VPN configurations on your iPhone by following these steps:
- Tap the Settings icon.
- Tap General.
- Tap Network.
- Scroll down to the bottom of the screen and tap VPN.
- On the VPN screen, tap a different VPN configuration to connect to it. Don’t tap the blue Circle icon with the > symbol, unless you want to change the login settings for that network.