
Chapter 9
Using Your Phone
The iPhone is capable of so many cool things that it's easy to forget that it's also a very powerful phone. In this chapter, we will cover the many features you would expect to find on a high-end smartphone. We'll begin with the basics, showing you how to dial by name, save time by using your recent call logs, dial by voice, and use voicemail.

Next, we'll explore the more advanced capabilities of the iPhone's Phone features. For example, we'll show you how to handle multiple callers and set up conference calls. And finally, we'll show you how to create new custom ringtones from your music library and set separate ringtones for individual callers.
Getting Started with the Phone Features
The iPhone initially places the Phone icon on your Bottom Dock. You can move it around or off your dock by using the steps described in Chapter 6: “ Icons and Folders.”

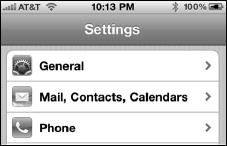
Finding Your Phone Number
Maybe you just received your new iPhone and you don't yet know your phone number. Don't worry; you can find your number in the Settings app. Tap the Settings icon, and then scroll down and tap Phone. Your number is listed at the top.

Using the iPhone Headset
If you are in one of the many states or provinces where you cannot legally hold your iPhone while driving a car, you will want to use the headphones or a Bluetooth car stereo connection to talk hands-free.
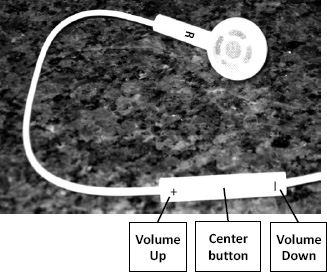
The headset you received with your iPhone works well for phone calls. There is a microphone built into the wire of the headset, along with volume controls and a Center button that allows you to answer or hang up a phone call. When you have your headset on, the phone will ring in the headset. Click the Center button on the headset once to answer, and then click it again to hang up.
Connecting to a Bluetooth Headset or Car Stereo
You can also connect to a Bluetooth headset or Bluetooth car stereo system to place and receive phone calls. We show you the detailed steps in Chapter 5: “AirPlay and Bluetooth.”
Dialing a Number from the Keypad
The simplest way to use your phone is to dial using the keypad. The numbers on the screen are large, so it's easy to dial. Follow these steps to dial a number:
- Tap the Phone icon (see Figure 9–1).
- If you do not see the keypad to dial, tap the Keypad icon at the bottom.
- Now you can simply start dialing by tapping number keys.
- If you make a mistake, press the Backspace key
 .
. - If you need to type a Plus Sign (+) for an international number, press and hold the Zero (0) key.
- When you are done dialing, press the Call key
 .
.
TIP: Dialing Pauses in a Phone Number
Sometimes you have to insert a pause in a phone number, and then enter another number such as an extension or a password. You can dial a pause by pressing and holding the Asterisk key (*) until you see a comma appear next to the phone number. This causes a two-second pause.
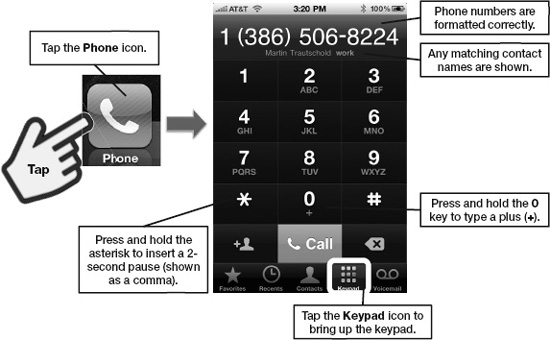
Figure 9–1. Dialing phone numbers with your iPhone keypad
Different Phone Views
We have just used the Keypad soft key. You can see several icons along the bottom of your Phone screen for Favorites, Recents, Contacts, Keypad, and Voicemail as shown in Figure 9–2.
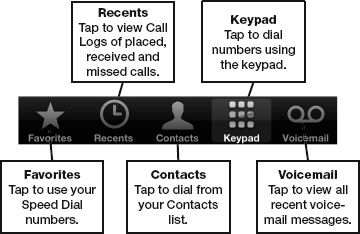
Figure 9–2. Use soft keys to see different Phone screens
Using Favorites (Speed Dials)
Your Favorites are people you callfrequently. You can think of Favorites as your speed dial list.
NOTE: You can also add FaceTime contacts to Favorites.
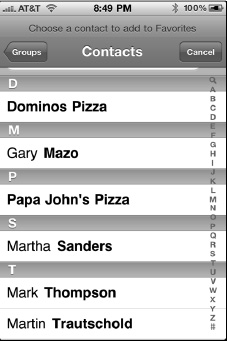
Adding New Favorites
It is easy to add new favorites to your list from your Contacts list. Follow these steps to do so:
TIP: You can also add a Favorite from your Recents call logs. In Recents, tap the blue Arrow icon ![]() and, on the next screen, scroll to the bottom of the Info page and tap Add to Favorites.
and, on the next screen, scroll to the bottom of the Info page and tap Add to Favorites.
- If you are not in the Phone screen, tap the Phone icon to start it up.
- Touch the Favorites icon in the bottom row of soft keys.
- The first time you start your Favorites, you will see a blank screen.

- Tap the Plus button
 in the upper-right corner to add a new entry. Your contact directory will open
 - Swipe up or down to locate a contact. Tap any contact to select it.
TIP: To search for your contacts by name, tap the very top of the screen just under the time. This will bring up the Search window, where you can type a few letters to find people. Remember that you can view different contact groups by tapping the Groups button in the upper-left corner.
- If an entry has more than one phone number, you will need to select one of them as your favorite entry.

- After tapping a number, you will be asked if you want to set the number as a Voice Call or one of your Favorites in FaceTime.
- You are returned to your list of Favorites, where you'll see the new person you just added. Favorites in FaceTime are shown with a little Video icon to the right of the person's name.


- Repeat Steps 4–7 to add more people to your Favorites. Each new entry is listed below the previous ones at the bottom of the list.
Organizing Your Favorites
As with other lists on your iPhone, you can re-order your Favorites list and remove entries:
- View your Favorites list as you did previously.
- Tap the Edit button in the upper-left corner.
- To re-order the entries, touch and drag the right edge with the three gray bars up or down the list.

- To delete an entry, tap the red Circle icon to the left of the entry to make it turn vertical.
- Tap the Delete button.
- When you are done re-ordering and deleting entries, tap the Done button in the upper-left corner.
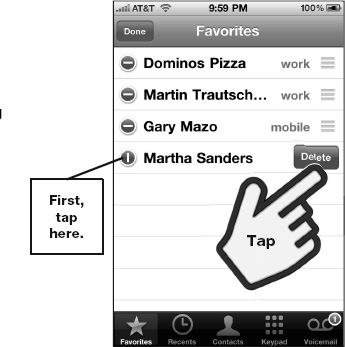
Calling a Favorite
To call any person in your Favorites list , just touch the name of the individual. There is no prompt or confirmation. As soon as you touch his name, the phone will dial his number (see Figure 9–3).

Figure 9–3. Dialing one of your Favorites by tapping him
Using Recents (Call Logs)
Using your Recents is similar to looking at your call log on other smartphones.
When you touch the Recents icon, a list of all your recent calls will be displayed. You can touch the All or Missed button at the top to narrow down the list (see Figure 9–4).

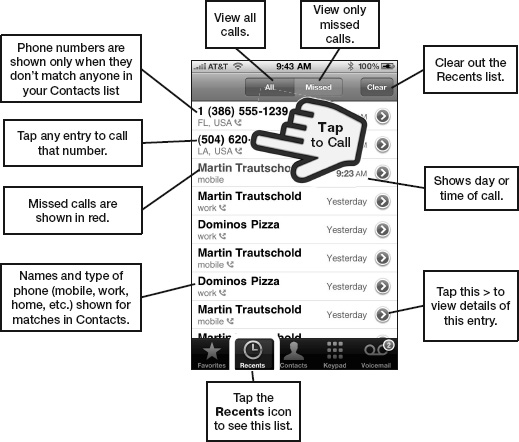
Figure 9–4. Working with your Recents screen
Placing a Call from Recents
It's easy to place a call from your Recents screen; simply touch the desired name or phone number, and your iPhone will immediately initiate a phone call to the individual.
Clearing All Recents
To clear or erase all your recent call log entries, press the Clear button in the upper-right corner.
Details of a Call or Contact Information
Touch the blue Arrow icon ![]() next to the name in the Recents list, and you will see either the information on the phone number or full contact information for that particular contact if he is in your Contacts list. If there are several calls, you will see the history of each call.
next to the name in the Recents list, and you will see either the information on the phone number or full contact information for that particular contact if he is in your Contacts list. If there are several calls, you will see the history of each call.
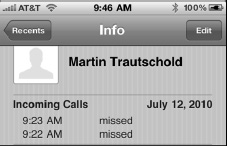
Scroll down to the bottom of the contact's Info screen to see more options. You can send a Text Message, start a FaceTime video call, or Share Contact by sending the contact information via e-mail or MMS.

Tap Add to Favorites to add this person to your Favorites list.
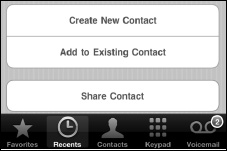
Adding a Phone Number to Contacts from Recents
If the Recents entry is a phone number not yet connected to someone who is in your Contacts list, then you will see two different buttons on the Info screen: Create New Contact and Add to Existing Contact.
Tap Create New Contact to create a new contact from this phone number.
Tap Add to Existing Contact to add this phone number to one of your existing contacts.
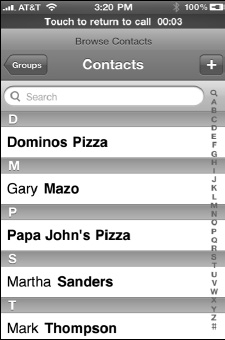
Placing Calls from Contacts
One of the great things about having all your contact information in your phone is that it's very easy to place calls from your Contacts list. Follow these steps to do so:
- If you are not in your Phone screen, tap the Phone icon to start it up (see Figure 9–5).
- Touch the Contacts icon in the bottom row of soft keys.
- Locate a contact to call using one of the following methods:
- Swipe up or down through the list.
- Put your finger on the letters along the right side of the screen and scroll up or down.
- Tap the status bar on top where it says the time to jump to the top. Tap in the Search window and type a few letters of the contact's first, last, or company name to search for him.
- When you find the contact entry you want, tap his name.
- Touch the phone number you wish to call.
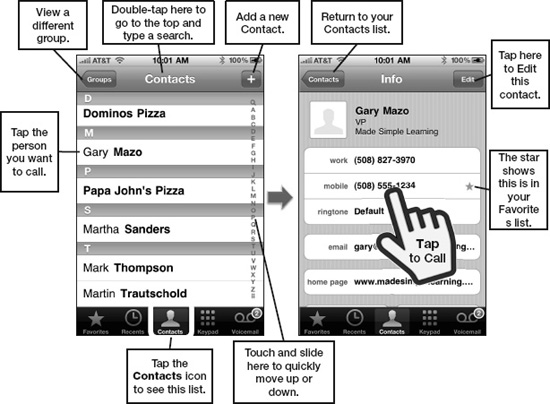
Figure 9–5. Placing calls from your Contacts list
Calling Any Underlined Phone Number
You will notice that the iPhone underlines almost every phone number it recognizes on the screen.
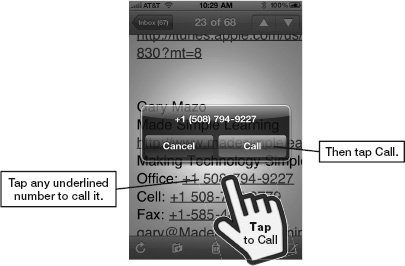
This happens in e-mail messages (e-mail signatures), SMS and iMessages, notes, web sites, and more.
To call to any of these underlined phone numbers, tap it, and then tap the Call button as shown.
TIP: As with underlined phone numbers, your iPhone also recognizes other information on the screen and allows you to act on it by tapping it. This feature is known as a Data Detector. You will see underlined addresses (tap to show the address in Maps), underlined dates such as tomorrow at 9am (tap to schedule a new Calendar event), and shipping numbers such as a FedEx or UPS tracking number (tap to show the tracking information in Safari).
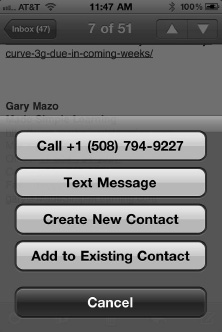
Creating a New Contact from an Underlined Phone Number
If you press and hold any underlined phone number for a few seconds, you will see a list of buttons appear from the bottom of the screen. Tap Create New Contact to create a new contact from the number or tap Add to Existing Contact if you want to add this number to a person already in your Contacts list.
Voice Dialing using Siri
You can use your voice to dial contacts using Siri. You can find all the steps for doing this in the “Siri” section of Chapter 7: “Multitasking and Siri.”
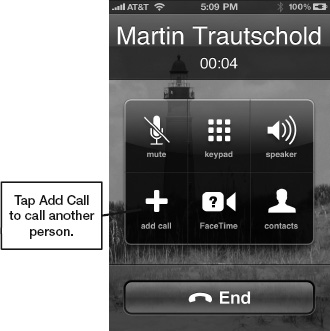
Functions While on a Call
You can do a number of things while your iPhone is dialing and even after you connect to the person you are calling.
All the phone functions available to you are clearly shown with the icons and buttons on the Phone screen.
You can do all of the following:

- Mute yourself.
- Dial additional numbers with the Keypad.
- Turn on your phone's speakerphone by tapping Speaker.
- Create a conference call by tapping Add Call.
- Start a video call with FaceTime(assuming the other caller also has a FaceTime–enabled iPhone, iPod touch, iPad, or Mac).
- View your Contacts list.
NOTE: Why does the screen go blank when you hold the phone to you ear? When you are talking into the iPhone (holding the phone next to your face), the screen senses this and goes blank so you can't accidentally press a button with your face. As soon as you move the iPhone away from your face, you will see the available options.
Using the Keypad
Perhaps the number you're calling requires you to dial an extension. Or maybe you are calling an automated answering service that requires you to input numbers for choices.
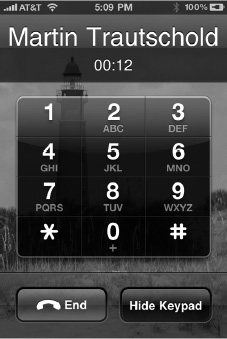

In these situations, just touch the Keypad icon and the keypad will be displayed. You can then input numbers as prompted.
Finally, press the Hide Keypad button at the bottom when you're finished.

Muting the Call
As the number is dialing, you will see the option in the top-left row to mute the call. Just tap the Mute button to mute yourself. Tap it again to turn off mute.

TIP: When you have FaceTime enabled, you don't see the Hold button. Use the Mute icon to put the call on hold.
Using the Speakerphone
If you would prefer to use your iPhone's built-in speakerphone, tap the Speaker icon.
Tap that same icon again to turn off the speakerphone.

Putting a Caller on Hold
It's a simple matter to put a caller on hold. Simply tap the Hold icon to put the caller on hold.

NOTE: You will only see the Hold icon if your FaceTime app is disabled (go to Settings ![]() Phone, and then set FaceTime to OFF). As notedearlier, if you don't see a Hold icon, just tap the Mute icon instead—it will accomplish the same result.
Phone, and then set FaceTime to OFF). As notedearlier, if you don't see a Hold icon, just tap the Mute icon instead—it will accomplish the same result.
It's just as easy to take someone off hold—tap the Hold button again to remove the hold.
NOTE: At the time of writing, Verizon's CDMA network did not officially support placing a call on hold.
Browsing Your Contacts

Let's say you need to browse through your Contacts list while on a call. For example, you might need to look up someone's e-mail, phone number, or address, so you can share it with your caller. Tap the Contacts button and scroll through or search for a contact.
To return to the call, tap the green bar at the top where it says Touch to return to call.
NOTE: It's a good idea to use the speakerphone or a Bluetooth headset while doing this (see Chapter 5: “AirPlay and Bluetooth”); this will enable you to continue talking on the phone as you search for the contact.
FaceTime Video Call

If you are chatting with someone who also has a recent iPhone, iPod touch, iPad, or Mac, and this person is on Wi-Fi;then you can tap the FaceTime icon to start a video call. (You may be able to use FaceTime on a 3G cellular connection in the future; for now, however, this feature requires a Wi-Fi connection.) You will see your picture in the top-left portion of the window and your caller's picture in the main window. You will also notice three buttons at the bottom: Mute, End call, and Switch Camera to swap between your front-facing and rear-facing cameras.

See Chapter 11: “Video Messaging and Skype” for more on using FaceTime.
NOTE: You will only see this FaceTime icon if your FaceTime app is enabled (you can enable it by going to Settings ![]() Phone, and then setting FaceTime to ON).
Phone, and then setting FaceTime to ON).
Setting up and Using Voicemail
Your iPhone comes with an enhanced voicemail system called Visual Voicemail. This feature allows you to quickly see all voicemails and play them in any order. To listen to any message, just tap it. In the image to the right, the number 3 in the red Circle icon shows that there are three unheard voicemail messages.

NOTE: if you live outside the US, your carrier may not have implemented Visual Voicemail service. If not, then you will need to dial in to retrieve your messages by pressing the Voicemail soft key, just as you would with any other mobile phone.
Setting Up Voicemail
If you've never set up voicemail before, setting it up on your new iPhone is straightforward; simply follow these steps:
- Tap the Phone icon.
- Tap the Voicemail icon
 in the bottom row of soft keys.
 - Tap the set Up Now button shown in Figure 9–7.
- Pick a four-digit password and then re-enter the password.
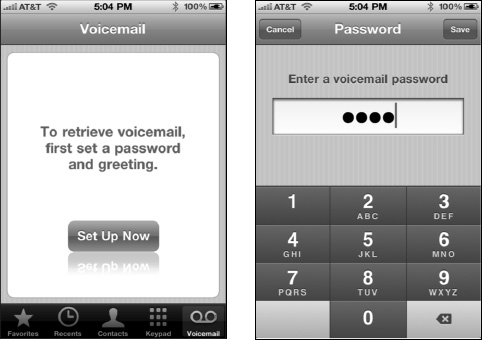
Figure 9–7. setting up your voicemail
- Next, you can choose a Default or Custom greeting. The Default greeting will say your phone number in a computer-like voice; it will also indicate that you are not available.
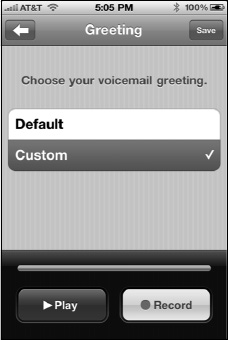
- If you choose a Custom greeting, you will need to record it by tapping the Record button. When done, tap the stop button, which is in the same place as the Record button.
- Once recorded, you can tap the Play button to see if you like your Custom greeting.
TIP: if you hold the iPhone too close to your mouth, your voice may sound a little distorted—be sure to hold the iPhone at a normal
Changing Your Voicemail Password
You may want to change your password. Follow these steps to do so:
- Navigate to the settings icon and tap it.
- Scroll down and tap Phone.
- Scroll down and tap Change Voicemail Password.
- Enter your current password, and then type your new password twice.
Playing Your Voicemail
The beauty of the Visual Voicemail system is that you never have to call in to check your voicemail. All voicemail messages will reside on your phone. You can save them, scroll through them, or delete them.
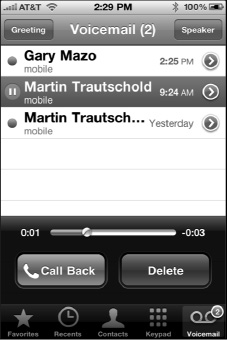
You will know how many unheard voicemail messages you have by the little number in the red Circle icon in the top right of the Voicemail icon.
Unheard items, like unread e-mail in your inbox, are marked with a little blue dot.
The Voicemail icon will show the number of voicemails in your mailbox. Tap the Play button next to the message and the message will play through your handset.
TIP: if you cannot look at the screen, you can still dial in to listen to your voicemail hands-free by pressing and holding the 1 key on your
Listening to Voicemail Through Your Speaker
If you would like to hear your voicemail through the iPhone's speaker (as opposed to listening through the handset), just touch the speaker button in the upper-right corner.
![]()
Adjusting Your Greeting
Tapthe Greeting button to adjust your voicemail greeting. You can listen to your greeting again, record a new Custom greeting, or change the greeting back to Default.
![]()
Calling Back a Person Who Left Voice Mail
If someone leaves you a voicemail message, you can call her back by touching the Call Back button; this will immediately return hercall.

Deleting a Voicemail Message
Your iPhone will store all your voicemails if you want to listen to them at a later date. Sometimes voicemails can get a bit hard to manage if you have too many of them. Highlighting a message and touching the red Delete button will remove a given message from your iPhone (see Figure 9–7).

NOTE: You have the option to save a “deleted” message. Your Voicemail screen will show your deleted messages in their own Deleted tab. If you touch a message in this tab, you can tap the Undelete button to restore it.

Figure 9–7. Working with deleted voicemail items
If you would like to permanently delete all your voicemails, tap Clear All.
Conference Calling
In today's busy world, working with several callers at once has become something that we demand from our phones. Fortunately, conference calling is very intuitive on the iPhone.
NOTE: While the AT&T/GSM iPhone can handle up to five-person conference calls, the technical limitations of Verizon's CDMA network limit Verizon iPhones to only three-person conference calls.
Initiating the First Call
As we showed you the earlier in this chapter, you can make a call to any number in Recents, to a new number, to a contact, to someone in your Favorites list, and so on.
You don't even have to start a call to create a conference call. For example, you can receive a call from the first caller instead of placing one to her. At that point, you can conference in the second person.
Move the iPhone away from your face to see the phone functions available to you. Most of these were covered earlier in this chapter.
Adding a Second Caller
Touch the Add Call button to begin adding a second caller. This will immediately put the first caller on hold.

Touching the Add Call button brings you to your Contacts list. Simply scroll or double-tap the top to search for the contact you want to add to this call.

You can also add a new caller by choosing her from your Favorites or Recents, or just by dialingher phone number after pressing the Keypad soft key on the bottom.
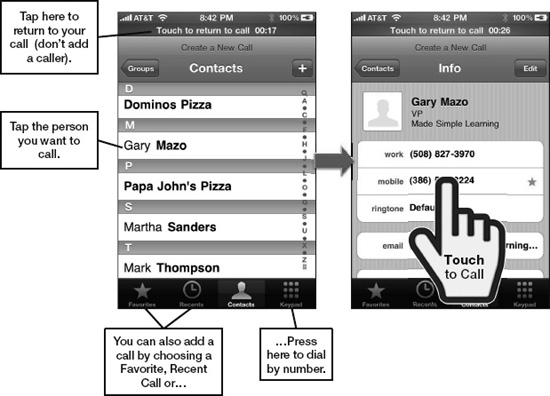
Figure 9–8. Adding a second caller
If the contact has more than one phone entry, tap the one you would like to call and the call will be initiated.
Merging Calls
Once the call to the second caller has been initiated, you will notice that the Add Call button has now been replaced with a Merge Calls button. Tap this button to merge both calls into a three-way conference call (see Figure 9–9).

Figure 9–9. Swapping between callers and merging them into a conference call
The top of the screen will now scroll a list of all the callers on the conference call.
Talking Privately with or Disconnecting from Individuals
In order to speak to one caller individually or privately from a conference call, perform these steps:
- Tap the small black Arrow icon
 next to the name at the top of the Phone screen (see Figure 9–10).
 - Now you will see a list of all callers.Tap the Private button
 next to a person's name to talk privately with that person. Everyone else is put on hold.
 - To hang up from any caller, tap the red Phone icon
 to the left of his name.
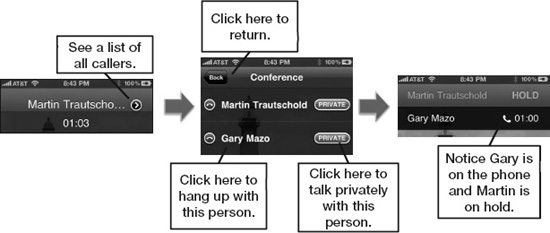
Figure 9–10. Talking privately with individual callers or hanging up on them
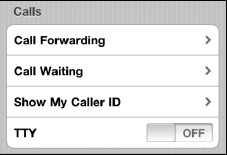
Phone Options and Settings
You can customize many things in your phone by going into the settings app:
- Tap the settings icon.
- Scroll down and tap Phone.
The sections that follow describe all the phone settings found here.
Call Forwarding
There may be times when you need to forward your calls to another number. For example, you may be traveling to the house of a friend who lives out in the boondocks, where there is very poor cell reception. In this case, you could forward calls to that person's land line. Follow these steps to do so:
- In the Phone settings screen, tap Call Forwarding.
- Set the Call Forwarding switch to ON.
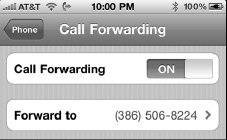
- Tap the Forward to row to enter the forwarding number.
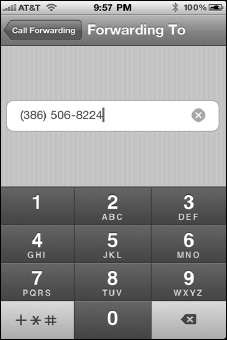
- Once entered, the number will be stored for future reference. All calls will be forwarded from your regular iPhone number to this number until you set Call Forwarding to OFF.
CAUTION: Call forwarding is not always free. Call your phone company to see if you will be charged for enabling call forwarding.
Call Waiting
Another Phone setting is Call Waiting. This option alerts you to the fact that another call is coming in while you are on the phone.

You then have the option to take the new call, hang up on the first call, or set up a conference call, as described previously.
Enabling call waiting is as simple as making sure the Call Waiting switch is set to the ON position, which is the default setting.
Show or Block (Hide) Your Caller ID
There may be certain situations where you would prefer that your phone number not show up on the caller's phone.
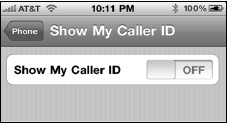
Fortunately, your iPhone gives you the option to block your Caller ID phone number. To do so, set the show My Caller ID switch to OFF.
Setting up Security on Your SIM Card
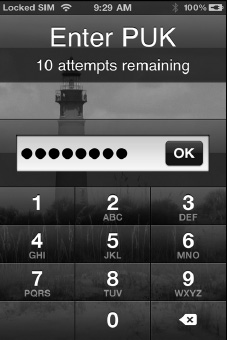
As an added measure of security, you can enable a PIN code to access information stored on your SIM card. If your iPhone is ever lost or stolen, this will prevent anyone from accessing the names and numbers stored on your SIM card.
CAUTION: setting this SIM PIN may lock your phone so that it is unusable until you enter a PUK (personal unlocking key). You can get this eight-digit PUK from your wireless carrier. For AT&T, loginto AT&T's web site, click My Services at the top of the page, and then click My Phone/Device in the middle. Next, select your iPhone and click the Unblock SIM Card link. If you do not have AT&T, then check your carrier's web site or call your carrier's help disk.
Follow these steps to do so:
- Go to the Phone settings menu, as described previously.
- Scroll down and tap sIM PIN.
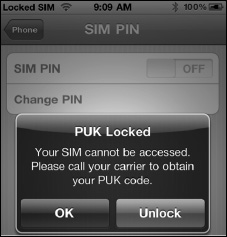
- This will take you to the sIM PIN screen. If you try to set the sIM PIN option to ON here, and you see an error message similar to the one shown to the right, then your iPhone has been locked. You can only unlock it by entering the PUK. See the preceding Caution for more details.
- If you don't see an error message after setting the switch next to sIM PIN to ON, then you can tap Change PIN to enter your new PIN.
NOTE: Verizon's CDMA network doesn't use SIM cases, so the Verizon iPhone doesn't offer SIM PIN locking.
TTY for Deaf People
TTY stands for Text Telephone Device. Such devices let deaf people type messages that are sent over phone lines. Your iPhone can communicate with another phone that is equipped with a TTY device—simply set the TTY switch to ON to do so.
Switching Between Wireless Carriers
In some countries, especially where unlocked iPhones are more popular, you may see a Carriers tab in your settings
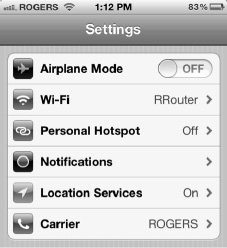
Tap Carrier to see the screen where you can switch between carriers for your iPhone.
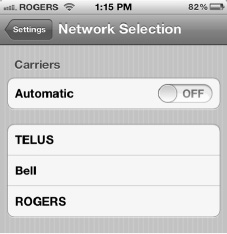
Leave it set to Automatic to have your iPhone select the best network.
If you want to force your iPhone onto a specific network, such as ROGERS, then tap that network name
Carrier Services
Pressing the Carrier Services button will list the name of your wireless carrier or phone company.
For example, if your carrier is AT&T in the US, tap AT&T Services at the bottom of the Phone settings screen to see special numbers related to AT&T. If you use a different carrier, this screen will show the special access numbers for your carrier.
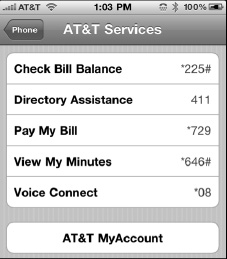
NOTE: Not all carriers support this function;if you don't see these options, visit your carrier's website for account
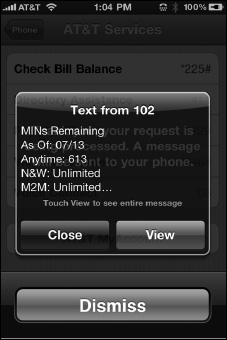
Tap any of the entries on this screen to perform the stated request. For example, if you tap View My Minutes, you'll receive a text message response showing details of your minutes remaining in your current billing cycle.
Tap the View button to see more details.
Ring Tones, Sounds, and Vibration
Your iPhone can use unique sounds or vibrations to alert you to incoming calls, voice mails received, and other events. These can easily be adjusted using the settings app.
The “Adjusting Sounds on your iPhone” section in Chapter 8: “Personalize and Secure” shows you how to change a ringtone, add vibration to both silent and Ring modes, and turn on or off the tone for voicemail messages.
Assigning Unique Ringtones to Contacts
Sometimes, it is both fun and useful to give a unique ringtone to a certain contacts in your address book. This way, you can know who is calling without looking at your phone.
You can use ringtones that are already on your iPhone, or you can acquire new ringtones by doing one of the following:
- Purchase ringtones using the iTunes app on your iPhone.
- Create and purchase ringtones using your music from iTunes on your computer.
- Create free ringtones using your music from iTunes on your computer.
For example, one of the authors (Gary) sets the ring tone for his son Daniel to Elton John's “Daniel.” Later in this chapter, we will show you how to make a ringtone from your iTunes music.
Giving a Contact a Unique Ringtone
You need to edit a person's information in Contacts to change his ringtone. Follow these steps to give a contact a unique ringtone:
- Tap the Contacts icon.
- Tap the contact you wish to change (in this case, Daniel).
- Tap Edit.
- Tap the Ringtone button to see the Ringtones screen.
- Tap any ringtone from the list. In this case, we chose the new custom ringtone, Daniel.
Purchasing a Tone from the iTunes App
In this section, we'll show you how to purchase a ringtone (most are US $1.29). You can then follow these steps to immediately attach it to a contact or set is as your Default Ringtone right from the iTunes app on your iPhone:
- Start up the iTunes app your iPhone.
- If you see the Tones soft key at the bottom, tap it. Otherwise, tap More then Tones. Next, scroll through the ringtones. Or, you can search for a ringtone by tapping the search soft key at the bottom.

- You can also browse ringtones by using the buttons at the top: Featured, Top Tens, and Genres.
- We selected Top Tens and then Alternative to see the image to the right.

- Tap any name or album cover to preview the ringtone. If you like it, tap the price to buy it, and then tap Buy Now.
- Once you select the ringtone to purchase, the iTunes app will prompt you to either set as Default Ringtone (your main phone ringtone) or Assign to a Contact.
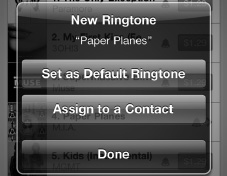
- If you choose Assign to a Contact, your Contacts list will launch. Next, scroll through or search for the contact. You will hear the new ringtone each time that contact calls.
Creating Custom Ringtones
Your iTunes library is filled with all your favorite songs. Wouldn't it be great if you could turn your own songs into ringtones for your iPhone? The good news is that you can turn most of your music into a ringtone. There are two ways to do this: an easy way that costs about US $1 per ringtone and a more challenging way that is free. We will show you both ways.
The Free, But More Challenging Way to Create Ring Tones
Let's begin by examining the free but more difficult approach. This method will work on any music in iTunes that is not protected with DRM (Digital Rights Management) copy protection. Older iTunes purchases might contain DRM. Any music you've loaded into iTunes from a CD or other non-DRM music (including newer non-DRM music from iTunes) will work.
Locating a Song
Follow these steps to highlight and select a song in iTunes to use as a basis for your custom ringtone:
- In the iTunes menu, select File
 Get Info. You can also right-click the song with your mouse and choose Get Info.
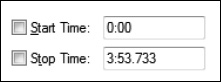
 - Click the Options tab and put a checkmark in the start Time: and stop Time: boxes.

- Click OK to close the Get Info dialog box.
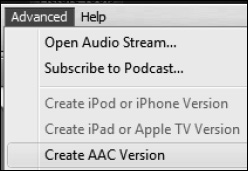
- In iTunes, click the Advanced menu and select Create AAC Version.
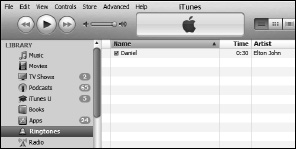
- You should now see a new version of the song that is only a few seconds long appear in your iTunes list. For example, the new version of Daniel is only 30 seconds long.

- Once you have your new 30-second version, make sure you go back into the original song and uncheck the start Time: and stop Time: boxes via the Get Info Options
- Once the new, shorter ringtone ACC version of the song is created, just drag it from iTunes to your desktop or copy and paste it onto the desktop.

- You need to change the extension of the file from
m4atom4r, so it will be recognized as a ringtone. You can do so by clicking the file to highlight its name and changing it; or you can right-click the file, choose Get Info, and then change the extension.
- You will see a warning message that the file may be unusable; just accept the change.
- You must now delete the 30-second version that is still in iTunes.
- Drag the new file with the new
m4rextension back into your iTunes library and drop it there. - If everything went well, you should now see your ringtone listed when you click Ringtones in the left column.
Syncing the Ringtone to Your iPhone
See the “Sync Ringtones” section of Chapter 3: “Sync with iCloud, iTunes and More” to learn how to get the new ringtone onto your iPhone.
Using Your New Custom Ringtone
If you want to tie your ringtone to a particular person in your Contacts list, you will need to edit that contact. Follow the steps in the “Giving a Contact a Unique Ringtone” section in this chapter to do so. If you want to use your new ringtone for your main phone ringtone, follow the steps in the “Sounds” section of Chapter 8: “Personalize and Secure.”