Chapter 1
Getting Started
In this chapter, we will take you on a step-by-step tour of your new iPhone and everything you get in the box. We will also look at the ins and outs of charging it and how to make your battery last longer. In order to get started with your iPhone, you need to connect it to iTunes to get it activated and registered. In our “iPhone Basics” section at the end of this chapter, we will show you the basics of how to maneuver on your iPhone, so you can get up and running quickly.
Getting to Know Your iPhone
In this section, we will show you how to use everything you get in the box with your iPhone. We also give you some iPhone battery and charging tips, talk about how to determine if your iPhone is already activated, and discuss the Slide to Unlock feature.
What Is Included in the Box
The box your iPhone comes in may seem skimpy if you’re new to iPhones. However, it does contain everything you need to get started and enjoy your iPhone—except for a good manual, which is why we wrote this book! Here is what your box contains:
- iPhone: On the very top, as soon as you open it, you will see your new iPhone.
- Paper folder: Under the plastic holder for the iPhone, you will find a paper folder that contains the following:
- Finger Tips: A 4.5″ × 2.5″ small fold-out booklet with 19 panels of basic information about your iPhone.
- iPhone Product Information Guide: A 4.5″ × 2.5″ booklet with font that is way too small to read. This book contains all the legal terms, conditions, warnings, and disclaimers related to your iPhone.
- Apple Logo Stickers: Two of those nice white Apple logos that you sometimes see on car windows. Enjoy!
In the bottom of the box, you will find the items shown in Figure 1–1: a headset, a USB cable, and a wall plug adapter.
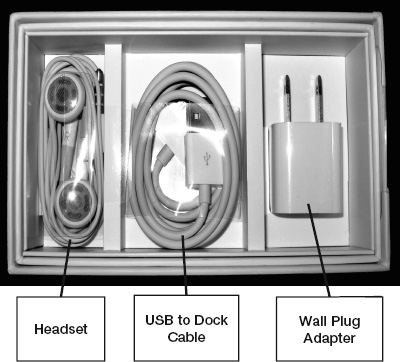
Figure 1–1. The headset, USB cable, and wall plug adapter in the bottom of your phone’s box
iPhone Headset
The headset consists of two white earphones for listening to music, videos, or phone calls, as well as a small controller attached to the wire of the right earphone. Plug this into the hole on the top-left edge of your iPhone. Make sure you insert it all the way—it can be a little tough to press in.
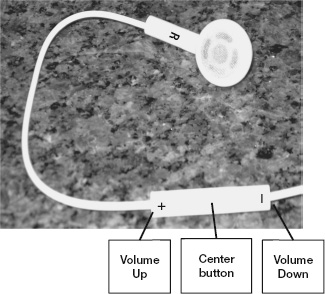
As the image here shows, the controller has Plus (+) and Minus (-) keys, as well as a Center button. You can increase or decrease volume with the (+) and (-) keys and use the Center button to answer or hang up phone calls.
NOTE: You can move between songs with two or three clicks of the Center button. Double-click to go to the next track. Triple-click to go to the previous track.
The included headset also contains a small microphone for phone calls.
USB to Dock Cable
The USB to dock cable connects your iPhone to your computer; it also doubles as your power cable.
Wall Plug Adapter
The wall plug adapter has a USB socket on one end and a plug on the other end that you insert into an electrical socket. Just connect the USB cable to your iPhone and the other end to a wall plug to charge your iPhone from the wall.
Removing or Installing the SIM Card
In order to place or receive phone calls on an AT&T/GSM iPhone (currently any iPhone except the Verizon iPhone), you need to have a SIM card (Subscriber Identity Module card). Every new GSM iPhone should already have a SIM card pre-installed.
NOTE: Like the iPad and iPhone 4, iPhone 4S uses the new MicroSIM standard—not the MiniSIM that you find on most other phones.
There may be times when you want to remove and replace the SIM card. For example, you might want to do this if you are travelling internationally, or if you just received a replacement iPhone and want to use the SIM card from your old one.
Follow these steps to eject and remove your iPhone’s SIM card:
- Insert the paperclip into the hole on the right side of your iPhone.Press the paperclip straight into the hole until the SIM card tray pops out.
- Remove the tray, so you can remove or replace the SIM card.
- When inserting a SIM card, make sure the SIM card is installed with the notch facing the top right of the holder. It should sit flush in the holder with the metal contacts facing the bottom of the holder.
- Slide the SIM card tray back into the iPhone until it clicks into place.
Charging Your iPhone and Battery Life Tips
Your iPhone may already have some battery life, but you might want to charge it completely, so you can enjoy uninterrupted hours of use after you get it set up. This charging time will give you a chance to check out the rest of this chapter, install or update the iTunes app, or check out all the cool iPhone apps available (see Chapter 23: “The Amazing App Store”).
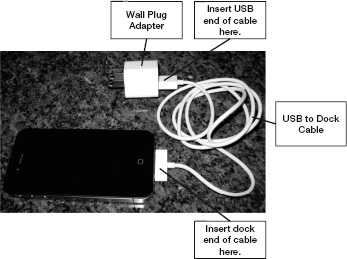
Charging from a Power Outlet
The fastest way to charge your iPhone is to plug it directly into a wall outlet. You use the same USB connection cable you use to connect your iPhone to your computer. As shown here, plug the wide end of the cable into the port at the bottom of your iPhone (next to the Home button) and the end of the USB cable into the wall plug adapter. Finally, plug the adapter into any wall outlet.
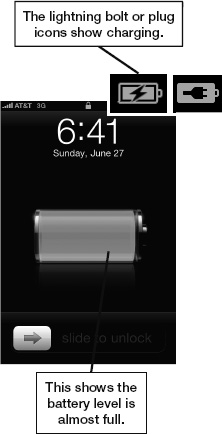
You can tell your iPhone is charging by looking at the screen. You will see a lightning bolt or plug icon inside the battery indicator in the upper-right corner.
The Main Battery icon will show your charge level. The image to the right shows a charging iPhone with an almost full battery.
TIP: Some newer cars have built-in power outlets (just like in your home) that you can use to plug in your iPhone power cord. Some also have a dock option that allows you to control the iPod app from your car radio headset. These outlets are sometimes buried in the middle console behind the front seat.
Charging from Your Computer
You can also charge your iPhone when you plug it into your computer, albeit a little more slowly than when you connect it directly to a wall charger.
TIP: Try using different USB ports on your computer. Some USB ports share a bus and draw less power, while others have their own bus and draw more power.
For optimal charging, you should have your computer plugged into the wall outlet. If your computer is not connected to the wall outlet, your iPhone will charge, but at a slower rate. Keep in mind that, if your laptop computer goes to sleep or you close the screen, your iPhone will stop charging.
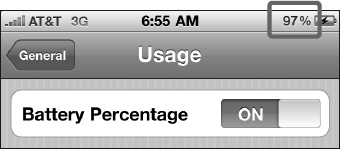
TIP: You can show the actual percentage of battery life remaining. To do this, tap your Settings icon ![]() General
General ![]() Usage. Finally set Battery Percentage to ON.
Usage. Finally set Battery Percentage to ON.
Charging from Other Accessories
Some accessories designed to work with your iPhone will also charge it. The most common of these are iPhone/iPod music docks. These are speaker systems that you plug into your iPhone to listen to music. The only time your iPhone will not charge is when you see the following warning message on your screen: “Charging is not supported with this accessory.” This occurs on older accessories or those not designed specifically for your iPhone.
TIP: A Case and External Battery Combined
Some cases actually have external batteries built into the case. There are several manufacturers available. One provider, mophie (www.mophie.com), has such cases for the iPhone 4 and iPhone 4S models called a juice packair and juice pack plus.
Expected Battery Life
Apple says the iPhone with its bigger battery and advanced technology should last longer than the iPhone 3Gs (see Table 1–1).
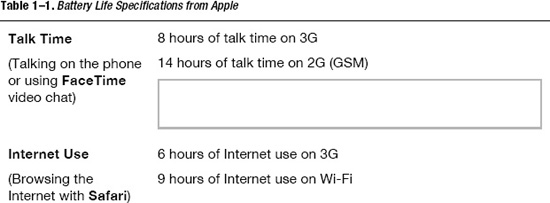

These battery life durations are in ideal conditions with a new, fully charged battery. You will notice that, over time, your actual battery life will diminish.
Battery and Charging Tips
The key question is this: how do you get the most out of your battery life and make sure your iPhone is charged and ready for you when you need it? In this section, we will cover a few tips to help you accomplish this.
Getting More Out of Each Charge
To extend your battery life, try some of the following tips:
- Lower your screen brightness: Tap Settings
 Brightness, and then use the slider bar to lower your brightness to a level less than halfway across that still works for you.
 - Turn off Location Services: If you don’t need your actual location to be transmitted to your apps, you can turn this off. Tap Settings General Location Services, and then set Location Services to OFF. If you go into an app that wants your location, you will be reminded to turn it back on.
- Set a Shorter Auto-Lock: This feature shortens the time your iPhone takes to enter Sleep mode (i.e., turn off the screen) when it’s not being used. Shortening this time can help save your battery life. To do this, tap Settings General Auto-Lock, and then set Auto-Lock to as short a value as possible—you can set it to as short as 1 minute if you like.
- Turn off push email and push notifications.
- Turn off Siri's Rasie to Speak Feature. Tap Settings General Siri and set Raise to Speak to OFF.
You can learn more battery life tips by visiting the Apple web site at www.apple.com/batteries/iphone.html.
Making the Battery Last Longer
The iPhone uses a rechargeable battery that has a limited number of cycles during its useful life; in other words, it will gradually lose its ability to maintain a charge over time. You can extend the life of your iPhone battery by making sure you run it down completely at least once a month. The rechargeable battery will last longer if you do this.
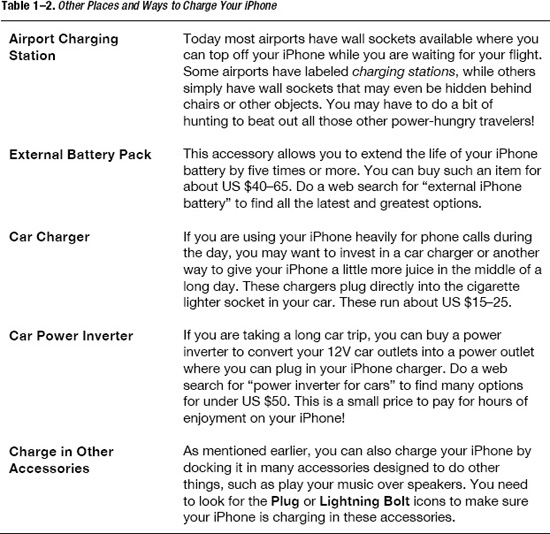
Finding More Places to Charge Your Phone
No matter what you do, you will want to find more places and more ways to charge your iPhone if you really use it a lot. Besides using your power cord or connecting your iPhone to your computer, you can take advantage of the charging tips described in Table 1–2.
Setting up Your iPhone
At this point, you know some of the basics about your iPhone and how to get the most out of your battery. Now you are ready to start enjoying it! Setting up your iPhone is the next step.
Knowing If You Need to Set Up Your iPhone
If you see a Welcome screen similar to the one shown here, you will need to set up your iPhone before you can use it. With iOS 5, you can set up your iPhone in a couple of ways. First, you can do so with over-the-air (OTA) using your Wi-Fi network and iCloud. Or, you can plug your phone into your PC using the USB dock cable and activate it with the iTunes service.
If this is your first iPhone or you want to set it up as a new iPhone, you probably want to use iCloud OTA.
If you are upgrading from an iPhone 4 or previous iPhone model, you probably want to restore from a backup using the iTunes service.

Setting up Your iPhone Over-the-Air Using iCloud
WithiOS 5, Apple has finally cut the iTunes cord. This means you no longer need to connect your iPhone to your PC to activate it or set it up. Instead, you can activate it directly from your iPhone OTA using Apple’s new iCloud service.
NOTE: During the initial set up process, you will be able to connect to any available Wi-Fi network which will be needed to set up your iPhone OTA using iCloud. If your home, work, or school Wi-Fi network isn’t available, and you don’t have a public access point like Starbucks handy, then you will need to activate your iPhone later. (You could choose to set up your iPhone via iTunes on your PC instead; however, you will still need Internet access to connect to Apple’s activation servers.)
Follow these steps to set up your iPhone with iCloud, as shown in the Welcome screen pictured earlier:
- Swipe to set up by touching the Arrow button and pulling it across the screen in the direction indicated.
- Choose the language you want to use with your iPhone. Apple will present you with the most common options based on where you bought your iPhone; however, you can also tap the Down Arrow for more language choices.
- When you’ve chosen your preferred language, tap the blue Next button at the top right of the screen.

- Choose your Country or Region. Again, Apple will provide you with a default choice based on where you bought your iPhone; however, you can tap Show More... to expand the list. Tap the blue Next button to continue.
- Decide if you would like to enable or disable Location Services, and then tap the blue Next button to continue.
NOTE: Location Services use GPS, cell-tower triangulation, and Wi-Fi router mapping to determine the approximate location of your iPhone. This feature is used for turn-by-turn navigation (like TomTom), check-in games (like Foursquare), social networks (like Facebook), geo-tagging (in the Camera app), and utilities (like Find my iPhone). Unless you have a particular need to globally disable all location services, you probably want to turn on the Location Services feature right now. You can selectively disable or enable these services later in the Settings app (e.g., turn off your Camera app’s geo-tagging, but leave on TomTom’s turn-by-turn navigation).
- Choose your Wi-Fi network, enter your network password, and then tap the blue Next button to continue.
- Your iPhone will now connect to Apple for activation. This can take a few seconds or up to a few minutes, depending on how fast your connection is and how busy Apple’s servers are.
- Once activation is complete, you’ll be given the option to set up your phone as a new iPhone, restore it from an iCloud backup, or restore it from iTunes.
Setting up a New iPhone Using iCloud
If this is your first iPhone—or if you simply want a clean, fresh start—choose Set up as a new iPhone.
TIP: Restoring from backups—especially from backups of different devices (e.g., restoring an iPhone from an iPad backup)—can sometimes lead to problems like more frequent app crashes or lower battery life. If you’re experiencing problems after restoring from a previous backup, you might want to try setting your phone up as a new iPhone. You’ll have to redo all your settings and accounts from scratch, and you’ll lose any saved app and game data; however, it’s sometimes your only option if your iPhone is no longer stable enough for everyday use.
To set up your phone as a new iPhone, you’ll either need to sign in with an existing Apple ID or create a new, free Apple ID. Apple IDs can be any of the following:
- iTunes ID: This is the e-mail address and password you use to log into iTunes and buy music, TV shows, movies, App Store apps and games, and iBooks.
- Free Apple ID: This is the e-mail address and password you use to log into Find my iPhone, FaceTime, Game Center, iCloud, or any other recent, free Apple service. This can also be the same ID you use to shop at the online Apple Store.
NOTE: If you’ve been using Apple products and services for a while, it’s not uncommon for one person to have multiple Apple IDs. For example, you might have an iTunes ID and old MobileMe accountand an Apple Store ID. Unfortunately, at the time of writing, Apple doesn’t allow IDs to be combined, so you’ll have to choose which one you want to use with iCloud.
If you have an old MobileMe account, Apple will migrate it to iCloud for you. Visit http://www.me.com/move to begin the process
Otherwise, the authors recommend you use your iTunes ID because it will have all your music, media, app, and games purchases tied to it, and you’ll be able to use iCloud’s re-download feature to easily restore these purchases to your new devices now and in the future.
If you have an Apple ID, log in with it now, accept the terms and conditions, and then skip ahead to the “Configuring iCloud Options” section. If you don’t have an Apple ID, create one now.
Creating a Free Apple ID
If you’ve never used iTunes and don’t have an Apple ID, then you’ll need to create one. This can be done quickly, right on your iPhone:
- Tap Create a new Apple ID.
- Enter your birthday by spinning the Year, Month, and Day rollers to represent the proper date, and then tap the blue Next button.
- Enter your first and last name in the appropriate fields, then tap the blue Next button.
- Choose whether you want to use an existing e-mail address (e.g., a Gmail, Hotmail, Yahoo!, or personal e-mail address) or create a new iCloud e-mail address (
@me.com). If you don’t want to be bothered remembering a new e-mail address, you’ll probably want to use an existing one. If you like keeping your e-mail separate, then you’ll probably want to create a new one. - If you’re creating a new iCloud
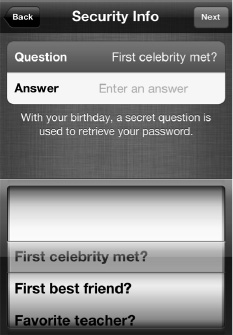
@me.comaddress, enter your password and click Verify. Your password must be “strong”; that is, it must contain uppercase and lowercase letters, at least one number, and be at least eight characters long. - Pick a Security Info question. This is something that should be easy for you to remember, but difficult for anyone else to guess easily (which means no one else should be able to find the answer just by looking at your blog or Facebook, Google, Yahoo!, or other online profile page).
- Choose whether you want to receive e-mail updates from Apple at this new address. If not, set this option to OFF.
- You’ll need to accept the Terms and Conditions twice, first by tapping the blue Agree button at the bottom left, and then by tapping the translucent Agree button when the pop-up confirmation appears. Again, it might take a few moments to verify.
- Apple will then set up your new Apple ID. This can take a few moments.
Configuring iCloud Options
Once you’ve logged in with your Apple ID, it’s time to configure your iCloud settings:
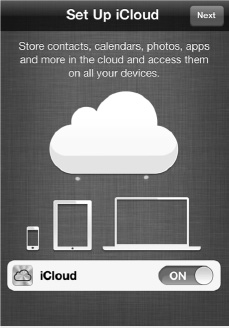
- If you want to use the Set Up iCloud feature—and we recommend you do this because it’s free and provides a host of useful backup and syncing features—then leave the iCloud option set to ON and tap the blue Next button.
- Choose whether you want to use the iCloud Backup service to wirelessly back up your iPhone over-the-air to Apple’s data center or to your computer over USB with iTunes. Again, we recommend using setting iCloud to ON because it’s automatic, and you won’t have to remember to do it.
- The Find my iPhone service is a free part of iCloud that shows you the approximate location of your phone (you’ll be able to tell whether it’s at your house or at the office, but not the specific room), make it ring so you can find it even if it’s fallen under the car seat or behind the sofa, or even wipe out all your personal data if it’s lost or stolen. If you want to use this feature, leave this option set to ON.
- That’s it! Your iPhone is now set up, and you can start using it.
Restoring Your iPhone Using iCloud
If you’ve previously used iCloud to back up your iPhone, you can restore from that backup over-the-air right from your device:
- Tap Restore from iCloud backup.
- Enter your iCloud Apple ID e-mail address and password.
- Select which backup you’d like to restore from. Typically, this will be the most recent backup available.
- Your iPhone will reboot, download the backup, and restart. This process can take a few minutes, especially if you have a lot of data to restore.
- Once your iPhone has been restored, your apps will begin to download and install. iCloud can download and install multiple apps at once, and you can use your iPhone while the restore process is going on.
Setting up Your iPhone Using iTunes
If you don’t want to use iCloud or you have a previous iTunes back up you’d like to restore from, then you can still set up your iPhone over USB with your PC.
If you do not have iTunes loaded on your computer, then open a web browser and go to www.itunes.com/download. Download the software from the link provided.
If you already have iTunes installed on your computer, you should check to see if an updated version is available. Version 10.5 was the latest version at the time of publishing. Follow these steps to update your version of iTunes:
- Start the iTunes app.
- If you are a Windows user, select Help from the menu, and then Check for Updates.
- If you are a Mac user, select iTunes from the menu, and then Check for Updates.
- If an update is available, then follow the instructions to update iTunes.
Restoring Your iPhone From a Previous Backup
The first time you connect your new iPhone to iTunes, you will see the screen shown in Figure 1–2.

Figure 1–2. Setting up your iPhone screen
CAUTION: We have heard of people experiencing problems (e.g., lock-ups and lower battery life) when they restore a backup from a non-iPhone (i.e., an iPad or iPod touch) to the iPhone. Also, selecting Restore assumes you have first made a backup of your old device; otherwise, there is no information to restore to your new iPhone.
Do the following to restore from the backup of another iPhone or device:
- Click the radio button to the left of Restore from the backup of:
- Select the particular backup file from the drop-down menu.
- Click the Continue button to restore data to your iPhone from the backup file. You are now done with the initial setup of your iPhone.
NOTE: You will still have to sync any apps, games, music, and other media you want to use on your new iPhone.
Maintaining Your iPhone
Now that you have set up your iPhone with iTunes, you will want to know how to safely clean the screen and keep it protected with various cases.
Cleaning Your iPhone Screen
After using your iPhone a little while, you will see that your fingers (or other fingers besides yours) have left smudges and oil on the formerly pristine screen. You will want to know how to safely clean the screen. One way to keep the screen cleaner throughout the day is to place a protective screen cover on the iPhone, which may also have the added benefit of cutting down on glare (discussed in the next section).
We also recommend the following steps:
- Turn off your iPhone by pressing and holding the Sleep/Power key on the top edge, and then use the slider to turn it off.
- Remove any cables, such as the USB sync cable.
- Rub the screen with a dry, soft, lint-free cloth (like a cloth supplied to clean eyeglasses or something similar).
- If the dry cloth does not work, then try adding a very little bit of water to dampen the cloth. If you use a damp cloth, try not to get any water in the openings.
- Another option is the iKlear screen cleaner from Klear Screen. This product works on your iPhone and other devices such as your computer, laptop or iPad screen.
CAUTION: Never use household cleaners, abrasive cleaners such as Soft Scrub, or ammonia-based cleaners such as Windex, alcohol, aerosol sprays, or solvents.
Cases and Protective Covers for Your iPhone
Once you have your iPhone in your hands, you will notice how beautifully it is constructed. You will also notice that it can be fairly slippery, rock around a bit, or have the back get scratched when you are typing on it.
We recommend buying a protective case for your iPhone. Average cases run about US $10–40, and fancy leather cases can cost US $100 or more. Spending a little to protect your iPhone, which costs $200 or more, makes good sense.
Where to Buy Your Covers
You can purchase an iPhone protective cover at any of the following locations:
- Amazon.com (
www.amazon.com) - The Apple Accessory Store (
http://store.apple.com) - iLounge (
http://ilounge.pricegrabber.com) - TiPB – The iPhone + iPad Blog Store (
http://store.tipb.com/)
You might also do a web search for “iPhone cases” or “iPhone protective covers.”
TIP: You may be able to use a case designed for another type of smartphone for your iPhone. If you go this route to save some money, just make sure your iPhone fits securely in the case or cover you choose.
What to Buy...
The following sections list some types of cases available for your iPhone and the price ranges you can expect to pay.
Rubber / Silicone Cases ($10–30)
Rubber and silicone cases provide a cushioned grip, absorb iPhone bumps and bruises, and isolate the edges of the phone (antennas) from your fingers.
Pros: These cases are inexpensive, colorful, and comfortable to hold. They also prevent your fingers from interfering with the iPhone antennas, which are the metal edges of the phone.
Cons: They are not as professional as a leather case.
Combined Cases with External Battery Packs ($50-80)
Cases combined with external battery packs serve a couple purposes: they combine the protective features of a hard shell case with a rechargeable external battery pack. Manufacturers such as Mophie and Case-Mate are busy working on iPhone versions of their cases; with some luck, they will be available by the time you read this book.
Pros: These cases protect your iPhone and provide a tremendous boost in your battery life—in some cases, they boost battery life by more than 50%.
Cons: They add weight and bulk to the phone.
Waterproof Cases ($10–40)
Waterproof cases protect for your iPhone from water, allowing you to safely use the device in the rain, at the pool, at the beach, on a boat, and so on.
TIP: If you like to row or paddle, then you will want a waterproof case. Check out the SpeedCoach Mobile app, which you can buy for about $65 from the App Store.

Pros: These cases provide good protection from various sources of water.
Cons: They can make the touch screen harder to use, and they usually do not protect from drops or bumps.
Hard Plastic / Metal Case ($20–40)
Hard plastic and metal cases provide solid protection against scratches, bumps, and short drops.
Pros: These cases provide superior protection for your phone.
Cons: They add some bulk and weight. Also, you may need to remove such cases when charging your iPhone, or it might overheat.
Leather or Special Cases ($50–100+)
Leather and other special cases provide more of a luxury feel and protect the iPhone.
Pros: These cases add a touch of luxury to your phone, while also protecting the front and back of the device.
Cons: They are more expensive and add bulk and weight.
Screen Protectors ($5–40)
Screen and back glass protectors help you protect the screen and back of the iPhone from scratches.
Pros: These cases help prolong the life of your iPhone by protecting it against scratches; most such cases also decrease screen glare.
Cons: Some of these cases may increase glare or affect the touch sensitivity of the screen.
iPhone Basics
Now that you have your iPhone charged, with a clean screen, and decked out with a new protective case—let’s look at some of the basics for getting around its software.
Powering On/Off and Sleep/Wake
To power on your iPhone, press and hold the Power/Sleep button on the top edge of the iPhone for a few seconds. Simply tapping this button quickly won’t power on the iPhone if it is completely off—in that case, you need to hold the button until you see the iPhone power on.
When you are no longer using your iPhone, you have two options: you can either put it into Sleep mode or turn it off completely.
The advantage of Sleep mode is this: when you want to use your iPhone again, simply tap the Power/Sleep button or the Home button to bring your iPhone back awake. If you want to maximize your battery or if you know you won’t be using your iPhone for quite some time—say when you go to sleep—you should turn it off completely. The way to do this is to press and hold the Power/Sleep button until you see the Slide to Power Off bar appear. Just slide the bar to the right and the iPhone will power off.
Assistive Touch Accessibility
As part of its excellent Accessibility features, Apple includes the Assistive Touch feature for people with special physical or motor skills needs. These include touch screen versions of the hardware buttons, as well as common and custom gestures.
Follow these steps to enable the Assistive Touch feature:
- Tap the Settings icon.
- Tap General.
- Tap Accessibility near the bottom of the page.
- Tap Assistive Touch.
- Set the Assistive Touch switch to On.
- Tap the Assistive Touch overlay icon when it appears at the bottom right of your screen.
- Tap Home to simulate a physical press of the hardware Home button.
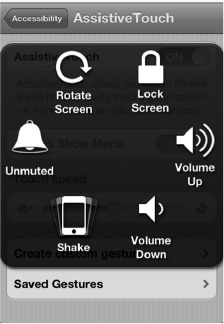
- Tap Device to get access to other hardware button simulators, including Rotate Screen, Lock Screen, Muted/Unmuted, Volume Up, Volume Down, and Shake.
- Tap Gestures or Favorites (favorite gestures) to access Pinch, Swipe, and any custom gestures that have been set up.
- Tap the center of the overlay menu to return to the previous menu or to exit Assistive Touch.
NOTE: Assistive Touch also allows for sophisticated gestures, including custom gestures.
Slide to Unlock and Quick Camera and Media Access
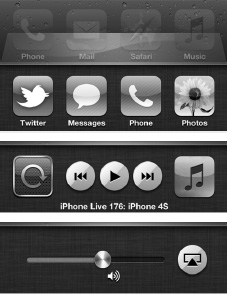
Once your iPhone has been activated, you will see the Slide to Unlock screen, as shown in Figure 1–3.
Double-click the Home button to see media control when you have music playing and, more importantly, get instant access to your camera for those times when you want to grab a quick picture. Tap the camera icon next to the slider at the bottom.
To get into your iPhone, touch your finger to the screen and follow the path of the arrow to move the Slide to Unlock button to the right. Once you do that, you will see your Home screen.
Notice the four icons in the Bottom Dock. The items in this dock do not move, while the rest of the icons can move back and forth in pages. You can learn how to move your favorite icons into the Bottom Dock in the “Moving Icons” section of Chapter 6: “Icons and Folders.”
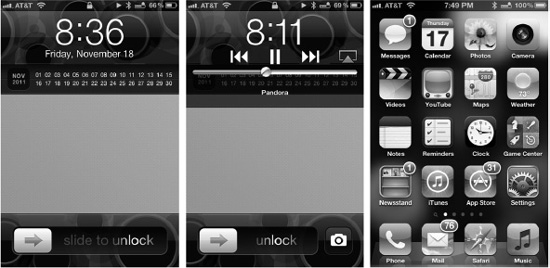
Figure 1–3. Slide to Unlock, Quick Camera and Media Access and your Home screen.
Moving Around Inside Apps and Your Settings Screens
Getting around the screens inside the apps on your iPhone is as simple as tapping the screen:
- Tap the Settings icon to start the Settings app.
- Touch General to see General settings.
- Touch Network to see Network settings.
- You can toggle any switch by tapping it. For example, touching the OFF switch next to Data Roaming will toggle it to ON.
- To go back a level in the screens, touch the button in the upper-left corner. In this case, you would touch the General button to leave the Network Settings screen.
The Home Button

The button you will use most often is your Home button. This button will initiate everything you do with your iPhone. If your iPhone is sleeping, press the Home button once to wake up your iPhone (assuming it is in Sleep mode).
Pressing the Home button will also take you out of any application program and bring you back to your Home screen.
Start Siri by Pressing and Holding the Home Button
Start your personal assistant by pressing and holding the Home button. Then simply speak to your iPhone. If you have enabled Raise to Speak, you can also simply raise your iPhone to your ear and start speaking to Siri. We show you all about Siri in Chapter 7.
Access the Fast App Switcher by Double-Clicking the Home Button
Accessing the Fast App Switcher is as simple as double-clicking the Home button.
- While in any app or from the Home screen, double-click the Home button.
- The screen will slide up and you will see a small bar of icons appear in the bottom row. These represent the apps that you have started since you powered on your iPhone.
- Tap any icon to switch back to that app.
- Swipe your finger to the left to see more apps.
- Swipe your finger to the right to see the orientation lock and media controls.
- Swipe your finger to the right again to see the volume control and AirPlay button.
Follow these steps to access the Fast App Switcher from a given app:
Volume Keys for Ringer and Audio/Video Playback
On the upper-left side of the iPhone (see Figure 1–4), you can see some simple Volume Up/Volume Down keys that you will find very handy.
Ringer Volume
If you are not playing a song, video, or other content, pressing these Volume keys will adjust the volume of your phone ringer.
TIP: When you’re in the Camera app, the Volume Up button becomes a camera shutter, allowing you to quickly snap a picture.
Muting the Phone Ringer
You have a switch just above the Volume keys on the left side of your iPhone. Slide the Ringer Mute switch to the back of the iPhone set it to ON. You will see a little orange light next to the switch when your sound is muted. To turn off the mute, simply slide the switch back toward the front of the iPhone (see Figure 1–4).
Adjusting Playback or Phone Voice Volume
You can use the Volume keys to raise or lower your phone’s volume when you are listening to music or a video, enjoying other content, or even on a phone call. When listening to music or a video, you can also use the on-screen slider bar to adjust volume(see Figure 1–4).
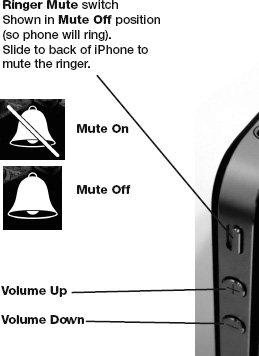
Figure 1–4. Adjusting the volume on your iPhone or muting the phone ringer
Locking Your Screen in Portrait (Vertical) Orientation
If you tilt your iPhone on its side, you will notice that its screen rotates to Horizontal (Landscape) orientation in some apps. You might want this behavior, so you can see the larger Landscape keyboard for typing. However, there may be times when you don’t want your screen to rotate from Portrait orientation when you turn your iPhone on its side. For these occasions, you can lock the screen in Portrait orientation.
- Double-click the Home button.
- Swipe left to right to see the media and screen lock controls.
- Touch the Portrait Orientation Lock button in the icon on the left.
- To disable the lock, tap the same button again.
TIP: The orientation lock feature can be a great way to read iBooks in bed. If you prefer the larger page view in Portrait mode, enable the Portrait Orientation Lock feature. This way, when you set your iPhone on your lap or hold it almost flat, the screen will not accidentally rotate to Landscape mode. For more information, check out Chapter 13: “iBooks and e-Books.”
Adjusting or Disabling the Auto-Lock Time-Out Feature
You will notice that your iPhone will auto-lock and go into Sleep mode (i.e., the screen will go blank) after a short amount of time. You can change how long it takes your phone to enter Sleep mode or even disable this feature altogether inside the Settings app. Follow these steps to do so:
- Touch the Settings icon from your Home screen.
- Touch General.
- Touch Auto-Lock.
- You will see your current sleep interval setting next to the Auto-Lock option on this page. The default setting is that the iPhone locks after three minutes of sitting idle (to save battery life). You can set this interval to 1 Minute, 2 Minutes, 3 Minutes, 4 Minutes, 5 Minutes, or Never.
- Touch the desired setting to select it—you know it’s selected when you see a checkmark next to it.
- Finally, touch the General button in the upper-left corner to get back to the General screen. You should now see your change reflected next to the Auto-Lock setting.
BATTERY LIFE TIP: Setting the Auto-Lock feature to a shorter interval (e.g., 1 Minute) will help you save battery life.
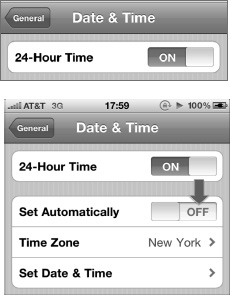
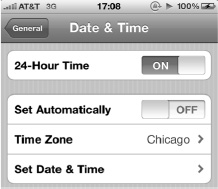
Adjusting the Date, Time, Time Zone, and 24-Hour Format
Usually, the date and time is either set for you or adjusts when you connect your iPhone to your computer; you can learn more about this in in Chapter 3: “Sync with iCloud, iPhone and More.” However, you can manually adjust your date and time quite easily. You may want to do this when you are traveling with your iPhone and need to adjust the time zone when you land. Follow these steps to do so:
- Touch the Settings icon.
- Touch General.
- Scroll down and touch Date & Time to seethe Date & Time settings screen.
- If you prefer to see 09:30 and 14:30 instead of 9:30 AM and 2:30 PM, respectively, then tap the 24-Hour Time option to set its switch to ON.
- To set the date and time manually, you have to turn off the automatic time setting feature. Tap the switch next to Set Automatically to set this option to OFF.
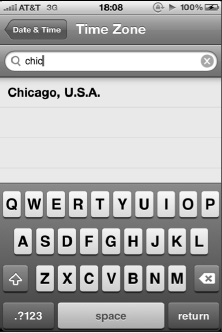
- To set your time zone, tap Time Zone and type in the name of a major city in your time zone. The iPhone will show you matching city names as you type.
- When you see the correct city in your time zone, tap it to select it. In the image here, we typed the first few letters of “Chicago” until we saw it appear. Next, we tapped Chicago, U.S.A. to select it.
- After selecting the city, you are brought back to the main Date & Time screen with your selected city shown next to the Time Zone option.
- Tap Set Date & Time to adjust your date and time.

- On this screen you can set the date and time. To adjust the date, tap the Date button shown at the top of the screen.
- To adjust the time, tap the Time button shown at the top of the screen.
- You can then adjusting the date and time by touching and sliding the Date and Time wheels up or down, as shown in the image here.
- When you are done, tap the Date & Time button in the upper-left corner.
Adjusting the Brightness
Your iPhone has an Auto-Brightness control available; this feature is turned on by default. This feature uses the built-in light sensor to adjust the brightness of the screen. When it is darker outside or at night, then the Auto-Brightness control will dim the screen. When it is bright and sunny, the screen will be automatically brightened, so it is easier to read. Generally, we advise that you keep this feature set to ON.
If you want to adjust the brightness, use the controls in your Settings app. Follow these steps to do so:
- From your Home screen, touch the Settings icon.
- Touch Brightness and move the slider control to adjust the brightness.
- Click the switch next to Auto-Brightness to toggle it ON or OFF.
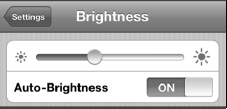
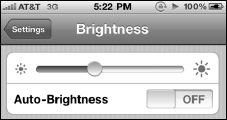
TIP: Setting the Brightness option to a lower value will help you save battery life. A little less than halfway across seems to work fine.
Notifications
New to iOS 5, the Notication Center introduces a better, less obtrusive, less interruptive way to organize and handle all the phone, e-mail, SMS, Twitter, Facebook, calendar, and other alert messages you receive during the day.
Notifications can appear in several ways:
- As Lock screen info, so you can glance at important alerts without having to unlock your phone. (This option does sacrifice some privacy.)
- As in-app notifications, which display as brief, rotating alerts across the top of the screen whenever a new message is received.
- In the Notification Center pull-down menu, which you can access with a single swipe anywhere, at any time, when your iPhone is unlocked.

If you’ve had an iPhone before or used an iPad or iPod touch prior to iOS 5, then Notification Center adds to the previous options of sound/vibrate, number badges, and pop-up alerts. Because they’re non-interruptive, alerts won’t stop your game of Angry Birds or the e-mail message you’re composing, forcing you to dismiss or open them before you can continue playing or writing. However, you still have the option to handle things you absolutely don’t want to miss, such as alarms.
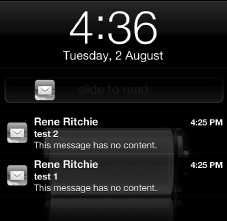
Lock Screen Info
Notifications on the Lock screen are displayed in two different ways: as a popup with the single, newest notification and as a pull-down list of all recent notifications.
If you receive a single notification while your iPhone is locked, the screen will turn on, and it will appear in a black box in the center of your Lock screen. It will also show an icon on the left that represents the app associated with that type of notification. For example, an e-mail message will show the Mail app icon to the left; an SMS text message will show the Messages icon; a missed call will show the Phone icon; a Facebook notice will show the Facebook icon; and so on. There are several things you can do from here:
- Ignore the notification. This will cause your alert to fade away, and your iPhone’s screen will go back to sleep.

- Grab the handle (the three gray lines right below the time and date) and drag it down to see a list of all the notifications you’ve received since the last time you unlocked your iPhone. The list will be sorted by notification type, so all e-mail messages will be grouped together, as will all calendar events, all missed phone calls, and so on. To the left of each notification, you will also see the appropriate icon for each alert.
NOTE: If you don’t see the handle, it’s because you don’t have any recent notifications.
- From either the single notification box or the list, tap the icon to the left of the notification and Slide to Read (or listen) to the notification, just as you would normally Slide to Unlock your iPhone. In most cases, you’ll be taken straight to the appropriate app with the full notification displayed. For example, touching the Mail app icon and sliding it will unlock your iPhone, switch to the Mail app, and load up the e-mail you just received.
NOTE: A few notifications—such as alarms and system messages like iTunes sync failures—might also show you a button to the left of the notification, such as Snooze for the alarm or OK for the sync failure. Tap the button to delay or dismiss the notification.
TIP: If you’re concerned about privacy and don’t like the idea of anyone being able to see your personal e-mails, texts, and other messages or alerts on your Lock screen, then you can turn them off in the Settings app (see the “Configuring Notification Center” section later in this chapter).
In-App Notifications
When your iPhone is unlocked and you’re busy using it, a new notification that comes in will animate briefly at the top part of the screen, and then rotate down to display the notification. This will happen no matter where you are, from the Home screen, to the built-in Phone app, to your favorite video game. The notification covers only a few pixels at the very top, so it shouldn’t get in the way of what you’re doing (or playing). There are two things you can do with an in-app notification:

- Ignore it and it will rotate back up and disappear. (Don’t worry: You can see the notification again by clicking the Notification Center pull-down menu, as described later in this chapter.)
- Tap the notification and you’ll be taken straight to the associated app to see the full message. For example, it will take you to the Mail app to read an e-mail or the Messages app to reply to an SMS text.
The Notification Center
Any time your iPhone is unlocked, you can swipe down from the very top of the screen to pull down the Notification Center options. Notification Center combines a very limited number of widgets (two at the time of writing) and a list of notifications similar to what you see on the Lock screen.
To get rid of Notification Center, swipe back up from the bottom of the screen.
The two widgets available at the time of writing are Weather and Stocks:
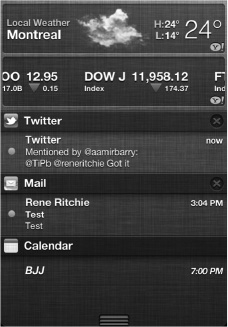
- The Weather widget displays the local weather for an area (if location-based weather is enabled) or whatever city you have set as first in the built-in Weather app (if location-based weather is turned off or unavailable). It also shows the high, low, and current temperature for the day. Tapping anywhere on the widget will take you to the Weather app.
- The Stocks widget shows a ticker of the stocks you follow, along with their recent market cap and an arrow showing recent losses or gains. The ticker will contain all stocks you currently have set up in the built-in Stocks app. Tapping anywhere on the widget will take you to the Stocks app.
Notification Center listings are available for the following apps and services:
- Calendar
- Reminders
- Phone (missed calls, voice mail)
- Messages (SMS/MMS/iMessage)
- Game Center
- Any additional apps or services you install that use notifications (e.g., social networks like Twitter, breaking news apps like CNN, and task managers like OmniFocus)
The notification list is divided by app, with a header bar for each app. On the left of the header bar is the app icon, followed by the app name. At the right of the header bar, you can see an X icon. Tapping the X icon clears all notifications for that app. For example, tapping the X to the right of the Mail icon will clear all e-mail notifications; however, this won’t clear any other notifications.
![]()
Below a header, you will see all current (unread) notifications for that app, along with the time they were received, who they came from (if applicable) and a preview of their contents. For example, you might see a list of recent Facebook messages or Game Center challenges. Tapping anywhere on any of the notifications in the list will switch you to the associated app and show you the full message.
![]()
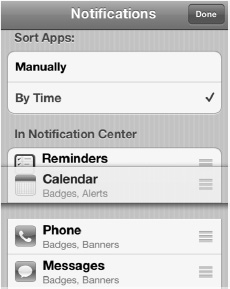
Configuring Notification Center
Notification Center can be easily configured via the Settings app:
- Tap the Settings app icon on the Home screen.
- Tap Notifications.
Notification Center can organize notifications By Time (widgets on top, then in order of the most recent notifications), or you can organize them Manually. Follow these steps to manually reorganize your notifications:
- Under Sort Apps, tap Manually.
- At the top right of the screen, tap the Edit button.
- Handles in the form of three gray, horizontal stripes will appear to the right of each app. Grab the handles and drag the apps up or down to put them in the order you like best.
- When you’ve got all the apps in just the order you want them, tap the blue Done button at the top right of the screen.
To show or hide the Weather or Stock widget, tap either widget to toggle it ON or OFF, as desired.
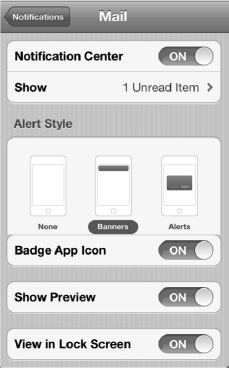
To choose how the notification lists work, follow these steps:
- Tap the app you want to edit (e.g., Mail).
- Switch the Notification Center toggle to OFF to remove the app from Notification Center completely. Toggle it to ON to put it back.
- Choose to Show the number of notifications you prefer in the list. At the time of writing, the choices were limited to 1 Unread Item, 5 Unread Items, and 10 Unread Items.
- Choose the Alert Style of the in-app notification you’d prefer.
- None means you’ll never see an alert.
- Banner means you’ll get the subtle, animated notification at the top of the screen that won’t interrupt you. This option lets you ignore the notification, if you so desire, which is useful for most communication notifications like e-mail, SMS, Facebook, and so on.
- Alert means you’ll get a pop-up box that you can’t ignore. You will either have to manually dismiss it or act on it right away. This is useful for alarms, appointments, and other urgent matters.
You can also set several other options related to notifications:
- Badge App Icon: This option adds a little red circle to the top right of Home screen icons. This red circle indicates how many unread notifications each app contains. For example, the number 10 on the Mail icon means you have 10 unread e-mail messages waiting for you. You can toggle this feature to OFF if you would rather not see them or to ON if you want them displayed.
- Sounds: This option lets you turn audio (and vibration) alerts for incoming notifications on or off. If a notification is urgent, like SMS, you might want to keep sounds toggled ON.
- Show Preview: This option adds the first few lines of a message associated with a notification, so you can get the gist of it at a glance. This feature enables you to see a notification’s contents without sliding to tap through to the app, so you can read the whole thing. If privacy is more of a concern, you might want to toggle this feature to OFF.
- View in Lock Screen: This option allows you to turn notifications on or off from the Lock screen. Again, if privacy is an issue, you might want to toggle this feature to OFF.
NOTE: Not all apps have the same options in Notification Center. For example, some may offer sound alerts, while others do not.
When you turn off notifications for a specific app, it gets put in a separate list under Settings called Not in Notification Center. This lets you easily see which apps are—and aren’t—sending you notifications.
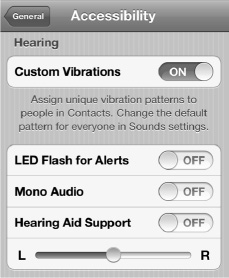
Accessibility Options For Notification Center
Apple provides various Accessibility options for people with special visual or hearing needs, including Custom Vibrations and LED Flash for Alerts.
Follow these steps to enable Accessibility options for Notifications:
- Tap the Settings icon.
- Tap General.
- Tap Accessibility near the bottom of the page.
- Toggle Custom Vibrations to ON to assign unique vibration patterns to your Contacts (patterns can be created in the Sound Preferences).
- Toggle LED Flash for Alerts to ON to make the camera flash go off when a notification comes in.