
Chapter 19
Calendar and Reminders
The iPhone makes the old calendar that used to hang on the fridge obsolete. In this chapter, we will show you how to utilize the Calendar app of the iPhone to its full potential. For example, we will show you how to schedule appointments, manage multiple calendars, change views on your calendar, and even how to deal with meeting invitations.
In iOS 5, Apple has added the Reminders app for easy management of all your tasks and to-do lists, which are based on both time and location!
NOTE: For most of this chapter, we will talk about syncing your iPhone calendar with another calendar because it is nice to have your calendar accessible on your iPhone and in other places. If you choose, you can also use your iPhone in a standalone mode, where you do not sync to any other calendar. In the latter case, all the steps we describe for events, viewing, and managing events still apply equally to you. It is critical, however, that you use the iCloud or iTunes automatic backup feature to save a copy of your calendar, just in case something happens to your iPhone.
Calendars, Reminders and Siri
Apple's new, artificially intelligent personal assistant, Siri, can quickly and easily create calendar events and reminder items for you. If it's something relatively simple, Siri can even add it more quickly and easily than you could create them yourself through “old fashioned” button tapping. Here are some examples of what Siri can do with calendars and reminders.
- “Show me my calendar for tomorrow”. Siri will show all events for any day or date you request.
- “Schedule an appointment for 9pm tomorrow with my boss.” Siri will even alert you if you have conflicts.
- “Move my appointment at 9pm tomorrow.” Siri will even tell you if it's a recurring appointment and offer to change the current one only, or all future events.
- “Show me my reminders.” Siri will give you a list your reminders and you can quickly check off any you've already completed.
- “Remind me to call my wife when I get to work.” Siri will create a location-based reminder.
- “Add cookies to my shopping list.” Siri will create a reminder to buy cookies on the list named “Shopping”.
Managing Your Busy Life on Your iPhone
The Calendar and Reminders appsprovide powerful, easy-to-use functionality that helps you manage your appointments, keep track of what you have to do, set reminder alarms, and even create and respond to meeting invitations(for Exchange and iCloud users).
Syncing or Sharing Your Calendar and Reminders
If you maintain a calendar or task list on your computer, or a calendar on a web site such as iCloud or Google Calendar, then you can synchronize or share that data with your iPhone either by using the iTunes app and your sync cable or by setting up a wireless synchronization (see Chapter 3: “Sync iCloud, iTunes, and More” for information on syncing).

After you set up the calendar and task syncing, all of your computer calendar appointments and to-do listswill be synced with your iPhone calendar automatically, based on your sync settings (see Figure 19–1).
If you use iTunes to sync with your calendar (e.g., Microsoft Outlook or Apple's iCal), your appointments and taskswill be transferred or synced every time you connect your iPhone to your computer.
If you use another method to sync (e.g., iCloud, Exchange, or similar), this sync is wireless and automatic, and it will most likely happen without you having to do anything after the initial setup process.
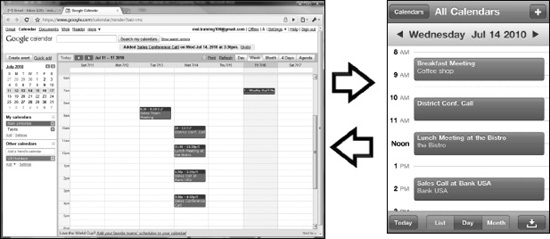
Figure 19–1. Syncing a PC or Mac calendar to an iPhone
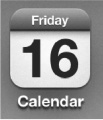
Today's Day and Date Shown on the Calendar Icon
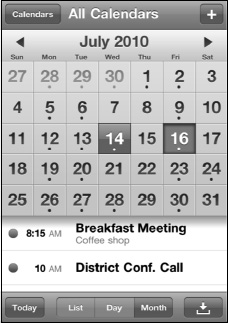
The Calendar icon is usually right on your iPhone's Home screen. You will quickly notice that your Calendar icon changes to show today's date and the day of the week. The icon to the right shows that it is a Friday, the 16th day of the month.
TIP: if you use your iPhone's Calendar app often, you might want to think about pinning or moving it to the Bottomdock; you learned how to do this in the section on docking icons in Chapter 6: “Icons and Folders.”
Viewing Your Appointments and Getting Around in Calendar
The default view for the Calendar app shows your Day view. This view shows you at a glance any upcoming appointments for your day. Appointments are shown in your calendar. If you happen to have multiple calendars set up on your computer, such as work and Home, then appointments from the different calendars will display as different colors on your iPhone's calendar.
You can manipulate the calendar in various ways:
- Move a day at a time: If you tap the triangles next to today's date at the top, you move forward or backward a day.
TIP: Touch and hold the triangles next to the date to advance quickly through days.
- Change views: Tap the List, Day, and Month buttons at the bottom to change the view.
- Jump to today: Tap the Today button at the bottom-left corner.
The Four Calendar Views
Your Calendar app comes with four views. Day, List, week, and Month are all available in Portrait orientation; and you can switch between views by tapping the name of the view at the bottom of the screen. week view is only available in Landscape orientation, and you can switch to it by turning your iPhone sideways. Here's a quick overview of the four views:
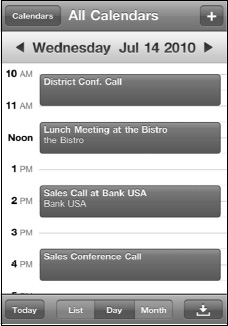
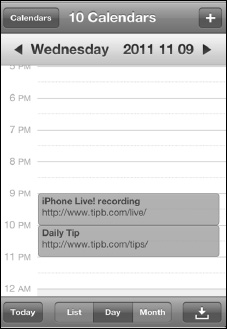
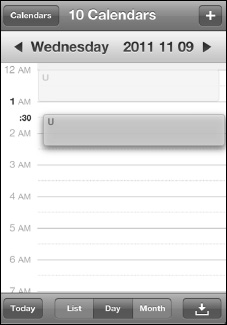
- Day view: When you start the iPhone's Calendar app, the default view is usually the Day view. This allows you to quickly see everything you have scheduled for the day. You can find buttons to change the view at the bottom of the Calendar app.
To move from one day to the next, simply swipe from right to left. To move back a day, swipe from left to right.

- List view(also known as Agenda view): Tap the List button at the bottom, and you can see a list of your appointments.
Depending on how much you have scheduled, you could see the next day or even the next week's worth of scheduled events.
Swipe up or down to see more events.
- Month view: Tap the Month button at the bottom, and you can see a layout of the full month. Days with appointments have a small dot in them. Dots for the current day will show up highlighted in blue.
TIP: To return to the Today view, just touch the Today button at the bottom left.

Go to the next month: Tap the triangle to the right of the month shown at the top.
Go to the previous month: Tap the triangle to the left of the month.
- Week view: Turn you iPhone sideways to landscape orientation to access the week view.
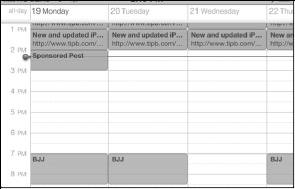
- Swipe left or rightto see more days.
Working with Several Calendars
The Calendar app lets you view and work with more than one calendar. The number of calendars you see depends on how many you are syncing. For example, you may have iCloud or Google Calendar syncing for home and Exchange for work,
To view just one calendar at a time, tap the Calendars button at the top and select only the calendar you wish to see.
When you set up your sync settings, you were able to specify which calendars you wanted to sync with your iPhone. You can customize your calendar further by following these instructions:
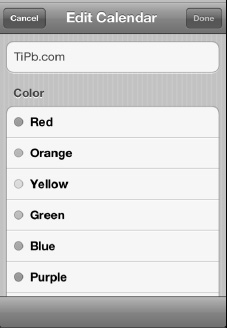
- Changing the colors: If you don't like the color of a calendar on your iPhone, it's easy to change:
- Adding a new calendar: If you are using iCloud to sync, you will be able to add a new calendar on your iPhone:
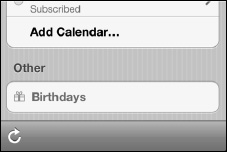
- Tap Calendars at the top-right.
- Tap Edit at the top-right.
- Scroll down and tap Add Calendar… in the iCloud section
- Enter a name and choose a color for your new calendar, and you're done!
Adding New Calendar Events
You can easily add new events or appointments right on your iPhone. These new events and appointments will be synced (or shared with) your computer the next time a sync takes place.
Adding a New Appointment
Your instinct will most likely be to try to touch the screen at a particular time to set an appointment; and with iOS 5, you can finally do just that!
To add a new calendar event from any Calendar view, follow these steps.
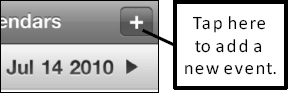
- Tap and hold your finger on the screen at the place where you want the appointment until a new colored bubble appears. (You can also still tap the + icon at the upper-right corner of the screen to add a new event.
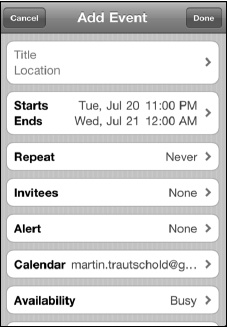
- On the Add Event screen, touch the box marked Title&Location.
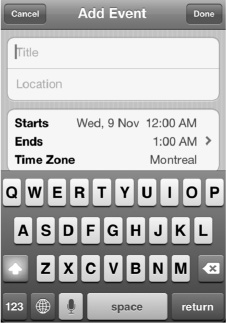
Type in a title for the event and the location (optional). For example, you might type “Meet with Martin” as the title and input the location as “Office.”Or, you might choose to type “Lunch with Martin” and then choose a very expensive restaurant in New York City.
- Touch the blue Done button in the upper-right corner to return to the Add Event screen.
- Touch the starts or Ends tab to adjust the event timing. To change the start time, touch the starts field to highlight it in blue. Next, move the rotating dials at the bottom to reflect the correct date and start time of the appointment.
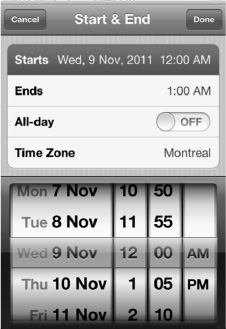
- Alternatively, you can set an all-day event bytouching the switch next to All-day to set it to ON.
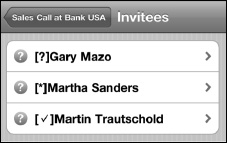
NOTE: You will see a tab labeled invitees after the Repeat tab only if your event is set up on an Exchange/Googleor iCloudcalendar.
Recurring Events
Some of your appointments happen every day, week, or month at the same time. Follow these steps if you are scheduling a recurring appointment:

- Touch the Repeat tab and then select the interval of time for the recurring appointment from the list.
- Touch Done to return to the main Event
- If you set a Repeat meeting, then you will also have to say when the repeating event ends. Tap the End Repeat button to set this.
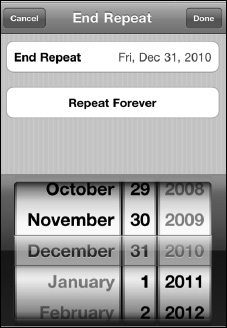
- You can select Repeat Forever or set a date.
- Tap Done when finished.
Calendar Alerts
You can have your iPhone 4 give you an audible reminder, or alert, about an upcoming appointment. Alerts can help you keep from forgetting an important event. Follow these steps to create an alert:
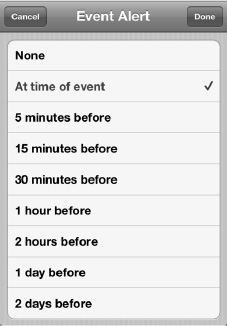
- Touch the Alert tab and then select the option for a reminder alarm.You can have no alarm (None) at all or set a reminder that ranges from At time of event all the way to 2 days before the event, depending on what works best for you.
- Touch Done to get back to the main Event screen.
Second Alert
NOTE: You will see a second Alert option if the calendar you are using is synced using iTunes or iCloud. However, you will not see a second alert if your event is tied to a Google Calendar synced using the Exchange setting.
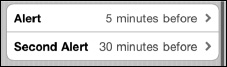
In most cases, you will see a tab for a second Alert option once you set your first Alert option. You can set this second alert to another time before or after the first alert. Some people find a second alert very helpful for remembering critical events or appointments.
TIP: Here's a practical example that illustrates when you might want to set up two calendar alerts.
If your child has a doctor or dentist appointment, then you might want to set the firstevent to go off the night before. This will remind you to write a note to the school and give it to your child.
You can then set the second event for 45 minutes prior to the appointment time. This will leave you enough time to pickup your child from school and get to the appointment.
Choosing a Calendar
![]()
If you use more than one calendar ‚‚tap on the Calendar tab to change the calendar to which your new event is assigned.
Touch the Calendar button in the upper- left corner to see all your calendars.
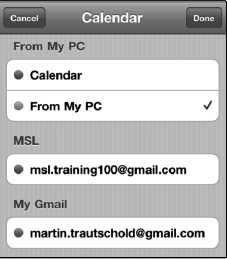
Tap the calendar you want to use for this particular event. Usually, the calendar selected by default is the one you selected the last time you used your iPhone to schedule an event.
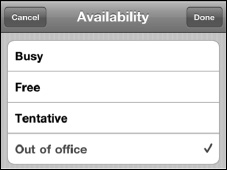
Availability
You can also let others know about your availability during the scheduled event. You can choose your availability from the following options: Busy (default), Free, Tentative, or Out of Office. (Tentative and Out of Office only appear when you sync an account with the Exchange setting.)
NOTE: You will only see the Availability or invitees fields if the calendar you are using for this event is synced with the iCloud, Exchange, or Exchange/Google settings, and each provides slightly different options. If you are synced with iCloud, you will also see a URL field where you can add a website address for later
Adding Notes to Calendar Events
![]()
Follow these steps if you want to add some notes to a calendar event:
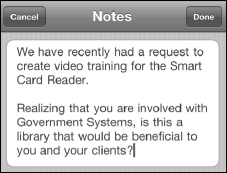
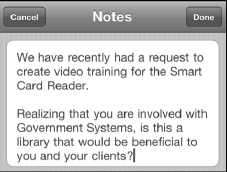
- Tap Notes and type or copy and paste a few notes.
- Tap Done to finish adding notes.
- Tap Done again to save your new calendar event.
TIP: if this is a meeting somewhere new, you might want to type or copy and paste some driving directions.
Using Copy and Paste Between the Email and Calendar Apps
The iPhone software's new Fast App Switcher means you can now easily jump between your Email and your Calendar programs to copy and paste information. This information could be anything, ranging from critical notes you need at your fingertips for a meeting to driving directions. Follow these steps to copy and paste information between your Email and Calendar programs:
- Create a new calendar event or edit one, as explained previously in this chapter.
- Scroll down to the Notes field and tap it to open it.
- Double-tap the Home button to bring up the Fast App Switcher.
- If you see the Mail icon, tap it. If you don't see Mail icon, swipe left or right to look for it. Once you find it, tap it to open the Mail app.
- Double-tap a word, then use your fingers to drag the blue handles to select the text you want to copy.
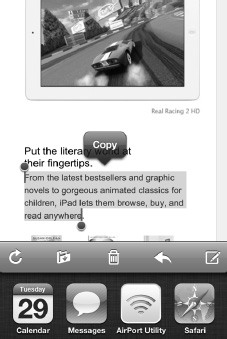
- Tap the Copy button.
- Double-tap the Home button to bring up the Fast App Switcher.
- Tap the Calendar icon. It should be the first icon on the left, since you just jumped out of the app.
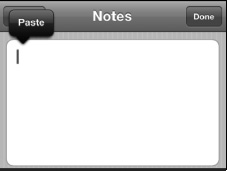
- Now tap and hold in the Notes field. When you let go, you should see the Paste pop-up field. If you don't see it, then hold your finger down a bit longer until you do see it.
- Tap Paste.
- Now you should see the text you copied and pasted into the Notes field.
- Tap Done to save your changes.
Editing Appointments
Sometimes, the details of an appointment may change and need to be adjusted. Fortunately, it's easy to revise an appointment on your iPhone. If all you want to do is change the time, you can simply move it on the screen.
- Touch and hold your finger down on the appointment you want to change.
- Drag the appointment to its new time slot.
If you need to change the time more drastically than touch-and-drag allows, or if you need to change other fields, you can also use the Edit button.
- Tap the appointment that you want to change.
- Tap the Edit button in the upper-right corner to see the Edit screen that shows the appointment details.
- Touch the tab in the field you need to adjust, just like you did when creating the event. For example, you can change the time of this appointment by touching the starts or Ends tab, and then adjusting the event's starting or ending time.
Editing a Repeating Event
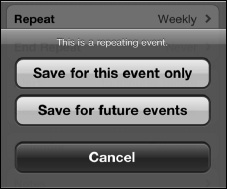
You edit a recurring or repeating event in exactly the same manner as any other event. The only difference is that you will be asked a question after you finish editing the event. You need to answer this question and tap the Done button.
![]()
Tap save for this event only if you want to make changes to only this instance of the repeating event.
Tap save for future events if you want to make changes to all instances of this repeating event.
Switching an Event to a Different Calendar
If you mistakenly set up an event on the wrong calendar, then go ahead and tap the Calendar button to change the calendar. Next, select one of the different calendars you have synced to your iPhone.
NOTE: Different fields may appear or disappear, depending on the calendar you choose to use.
If you change your event from a calendar synced using iTunes to one synced with Exchange, then you will see the second Alert field disappear. Also, you will see two new fields appear with an Exchange, Google, or iCloudcalendar: invitees and Availability.
Deleting an Event
Notice that, at the bottom of the Edit screen, you also have the option to delete this event. Simply touch the Delete Event button at the bottom of the screen to do so.
Meeting Invitations
For those who use Microsoft Exchange, Microsoft Outlook, or iCloud regularly, meeting invitations become a way of life. You receive a meeting invitation in your email, you accept the invitation, and then the appointment gets automatically placed in your calendar.
On your iPhone, you will see that invitations you accept are placed into your calendar immediately.
If you touch the meeting invitation in your calendar, you can see all the details that you need: the dial in number, the meeting ID, and any other details that might be included in the invitation.
Calendar Options
There are only a few options to adjust in your Calendar app; you can find these in the settings app. Follow these steps to adjust these options:
- Tap settings from your Home
- Scroll down to Mail, Contacts, Calendars and tap it.
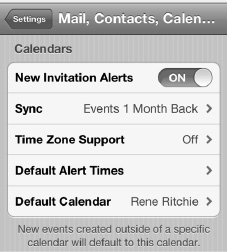
- Scroll down to Calendars (it's at the very bottom!) to see a few options.
- The first option is a simple switch that notifies you about New Invitation Alerts. If you receive any meeting invitations, it is good to keep this option set to the default ON position.
- Next, you may see the sync option if you sync your Calendar program using Exchange or iCloud. You can adjust the setting to sync events to 2 Weeks Back, 1 Month Back, 3 Months Back, 6 Months Back, or to show all All Events.
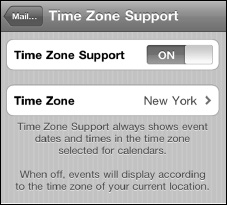
- Next, you can choose your time zone. This setting should reflect your Home settings from when you set up your iPhone. If you are traveling and want to adjust your appointments for a different time zone, you can change the Time Zone value to whatever city you prefer.
- Default alert times can be set for birthdays, events, and all-day events. Events contain the usual options while birthdays and all-day events allow for the day of the event, 1 day before, or 2 days before (all at 9am), or 1 week
Changing the Default Calendar
We mentioned earlier that you can have multiple calendars displayed on your iPhone. The Default Calendar screen allows you to choose which calendar will be your default calendar.
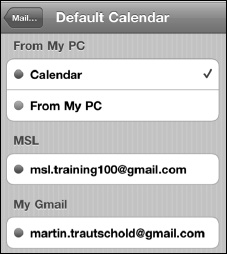
Specifying a calendar as the default means that, when you go to schedule a new appointment, this calendar will be selected by default.
If you wish to use a different calendar—say, your work calendar—then you can change that when you actually set the appointment, as shown earlier in this chapter.
Reminders
Reminders is a new app in iOS 5 that lets you simply and easily keep track of the things you need to get done, the dates and times you need to get them done by, and even the locations where they need doing. You can think of this app as Apple's answer to task or to-do lists.
Reminder Views
Your Reminders app has three main views: List, Date, and Month. what follows is a quick overview of these views.
List is the default view for Reminders and shows you at a glance all the tasks you need to accomplish.
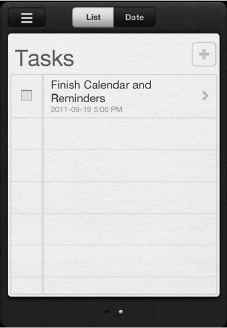
NOTE: The default List view for iCloud accounts is called Reminders. The default List view for Microsoft Exchange accounts is called Tasks.
If you have multiple lists, you can move between them by swiping from right to left, just as when moving between the different app pages on your iPhone's Home screen.
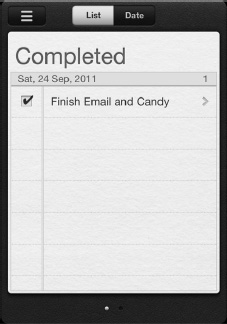
Swipe from left to right to see a list of your Completed
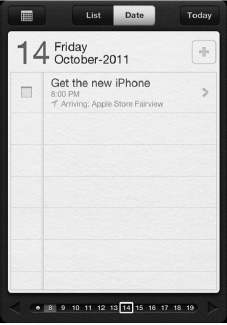
Date view lets you see your reminders on the day they're due. You can easily swipe from one day to the next; you can also scroll along the Date slider at the bottom. Follow these steps to change the date shown:
- Go to the next day: Swipe from right to left.
- Go to the previous day: Swipe from left to right.
- Go to Completed Tasklist: Swipe from left to right from the current day.
TIP: To return to the Today view, just touch the Today button at the top right.

To see the Month view, tap the Month button 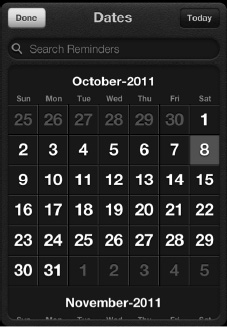 at the top left of the Date view. This will show you a layout of the full month. Days with reminders due are colored red.
![]()
TIP: To return to the Today view, just touch the Today button at the top right.
![]()
Follow these steps to move back and forth between months:
- Go to the next month: scroll down.
- Go to the previous month: scroll up.
Adding a New Reminder
To add a new task from any List view, follow these steps:
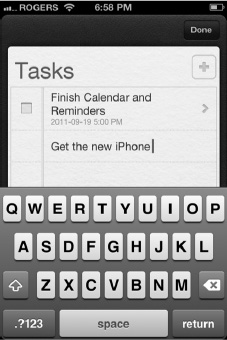
- Tap the first blank line at the end of your current list.

- Type in a title for your task.
- When you're finished, tap the black Done button on the top right.
NOTE: You can also tap the Add button to create a new task.![]()
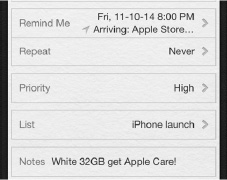
Adding Reminder Details
To add details to a task, tap the task's title. The Details screen lets you add the due date or location for Remind Me, the Priority of the reminder, which List you'd like it attached to, and any Notes you might want to add.
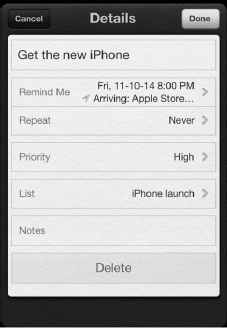
The Details page is also where you can delete a task.
NOTE: if you don't see all the options at first, tap the show More button to reveal them.
Setting Due Dates and Locations
The Reminders app includes standard due dates you can set for your reminders. When a task reaches its due date, you'll receive a popup notification to remind you about it.
The Reminders app also includes powerful geo-fencing capabilities; that is, it lets you set up location-based alerts for reminders. This means you can set reminders to change the light bulb when you arrive at your mother's house or to pick up milk when you leave the office.
NOTE: Location-based reminders are currently available only if you're using iCloud and you assign the task to an iCloud associated list.
Follow these steps to set a Remind Me date or location:
- Tap Remind Me.
- To set a due date, toggle the On a Day option to ON. By default, the date will be set to the current day.
- To change the date, tap it and move the rotating dials at the bottom to reflect the correct date for the task.
- Tap Done to return to the main Details screen.
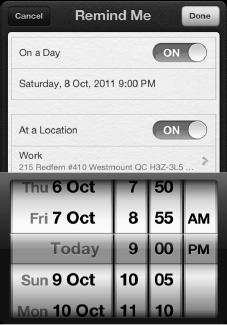
- To set a place, toggle At a Location to ON. By default, the place will be set to your current location.
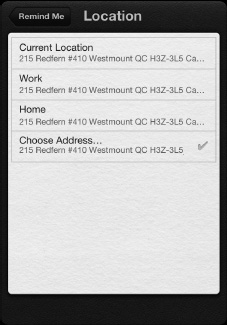
- To change your location, tap the field beneath At a Location and then tap Choose Address.
- Select an address from your Contactslist.
- Tap Done to return to the main Details screen.
TIP: Before you can use a location in Reminders, the location must be in your Contacts. To quickly add locations to your Contacts, use the Maps app (see Chapter 21: “Maps”).
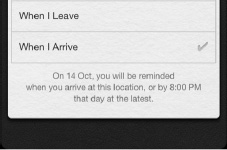
- If you want to be reminded when you leave a location, tap when I Leave.
- If you want to be reminded when you arrive at a location, tap when I Arrive.
- Tap Done to return to the main Details screen.
NOTE: if you set both a due date and a location, Reminders will send you an alert for whichever occurs first—you arrive at or leave a location or a reminder reaches the set time.
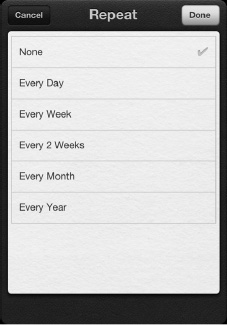
Recurring Reminders
Some of your reminders need to be triggered every day, week, or month at the same time or place. Follow these steps if you are scheduling a repeating or recurring task:
- Tap the Repeat tab and then select the time interval for the repeated event from the list.
- Tap Done to return to the main Details screen.
Changing Lists
Each treminder belongs to a list. You can have work lists, home lists, vacation lists, shopping lists—anything you like. The Details page will show the name of the list currently associated with your new task. Follow these steps to change your current list:
- Tap the current list name.
- Tap the list you want to change to.
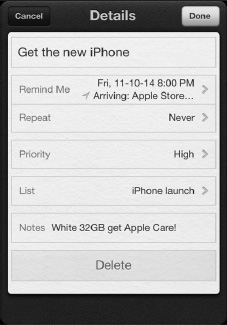
Adding Notes to a Task
Follow these steps if you want to add some notes to a task:
- Tap Notes and type or copy and paste a few notes.

- Tap Done to finish adding notes.
TIP: if this is a shopping list, you might want to include extra information like clothing sizes, food brands, or anything else that could be helpful.
Completing Reminders
It's incredibly easy to mark a reminder as Completed. Simply tap the box immediately to the left of the reminder's title and a Checkmark icon will appear. That will move the reminder from its current list to the special Completed list, so you can go back and refer to it later, if necessary.
![]()
If you make a mistake, just tap the box again to remove the Checkmark icon and return the reminder to its previous status. If the task has already been moved to the Completed list, swipe left until you get to the Completed list and then tap the box to uncheck it and move the reminder back to its previous list.
Editing Reminders
Sometimes, the details of a task may change and need to be adjusted. Luckily, changing any reminder is as simple as following these steps:
![]()
- Tap the reminder that you want to change.
- Tap the tabs on the Details page and adjust the details, just as you do when setting up a new task.
Deleting a Reminder
Notice that, at the bottom of the Details screen, you also have the option to delete a task. Simply tap the Delete button at the bottom of the screen to do so.
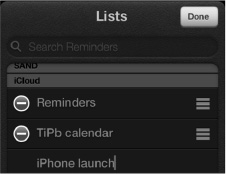
Adding a New List
The Reminders app lets you have multiple lists, which is handy for keeping your tasks organized. For example, you can make a new list to help you pack for an upcoming trip or shop for an upcoming birthday.
You can create a new list for either iCloud Reminders or Exchange Tasks accounts, or local lists On my iPhone. Follow these steps to create a new list:
- Tap the Lists button
 on the top left of the screen.

- On the Lists page, tap the Edit button at the top right.
- If you have more than one account syncing with Reminders, choose the one you want to add the new list to.
- Tap the Create New List… tab.
- Type in the name of your new list.
- Tap the grey Done button at the top right.
Moving and Deleting Lists
From the Lists page, you can also move and delete lists.
To move a list, touch and hold the Gripper icon to the far right, and then drag it to its new position.
To delete a list, tap the red Circle icon to the left of the list's name, and then tap the Delete button to confirm your choice.
Reminders Options
There are only two options to adjust in the Reminders app; you can find these in the settings app:
![]()
- Tap the settings icon from your Home screen.
- Scroll down to Mail, Contacts, Calendars and tap it.
- Scroll down to Reminders (it's at the very bottom!) to see the two options.
- The first option is sync. You can adjust this setting to sync 2 Weeks Back, 1 Month Back, 3 Months Back, 6 Months Back, or to show All Reminders.
Changing the Default List
We mentioned earlier that you can have multiple lists displayed on your iPhone. The Default List screen allows you to choose which list will be your default list.
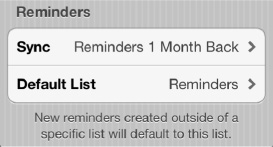
Specifying a list as the default means that, when you go to create a new reminder, it will be assigned to the specified list by default.