
Chapter 26
Troubleshooting
The iPhone is usually highly reliable. Occasionally, aswith your computer or any complicated electronic device, you might have to reset the device or troubleshoot a problem. In this chapter, we will give you some useful tools to help get your iPhone back up and running as quickly as possible. We will start with some basic quick troubleshooting and move onto more in-depth problems and resolutions in the “Advanced Troubleshooting” section.
We will also cover some other odds and ends related to your iPhone and give you a list of resources where you can find help for your iPhone.
Basic Troubleshooting
We will begin by covering a few basic tips and tricks to get your iPhone back up and running.when something goes wrong.
What to Do If the iPhone Stops Responding
Sometimes, your iPhone won't respond to your touch—it simply freezes in the middle of a program. If this happens, try these steps to see whether the iPhone will start responding (see Figure 26–1):

- Click the Home button once to see whether that exits the app to the Home screen.
- If a particular app is causing trouble, try double-clicking the Home button to open the App Switcher bar. Next, press and hold anyicon in the App Switcher baruntil they all shakeand a red Circle icon with a minus sign appears in the upper-left corner of the app icon.

- Tap the red Circle iconto close the app.
- If the iPhone continues to be unresponsive, try pressing the Sleep/Power key until you see Slide toPower Off.
- Press and hold the Home button until you return to the Home screen—this should quit the program.
- Make sure your iPhone isn't running out of power. Try plugging it in or attaching it to your computer (if it's plugged in) to see whether it will start to respond.
- If holding the Home button doesn't work, you will need to try to turn off your iPhone by pressing and holding the Power/Sleep button for three to four seconds.
- Next, slide the Slide to Power Off slider at the top of the screen. If you cannot power off the iPhone, then you will need to reset the iPhone. Skip ahead to the next section to learn how.
- After you power off the iPhone, wait a minute or so, and then turn on the iPhone by holding the same Power button for a few seconds.
- You should see the Apple logo appear on the screen. Wait until the iPhone starts up, and you should be able to access your programs and data.
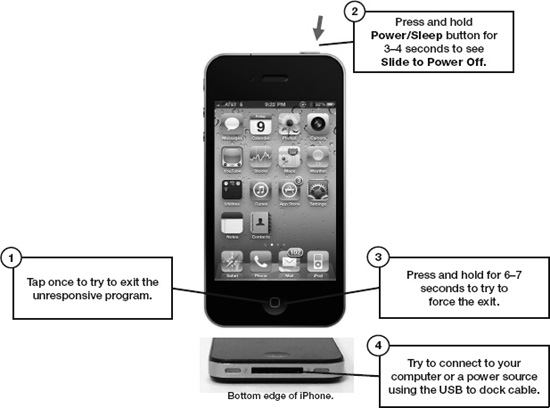
Figure 26–1. Basic troubleshooting steps
If these steps don't work, you will need to reset your iPhone.
How to Hard-Reset Your iPhone
Resetting your device is another option for dealing with an unresponsive iPhone. It is perfectly safe to do this, and it usually fixes many problems (see Figure 26–2).
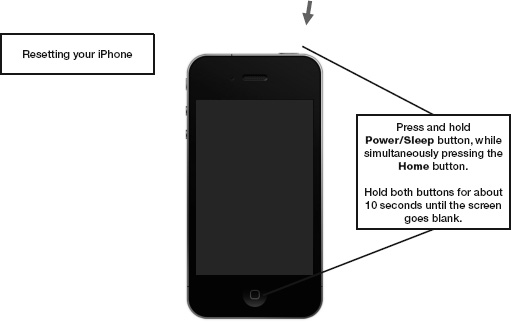
Figure 26–2. Resetting your iPhone
Follow these steps to hard-reset your iPhone:
- Using two hands, press and hold the Home button and the Power/Sleep button at the same time.
- Keep both buttons held down for about eight to ten seconds. You will see the Slide to Power Off slider. Ignore that and keep holding both buttons until the screen goes blank.
- After a few more seconds, you should see the Apple logo appear. When you see the logo, just release the buttons, and your iPhone will be reset.
How to Soft-Reset Your iPhone
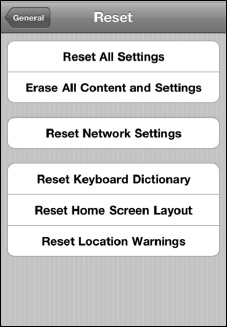
There are various things you can reset in the Settings app, from the Home screen layout to the network settings to all the data on your device:
- Tap the Settings icon.
- Tap General.
- Swipe up to see the bottom of the page.
- Tap Reset.
- Tap Reset All Settings to reset the network, keyboard, Home screen layout, and location warnings. Tap Reset to confirm in the pop-up window.
- Tap Erase All Content and Settings to erase everything from your iPhone, andthen tap Erase to confirm in the pop-up window.
- Tap Reset Network Settings to clear all your Wi-Fi (and 3G) network settings.
- Tap Reset Keyboard Dictionary to reset the spelling dictionary.
- Tap Reset Home Screen Layout to return to the factory layout; this restores your iPhone's Home screen to its original layout.
- Tap Reset Location Warnings to reset the warning messages you receive about allowing apps to use your current location.
No Sound in Music, Video, Alerts or Phone Ringer
Few things are more frustrating than missing phone calls, hoping to listen to music or watch a video, only to find that no sound comes out of the iPhone. Usually, there is an easy fix for this problem:
- If you are not hearing the phone ring or any other alerts, then check to make sure your Mute switch on the upper left edge of your device is not turned on. You know the Mute switch is set to on when it's switched toward the back of your device and you see a little orange color next to the switch. Make sure the Mute switch is pushed toward the front of your device, which is the off position.
- Check the volume by using the Volume Up key in the upper-left edge of your iPhone. You might have accidentally lowered the volume all the way or muted it.
- If you are using wired headphones from the headphone jack, unplug your headphones, and then put them back in. Sometimes, the headset jack isn't connected well.
- Follow these steps if you are using wireless Bluetooth headphones or a Bluetooth stereo setup:
- Check the volume setting (if available on the headphones or stereo).
- Check to make sure the Bluetooth device is connected. Tap the Settings icon, tap General, and then tap Bluetooth. Make sure you see your device listed and that its status is Connected. If it is not connected, then tap it and follow the directions to pair it with the iPhone.
NOTE: Sometimes you may actually be connected to a Bluetooth device and not know it. If you are connected to a Bluetooth Stereo device, no sound will come out of the actual iPhone.
- Make sure the song or video is not in Pause mode.
- Open the iPhone music or video controls. Double-clicking the Home button should open the App Switcher bar. Swipe from left to right to see your media controls.
- Swipe one more time to the right to see the volume controls. Verify that the song is not paused andthat the volume is not turned down all the way.
- Finally, check the Settings icon to see whether you (or someone else) has set the Volume Limit on the iPhone:
- Tap the Settings icon.
- Swipe down the page and tap Music.
- See whether Volume Limit is On.
- Tap Volume Limit to check the setting level. If the limit is unlocked, simply slide the volume to a higher level.
- If it is locked, you need to unlock it first by tapping the Unlock Volume Limit button and entering the four-digit code.
If none of these steps helps, check out the “Additional Troubleshooting and Help Resources” section later in this chapter. If that doesn't help, then try to restore your iPhone from a backup file using the steps in the “Restore Your iPhone from a Backup” section in the chapter. Finally, if that does not help, then contact the store or business that sold you your iPhone for assistance.
If You Can't Make Purchases from iTunes or the App Store
You have this cool new device, so you decide to visit the iTunes Store or the App Store. But what if you receive an error message, or you are not allowed to make a purchase? Try these steps if this happens to you:
- Both stores require an active Internet connection. Make sure you have either a Wi-Fi connection or a cellular data connection. For assistance, check out Chapter 4: “Connect to the Network.”
- Verify you have an active iTunes account.
Advanced Troubleshooting
Thus far we've covered the basic troubleshooting steps on your iPhone. In the upcoming sections, we will delve into some more advanced troubleshooting steps.
When YouriPhone Does Not Show Up in iTunes
Occasionally, your iPhone may not be recognized by the iTunes app when you connect your iPhone to your PC or Mac. Consequently, your iPhone will not appear in the left nav bar.
After you connect your iPhone to your computer, you should see it listed in the left nav bar under DEVICES. There are a few steps you can take to try and get the iTunes app to recognize your iPhone:
- Check the battery charge of the iPhone by looking at the battery level in the top right of the Home screen. If you have let the battery run too far down, the iTunes app won't see it until the level of the battery rises a bit.
- If the battery is charged, try connecting the iPhone to a different USB port on your computer. Sometimes, if you have always used one USB port for the iPhone and switch it to another port, the computer won't see it.
- If this still does not fix the problem, try disconnecting the iPhone and restarting the computer.
- Next, reconnect the iPhone to the USB port.
- If the iTunes app still doesn't see your iPhone, then download the latest update to iTunes, or completely uninstall and reinstall theiTunes app on the computer. If you choose this option, make sure that you back up all the information in iTunes first.
- You also might want to try another sync cable, it could be possible that your USB sync cable is defective.
Synchronization Problems
Sometimes, you might encounter errors when synchronizing your iPhone with your computer (PC or Mac). How you address the problem depends on your sync method.
Using iTunes to Sync
If you are using iTunes to sync your personal information, then follow these steps to resolve synchronization problems:
- First, follow all the steps we outlined in the “iPhone Does Not Show Up in iTunes” section of this chapter.
- If the iPhone still will not sync, but you can see it in the left nav bar of your iTunes app, go back to Chapter 3: “Sync with iCloud, iTunes, and More” andreview your sync settings very carefully.
Using Apple's iCloudor Microsoft Exchange to Sync
If you are using the iCloud service or Microsoft Exchange method to sync your email and personal information, then follow these troubleshooting steps to resolve synchronization problems:
- Both iCloud and Exchange sync require a wireless Internet data connection in order to sync your email and personal information. Verify that you have a live data connection by checking Table 1 in the Quick Start Guide's “Reading the Connectivity Status Icons” section.
- If you do not have a wireless data signal, then verify your Wi-Fi or 3G connection is set up correctly (see Chapter 4: “Connect to the Network”).
- After you have verified your connection, you need to check that your sync settings are correct on your computer and iPhone (see Chapter 3).
TIP: Sometimes your problem can be as simple as a changed password. If this is the case, then make sure to correct your password on your iPhone for your sync settings. These are found by tapping your Settings icon, then tapping Mail, Contacts and Calendars. Finally, tap the account name and adjust the password.
Reinstalling the iPhone Operating System (with or Without a Restore)
Sometimes, you might have to do a clean install of your iPhone operating system to get your iPhone back up and running smoothly. If an update is currently available, then this process will also result in upgrading your iPhone software.
TIP: This process is virtually identical to the process of updating your iPhone with a new version of the operating system.
During this process, you will have three choices:
- If you want to return the iPhone to its normal state with all your data, you will have to use the Restore function in the iTunes app.
- If you plan on getting a clean start and tying the iPhone to an iTunes account, then you will need to use the Setup a new iPhone function at the end of this process.
- If you plan on giving away or selling your iPhone, then you will simply need to eject the iPhone from iTunes at the end of this process (before doing a restore or new setup).
CAUTION: This restore process will wipe your iPhone totally clean. You will need to resynchronize and reinstall all of your apps and enter your account information, such as your email accounts. This process could take 30 minutes or longer, depending on how much information you have synced to your iPhone.
To reinstall the iPhone operating system software with the option of restoring data to your iPhone from a previous backup, follow these steps:
- Connect your iPhone to your computer and load the iTunesapp.
- Click your iPhone in the DEVICES category in the left nav bar.
- Click Summary in the top nav bar.
- You will see the Summary screen with all the information about your iPhone. Click the Restore button in the middle screen, as shown here (see Figure 26–3).
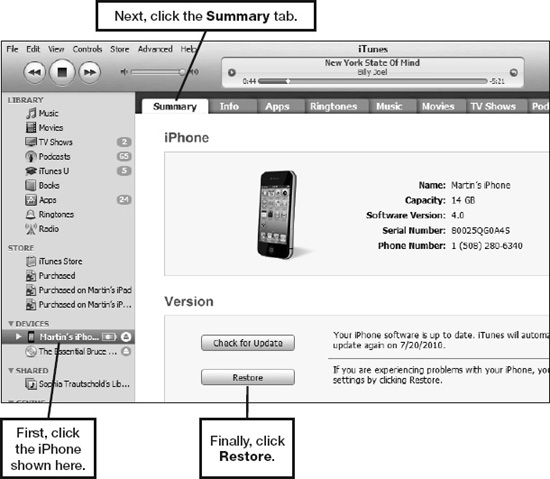
Figure 26–3. Connecting your iPhone and clicking the Restore button in the Summary screen
- Now you will be asked whether you want to back up your phone. Click Back Up just to be safe (see Figure 26–4).
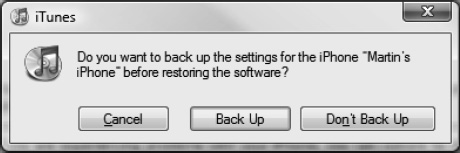
Figure 26–4. Backing up before you restore in iTunes
- On the next screen, you are warned that all data will be erased. Click Restore or Restore and Update to continue (see Figure 26–5).
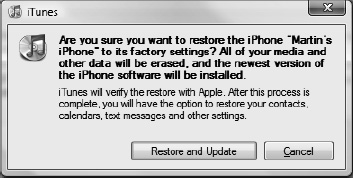
Figure 26–5. Backing up your iPhone in iTunes before a restore
- You will see an iPhone Software Update screen. Click Next> to continue.
- Next, you will see the Software License Agreement screen. Click Agree to continue and start the process.
- iTunes will download the latest iPhone software, back up and sync your iPhone, and then reinstall the iPhone software. This process completely erases all data and restores your iPhone to its original, “clean” state. You will see status messages at the top of iTunes similar to the one shown in Figure 26–6.

Figure 26–6. The software update/restore process, with a status window at top of iTunes
- After the backup and sync, your iPhone screen will go black. Next, the Apple logo will appear, and you will see a status bar under the logo. Finally, a small pop-up window will appear in iTunes to tell you the update process is complete. Click OK to go to the Set Up Your iPhone screen. You will have a couple options at this point:
- If you want to keep your iPhone clean (i.e., without any of your personal data), then select the top option, Setup as a new iPhone. You might want to use this option if you are setting up this iPhone for someone else (you will need her Apple ID and password).
- If you are giving away or selling your iPhone, simply click the Eject icon next to the iPhone, and you're done (see Figure 26–7).

Figure 26–7. Ejecting the iPhone if you are giving it away or selling it
- Select Restore from the backup of: and verify that the pull-down menu is set to the correct device.
- Finally, click Continue (see Figure 26–8).

Figure 26–8. Setting up as a new iPhone or restoring from a backup file
- If you chose to restore, then after a little while you will see a Restore in Progress screen on your iPhone and a status window in iTunes that says, “Restoring iPhone from backup…” This status window will also show a time estimate.
- Next, you will see a little pop-up window saying, “The settings for your iPhone have been restored.” In a few seconds, you will see your iPhone appear in the left nav bar under DEVICES in iTunes.
- If you sync your information with iTunes, all data will be synced now.
- If you use iCloud, Exchange, or another sync process, you will probably have to reenter passwords on your iPhone to get those sync processes back up and running.
Additional Troubleshooting and Help Resources
Sometimes you may encounter a particular issue or question that you cannot find an answer to in this book. In the following sections, we will provide some good resources that you can access from the iPhone and from your computer's web browser. The iPhone's on-device user guide is easy to navigate and canquickly provide you with the information you seek. The Apple knowledgebase is helpful if you are facing a troubleshooting problem that is proving especially difficult to resolve. The iPhone/iPod touch-related web blogs and forums are also good places to locate answers and even ask unique questions you might be facing.
On-Device iPhone User Guide
Follow these steps to access the on-device iPhone user guide:
- Open your Safari web browser to view the online user guide for your iPhone.
- Tap the Bookmarks button
 in the bottom row of icons.
 - Swipe to the bottom of the list and tap iPhone User Guide.
If you don't see that bookmark, then type this URL into Safari's Address bar on your iPhone: http://help.apple.com/iPhone.
TIP: To view the manual in PDF format from your computer, go to http://support.apple.com/manuals/iphone/.
Once you get to the user guide on your iPhone, you should see a screen similar to the one shown in Figure 26–9.
The nice thing is that you already know how to navigate the guide. Tap any topic to see more information about a topic—either another list of subtopics or more detailed information.
Read the topic or tap another link to learn more.
You can tap the button to the right of the screen to back out one level.
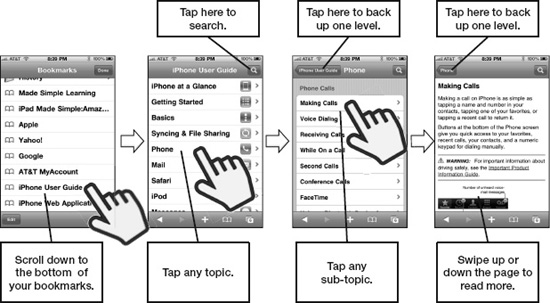
Figure 26–9. Using the iPhone manual from Safari on your iPhone
The Apple Knowledgebase
On your iPhone or computer's web browser, go to this web page: www.apple.com/support/iphone/
Finally, click a topic in the left navbar.
iPhone-Related Blogs
One of the great things about owning an iPhone is that you immediately join in the worldwide camaraderie of iPhone owners.
Many iPhone owners would be classified as enthusiasts and are part of any number of iPhone user groups. These user groups, along with various forums and web sites, serve as a great resource for iPhone users.
Many of these resources are available right from your iPhone, and others are web sites that you might want to visit on your computer.
Sometimes you might want to connect with other iPhone enthusiasts, ask a technical question, or keep up with the latest and greatest rumors. The blogs are a great place to do that.
Here are a few popular iPhone (and iPad or iPod touch) blogs:
www.tipb.comwww.iphonefreak.comwww.gizmodo.com(iPhone section)
TIP: Before you post a new question on any of these blogs, please do a search on the blog to make sure your question has not already been asked and answered. Also, make sure you are posting your question on the right section (e.g., iPhone) of the blog. Otherwise, you may incur the wrath of the community for not doing your homework first!
You can also do a web search for “iPhone blogs” or “iPhone news and reviews” to locate more blogs.