
Chapter 6
Icons and Folders
Your new iPhoneis very customizable. In this chapter, we will show you how to move icons around and put your favorite icons just where you want them. You’ve got up to 11 pages of icons to work with, and you can adjust the look and feel of those pages so they reflect your tastes.
Like a Mac computer or an iPad, the iPhone has a Bottom Dock where you can put the icons for your favorite apps. iPhones come with four standard icons in the Bottom Dock. You can replace the default icons with the icons for your favorite apps, so they are always available at the bottom of your screen. You can even move an entire folder of apps to the Bottom Dock.
TIP: You can also move or delete icons using the iTunes app on your computer. Check out Chapter 22:“iTunes on Your Device” for more information.
Moving Icons to the Bottom Dock
When you turn your iPhone on, you’ll notice four icons locked to the Bottom Dock.
Suppose you decide you want to exchange one or more of these icons for apps you use more often. Fortunately, moving icons to and from the Bottom Dock is easy.

Starting the Move
Press the Home button to get to your Home screen. Now touch and hold any icon on the Home screen for a couple of seconds. You’ll notice that all the icons start to shake.
Just try moving a couple of icons around at first. You’ll see that when you move an icon down, the other icons in the row move to make space for it.
Once you have a feel for how the icons move, you are ready to replace one of the Bottom Dock icons. While the icons are shaking, take the icon you wish to replace from the Bottom Dock and move it up to an area covered by other icons. (If you move it to an empty area, it will simply jump back to the Bottom Dock).
NOTE: You can have up to four icons in the Bottom Dock; so if you already have four icons there, you will have to remove one to replace it with a new one.
For example, suppose you want to replace the App Store icon in our example with the Skype icon because you like to have Skype handy to talk with your children away at college. The first thing to do is to make space in the Bottom Dock by removing the App Store icon from the Bottom Dock, as shown in Figure 6–1.
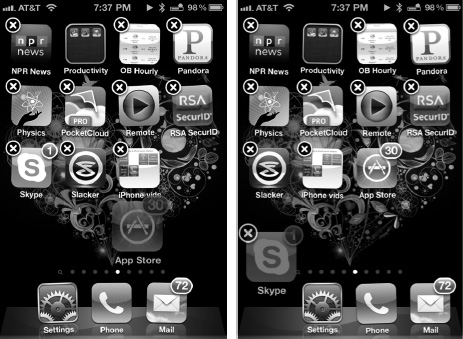
Figure 6–1. Swapping icons in the Bottom Dock
Next, locate your Skype icon and move it down to the Bottom Dock. As you’ll see, the icon becomes semi-transparent until you actually set it into place.
When you are sure that you have the icons just where you want them, simply press the Home button once and the icons will lock into place. At this point, you have the Skype icon in the Bottom Dock, where you can easily start video calls to your children in college.
Moving Icons to a Different Icon Page
iPhones can hold 16 icons on a page (not including the dock). You can navigate through these pages by swiping (right to left) on your Home screen. With all the cool apps available, it is not uncommon to have five, six, or even more pages of icons. You can have up to 11 pages filled with icons, if you feel adventurous!
NOTE: You can also navigate to new pages by swiping from left to right on any screen except the Home screen. On the Home screen, swiping left to right takes you to Spotlight Search; see Chapter 2: “Typing, Copy, and Search” for more information.
You may have an icon that you rarely use on your first page, so you want to move it way off to the last page. Or you may want to move an icon you often use from the last of the pages to the first page. Both tasks are very easy to do; indeed, it’s very much like moving icons to the Bottom Dock:
- Touch and hold any icon to initiate the moving process.
- Touch and hold the icon you wish to move. For example, let’s assume you want to move the iBooks icon to the first page (see Figure 6–2).
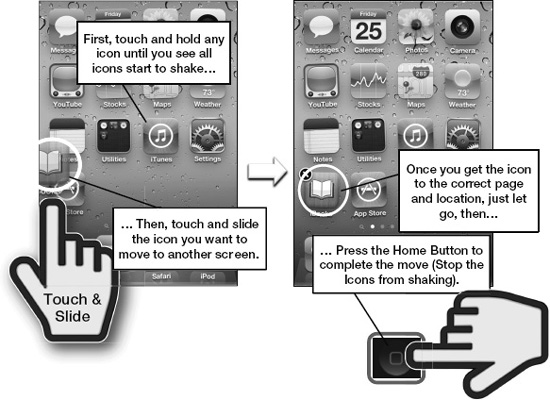
Figure 6–2. Moving icons from one page to another
- Now drag and drop the icon onto another page. To do this, touch and hold the iBooks icon and drag it to the left. You will see all of your pages of icons move by. When you get to the first page, just release the icon, and it is now placed at the very beginning.
- Press the Home key to complete the move and stop the icons from shaking.
Deleting Icons
Be careful—it is as easy to delete an icon as it is to move it. And when you delete an icon on the iPhone, you are actually deleting the program it represents. This means you won’t be able to use the program again without reinstalling or redownloading it.
Depending on your Application Sync settings in the iTunes app, the program may still reside in your Applications folder in iTunes. In that case, you would be able to reinstall the deleted app simply by checking that application in the list of apps to sync in iTunes.
As Figure 6–3 shows, the process to delete an icon is similar to the process for moving it. Touch and hold any icon to initiate the deletion process. Just as before, touching and holding makes the icons shake and allows you to move or delete them.
NOTE: You may delete only programs you have downloaded to your iPhone; the preinstalled icons and their associated programs can’t be deleted. You can tell which programs can be deleted because the icons for apps that can be deleted contain a small black x in the upper-left corner.
Just tap the x on the icon you’d like to delete. You will be prompted to either Delete the icon or Cancel the delete request. If you touch Delete, the icon and its related app will be removed from your iPhone.
NOTE: If you delete an icon such as a game where your progress has been tracked and saved, your progress will be erased when you delete that game.
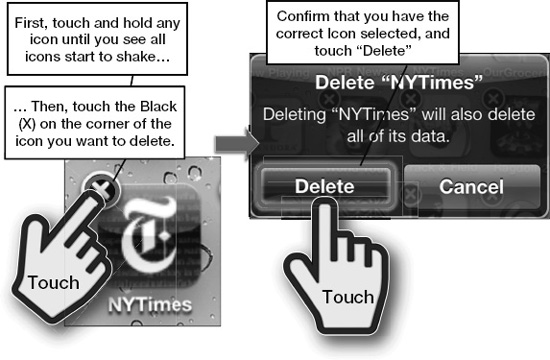
Figure 6–3. Deleting an icon and its associated program
Resetting All Your Icon Locations (Factory Defaults)
Occasionally, you might want to go back to the original, factory default icon settings. This might be the case when you’ve moved too many new icons to your first page and want to see all the basic icons again.
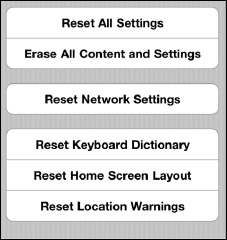
To do this, touch the Settings icon. Next, touch General, finally, scroll all the way to the bottom to touch Reset.

NOTE: Built-in apps will be restored to the same order they were in when Apple shipped the iPhone.
On the Reset screen, touch Reset Home Screen Layout near the bottom. Now all your icons will be returned to their original settings.
CAUTION: Be careful you don’t touch one of the other Reset options, as you can inadvertently erase your entire iPhone if you touch the wrong button. If you do, you’ll have to restore data from your iTunes backup.
Working with Folders
Your iPhone lets you organize your apps into folders. When you download new apps, they take up a spot on your Home page. Once you download many apps, it can become hard to find apps and keep them organized.
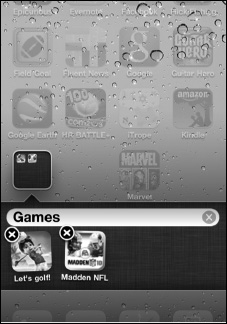
Using folders will allow you to keep your games, your productivity apps, and other like-functioning apps together in folders. Each folder can hold up to 12 apps—which can really help you organize your iPhone!
Creating the Folder
Creating folders is intuitive and fun:
- Hold down an app until all the apps start shaking (as you did before in the “Moving Icons” section).
- Drag an app onto another like-functioning app. For example, drag one productivity app onto another similar app. The iPhone will initially create a name for the folder.
- In this example, we dragged all three of the Apple productivity apps (Numbers, Keynote and Pages) on top of one another, and the iPhone created a folder called “Productivity.”
- You can edit the folder name by touching the Name field and typing a new name. (see Figure 6–4).
- Press the Home button to set the new folder name.
- Press the Home button again to return to the Home screen. At this point, you will see the new folder with its new name.
NOTE: You can place up to 12 app icons in a given folder. If you try to put more than that in a folder, you will see the new icon continually being “pushed” out of the folder. This animation indicates that the folder is full.
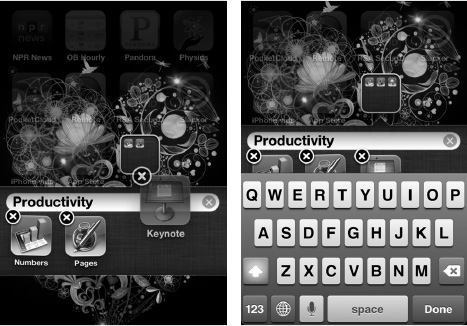
Figure 6–4. Moving icons to create a folder and renaming it.
Moving Folders
Just like apps, folders can also be moved from one Home page to another:
- Press and hold a folder until the folder and icons on the Home screen start to shake.
- Touch and hold the folder and drag it to your preferred spot on the screen (or to another Home screen), and then let go.
- When you have the folder in the spot you desire, just press the Home button to complete the move.
TIP: You can even move a folder down to the Bottom Dock if you like. This is a very handy way of having lots of apps right at your fingertips (see Figure 6–5).
