
![]()
Data Protection with Check Constraints and Triggers
You can’t, in sound morals, condemn a man for taking care of his own integrity. It is his clear duty.
—Joseph Conrad
One of the weirdest things I see in database implementations is that people spend tremendous amounts of time designing the correct database storage (or, at least, what seems like tremendous amounts of time to them) and then just leave the data unprotected with tables being more or less treated like buckets that will accept anything, opting to let code outside of the database layer to do all of the data protection. Honestly, I do understand the allure, in that the more constraints you apply, the harder development is in the early stages of the project, and the programmers honestly do believe that they will catch everything. The problem is, there is rarely a way to be 100% sure that all code written will always enforce every rule.
The second argument against using automatically enforced data protection is that programmers want complete control over the errors they will get back and over what events may occur that can change data. Later in this chapter, I will suggest methods that will let data formatting or even cascading insert operations occur to make sure that certain conditions in the data are met, making coding a lot easier. While the data being manipulated “magically” can be confusing initially, you have to think of the data layer as part of the application, not as a bucket with no limitations. Keeping the data from becoming an untrustworthy calamity of random bits is in everyone’s best interest.
Perhaps, in an ideal world, you could control all data input carefully, but in reality, the database is designed and then turned over to the programmers and users to “do their thing.” Those pesky users immediately exploit any weakness in your design to meet the requirements that they “thought they gave you in the first place.” No matter how many times I’ve forgotten to apply a UNIQUE constraint in a place where one was natural to be (yeah, I am preaching to myself along with the choir in this book sometimes), it’s amazing to me how quickly the data duplications start to occur. Ultimately, user perception is governed by the reliability and integrity of the data users retrieve from your database. If they detect data anomalies in their data sets (usually in skewed report values), their faith in the whole application plummets faster than a skydiving elephant who packed lunch instead of a parachute. After all, your future reputation is based somewhat on the perceptions of those who use the data on a daily basis.
One of the things I hope you will feel as you read this chapter (and keep the earlier ones in mind) is that, if at all possible, the data storage layer should own protection of the fundamental data integrity. Not that the other code shouldn’t play a part: I don’t want to have to wait for the database layer to tell me that a required value is missing, but at the same time, I don’t want a back-end loading process to have to use application code to validate that the data is fundamentally correct either. If the column allows NULLs, then I should be able to assume that a NULL value is at least in some context allowable. If the column is a nvarchar(20) column with no other data checking, I should be able to put every Unicode character in the column, and up to 20 concatenated values at that. The primary point of data protection is that the application layers ought do a good job of making it easy for the user, but the data layer can realistically be made nearly 100 percent trustworthy, whereas the application layers cannot. At a basic level, you expect keys to be validated, data to be reasonably formatted and fall within acceptable ranges, and required values to always exist, just to name a few. When those criteria can be assured, the rest won’t be so difficult, since the application layers can trust that the data they fetch from the database meets them, rather than having to revalidate.
The reason I like to have the data validation and protection logic as close as possible to the data it guards is that it has the advantage that you have to write this logic only once. It’s all stored in the same place, and it takes forethought to bypass. At the same time, I believe you should implement all data protection rules in the client, including the ones you have put at the database-engine level. This is mostly for software usability sake, as no user wants to have to wait for the round-trip to the server to find out that a column value is required when the UI could have simply indicated this to them, either with a simple message or even with visual cues. You build these simple validations into the client, so users get immediate feedback. Putting code in multiple locations like this bothers a lot of people because they think it’s
- Bad for performance
- More work
As C.S. Lewis had one of his evil characters note, “By mixing a little truth with it they had made their lie far stronger.” The fact of the matter is that these are, in fact, true statements, but in the end, it is a matter of degrees. Putting code in several places is a bit worse on performance, usually in a minor way, but done right, it will help, rather than hinder, the overall performance of the system. Is it more work? Well, initially it is for sure. I certainly can’t try to make it seem like it’s less work to do something in multiple places, but I can say that it is completely worth doing. In a good user interface, you will likely code even simple rules in multiple places, such as having the color of a column indicate that a value is required and having a check in the submit button that looks for a reasonable value instantly before trying to save the value where it is again checked by the business rule or object layer.
The real problem we must solve is that data can come from multiple locations:
- Users using custom front-end tools
- Users using generic data manipulation tools, such as Microsoft Access
- Routines that import data from external sources
- Raw queries executed by data administrators to fix problems caused by user error
Each of these poses different issues for your integrity scheme. What’s most important is that each of these scenarios (with the possible exception of the second) forms part of nearly every database system developed. To best handle each scenario, the data must be safeguarded, using mechanisms that work without the responsibility of the user.
If you decide to implement your data logic in a different tier other than directly in the database, you have to make sure that you implement it—and far more importantly, implement it correctly—in every single one of those clients. If you update the logic, you have to update it in multiple locations anyhow. If a client is “retired” and a new one introduced, the logic must be replicated in that new client. You’re much more susceptible to coding errors if you have to write the code in more than one place. Having your data protected in a single location helps prevent programmers from forgetting to enforce a rule in one situation, even if they remember everywhere else.
Because of concurrency, every statement is apt to fail due to a deadlock, or a timeout, or the data validated in the UI no longer being in the same state as it was even milliseconds ago. In Chapter 11, we will cover concurrency, but suffice it to say that errors arising from issues in concurrency are often exceedingly random in appearance and must be treated as occurring at any time. And concurrency is the final nail in the coffin of using a client tier only for integrity checking. Unless you elaborately lock all users out of the database objects you are using, the state could change and a database error could occur. Are the errors annoying? Yes, they are, but they are the last line of defense between having excellent data integrity and something quite the opposite.
In this chapter, I will look at the two basic building blocks of enforcing data integrity in SQL Server, first using declarative objects: check constraints, which allow you to define predicates on new rows in a table, and triggers, which are stored procedure style objects that can fire after a table’s contents have changed.
Check constraints are part of a class of the declarative constraints that are a part of the base implementation of a table. Basically, constraints are SQL Server devices that are used to enforce data integrity automatically on a single column or row. You should use constraints as extensively as possible to protect your data, because they’re simple and, for the most part, have minimal overhead.
One of the greatest aspects of all of SQL Server’s constraints (other than defaults) is that the query optimizer can use them to optimize queries, because the constraints tell the optimizer about some additional quality aspect of the data. For example, say you place a constraint on a column that requires that all values for that column must fall between 5 and 10. If a query is executed that asks for all rows with a value greater than 100 for that column, the optimizer will know without even looking at the data that no rows meet the criteria.
SQL Server has five kinds of declarative constraints:
- NULL: Determines if a column will accept NULL for its value. Though NULL constraints aren’t technically constraints, they behave like them.
- PRIMARY KEY and UNIQUE constraints: Used to make sure your rows contain only unique combinations of values over a given set of key columns.
- FOREIGN KEY: Used to make sure that any migrated keys have only valid values that match the key columns they reference.
- DEFAULT: Used to set an acceptable default value for a column when the user doesn’t provide one. (Some people don’t count defaults as constraints, because they don’t constrain updates.)
- CHECK: Used to limit the values that can be entered into a single column or an entire row.
We have introduced NULL, PRIMARY KEY, UNIQUE, and DEFAULT constraints in enough detail in Chapter 6; they are pretty straightforward without a lot of variation in the ways you will use them. In this section, I will focus the examples on the various ways to use check constraints to implement data protection patterns for your columns/rows. You use CHECK constraints to disallow improper data from being entered into columns of a table. CHECK constraints are executed after DEFAULT constraints (so you cannot specify a default value that would contradict a CHECK constraint) and INSTEAD OF triggers (covered later in this chapter) but before AFTER triggers. CHECK constraints cannot affect the values being inserted or deleted but are used to verify the validity of the supplied values.
The biggest complaint that is often lodged against constraints is about the horrible error messages you will get back. It is one of my biggest complaints as well, and there is very little you can do about it, although I will posit a solution to the problem later in this chapter. It will behoove you to understand one important thing: all statements should have error handling as if the database might give you back an error—because it might.
There are two flavors of CHECK constraint: column and table. Column constraints reference a single column and are used when the individual column is referenced in a modification. CHECK constraints are considered table constraints when more than one column is referenced in the criteria. Fortunately, you don’t have to worry about declaring a constraint as either a column constraint or a table constraint. When SQL Server compiles the constraint, it verifies whether it needs to check more than one column and sets the proper internal values.
We’ll be looking at building CHECK constraints using two methods:
The two methods are similar, but you can build more complex constraints using functions, though the code in a function can be more complex and difficult to manage. In this section, we’ll take a look at some examples of constraints built using each of these methods; then we’ll take a look at a scheme for dealing with errors from constraints. First, though, let’s set up a simple schema that will form the basis of the examples in this section.
The examples in this section on creating CHECK constraints use the sample tables shown in Figure 7-1.
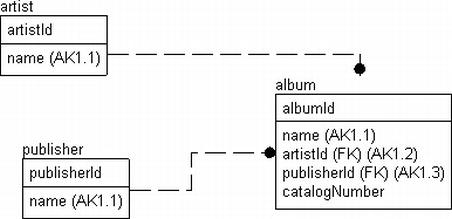
Figure 7-1. The example schema
To create and populate the tables, execute the following code (in the downloads, I include a simple create database for a database named Chapter7 and will put all objects in that database):
CREATE SCHEMA Music;
GO
CREATE TABLE Music.Artist
(
ArtistId int NOT NULL,
Name varchar(60) NOT NULL,
CONSTRAINT PKMusic_Artist PRIMARY KEY CLUSTERED (ArtistId),
CONSTRAINT PKMusic_Artist_Name UNIQUE NONCLUSTERED (Name)
);
CREATE TABLE Music.Publisher
(
PublisherIdint NOT NULL, primary key
Namevarchar(20) NOT NULL,
CatalogNumberMask varchar(100) NOT NULL
CONSTRAINT DfltMusic_Publisher_CatalogNumberMask default ('%'),
CONSTRAINT AKMusic_Publisher_Name UNIQUE NONCLUSTERED (Name),
);
CREATE TABLE Music.Album
(
AlbumId int NOT NULL,
Name varchar(60) NOT NULL,
ArtistId int NOT NULL,
CatalogNumber varchar(20) NOT NULL,
PublisherId int NOT NULL --not requiring this information
CONSTRAINT PKMusic_Album PRIMARY KEY CLUSTERED(AlbumId),
CONSTRAINT AKMusic_Album_Name UNIQUE NONCLUSTERED (Name),
CONSTRAINT FKMusic_Artist$records$Music_Album
FOREIGN KEY (ArtistId) REFERENCES Music.Artist(ArtistId),
CONSTRAINT FKMusic_Publisher$published$Music_Album
FOREIGN KEY (PublisherId) REFERENCES Music.Publisher(PublisherId)
);
Then seed the tables with the following data:
INSERT INTO Music.Publisher (PublisherId, Name, CatalogNumberMask)
VALUES (1,'Capitol',
'[0-9][0-9][0-9]-[0-9][0-9][0-9a-z][0-9a-z][0-9a-z]-[0-9][0-9]'),
(2,'MCA', '[a-z][a-z][0-9][0-9][0-9][0-9][0-9]'),
INSERT INTO Music.Artist(ArtistId, Name)
VALUES (1, 'The Beatles'),(2, 'The Who'),
INSERT INTO Music.Album (AlbumId, Name, ArtistId, PublisherId, CatalogNumber)
VALUES (1, 'The White Album',1,1,'433-43ASD-33'),
(2, 'Revolver',1,1,'111-11111-11'),
(3, 'Quadrophenia',2,2,'CD12345'),
A likely problem with this design is that it isn’t normalized well enough for a realistic solution. Publishers usually have a mask that’s valid at a given point in time, but everything changes. If the publishers lengthen the size of their catalog numbers or change to a new format, what happens to the older data? For a functioning system, it would be valuable to have a release-date column and catalog number mask that was valid for a given range of dates. Of course, if you implemented the table as presented, the enterprising user, to get around the improper design, would create publisher rows such as 'MCA 1989-1990', 'MCA 1991-1994', and so on and mess up the data for future reporting needs, because then, you’d have work to do to correlate values from the MCA company (and your table would be not even technically in First Normal Form!).
As a first example of a check constraint, consider if you had a business rule that no artist with a name that contains the word 'Pet' followed by the word 'Shop' is allowed, you could code the following as follows (note, all examples assume a case-insensitive collation, which is almost certainly the norm):
ALTER TABLE Music.Artist WITH CHECK
ADD CONSTRAINT chkMusic_Artist$Name$NoPetShopNames
CHECK (Name not like '%Pet%Shop%'),
Then, test by trying to insert a new row with an offending value:
INSERT INTO Music.Artist(ArtistId, Name)
VALUES (3, 'Pet Shop Boys'),
This returns the following result
Msg 547, Level 16, State 0, Line 1
The INSERT statement conflicted with the CHECK constraint "chkMusic_Artist$Name$NoPetShopNames". The conflict occurred in database "Chapter7", table "Music.Artist", column 'Name'.
thereby keeping my music collection database safe from at least one band from the ’80s.
When you create a CHECK constraint, the WITH NOCHECK setting (the default is WITH CHECK) gives you the opportunity to add the constraint without checking the existing data in the table.
Let’s add a row for another musician who I don’t necessarily want in my table:
INSERT INTO Music.Artist(ArtistId, Name)
VALUES (3, 'Madonna'),
Later in the process, it is desired that no artists with the word “Madonna” will be added to the database, but if you attempt to add a check constraint
ALTER TABLE Music.Artist WITH CHECK
ADD CONSTRAINT chkMusic_Artist$Name$noMadonnaNames
CHECK (Name not like '%Madonna%'),
rather than the happy “Command(s) completed successfully.” message you so desire to see, you see the following:
Msg 547, Level 16, State 0, Line 1
The ALTER TABLE statement conflicted with the CHECK constraint "chkMusic_Artist$Name$noMadonnaNames". The conflict occurred in database "Chapter7", table "Music.Artist", column 'Name'.
In order to allow the constraint to be added, you might specify the constraint using WITH NOCHECK rather than WITH CHECK because you now want to allow this new constraint, but there’s data in the table that conflicts with the constraint, and it is deemed too costly to fix or clean up the existing data.
ALTER TABLE Music.Artist WITH NOCHECK
ADD CONSTRAINT chkMusic_Artist$Name$noMadonnaNames
CHECK (Name not like '%Madonna%'),
The statement is executed to add the check constraint to the table definition, though using NOCHECK means that the bad value does not affect the creation of the constraint. This is OK in some cases but can be very confusing because anytime a modification statement references the column, the CHECK constraint is fired. The next time you try to set the value of the table to the same bad value, an error occurs. In the following statement, I simply set every row of the table to the same name it has stored in it:
UPDATE Music.Artist
SET Name = Name;
This gives you the following error message:
Msg 547, Level 16, State 0, Line 1
The UPDATE statement conflicted with the CHECK constraint "chkMusic_Artist$Name$noMadonnaNames". The conflict occurred in database "Chapter7", table "Music.Artist", column 'Name'.
“What?” most users will exclaim. If the value was in the table, shouldn’t it already be good? The user is correct. This kind of thing will confuse the heck out of everyone and cost you greatly in support, unless the data in question is never used. But if it’s never used, just delete it, or include a time range for the values. CHECK Name not like %Madonna% OR rowCreateDate < '20111131' could be a reasonable compromise. Using NOCHECK and leaving the values unchecked is almost worse than leaving the constraint off in many ways.
![]() Tip If a data value could be right or wrong, based on external criteria, it is best not to be overzealous in your enforcement. The fact is, unless you can be 100 percent sure, when you use the data later, you will still need to make sure that the data is correct before usage.
Tip If a data value could be right or wrong, based on external criteria, it is best not to be overzealous in your enforcement. The fact is, unless you can be 100 percent sure, when you use the data later, you will still need to make sure that the data is correct before usage.
One of the things that makes constraints excellent beyond the obvious data integrity reasons is that if the constraint is built using WITH CHECK , the optimizer can make use of this fact when building plans if the constraint didn’t use any functions and just used simple comparisons such as less than, greater than, and so on. For example, imagine you have a constraint that says that a value must be less than or equal to 10. If, in a query, you look for all values of 11 and greater, the optimizer can use this fact and immediately return zero rows, rather than having to scan the table to see whether any value matches.
If a constraint is built with WITH CHECK, it’s considered trusted, because the optimizer can trust that all values conform to the CHECK constraint. You can determine whether a constraint is trusted by using the sys.check_constraints catalog object:
SELECT definition, is_not_trusted
FROMsys.check_constraints
WHEREobject_schema_name(object_id) = 'Music'
AND name = 'chkMusic_Artist$Name$noMadonnaNames';
This returns the following results (with some minor formatting, of course):
definition is_not_trusted
------------------------------ ------------
(NOT [Name] like '%Madonna%') 1
Make sure, if at all possible, that is_not_Trusted = 0 for all rows so that the system trusts all your CHECK constraints and the optimizer can use the information when building plans.
![]() Caution Creating check constraints using the CHECK option (instead of NOCHECK) on a tremendously large table can take a very long time to apply, so often, you’ll feel like you need to cut corners to get it done fast. The problem is that the shortcut on design or implementation often costs far more in later maintenance costs or, even worse, in the user experience. If at all possible, it’s best to try to get everything set up properly, so there is no confusion.
Caution Creating check constraints using the CHECK option (instead of NOCHECK) on a tremendously large table can take a very long time to apply, so often, you’ll feel like you need to cut corners to get it done fast. The problem is that the shortcut on design or implementation often costs far more in later maintenance costs or, even worse, in the user experience. If at all possible, it’s best to try to get everything set up properly, so there is no confusion.
To make the constraint trusted, you will need to clean up the data and use ALTER TABLE <tableName> WITH CHECK CHECK CONSTRAINT constraintName to have SQL Server check the constraint and set it to trusted. Of course, this method suffers from the same issues as creating the constraint with NOCHECK in the first place (mostly, it can take forever!). But without checking the data, the constraint will not be trusted, not to mention that forgetting to reenable the constraint is too easy. For our constraint, we can try to check the values:
ALTER TABLE Music.Artist WITH CHECK CHECK CONSTRAINT chkMusic_Artist$Name$noMadonnaNames;
And it will return the following error (as it did when we tried to create it the first time):
Msg 547, Level 16, State 0, Line 1
The ALTER TABLE statement conflicted with the CHECK constraint "chkMusic_Artist$Name$noMadonnaNames". The conflict occurred in database "Chapter7", table "Music.Artist", column 'Name'.
But, if we delete the row with the name Madonna
DELETE FROM Music.Artist
WHERE Name = 'Madonna';
and try again, the ALTER TABLE statement will be execute without error, and the constraint will be trusted (and all will be well with the world!). One last thing you can do is to disable a constraint, using NOCHECK:
ALTER TABLE Music.Artist NOCHECK CONSTRAINT chkMusic_Artist$Name$noMadonnaNames;
Now, you can see that the constraint is disabled by adding an additional object property:
SELECT definition, is_not_trusted, is_disabled
FROMsys.check_constraints
WHEREobject_schema_name(object_id) = 'Music'
AND name = 'chkMusic_Artist$Name$noMadonnaNames';
which will return
definition is_not_trusted is_disabled
------------------------------ ------------ ------------
(NOT [Name] like '%Madonna%') 1 1
Then, rerun the statement to enable the statement before we continue:
ALTER TABLE Music.Artist WITH CHECK CHECK CONSTRAINT chkMusic_Artist$Name$noMadonnaNames
After that, checking the output of the sys.check_constraints query, you will see that it has been enabled.
CHECK Constraints Based on Simple Expressions
By far, most CHECK constraints are simple expressions that just test some characteristic of a value in a column or columns. These constraints often don’t reference any data other than the single column but can reference any of the columns in a single row.
As a few examples, consider the following:
- Empty strings: Prevent users from inserting one or more space characters to avoid any real input into a column—CHECK (LEN(ColumnName) > 0). This constraint is on 90 percent of the varchar and char columns in databases I design.
- Date range checks: Make sure a reasonable date is entered, for example:
- The date a rental is required to be returned should be greater than one day after the RentalDate (assume the two columns are implemented with the date datatype): CHECK (ReturnDate > dateadd(day,1,RentalDate)).
- Date of some event that’s supposed to have occurred already in the past: CHECK (EventDate <= GETDATE()).
- Value reasonableness: Make sure some value, typically a number of some sort, is reasonable for the situation. Reasonable, of course, does not imply that the value is necessarily correct for the given situation, which is usually the domain of the middle tier of objects—just that it is within a reasonable domain of values. For example:
- Values must be a nonnegative integer. This is common, because there are often columns where negative values don’t make sense (hours worked, miles driven, and so on): CHECK (MilesDriven >= 0).
- Royalty rate for an author that’s less than or equal to 30 percent. If this rate ever could be greater, it isn’t a CHECK constraint. So if 15 percent is the typical rate, the UI might warn that it isn’t normal, but if 30 percent is the absolute ceiling, it would be a good CHECK constraint: CHECK (RoyaltyRate <= .3).
CHECK constraints of this variety are always a good idea when you have situations where there are data conditions that must always be true. Another way to put this is that the very definition of the data is being constrained, not just a convention that could change fairly often or even be situationally different. These CHECK constraints are generally extremely fast and won’t negatively affect performance except in extreme situations. As an example, I’ll just show the code for the first, empty string check, because simple CHECK constraints are easy to code once you have the syntax. A common CHECK constraint that I add to string type columns (varchar, char) prevents blank data from being entered. This is because, most of the time, if a value is required, it isn’t desired that the value for a column be blank, unless having no value for the column makes sense(as opposed to having a NULL value, meaning that the value is not currently known).
For example, in the Album table, the Name column doesn’t allow NULLs. The user has to enter something, but what about when the enterprising user realizes that '' is not the same as NULL? What will be the response to an empty string? Ideally, of course, the UI wouldn’t allow such nonsense for a column that had been specified as being required, but the user just hits the space bar, but to make sure, we will want to code a constraint to avoid it.
To avoid letting a user get away with a blank row, you can add the following constraint to prevent this from ever happening again (after deleting the two blank rows). It works by using the LEN function that does a trim by default, eliminating any space characters, and checking the length:
ALTER TABLE Music.Album WITH CHECK
ADD CONSTRAINT chkMusicAlbum$Name$noEmptyString
CHECK (LEN(Name) > 0); --note,len does a trim by default, so any string
--of all space characters will return 0
Testing this with data that will clash with the new constraint
INSERT INTO Music.Album ( AlbumId, Name, ArtistId, PublisherId, CatalogNumber )
VALUES ( 4, '', 1, 1,'dummy value' );
you get the following error message
Msg 547, Level 16, State 0, Line 1
The INSERT statement conflicted with the CHECK constraint "chkMusicAlbum$Name$noEmptyString". The conflict occurred in database "Chapter7", table "Music.Album", column 'Name'.
All too often, nonsensical data is entered just to get around your warning, but that is more of a UI or managerial oversight problem than a database design concern, because the check to see whether 'ASDFASDF' is a reasonable name value is definitely not of the definite true/false variety. (Have you seen what some people name their kids?) What’s generally the case is that the user interface will then prevent such data from being created via the UI, but the CHECK constraint is there to prevent other processes from putting in completely invalid data as well.
These check constraints are very useful when you are loading data into the table from an outside source. Often, when data is imported from a file, like from the Import Wizard, blank data will be propagated as blank values, and the programmers involved might not think to deal with this condition. The check constraints make sure that the data is put in correctly. And as long as you are certain to go back and recheck the trusted status and values, their existence helps to remind you even if they are ignored, like using SSIS’s bulk loading features. In Figure 7-2, you will see that you can choose to (or choose not to) check constraints on the OLEDB destination output. In this case, it may either disable the constraint, or set to not trusted to speed loading, but it will limit the data integrity and optimizer utilization of the constraint until you reset it to trusted as was demonstrated in the previous section.
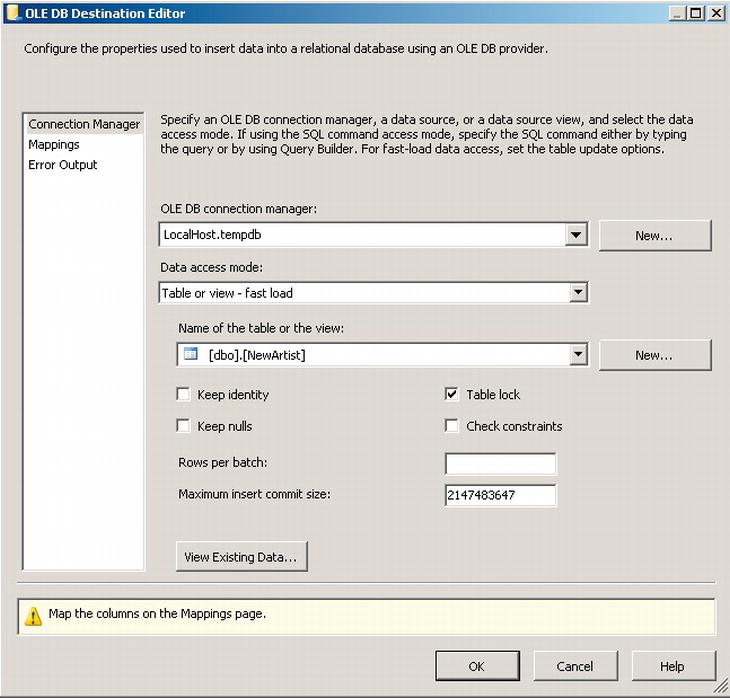
Figure 7-2. Example SSIS OLEDB Output with Check constraints deselected
CHECK Constraints Using Functions
Sometimes, you really need to implement a complex data check where a simple Boolean expression using the columns in the table and base T-SQL scalar functions just won’t do. In standard SQL, you can use a subquery in your constraints. However, in SQL Server, subqueries are not allowed, but you can use a scalar T-SQL function, even if it accesses another table.
In general, using functions is a fairly atypical solution to ensuring data integrity, but it can be far more powerful and, in many ways, quite useful when you need to build slightly complex data integrity protection. For the most part, CHECK constraints usually consist of the simple task of checking a stable format or value of a single column, and for these tasks, a standard CHECK constraint using the simple <BooleanExpression> is perfectly adequate.
However, a CHECK constraint need not be so simple. A UDF can be complex and might touch several tables in the instance. Here are some examples:
- Complex scalar validations (often using CLR functions): For example, in a situation where a regular expression would be easier to use than a LIKE comparison.
- Validations that access other tables : For example, to check a domain that is based on values in several tables, rather than a simple foreign key. In the example, I will implement an entry mask that is table based, so it changes based on a related table’s value.
I should warn you that calling a UDF has a great deal of overhead, and while you might get the urge to encapsulate a simple scalar for use in a CHECK constraint, it almost always isn’t worth the overhead. As we have mentioned, CHECK constraints are executed once per row affected by the DML modification statement, and this extra cost will be compounded for every row affected by the modification query. I realize that this can be counterintuitive to a good programmer thinking that encapsulation is one of the most important goals of programming, but SQL is quite different from other types of programming in many ways because of the fact that you are pushing so much of the work to the engine, and the engine has its own way of doing things that you must respect.
Hence, it’s best to try to express your Boolean expression without a UDF unless it’s entirely necessary to access additional tables or do something more complex than a simple expression can. In the following examples, I’ll employ UDFs to provide powerful rule checking, which can implement complex rules that would prove difficult to code using a simple Boolean expression.
You can implement the UDFs in either T-SQL or a .NET language (VB .NET, C#, or any .NET language that lets you exploit the capabilities of SQL Server 2005+ to write CLR-based objects in the database). In many cases, especially if you aren’t doing any kind of table access in the code of the function, the CLR will perform much better than the T-SQL version.
As an example, I need to access values in a different table, so I’m going to build an example that implements an entry mask that varies based on the parent of a row. Consider that it’s desirable to validate that catalog numbers for albums are of the proper format. However, different publishers have different catalog number masks for their clients’ albums. (A more natural, yet distinctly more complex example would be phone numbers and addresses from around the world.)
For this example, I will continue to use the tables from the previous section. Note that the mask column, Publisher.CatalogNumberMask , needs to be considerably larger (five times larger in my example code) than the actual CatalogNumber column, because some of the possible masks use multiple characters to indicate a single character. You should also note that it’s a varchar, even though the column is stored as a char value, because using char variables as LIKE masks can be problematic because of the space padding at the end of such columns (the comparison thinks that the extra space characters that are padded on the end of the fixed-length string need to match in the target string, which is rarely what’s desired).
To do this, I build a T-SQL function that accesses this column to check that the value matches the mask, as shown (note that we’d likely build this constraint using T-SQL rather than by using the CLR, because it accesses a table in the body of the function):
CREATE FUNCTION Music.Publisher$CatalogNumberValidate
(
@CatalogNumber char(12),
@PublisherId int --not based on the Artist ID
)
RETURNS bit
AS
BEGIN
DECLARE @LogicalValue bit, @CatalogNumberMask varchar(100);
SELECT @LogicalValue = CASE WHEN @CatalogNumber LIKE CatalogNumberMask
THEN 1
ELSE 0 END
FROM Music.Publisher
WHERE PublisherId = @PublisherId;
RETURN @LogicalValue;
END;
When I loaded the data in the start of this section, I preloaded the data with valid values for the CatalogNumber and CatalogNumberMask columns:
SELECT Album.CatalogNumber, Publisher.CatalogNumberMask
FROMMusic.Album as Album
JOIN Music.Publisher as Publisher
ON Album.PublisherId = Publisher.PublisherId;
This returns the following results:
CatalogNumber CatalogNumberMask
-------------- ------------------------------------------------------------
433-43ASD-33 [0-9][0-9][0-9]-[0-9][0-9][0-9a-z][0-9a-z][0-9a-z]-[0-9][0-9]
111-11111-11 [0-9][0-9][0-9]-[0-9][0-9][0-9a-z][0-9a-z][0-9a-z]-[0-9][0-9]
CD12345 [a-z][a-z][0-9][0-9][0-9][0-9][0-9]
Now, let’s add the constraint to the table, as shown here:
ALTER TABLE Music.Album
WITH CHECK ADD CONSTRAINT
chkMusicAlbum$CatalogNumber$CatalogNumberValidate
CHECK (Music.Publisher$CatalogNumbervalidate
(CatalogNumber,PublisherId) = 1);
If the constraint gives you errors because of invalid data existing in the table (because you were adding data, trying out the table, or in real development, this often occurs with test data from trying out the UI that they are building), you can use a query like the following to find them:
SELECT Album.Name, Album.CatalogNumber, Publisher.CatalogNumberMask
FROMMusic.Album AS Album
JOIN Music.Publisher AS Publisher
on Publisher.PublisherId = Album.PublisherId
WHERE Music.Publisher$CatalogNumbervalidate(Album.CatalogNumber,Album.PublisherId) = 1;
Now, let’s attempt to add a new row with an invalid value:
INSERT Music.Album(AlbumId, Name, ArtistId, PublisherId, CatalogNumber)
VALUES (4,'Who''s Next',2,2,'1'),
This causes the error, because the catalog number of '1' doesn’t match the mask set up for PublisherId number 2:
Msg 547, Level 16, State 0, Line 1
The INSERT statement conflicted with the CHECK constraint "chkMusicAlbum$CatalogNumber$CatalogNumberValidate". The conflict occurred in database "Chapter7", table "Music.Album".
Now, changing change the catalog number to something that matches the entry mask the constraint is checking:
INSERT Music.Album(AlbumId, Name, ArtistId, CatalogNumber, PublisherId)
VALUES (4,'Who''s Next',2,'AC12345',2);
SELECT * FROM Music.Album;
This returns the following results, which you can see matches the ‘[a-z][a-z][0-9][0-9][0-9][0-9][0-9]’ mask set up for the publisher with PublisherId = 2:
| AlbumId | Name | ArtistId | CatalogNumber | PublisherId |
| ------- | --------------- | -------- | ------------- | ----------- |
| 1 | The White Album | 1 | 433-43ASD-33 | 1 |
| 2 | Revolver | 1 | 111-11111-11 | 1 |
| 3 | Quadrophenia | 2 | CD12345 | 2 |
| 4 | Who's Next | 2 | AC12345 | 2 |
Using this kind of approach, you can build any single-row validation code for your tables. As described previously, each UDF will fire once for each row and each column that was modified in the update. If you are making large numbers of inserts, performance might suffer, but having data that you can trust is worth it.
We will talk about triggers later in this chapter, but alternatively, you could create a trigger that checks for the existence of any rows returned by a query, based on the query used earlier to find improper data in the table:
SELECT *
FROM Music.Album AS Album
JOIN Music.Publisher AS Publisher
on Publisher.PublisherId = Album.PublisherId
WHERE Music.Publisher$CatalogNumberValidate
(Album.CatalogNumber, Album.PublisherId) <> 1;
There’s one drawback to this type of constraint, whether implemented in a constraint or trigger. As it stands right now, the Album table is protected from invalid values being entered into the CatalogNumber column, but it doesn’t say anything about what happens if a user changes the CatalogEntryMask on the Publisher table. If this is a concern, you’d need to add a CHECK constraint to the Publisher table that validates changes to the mask against any existing data.
![]() Caution Using user-defined functions
that access other rows in the same table is dangerous, because while the data for each row appears in the table as the function is executed, if multiple rows are updated simultaneously, those rows do not appear to be in the table, so if an error condition exists only in the rows that are being modified, your final results could end up in error.
Caution Using user-defined functions
that access other rows in the same table is dangerous, because while the data for each row appears in the table as the function is executed, if multiple rows are updated simultaneously, those rows do not appear to be in the table, so if an error condition exists only in the rows that are being modified, your final results could end up in error.
Enhancing Errors Caused by Constraints
The real downside to check constraints is the error messages they produce upon failure. The error messages are certainly things you don’t want to show to a user, if for no other reason other than they will generate help desk calls every time typical users see them. Dealing with these errors is one of the more annoying parts of using constraints in SQL Server.
Whenever a statement fails a constraint requirement, SQL Server provides you with an ugly message and offers no real method for displaying a clean message automatically. Luckily, SQL Server 2005 implemented vastly improved error-handling capabilities in T-SQL over previous versions. In this section, I’ll briefly detail a way to refine the ugly messages you get from a constraint error message, much like the error from the previous statement:
Msg 547, Level 16, State 0, Line 1
The INSERT statement conflicted with the CHECK constraint "chkMusicAlbum$CatalogNumber$CatalogNumberValidate". The conflict occurred in database "Chapter7", table "Music.Album".
I’ll show you how to map this to an error message that at least makes some sense. First, the parts of the error message are as follows:
- Error number —Msg 547: The error number that’s passed back to the calling program. In some cases, this error number is significant; however, in most cases it’s enough to say that the error number is nonzero.
- Level —Level 16: A severity level for the message. 0 through 18 are generally considered to be user messages, with 16 being the default. Levels 19–25 are severe errors that cause the connection to be severed (with a message written to the log) and typically involve data corruption issues.
- State —State 0: A value from 0–127 that represents the state of the process when the error was raised. This value is rarely used by any process.
- Line —Line 1: The line in the batch or object where the error is occurring. This value can be extremely useful for debugging purposes.
- Error description : A text explanation of the error that has occurred.
In its raw form, this is the exact error that will be sent to the client. Using the new TRY-CATCH error handling, we can build a simple error handler and a scheme for mapping constraints to error messages (or you can do much the same thing in client code as well for errors that you just cannot prevent from your user interface). Part of the reason we name constraints is to determine what the intent was in creating the constraint in the first place. In the following code, we’ll implement a very rudimentary error-mapping scheme by parsing the text of the name of the constraint from the message, and then we’ll look this value up in a mapping table. It isn’t a “perfect” scheme, but it does the trick when using constraints as the only data protection for a situation (it is also helps you to document the errors that your system may raise as well).
First, let’s create a mapping table where we put the name of the constraint that we’ve defined and a message that explains what the constraint means:
CREATE SCHEMA utility; --used to hold objects for utility purposes
GO
CREATE TABLE utility.ErrorMap
(
ConstraintName sysname NOT NULL primary key,
Message varchar(2000) NOT NULL
);
GO
INSERT utility.ErrorMap(constraintName, message)
VALUES ('chkMusicAlbum$CatalogNumber$CatalogNumberValidate',
'The catalog number does not match the format set up by the Publisher'),
Then, we create a procedure to do the actual mapping by taking the values that can be retrieved from the ERROR_%() procedures that are accessible in a CATCH block and using them to look up the value in the ErrorMap table:
CREATE PROCEDURE utility.ErrorMap$MapError
(
@ErrorNumber int = NULL,
@ErrorMessage nvarchar(2000) = NULL,
@ErrorSeverity INT= NULL
) AS
BEGIN
SET NOCOUNT ON
--use values in ERROR_ functions unless the user passes in values
SET @ErrorNumber = Coalesce(@ErrorNumber, ERROR_NUMBER());
SET @ErrorMessage = Coalesce(@ErrorMessage, ERROR_MESSAGE());
SET @ErrorSeverity = Coalesce(@ErrorSeverity, ERROR_SEVERITY());
--strip the constraint name out of the error message
DECLARE @constraintName sysname;
SET @constraintName = substring( @ErrorMessage,
CHARINDEX('constraint "',@ErrorMessage) + 12,
CHARINDEX('"',substring(@ErrorMessage,
CHARINDEX('constraint "',@ErrorMessage) +
12,2000))-1)
--store off original message in case no custom message found
DECLARE @originalMessage nvarchar(2000);
SET @originalMessage = ERROR_MESSAGE();
IF @ErrorNumber = 547 --constraint error
BEGIN
SET @ErrorMessage =
(SELECT message
FROM utility.ErrorMap
WHERE constraintName = @constraintName
);
END
--if the error was not found, get the original message with generic 50000 error number
SET @ErrorMessage = isNull(@ErrorMessage, @originalMessage);
THROW 50000, @ErrorMessage, @ErrorSeverity;
END
GO
Now, see what happens when we enter an invalid value for an album catalog number:
BEGIN TRY
INSERT Music.Album(AlbumId, Name, ArtistId, CatalogNumber, PublisherId)
VALUES (5,'who are you',2,'badnumber',2);
END TRY
BEGIN CATCH
EXEC utility.ErrorMap$MapError;
END CATCH
The error message is as follows:
Msg 50000, Level 16, State 1, Procedure ErrorMap$mapError, Line 24
The catalog number does not match the format set up by the Publisher
rather than:
Msg 547, Level 16, State 0, Line 1
The INSERT statement conflicted with the CHECK constraint "chkMusicAlbum$CatalogNumber$CatalogNumberValidate". The conflict occurred in database "Chapter7", table "Music.Album".
This is far more pleasing, even if it was a bit of a workout getting to this new message.
Triggers are a type of stored procedure attached to a table or view that is executed automatically when the contents of a table are changed. While they share the ability to enforce data protection, they differ from constraints in being far more flexible because you can code them like stored procedures and you can introduce side effects like formatting input data or cascading an operation to another table. You can use them to enforce almost any business rule, and they’re especially important for dealing with situations that are too complex for a CHECK constraint to handle. We used triggers in the previous chapter to automatically manage row update date values.
Triggers often get a bad name because they can be pretty quirky, especially because they can kill performance when you are dealing with large updates. For example, if you have a trigger on a table and try to update a million rows, you are likely to have issues. However, for most OLTP operations in a relational database, operations shouldn’t be touching more than a handful of rows at a time. Trigger usage does need careful consideration, but where they are needed, they are terribly useful. My recommendation is to use triggers when you need to do the following:
- Perform cross-database referential integrity.
- Check inter-row rules, where just looking at the current row isn’t enough for the constraints.
- Check inter-table constraints, when rules require access to data in a different table.
- Introduce desired side effects to your data-modification queries, such as maintaining required denormalizations.
- Guarantee that no insert, update, or delete operations can be executed on a table, even if the user does have rights to perform the operation.
Some of these operations could also be done in an application layer, but for the most part, these operations are far easier and safer (particularly for data integrity) when done automatically using triggers. When it comes to data protection, the primary advantages that triggers have over constraints is the ability to access other tables seamlessly and to operate on multiple rows at once. In Appendix B, I will discuss a bit more of the mechanics of writing triggers and their limitations. In this chapter, I am going to create DML triggers to handle typical business needs.
There are two different types of DML triggers that we will make use of in this section. Each type can be useful in its own way, but they are quite different in why they are used.
- AFTER : These triggers fire after the DML statement (INSERT/UPDATE/DELETE) has affected the table. AFTER triggers are usually used for handling rules that won’t fit into the mold of a constraint, for example, rules that require data to be stored, such as a logging mechanism. You may have a virtually unlimited number of AFTER triggers that fire on INSERT, UPDATE, and DELETE, or any combination of them.
- INSTEAD OF : These triggers operate “instead of” the built-in command (INSERT, UPDATE, or DELETE) affecting the table or view. In this way, you can do whatever you want with the data, either doing exactly what was requested by the user or doing something completely different (you can even just ignore the operation altogether). You can have a maximum of one INSTEAD OF INSERT, UPDATE, and DELETE trigger of each type per table. It is allowed (but not a generally good idea) to combine all three into one and have a single trigger that fires for all three operations.
This section will be split between these two types of triggers because they have two very different sets of use cases. Since coding triggers is not one of the more well trod topics in SQL Server, in Appendix B, I will introduce trigger coding techniques and provide a template that we will use throughout this chapter (it’s the template we used in Chapter 6, too).
AFTER Triggers
AFTER triggers fire after the DML statement has completed. They are the most common trigger that people use, because they have the widest array of uses. Though triggers may not seem very useful, back in SQL Server 6.0 and earlier, there were no CHECK constraints, and even FOREIGN KEYS where just being introduced, so all data protection was managed using triggers. Other than being quite cumbersome to maintain, some fairly complex systems were created using hardware that is comparable to one of my Logitech Harmony remote controls.
In this section on AFTER triggers, I will present examples that demonstrate several forms of triggers that I use to solve problems that are reasonably common. I’ll give examples of the following usages of triggers:
- Range checks on multiple rows
- Maintaining summary values (only as necessary)
- Cascading inserts
- Child-to-parent cascades
- Maintaining an audit trail
- Relationships that span databases and servers
From these examples, you should be able to extrapolate almost any use of AFTER triggers. Just keep in mind that, although triggers are not the worst thing for performance, they should be used no more than necessary.
![]() Note For one additional example, check the section on uniquness in Chapter 8, where I will implement a type of uniqueness based on ranges of data using a trigger-based solution.
Note For one additional example, check the section on uniquness in Chapter 8, where I will implement a type of uniqueness based on ranges of data using a trigger-based solution.
The first type of check we’ll look at is the range check, in which we want to make sure that a column is within some specific range of values. You can do range checks using a CHECK constraint to validate the data in a single row (for example, column > 10) quite easily. However, you wouldn’t want to use them to validate conditions based on aggregates of multiple rows (sum(column) > 10), because if you updated 100 rows, you would have to do 100 validations where one statement could do the same work.
If you need to check that a row or set of rows doesn’t violate a given condition, usually based on an aggregate like a maximum sum, you should use a trigger. As an example, I’ll look at a simple accounting system. As users deposit and withdraw money from accounts, you want to make sure that the balances never dip below zero. All transactions for a given account have to be considered.
First, we create a schema for the accounting groups :
CREATE SCHEMA Accounting;
Then, we create a table for an account and then one to contain the activity for the account:
CREATE TABLE Accounting.Account
(
AccountNumber char(10)
constraint PKAccounting_Account primary key
--would have other columns
);
CREATE TABLE Accounting.AccountActivity
(
AccountNumber char(10) NOT NULL
constraint Accounting_Account$has$Accounting_AccountActivity
foreign key references Accounting.Account(AccountNumber),
--this might be a value that each ATM/Teller generates
TransactionNumberchar(20) NOT NULL,
Datedatetime2(3) NOT NULL,
TransactionAmountnumeric(12,2) NOT NULL,
constraint PKAccounting_AccountActivity
PRIMARY KEY (AccountNumber, TransactionNumber)
);
Now, we add a trigger to the Accounting.AccountActivity table that checks to make sure that when you sum together the transaction amounts for an Account, that the sum is greater than zero:
CREATE TRIGGER Accounting.AccountActivity$insertUpdateTrigger
ON Accounting.AccountActivity
AFTER INSERT,UPDATE AS
BEGIN
SET NOCOUNT ON;
SET ROWCOUNT 0; --in case the client has modified the rowcount
--use inserted for insert or update trigger, deleted for update or delete trigger
--count instead of @@rowcount due to merge behavior that sets @@rowcount to a number
--that is equal to number of merged rows, not rows being checked in trigger
DECLARE @msg varchar(2000), --used to hold the error message
--use inserted for insert or update trigger, deleted for update or delete trigger
--count instead of @@rowcount due to merge behavior that sets @@rowcount to a number
--that is equal to number of merged rows, not rows being checked in trigger
@rowsAffected int = (SELECT COUNT(*) FROM inserted);
-- @rowsAffected int = (SELECT COUNT(*) FROM deleted);
--no need to continue on if no rows affected
IF @rowsAffected = 0 RETURN;
BEGIN TRY
--[validation section]
--disallow Transactions that would put balance into negatives
IF EXISTS ( SELECT AccountNumber
FROM Accounting.AccountActivity as AccountActivity
WHERE EXISTS (SELECT *
FROM inserted
WHERE inserted.AccountNumber =
AccountActivity.AccountNumber)
GROUP BY AccountNumber
HAVING SUM(TransactionAmount) < 0)
BEGIN
IF @rowsAffected = 1
SELECT @msg = 'Account: ' + AccountNumber +
' TransactionNumber:' +
cast(TransactionNumber as varchar(36)) +
' for amount: ' + cast(TransactionAmount as varchar(10))+
' cannot be processed as it will cause a negative balance'
FROM inserted;
ELSE
SELECT @msg = 'One of the rows caused a negative balance';
THROW 50000, @msg, 16;
END
--[modification section]
END TRY
BEGIN CATCH
IF @@trancount > 0
ROLLBACK TRANSACTION;
THROW; --will halt the batch or be caught by the caller's catch block
END CATCH
END;
The key to using this type of trigger is to look for the existence of rows in the base table, not the rows in the inserted table, because the concern is how the inserted rows affect the overall status for an Account. Take this query, which we’ll use to determine whether there are rows that fail the criteria:
SELECT AccountNumber
FROM Accounting.AccountActivity as AccountActivity
WHERE EXISTS (SELECT *
FROM inserted
WHERE inserted.AccountNumber = AccountActivity.AccountNumber)
GROUP BY AccountNumber
HAVING SUM(TransactionAmount) < 0;
The key here is that we could remove the bold part of the query, and it would check all rows in the table. The WHERE clause simply makes sure that the only rows we consider are for accounts that have new data inserted. This way, we don’t end up checking all rows that we know our query hasn’t touched. Note, too, that I don’t use a JOIN operation. By using an EXISTS criteria in the WHERE clause, we don’t affect the cardinality of the set being returned in the FROM clause , no matter how many rows in the inserted table have the same AccountNumber .
To see it in action, use this code:
--create some set up test data
INSERT INTO Accounting.Account(AccountNumber)
VALUES ('1111111111'),
INSERT INTO Accounting.AccountActivity(AccountNumber, TransactionNumber,
Date, TransactionAmount)
VALUES ('1111111111','A0000000000000000001','20050712',100),
('1111111111','A0000000000000000002','20050713',100);
Now, let’s see what happens when we violate this rule:
INSERT INTO Accounting.AccountActivity(AccountNumber, TransactionNumber,
Date, TransactionAmount)
VALUES ('1111111111','A0000000000000000003','20050713',-300);
Here’s the result:
Msg 50000, Level 16, State 16, Procedure AccountActivity$insertUpdateTrigger, Line 36
Account: 1111111111 TransactionNumber:A0000000000000000003 for amount: -300.00 cannot be processed as it will cause a negative balance
The error message is the custom error message that we coded in the case where a single row was modified. Now, let’s make sure that the trigger works when we have greater than one row in the INSERT statement:
--create new Account
INSERT INTO Accounting.Account(AccountNumber)
VALUES ('2222222222'),
GO
--Now, this data will violate the constraint for the new Account:
INSERT INTO Accounting.AccountActivity(AccountNumber, TransactionNumber,
Date, TransactionAmount)
VALUES ('1111111111','A0000000000000000004','20050714',100),
('2222222222','A0000000000000000005','20050715',100),
('2222222222','A0000000000000000006','20050715',100),
('2222222222','A0000000000000000007','20050715',-201);
This causes the following error:
Msg 50000, Level 16, State 16, Procedure AccountActivity$insertUpdateTrigger, Line 36
One of the rows caused a negative balance
The multirow error message is much less informative, though you could expand it to include information about a row (or all the rows) that caused the violation with some more text, even showing the multiple failed values. Usually a simple message is sufficient to deal with, because generally if multiple rows are being modified in a single statement, it’s a batch process, and the complexity of building error messages is way more than it’s worth. Processes would likely be established on how to deal with certain errors being returned.
![]() Tip In the error message, note that the first error states it’s from line 36. This is line 36 of the trigger where the error message was raised. This can be valuable information when debugging triggers (and any SQL code, really). Note also that because the ROLLBACK command was used in the trigger, the batch will be terminated. This will be covered in more detail in the "Dealing with Triggers and Constraints Errors" section later in this chapter.
Tip In the error message, note that the first error states it’s from line 36. This is line 36 of the trigger where the error message was raised. This can be valuable information when debugging triggers (and any SQL code, really). Note also that because the ROLLBACK command was used in the trigger, the batch will be terminated. This will be covered in more detail in the "Dealing with Triggers and Constraints Errors" section later in this chapter.
To see the events for which a trigger fires, you can use the following query:
SELECT trigger_events.type_desc
FROM sys.trigger_events
JOIN sys.triggers
ON sys.triggers.object_id = sys.trigger_events.object_id
WHERE triggers.name = 'AccountActivity$insertUpdateTrigger';
This returns INSERT and UPDATE in two rows, because we declared the Accounting.AccountActivity$insertUpdateTrigger trigger to fire on INSERT and UPDATE operations.
Maintaining summary values is generally not necessary, and doing so typically is just a matter of poor normalization or perhaps a misguided attempt to optimize where a better database design would have sufficed. However, there are cases where some form of active summarization may be necessary:
- There is no other reasonable method available.
- The amount of data to be summarized is large.
- The amount of reads of the summary values is far greater than the activity on the lower values.
As an example, let’s extend the previous example of the Account and AccountActivity tables from the “Range Checks on Multiple Rows” section. To the Account table, I will add a BalanceAmount column:
ALTER TABLE Accounting.Account
ADD BalanceAmount numeric(12,2) NOT NULL
CONSTRAINT DfltAccounting_Account_BalanceAmount DEFAULT (0.00);
Then, we will update the Balance column to have the current value of the data in the -AccountActivity rows. First, running this query to view the expected values:
SELECT Account.AccountNumber,
SUM(coalesce(AccountActivity.TransactionAmount,0.00)) AS NewBalance
FROM Accounting.Account
LEFT OUTER JOIN Accounting.AccountActivity
ON Account.AccountNumber = AccountActivity.AccountNumber
GROUP BY Account.AccountNumber;
This returns the following:
AccountNumber NewBalance
------------- ----------
1111111111 200.00
2222222222 0.00
Now, update the BalanceAmount column values to the existing rows using the following statement:
WITH Updater as (
SELECT Account.AccountNumber,
SUM(coalesce(TransactionAmount,0.00)) as NewBalance
FROM Accounting.Account
LEFT OUTER JOIN Accounting.AccountActivity
On Account.AccountNumber = AccountActivity.AccountNumber
GROUP BY Account.AccountNumber)
UPDATE Account
SET BalanceAmount = Updater.NewBalance
FROM Accounting.Account
JOIN Updater
ON Account.AccountNumber = Updater.AccountNumber;
That statement will make the basis of our changes to the trigger that we added in the previous section (the changes appear in bold). The only change that needs to be made is to filter the Account set down to the accounts that were affected by the DML that cause the trigger to fire. Using an EXISTS filter lets you not have to worry about whether one new row was created for the account or 100.
ALTER TRIGGER Accounting.AccountActivity$insertUpdateTrigger
ON Accounting.AccountActivity
AFTER INSERT,UPDATE AS
BEGIN
SET NOCOUNT ON;
SET ROWCOUNT 0; --in case the client has modified the rowcount
--use inserted for insert or update trigger, deleted for update or delete trigger
--count instead of @@rowcount due to merge behavior that sets @@rowcount to a number
--that is equal to number of merged rows, not rows being checked in trigger
DECLARE @msg varchar(2000), --used to hold the error message
--use inserted for insert or update trigger, deleted for update or delete trigger
--count instead of @@rowcount due to merge behavior that sets @@rowcount to a number
--that is equal to number of merged rows, not rows being checked in trigger
@rowsAffected int = (SELECT COUNT(*) FROM inserted);
-- @rowsAffected int = (SELECT COUNT(*) FROM deleted);
BEGIN TRY
--[validation section]
--disallow Transactions that would put balance into negatives
IF EXISTS ( SELECT AccountNumber
FROM Accounting.AccountActivity as AccountActivity
WHERE EXISTS (SELECT *
FROM inserted
WHERE inserted.AccountNumber =
AccountActivity.AccountNumber)
GROUP BY AccountNumber
HAVING sum(TransactionAmount) < 0)
BEGIN
IF @rowsAffected = 1
SELECT @msg = 'Account: ' + AccountNumber +
' TransactionNumber:' +
cast(TransactionNumber as varchar(36)) +
' for amount: ' + cast(TransactionAmount as varchar(10))+
' cannot be processed as it will cause a negative balance'
FROM inserted;
ELSE
SELECT @msg = 'One of the rows caused a negative balance';
THROW 50000, @msg, 16;
END
--[modification section]
IF UPDATE (TransactionAmount)
BEGIN
;WITH Updater as (
SELECT Account.AccountNumber,
SUM(coalesce(TransactionAmount,0.00)) as NewBalance
FROM Accounting.Account
LEFT OUTER JOIN Accounting.AccountActivity
On Account.AccountNumber = AccountActivity.AccountNumber
--This where clause limits the summarizations to those rows
--that were modified by the DML statement that caused
--this trigger to fire.
WHERE EXISTS (SELECT *
FROM Inserted
WHERE Account.AccountNumber = Inserted.AccountNumber)
GROUP BY Account.AccountNumber)
UPDATE Account
SET BalanceAmount = Updater.NewBalance
FROM Accounting.Account
JOIN Updater
on Account.AccountNumber = Updater.AccountNumber;
END
END TRY
BEGIN CATCH
IF @@trancount > 0
ROLLBACK TRANSACTION;
THROW; --will halt the batch or be caught by the caller's catch block
END CATCH
END;
Now, insert a new row into AccountActivity :
INSERT INTO Accounting.AccountActivity(AccountNumber, TransactionNumber,
Date, TransactionAmount)
VALUES ('1111111111','A0000000000000000004','20050714',100);
Next, examine the state of the Account table, comparing it to the query used previously to check what the balances should be:
SELECT Account.AccountNumber,Account.BalanceAmount,
SUM(coalesce(AccountActivity.TransactionAmount,0.00)) AS SummedBalance
FROM Accounting.Account
LEFT OUTER JOIN Accounting.AccountActivity
ON Account.AccountNumber = AccountActivity.AccountNumber
GROUP BY Account.AccountNumber,Account.BalanceAmount;
which returns the following, showing that the sum is the same as the stored balance:
| AccountNumber | BalanceAmount | SummedBalance |
| ------------- | ------------- | ------------- |
| 1111111111 | 300.00 | 300.00 |
| 2222222222 | 0.00 | 0.00 |
The next step—the multirow test—is very important when building a trigger such as this. You need to be sure that if a user inserts more than one row at a time, it will work. In our example, we will insert rows for both accounts in the same DML statement and two rows for one of the accounts. This is not a sufficient test necessarily, but it’s enough for demonstration purposes at least:
INSERT into Accounting.AccountActivity(AccountNumber, TransactionNumber,
Date, TransactionAmount)
VALUES ('1111111111','A0000000000000000005','20050714',100),
('2222222222','A0000000000000000006','20050715',100),
('2222222222','A0000000000000000007','20050715',100);
Again, the query on the AccountActivity and Account should show the same balances:
| AccountNumber | BalanceAmount | SummedBalance |
| ------------- | ------------- | ------------- |
| 1111111111 | 400.00 | 400.00 |
| 2222222222 | 200.00 | 200.00 |
If you wanted a DELETE trigger (and in the case of a ledger like this, you generally do not want to actually delete rows but rather insert offsetting values, so to delete a $100 insert, you would insert a –100), the only difference is that instead of the EXISTS condition referring to the inserted table, it needs to refer to the deleted table:
CREATE TRIGGER Accounting.AccountActivity$deleteTrigger
ON Accounting.AccountActivity
AFTER DELETE AS
BEGIN
SET NOCOUNT ON;
SET ROWCOUNT 0; --in case the client has modified the rowcount
--use inserted for insert or update trigger, deleted for update or delete trigger
--count instead of @@rowcount due to merge behavior that sets @@rowcount to a number
--that is equal to number of merged rows, not rows being checked in trigger
DECLARE @msg varchar(2000), --used to hold the error message
--use inserted for insert or update trigger, deleted for update or delete trigger
--count instead of @@rowcount due to merge behavior that sets @@rowcount to a number
--that is equal to number of merged rows, not rows being checked in trigger
-- @rowsAffected int = (SELECT COUNT(*) FROM inserted);
@rowsAffected int = (SELECT COUNT(*) FROM deleted);
BEGIN TRY
--[validation section]
--[modification section]
;WITH Updater as (
SELECT Account.AccountNumber,
SUM(coalesce(TransactionAmount,0.00)) as NewBalance
FROM Accounting.Account
LEFT OUTER JOIN Accounting.AccountActivity
On Account.AccountNumber = AccountActivity.AccountNumber
WHERE EXISTS (SELECT *
FROM deleted
WHERE Account.AccountNumber =
deleted.AccountNumber)
GROUP BY Account.AccountNumber, Account.BalanceAmount)
UPDATE Account
SET BalanceAmount = Updater.NewBalance
FROM Accounting.Account
JOIN Updater
ON Account.AccountNumber = Updater.AccountNumber;
END TRY
BEGIN CATCH
IF @@trancount > 0
ROLLBACK TRANSACTION;
THROW; --will halt the batch or be caught by the caller's catch block
END CATCH
END;
GO
So now, delete a couple of transactions:
DELETE Accounting.AccountActivity
WHERE TransactionNumber in ('A0000000000000000004',
'A0000000000000000005'),
Checking the balance now, you will see that the balance for Account 1111111111 has been decremented to 200:
| AccountNumber | BalanceAmount | SummedBalance |
| ------------- | ------------- | ------------- |
| 1111111111 | 200.00 | 200.00 |
| 2222222222 | 200.00 | 200.00 |
I can’t stress enough that this type of strategy should be the exception, not the rule. But when you have to implement summary data, using a trigger is the way to go in most cases. One of the more frustrating things to have to deal with is summary data that is out of whack, because it takes time away from making progress with creating new software.
![]() Caution I want to reiterate to be extremely careful to test your code extra thoroughly when you include denormalizations like this. If you have other DML in triggers that insert or update into the same table, there is a chance that the trigger will not fire again, based on how you have the nested triggers and recursive triggers options set that I discussed previously. Good testing strategies are important in all cases really, but the point here is to be extra careful when using triggers to modify data.
Caution I want to reiterate to be extremely careful to test your code extra thoroughly when you include denormalizations like this. If you have other DML in triggers that insert or update into the same table, there is a chance that the trigger will not fire again, based on how you have the nested triggers and recursive triggers options set that I discussed previously. Good testing strategies are important in all cases really, but the point here is to be extra careful when using triggers to modify data.
A cascading insert refers to the situation whereby after a row is inserted into a table, one or more other new rows are automatically inserted into other tables. This is frequently done when you need to initialize a row in another table, quite often a status of some sort.
For this example, we’re going to build a small system to store URLs for a website-linking system. During low-usage periods, an automated browser connects to the URLs so that they can be verified (hopefully, limiting broken links on web pages).
To implement this, I’ll use the set of tables in Figure 7-3.
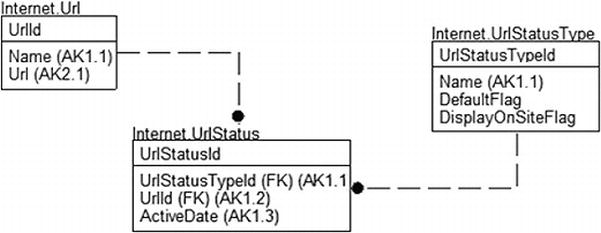
Figure 7-3. Storing URLs for a website-linking system
CREATE SCHEMA Internet;
GO
CREATE TABLE Internet.Url
(
UrlId int not null identity(1,1) constraint PKUrl primary key,
Name varchar(60) not null constraint AKInternet_Url_Name UNIQUE,
Url varchar(200) not null constraint AKInternet_Url_Url UNIQUE
);
--Not a user manageable table, so not using identity key (as discussed in
--Chapter 5 when I discussed choosing keys) in this one table. Others are
--using identity-based keys in this example.
CREATE TABLE Internet.UrlStatusType
(
UrlStatusTypeId int not null
CONSTRAINT PKInternet_UrlStatusType PRIMARY KEY,
Name varchar(20) NOT NULL
CONSTRAINT AKInternet_UrlStatusType UNIQUE,
DefaultFlag bit NOT NULL,
DisplayOnSiteFlag bit NOT NULL
);
CREATE TABLE Internet.UrlStatus
(
UrlStatusId int not null identity(1,1)
CONSTRAINT PKInternet_UrlStatus PRIMARY KEY,
UrlStatusTypeId int NOT NULL
CONSTRAINT
Internet_UrlStatusType$defines_status_type_of$Internet_UrlStatus
REFERENCES Internet.UrlStatusType(UrlStatusTypeId),
UrlId int NOT NULL
CONSTRAINT Internet_Url$has_status_history_in$Internet_UrlStatus
REFERENCES Internet.Url(UrlId),
ActiveTime datetime2(3) NOT NULL,
CONSTRAINT AKInternet_UrlStatus_statusUrlDate
UNIQUE (UrlStatusTypeId, UrlId, ActiveTime)
);
--set up status types
INSERT Internet.UrlStatusType (UrlStatusTypeId, Name,
DefaultFlag, DisplayOnSiteFlag)
VALUES (1, 'Unverified',1,0),
(2, 'Verified',0,1),
(3, 'Unable to locate',0,0);
The Url table holds URLs to different sites on the Web. When someone enters a URL, we initialize the status to 'Unverified'. A process should be in place in which the site is checked often to make sure nothing has changed (particularly the unverified ones!).
You begin by building a trigger that inserts a row into the UrlStatus table on an insert that creates a new row with the UrlId and the default UrlStatusType based on DefaultFlag having the value of 1.
CREATE TRIGGER Internet.Url$afterInsertTrigger
ON Internet.Url
AFTER INSERT AS
BEGIN
SET NOCOUNT ON;
SET ROWCOUNT 0; --in case the client has modified the rowcount
--use inserted for insert or update trigger, deleted for update or delete trigger
--count instead of @@rowcount due to merge behavior that sets @@rowcount to a number
--that is equal to number of merged rows, not rows being checked in trigger
DECLARE @msg varchar(2000), --used to hold the error message
--use inserted for insert or update trigger, deleted for update or delete trigger
--count instead of @@rowcount due to merge behavior that sets @@rowcount to a number
--that is equal to number of merged rows, not rows being checked in trigger
@rowsAffected int = (SELECT COUNT(*) FROM inserted);
-- @rowsAffected int = (SELECT COUNT(*) FROM deleted);
BEGIN TRY
--[validation section]
--[modification section]
--add a row to the UrlStatus table to tell it that the new row
--should start out as the default status
INSERT INTO Internet.UrlStatus (UrlId, UrlStatusTypeId, ActiveTime)
SELECT inserted.UrlId, UrlStatusType.UrlStatusTypeId,
SYSDATETIME()
FROM inserted
CROSS JOIN (SELECT UrlStatusTypeId
FROM UrlStatusType
WHERE DefaultFlag = 1) as UrlStatusType;
--use cross join with a WHERE clause
--as this is not technically a join
--between inserted and UrlType
END TRY
BEGIN CATCH
IF @@trancount > 0
ROLLBACK TRANSACTION;
THROW; --will halt the batch or be caught by the caller's catch block
END CATCH
END;
The idea here is that for every row in the inserted table, we’ll get the single row from the UrlStatusType table that has DefaultFlag equal to 1. So, let’s try it:
INSERT Internet.Url(Name, Url)
VALUES ('More info can be found here',
'http://sqlblog.com/blogs/louis_davidson/default.aspx'),
SELECT * FROM Internet.Url;
SELECT * FROM Internet.UrlStatus;
This returns the following results:
| UrlId | Name | Url |
| ----- | --------------------------- | ---------------------------------------------------- |
| 1 | More info can be found here | http://sqlblog.com/blogs/louis_davidson/default.aspx |
| UrlStatusId | UrlStatusTypeId | UrlId | ActiveTime |
| ----------- | --------------- | ----- | ----------------------- |
| 1 | 1 | 1 | 2011-06-10 00:11:40.480 |
![]() Tip It’s easier if users can’t modify tables such as the UrlStatusType table, so there cannot be a case where there’s no status set as the default (or too many rows). If there were no default status, the URL would never get used, because the processes wouldn’t see it. You could also create a trigger to check to see whether more than one row is set to the default, but the trigger still doesn’t protect you against there being zero rows that are set to the default.
Tip It’s easier if users can’t modify tables such as the UrlStatusType table, so there cannot be a case where there’s no status set as the default (or too many rows). If there were no default status, the URL would never get used, because the processes wouldn’t see it. You could also create a trigger to check to see whether more than one row is set to the default, but the trigger still doesn’t protect you against there being zero rows that are set to the default.
Cascading from Child to Parent
All the cascade operations that you can do with constraints (CASCADE or SET NULL) are strictly from parent to child. Sometimes, you want to go the other way around and delete the parents of a row when you delete the child. Typically, you do this when the child is what you’re interested in and the parent is simply maintained as an attribute of the child. Also typical of this type of situation is that you want to delete the parent only if all children are deleted.
In our example, we have a small model of my game collection. I have several game systems and quite a few games. Often, I have the same game on multiple platforms, so I want to track this fact, especially if I want to trade a game that I have on multiple platforms for something else. So, we have a table for the GamePlatform (the system) and another for the actual game itself. This is a many-to-many relationship, so we have an associative entity called GameInstance to record ownership, as well as when the game was purchased for the given platform. Each of these tables has a delete-cascade relationship, so all instances are removed. What about the games, though? If all GameInstance rows are removed for a given game, we want to delete the game from the database. The tables are shown in Figure 7-4.
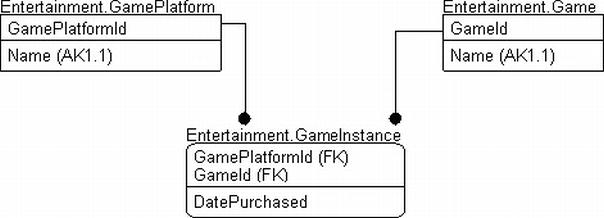
Figure 7-4. The game tables
--start a schema for entertainment-related tables
CREATE SCHEMA Entertainment;
go
CREATE TABLE Entertainment.GamePlatform
(
GamePlatformId int NOT NULL CONSTRAINT PKEntertainmentGamePlatform PRIMARY KEY
Name varchar(50) NOT NULL CONSTRAINT AKEntertainmentGamePlatform_Name UNIQUE
);
CREATE TABLE Entertainment.Game
(
GameId int NOT NULL CONSTRAINT PKEntertainmentGame PRIMARY KEY,
Namevarchar(50) NOT NULL CONSTRAINT AKEntertainmentGame_Name UNIQUE
--more details that are common to all platforms
);
--associative entity with cascade relationships back to Game and GamePlatform
CREATE TABLE Entertainment.GameInstance
(
GamePlatformId int NOT NULL,
GameId int NOT NULL,
PurchaseDate date NOT NULL,
CONSTRAINT PKEntertainmentGameInstance PRIMARY KEY (GamePlatformId, GameId),
CONSTRAINT
EntertainmentGame$is_owned_on_platform_by$EntertainmentGameInstance
FOREIGN KEY (GameId) REFERENCES Entertainment.Game(GameId)
ON DELETE CASCADE,
CONSTRAINT
EntertainmentGamePlatform$is_linked_to$EntertainmentGameInstance
FOREIGN KEY (GamePlatformId)
REFERENCES Entertainment.GamePlatform(GamePlatformId)
ON DELETE CASCADE
);
Then, I insert a sampling of data:
INSERT into Entertainment.Game (GameId, Name)
VALUES (1,'Lego Pirates of the Carribean').
(2,'Legend Of Zelda: Ocarina of Time'),
INSERT into Entertainment.GamePlatform(GamePlatformId, Name)
VALUES (1,'Nintendo Wii'), --Yes, as a matter of fact I am still a
(2,'Nintendo 3DS'), --Nintendo Fanboy, why do you ask?
INSERT into Entertainment.GameInstance(GamePlatformId, GameId, PurchaseDate)
VALUES (1,1,'20110804'),
(1,2,'20110810'),
(2,2,'20110604'),
--the full outer joins ensure that all rows are returned from all sets, leaving
--nulls where data is missing
SELECT GamePlatform.Name as Platform, Game.Name as Game, GameInstance. PurchaseDate
FROM Entertainment.Game as Game
FULL OUTER JOIN Entertainment.GameInstance as GameInstance
ON Game.GameId = GameInstance.GameId
Full Outer Join Entertainment.GamePlatform
ON GamePlatform.GamePlatformId = GameInstance.GamePlatformId;
As you can see, I have two games for Wii and only a single one for Nintendo 3DS:
| platform | Game | PurchaseDate |
| ------------ | ------------------ | ------------ |
| Nintendo Wii | Lego Star Wars III | 2011-08-04 |
| Nintendo Wii | Ocarina of Time | 2011-08-10 |
| Nintendo 3DS | Ocarina of Time | 2011-06-04 |
So, we create a trigger on the table to do the “reverse” cascade operation:
CREATE TRIGGER Entertainment.GameInstance$afterDeleteTrigger
ON Entertainment.GameInstance
AFTER DELETE AS
BEGIN
SET NOCOUNT ON;
SET ROWCOUNT 0; --in case the client has modified the rowcount
--use inserted for insert or update trigger, deleted for update or delete trigger
--count instead of @@rowcount due to merge behavior that sets @@rowcount to a number
--that is equal to number of merged rows, not rows being checked in trigger
DECLARE @msg varchar(2000), --used to hold the error message
--use inserted for insert or update trigger, deleted for update or delete trigger
--count instead of @@rowcount due to merge behavior that sets @@rowcount to a number
--that is equal to number of merged rows, not rows being checked in trigger
-- @rowsAffected int = (SELECT COUNT(*) FROM inserted);
@rowsAffected int = (SELECT COUNT(*) FROM deleted);
BEGIN TRY
--[validation section]
--[modification section]
--delete all Games
DELETE Game --where the GameInstance was deleted
WHERE GameId in (SELECT deleted.GameId
FROM deleted --and there are no GameInstances
WHERE not exists (SELECT * --left
FROM GameInstance
WHERE GameInstance.GameId =
deleted.GameId));
END TRY
BEGIN CATCH
IF @@trancount > 0
ROLLBACK TRANSACTION;
THROW; --will halt the batch or be caught by the caller's catch block
END CATCH
END
It’s as straightforward as that. Just delete the games, and let the trigger cover the rest. Delete the row for the Wii:
DELETE Entertainment.GamePlatform
WHERE GamePlatformId = 1;
Next, check the data
SELECT GamePlatform.Name AS Platform, Game.Name AS Game, GameInstance. PurchaseDate
FROM Entertainment.Game AS Game
FULL OUTER JOIN Entertainment.GameInstance as GameInstance
ON Game.GameId = GameInstance.GameId
FULL OUTER JOIN Entertainment.GamePlatform
ON GamePlatform.GamePlatformId = GameInstance.GamePlatformId;
You can see that now we have only a single row in the Game table:
| platform | Game | PurchaseDate |
| ------------ | ------------------ | ------------ |
| Nintendo 3DS | Ocarina of Time 3D | 2011-06-04 |
A common task that’s implemented using triggers is the audit trail or audit log. You use it to record previous versions of rows or columns so you can determine who changed a given row. Often, an audit trail is simply for documentation purposes, so we can go back to other users and ask why they made a change.
![]() Note In SQL Server 2008 the SQL Server Audit feature eliminated the need for many audit trails in triggers, and two other features called change tracking and change data capture may obviate the necessity to use triggers to implement tracking of database changes in triggers. However, using triggers is still a possible tool for building an audit trail depending on your requirements and version/edition of SQL Server. Auditing is covered in Chapter 9 in the “Server and Database Audit” section. I will not cover change tracking and change data capture because they are mostly programming/ETL building tools.
Note In SQL Server 2008 the SQL Server Audit feature eliminated the need for many audit trails in triggers, and two other features called change tracking and change data capture may obviate the necessity to use triggers to implement tracking of database changes in triggers. However, using triggers is still a possible tool for building an audit trail depending on your requirements and version/edition of SQL Server. Auditing is covered in Chapter 9 in the “Server and Database Audit” section. I will not cover change tracking and change data capture because they are mostly programming/ETL building tools.
An audit trail is straightforward to implement using triggers. In our example, we’ll build an employee table and audit any change to the table. I’ll keep it simple and have a copy of the table that has a few extra columns for the date and time of the change, plus the user who made the change and what the change was. In Chapter 12, I will talk a bit more about audit trail type objects with an error log. This particular type of audit trail I am discussing in this chapter is typically there for an end user’s needs. In this case, the purpose of the auditTrail is not necessarily for a security purpose but more to allow the human resources managers to see changes in the employee’s status.
We implement an employee table (using names with underscores just to add variety) and then a replica to store changes into:
CREATE SCHEMA hr;
GO
CREATE TABLE hr.employee
(
employee_id char(6) NOT NULL CONSTRAINT PKhr_employee PRIMARY KEY,
first_name varchar(20) NOT NULL,
last_name varchar(20) NOT NULL,
salary decimal(12,2) NOT NULL
);
CREATE TABLE hr.employee_auditTrail
(
employee_id char(6) NOT NULL,
date_changed datetime2(0) not null --default so we don't have to
--code for it
CONSTRAINT DfltHr_employee_date_changed DEFAULT (SYSDATETIME()),
first_name varchar(20) NOT NULL,
last_name varchar(20) NOT NULL,
salary decimal(12,2) NOT NULL,
--the following are the added columns to the original
--structure of hr.employee
action char(6) NOT NULL
CONSTRAINT chkHr_employee_action --we don't log inserts, only changes
CHECK(action in ('delete','update')),
changed_by_user_name sysname NOT NULL
CONSTRAINT DfltHr_employee_changed_by_user_name
DEFAULT (original_login()),
CONSTRAINT PKemployee_auditTrail PRIMARY KEY (employee_id, date_changed)
);
Now, we create a trigger with code to determine whether it’s an UPDATE or a DELETE , based on how many rows are in the inserted table:
CREATE TRIGGER hr.employee$updateAndDeleteAuditTrailTrigger
ON hr.employee
AFTER UPDATE, DELETE AS
BEGIN
SET NOCOUNT ON;
SET ROWCOUNT 0; --in case the client has modified the rowcount
--use inserted for insert or update trigger, deleted for update or delete trigger
--count instead of @@rowcount due to merge behavior that sets @@rowcount to a number
--that is equal to number of merged rows, not rows being checked in trigger
DECLARE @msg varchar(2000), --used to hold the error message
--use inserted for insert or update trigger, deleted for update or delete trigger
--count instead of @@rowcount due to merge behavior that sets @@rowcount to a number
--that is equal to number of merged rows, not rows being checked in trigger
-- @rowsAffected int = (SELECT COUNT(*) FROM inserted);
@rowsAffected int = (SELECT COUNT(*) FROM deleted);
BEGIN TRY
--[validation section]
--[modification section]
--since we are only doing update and delete, we just
--need to see if there are any rows
--inserted to determine what action is being done.
DECLARE @action char(6);
SET @action = CASE WHEN (SELECT COUNT(*) FROM INSERTED) > 0
THEN 'update' ELSE 'delete' END;
--since the deleted table contains all changes, we just insert all
--of the rows in the deleted table and we are done.
INSERT employee_auditTrail (employee_id, first_name, last_name,
salary, action)
SELECT employee_id, first_name, last_name, salary, @action
FROM deleted;
END TRY
BEGIN CATCH
IF @@trancount > 0
ROLLBACK TRANSACTION;
THROW; --will halt the batch or be caught by the caller's catch block
END CATCH
END;
We create some data:
INSERT hr.employee (employee_id, first_name, last_name, salary)
VALUES (1, 'Phillip','Taibul',10000);
Now, unlike the real world in which we live, the person gets a raise immediately:
UPDATE hr.employee
SET salary = salary * 1.10 --ten percent raise!
WHERE employee_id = 1;
SELECT *
FROM hr.employee;
This returns the data with the new values:
| employee_id | first_name | last_name | salary |
| ----------- | --------- | --------- | -------- |
| 1 | Phillip | Taibul | 11000.00 |
Check the audit trail table:
SELECT *
FROM hr.employee_auditTrail;
You can see that the previous values for the row are stored here:
| employee_id | date_changed | first_name | last_name |
| ----------- | ------------------- | --------- | --------- |
| 1 | 2011-06-13 20:18:16 | Phillip | Taibul |
| salary | action | changed_by_user_name |
| ------ | ------ | -------------------- |
| 10000.00 | update | DENALI-PCAlienDrsql |
This can be a cheap and effective auditing system for many smaller systems. If you have a lot of columns, it can be better to check and see which columns have changed and implement a table that has tablename , columnname , and previous value columns, but often, this simple strategy works quite well when the volume is low and the number of tables to audit isn’t large. Keeping only recent history in the audit trail table helps as well.
Relationships That Span Databases and Servers
Prior to constraints, all relationships were enforced by triggers. Thankfully, when it comes to relationships, triggers are now relegated to enforcing special cases of relationships, such as when you have relationships between tables that are on different databases. I have used this sort of thing when I had a common demographics database that many different systems used.
To implement a relationship using triggers, you need several triggers:
- Parent:
- UPDATE: Disallow the changing of keys if child values exist, or cascade the update.
- DELETE: Prevent or cascade the deletion of rows that have associated parent rows.
- Child:
- INSERT: Check to make sure the key exists in the parent table.
- UPDATE: Check to make sure the “possibly” changed key exists in the parent table.
To begin this section, I will present templates to use to build these triggers, and then in the final section, I will code a complete trigger for demonstration. For these snippets of code, I refer to the tables as parent and child, with no schema or database named. Replacing the bits that are inside these greater-than and less-than symbols with appropriate code and table names that include the database and schema gives you the desired result when plugged into the trigger templates we’ve been using throughout this -chapter.
Note that you can omit the parent update step if using surrogate keys based on identity property columns, because they aren’t editable and hence cannot be changed.
There are a few possibilities you might want to implement:
- Cascading operations to child rows
- Preventing updating parent if child rows exist
Cascading operations is not possible from a proper generic trigger coding standpoint. The problem is that if you modify the key of one or more parent rows in a statement that fires the trigger, there is not necessarily any way to correlate rows in the inserted table with the rows in the deleted table, leaving you unable to know which row in the inserted table is supposed to match which row in the deleted table. So, I would not implement the cascading of a parent key change in a trigger; I would do this in your external code (though, frankly, I rarely see the need for modifiable keys anyhow).
Preventing an update of parent rows where child rows exist is very straightforward. The idea here is that you want to take the same restrictive action as the NO ACTION clause on a relationship, for example:
IF UPDATE(<parent_key_columns>)
BEGIN
IF EXISTS ( SELECT *
FROM deleted
JOIN <child>
ON <child>.<parent_keys> =
deleted.<parent_keys>
)
BEGIN
IF @rowsAffected = 1
SELECT @msg = 'one row message' + inserted.<somedata>
FROM inserted;
ELSE
SELECT @msg = 'multi-row message';
THROW 50000, @msg, 16;
END
END
Like the update possibilities, when a parent table row is deleted, we can either:
- Cascade the delete to child rows
- Prevent deleting parent rows if child rows exist
Cascading is very simple. For the delete, you simply use a correlated EXISTS subquery to get matching rows in the child table to the parent table:
DELETE <child>
WHERE EXISTS ( SELECT *
FROM <parent>
WHERE <child>.<parent_key> = <parent>.<parent_key>);
To prevent the delete from happening when a child row exists, here’s the basis of code to prevent deleting rows that have associated parent rows:
IF EXISTS ( SELECT *
FROM deleted
JOIN <child>
ON <child>.<parent_key> = deleted.<parent_key>
)
BEGIN
IF @rowsAffected = 1
SELECT @msg = 'one row message' + inserted.<somedata>
FROM inserted;
ELSE
SELECT @msg = 'multi-row message'
THROW 50000, @msg, 16;
END
END
On the child table, the goal will basically be to make sure that for every value you create in the child table, there exists a corresponding row in the parent table. The following snippet does this and takes into consideration the case where null values are allowed as well:
--@numrows is part of the standard template
DECLARE @nullcount int,
@validcount int;
IF UPDATE(<parent_key>)
BEGIN
--you can omit this check if nulls are not allowed
SELECT@nullcount = count(*)
FROMinserted
WHEREinserted.<parent_key> is null;
--does not count null values
SELECT @validcount = count(*)
FROM inserted
JOIN <parent> as Parent
ON inserted.<parent_keys> = Parent.<parent_keys>;
if @validcount + @nullcount != @numrows
BEGIN
IF @rowsAffected = 1
SELECT @msg = 'The inserted <parent_key_name>:'
+ cast(parent_key as varchar(10))
+ ' is not valid in the parent table.'
FROM inserted;
ELSE
SELECT @msg = 'Invalid <parent key> in the inserted rows;'
THROW 50000, @msg, 16;
END
END
Using basic blocks of code such as these, you can validate most any foreign key relationship using triggers. For example, say you have a table in your PhoneData database called Logs.Call , with a primary key of CallId . In the CRM database, you have a Contacts.Journal table that stores contacts made to a person. To implement the child update and insert a trigger, just fill in the blanks. (I’ve put the parts of the code in bold where I’ve replaced the tags with the text specific to this trigger.)
CREATE TRIGGER Contacts.Journal$afterInsertUpdateTrigger
ON Contacts.Journal
AFTER INSERT, UPDATE AS
BEGIN
SET NOCOUNT ON;
SET ROWCOUNT 0; --in case the client has modified the rowcount
--use inserted for insert or update trigger, deleted for update or delete trigger
--count instead of @@rowcount due to merge behavior that sets @@rowcount to a number
--that is equal to number of merged rows, not rows being checked in trigger
DECLARE @msg varchar(2000), --used to hold the error message
--use inserted for insert or update trigger, deleted for update or delete trigger
--count instead of @@rowcount due to merge behavior that sets @@rowcount to a number
--that is equal to number of merged rows, not rows being checked in trigger
@rowsAffected int = (SELECT COUNT(*) FROM inserted);
-- @rowsAffected int = (SELECT COUNT(*) FROM deleted);
BEGIN TRY
--[validation section]
--@numrows is part of the standard template
DECLARE @nullcount int,
@validcount int;
IF update(CallId)
BEGIN
--omit this check if nulls are not allowed
--(left in here for an example)
SELECT @nullcount = count(*)
FROM inserted
WHERE inserted.CallId is null;
--does not include null values
SELECT @validcount = count(*)
FROM inserted
JOIN PhoneData.Logs.Call as Parent
on inserted.CallId = Parent.CallId;
IF @validcount + @nullcount <> @numrows
BEGIN
IF @rowsAffected = 1
SELECT @msg = 'The inserted CallId: '
+ cast(CallId as varchar(10))
+ ' is not valid in the'
+ ' PhoneData.Logs.Call table.'
FROM inserted;
ELSE
SELECT @msg = 'Invalid CallId in the inserted rows.';
THROW 50000, @ErrorMessage, @ErrorState;
END
END
--[modification section]
END TRY
BEGIN CATCH
IF @@trancount > 0
ROLLBACK TRANSACTION
THROW; --will halt the batch or be caught by the caller's catch block
END CATCH
END
As explained in the introduction to the DML triggers section, INSTEAD OF triggers fire before to the DML action being affected by the SQL engine, rather than after it for AFTER triggers. In fact, when you have an INSTEAD OF trigger on a table, it’s the first thing that’s done when you INSERT, UPDATE, or DELETE from a table. These triggers are named INSTEAD OF because they fire instead of the native action the user executed. Inside the trigger, you perform the action—either the action that the user performed or some other action. One thing that makes these triggers useful is that you can use them on views to make noneditable views editable. Doing this, you encapsulate calls to all the affected tables in the trigger, much like you would a stored procedure, except now this view has all the properties of a physical table, hiding the actual implementation from users.
Probably the most obvious limitation of INSTEAD OF triggers is that you can have only one for each action (INSERT, UPDATE, and DELETE) on the table. It is also possible to combine triggered actions just like you can for AFTER triggers, like having one instead of trigger for INSERT and UPDATE (something I strongly suggest against for almost all uses INSTEAD OF triggers). We’ll use a slightly modified version of the same trigger template that we used for the T-SQL AFTER triggers, covered in more detail in Appendix B.
I most often use INSTEAD OF triggers to set or modify values in my statements automatically so that the values are set to what I want, no matter what the client sends in a statement. A good example is a column to record the last time the row was modified. If you record last update times through client calls, it can be problematic if one of the client’s clock is a minute, a day, or even a year off. (You see this all the time in applications. My favorite example was in one system where phone calls appeared to be taking negative amounts of time because the client was reporting when something started and the server was recording when it stopped.) It’s generally a best practice not to use INSTEAD OF triggers to do validations and to use them only to shape the way the data is seen by the time it’s stored in the DBMS . There’s one slight alteration to this, in that you can use INSTEAD OF triggers to prevalidate data so that it’s never subject to constraints or AFTER triggers. (We will demonstrate that later in this section.)
I’ll demonstrate three ways you can use INSTEAD OF triggers:
- Formatting user input
- Redirecting invalid data to an exception table
- Forcing no action to be performed on a table, even by someone who technically has proper rights
In Chapter 6, we used INSTEAD OF triggers to automatically set the value for columns—in that case, the rowCreate and rowModifyDate—so I won’t duplicate that example here in this chapter.
Consider the columns firstName and lastName. What if the users who were entering this were heads-down, paid-by-the-keystroke kinds of users? Would we want them to go back and futz around with “joHnson” and make sure that it was formatted as “Johnson”? Or what about data received from services that still use mainframes, in which lowercase letters are still considered a work of the underlord? We don’t want to have to make anyone go in and reformat the data by hand (even the newbie intern who doesn’t know any better).
One good place for this kind of operation is an INSTEAD OF trigger, often using a function to handle the formatting. Here, I’ll present them both in their basic state, generally capitalizing the first letter of each word. This way, we can handle names that have two parts, such as Von Smith, or other more reasonable names that are found in reality. The crux of the function is that I’m simply capitalizing the first character of every letter after a space. The function needs to be updated to handle special cases, such as McDonald.
I am going to simply code this function in T-SQL. The syntax for functions hasn’t changed much since SQL Server 2000, though in 2005, Microsoft did get a bit more lenient on what you’re allowed to call from a function, such as CURRENT_TIMESTAMP—the standard version of GETDATE()—which was one of the most requested changes to functions in SQL Server 2000.
First we start with the following table and definition:
CREATE SCHEMA school;
Go
CREATE TABLE school.student
(
studentId int identity not null
CONSTRAINT PKschool_student PRIMARY KEY,
studentIdNumber char(8) not null
CONSTRAINT AKschool_student_studentIdNumber UNIQUE,
firstName varchar(20) not null,
lastName varchar(20) not null,
--implementation columns, we will code for them in the trigger too
rowCreateDate datetime2(3) not null
CONSTRAINT dfltSchool_student_rowCreateDate
DEFAULT (current_timestamp),
rowCreateUser sysname not null
CONSTRAINT dfltSchool_student_rowCreateUser DEFAULT (current_user)
);
Then, we will create a simple function to format a string value. I will use T-SQL to keep it simple for you to implement and use, but if this were going to be heavily used by many different systems, it would probably behoove you to build a proper function that deals with all of the cases (including allowing exceptions, since some people have nonstandard names!). You might want to use CLR, and you would probably also want versions to use for address standardization, phone number format checking, and so on.
CREATE FUNCTION Utility.TitleCase
(
@inputString varchar(2000)
)
RETURNS varchar(2000) AS
BEGIN
-- set the whole string to lower
SET @inputString = LOWER(@inputstring);
-- then use stuff to replace the first character
SET @inputString =
--STUFF in the uppercased character in to the next character,
--replacing the lowercased letter
STUFF(@inputString,1,1,UPPER(SUBSTRING(@inputString,1,1)));
--@i is for the loop counter, initialized to 2
DECLARE @i int = 2;
--loop from the second character to the end of the string
WHILE @i < LEN(@inputString)
BEGIN
--if the character is a space
IF SUBSTRING(@inputString,@i,1) = ' '
BEGIN
--STUFF in the uppercased character into the next character
SET @inputString = STUFF(@inputString,@i +
1,1,UPPER(SUBSTRING(@inputString,@i + 1,1)));
END
--increment the loop counter
SET @i = @i + 1;
END
RETURN @inputString;
END;
Now, we can alter our trigger from the previous section, which was used to set the rowCreateDate rowCreate user for the school.student table. This time, you’ll modify the trigger to title-case the name of the student. The changes are in bold:
CREATE TRIGGER school.student$insteadOfInsertTrigger
ON school.student
INSTEAD OF INSERT AS
BEGIN
SET NOCOUNT ON;
SET ROWCOUNT 0; --in case the client has modified the rowcount
--use inserted for insert or update trigger, deleted for update or delete trigger
--count instead of @@rowcount due to merge behavior that sets @@rowcount to a number
--that is equal to number of merged rows, not rows being checked in trigger
DECLARE @msg varchar(2000), --used to hold the error message
--use inserted for insert or update trigger, deleted for update or delete trigger
--count instead of @@rowcount due to merge behavior that sets @@rowcount to a number
--that is equal to number of merged rows, not rows being checked in trigger
@rowsAffected int = (SELECT COUNT(*) FROM inserted);
-- @rowsAffected int = (SELECT COUNT(*) FROM deleted);
BEGIN TRY
--[validation section]
--[modification section]
--<perform action>
INSERT INTO school.student(studentIdNumber, firstName, lastName,
rowCreateDate, rowCreateUser)
SELECT studentIdNumber,
Utility.titleCase(firstName),
Utility.titleCase(lastName),
CURRENT_TIMESTAMP, ORIGINAL_LOGIN()
FROM inserted; --no matter what the user put in the inserted row
END TRY --when the row was created, these values will be inserted
BEGIN CATCH
IF @@trancount > 0
ROLLBACK TRANSACTION;
THROW; --will halt the batch or be caught by the caller's catch block
END CATCH
END;
Then, insert a new row with funky formatted data:
INSERT school.student(studentIdNumber, firstName, lastName)
VALUES ( '0000001','CaPtain', 'von nuLLY'),
And include two more rows in a single insert with equally funkily formatted data:
INSERT school.student(studentIdNumber, firstName, lastName)
VALUES ( '0000002','NORM', 'uLl'),
( '0000003','gREy', 'tezine'),
Next, we can check the data using a simple SELECT statement:
SELECT *
FROM school.student
Now, you see that this data has been formatted:
| studentId | studentIdNumber | firstName |
| --------- | --------------- | -------- |
| 1 | 0000001 | Captain |
| 2 | 0000002 | Norm |
| 3 | 0000003 | Grey |
| lastName | rowCreateDate | rowCreateUser |
| --------- | ----------------------- | -------------------- |
| Von Nully | 2011-06-13 21:01:39.177 | DENALI-PCAlienDrsql |
| Ull | 2011-06-13 21:01:39.177 | DENALI-PCAlienDrsql |
| Tezine | 2011-06-13 21:01:39.177 | DENALI-PCAlienDrsql |
I’ll leave it to you to modify this trigger for the UPDATE version, because there are few differences, other than updating the row rather than inserting it.
It is not uncommon for this kind of formatting to be done at the client to allow for overriding as needed. Just as I have said many times, T-SQL code could (and possibly should) be used to manage formatting when it is always done. If there are options to override, then you cannot exclusively use a trigger for sure. In our example, you could just use the INSERT trigger to format the name columns initially and then not have an UPDATE trigger to allow for overrides. Of course this largely depends on the requirements of the system, but in this chapter my goal is to present you with options for how to protect your data integrity.
![]() Tip If we were to run SELECT SCOPE_IDENTITY()
, it would return NULL (because the actual insert was out of scope). Instead of scope_identity(), use the alternate key, in this case, the studentIdNumber that equals '0000001'. You might also want to forgo using an IDENTITY based value for a surrogate key and use a SEQUENCE object to generate surrogate values in the case where another suitable candidate key can be found for that table.
Tip If we were to run SELECT SCOPE_IDENTITY()
, it would return NULL (because the actual insert was out of scope). Instead of scope_identity(), use the alternate key, in this case, the studentIdNumber that equals '0000001'. You might also want to forgo using an IDENTITY based value for a surrogate key and use a SEQUENCE object to generate surrogate values in the case where another suitable candidate key can be found for that table.
Redirecting Invalid Data to an Exception Table
On some occasions, instead of returning an error when an invalid value is set for a column, you simply want to ignore it and log that an error had occurred. Generally, this wouldn’t be used for bulk loading data (using SSIS’s facilities to do this is a much better idea), but some examples of why you might do this follow:
- Heads-down key entry: In many shops where customer feedback or payments are received by the hundreds or thousands, there are people who open the mail, read it, and key in what’s on the page. These people become incredibly skilled in rapid entry and generally make few mistakes. The mistakes they do make don’t raise an error on their screens; rather, they fall to other people—exception handlers—to fix. You could use an INSTEAD OF trigger to redirect the wrong data to an exception table to be handled later.
- Values that are read in from devices: An example of this is on an assembly line, where a reading is taken but is so far out of range it couldn’t be true, because of the malfunction of a device or just a human moving a sensor. Too many exception rows would require a look at the equipment, but only a few might be normal and acceptable. Another possibility is when someone scans a printed page using a scanner and inserts the data. Often, the values read are not right and have to be checked manually.
For our example, I’ll design a table to take weather readings from a single thermometer. Sometimes, this thermometer sends back bad values that are impossible. We need to be able to put in readings, sometimes many at a time, because the device can cache results for some time if there is signal loss, but it tosses off the unlikely rows.
We build the following table, initially using a constraint to implement the simple sanity check. In the analysis of the data, we might find anomalies, but in this process, all we’re going to do is look for the “impossible” cases:
CREATE SCHEMA Measurements;
GO
CREATE TABLE Measurements.WeatherReading
(
WeatherReadingId int NOT NULL identity
CONSTRAINT PKWeatherReading PRIMARY KEY,
ReadingTime datetime2(3) NOT NULL
CONSTRAINT AKMeasurements_WeatherReading_Date UNIQUE,
Temperature float NOT NULL
CONSTRAINT chkMeasurements_WeatherReading_Temperature
CHECK(Temperature between -80 and 150)
--raised from last edition for global warming
);
Then, we go to load the data, simulating what we might do when importing the data all at once:
INSERT into Measurements.WeatherReading (ReadingTime, Temperature)
VALUES ('20080101 0:00',82.00), ('20080101 0:01',89.22),
('20080101 0:02',600.32),('20080101 0:03',88.22),
('20080101 0:04',99.01);
As we know with CHECK constraints, this isn’t going to fly:
Msg 547, Level 16, State 0, Line 1
The INSERT statement conflicted with the CHECK constraint "chkMeasurements_WeatherReading_Temperature". The conflict occurred in database "Chapter7", table "Measurements.WeatherReading", column 'Temperature'.
Select all the data in the table, and you’ll see that this data never gets entered. Does this mean we have to dig through every row individually? Yes, in the current scheme. Or you could insert each row individually, which would take a lot more work for the server, but if you’ve been following along, you know we’re going to write an INSTEAD OF trigger to do this for us. First we add a table to hold the exceptions to the Temperature rule:
CREATE TABLE Measurements.WeatherReading_exception
(
WeatherReadingId int NOT NULL identity
CONSTRAINT PKMeasurements_WeatherReading_exception PRIMARY KEY,
ReadingTime datetime2(3) NOT NULL,
Temperature float NOT NULL
);
Then, we create the trigger:
CREATE TRIGGER Measurements.WeatherReading$InsteadOfInsertTrigger
ON Measurements.WeatherReading
INSTEAD OF INSERT AS
BEGIN
SET NOCOUNT ON;
SET ROWCOUNT 0; --in case the client has modified the rowcount
--use inserted for insert or update trigger, deleted for update or delete trigger
--count instead of @@rowcount due to merge behavior that sets @@rowcount to a number
--that is equal to number of merged rows, not rows being checked in trigger
DECLARE @msg varchar(2000), --used to hold the error message
--use inserted for insert or update trigger, deleted for update or delete trigger
--count instead of @@rowcount due to merge behavior that sets @@rowcount to a number
--that is equal to number of merged rows, not rows being checked in trigger
@rowsAffected int = (SELECT COUNT(*) FROM inserted);
-- @rowsAffected int = (SELECT COUNT(*) FROM deleted);
BEGIN TRY
--[validation section]
--[modification section]
--<perform action>
--BAD data
INSERT Measurements.WeatherReading_exception
(ReadingTime, Temperature)
SELECT ReadingTime, Temperature
FROM inserted
>WHERE NOT(Temperature between -80 and 120);
--GOOD data
INSERT Measurements.WeatherReading (ReadingTime, Temperature)
SELECT ReadingTime, Temperature
FROM inserted
WHERE (Temperature between -80 and 120);
END TRY
BEGIN CATCH
IF @@trancount > 0
ROLLBACK TRANSACTION;
THROW; --will halt the batch or be caught by the caller's catch block
END CATCH
END
Now, we try to insert the rows with the bad data still in there:
INSERT INTO Measurements.WeatherReading (ReadingTime, Temperature)
VALUES ('20080101 0:00',82.00), ('20080101 0:01',89.22),
('20080101 0:02',600.32),('20080101 0:03',88.22),
('20080101 0:04',99.01);
SELECT *
FROM Measurements.WeatherReading;
The good data is in the following output:
| WeatherReadingId | ReadingTime | Temperature |
| ---------------- | ----------------------- | ----------- |
| 4 | 2008-01-01 00:00:00.000 | 82 |
| 5 | 2008-01-01 00:01:00.000 | 89.22 |
| 6 | 2008-01-01 00:03:00.000 | 88.22 |
| 7 | 2008-01-01 00:04:00.000 | 99.01 |
The nonconforming data can be seen by viewing the data in the exception table:
SELECT *
FROM Measurements.WeatherReading_exception;
This returns the following result:
| WeatherReadingId | ReadingTime | Temperature |
| ---------------- | ----------------------- | ----------- |
| 1 | 2008-01-01 00:02:00.000 | 600.32 |
Now, it might be possible to go back and work on each exception, perhaps extrapolating the value it should have been, based on the previous and the next measurements taken:
(88.22 + 89.22) /2 = 88.72
Of course, if we did that, we would probably want to include another attribute that indicated that a reading was extrapolated rather than an actual reading from the device. This is obviously a very simplistic example, and you could even make the functionality a lot more interesting by using previous readings to determine what is reasonable.
Forcing No Action to Be Performed on a Table
Our final INSTEAD OF trigger example deals with what’s almost a security issue. Often, users have too much access, and this includes administrators who generally use sysadmin privileges to look for problems with systems. Some tables we simply don’t ever want to be modified. We might implement triggers to keep any user—even a system administrator—from changing the data.
In this example, we’re going to implement a table to hold the version of the database. It’s a single-row “table” that behaves more like a global variable. It’s here to tell the application which version of the schema to expect, so it can tell the user to upgrade or lose functionality:
CREATE SCHEMA System;
go
CREATE TABLE System.Version
(
DatabaseVersion varchar(10) NOT NULL
);
INSERT into System.Version (DatabaseVersion)
VALUES ('1.0.12'),
Our application always looks to this value to see what objects it expects to be there when it uses them. We clearly don’t want this value to get modified, even if someone has db_owner rights in the database. So, we might apply an INSTEAD OF trigger:
CREATE TRIGGER System.Version$InsteadOfInsertUpdateDeleteTrigger
ON System.Version
INSTEAD OF INSERT, UPDATE, DELETE AS
BEGIN
SET NOCOUNT ON;
SET ROWCOUNT 0; --in case the client has modified the rowcount
--use inserted for insert or update trigger, deleted for update or delete trigger
--count instead of @@rowcount due to merge behavior that sets @@rowcount to a number
--that is equal to number of merged rows, not rows being checked in trigger
DECLARE @msg varchar(2000), --used to hold the error message
--use inserted for insert or update trigger, deleted for update or delete trigger
--count instead of @@rowcount due to merge behavior that sets @@rowcount to a number
--that is equal to number of merged rows, not rows being checked in trigger
@rowsAffected int = (SELECT COUNT(*) FROM inserted);
IF @rowsAffected = 0 SET @rowsAffected = (SELECT COUNT(*) FROM deleted);
--no need to complain if no rows affected
IF @rowsAffected = 0 RETURN;
--No error handling necessary, just the message.
--We just put the kibosh on the action.
THROW 50000, 'The System.Version table may not be modified in production', 16;
END;
Attempts to delete the value, like so
UPDATE system.version
SET DatabaseVersion = '1.1.1';
GO
will result in the following:
Msg 50000, Level 16, State 16, Procedure Version$InsteadOfInsertUpdateDeleteTrigger, Line 15
The System.Version table may not be modified in production
Checking the data, you will see that it remains the same:
SELECT *
FROM System.Version;
Returns:
DatabaseVersion
---------------
1.0.12
The administrator, when doing an upgrade, would then have to take the conscious step of running the following code:
ALTER TABLE system.version
DISABLE TRIGGER version$InsteadOfInsertUpdateDeleteTrigger;
Now, you can run the update statement:
UPDATE system.version
SET DatabaseVersion = '1.1.1';
And checking the data
SELECT *
FROM System.Version;
you will see that it has been modified:
DatabaseVersion
---------------
1.1.1
Reenable the trigger using ALTER TABLE . . . ENABLE TRIGGER:
ALTER TABLE system.version
ENABLE TRIGGER version$InsteadOfInsertUpdateDeleteTrigger;
Using a trigger like this (not disabled, of course, which is something you can catch with a DDL trigger) enables you to “close the gate,” keeping the data safely in the table, even from accidental changes.
Dealing with Triggers and Constraints Errors
One important thing to consider about triggers and constraints is how you need to deal with the error-handling errors caused by constraints or triggers. One of the drawbacks to using triggers is that the state of the database after a trigger error is different from when you have a constraint error. This is further complicated by the changes that were in SQL Server 2005 to support TRY-CATCH.
In versions of SQL Server prior to the implementation of TRY-CATCH, handling errors for triggers was easy—if there’s an error in a trigger, everything stops in its tracks. Now, this has changed. We need to consider two situations when we do a ROLLBACK in a trigger, using an error handler such as we have in this chapter:
- You aren’t using a TRY-CATCH block : This situation is simple. The batch stops processing in its tracks. SQL Server handles cleanup for any transaction you were in.
- You are using a TRY-CATCH block: This situation can be a bit tricky.
Take a TRY-CATCH block, such as this one:
BEGIN TRY
<DML STATEMENT>
END TRY
BEGIN CATCH
<handle it>
END CATCH
If the T-SQL trigger rolls back and an error is raised, when you get to the <handle it> block, you won’t be in a transaction. For CLR triggers, you’re in charge of whether the connection ends. When a CHECK constraint causes the error or executes a simple RAISERROR, you’ll be in a transaction. Generically, here’s the CATCH block that I use (making use of the objects we’ve already been using in the triggers):
BEGIN CATCH
IF @@trancount > 0
ROLLBACK TRANSACTION;
THROW; --will halt the batch or be caught by the caller's catch block
END CATCH
In almost every case, I roll back any transaction, log the error, and then reraise the error. As an example, I will build the following abstract tables for demonstrating trigger and constraint error handling:
CREATE SCHEMA alt;
GO
CREATE TABLE alt.errorHandlingTest
(
errorHandlingTestId int NOT NULL CONSTRAINT PKerrorHandlingTest PRIMARY KEY,
CONSTRAINT chkAlt_errorHandlingTest_errorHandlingTestId_greaterThanZero
CHECK (errorHandlingTestId > 0)
);
GO
Note that if you try to put a value greater than 0 into the errorHandlingTestId , it will cause a constraint error. In the trigger, the only statement we will implement in the TRY section will be to raise an error. So no matter what input is sent to the table, it will be discarded and an error will be raised and as we have done previously, we will use ROLLBACK if there is a transaction in progress and then do a THROW.
CREATE TRIGGER alt.errorHandlingTest$afterInsertTrigger
ON alt.errorHandlingTest
AFTER INSERT
AS
BEGIN TRY
THROW 50000, 'Test Error',16;
END TRY
BEGIN CATCH
IF @@TRANCOUNT > 0
ROLLBACK TRANSACTION;
THROW;
END CATCH
GO
The first thing to understand is that when a constraint causes the DML operation to fail, the batch will continue to operate:
--NO Transaction, Constraint Error
INSERT alt.errorHandlingTest
VALUES (-1);
SELECT 'continues';
You will see that the error is raised, and then the SELECT statement is executed:
Msg 547, Level 16, State 0, Line 2
The INSERT statement conflicted with the CHECK constraint "chkAlt_errorHandlingTest_errorHandlingTestId_greaterThanZero". The conflict occurred in database "Chapter7", table "alt.errorHandlingTest", column 'errorHandlingTestId'.
The statement has been terminated.
---------
continues
However, do this with a trigger error:
INSERT alt.errorHandlingTest
VALUES (1);
SELECT 'continues';
This returns the following and does not get to the SELECT 'continues' line at all:
Msg 50000, Level 16, State 16, Procedure errorHandlingTest$afterInsertTrigger, Line 6
Test Error
There are also differences in dealing with errors from constraints and triggers when you are using TRY-CATCH and transactions. Take the following batch. The error will be a constraint type. The big thing to understand is the state of a transaction after the error. This is definitely an issue that you have to be careful with.
BEGIN TRY
BEGIN TRANSACTION
INSERT alt.errorHandlingTest
VALUES (-1);
COMMIT
END TRY
BEGIN CATCH
SELECT CASE XACT_STATE()
WHEN 1 THEN 'Committable'
WHEN 0 THEN 'No transaction'
ELSE 'Uncommitable tran' END as XACT_STATE
,ERROR_NUMBER() AS ErrorNumber
,ERROR_MESSAGE() as ErrorMessage;
IF @@TRANCOUNT > 0
ROLLBACK TRANSACTION;
END CATCH
This returns the following:
| XACT_STATE | ErrorNumber | ErrorMessage |
| ----------- | ----------- | ---------------------------------------------------------- |
| Committable | 547 | The INSERT statement conflicted with the CHECK constraint… |
The transaction is still in force and in a stable state. If you wanted to continue on in the batch doing whatever you need to do it is certainly fine to do so. However, if you end up using any triggers to enforce data integrity, the situation will be different. In the next batch, we will use 1 as the value, so we get a trigger error instead of a constraint one:
BEGIN TRANSACTION
BEGIN TRY
INSERT alt.errorHandlingTest
VALUES (1);
COMMIT TRANSACTION;
END TRY
BEGIN CATCH
SELECT CASE XACT_STATE()
WHEN 1 THEN 'Committable'
WHEN 0 THEN 'No transaction'
ELSE 'Uncommitable tran' END as XACT_STATE
,ERROR_NUMBER() AS ErrorNumber
,ERROR_MESSAGE() as ErrorMessage;
IF @@TRANCOUNT > 0
ROLLBACK TRANSACTION;
END CATCH
This returns the following:
| XACT_STATE | ErrorNumber | ErrorMessage |
| ----------- | ----------- | ------------ |
| No transaction | 50000 | Test Error |
In the error handler of our batch, the session is no longer in a transaction, since we rolled the transaction back in the trigger. However, unlike the case without an error handler, we continue on in the batch rather than the batch dying. Note, however, that there is no way to recover from an issue in a trigger without resorting to trickery (like storing status in a temporary table instead of throwing an error or rolling back, but this is highly discouraged to keep coding standard and easy to follow).
The unpredictability of the transaction state is why we check the @@TRANCOUNT to see if we need to do a rollback. In this case, the error message in the trigger was bubbled up into this CATCH statement, so we are in an error state that is handled by the CATCH BLOCK.
As a final demonstration, let’s look at one other case, and that is where you raise an error in a trigger without rolling back the transaction .
ALTER TRIGGER alt.errorHandlingTest$afterInsertTrigger
ON alt.errorHandlingTest
AFTER INSERT
AS
BEGIN TRY
THROW 50000, 'Test Error',16;
END TRY
BEGIN CATCH
--Commented out for test purposes
--IF @@TRANCOUNT > 0
-- ROLLBACK TRANSACTION;
THROW;
END CATCH
Now, causing an error in the trigger:
BEGIN TRY
BEGIN TRANSACTION
INSERT alt.errorHandlingTest
VALUES (1);
COMMIT TRANSACTION;
END TRY
BEGIN CATCH
SELECT CASE XACT_STATE()
WHEN 1 THEN 'Committable'
WHEN 0 THEN 'No transaction'
ELSE 'Uncommitable tran' END as XACT_STATE
,ERROR_NUMBER() AS ErrorNumber
,ERROR_MESSAGE() as ErrorMessage;
IF @@TRANCOUNT > 0
ROLLBACK TRANSACTION;
END CATCH
The result will be as follows:
| XACT_STATE | ErrorNumber | ErrorMessage |
| ----------- | ----------- | ------------ |
| Uncommitable tran | 50000 | Test Error |
You get an uncommittable transaction, which is also called “doomed” sometimes. A doomed transaction is still in force but can never be committed and must be rolled back.
The point to all of this is that you need to be careful when you code your error handling to do a few things:
- Keep things simple: Do only as much handling as you need, and generally treat errors as unrecoverable unless recovery is truly necessary. The key is to deal with the errors and get back out to a steady state so that the client can know what to try again.
- Keep things standard: Set a standard, and follow it. Always use the same handler for all your code in all cases where it needs to do the same things.
- Test well: The most important bit of information is to test and test again all the possible paths your code can take.
To always get a consistent situation in my code, I pretty much always use a standard handler. Basically, before every data manipulation statement, I set a manual message in a variable, use it as the first half of the message to know what was being executed, and then append the system message to know what went wrong, sometimes using a constraint mapping function as mentioned earlier, although usually that is overkill since the UI traps all errors:
BEGIN TRY
BEGIN TRANSACTION;
DECLARE @errorMessage nvarchar(4000) = 'Error inserting data into alt.errorHandlingTest';
INSERT alt.errorHandlingTest
VALUES (-1);
COMMIT TRANSACTION;
END TRY
BEGIN CATCH
IF @@TRANCOUNT > 0
ROLLBACK TRANSACTION;
--I also add in the stored procedure or trigger where the error
--occurred also when in a coded object
SET @errorMessage = Coalesce(@errorMessage,'') +
' ( System Error: ' + CAST(ERROR_NUMBER() as varchar(10)) +
':' + ERROR_MESSAGE() + ': Line Number:' +
CAST(ERROR_LINE() as varchar(10)) + ')';
THROW 50000,@errorMessage,16;
END CATCH
Now, this returns the following:
Msg 50000, Level 16, State 16, Line 18
Error inserting data into alt.errorHandlingTest ( System Error: 547:The INSERT statement conflicted with the CHECK constraint "chkAlt_errorHandlingTest_errorHandlingTestId_greaterThanZero".
The conflict occurred in database "Chapter7", table "alt.errorHandlingTest", column 'errorHandlingTestId'.: Line Number:4)
This returns the manually created message and the system message, as well as where the error occurred. I might also include the call to the utility.ErrorLog$insert object , depending on whether the error was something that you expected to occur on occasion or whether it is something (as I said about triggers) that really shouldn’t happen. If I was implementing the code in such a way that I expected errors to occur, I might also include a call to something like the utility.ErrorMap$ MapError procedure that was discussed earlier to beautify the error message value for the system error.
Error handling did take a leap of improvement in 2005, with a few improvements here in 2011 (most notably being able to rethrow an error using THROW , which we have used in the standard trigger template), but it is still not perfect or straightforward. As always, the most important part of writing error handing code is the testing you do to make sure that it works!
Best Practices
The main best practice is to use the right tool for the job. There are many tools in (and around) SQL to use to protect the data. Picking the right tool for a given situation is essential. For example, every column in every table could be defined as nvarchar(max). Using CHECK constraints, you could then constrain the values to look like almost any datatype. It sounds silly perhaps, but it is possible. But you know better after reading Chapter 5 and now this chapter, right?
When choosing your method of protecting data, it’s best to apply the following types of objects, in this order:
- Datatypes: Choosing the right type is the first line of defense. If all your values need to be integers between 1 and 10,000, just using an integer datatype takes care of one part of the rule immediately.
- Defaults: Though you might not think defaults can be considered data-protection resources, you should know that you can use them to automatically set columns where the purpose of the column might not be apparent to the user (and the database adds a suitable value for the column).
- Simple CHECK constraints: These are important in ensuring that your data is within specifications. You can use almost any scalar functions (user-defined or system), as long as you end up with a single logical expression.
- Complex CHECK constraints using functions: These can be very interesting parts of a design but should be used sparingly, and you should rarely use a function that references the same tables data due to inconsistent results.
- Triggers: These are used to enforce rules that are too complex for CHECK constraints. Triggers allow you to build pieces of code that fire automatically on any INSERT, UPDATE, and DELETE operation that’s executed against a single table.
Don’t be afraid to enforce rules in more than one location. Although having rules as close to the data storage as possible is essential to trusting the integrity of the data when you use the data, there’s no reason why the user needs to suffer through a poor user interface with a bunch of simple text boxes with no validation. If the tables are designed and implemented properly, you could do it this way, but the user should get a nice rich interface as well.
Or course, not all data protection can be done at the object level, and some will need to be managed using client code. This is important for enforcing rules that are optional or frequently changing. The major difference between user code and the methods we have discussed so far in the book is that SQL Server–based enforced integrity is automatic and cannot (accidentally) be overridden. On the other hand, rules implemented using stored procedures or .NET objects cannot be considered as required rules. A simple UPDATE statement can be executed from Management Studio that violates rules enforced in a stored procedure.
Summary
Now, you’ve finished the task of developing the data storage for your databases. If you’ve planned out your data storage, the only bad data that can get into your system has nothing to do with the design (if a user wants to type the name John as “Jahn” or even “Bill”—stranger things have happened!—there’s nothing that can be done in the database server to prevent it). As an architect or programmer, you can’t possibly stop users from putting the names of pieces of equipment in a table named Employee. There’s no semantic checking built in, and it would be impossible to do so without tremendous work and tremendous computing power. Only education can take care of this. Of course, it helps if you’ve given the users tables to store all their data, but still, users will be users.
The most we can do in SQL Server is to make sure that data is fundamentally sound, such that the data minimally makes sense without knowledge of decisions that were made by the users that, regardless of whether they are correct, are legal values. If your HR employees keep trying to pay your new programmers minimum wage, the database likely won’t care, but if they try to say that new employees make a negative salary, actually owing the company money for the privilege to come to work, well, that is probably not going to fly, even if the job is video game tester or some other highly desirable occupation. During this process, we used the resources that SQL Server gives you to protect your data from having such invalid values that would have to be checked for again later.
Once you’ve built and implemented a set of appropriate data-safeguarding resources, you can then trust that the data in your database has been validated. You should never need to revalidate keys or values in your data once it’s stored in your database, but it’s a good idea to do random sampling, so you know that no integrity gaps have slipped by you, especially during the full testing process.