
![]()
Database Security and Security Patterns
“If you want total security, go to prison. There you’re fed, clothed, given medical care and so on. The only thing lacking … is freedom.”
—Dwight D. Eisenhower
There are so many threats to your security that it is essential to remain ever vigilant—without ending up with your server in a bunker of lead wearing a tinfoil hat protecting data by keeping it completely inaccessible to any human eyes. Business needs connectivity to customers, and customers need connectivity to their data. Security is one of the most important tasks when setting up and creating a new application, yet it is often overlooked and dealt with late in the application building process. Whether or not this is acceptable is generally up to your requirements and how your application will be built, but at one point or another, your application team must take the time to get serious about security. Over and over, stories in the news report data being stolen, and the theft is inevitably due to poor security. In the last edition of this book, I used the example of an election official’s stolen laptop in my home city of Nashville, Tennessee; names, addresses, and partial social security numbers were stolen. Since then, there has been a steady stream of such stories, and probably the most high profile has been Sony’s Playstation network getting hacked and being down for months. Hence, if you are the architect of a database system that holds personal and private information, it could be you who becomes jobless with a stain on your career the size of the Mojave desert and possibly quite unemployed if it turns out to be your fault that data leaked out into the hands of some junkie looking for stuff to hock.
Security is on the minds of almost every company today, as evidenced by the constant stream of privacy policies that we continue to come across these days. They’re everywhere and if your company does business with anyone, it likely has one too. Let’s be clear: for far too many organizations, most security is implemented by hoping average users are as observant as Dorothy and her shoes. They have a lot of power if they just were adventurous enough to open a tool like Management Studio and start clicking around (or perhaps clicking their ruby slipper heels together three times.) Of course, fear is a reasonably good motivator for sticking to the marked path, and most average users aren’t too adventurous in the first place (work the help desk for a week, and you will know exactly what I mean). If they were, they’d not only discover how to fix the same problem they had yesterday, but also may just find that they have incredible power to see more than they need to see or to get back home to Kansas in the blink of an eye.
In this chapter, we will be covering the following topics:
- Database security prerequisites: We will cover some of the fundamentals that you need to understand before dealing with database-level access.
- Database securables: Once you are in the context of a database, you have a lot of built-in control over what users can access. In this section, we will cover what they are.
- Controlling access to data via T-SQL coded objects: We will look beyond direct access to data, at how you can restrict access to data in more granular ways using T-SQL procedures, views, and so on.
- Crossing database lines: Databases are ideally independent containers, but on occasion, you will need to access data that is not stored within the confines of the database. In this section, we will cover some of the caveats when implementing cross database access.
- Obfuscating data: Often, you cannot prevent a user from having access to some data, but you want the program to be able to decode the data only situationally. This is particularly important for personally identifiable data or financial data, so we encrypt the data to keep eyes out except where allowable.
- Monitoring and auditing: Turning on a “security camera” and watch what people are doing is sometimes the only real way to verify that you can provide adequate security, and in many cases you will do this and the aforementioned items.
Overall, we will cover a solid sampling of what you will need to secure your data but not the complete security picture, especially if you start to use some of the features of SQL Server that we are not covering in this book (Service Broker to name one). The goal of this chapter will be to shine a light on what is available, demonstrate some of the implementation patterns you may use, and then let you dig in for your exact needs.
I should also note that not everyone will use many, if any, of the guidelines in this chapter in their security implementations. Often, the application layer is left to implement the security alone, showing or hiding functionality from the user. This approach is common, but it can leave gaps in security, especially when you have to give users ad hoc access to the data or you have multiple user interfaces that have to implement different methods of security. My advice is to make use of the permissions in the database server as much as possible. However, having the application layer control security isn’t a tremendous hole in the security of the organization, as long as the passwords used are seriously complex, encrypted, and extremely well guarded and ideally the data is accessed using Windows Authentication from the middle tier.
In this initial section of this chapter, we are going to cover a few prerequisites that we will need for the rest of this chapter on database security. As a programmer, I have generally only been an advisor on how to configure most of the server beyond the confines of the individual database. Setting up the layers of security at the SQL Server instance and Windows Server level is not tremendously difficult, but it is certainly outside of the scope of this book on database design.
As a bit of an introduction to the prerequisites, I am going to cover a few topics to get you started on your way to implementing a secure environment:
- Guidelines for server security: In this section, I will cover some of the things you can use to make sure your server is configured to protect against outside harm.
- Principals and securables: All security in SQL Server is centered around principals (loosely, logins and users) and securables (stuff that you can limit access to).
- Connecting to the server: With changes in SQL Server 2012, there are now multiple ways to access the server. We will cover these in this section.
- Impersonation: Using the EXECUTE AS statement, you can “pretend” you are a different security principal to use the other users’ security. It is a very important concept for testing security that we will use often in this chapter.
Guidelines for Server Security
Even as strictly a database architect/programmer, you may need to set up, or at least validate, the security of your SQL Server installation. The following bulleted list contains some high-level characteristics you will want to use to validate the security of the server to protect your system from malicious hackers. It is not an exhaustive list, but it is a good start nonetheless:
- Strong passwords are applied to all accounts, both Windows Authentication and SQL Server authentication style (server and contained database style, new to SQL Server 2012)—certainly, all universally known system accounts have very strong passwords (such as sa, if you haven’t changed the name). Certainly, there are no blank passwords for any accounts!
- SQL Server isn’t sitting unguarded on the Web, with no firewall and no logging of failed login attempts.
- The guest user has been removed from all databases where it isn’t necessary.
- Care has been taken to guard against SQL injection by avoiding query strings whereby a user could simply inject SELECT name FROM sys.sql_logins and get a list of all your logins in a text box in your application that should display something like toothpaste brands. (Chapter 13 mentions SQL injection again; there I contrast ad hoc SQL with stored procedures.)
- Application passwords are secured/encrypted and put where they can be seen by only necessary people (such as the DBA and the application programmers who use them in their code). The password is encrypted into application code modules when using application logins.
- You’ve made certain that few people have file-level access to the server where the data is stored and, probably more important, where the backups are stored. If one malicious user has access to your backup file (or tape if you are still living in the past), that person has access to your data by simply attaching that file to a different server, and you can’t stop him or her from accessing the data (even encryption isn’t 100 percent secure if the hacker has virtually unlimited time).
- You have taken all necessary precautions to make sure that the physical computer where the data is stored cannot be taken away as a whole. Even things like encryption aren’t completely effective if the data needed to decrypt the values is available on one of the machines that has been stolen along with the machine with the encrypted values.
- Your SQL Server installation is located in a very secure location. A Windows server, just like your laptop, is only as secure as the physical box. Just like on any spy TV show, if the bad guys can access your physical hardware, they could boot to a CD or USB device and have access to your hard disks (note that using transparent data encryption (TDE) can help in this case).
- All features that you are not using are turned off. To make SQL Server as secure as possible out of the box, many features are disabled by default and have to be enabled explicitly before you can use them. For example, remote administrator connections, Database Mail, CLR programming, and others are all off by default. You can enable these features and others using the sp_configure stored procedure.
Principals and Securables
At the very core of security in SQL Server are the concepts of principals and securables. Principals are those objects that may be granted permission to access particular database objects, while securables are those objects to which access can be controlled. Principals can represent a specific user, a role that may be adopted by multiple users, or an application, certificate, and more. There are three sorts of SQL Server principals that you will deal with:
- Windows principals: These represent Windows user accounts or groups, authenticated using Windows security.
- SQL Server principals: These are server-level logins or groups that are authenticated using SQL Server security.
- Database principals: These include database users, groups, and roles, as well as application roles.
Securables are the database objects to which you can control access and to which you can grant principals permissions. SQL Server distinguishes between three scopes at which different objects can be secured:
- Server scope: Server-scoped securables include logins, HTTP endpoints, event notifications, and databases. These are objects that exist at the server level, outside of any individual database, and to which access is controlled on a server-wide basis.
- Database scope : Securables with database scope are objects such as schemas, users, roles, and CLR assemblies, DDL triggers, and so on, which exist inside a particular database but not within a schema.
- Schema scope : This group includes those objects that reside within a schema in a database, such as tables, views, and stored procedures. A SQL Server 2005 and later schema corresponds roughly to the owner of a set of objects (such as dbo) in SQL Server 2000.
These concepts will come into play in all of the following sections as we walk through the different ways that you will need to secure the data in the database. You can then grant or deny usage of these objects to the roles that have been created. SQL Server uses three different security statements to give or take away rights from each of your roles:
- GRANT : Gives the privilege to use an object.
- DENY : Denies access to an object, regardless of whether the user has been granted the privilege from any other role.
- REVOKE : Used to remove any GRANT or DENY permissions statements that have been applied to an object. This behaves like a delete of an applied permission, one either granted or denied.
Typically, you’ll simply give permissions to a role to perform tasks that are specific to the role. DENY is then used only in “extreme” cases, because no matter how many other times the user has been granted privileges to an object, the user won’t have access to it while there’s one DENY.
For a database or server right, you will use syntax like
GRANT <privilege> TO <principal> [WITH GRANT OPTION];
The WITH GRANT OPTION will allow the principal to grant the privilege to another principal.
For the most part, this book will deal primarily with database object privileges, as database and server privileges are almost always an administrative consideration. They allow you to let principals create objects, drop objects, do backups, view metadata, and so on.
For database objects, there is a minor difference in the syntax, in that the securable that you will be granting rights to will be specified. For example, to grant a privilege on a securable in a database, the command would be as follows:
GRANT <privilege> ON <securable> to <principal> [WITH GRANT OPTION];
Next, if you want to remove the privilege, you have two choices. You can either REVOKE the permission, which just deletes the granted permission, or you can DENY the permission. Execute the following:
REVOKE <privilege> FROM <securable> to <principal>;
I haven’t covered role membership yet (it’s covered later in this chapter), but if the user were a member of a role that had access to this object, the user would still have access. However, execute the following code:
DENY <privilege> ON <securable> to <principal>;
The use of DENY will prohibit the principal from using the securable, even if they have also been granted access by means of another securable. To remove DENY, you again use the REVOKE command. This will all become clearer when I cover roles later in this chapter, but in my experience, DENY isn’t a typical thing to use on a principal’s privilege set. It’s punitive in nature and is confusing to the average user. More commonly, users are given rights and not denied access.
Another bit of notation you will see quite often is to denote the type of securable before the securable where it is not the default. For objects that show up in sys.objects that have security granted to them (from Books Online, these are table, view, table-valued function, stored procedure, extended stored procedure, scalar function, aggregate function, service queue, or synonym), you can simply reference the name of the object:
GRANT <privilege> ON <securable> to <database principal>;
For other types of objects, such as schemas, assemblies, and search property lists, to name a few, you will specify the type in the name. For example, for a schema GRANT, the syntax is
GRANT <privilege> ON SCHEMA::<schema securable> to <database principal>;
Note that, for objects, you can also use the a prefix of OBJECT::, as in the following:
GRANT <privilege> ON OBJECT::<securable> to <database principal>;
Connecting to the Server
Before we finally get the database security, we need to cover accessing the server. Prior to SQL Server 2012, there was a single way to access a database. This method is still pretty much the norm and is basically as follows: A login principal is defined that allows a principal to access the server using Windows credentials, a login that is managed in the SQL Server instance (known as SQL Server authentication), or one of several other methods including a certificate or an asymmetric key. The login is then mapped to a user within the database to gain access.
The additional method in SQL Server 2012 uses a new concept of a contained database (CDB). I will cover the broader picture and a bit of the management of CDB as a whole later in the chapter when I cover cross-database security, but I do need to introduce the syntax and creation of the database here as it is, from a coding standpoint, largely a security question. Contained databases in SQL Server 2012 are the initial start of making databases essentially standalone containers that can be moved from server to server with little effort (and likely eventually to Azure as well).
In this section, I will provide two examples of connecting to the server:
- Using the classic approach of a login and user
- Access the database directly using the containment model
To access the server, we will create a server principal known as a login. There are two typical methods that you will use to create almost all logins. The first method is to map a login to a Windows Authentication principal. This is done using the CREATE LOGIN statement. The following example would create the login I have on my laptop for writing content:
CREATE LOGIN [DENALI-PCAlienDrsql] FROM WINDOWS
WITH DEFAULT_DATABASE=tempdb, DEFAULT_LANGUAGE=us_english;
The name of the login is the same as the name of the Windows principal, which is how they map together. So on my local virtual machine named DENALI-PC, I have a user named AlienDrsql (I have an Alienware PC, hence the name; I am not a weirdo; I promise.) The Windows principal can be a single user or a Windows group. For a group, all users in the group will gain access to the server in the same way and have the exact same permission set. This is, generally speaking, the most convenient method of creating and giving users rights to SQL Server.
The second way is to create a login with a password:
CREATE LOGIN [Fred] WITH PASSWORD=N'password' MUST_CHANGE, DEFAULT_DATABASE=[tempdb],
DEFAULT_LANGUAGE=[us_english], CHECK_EXPIRATION=ON, CHECK_POLICY=ON;
If you set the CHECK_POLICY setting to ON, the password will need to follow the password complexity rules of the Windows server it is created on, and CHECK_EXPIRATION, when set to ON, will require the password to be changed based on the policy of the Windows server as well. Generally speaking, the most desirable method is to use Windows Authentication for the default access to the server where possible, since keeping the number of passwords a person has to a minimum makes it less likely for them to tape the password up on the wall for all to see. Of course, using Windows Authentication can be troublesome in some cases where SQL Server are located in a DMZ with no trust between domains so you have to resort to SQL Server authentication, so use very complex passwords and (ideally) change them often.)
In both cases, I defaulted the database to tempdb , because it requires a conscious effort to go to a user database and start building, or even dropping, objects. However, any work done in tempdb is deleted when the server is stopped. This is actually one of those things that may save you more times than you might imagine. Often, a script gets executed and the database is not specified, and a bunch of data gets created—usually in master (the default database if you haven’t set one explicitly…so the default default database.) I have built more test objects on my local SQL Server in master over the years than I can count.
Once you have created the login, you will need to do something with it. If you want to make it a system administrator–level user, you could add it to the sysadmin group, which is something that you will want to do on your local machine with your default user (though you probably already did this when you were installing the server and working though the previous chapters, probably during the installation process, possibly without even realizing that was what you were doing):
ALTER SERVER ROLE [sysadmin] ADD MEMBER [DENALI-PCAlienDrsql];
![]() Tip Members of the sysadmin role basically bypass all rights checks on the server and are allowed to do anything. It is important to make sure you always have one sysadmin user that someone has the credentials for. It may sound obvious, but many a server has been reinstalled after all sysadmin users have been dropped or lost their passwords.
Tip Members of the sysadmin role basically bypass all rights checks on the server and are allowed to do anything. It is important to make sure you always have one sysadmin user that someone has the credentials for. It may sound obvious, but many a server has been reinstalled after all sysadmin users have been dropped or lost their passwords.
You can give users rights to do certain actions using server permissions. For example, you might give the FRED user rights to VIEW SERVER STATE (which lets you run Dynamic Management Views, for example) using:
GRANT VIEW SERVER STATE to [Fred];
And new in SQL Server 2012, you can create user-defined server roles. For example, if you want to give support people rights to VIEW SERVER STATE and VIEW ANY DATABASE (letting them see the structure of all databases) rights, you could create a server role:
CREATE SERVER ROLE SupportViewServer;
Grant the role the rights desired:
GRANT VIEW SERVER STATE to SupportViewServer;
GRANT VIEW ANY DATABASE to SupportViewServer;
And add the login to the server role:
ALTER SERVER ROLE SupportViewServer ADD MEMBER Fred;
Once we have our login created, the next step is to set up access to a database (unless you used sysadmin, in which case you have unfettered access to everything on the server). For example, let’s create a simple database. For the remainder of this chapter, I will expect that you are a using a user who is a member of the sysadmin server role as the primary user, much as we have for the entire book, except when we are testing some code, and it will be set up in the text as to what we are doing. So we create database ClassicSecurityExample:
CREATE DATABASE ClassicSecurityExample;
Next, we will create another login, using SQL Server Authentication. Most logins we will create in the book will be SQL Server Authentication to make it easier to test the user. We will also keep the password simple (CHECK_POLICY) and not require it to be changed (CHECK_EXPIRATION) to make our examples easier:
CREATE LOGIN Barney WITH PASSWORD=N'password', DEFAULT_DATABASE=[tempdb],
DEFAULT_LANGUAGE=[us_english], CHECK_EXPIRATION=OFF, CHECK_POLICY=OFF;
Login using the user in Management Studio into a query window:
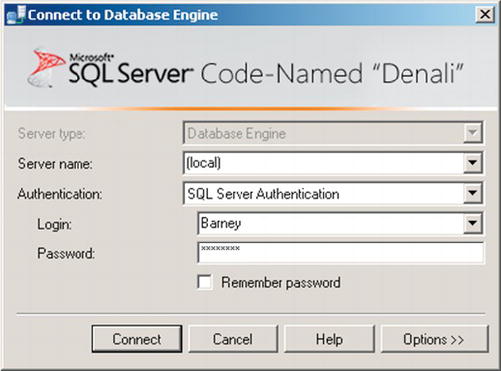
Figure 9-1. Logging in using test user
Next, try to execute USE statement to change context to the ClassicSecurityExample database:
USE ClassicSecurityExample;
You will receive the following error:
Msg 916, Level 14, State 1, Line 1
The server principal "Barney" is not able to access the database "ClassicSecurityExample" under the current security context.
Your database context will remain in tempdb, since this is the default database we set up for the user. Going back to the window where you are in the sysadmin user context, we need to enable the user to access the database. There are two ways to do this, the first being to give the guest user rights to connect to the database:
USE ClassicSecurityExample;
GO
GRANT CONNECT to guest;
If you go back to the connection where the user Barney is logged in, you will find that Barney can now access the ClassicSecurityExample database—as can any other login in your system. You can apply this strategy if you have a database that you want all users to have access to, but it is generally not the best idea under most circumstances.
So, let’s remove this right from the guest user using the REVOKE statement:
REVOKE CONNECT TO guest;
Going back to the window where you have connected to the database as Barney, you will find that executing a statement is still allowed, but if you disconnect and reconnect, you will not be able to access the database. Finally, to give server principal Barney access to the database, we will create a user in the database and grant it the right to connect:
USE ClassicSecurityExample;
GO
CREATE USER BarneyUser FROM LOGIN Barney;
GO
GRANT CONNECT to BarneyUser;
Going back to the query window in the context of Barney, you will see that you can connect to the database, and using a few system functions, you can see your server and database security contexts in each.
USE ClassicSecurityExample;
GO
SELECT SUSER_SNAME() as server_principal_name, USER_NAME() as database_principal_name;
This will return:
| server_principal_name | database_principal_name |
| --------------------- | ----------------------- |
| Barney | BarneyUser |
Executing this in your system administrator connection, you will see:
| server_principal_name | database_principal_name |
| --------------------- | ----------------------- |
| DENALI-PCAlienDrsql | dbo |
The server principal will be the login you used, and the database principal will always be dbo (the database owner), as the system administrator user will always be mapped to the database owner. Now, this is the limit of what we are covering in this section, as you are now able to connect to the database. We will cover what you can do in the database after we cover connecting to the database with a contained database.
Using the Contained Database Model
A tremendous paradigm shift has occurred since I first started writing about database design and programming, and this is virtualization. Even back with SQL Server 2008, the advice would have been strongly against using any sort of virtualization technology with SQL Server, and now, even at the nonprofit I work for, we have nearly everything running on virtualized Windows hardware. One of the many tremendous benefits of virtualization is that you can move around your virtual computer and/or servers within your enterprise to allow optimum use of hardware.
And since SQL 2008 was presented, another paradigm shift has begun with what is referred to as the cloud, where instead of housing your own hardware and servers, you put your database on a massive server such that, on average, their hardware is used quite constantly but the users don’t exactly feel it. I haven’t made too big of a deal about the cloud version of SQL Server (SQL Server Azure) in this book, largely because it is just (simplifying quite a bit, naturally), a relational database that you use over the WAN instead of the LAN. I expect that, although I will just touch a bit on the subject for this book, in the next edition of this book, the cloud will be far more prevalent.
To that end, Microsoft has added the beginnings of what is going to be a very important step in making databases easy to move from local to cloud with ease called contained databases. Where applicable, I will note some of the places where contained database security is different that the classic model, which is mostly concerning accessing external objects.
Our first step is to create a new database that we will set CONTAINMENT = PARTIAL. For SQL Server 2012, there are two models: OFF, which I am referring to as classic model, and PARTIAL, which will give you a few benefits (like temporary object collation defaulting to the partially contained databases rather than the server). Later versions of SQL Server will likely include a fully contained model that will be almost completely isolated from other databases in most ways.
The way you will connect to the database is a fundamental change, and just like filestream we discussed in previous chapters, this means a security point that is going to be turned off by default. Hence, the first thing we will do is configure the server to allow new connections using what is called contained database authentication using sp_configure :
EXECUTE sp_configure 'contained database authentication', 1;
GO
RECONFIGURE WITH OVERRIDE;
You should get a message telling you that the value was changed, either from 0 to 1 or 1 to 1, depending on if the server is already set up for the contained authentication. Next, create the database. You do not set the containment properties in the CREATE DATABASE statement, so you will create a database just like any other database:
CREATE DATABASE ContainedDBSecurityExample;
The next step is to set the containment model using an ALTER DATABASE statement, which you will do in the context of the database:
USE ContainedDBSecurityExample;
GO
-- set the contained database to be partial
ALTER DATABASE ContainedDBSecurityExample SET CONTAINMENT = PARTIAL;
Next, we will create a user, in this case referred to as a contained user. Contained users are basically a hybrid of login and user, and they are created using the CREATE USER statement, which is a bit regrettable, as the syntaxes are different (you will be warned if you try to use the wrong syntax). Books Online lists 11 variations of the CREATE USER syntax, so you should check it out if you need a different sort of user!
The first case we will use is a new SQL Server authentication user that logs into the database directly with a password that exists in the system catalog tables in the database. You must be in the context of the database (which we set earlier), or you will get an error telling you that you can only create a user with a password in a contained database.
CREATE USER WilmaContainedUser WITH PASSWORD = 'p@ssword1';
You can also create a Windows Authentication user in the following manner as long as a corresponding login does not exist. So the following syntax is correct, but on my computer, this fails because that user already has a login defined:
CREATE USER [DENALI-PCAlienDrsql];
Since that user already has a login, you will get the following error:
Msg 15063, Level 16, State 1, Line 1
The login already has an account under a different user name.
presumably because it has the same security context, and it would default to using the server rights, with the default database set (as I will demonstrate in the next paragraph!). But again, for demonstration purposes, we will be using SQL Server Authentication to make the process easier.
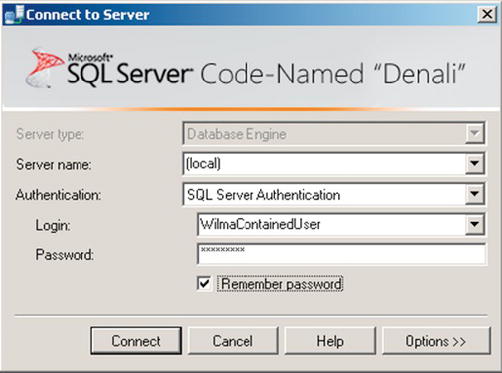
Next, we will connect to the database in SSMS using the contained user we previously created named WilmaContainedUser with password p@ssword1. To do this, you will specify the server name, choose SQL Server Authentication, and set the username and password:
Next, click the Options button. Go to the connection properties tab, and enter the name of the contained database as seen in Figure 9-3.
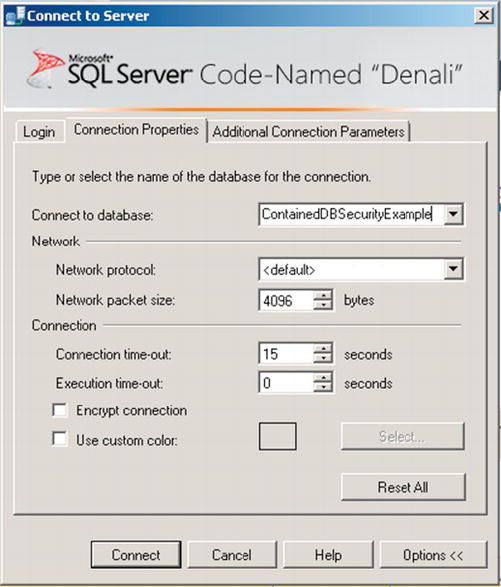
Figure 9-3. Enter the name of the database in the blank
You will need to know the name since the security criteria you are using will not have rights to the metadata of the server, so if you try to browse the database with the login you have supplied, it will give you the error you can see in Figure 9-4.

Figure 9-4. Error trying to browse for name of contained database
Now, as you will see in Object Explorer, the server seems like it is made up of a single database, as shown in Figure 9-5.
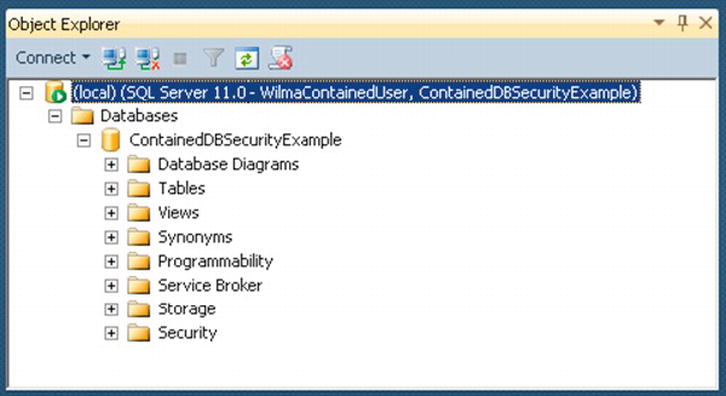
Figure 9-5. Contained database Object Explorer in SSMS
After this point in the process, you will be in the context of a database, and everything will be pretty much the same whether the database is partially contained or completely uncontained. The big difference is that in the drop-down list of databases you will have the current database (ContainedDBSecurityExample), and master and tempdb. At this point, you are in the context of the database just like in the previous section on the classic security model.
You cannot create a contained user in an uncontained database, but you can still create a user linked to a login in a contained database. For example, you could create a new login:
CREATE LOGIN Pebbles WITH PASSWORD = 'BamBam01$';
Then link that user to the login you have created:
CREATE USER PebblesUnContainedUser FROM LOGIN Pebbles;
Obviously, this begins to defeat the overarching value of a contained database, which is to make the database portable without the need to reconcile logins on one server to a login on another, but rather to be immediately usable with the same users (with the caveat that the Windows Authentication user will have to be able to connect to the authenticating server).
Note that you can switch a contained database back to not being contained but you cannot have any contained database principals in it. If you try to set the ContainedDbSecurityExample database back to uncontained:
ALTER DATABASE ContainedDbSecurityExample SET CONTAINMENT = none;
You will get another excellent error message that (unless you have seen it before) will undoubtedly cause you to scratch your head:
Msg 33233, Level 16, State 1, Line 1
You can only create a user with a password in a contained database.
Msg 5069, Level 16, State 1, Line 1
ALTER DATABASE statement failed.
If you need to make this database uncontained, you will need to drop the contained users, which you can identify with the following list:
SELECT name
FROM sys.database_principals
WHERE authentication_type_desc = 'DATABASE';
In our database, this returns
Name
------------------
WilmaContainedUser
Drop this user, and you would then be able to turn containment off for this database. Later in this chapter, we will come back to the topic of containment when we cover cross database access (and in the case of containment, working to protect against it to keep databases more portable).
The ability to pretend to be another user or login is fairly important when it comes to testing security. Impersonation is, in fact, one of the most important tools you will need when you are testing your security configuration. After some code has been migrated to production, it is common to get a call from clients who claims that they cannot do something that you think they really ought to be able to do. Since all system problems are inevitably blamed on the database first, it is a useful trick to impersonate the user and then try the questioned code in Management Studio to see whether it is a security problem. If the code works in Management Studio, your job is almost certainly done from a database standpoint, and you can point your index finger at some other part of the system. You can do all of this without knowing their passwords, as you are either the sysadmin user or have been granted rights to impersonate the user.
To demonstrate security in a reasonable manner on a single SQL Server connection, I will use a feature that was new to SQL Server 2005. In 2000 and earlier, if the person with administrator rights wanted to impersonate another user, he or she used SETUSER (I still see people use SETUSER, so I feel I still need to mention it here). Using SETUSER, you can impersonate any server or a database principal, and you get all rights that user has (and consequently lose the rights you previously had). You can go back to the previous security context by executing REVERT. The only downside is that when you try to impersonate a Windows Authentication–based principal, you cannot do this disconnected from the domain where the principal was created.
![]() Note For non-dbo or sa users to use EXECUTE AS, they must have been granted IMPERSONATE permissions on the specified login name or username that they are trying to impersonate. You can even impersonate a sysadmin-level user if you have been granted such rights.
Note For non-dbo or sa users to use EXECUTE AS, they must have been granted IMPERSONATE permissions on the specified login name or username that they are trying to impersonate. You can even impersonate a sysadmin-level user if you have been granted such rights.
As an example, I’ll show a way that you can have a user impersonating a member of the server-system sysadmin role. Using impersonation in such a way takes some getting used to, but it certainly makes it easier to have full sysadmin power only when it’s needed. As said previously, there are lots of server privileges, so you can mete out rights that are needed on a day-to-day basis and reserve the “dangerous” ones like DROP DATABASE only for logins that you have to impersonate.
As an example (and this is the kind of example that I’ll have throughout this chapter), we first create a login that we never expect to be logged into directly. I use a standard login, but you could map it to a certificate, a key, a Windows user, or whatever. Standard logins make it much easier to test situations and learn from them because they’re self-contained. Then, we add the login to the sysadmin role. You probably also want to use a name that isn’t so obviously associated with system administration. If a hacker got into your list of users somehow, the name 'itchy' wouldn’t so obviously be able to do serious damage to your database server, as would a name like 'Merlin'.
USE master;
GO
CREATE LOGIN system_admin WITH PASSWORD = 'tooHardToEnterAndNoOneKnowsIt',CHECK_POLICY=OFF;
EXEC sp_addsrvrolemember 'system_admin','sysadmin';
Then, we create a regular login and give rights to impersonate the system_admin user:
CREATE LOGIN louis with PASSWORD = 'reasonable', DEFAULT_DATABASE=tempdb,CHECK_POLICY=OFF;
--Must execute in master Database
GRANT IMPERSONATE ON LOGIN::system_admin TO louis;
![]() Caution You might not want to execute this code on your instance unless you are doing this isolated from production code. The passwords I used (and will use) are far simpler than your production ones will be. For example, the one that was tooHardToEnterAndNoOneKnowsIt would actually be something more like a random string of letters, numbers, and special characters. Some of my current sa passwords have been over 50 characters long and filled with special characters that can only feasibly be pasted to be used.
Caution You might not want to execute this code on your instance unless you are doing this isolated from production code. The passwords I used (and will use) are far simpler than your production ones will be. For example, the one that was tooHardToEnterAndNoOneKnowsIt would actually be something more like a random string of letters, numbers, and special characters. Some of my current sa passwords have been over 50 characters long and filled with special characters that can only feasibly be pasted to be used.
We log in as louis and try to run the following code (in Management Studio, you can just right-click in the query window to use the Connection/Change Connection context menu and use a standard login):
USE ClassicSecurityExample;
The following error is raised:
Msg 916, Level 14, State 1, Line 1
The server principal "louis" is not able to access the database "ClassicSecurityExample" under the current security context.
Now, we change security context to the system_admin user (note that you cannot use EXECUTE AS LOGIN when you are in the context of a contained database user):
EXECUTE AS LOGIN = 'system_admin';
We now have control of the server in that window as the system_admin user! To look at the security context, you can use several variables/functions:
USE ClassicSecurityExample;
GO
SELECT user as [user], system_user as [system_user],
original_login() as [original_login];
This returns the following result:
| user | system_user | original_login |
| ---- | ----------- | --------------- |
| dbo | system_admin | louis |
The columns mean
- user: The database principal name of context for the user in the database
- system_user: The server principal name of context for the login
- original_login(): The login name of the server principal who actually logged in to start the connection (This is an important function that you should use when logging which login performed an action.)
Then, you execute the following code:
REVERT --go back to previous security context
We see the following result:
Msg 15199, Level 16, State 1, Line 1
The current security context cannot be reverted. Please switch to the original database where 'Execute As' was called and try it again.
You started in tempdb, so you use the following code:
USE tempdb;
REVERT;
SELECT user as [user], SYSTEM_USER as [system_user],
ORIGINAL_LOGIN() as [original_login];
This now returns the following result:
| user | system_user | original_login |
| ---- | ----------- | --------------- |
| guest | louis | louis |
Impersonation gives you a lot of control over what a user can do and allows you to situationally play one role or another, such as creating a new database. I’ll use impersonation to change security context to demonstrate security concepts.
![]() Note The user here is guest, which is a user I recommend that you consider disabling in every nonsystem database unless it is specifically needed. Disable guest by executing REVOKE CONNECT FROM GUEST. You cannot disable the guest user in the tempdb or master database, because users must have access to these databases to do any work. Trying to disable guest in these databases will result in the following message: "Cannot disable access to the guest user in master or tempdb".
Note The user here is guest, which is a user I recommend that you consider disabling in every nonsystem database unless it is specifically needed. Disable guest by executing REVOKE CONNECT FROM GUEST. You cannot disable the guest user in the tempdb or master database, because users must have access to these databases to do any work. Trying to disable guest in these databases will result in the following message: "Cannot disable access to the guest user in master or tempdb".
Using impersonation, you can execute your code as a member of the sysadmin server or db_owner database role and then test your code as a typical user without opening multiple connections (and this technique makes the sample code considerably easier to follow). Note that I have only demonstrated impersonating a login, but you can also impersonate users, which we will use along with impersonating a login throughout the rest of this chapter. Note that there are limitations on what you can do when using impersonation. For a full treatment of the subject, check in Books Online under the “EXECUTE AS” topic.
Database Securables
Now that we have covered access to the server and/or database, your users are going to need the ability to do something in the database they now have access to. In the previous section, we covered getting into the context of a database, and in this section, we are going to cover the different ways you can now use the database principals you have created.
Permissions to use data securables are rights granted (or denied) to a principal to access some securable. I’ll cover the basics of database permissions for a foundation of best practices. Taken to the extreme, an extensively large set of things are considered securable, especially at the server level, but over 90 percent of security for the average database programmer/architect (and certainly a data architect, as is the main focus of this book) is securing tables, views, functions and procedures, and this is what’s primarily interesting from a database-design standpoint.
At the database level, there are two main types of principals: the user and the role. We covered the user in the previous section and whether you use Windows Authentication or standard authentication, or if you use the classic or the containment model, the database implementation will be essentially the same.
The next principal is the role, which is a way to set up different functional roles and then assign a user or another role to it. The very best practice for assigning security to database principals is to nearly always use roles, even if you have only a single user in a role. This practice may sound like more work, but in the end, it helps keep rights straight between your development and production environments (and all environments in between) and helps avoid users who end up with god-like powers from getting one permission here and another there. The roles will be the same in all areas; the users who are associated with the roles are then different in production, test, and so on.
I’ll cover the following topics, which revolve around giving users permissions to use securables:
- Grantable permissions: This section covers the different sorts of database permissions and how to grant and revoke permission on securables.
- Roles and schemas: You’ll learn how to use roles and schemas to grant rights efficiently to database securables.
These two topics will give you most of the information you need to know about setting up your database-level security.
Using SQL Server security, you can easily build a security plan that prevents unwanted usage of your objects by any user. You can control rights to almost every object type, and in SQL Server, you can secure a tremendous number of object types. For our purposes here, I’ll cover data-oriented security specifically, limited to the objects and the actions you can give or take away access to (see Table 9-1).
Table 9-1. Database Objects and Permissions
| Object Type | Permission Type |
|---|---|
| Tables | SELECT, INSERT, UPDATE, DELETE, REFERENCES |
| Views | SELECT, INSERT, UPDATE, DELETE |
| Columns (view and table) | SELECT, INSERT, UPDATE, DELETE |
| Functions | EXECUTE (scalar) SELECT (table valued) |
| Stored procedures | EXECUTE |
Most of these are straightforward and probably are familiar if you’ve done any SQL Server administration, although perhaps REFERENCES isn’t familiar. Briefly, SELECT allows you to read data using a SELECT statement; INSERT allows you to add data, UPDATE to modify data, and DELETE to remove data. EXECUTE lets you execute coded objects, and REFERENCES allows objects that one user owns to reference another one via a foreign key. This is for the situation in which tables are owned by schemas that are then owned by different database principals. If you wanted to apply a foreign key between the tables, you’d be required to give the child table REFERENCES permissions.
As briefly mentioned earlier in this chapter for server and database permissions, you will use one of the three different statements to give or take away rights from each of your roles:
- GRANT: Gives the privilege to use an object
- DENY: Denies access to an object, regardless of whether the user has been granted the privilege from any other role
- REVOKE: Used to remove any GRANT or DENY permissions statements that have been applied to an object (This behaves like a delete of an applied permission.)
To see the user’s rights in the database, you can use the sys.database_permissions catalog view. For example, use the following code to see all the rights that have been granted in the database:
SELECT class_desc AS permission_type,
object_schema_name(major_id) + '.' + object_name(major_id) AS object_name,
permission_name, state_desc, user_name(grantee_principal_id) AS Grantee
FROM sys.database_permissions
Using that query in the master database, you will be able to see users that have CONNECT rights, as well as the different stored procedures and tables that you have access to.
Controlling Access to Objects
One of the worst things that can happen in an organization is for a user to see data out of context and start a worry- or gossip-fest. Creating roles and associating users with them is a fairly easy task and is usually worth the effort. Once you’ve set up the security for a database using sufficient object groupings (as specific as need be, of course), management can be relatively straightforward.
Your goal is to allow the users to perform whatever tasks they need to but to prohibit any other tasks and not to let them see any data that they shouldn’t. You can control access at several levels. At a high level, you might want to grant (or deny) a principal access to all invoices—in which case, you might control access at the level of a table. At a more granular level, you might want to control access to certain columns or rows within that table. In a more functional approach, you might give rights only to use stored procedures to access data. All these approaches are commonly used in the same database in some way, shape, or form.
In this section, I’ll cover the built-in security for tables and columns as it’s done using the built-in vanilla security, before moving on to the more complex strategies using coded objects like views and stored procedures.
As already mentioned, for tables at an object level, you can grant a principal rights to INSERT, UPDATE, DELETE, or SELECT data from a table. This is the most basic form of security when dealing with data. The goal when using table-based security is to keep users looking at, or modifying, the entire set of data, rather than specific rows. We’ll progress to the specific security types as we move through the chapter. As mentioned in the introduction to this section, all objects should be owned by the same user for most normal databases (not to be confused with the owner from the previous versions of SQL Server), so we won’t deal with the REFERENCES permission type.
![]() Note In the context of security, a view will be treated just like a table, in that you can grant INSERT, UPDATE, DELETE, and/or SELECT rights to the view. Views have other considerations that will be covered later in this chapter.
Note In the context of security, a view will be treated just like a table, in that you can grant INSERT, UPDATE, DELETE, and/or SELECT rights to the view. Views have other considerations that will be covered later in this chapter.
As an example of table security, you’ll create a new table, and I’ll demonstrate, through the use of a new user, what the user can and cannot do:
USE ClassicSecurityExample;
GO
--start with a new schema for this test and create a table for our demonstrations
CREATE SCHEMA TestPerms;
GO
CREATE TABLE TestPerms.TableExample
(
TableExampleId int identity(1,1)
CONSTRAINT PKTableExample PRIMARY KEY,
Value varchar(10)
);
Next, create a new user, without associating it with a login. You won’t need a login for many of the examples, because you’ll use impersonation to pretend to be the user without logging in:
CREATE USER Tony WITHOUT LOGIN;
![]() Note The ability to have a user without login privileges allows you to have objects in the database that aren’t actually owned by a particular login, making managing objects cleaner, particularly when you drop a login that was connected to a user or restore a database.
Note The ability to have a user without login privileges allows you to have objects in the database that aren’t actually owned by a particular login, making managing objects cleaner, particularly when you drop a login that was connected to a user or restore a database.
You impersonate the user Tony and try to create a new row:
EXECUTE AS USER = 'Tony';
INSERT INTO TestPerms.TableExample(Value)
VALUES ('a row'),
Well, as you would (or, at least, will come to) expect, here’s the result:
Msg 229, Level 14, State 5, Line 2
The INSERT permission was denied on the object 'TableExample', database 'ClassicSecurityExample', schema 'TestPerms'.
Now, go back to being the dbo using the REVERT command, give the user rights, return to being Tony, and try to insert again:
REVERT; --return to admin user context
GRANT INSERT ON TestPerms.TableExample TO Tony;
GO
Then, try to execute the insert statement again as Tony; you should now be able to execute the insert statement:
EXECUTE AS USER = 'Tony';
INSERT INTO TestPerms.TableExample(Value)
VALUES ('a row'),
No errors here. Now, because Tony just created the row, the user should be able to select the row, right?
SELECT TableExampleId, Value
FROM TestPerms.TableExample;
No, the user had rights only to INSERT data, not to view it:
Msg 229, Level 14, State 5, Line 1
The SELECT permission was denied on the object 'TableExample', database 'ClassicSecurityExample', schema 'TestPerms'.
Now, you can give the user Tony rights to SELECT data from the table using the following GRANT statement:
REVERT;
GRANT SELECT ON TestPerms.TableExample TO Tony;
Now that Tony has rights, you can successfully run the following:
EXECUTE AS USER = 'Tony';
SELECT TableExampleId, Value
FROM TestPerms.TableExample;
REVERT;
The SELECT statement works and does return the row the user created. At the table level, you can do this individually for each of the four DML statements INSERT, UPDATE, DELETE, and SELECT (or you can use GRANT ALL ON <objectName> TO <principal> to give all rights to the <objectName> to the <principal>. The goal is to give the users only what they need. For example, if the user happened to represent a device that was inserting readings, it wouldn’t need to be able to read, modify, or destroy data, just create it.
For the most part, it’s enough simply to limit a user’s access at the level of either being able to use (or not use) the entire table or view, but as the next two major sections of the chapter will discuss, sometimes the security needs to be more granular. Sometimes you need to restrict users to using merely part of a table. In this section, I’ll look at the security syntax that SQL Server provides at a basic level to grant rights at a column level. Later in this chapter, I’ll present other methods that use views or stored procedures.
For our example, we’ll create a couple of database users:
CREATE USER Employee WITHOUT LOGIN;
CREATE USER Manager WITHOUT LOGIN;
Then, we’ll create a table to use for our column-level security examples for a Product table. This Product table has the company’s products, including the current price and the cost to produce this product:
CREATE SCHEMA Products;
GO
CREATE TABLE Products.Product
(
ProductId int identity CONSTRAINT PKProduct PRIMARY KEY,
ProductCode varchar(10) CONSTRAINT AKProduct_ProductCode UNIQUE,
Description varchar(20),
UnitPrice decimal(10,4),
ActualCost decimal(10,4)
);
INSERT INTO Products.Product(ProductCode, Description, UnitPrice, ActualCost)
VALUES ('widget12','widget number 12',10.50,8.50),
('snurf98','Snurfulator',99.99,2.50);
Now, we want our employees to be able to see all the products, but we don’t want them to see what each product costs to manufacture. The syntax is the same as using GRANT on a table, but we include in parentheses a comma-delimited list of the columns to which the user is being denied access. In the next code block, we grant SELECT rights to both users but take away these rights on the ActualCost column:
GRANT SELECT ON Products.Product TO employee, manager;
DENY SELECT ON Products.Product (ActualCost) TO employee;
To test our security, we impersonate the manager:
EXECUTE AS USER = 'manager';
SELECT *
FROM Products.Product;
This returns all columns with no errors:
| ProductId | ProductCode | Description | UnitPrice | ActualCost |
| --------- | ----------- | ----------- | --------- | ---------- |
| 1 | widget12 | widget number 12 | 10.5000 | 8.5000 |
| 2 | snurf98 | Snurfulator | 99.9900 | 2.5000 |
![]() Tip I know you are probably thinking that it’s bad practice to use SELECT * in a query. It’s true that using SELECT * in your permanent code is a bad idea, but generally speaking, when writing ad hoc queries, most users use the * shorthand for all columns, and it is perfectly acceptable to do so. It is in stored objects that the * shorthand is considered bad. It is also an essential part of the example I am presenting!
Tip I know you are probably thinking that it’s bad practice to use SELECT * in a query. It’s true that using SELECT * in your permanent code is a bad idea, but generally speaking, when writing ad hoc queries, most users use the * shorthand for all columns, and it is perfectly acceptable to do so. It is in stored objects that the * shorthand is considered bad. It is also an essential part of the example I am presenting!
The manager worked fine; what about the employee?
REVERT; --revert back to SA level user or you will get an error that the
--user cannot do this operation because the manager user doesn't
--have rights to impersonate the employee
GO
EXECUTE AS USER = 'employee';
GO
SELECT *
FROM Products.Product;
This returns the following result:
Msg 230, Level 14, State 1, Line 1
The SELECT permission was denied on the column 'ActualCost' of the object 'Product', database 'ClassicSecurityExample', schema 'Products'.
“Why did I get this error?” the user first asks, then (and this is harder to explain), “How do I correct it?” You might try to explain to the user, “Well, just list all the columns you do have access to, without the columns you cannot see, like this:”
SELECT ProductId, ProductCode, Description, UnitPrice
FROM Products.Product;
REVERT;
This returns the following results for the user employee:
| ProductId | ProductCode | Description | UnitPrice |
| --------- | ----------- | ----------- | --------- |
| 1 | widget12 | widget number 12 | 10.5000 |
| 2 | snurf98 | Snurfulator | 99.9900 |
The answer, although technically correct, isn’t even vaguely what the user wants to hear. “So every time I want to build an ad hoc query on the Product table (which has 87 columns instead of the 5 we’ve generously mocked up for your learning ease), I have to type out all the columns? And I have to remember all of the columns? Ugh!”
This is why, for the most part, column-level security is rarely used as a primary security mechanism, because of how it’s implemented. You don’t want users getting error messages when they try to run a fairly simple query on a table. You might add column-level security to the table “just in case,” but for the most part, use coded objects such as stored procedures or views to control access to certain columns. I’ll discuss these solutions in the next section.
Here’s one last tidbit about column security syntax: once you’ve applied the DENY option on a column, to give the user rights you need to REVOKE the DENY to restore the ability to access the column and then GRANT access to the entire table. Using REVOKE alone would only delete the DENY.
Roles
Core to the process of granting rights is who to grant rights to. I’ve introduced the database user, commonly referred to as just user. The user is the lowest level of security principal in the database and can be mapped to logins, certificates, and asymmetrical keys, or even not mapped to a login at all (either a user created with the WITHOUT LOGIN option specifically for impersonation, or they can be orphaned by dropped users). In this section, I will expand a bit more on just what a role is.
Roles are groups of users and other roles that allow you to grant object access to multiple users at once. Every user in a database is a member of at least the public role, which will be mentioned again in the “Built-in Database Roles” section, but may be a member of multiple roles. In fact, roles may be members of other roles. I’ll discuss a couple types of roles:
- Built-in database roles: Roles that are provided by Microsoft as part of the system
- User-defined database roles: Roles, defined by you, that group Windows users together in a user-defined package of rights
- Application roles: Roles that are used to give an application specific rights, rather than to a group or individual user
Each of these types of roles is used to give rights to objects in a more convenient manner than granting them directly to an individual user. Many of these possible ways to implement roles (and all security really) are based on the politics of how you get to set up security in your organization. There are many different ways to get it done, and a lot of it is determined by who will do the actual work. End users may need to give another user rights to do some things, as a security team, network administrators, DBAs, and so on, also dole out rights. The whole idea of setting up roles to group users is to lower the amount of work required to get things done and managed right.
As part of the basic structure of the database, Microsoft provides a set of nine built-in roles that give a user a special set of rights at a database level:
- db_owner: Users associated with this role can perform any activity in the database.
- db_accessadmin: Users associated with this role can add or remove users from the database.
- db_backupoperator: Users associated with this role are allowed to back up the database.
- db_datareader: Users associated with this role are allowed to read any data in any table.
- db_datawriter: Users associated with this role are allowed to write any data in any table.
- db_ddladmin: Users associated with this role are allowed to add, modify, or drop any objects in the database (in other words, execute any DDL statements).
- db_denydatareader: Users associated with this role are denied the ability to see any data in the database, though they may still see the data through stored procedures.
- db_denydatawriter: Much like the db_denydatareader role, users associated with this role are denied the ability to modify any data in the database, though they still may modify data through stored procedures.
- db_securityadmin: Users associated with this role can modify and change permissions and roles in the database.
Of particular interest in these groups to many DBAs and developers are the db_datareader and db_datawriter roles. All too often these roles (or, unfortunately, the db_owner role) are the only permissions ever used in the database. For most any database, this should rarely be the case. Even when the bulk of the security is being managed by the user interface, there are going to be tables that you may not want users to be able to access. As an example, in my databases, I almost always have a utility schema that I place objects in to implement certain database-level utility tasks. If I wanted to keep up with the counts of rows in tables on a daily basis, I would create a row in the table each day with the row count of each table. If I want a procedure to drop all of the constraints on a database for a given process, I would have a procedure in the utility schema as well. If users accidentally executes that procedure instead of the benign query procedure they were trying to click, it is your fault, not theirs.
The point is that security should be well planned out and managed in a thoughtful manner, not just managed by giving full access and hoping for the best from the user interface standpoint. As I will introduce in the “Schemas” section, instead of using the db_datareader fixed role, consider granting SELECT permissions at the schema level. If you do, any new schema added for some purpose will not automatically be accessible to everyone by the db_datareader membership, but all of the objects in that schema (even new ones) will automatically get the existing schema permission. My goal is to limit fixed schema use to utility users, like an ETL program’s access, for example, that will not be doing any ad hoc queries that could be in error.
User-Defined Database Roles
In addition to the fixed database roles, you can create your own database roles to grant rights to database objects. To a role, you can give or deny rights to use tables and code in the database, as well as database-level rights such as ALTER, ALTER ANY USER, DELETE (from any table), CREATE ROLE, and so on. You can control rights to database management and data usage together in the same package, rather than needing to grant users ownership of the database where they have unlimited power to make your day busy restoring from backups and fixing the database.
Roles should be used to create a set of database rights for a job description, or perhaps an aspect of a job description. Take, for example, any typical human resources system that has employee information such as name, address, position, manager, pay grade, and so on. We’ll likely need several roles, such as the following to cover all the common roles that individuals and some processes need to do their job:
- Administrators : Should be able to do any task with data, including ad hoc access; will also need rights to back up and restore the database on occasion (using a user interface, naturally).
- HRManagers : Should be able to do any task in the system with data.
- HRWorkers : Can maintain any attribute in the system, but approval rows are required to modify salary information.
- Managers : All managers in the company might be in a role like this, which might give them view rights to high-level corporate information. You can then limit them to only the ability to see the details for their own workers, using further techniques I’ll present in the section “Implementing Configurable Row-Level Security with Views” later in this chapter.
- Employees : Can see only their own information and can modify only their own personal address information.
Setting up a tight security system isn’t an easy task, and it takes lots of thought, planning, and hard work to get it done right.
Each of the roles would then be granted access to all the resources that they need. A member of the Managers role would likely also be a member of the Employees role. That way, the managers could see the information for their employees and also for themselves. Users can be members of multiple roles, and roles can be members of other roles. Permissions are additive, so if a user is a member of three roles, the user has an effective set of permissions that’s the union of all permissions of the groups, for example:
- Managers: Can view the Employees table
- Employees: Can view the Product table
- HRWorkers: Can see employment history
If the Managers role were a member of the Employees role, a member of the Managers role could do activities that were enabled by either role. If a user were a member of the HRWorkers group and the Employees role, the user could see employment history and the Product table (it might seem logical that users could see the Employees table, but this hasn’t been explicitly set in our tiny example). If a manager decides that making the lives of others miserable is no longer any fun, as part of the demotion, that user would be removed from the Managers role.
Programmatically, you can determine some basic information about a user’s security information in the database:
- IS_MEMBER ('<role>'): Tells you whether the current user is the member of a given role. This is useful for building security-based views.
- USER: Tells you the current user’s name in the database.
- HAS_PERMS_BY_NAME: Lets you interrogate the security system to see what rights a user has. This function has a complex public interface, but it’s powerful and useful.
You can use these functions in applications and T-SQL code to determine at runtime what the user can do. For example, if you wanted only HRManager members to execute a procedure, you could check this:
SELECT IS_MEMBER('HRManager'),
A return value of 1 means the user is a member (0 means not a member) of the role. A procedure might start out like the following:
IF (SELECT IS_MEMBER('HRManager')) = 0 OR (SELECT IS_MEMBER('HRManager')) IS NULL
SELECT 'I..DON''T THINK SO!';
This prevents even the database owner from executing the procedure, though dbo users can obviously get the code for the procedure and execute it if they’re desirous enough (the “Monitoring and Auditing” section of this chapter covers some security precautions to handle nosy DBA types), though this is generally a hard task to make bulletproof enough.
![]() Tip If there isn’t an HRManager role configured, is_member will return NULL. If this is a consideration, be certain to code for it like I did in my query, or add another block of code to warn or log that the setup is invalid.
Tip If there isn’t an HRManager role configured, is_member will return NULL. If this is a consideration, be certain to code for it like I did in my query, or add another block of code to warn or log that the setup is invalid.
For example, in our HR system, if you wanted to remove access to the salaryHistory table just from the Employees role, you wouldn’t deny access to the Employees role, because managers are employees also and would need to have rights to the salaryHistory table. To deal with this sort of change, you might have to revoke rights to the Employees role and then give rights to the other groups, rather than deny rights to a group that has lots of members.
As an example, consider that you have three users in the database:
CREATE USER Frank WITHOUT LOGIN;
CREATE USER Julie WITHOUT LOGIN;
CREATE USER Rie WITHOUT LOGIN;
Julie and Rie are members of the HRWorkers role, so we will add:
CREATE ROLE HRWorkers;
ALTER ROLE HRWorkers ADD MEMBER Julie;
ALTER ROLE HRWorkers ADD MEMBER Rie;
![]() Tip ALTER ROLE is new to SQL Server 2012. It replaces sp_addrolemember.
Tip ALTER ROLE is new to SQL Server 2012. It replaces sp_addrolemember.
Next, you have a Payroll schema, and in this is (at the least) an EmployeeSalary table:
CREATE SCHEMA Payroll;
GO
CREATE TABLE Payroll.EmployeeSalary
(
EmployeeId int,
SalaryAmount decimal(12,2)
);
GRANT SELECT ON Payroll.EmployeeSalary to HRWorkers;
Next, test the users:
EXECUTE AS USER = 'Frank';
SELECT *
FROM Payroll.EmployeeSalary;
This returns the following error, because Frank isn’t a member of this group:
Msg 229, Level 14, State 5, Line 3
The SELECT permission was denied on the object 'EmployeeSalary', database 'ClassicSecurityExample', schema 'Payroll'.
However, change over to Julie:
REVERT;
EXECUTE AS USER = 'Julie';
SELECT *
FROM Payroll.EmployeeSalary;
She can view the data of tables in the Payroll schema because she’s a member of the role that was granted SELECT permissions to the table:
| EmployeeId | SalaryAmount |
| ---------- | ------------ |
Roles are almost always the best way to apply security in a database. Instead of giving individual users specific rights, develop roles that match job positions. Granting rights to an individual is not necessarily bad. To keep this section reasonable, I won’t extend the example to include multiple roles, but a user can be a member of many roles, and the user gets the cumulative effect of the chosen rights. So if there is an HRManagers role and Julie is a member of this group as well as the HRWorkers role, the rights of the two groups would effectively be UNIONed. The result would be the user’s rights.
There’s one notable exception: one DENY operation prevents another’s GRANT operations from applying. Say Rie had her rights to the EmployeeSalary table denied:
REVERT;
DENY SELECT ON payroll.employeeSalary TO Rie;
Say she tried to select from the table:
EXECUTE AS USER = 'Rie';
SELECT *
FROM payroll.employeeSalary;
She would be denied:
Msg 229, Level 14, State 5, Line 2
The SELECT permission was denied on the object 'EmployeeSalary', database 'ClassicSecurityExample', schema 'Payroll'.
This denial of access is true even though she was granted rights via the HRWorkers group. This is why DENY is generally not used much. Rarely will you punish users via rights, if for no other reason than keeping up with the rights can be too difficult. You might apply DENY to a sensitive table or procedure to be certain it wasn’t used, but only in limited cases.
If you want to know from which tables the user can SELECT, you can use a query such as the following while in the context of the user. Reverting to your sysadmin login–based user, executing this query will return the three tables we have created so far in this database. A bit more interesting is what happens when I check the permissions when the user is Julie:
REVERT ;
EXECUTE AS USER = 'Julie';
--note, this query only returns rows for tables where the user has SOME rights
SELECT TABLE_SCHEMA + '.' + TABLE_NAME as tableName,
HAS_PERMS_BY_NAME(TABLE_SCHEMA + '.' + TABLE_NAME, 'OBJECT', 'SELECT')
AS allowSelect,
HAS_PERMS_BY_NAME(TABLE_SCHEMA + '.' + TABLE_NAME, 'OBJECT', 'INSERT')
As allowInsert
FROM INFORMATION_SCHEMA.TABLES;
This returns
| tableName | allowSelect | allowInsert |
| ---------------------- | ----------- | ----------- |
| Payroll.EmployeeSalary | 1 | 0 |
User Julie has rights to see only one of the tables we have created, and she has only select rights. Applications that use direct access to the tables can use a query such as this to determine what actions users can do and adjust the user interface to match their rights. Finally, you will need to use REVERT to go back to the security context of the power user to continue to the next examples.
Developers commonly like to set up applications using a single login and then manage security in the application. This can be an adequate way to implement security, but it requires you to re-create all the login stuff, when you could use simple Windows Authentication to check whether a user can execute an application. Application roles let you use the SQL Server login facilities to manage who a person is and if that person has rights to the database and then let the application perform the finer points of security.
To be honest, this can be a nice mix, because the hardest part of implementing security isn’t restricting a person’s ability to do an activity; it’s nicely letting them know by hiding actions they cannot do. I’ve shown you a few of the security catalog views already, and there are more in Books Online. Using them, you can query the database to see what a user can do to help facilitate this process. However, it isn’t a trivial task and is often considered too much trouble, especially for homegrown applications.
An application role is almost analogous to using EXECUTE AS to set rights to another user, but instead of a person, the user is an application. You change to the context of the application role using sp_setapprole. You grant the application role permissions just like any other role, by using the GRANT statement.
As an example of using an application role, you’ll create both a user named Bob and an application role and give them totally different rights. The TestPerms schema was created earlier, so if you didn’t create it before, go ahead and do so.
CREATE TABLE TestPerms.BobCan
(
BobCanId int identity(1,1) CONSTRAINT PKBobCan PRIMARY KEY,
Value varchar(10)
);
CREATE TABLE TestPerms.AppCan
(
AppCanId int identity(1,1) CONSTRAINT PKAppCan PRIMARY KEY,
Value varchar(10)
);
Now, create the user Bob to correspond to the BobCan table:
CREATE USER Bob WITHOUT LOGIN;
Next, give Bob SELECT rights to his table:
GRANT SELECT ON TestPerms.BobCan TO Bob;
GO
Finally, create an application role, and give it rights to its table:
CREATE APPLICATION ROLE AppCan_application with password = '39292LjAsll2$3';
GO
GRANT SELECT on TestPerms.AppCan to AppCan_application;
You will probably note that one of the drawbacks to using an application role is that it requires a password. This password is passed in clear text to the SQL Server, so make sure that, first, the password is complex and, second, you encrypt any connections that might be using these when there’s a threat of impropriety. There is an encryption option that will obfuscate the password, but it is only available with an ODBC or OleDB client. For more security, use an encrypted connection. For more information on encrypting connections, look up “Secure Sockets Layer (SSL)” in Books Online.
Next, set the user you’re working as to Bob:
EXECUTE AS USER = 'Bob';
Now, try to retrieve data from the BobCan table:
SELECT * FROM TestPerms.BobCan;
It works with no error:
| BobCanId | Value |
| -------- | ----- |
However, try retrieving data from the AppCan table:
SELECT * FROM TestPerms.AppCan;
The following error is returned:
Msg 229, Level 14, State 5, Line 1
The SELECT permission was denied on the object 'AppCan', database 'ClassicSecurityExample', schema 'TestPerms'.
This isn’t surprising, because Bob has no permissions on the AppCan table. Next, still logged in as Bob, use the sp_setapprole procedure to change the security context of the user to the application role, and the security is reversed:
REVERT;
GO
EXECUTE sp_setapprole 'AppCan_application', '39292LjAsll2$3';
GO
SELECT * FROM TestPerms.BobCan;
This returns the following error:
Msg 229, Level 14, State 5, Line 1
The SELECT permission was denied on the object 'BobCan', database 'ClassicSecurityExample', schema 'TestPerms'.
That’s because you’re now in context of the application role, and the application role doesn’t have rights to the table. Finally, the application role can read from the AppCan table:
SELECT * from TestPerms.AppCan;
This doesn’t return an error:
| AppCanId | Value |
| -------- | ----- |
When you’re in the application role context, you look to the database as if you’re the application, not your user, as evidenced by the following code:
SELECT user as userName, system_user as login;
This returns the following result:
| userName | login |
| ------------------ | -------------------- |
| AppCan_application | DENALI-PCAlienDrsql |
The login returns whatever login name you’re logged in as, without regard to any impersonation, because the user is at the database level and the login is at the server level. Once you’ve executed sp_setapprole, the security stays as this role until you disconnect from the SQL Sever server or execute sp_unsetapprole. However, sp_unsetapprole doesn’t work nearly as elegantly as REVERT, because you need to have a “cookie” value stored to be able to go back to your previous database security context.
![]() Note You will need to disconnect and reconnect at this point, because you will be stuck in the application role state.
Note You will need to disconnect and reconnect at this point, because you will be stuck in the application role state.
To demonstrate, log back in as your sysadmin role user:
--Note that this must be executed as a single batch because of the variable
--for the cookie
DECLARE @cookie varbinary(8000);
EXECUTE sp_setapprole 'AppCan_application', '39292LjAsll2$3'
, @fCreateCookie = true, @cookie = @cookie OUTPUT;
SELECT @cookie AS cookie;
SELECT USER AS beforeUnsetApprole;
EXEC sp_unsetapprole @cookie;
SELECT USER AS afterUnsetApprole;
REVERT; --done with this user
This returns the following results:
Cookie
--------------------------------------------------------------------------------------------
0x39881A28E9FB46A0A002ABA31C11B7F4C149D8CB2BCF99B7863FFF729E2BE48F13C0F83BAD62CF0B221A863B83
beforeUnsetApprole
------------------
AppCan_application
afterUnsetApprole
-----------------
dbo
The cookie is an interesting value, much larger than a GUID—it was declared as varbinary(8000) in Books Online, so I used that data type as well. It does change for each execution of the batch. The fact is, it is fairly unlikely to want to unset the application role for most usages.
Schemas were introduced and used heavily in the previous chapters, and up to this point, they’ve been used merely as a method to group like objects. Logical grouping is an important usage of schemas, but it is only one of they uses. Using these logical groups to apply security is where they really pay off. A user owns a schema, and a user can also own multiple schemas. For most any database that you’ll develop for a system, the best practice is to let all schemas be owned by the dbo system user. You might remember from versions before 2005 that dbo owned all objects, and although this hasn’t technically changed, it is the schema that is owned by dbo, and the table in the schema. Hence, instead of the reasonably useless dbo prefix being attached to all objects representing the owner, you can nicely group together objects of a common higher purpose and then (because this is a security chapter) grant rights to users at a schema level, rather than at an individual object level.
For our database-design purposes, we will assign rights for users to use the following:
- Tables and (seldomly) individual columns
- Views
- Synonyms (which can represent any of these things and more)
- Functions
- Procedures
You can grant rights to other types of objects, including user-defined aggregates, queues, and XML schema collections, but I won’t cover them here. As an example, in the AdventureWorks2012 database, there’s a HumanResources schema. Use the following query of the sys.objects catalog view (which reflects schema-scoped objects):
USE AdventureWorks2012;
GO
SELECT type_desc, count(*)
FROM sys.objects
WHERE schema_name(schema_id) = 'HumanResources'
AND type_desc IN ('SQL_STORED_PROCEDURE','CLR_STORED_PROCEDURE',
'SQL_SCALAR_FUNCTION','CLR_SCALAR_FUNCTION',
'CLR_TABLE_VALUED_FUNCTION','SYNONYM',
'SQL_INLINE_TABLE_VALUED_FUNCTION',
'SQL_TABLE_VALUED_FUNCTION','USER_TABLE','VIEW')
GROUP BY type_desc;
GO
USE ClassicSecurityExample;
This query shows how many of each object can be found in the version of the HumanResources schema I have on my laptop. As mentioned previously in this chapter, to grant privileges to a schema to a role or user, you prefix the schema name with SCHEMA:: to indicate the type of object you are granting to. To give the users full usage rights to all these, you can use the following command:
GRANT EXECUTE, SELECT, INSERT, UPDATE, DELETE ON
SCHEMA::<schemaname> TO <database_principal>;
By using schemas and roles liberally, the complexity of granting rights to users on database objects can be pretty straightforward. That’s because, instead of having to make sure rights are granted to 10 or even 100 stored procedures to support your application’s Customer section, you need just a single line of code:
GRANT EXECUTE on SCHEMA::Customer TO CustomerSupport;
Bam! Every user in the CustomerSupport role now has access to the stored procedures in this schema. Nicer still is that even new objects added to the schema at a later date will be automatically accessible to people with rights at the schema level. For example, create a user named Tom; then, grant Tom SELECT rights on the TestPerms schema created in a previous section:
USE ClassicSecurityExample;
GO
CREATE USER Tom WITHOUT LOGIN;
GRANT SELECT ON SCHEMA::TestPerms TO Tom;
Immediately, Tom has rights to select from the tables that have been created:
EXECUTE AS USER = 'Tom';
GO
SELECT * FROM TestPerms.AppCan;
GO
REVERT;
But also, Tom gets rights to the new table that we create here:
CREATE TABLE TestPerms.SchemaGrant
(
SchemaGrantId int primary key
);
GO
EXECUTE AS USER = 'Tom';
GO
SELECT * FROM TestPerms.schemaGrant;
GO
REVERT;
Essentially, a statement like GRANT SELECT ON SCHEMA:: is a much better way to give a user read rights to the database than using the db_datareader fixed database role, especially if you use schemas. This ensures that if a new schema is created and some users shouldn’t have access, they will not automatically get access, but it also ensures that users get access to all new tables that they should get.
Controlling Access to Data via T-SQL–Coded Objects
Just using the database-level security in SQL Server allows you to give a user rights to access only certain objects, but as you’ve seen, the database-level security doesn’t work in an altogether user-friendly manner, nor does it give you a great amount of specific control. You can control access to the entire table or, at the most, restrict access at a column level. In many cases, you might want to let a user join to a table to get a value but not to browse the entire table using a SELECT statement. Using table/object-level security alone, this is impossible, but using T-SQL coded objects, it is very possible.
Now, we get down to the business of taking complete control over database access by using the following types of objects:
- Stored procedures and scalar functions: These objects give users an API to the database, and then, the DBA can control security based on what the procedure does.
- Views and table-valued functions: In cases where the tools being used can’t use stored procedures, you can still use views to present an interface to the data that appears to the user as a normal table would. In terms of security, views and table-valued functions can be used for partitioning data vertically by hiding columns or even horizontally by providing row-level security.
Coded objects let you take control of the data in ways that not only give you security over the data from a visibility or modifiability standpoint but let you control everything the user can do. (No, “modifiability” is probably not technically a word, but it will be if you just start using it. Then Webster’s will cite this book as the origin, and I will sell a million copies to curious English professors! Yeah, that’ll work …)
Controlling security with coded objects requires an understanding of how ownership affects rights to objects. For example, if a user owns a stored procedure and that stored procedure uses other objects it owns, the user who executes the procedure doesn’t need direct rights to the other objects. The name for the way rights are allowed on owned objects in coded objects is ownership chaining.
Just because a user can use a stored procedure or function doesn’t necessarily mean that he or she will need to have rights to every object to which the stored procedure refers. As long as the owner or the object owns all the schemas for all the objects that are referenced, the ownership chain isn’t broken, and any user granted rights to use the object can see any referenced data. If you break the ownership chain and reference data in a schema not owned by the same user, the user will require rights granted directly to the object, instead of the object being created. This concept of the ownership chain is at the heart of why controlling object access via coded objects is so nice.
I put stored procedures along with views and functions together in a section because whichever option you choose, you will still have accomplished the separation of interface from implementation. As long as the contract between the stored procedure or view is what the developer or application is coding or being coded to, the decision of which option to select will offer different sorts of benefits.
Stored Procedures and Scalar Functions
Security in stored procedures and functions is always at the object level. Using stored procedures and functions to apply security is quite nice because you can give the user rights to do many operations without the user having rights to do the same operations on their own (or even knowing how it’s done.)
In some companies, stored procedures are used as the primary security mechanism, by requiring that all access to the server be done without executing a single “raw” DML statement against the tables. By building code that encapsulates all functionality, you then can apply permissions to the stored procedures to restrict what the user can do.
In security terms only, this allows you to have situational control on access to a table. This means that you might have two different procedures that functionally do the same operation, but giving a user rights to one procedure doesn’t imply that he or she has rights to the other. (I will discuss more about the pros and cons of different access methods in Chapter 13, but in this chapter, we will to limit our discussion to the security aspects.)
Take, for example, the case where a screen is built using one procedure; the user might be able to do an action, such as deleting a row from a specific table. But when the user goes to a different screen that allows deleting 100 rows, that ability might be denied. What makes this even nicer is that with decent naming of your objects, you can give end users or managers rights to dole out security based on actions they want their employees to have, without needing the IT staff to handle it.
As an example, create a new user for the demonstration:
CREATE USER procUser WITHOUT LOGIN;
Then (as dbo), create a new schema and table:
CREATE SCHEMA procTest;
GO
CREATE TABLE procTest.misc
(
Value varchar(20),
Value2 varchar(20)
);
GO
INSERT INTO procTest.misc
VALUES ('somevalue','secret'),
('anothervalue','secret'),
Next, we will create a stored procedure to return the values from the value column in the table, not the value2 column; then, we grant rights to the procUser to execute the procedure:
CREATE PROCEDURE procTest.misc$select
AS
SELECT Value
FROM procTest.misc;
GO
GRANT EXECUTE on procTest.misc$select to procUser;
After that, change the context to the procUser user and try to SELECT from the table:
EXECUTE AS USER = 'procUser';
GO
SELECT Value, Value2
FROM procTest.misc;
You get the following error message, because the user hasn’t been given rights to access this table:
Msg 229, Level 14, State 5, Line 1
The SELECT permission was denied on the object 'misc', database 'ClassicSecurityExample', schema 'procTest'.
However, execute the following procedure:
EXECUTE procTest.misc$select;
The user does have access to execute the procedure, so you get the results expected:
Value
------------
somevalue
anothervalue
This is the best way to architect a database solution. It leaves a manageable surface area, gives you a lot of control over what SQL is executed in the database, and lets you control data security nicely.
You can see what kinds of access a user has to stored procedures by executing the following statement:
SELECT schema_name(schema_id) +'.' + name AS procedure_name
FROM sys.procedures;
REVERT;
While in the context of the procUser, you will see the one row for the procTest.misc$select procedure returned. If you were using only stored procedures to access the data, this query could be executed by the application programmer to know everything the user can do in the database.
![]() Tip If you don’t like using stored procedures as your access layer, I know you can probably make a list of reasons why you disagree with this practice. However, as I mentioned, this is largely considered a best practice in the SQL Server architect community because of not only the security aspects of stored procedures but also the basic encapsulation reasons I will discuss in Chapter 13. A lot of applications using object relational mapping layers will not work with stored procedures, at least not working in “easy” mode, which would mean a noticeable drop off in coding performance, leading to unhappy managers, no matter what the future benefit may be.
Tip If you don’t like using stored procedures as your access layer, I know you can probably make a list of reasons why you disagree with this practice. However, as I mentioned, this is largely considered a best practice in the SQL Server architect community because of not only the security aspects of stored procedures but also the basic encapsulation reasons I will discuss in Chapter 13. A lot of applications using object relational mapping layers will not work with stored procedures, at least not working in “easy” mode, which would mean a noticeable drop off in coding performance, leading to unhappy managers, no matter what the future benefit may be.
I already talked about the EXECUTE AS statement, and it has some great applications, but using the WITH EXECUTE clause on a procedure or function declaration can give you some incredible flexibility to give the executor greater powers than might have been possible otherwise, certainly not without granting additional rights. Instead of changing context before an operation, you can change context while executing a stored procedure, function, or DML trigger (plus queues for Service Broker, but I won’t be covering that topic). Unfortunately, the WITH EXECUTE clause is not available for views, because they are not technically executable objects (hence the reason why you grant SELECT rights and not EXECUTE ones).
By adding the following code, you can change the security context of a procedure to a different server or database principal when the execution begins:
CREATE PROCEDURE <schemaName>.<procedureName>
WITH EXECUTE AS <'loginName' | caller | self | owner>;
The different options for whom to execute as are as follows:
- 'userName': A specific user principal in the database.
- caller: The context of the user who called the procedure. This is the default security context you get when executing an object.
- self: It’s in the context of the user who created the procedure.
- owner: It’s executed in the context of the owner of the module or schema.
Note that using EXECUTE AS doesn’t affect the ownership chaining of the call. The security of the statements in the object is still based on the security of the schema owner. Only when the ownership chain is broken will the ownership chaining come into play. The following statements go along with the EXECUTE AS clause:
- EXECUTE AS CALLER: You can execute this in your code to go back to the default, where access is as the user who actually executed the object.
- REVERT: This reverts security to the security specified in the WITH EXECUTE AS clause.
As an example, I’ll show how to build a situation where one schema owner has a table and where the next schema owner has a table and a procedure that the schema owner wants to use to access the first user’s table. Finally, you have an average user who wants to execute the stored procedure.
First, you create a few users and give them rights to create objects in the database. The three users are named as follows:
- schemaOwner: This user owns the primary schema where one of the objects resides.
- procedureOwner: This user owns the owner of an object and a stored procedure.
- aveSchlub: This is the average user who finally wants to use procedureOwner’s stored procedure.
So, now create these users and grant them rights:
--this will be the owner of the primary schema
CREATE USER schemaOwner WITHOUT LOGIN;
GRANT CREATE SCHEMA TO schemaOwner;
GRANT CREATE TABLE TO schemaOwner;
--this will be the procedure creator
CREATE USER procedureOwner WITHOUT LOGIN;
GRANT CREATE SCHEMA TO procedureOwner;
GRANT CREATE PROCEDURE TO procedureOwner;
GRANT CREATE TABLE TO procedureOwner;
GO
--this will be the average user who needs to access data
CREATE USER aveSchlub WITHOUT LOGIN;
Then, you change to the context of the main object owner, create a new schema, and create a table with some rows:
EXECUTE AS USER = 'schemaOwner';
GO
CREATE SCHEMA schemaOwnersSchema;
GO
CREATE TABLE schemaOwnersSchema.Person
(
PersonId int constraint PKtestAccess_Person primary key,
FirstName varchar(20),
LastName varchar(20)
);
GO
INSERT INTO schemaOwnersSchema.Person
VALUES (1, 'Phil','Mutayblin'),
(2, 'Del','Eets'),
Next, this user gives SELECT permissions to the procedureOwner user:
GRANT SELECT on schemaOwnersSchema.Person TO procedureOwner;
After that, you set context to the secondary user to create the procedure:
REVERT --we can step back on the stack of principals,
--but we can't change directly
--to procedureOwner. Here I step back to the db_owner user you have
--used throughout the chapter
GO
EXECUTE AS USER = 'procedureOwner';
Then, you create a schema and another table, owned by the procedureOwner user, and add some simple data for the demonstration:
CREATE SCHEMA procedureOwnerSchema;
GO
CREATE TABLE procedureOwnerSchema.OtherPerson
(
personId int constraint PKtestAccess_person primary key,
FirstName varchar(20),
LastName varchar(20)
);
GO
INSERT INTO procedureOwnerSchema.OtherPerson
VALUES (1, 'DB','Smith'),
INSERT INTO procedureOwnerSchema.OtherPerson
VALUES (2, 'Dee','Leater'),
You can see the owners of the objects and their schema using the following query of the catalog views:
REVERT;
SELECT tables.name as [table], schemas.name as [schema],
database_principals.name as [owner]
FROM sys.tables
JOIN sys.schemas
ON tables.schema_id = schemas.schema_id
JOIN sys.database_principals
ON database_principals.principal_id = schemas.principal_id
WHERE tables.name in ('Person','OtherPerson'),
This returns the following:
| table | schema | owner |
| ----------- | -------------------- | -------------- |
| OtherPerson | procedureOwnerSchema | procedureOwner |
| Person | schemaOwnersSchema | schemaOwner |
Next, you create two procedures as the procedureOwner user, one for the WITH EXECUTE AS as CALLER, which is the default, and then SELF, which puts it in the context of the creator, in this case procedureOwner:
EXECUTE AS USER = 'procedureOwner';
GO
CREATE PROCEDURE procedureOwnerSchema.person$asCaller
WITH EXECUTE AS CALLER --this is the default
AS
BEGIN
SELECT personId, FirstName, LastName
FROM procedureOwnerSchema.OtherPerson; --<-- ownership same as proc
SELECT personId, FirstName, LastName
FROM schemaOwnersSchema.person; --<-- breaks ownership chain
END;
GO
CREATE PROCEDURE procedureOwnerSchema.person$asSelf
WITH EXECUTE AS SELF --now this runs in context of procedureOwner,
--since it created it
AS
BEGIN
SELECT personId, FirstName, LastName
FROM procedureOwnerSchema.OtherPerson; --<-- ownership same as proc
SELECT personId, FirstName, LastName
FROM schemaOwnersSchema.person; --<-- breaks ownership chain
END;
Next, you grant rights on the proc to the aveSchlub user:
GRANT EXECUTE ON procedureOwnerSchema.person$asCaller TO aveSchlub;
GRANT EXECUTE ON procedureOwnerSchema.person$asSelf TO aveSchlub;
Then, you change to the context of the aveSchlub:
REVERT; EXECUTE AS USER = 'aveSchlub';
Finally, you execute the procedure:
--this proc is in context of the caller, in this case, aveSchlub
EXECUTE procedureOwnerSchema.person$asCaller;
This produces the following output, because the ownership chain is fine for the procedureOwnerSchema object, but not for the schemaOwnerSchema:
| personId | FirstName | LastName |
| -------- | --------- | -------- |
| 1 | DB | Smith |
| 2 | Dee | Leather |
Msg 229, Level 14, State 5, Procedure person$asCaller, Line 7
The SELECT permission was denied on the object 'Person', database 'ClassicSecurityExample', schema 'schemaOwnersSchema'.
Next, you execute the asSelf variant:
--procedureOwner, so it works
EXECUTE procedureOwnerSchema.person$asSelf;
This returns two result sets:
| personId | FirstName | LastName |
| -------- | --------- | -------- |
| 1 | DB | Smith |
| 2 | Dee | Leather |
| personId | FirstName | LastName |
| -------- | --------- | -------- |
| 1 | Phil | Mutayblin |
| 2 | Del | Eets |
What makes this different is that when the ownership chain is broken, the security context you’re in is the secondaryUser, not the context of the caller, aveSchlub. Using EXECUTE AS to change security context is a cool feature. Now, you can give users temporary rights that won’t even be apparent to them and won’t require granting any permissions.
However, EXECUTE AS isn’t a feature that should be overused, and its use should definitely be monitored by code reviews! It can be all too easy just to build your procedures in the context of the dbo and forget about decent security altogether. And that is the “nice” reason for taking care in using the feature. Another reason to take care is that a malicious programmer could (if they were devious or stupid) include dangerous code that would run as if it were the database owner, which could certainly cause undesired effects.
For example, using impersonation is a great way to implement dynamic SQL calls (I will discuss more in Chapter 13 when I discuss code-level design), but if you aren’t careful to secure your code against an injection attack, the attack might just be in the context of the database owner rather than the basic application user that should have only limited rights if you have listened to anything I have said in the rest of this chapter.
One thing that you can do with this EXECUTE AS technique is to give a user super rights temporarily in a database. For example, consider the following procedure:
REVERT;
GO
CREATE PROCEDURE dbo.testDboRights
AS
BEGIN
CREATE TABLE dbo.test
(
testId int
);
END;
This procedure isn’t executable by any users other than one who has db_owner level rights in the database, even if they have rights to execute the procedure. Say we have the following user and give him rights (presuming “Leroy” is a male name and not just some horrible naming humor that a female had to live with) to execute the procedure:
CREATE USER leroy WITHOUT LOGIN;
GRANT EXECUTE ON dbo.testDboRights TO Leroy;
Note that you grant only rights to the dbo.testDboRights procedure. The user leroy can execute the one stored procedure in the database:
EXECUTE AS USER = 'leroy';
EXECUTE dbo.testDboRights;
The result is as follows, because creating a table is a database permission that leroy doesn’t have, either explicitly granted or as a member of a role db_owner’s role:
Msg 262, Level 14, State 1, Procedure testDboRights, Line 5
CREATE TABLE permission denied in database 'ClassicSecurityExample'.
![]() Tip If I had a nickel for every time I have seen security issues come up when new changes were moved to a production server, I would be rich. In fact, if I just had the nickels from my own mistakes, I wouldn’t exactly die a pauper.
Tip If I had a nickel for every time I have seen security issues come up when new changes were moved to a production server, I would be rich. In fact, if I just had the nickels from my own mistakes, I wouldn’t exactly die a pauper.
If you alter the procedure with EXECUTE AS 'dbo', the result is that the table is created, if there isn’t already a table with that name that someone else has created (like if the dbo has executed this procedure previously):
REVERT;
GO
ALTER PROCEDURE dbo.testDboRights
WITH EXECUTE AS 'dbo'
AS
BEGIN
CREATE TABLE dbo.test
(
testId int
);
END;
Now, you can execute this procedure and have it create the table. Run the procedure twice, and you will get an error about already having a table called dbo.test in the database. For more detailed information about EXECUTE AS, check the “EXECUTE AS” topic in Books Online.
![]() Tip As will be discussed in the cross-database security section later in this chapter, to use external resources (like a table in a different database) using impersonation, you need to set TRUSTWORTHY to ON using the ALTER DATABASE command.
Tip As will be discussed in the cross-database security section later in this chapter, to use external resources (like a table in a different database) using impersonation, you need to set TRUSTWORTHY to ON using the ALTER DATABASE command.
In Chapter 13, a rather large section discusses the value of ad hoc SQL versus stored procedures, and we use the EXECUTE AS functionality to provide security when it comes to executing dynamic SQL in stored procedures. This is a great new feature that will bring stored procedure development—including stored procedures that are CLR-based—to new heights, because dynamic SQL-based stored procedures were a security issue in earlier versions of SQL Server.
Views and Table-Valued Functions
In this section, I’ll talk about using views and table-valued functions to encapsulate the views of the data in ways that leave the data in table-like structures. You might use views and table-valued functions in concert with, or in lieu of, a full stored procedure approach to application architecture. Views, as discussed in previous chapters, allow you to form pseudotables from other table sources, sometimes by adding tables together and sometimes by splitting a table up into smaller chunks. In this section, the goal is to “hide” data, like a column, from users or hide certain rows in a table, providing data security by keeping the data out of the view of the user in question.
For an overall architecture, I will always suggest that you should use stored procedures to access data in your applications, if for no other reason than you can encapsulate many data-oriented tasks in the background, giving you easy access to tweak the performance of an activity with practically zero impact to the application. (In Chapter 13, I will give some basic coverage of application architecture.)
In this section, I’ll look at the following:
- General usage: I’ll cover basic use of views to implement security.
- Configurable row-level security: You can use views to implement security at the row level, and this can be extended to provide user-manageable security.
Instead of the more up-front programming-heavy stored procedure methods from the previous section, simply accessing views and table-valued functions allows for more straightforward usage. Sometimes, because of the oft-repeated mantra of “just get it done,” the concept of stored procedures is an impossible sale. You will lose a bit of control, and certain concepts won’t be available to you (for example, you cannot use EXECUTE AS in a view definition), but it will be better in some cases when you don’t want to dole out access to the tables directly.
General Usage
We’ll use two properties of views to build a more secure database. The first is assigning privileges to users such that they can use a view, though not the underlying tables. For example, let’s go back to the Products.Product table used earlier in this chapter. As a reminder, execute this statement (after executing REVERT, if you haven’t already, from the previous example):
SELECT *
FROM Products.Product;
The following data is returned:
| ProductId | ProductCode | Description | UnitPrice | ActualCost |
| --------- | ----------- | ---------------- | --------- | ---------- |
| 1 | widget12 | widget number 12 | 10.5000 | 8.5000 |
| 2 | snurf98 | Snurfulator | 99.9900 | 2.5000 |
We could construct a view on this:
CREATE VIEW Products.allProducts
AS
SELECT ProductId,ProductCode, Description, UnitPrice, ActualCost
FROM Products.Product;
Selecting data from either the table or the view returns the same data. However, they’re two separate structures to which you can separately assign access privileges, and you can deal with each separately. If you need to tweak the table, you might not have to modify the view. Of course, in practice, the view won’t usually include the same columns and rows as the base table, but as an example, it is interesting to realize that if you build the view in this manner, there would be little, if any, difference with using the two objects, other than how the security was set up.
One of the most important things that make views useful as a security mechanism is the ability to partition a table structure, by limiting the rows or columns visible to the user. First, you’ll look at using views to implement column-level security , which is also known as projection or vertical partitioning of the data, because you’ll be dividing the view’s columns. (In the next section, I will cover horizontal partitioning, or row-level security.) For example, consider that the users in a warehouseUsers role need only to see a list of products, not how much they cost and certainly not how much they cost to produce. You might create a view like the following to partition the columns accordingly:
CREATE VIEW Products.WarehouseProducts
AS
SELECT ProductId,ProductCode, Description
FROM Products.Product;
By the same token, you can use table-valued functions in much the same way, though you can do more using them, including forcing some form of filter on the results. For example, you might code the following function to list all products that are less than some price:
CREATE FUNCTION Products.ProductsLessThanPrice
(
@UnitPrice decimal(10,4)
)
RETURNS table
AS
RETURN ( SELECT ProductId, ProductCode, Description, UnitPrice
FROM Products.Product
WHERE UnitPrice <= @UnitPrice);
This can be executed like the following:
SELECT * FROM Products.ProductsLessThanPrice(20);
This returns the following result:
| ProductId | ProductCode | Description | UnitPrice |
| --------- | ----------- | ---------------- | --------- |
| 1 | widget12 | widget number 12 | 10.5000 |
Using a multistatement table-valued function (say that three times fast), you could force the condition that only users of a given security group can look at items with a price greater than some amount. Here’s an example of such a function:
CREATE FUNCTION Products.ProductsLessThanPrice_GroupEnforced
(
@UnitPrice decimal(10,4)
)
RETURNS @output table (ProductId int,
ProductCode varchar(10),
Description varchar(20),
UnitPrice decimal(10,4))
AS
BEGIN
--cannot raise an error, so you have to implement your own
--signal, or perhaps simply return no data.
IF @UnitPrice > 100 and (
IS_MEMBER('HighPriceProductViewer') = 0
or IS_MEMBER('HighPriceProductViewer') is null)
INSERT @output
SELECT -1,'ERROR','',-1;
ELSE
INSERT@output (ProductId, ProductCode, Description, UnitPrice)
SELECTProductId, ProductCode, Description, UnitPrice
FROM Products.Product
WHERE UnitPrice <= @UnitPrice;
RETURN;
END;
To test, I will create a couple of roles and add users (with what I hope are obvious enough names):
CREATE ROLE HighPriceProductViewer;
CREATE ROLE ProductViewer;
GO
CREATE USER HighGuy WITHOUT LOGIN;
CREATE USER LowGuy WITHOUT LOGIN;
GO
ALTER ROLE HighPriceProductViewer ADD MEMBER HighGuy;
ALTER ROLE ProductViewer ADD MEMBER HighGuy;
ALTER ROLE ProductViewer ADD MEMBER LowGuy;
GO
Then, I will grant rights to the function to the ProductViewer group only. This gives members of this group rights to execute the procedure, but the checks in the function still have to be passed.
GRANT SELECT ON Products.ProductsLessThanPrice_GroupEnforced TO ProductViewer;
Then, executing as the high-limit user, look for products up to $10,000:
EXECUTE AS USER = 'HighGuy';
SELECT *
FROM Products.ProductsLessThanPrice_GroupEnforced(10000);
REVERT;
You get these results:
| ProductId | ProductCode | Description | UnitPrice |
| --------- | ----------- | ---------------- | --------- |
| 1 | widget12 | widget number 12 | 10.5000 |
| 2 | snurf98 | Snurfulator | 99.9900 |
But execute as the low-limit user with too large of a parameter value:
EXECUTE AS USER = 'LowGuy';
SELECT *
FROM Products.ProductsLessThanPrice_GroupEnforced(10000);
REVERT;
and you get the following error output:
| ProductId | ProductCode | Description | UnitPrice |
| --------- | ----------- | ----------- | --------- |
| -1 | ERROR | -1.0000 |
![]() Note The lack of error reporting from table-valued functions is annoying at times. I chose to output some form of error description to give the example some flashiness, but just returning no values could be an acceptable output too.
Note The lack of error reporting from table-valued functions is annoying at times. I chose to output some form of error description to give the example some flashiness, but just returning no values could be an acceptable output too.
Using the same GRANT syntax as in the “Table Security” section, you can give a user rights to use the view for SELECT, INSERT, UPDATE, or DELETE to a view such that it will look and act to the user just like a table. If the view is a view of multiple tables, the view might not support modifications or deletions, but you can implement INSTEAD OF triggers to allow these operations on a view to do nearly anything you need (triggers were used in several previous chapters and are covered in some detail in Appendix B).
What makes this grand is that if you aren’t able to use stored procedures, because of some technical or political reason (or personal choice, I suppose), you can do most of the things that you need to do in code using INSTEAD OF triggers or, at worst, user-defined functions, and the client programmers needn’t know that they exist. The only concern here is that if you change any data that the client might have cached, you might have to work this out so the data and cached copies aren’t significantly out of sync.
Implementing Configurable Row-Level Security with Views
I’ve covered vertical partitioning, which is pretty easy. Row-level security, or horizontally partitioning data, isn’t quite so elegant, especially if you can’t use stored procedures in your applications. Using stored procedures, you could have a procedure that fixes certain operations, such as modifying active customers, or just certain products of a specific type, and so on.
With some planning, the same kind of partitioning can be done with views, and you could implement views that included all of a given type of product, another view for a different type, and yet another for other types. This scheme can work, but it isn’t altogether flexible, and it’s generally unnatural for a UI to have to view different objects to do ostensibly the same operation, just with a slightly different filter of data based on the security context of a user. It makes the objects tightly coupled with the data in the table. For some fixed domain tables that never change, this isn’t a problem. But for many situations, users don’t want to have to go back to the programming staff and ask for an implementation for which they have to jump through hoops, because the change will cost money for planning, programming, testing, and such.
In this section, I’ll demonstrate a way to implement runtime configurable row-level security—using views. Views let you cut the table in sections that include all the columns, but not all the rows, based on some criteria. To the example table, you’re going to add a productType column that you’ll use to partition on:
ALTER TABLE Products.Product
ADD ProductType varchar(20) NULL;
GO
UPDATE Products.Product
SET ProductType = 'widget'
WHERE ProductCode = 'widget12';
GO
UPDATE Products.Product
SET ProductType = 'snurf'
WHERE ProductCode = 'snurf98';
Looking at the data in the table, you can see the following results:
| ProductId | ProductCode | Description | UnitPrice | ActualCost | ProductType |
| --------- | ----------- | ---------------- | --------- | ---------- | ----------- |
| 1 | widget 12 | widget number 12 | 10.5000 | 8.5000 | widget |
| 2 | snurf98 | Snurfulator | 99.9900 | 2.5000 | snurf |
As discussed, the simplest version of row-level security is just building views to partition the data. For example, suppose you want to share the widgets only with a certain group in a company, mapped to a role. You can build the following view:
CREATE VIEW Products.WidgetProducts
AS
SELECT ProductId, ProductCode, Description, UnitPrice, ActualCost
FROM Products.Product
WHERE ProductType = 'widget'
WITH CHECK OPTION; --This prevents the user from entering data that would not
--match the view's criteria
Now, you can select data from this table and the user never needs to know that other products exist:
SELECT *
FROM Products.WidgetProducts;
This returns the following result:
| ProductId | ProductCode | Description | UnitPrice | ActualCost | ProductType |
| --------- | ----------- | ---------------- | --------- | ---------- | ----------- |
| 1 | widget 12 | widget number 12 | 10.5000 | 8.5000 | widget |
You can grant INSERT, UPDATE, and DELETE rights to the user to modify the view as well, because it’s based on one table and we set the WITH CHECK OPTION. This option ensures that the rows after modification remain visible through the view after the change, or in this case, that the user couldn’t change the ProductType if it were in the SELECT list. The only rows a user of this view would be able to modify would be the ones where ProductType = 'widget'. Using INSTEAD OF, triggers you can code almost any security you want to for modifications on your views. For simple partitioning needs, the CHECK OPTION might work fine; otherwise, use triggers or stored procedures as needed.
This view can then have permissions granted to let only certain people use it. This is a decent technique when you have an easily described set, or possibly few types to work with, but can become a maintenance headache.
In the next step, ramping up row-level security, you build the following view to let users see snurfs only if they’re members of the snurfViewer role, using the is_member function:
CREATE VIEW Products.ProductsSelective
AS
SELECT ProductId, ProductCode, Description, UnitPrice, ActualCost
FROM Products.Product
WHERE ProductType <> 'snurf'
or (IS_MEMBER('snurfViewer') = 1)
or (IS_MEMBER('db_owner') = 1) --can't add db_owner to a role
WITH CHECK OPTION;
Though you probably don’t want to give too broad of a permissions to the object (no need to present all users with the possibility of using the view when they can’t), you can still give rights to public, and only users mentioned in the code will be able to see data returned. We will simply grant rights to the procedure to public so any authenticated user in the database could use the view.
GRANT SELECT ON Products.ProductsSelective to public;
Next, you create a principal named chrissy and the snurfViewer role. Note that you don’t add this user to the group yet; you’ll do that later in the example:
CREATE USER chrissy WITHOUT LOGIN;
CREATE ROLE snurfViewer;
Then, you change security context to chrissy and select from the view:
EXECUTE AS USER = 'chrissy';
SELECT * from Products.ProductsSelective;
REVERT;
This returns the one row to which she has access:
| ProductId | ProductCode | Description | UnitPrice | ActualCost | ProductType |
| --------- | ----------- | ---------------- | --------- | ---------- | ----------- |
| 1 | widget 12 | widget number 12 | 10.5000 | 8.5000 | widget |
Next, you add Chrissy to the snurfViewer group, go back to context as this user, and run the statement again:
ALTER ROLE snurfViewer ADD MEMBER chrissy;
GO
EXECUTE AS USER = 'chrissy';
SELECT *
FROM Products.ProductsSelective;
REVERT;
Now, you see all the rows:
| ProductId | ProductCode | Description | UnitPrice | ActualCost | ProductType |
| --------- | ----------- | ---------------- | --------- | ---------- | ----------- |
| 1 | widget12 | widget number 12 | 10.5000 | 8.5000 | widget |
| 2 | snurf98 | Snurfulator | 99.9900 | 22.5000 | snurf |
This is even better, but it’s still rigid and requires foreknowledge of the data during the design phase. Instead, you’ll create a table that maps database role principals with different types of products. Now, this gives you total control. To start the process, we will create the following table:
CREATE TABLE Products.ProductSecurity
(
ProductsSecurityId int Not NULL identity(1,1)
CONSTRAINT PKProducts_ProductsSecurity PRIMARY KEY,
ProductType varchar(20) Not NULL, --at this point you probably will create a ProductType
--domain table, but this keeps the example a bit simpler
DatabaseRole sysname Not NULL,
CONSTRAINT AKProducts_ProductsSecurity_typeRoleMapping
UNIQUE (ProductType, DatabaseRole)
);
Then, you insert a row that will be used to give everyone with database rights the ability to see widget-type products:
INSERT INTO Products.ProductSecurity(ProductType, DatabaseRole)
VALUES ('widget','public'),
Next, we alter the ProductsSelective view to show only rows to which the user has rights, based on row security:
ALTER VIEW Products.ProductsSelective
AS
SELECT Product.ProductId, Product.ProductCode, Product.Description,
Product.UnitPrice, Product.ActualCost, Product.ProductType
FROM Products.Product as Product
JOIN Products.ProductSecurity as ProductSecurity
ON (Product.ProductType = ProductSecurity.ProductType
AND IS_MEMBER(ProductSecurity.DatabaseRole) = 1)
OR IS_MEMBER('db_owner') = 1; --don't leave out the dbo!
This view joins the Product table to the ProductSecurity table and checks the matching roles against the role membership of the principal. Now, you test it:
EXECUTE AS USER = 'chrissy';
SELECT *
FROM Products.ProductsSelective;
REVERT;
This returns the following result:
| ProductId | ProductCode | Description | UnitPrice | ActualCost | ProductType |
| --------- | ----------- | ---------------- | --------- | ---------- | ----------- |
| 1 | widget12 | widget number 12 | 10.5000 | 8.5000 | widget |
Then, you add the snurfViewer role to the ProductSecurity table and try again:
INSERT INTO Products.ProductSecurity(ProductType, databaseRole)
VALUES ('snurf','snurfViewer'),
GO
EXECUTE AS USER = 'chrissy';
SELECT * FROM Products.ProductSecurity;
REVERT;
Now, you see it returns all data:
| ProductId | ProductCode | Description | UnitPrice | ActualCost | ProductType |
| --------- | ----------- | ---------------- | --------- | ---------- | ----------- |
| 1 | widget12 | widget number 12 | 10.5000 | 8.5000 | widget |
| 2 | snurf98 | Snurfulator | 99.9900 | 2.5000 | snurf |
This causes a bit of overhead, but then again, all solutions for row-level security will. If you need it, you need it, and not much more can be said. The important aspect of this solution is that we can now use this view in a stored procedure, and regardless of who owns the stored procedure, we can restrict row usage in a generic manner that uses only SQL Server security.
![]() Tip You can take this type of thing to another level and get really specific with the security. You can even selectively hide and show columns to the user (replacing values with NULLs, or securevalue, or something using a CASE expression like CASE WHEN IS_MEMBER(..) THEN Column ELSE 'SECURE VALUE' END). What’s better is that once you have set it up, it’s a no-brainer to add a principal to a group, and bam, that person has everything he or she needs, without costly setup.
Tip You can take this type of thing to another level and get really specific with the security. You can even selectively hide and show columns to the user (replacing values with NULLs, or securevalue, or something using a CASE expression like CASE WHEN IS_MEMBER(..) THEN Column ELSE 'SECURE VALUE' END). What’s better is that once you have set it up, it’s a no-brainer to add a principal to a group, and bam, that person has everything he or she needs, without costly setup.
Crossing Database Lines
So far, all the code and issues we’ve discussed have been concerned with everything owned by a single owner in a single database. When our code and/or relationships must go outside the database limits, the complexity is greatly increased. This is because in SQL Server architecture, databases are generally designed to be thought of as independent containers of data, and this is becoming more and more the expectation with Azure, contained databases, and even the developer tools that are shipped with SQL Server. One database equals one project in so many cases. However, often, you need to share data from one database to another, often for some object that’s located in a third-party system your company has purchased.
This can be a real annoyance for the following reasons:
- Foreign key constraints cannot be used to handle referential integrity needs (I covered in Chapter 7 how you implement relationships using triggers to support this).
- Backups must be coordinated or your data could be out of sync with a restore. You lose some of the protection from a single database-backup scenario. This is because when, heaven forbid, a database restore is needed, it isn’t possible to make certain that the data in the two databases is in sync.
Although accessing data in outside databases is not optimal, sometimes it’s unavoidable. A typical example might be linking an off-the-shelf system into a homegrown system. The off-the shelf package may have requirements that you not make any changes or additions to its database schema. So you create a database to bolt on functionality. Beyond the coding and maintenance aspects, which aren’t necessarily trivial, a very important consideration is security. As mentioned in the first paragraph of this section, databases are generally considered independent in the security theme of how SQL Server works. This causes issues when you need to include data outside the database, because users are scoped to a database. That’s why userA in database1 is never the same as userA in database2, even in an uncontained database mapped to the same login.
The ownership chain inside the boundaries of a database is relatively simple. If the owner of the object refers only to other objects owned by that user, then the chain isn’t broken. Any user to whom the object’s owner grants rights can use the object. However, when leaving the confines of a single database, things get murky. Even if a database is owned by the same system login, the ownership chain is (by default) broken when an object references data outside the database. So, not only does the object creator need to have access to the objects outside the database, the caller needs rights also.
In this section, I will be demonstrating four different concepts when dealing with accessing data outside of a single database:
- Using cross-database chaining
- Using impersonation to implement cross database connections
- Certificate-based trusts
- Accessing data outside of the server
Ideally, you will seldom, if ever, need to access data that is not within the boundaries of a single database, but in practice, that can be an impossible dream. A major example that is common is a third-party application database, where (due to support rules) you are not allowed to put objects in the database, but you need to add to the functionality.
The cross-database chaining solution is to tell the database to recognize that indeed the owners of database1 and database2 are the same. Then, if you, as system administrator, want to allow users to use your objects seamlessly across databases, then it’s fine. However, a few steps and requirements need to be met:
- Each database that participates in the chaining relationship must be owned by the same -system login.
- The DB_CHAINING database option (set using ALTER DATABASE) must be set to ON for each database involved in the relationship. It’s OFF by default.
- The database where the object uses external resources must have the TRUSTWORTHY database option set to ON; it’s OFF by default. (Again, set this using ALTER DATABASE.)
- The users who use the objects need to have a user in the database where the external resources reside.
I often will use the database chaining approach to support a reporting solution. For example, we have several databases that make up a complete reporting solution in our production system. We have a single database with views of each system to provide a single database for reporting from the OLTP databases (for real-time reporting needs only; other reporting comes from an integrated copy of the database and a data warehouse). Users have access to the views in the reporting database, but not rights to the base database tables.
![]() Caution If I could put this caution in a flashing font, I would, but my editor would probably say it wasn’t cost effective or something silly like that. It’s important to understand the implications of the database chaining scenario. You’re effectively opening up the external database resources completely to the users in the database who are members of the db_owner database role, even if they have no rights in the external database. Because of the last two criteria in the bulleted list, chaining isn’t necessarily a bad thing to do for most corporate situations where you simply have to retrieve data from another database. However, opening access to the external database resources can be especially bad for shared database systems, because this can be used to get access to the data in a chaining-enabled database. All that may need to be known is the username and login name of a user in the other database.
Caution If I could put this caution in a flashing font, I would, but my editor would probably say it wasn’t cost effective or something silly like that. It’s important to understand the implications of the database chaining scenario. You’re effectively opening up the external database resources completely to the users in the database who are members of the db_owner database role, even if they have no rights in the external database. Because of the last two criteria in the bulleted list, chaining isn’t necessarily a bad thing to do for most corporate situations where you simply have to retrieve data from another database. However, opening access to the external database resources can be especially bad for shared database systems, because this can be used to get access to the data in a chaining-enabled database. All that may need to be known is the username and login name of a user in the other database.
Note that if you need to turn chaining on or off for all databases, you can use sp_configure to set 'Cross DB Ownership Chaining' to '1', but this is not considered a best practice. Use ALTER DATABASE to set chaining only where absolutely required.
As an example, consider the following scenario where I’ll create two databases with a table in each database and then a procedure. First, I’ll create the new database and add a simple table. I won’t add any rows or keys, because this isn’t important to this demonstration. Note that you have to create a login for this demonstration, because the user must be based on the same login in both databases. We will start with this database in an uncontained model and will switch to a contained model to see how it affects the cross database access:
CREATE DATABASE externalDb;
GO
USE externalDb;
GO
--smurf theme song :)
CREATE LOGIN smurf WITH PASSWORD = 'La la, la la la la, la, la la la la';
CREATE USER smurf FROM LOGIN smurf;
CREATE TABLE dbo.table1 ( value int );
Next, you create a local database, the one where you’ll be executing your queries. You add the login you created as a new user and again create a table:
CREATE DATABASE localDb;
GO
USE localDb;
GO
CREATE USER smurf FROM LOGIN smurf;
Another step that’s generally preferred is to have all databases owned by the same server_principal, usually the sysadmin’s account. I will use the sa account here. Having the databases owned by sa prevents issues if the Windows Authentication account is deleted or disabled. We do this with the ALTER AUTHROIZATION DDL statement:
ALTER AUTHORIZATION ON DATABASE::externalDb To sa;
ALTER AUTHORIZATION ON DATABASE::localDb To sa;
To check the owner of the database, use the sys.databases catalog view:
SELECT name,suser_sname(owner_sid) as owner
FROM sys.databases
WHERE name in ('externalDb','localDb'),
This should return the following (if not, you will want to make sure of what you may have missed, as it is essential that the databases are owned by the same system principal for the upcoming examples):
| name | owner |
| ---------- | ----- |
| externalDb | sa |
| localDb | sa |
Next, you create a simple procedure, still in the localDb context, selecting data from the external database, with the objects being owned by the same dbo owner. You then give rights to our new user:
CREATE PROCEDURE dbo.externalDb$testCrossDatabase
AS
SELECT value
FROM externalDb.dbo.table1;
GO
GRANT EXECUTE ON dbo.externalDb$testCrossDatabase TO smurf;
Now, try it as the sysadmin user:
EXECUTE dbo.externalDb$testCrossDatabase;
And it works fine, because the sysadmin user is basically implemented to ignore all security. Execute as the user smurf that is in the localDb:
EXECUTE AS USER = 'smurf';
GO
EXECUTE dbo.externalDb$testCrossDatabase;
GO
REVERT;
This will give you the following error:
Msg 916, Level 14, State 1, Procedure externalDb$testCrossDatabase, Line 3
The server principal "smurf" is not able to access the database "externalDb" under the current security context.
You then set the chaining and trustworthy attributes for the localDb and chaining for the externalDb (making these settings requires sysadmin rights):
ALTER DATABASE localDb
SET DB_CHAINING ON;
ALTER DATABASE localDb
SET TRUSTWORTHY ON;
ALTER DATABASE externalDb
SET DB_CHAINING ON;
Now, if you execute the procedure, you will see that it returns a valid result. This is because
- The owner of the objects and databases is the same, which we set up with the ALTER AUTHORIZATION statements.
- The user has access to connect to the external database, which was why we created the user when we set up the externalDb database. (You can also use the guest login to allow any user to access the database as well, though as mentioned, this is not a best practice).
You can validate the metadata for these databases using the sys.databases catalog view:
SELECT name, is_trustworthy_on, is_db_chaining_on
FROM sys.databases
WHERE name in ('externalDb','localDb'),
This returns the following results:
| name | is_trustworthy_on | is_db_chaining_on |
| ---------- | ----------------- | ----------------- |
| externalDb | 0 | 1 |
| localDb | 1 | 1 |
I find that the biggest issue when setting up cross-database chaining is the question of ownership of the databases involved. The owner changes sometimes because users create databases and leave them owned by their security principals. Note that this is the only method I will demonstrate that doesn’t require stored procedures to work. You can also use basic queries and views in this very same manner, as they are simply stored queries that you use as the basis of a SELECT statement. Stored procedures are executable code modules that allow them a few additional properties, which I will demonstrate in the next two sections.
Now let’s see how this will be affected by setting the database to use the containment model:
ALTER DATABASE localDB SET CONTAINMENT = PARTIAL;
Then, connect to the server as user: smurf using SSMS and default database to localDb and try to run the procedure. You will notice that the connection isn’t to the contained database it is to the server and you are in the context of the contained database. Using EXECUTE AS will give you the same effect:
EXECUTE AS USER = 'smurf';
go
EXECUTE dbo.externalDb$testCrossDatabase;
GO
REVERT;
GO
You will see that it behaves the exact same way and gives you a result to the query. However, connect with a contained user is a different challenge. First, let’s create a contained user, and then give it rights to execute the procedure.
CREATE USER Gargy WITH PASSWORD = 'Nasty1$';
GO
GRANT EXECUTE ON dbo.externalDb$testCrossDatabase to Gargy;
Next, change to the database security context of the new contained user and try to change context to the externalDb:
EXECUTE AS USER = 'Gargy';
GO
USE externalDb;
This will give the following error:
Msg 916, Level 14, State 1, Line 1
The server principal "S-1-9-3-3326261859-1215110459-3885819776-190383717." is not able to access the database "externalDb" under the current security context.
Obviously the “server principal” part of the error message could be confusing, but it is also true because in this case, the database will behave as a server to that user. Executing the following code will give you the exact same error:
EXECUTE dbo.externalDb$testCrossDatabase;
GO
REVERT;
GO
When turning on containment, you will note that since the maximum containment level is PARTIAL, some code you have written may not be containment safe. To check, you can use the sys.dm_db_uncontained_entities dynamic management view. Even if you aren't using containment, you can use the following containment DMVs query to see code referencing outside data:
SELECT OBJECT_NAME(major_id) AS object_name,statement_line_number,
statement_type, feature_name, feature_type_name
FROM sys.dm_db_uncontained_entities AS e
WHERE class_desc = 'OBJECT_OR_COLUMN';
For our database, it will return the following, which corresponds to the procedure we created and the query that used a cross-database reference:
| object_name | statement_line_number | statement_type |
| ---------------------------- | --------------------- | -------------- |
| externalDb$testCrossDatabase | 3 | SELECT |
| feature_name | feature_type_name | ||||||||||
| --------------------------------- | ----------------- | ||||||||||
| Server or Database Qualified Name | T-SQL Syntax |
The object will also return uncontained users:
SELECT USER_NAME(major_id) AS USER_NAME,*
FROM sys.dm_db_uncontained_entities AS e
WHERE class_desc = 'DATABASE_PRINCIPAL'
and USER_NAME(major_id) <> 'dbo';
And we created one already in this chapter:
USER_NAME
---------
smurf
![]() Note One additional very interesting (albeit non-security-related) feature of contained databases is that the collation of the tempdb as seen from the contained user will be that of the contained database. While this is not frequently an issue for most databases, it will make life easier for moving databases around to servers with different collations. I won’t cover that feature in any other location in this book.
Note One additional very interesting (albeit non-security-related) feature of contained databases is that the collation of the tempdb as seen from the contained user will be that of the contained database. While this is not frequently an issue for most databases, it will make life easier for moving databases around to servers with different collations. I won’t cover that feature in any other location in this book.
Finally, we need to do a bit of housekeeping to remove containment from the database. To do this, we will delete the contained user we created and turn off containment (we have to drop the user, or as previously mentioned, you would receive an error stating that uncontained databases cannot have contained users):
DROP USER Gargy;
GO
USE Master;
GO
ALTER DATABASE localDB SET CONTAINMENT = NONE;
GO
USE LocalDb;
GO
Using Impersonation to Cross Database Lines
Impersonation can be an alternative to using the DB_CHAINING setting. Now, you no longer need to set the chaining to ON; all you need is to set it to TRUSTWORTHY:
ALTER DATABASE localDb
SET DB_CHAINING OFF;
ALTER DATABASE localDb
SET TRUSTWORTHY ON;
ALTER DATABASE externalDb
SET DB_CHAINING OFF;
Now, you can rewrite the procedure like this, which lets the person execute in the context of the owner of the schema that the procedure is in:
CREATE PROCEDURE dbo.externalDb$testCrossDatabase_Impersonation
WITH EXECUTE AS SELF --as procedure creator, who is the same as the db owner
AS
SELECT value
FROM externalDb.dbo.table1;
GO
GRANT execute on dbo.externalDb$testCrossDatabase_impersonation to smurf;
If the login of the owner of the dbo schema (in this sa, because I set the owner of both databases to sa) has access to the other database, you can impersonate dbo in this manner. In fact, you can access the external resources seamlessly. This is probably the simplest method of handling cross-database chaining for most corporate needs. Of course, impersonation should be used very carefully and raise a humongous flag if you’re working on a database server that’s shared among many different companies.
Now, when I execute the procedure as smurf user, it works:
EXECUTE AS USER = 'smurf';
GO
EXECUTE dbo.externalDb$testCrossDatabase_impersonation;
GO
REVERT;
If you toggle off TRUSTWORTHY and try to execute the procedure
ALTER DATABASE localDb SET TRUSTWORTHY OFF;
GO
EXECUTE dbo.externalDb$testCrossDatabase_impersonation;
no matter what user you execute as, you’ll receive the following error:
Msg 916, Level 14, State 1, Procedure externalDb$testCrossDatabase_Impersonation, Line 4
The server principal "sa" is not able to access the database "externalDb" under the current security context.
This is clearly another of the confusing sorts of error messages you get on occasion, since the server principal sa ought to be able to do anything, but it is what it is. Next, we go back to the containment method. Turn back on TRUSTWORTHY, set the containment, and re-create the Gargy user, giving rights to the impersonation procedure:
ALTER DATABASE localDb SET TRUSTWORTHY ON;
GO
ALTER DATABASE localDB SET CONTAINMENT = PARTIAL;
GO
CREATE USER Gargy WITH PASSWORD = 'Nasty1$';
GO
GRANT EXECUTE ON externalDb$testCrossDatabase_Impersonation to Gargy;
Now execute the procedure in the context of the contained user:
EXECUTE AS USER = 'Gargy';
GO
EXECUTE dbo.externalDb$testCrossDatabase_Impersonation;
GO
REVERT;
This time, you will see that there no error is raised, because the procedure is in the context of the owner of the procedure and is mapped to a server principal that is the same that owns the database and the object you are using. Note that this breaks (or really, violates) containment because you are using external data, but it will give you the rights you need in the (hopefully) rare requirement to use cross-database access.
Finally, we clean up the users and containment as we have done before:
DROP USER Gargy;
GO
USE Master;
GO
ALTER DATABASE localDB SET CONTAINMENT = NONE;
GO
USE LocalDb;
Using a Certificate-Based Trust
The final thing I’ll demonstrate around cross-database access is using a single certificate installed in both databases to let the code access data across database boundaries. We’ll use it to sign the stored procedure and map a user to this certificate in the target database. This is a straightforward technique and is the best way to do cross-database security chaining when the system isn’t a dedicated corporate resource. It takes a bit of setup, but it isn’t overwhelmingly difficult. What makes using a certificate nice is that you don’t need to open the hole left in the system’s security by setting the database to TRUSTWORTHY. This is because the user who will be executing the procedure is a user in the database, just as if the target login or user were given rights in the externalDB. Because the certificate matches, SQL Server knows that this cross-database access is acceptable.
First, turn off the TRUSTWORTHY setting:
REVERT;
GO
USE localDb;
GO
ALTER DATABASE localDb
SET TRUSTWORTHY OFF;
Check the status of your databases as follows:
SELECT name,
suser_sname(owner_sid) as owner,
is_trustworthy_on, is_db_chaining_on
FROM sys.databases where name in ('localdb','externaldb'),
This should return the following results (if not, go back and turn off TRUSTWORTHY and chaining for the databases where necessary):
| name | owner | is_trustworthy_on | is_db_chaining_on |
| ---------- | ----- | ----------------- | ----------------- |
| externalDb | sa | 0 | 0 |
| localDb | sa | 0 | 0 |
Now, we will create another procedure and give the user smurf rights to execute it, just like the others (which won’t work now because TRUSTWORTHY is turned off):
CREATE PROCEDURE dbo.externalDb$testCrossDatabase_Certificate
AS
SELECT Value
FROM externalDb.dbo.table1;
GO
GRANT EXECUTE on dbo.externalDb$testCrossDatabase_Certificate to smurf;
Then, create a certificate:
CREATE CERTIFICATE procedureExecution ENCRYPTION BY PASSWORD = 'jsaflajOIo9jcCMd;SdpSljc'
WITH SUBJECT =
'Used to sign procedure:externalDb$testCrossDatabase_Certificate';
Add this certificate as a signature on the procedure:
ADD SIGNATURE TO dbo.externalDb$testCrossDatabase_Certificate
BY CERTIFICATE procedureExecution WITH PASSWORD = 'jsaflajOIo9jcCMd;SdpSljc';
Finally, make an OS file out of the certificate, so a certificate object can be created in the externalDb based on the same certificate (choose a directory that works best for you):
BACKUP CERTIFICATE procedureExecution TO FILE = 'c: empprocedureExecution.cer';
This completes the setup of the localDb. Next, you have to apply the certificate to the externalDb:
USE externalDb;
GO
CREATE CERTIFICATE procedureExecution FROM FILE = 'c: empprocedureExecution.cer';
After that, map the certificate to a user, and give this user rights to the table1 that the user in the other database is trying to access:
CREATE USER procCertificate FOR CERTIFICATE procedureExecution;
GO
GRANT SELECT on dbo.table1 TO procCertificate;
Now, you’re good to go. Change back to the localDb and execute the procedure:
USE localDb;
GO
EXECUTE AS LOGIN = 'smurf';
EXECUTE dbo.externalDb$testCrossDatabase_Certificate;
The stored procedure has a signature that identifies it with the certificate, and in the external database, it connects with this certificate to get the rights of the certificate-based user. So, since the certificate user can view data in the table, your procedure can use the data.
The certificate-based approach isn’t as simple as the other possibilities, but it’s more secure, for certain. Pretty much the major downside to this is that it works only with procedures and not with views, and I didn’t really cover any of the intricacies of using certificates. However, now you have a safe way of crossing database boundaries that doesn’t require giving the user direct object access and doesn’t open up a hole in your security. Hence, you could use this solution on any server in any situation. Make sure to secure or destroy the certificate file once you’ve used it, so no other user can use it to gain access to your system. Then you clean up the databases used for the example.
Of the methods shown, this would be the least desirable to use with containment, because you now have even more baggage to set up after moving the database, so we will simply leave it as “it could be done, but shouldn’t be.”
Finally, we clean up the databases used for the examples and move back to the ClassicSecurityExample database we have used throughout this chapter:
REVERT;
GO
USE MASTER;
GO
DROP DATABASE externalDb;
DROP DATABASE localDb;
GO
USE ClassicSecurityExample;
Different Server (Distributed Queries)
I want to make brief mention of distributed queries and introduce the functions that can be used to establish a relationship between two SQL Server instances, or a SQL Server instance and an OLE DB or ODBC data source. (Note that OLEDB is being deprecated and will not be supported for long. For more details check http://msdn.microsoft.com/en-us/library/ms810810.aspx , which outlines Microsoft’s “Data Access Technologies Road Map.”)
You can use either of these two methods:
- Linked servers: You can build a connection between two servers by registering a “server” name that you then access via a four-part name (<linkedServerName>.<database>.<schema>.<objectName>) or through the OPENQUERY interface. The linked server name is the name you specify using sp_addlinkedserver. This could be a SQL Server server or anything that can be connected to via OLE DB.
- Ad hoc connections: Using the OPENROWSET or OPENDATASOURCE interfaces, you can return a table of data from any OLE DB source.
In either case, the security chain will be broken when crossing SQL Server instance connections and certainly when using any data source that isn’t SQL Server–based. Whether or not this is a problem is based on the connection properties and/or connection string used to create the linked server or ad hoc connection. Using linked servers, you could be in the context of the Windows login you are logged in with, a SQL Server standard login on the target machine, or even a single login that everyone uses to “cross over” to the other server. The best practice is to use the Windows login where possible.
As I mentioned briefly in the previous section, one use for EXECUTE AS could be to deal with the case where you’re working with distributed databases. One user might be delegated to have rights to access the distributed server, and then, you execute the procedure as this user to give access to the linked server objects.
Using linked servers or ad-hoc connections will both break the containment model. Linked servers are defined in the master database.
It isn’t always possible to keep users from accessing data. We database administrator types all too often have unfettered access to entire production systems with far too much personal data. Even with the far-improved security granularity starting with SQL Server 2005, a few users will still have rights to run as a member of the sys admin server role, giving them access to all data.
Also, technically, once people access to unencrypted backups of the system, they can easily access any data in the database by simply restoring it to a different server where they are administrators. And don’t forget that if you can attach the database, the data is also going to be viewable, in some fashion. If you’re dealing with sensitive data, you need to be wary of how you deal with this data:
- Do you back up the database? Where are these backups?
- Do you send the backups to an offsite safe location? Who takes them there?
- Who has access to the servers where data is stored? Do you trust the fate of your company in their hands? Could these servers be hacked?
SQL Server definitely improved on the 2008 version in terms of the DBA job of protecting data by implementing transparent data encryption. Basically, this will encrypt the data and log files during I/O so that you don’t have to change your code, but anytime the data is at rest, it will stay encrypted (including when it is backed up). You can also use several third-party tools to encrypt backups.
When data is at rest in the database and users have access to the data, it is also important that we obfuscate the data such that a user cannot tell what it is exactly. This is one of the main ways that we can protect data from casual observers, especially those like us DBA types who generally have full control over the database (in other words, way too much power in the database).
The biggest “key” to encryption is that you don’t include all the information needed to decrypt the data easily available to the user. SQL Server has a rich set of encryption features, featuring a key and certificate management system. You can use this system to encrypt data from each user and from people who might get access to the data outside of the server.
In the following example, I’ll use the simplest encryption that SQL Server gives us, using the encryptByPassPhrase. (You can also use keys, asymmetric keys, and certificates.) The encryptByPassPhrase function lets you specify your key as a string value that SQL Server uses to munge the data, such that you must have this key to reconstitute the data. Passphrase encryption can be one of the most useful forms of encryption using the SQL Server built-in encryption, because you can let each row have its own password. So, let’s say we have a column of very personal information, such as a vault of information that an end user might be able to save securely. Using the password in the application, the data could become visible, but it would not be available to anyone else who did not know the password. Of course, passphrase encryption does suffer from the problem that if the password is lost, the data is lost for good.
As an example, we’ll build an incredibly simple encryption scheme that you could use to secure a column in your database. First, as a quick demonstration of how the function works, consider the following:
SELECT encryptByPassPhrase('hi', 'Secure data'),
'Secure data' is the value to be encrypted, and 'hi' is the passphrase that’s required to get this value back later. Executing this statement returns the following result (the results will be different each time you execute the statement, but if you take my results or yours, you will get back the answer ‘Secure data’):
--------------------------------------------------------------------------
0x010000004D2B87C6725612388F8BA4DA082495E8C836FF76F32BCB642B36476594B4F014
This is a clearly unreadable binary string, and even cooler, the value is different every time you execute it, so no one can come behind and decrypt it with any ease. To decrypt it, just use the following:
SELECT decryptByPassPhrase('hi',
0x010000004D2B87C6725612388F8BA4DA082495E8C836FF76F32BCB642B36476594B4F014);
This returns the following result:
------------------------
0x5365637572652064617461
This is the binary representation of our original string, which makes it easy to represent most any datatype. To use the value, you have to cast it back to the original varchar type:
SELECT CAST(decryptByPassPhrase('hi',
0x010000004D2B87C6725612388F8BA4DA082495E8C836FF76F32BCB642B36476594B4F014)
AS VARCHAR(30));
This returns the following result:
-----------
Secure data
![]() Tip The data is different each time because the encryption scheme uses various nonencrypted data, such as the time value, to encrypt the data (this is generally known as the salt value of the encryption). You cannot infer the decryption of all values based on breaking a single value. This is also what makes searching encrypted data so difficult (as it really should be!).
Tip The data is different each time because the encryption scheme uses various nonencrypted data, such as the time value, to encrypt the data (this is generally known as the salt value of the encryption). You cannot infer the decryption of all values based on breaking a single value. This is also what makes searching encrypted data so difficult (as it really should be!).
I am not going to go any deeper into the concepts of encryption, because it is far too complex to cover in one section of a chapter (a couple of my great guys, Micheal Coles and Rodney Landrum have an Apress book on the subject named Expert SQL Server 2008 Encryption that will give you an understanding of why it is an entire book worth of material). The important thing to do for your database design is to make sure that any time you store personally identifiable data or really any data that could harm the customer if it were to get out should be encrypted. Social Security numbers are a prime example. If your database needs to store such data it should be stored encrypted.
Keep in mind as you design your encryption needs, “Who can decrypt the data?” If the information to do the decryption is stored with the encrypted data, you are not gaining much. SQL Server’s basic encryption uses certificates and keys that are all on the local server. This can keep employees eyes off of sensitive data, but if a person got the entire database and a sysadmin role user, they could get to everything. SQL Server has a better method called extensible key management, but it still isn’t perfect. The best method is to implement your decryption engine on a different server that is not linked to the database engine at all.
A very useful and security-minded goal you should have in most organizations is to try not to hold information like credit card numbers in your database at all and use a third-party bank to handle it for you. Of course, if you do work for a bank, I clearly could not do your encryption needs justice in a single chapter, much less this section.
In the end, if your backup tape is pocketed by an employee who’s changing jobs from legit IT worker to a personal identification salesperson, the data is worthless, and all your press release need say is “Company X regrets to say that some financial data tapes were stolen from our vaults. All data was encrypted; hence, there is little chance any usable data was acquired.” And you, as DBA, will be worshipped—and isn’t that really the goal of every programmer!
Monitoring and Auditing
Often, a client won’t care too much about security, so he or she doesn’t want to limit what a user can do in the database. However, many times, there’s a hidden subtext: “I don’t want to be restrictive, but how can we keep up with what users have done?”
An alternative to implementing a full-blown security system can be simply to watch what users do, in case they do something they shouldn’t. To implement our Big Brother security scenario, I’ll demonstrate three possible techniques:
- Server and database audit: In SQL Server 2008 and later, you can define audit specifications that will watch and log all the activity as you define.
- Watching table changes using DML triggers: Keep up with a history of previous values for rows in a table.
- DDL triggers: Use these to log any DDL events, such as creating users, creating or modifying tables, and so on.
- Using Profiler: Profiler catches everything, so you can use it to watch user activity.
In some cases, these techniques are used to augment the security of a system, for example, to make sure system administrators keep out of certain parts of the system.
![]() Note In SQL Server 2008, Microsoft introduced two other new features that are interesting for watching changes to the database, but they are not of direct value for a security purpose. Change Data Capture is an Enterprise Edition–only feature that allows you to do full tracking of every change in data, and change tracking is available to other editions to capture that a change has occurred since the last time you checked the Change Tracking system. However, neither of those new features will tell you the user who made a given change; thus, they don’t have security applications. They are, however, amazingly useful for implementing a reporting/data warehouse system, because finding the rows that changed for ETL has always been the hardest thing. These new features have less overhead (and certainly less setup) than do triggers that you might write to accomplish the same goal.
Note In SQL Server 2008, Microsoft introduced two other new features that are interesting for watching changes to the database, but they are not of direct value for a security purpose. Change Data Capture is an Enterprise Edition–only feature that allows you to do full tracking of every change in data, and change tracking is available to other editions to capture that a change has occurred since the last time you checked the Change Tracking system. However, neither of those new features will tell you the user who made a given change; thus, they don’t have security applications. They are, however, amazingly useful for implementing a reporting/data warehouse system, because finding the rows that changed for ETL has always been the hardest thing. These new features have less overhead (and certainly less setup) than do triggers that you might write to accomplish the same goal.
Server and Database Audit
For the 2008 release, Microsoft added a very nice feature for auditing the activities of your users. It is called SQL Server Audit , and it allows you to define server- and database-level audits that you can use to monitor almost everything your logins and users do to your server and/or databases. For SQL Server 2008, it was a feature that is included only in the Enterprise Edition. For SQL Server 2012, database-level audits are still Enterprise only, but server-level audits are available in all versions to monitor server configuration changes.
In versions before SQL Server 2008, most monitoring would have required a web of DML and DDL triggers, plus the use of Profiler to watch everyone’s moves. Now, you can implement detailed monitoring in a declarative manner. SQL Server Audit is a tremendously cool feature and will make the process of meeting auditing requirements much easier than ever before. Instead of lots of code to pore through, you can just print the audits that you are enforcing, and you are done. Note that SQL Server Audit does not obviate the use of DML or DDL triggers as a tool for watching what users are doing, mostly because in a trigger you can react to what a user is doing and alter their path. Using SQL Server Audit, you will simply be able to watch what the user is doing.
![]() Note As usual, there are graphical user interface (GUI) versions of everything I discuss, and I imagine that many DBAs (even some hardcore ones) will probably use the GUI for the most part, but as with everything else in this book, I want to show the syntax because it will make using the GUI easier, and if you have to apply these settings to more than one server, you will quickly learn to write scripts, or at least to use the GUI to generate scripts.
Note As usual, there are graphical user interface (GUI) versions of everything I discuss, and I imagine that many DBAs (even some hardcore ones) will probably use the GUI for the most part, but as with everything else in this book, I want to show the syntax because it will make using the GUI easier, and if you have to apply these settings to more than one server, you will quickly learn to write scripts, or at least to use the GUI to generate scripts.
The auditing is file based, in that you don’t do your logging to a database; rather, you specify a directory on your server (or off your server if you so desire). You will want to make sure that the directory is a very fast access location to write to, because writing to it will be part of the transactions you execute. When auditing is turned on, each operation will be audited or not executed. However, it doesn’t write directly to the file; rather, for maximum performance, SQL Server Audit uses Service Broker queues under the covers, so it doesn’t have to write audit data to the file as part of each transaction. Instead, queue mechanisms make sure that the data is written asynchronously (there is a setting to force an audit trail to be written in some amount of time or synchronously if you need it to be guaranteed 100 percent up to date).
The audit structures consist of three basic objects:
- Server audit: Top-level object that defines where the audit file will be written to and other essential settings
- Server audit specification: Defines the actions at the server level that will be audited
- Database audit specification: Defines the actions at the database level that will be audited
In the following sections, we will go through the steps to define an audit specification, enable the audit, and then view the audit results.
Defining an Audit Specification
As an example, I will set up an audit on our test server/security database to watch for logins to be changed (such as a new login created or one changed/dropped) as well as watching for the employee or manager user to execute a SELECT statement against the Products.Product table and SELECTs by anyone on Sales.Invoice. First, you define the SERVER AUDIT:
USE master;
GO
CREATE SERVER AUDIT ProSQLServerDatabaseDesign_Audit
TO FILE --choose your own directory, I expect most people
( FILEPATH = N'c: emp' --have a temp directory on their system drive
,MAXSIZE = 15 MB
,MAX_ROLLOVER_FILES = 0 --unlimited
)
WITH
(
ON_FAILURE = SHUTDOWN --if the file cannot be written to,
--shut down the server
);
![]() Note The audit is created in a disabled state. You need to start it once you have added audit specifications.
Note The audit is created in a disabled state. You need to start it once you have added audit specifications.
The next step is to define an audit specification to set up the container to hold a list of related items to audit. This container-based approach lets you easily enable or disable auditing for the entire group of related features. Create the container by defining a SERVER AUDIT SPECIFICATION:
CREATE SERVER AUDIT SPECIFICATION ProSQLServerDatabaseDesign_Server_Audit
FOR SERVER AUDIT ProSQLServerDatabaseDesign_Audit
WITH (STATE = OFF); --disabled. I will enable it later
The next step is to add things to the specification to audit. There are lots of different things you can audit. You can find the list under “SQL Server Audit Action Groups and Actions” in Books Online. In our sample, we are going to watch for server principals to change:
ALTER SERVER AUDIT SPECIFICATION ProSQLServerDatabaseDesign_Server_Audit
ADD (SERVER_PRINCIPAL_CHANGE_GROUP);
Next, I will go through the same process for the database that I did for the server, setting up the container for the audit using the DATABASE AUDIT SPECIFICATION command:
USE ClassicSecurityExample;
GO
CREATE DATABASE AUDIT SPECIFICATION
ProSQLServerDatabaseDesign_Database_Audit
FOR SERVER AUDIT ProSQLServerDatabaseDesign_Audit
WITH (STATE = OFF);
This time, we will audit the employee and manager database principals use of the Products.Product table. Here is how we add those items to the specification:
ALTER DATABASE AUDIT SPECIFICATION
ProSQLServerDatabaseDesign_Database_Audit
ADD (SELECT ON Products.Product BY employee, manager),
ADD (SELECT ON Products.AllProducts BY employee, manager);
Enabling an Audit Specification
Finally, we enable the two audit specifications that we’ve just created. Remember, to enable a specification is to enable all the audits defined in that container, for example:
USE master;
GO
ALTER SERVER AUDIT ProSQLServerDatabaseDesign_Audit
WITH (STATE = ON);
ALTER SERVER AUDIT SPECIFICATION ProSQLServerDatabaseDesign_Server_Audit
WITH (STATE = ON);
GO
USE ClassicSecurityExample;
GO
ALTER DATABASE AUDIT SPECIFICATION ProSQLServerDatabaseDesign_Database_Audit
WITH (STATE = ON);
Now that our audits are enabled, we can monitor the usage of the features and functionality that we’re auditing. The following code executes some actions that will be audited as a result the specifications we’ve just created. The following script will do a few actions that will be audited by the audit objects we have set up in the previous sections:
CREATE LOGIN MrSmith WITH PASSWORD = 'Not a good password';
GO
EXECUTE AS USER = 'manager';
GO
SELECT *
FROM Products.Product;
GO
SELECT *
FROM Products.AllProducts; --Permissions will fail
GO
REVERT
GO
EXECUTE AS USER = 'employee';
GO
SELECT *
FROM Products.AllProducts; --Permissions will fail
GO
REVERT;
GO
The following query will let us view the log that was set up with the CREATE SERVER AUDIT command in the first step of the process. By executing this
SELECT event_time, succeeded,
database_principal_name, statement
FROM sys.fn_get_audit_file ('c: emp*',default,default);
we can see the different statements that were executed (and you see the two statements where the permission failed, which is the only reason the data will be put in the audit when it doesn’t succeed):
| event_time | succeeded | database_principal_name | statement |
| ---------------------- | --------- | ----------------------- | ------------------------------- |
| 2011-09-02 03:36:53.31 | 1 | dbo | CREATE LOGIN MrSmith WITH PASS… |
| 2011-09-02 03:36:53.37 | 1 | Manager | SELECT * |
| FROM Products.Product | |||
| 2011-09-02 03:36:53.58 | 0 | Manager | SELECT * |
| FROM Products.AllProducts… | |||
| 2011-09-02 03:36:53.60 | 0 | Employee | SELECT * |
| FROM Products.AllProducts… |
There are lots of other pieces of information returned by the sys.fn_get_audit_file function that are very useful, especially including the server principal information. Using a few of the catalog views, you can get a picture of what the audits do. Note that the query I built works only at an object level. It could be extended if you wanted to do column-level audits.
Viewing the Audit Configuration
Finally, once you have set up the audit trail, it is often important to find out what is being audited. You can do this using several of the catalog views:
- sys.server_audits: One row per server audit
- sys.server_audit_specifications: Details about the audits that have been configured for this server, such as when it was started, the last time it was modified, and so on
- sys.server_audit_specification_details: Links the objects being audited and actions being audited
The following query, using these views, will get you the definition of what is being audited at a server level:
SELECT sas.name as audit_specification_name,
audit_action_name
FROM sys.server_audits as sa
JOIN sys.server_audit_specifications as sas
ON sa.audit_guid = sas.audit_guid
JOIN sys.server_audit_specification_details as sasd
ON sas.server_specification_id = sasd.server_specification_id
WHERE sa.name = 'ProSQLServerDatabaseDesign_Audit';
By executing this, given all of the audit stuff we had set up, will return the following:
audit_specification_name audit_action_name
---------------------------------- ----------------------------------
ProSQLServerDatabaseDesign_Server_Audit SERVER_PRINCIPAL_CHANGE_GROUP
Digging deeper, to get the objects and actions, the following query will get you the database-level actions that are being audited:
SELECT --sas.name as audit_specification_name,
audit_action_name,dp.name as [principal],
SCHEMA_NAME(o.schema_id) + '.' + o.name as object
FROM sys.server_audits as sa
join sys.database_audit_specifications as sas
on sa.audit_guid = sas.audit_guid
join sys.database_audit_specification_details as sasd
on sas.database_specification_id = sasd.database_specification_id
join sys.database_principals as dp
on dp.principal_id = sasd.audited_principal_id
join sys.objects as o
on o.object_id = sasd.major_id
WHERE sa.name = 'ProSQLServerDatabaseDesign_Audit'
and sasd.minor_id = 0; --need another query for column level audits
This query returns the following:
| audit_action_name | principal | object |
| ----------------- | --------- | -------------------- |
| SELECT | Employee | Products.Product |
| SELECT | Manager | Products.Product |
| SELECT | Employee | Products.allProducts |
| SELECT | Manager | Products.allProducts |
Quite a few more catalog views pertain to the server and database auditing facilities of SQL Server, certainly more than is necessary in this chapter for me to cover. The basic setup of auditing is really quite straightforward, and auditing is a nice feature of SQL Server that is going to be a welcome tool for users who have the need to audit the activities of their users and especially administrators.
Watching Table History Using DML Triggers
Even in addition to the kind of logging you can do with SQL Server Audit, you will still find uses for trigger-based logging of table history. And in previous versions of SQL Server, trigger-based logging is very much the way to watch what your users do with your data.
As discussed in Chapter 6, you can run code whenever a user executes an INSERT, UPDATE, or DELETE DML statement on a table or view. We already constructed an auditing trigger in Chapter 6 in the section “DML Triggers” that audited change, and we’ll create another one here. When finished, a history of the previous values for a column in a table will be maintained, in case some user changes the data improperly.
The scenario is that we have a slice of the Sales and Inventory sections of the database for products and invoices (see Figure 9-6).
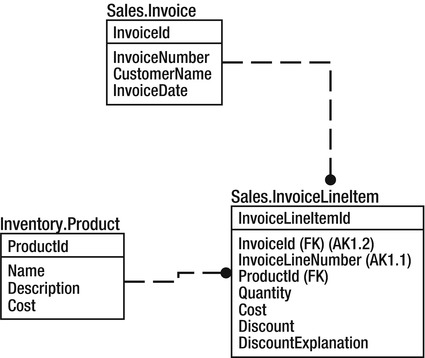
Figure 9-6. Sample tables for table history example
On each invoice line item, there’s a cost and a discount percentage. If the cost value doesn’t match the current value in the Product table and the discount percentage isn’t zero, we want to log the difference. A report of differences will be built and sent to the manager to let the values be checked to make sure everything is within reason.
First we build the tables, going back to the ClassicSecurityExample database:
USE ClassicSecurityExample;
GO
CREATE SCHEMA Sales;
GO
CREATE SCHEMA Inventory;
GO
CREATE TABLE Sales.Invoice
(
InvoiceId int not null identity(1,1) CONSTRAINT PKInvoice PRIMARY KEY,
InvoiceNumber char(10) not null
CONSTRAINT AKInvoice_InvoiceNumber UNIQUE,
CustomerName varchar(60) not null , --should be normalized in real database
InvoiceDate smalldatetime not null
);
CREATE TABLE Inventory.Product
(
ProductId int not null identity(1,1) CONSTRAINT PKProduct PRIMARY KEY,
name varchar(30) not null CONSTRAINT AKProduct_name UNIQUE,
Description varchar(60) not null ,
Cost numeric(12,4) not null
);
CREATE TABLE Sales.InvoiceLineItem
(
InvoiceLineItemId int not null identity(1,1)
CONSTRAINT PKInvoiceLineItem PRIMARY KEY,
InvoiceId int not null,
ProductId int not null,
Quantity numeric(6,2) not null,
Cost numeric(12,4) not null,
discount numeric(3,2) not null,
discountExplanation varchar(200) not null,
CONSTRAINT AKInvoiceLineItem_InvoiceAndProduct
UNIQUE (InvoiceId, ProductId),
CONSTRAINT FKSales_Invoice$listsSoldProductsIn$Sales_InvoiceLineItem
FOREIGN KEY (InvoiceId) REFERENCES Sales.Invoice(InvoiceId),
CONSTRAINT FKSales_Product$isSoldVia$Sales_InvoiceLineItem
FOREIGN KEY (InvoiceId) REFERENCES Sales.Invoice(InvoiceId)
--more constraints should be in place for full implementation
);
Now, we create another table to hold the audit of the line item of an invoice:
CREATE TABLE Sales.InvoiceLineItemDiscountAudit
(
InvoiceLineItemDiscountAudit int not null identity(1,1)
CONSTRAINT PKInvoiceLineItemDiscountAudit PRIMARY KEY,
InvoiceId int NOT NULL,
InvoiceLineItemId int not null,
AuditTime datetime not null,
SetByUserId sysname not null,
Quantity numeric(6,2) not null,
Cost numeric(12,4) not null,
Discount numeric(3,2) not null,
DiscountExplanation varchar(300) not null
);
I used a surrogate primary key with no other uniqueness criteria here for the audit table, because you just cannot predict whether two users could change the same row at the same point in time (heck, even the same user could change the row twice at the same time on two different connections!). In this case, we settle on the surrogate to simply represent the order of events, rather than their existing logical uniqueness.
Then, we code a trigger, using the same trigger template as in the previous chapters (and defined in Appendix B). The trigger will cascade the change from the primary table to the audit table behind the scenes:
CREATE TRIGGER Sales.InvoiceLineItem$insertAndUpdateAuditTrail
ON Sales.InvoiceLineItem
AFTER INSERT,UPDATE AS
BEGIN
SET NOCOUNT ON;
SET ROWCOUNT 0; --in case the client has modified the rowcount
--use inserted for insert or update trigger, deleted for update or delete trigger
--count instead of @@rowcount due to merge behavior that sets @@rowcount to a number
--that is equal to number of merged rows, not rows being checked in trigger
DECLARE @msg varchar(2000), --used to hold the error message
--use inserted for insert or update trigger, deleted for update or delete trigger
--count instead of @@rowcount due to merge behavior that sets @@rowcount to a number
--that is equal to number of merged rows, not rows being checked in trigger
@rowsAffected int = (SELECT COUNT(*) FROM inserted);
-- @rowsAffected int = (SELECT COUNT(*) FROM deleted);
--no need to continue on if no rows affected
IF @rowsAffected = 0 RETURN;
BEGIN TRY
--[validation blocks]
--[modification blocks]
IF UPDATE(Cost)
INSERT INTO Sales.InvoiceLineItemDiscountAudit (InvoiceId,
InvoiceLineItemId, AuditTime, SetByUserId, Quantity,
Cost, Discount, DiscountExplanation)
SELECT inserted.InvoiceId, inserted.InvoiceLineItemId,
current_timestamp, suser_sname(), inserted.Quantity,
inserted.Cost, inserted.Discount,
inserted.DiscountExplanation
FROM inserted
JOIN Inventory.Product as Product
ON inserted.ProductId = Product.ProductId
--if the Discount is more than 0, or the cost supplied is less than the
--current value
WHERE inserted.Discount > 0
OR inserted.Cost < Product.Cost;
-- if it was the same or greater, that is good!
-- this keeps us from logging if the cost didn't actually
-- change
END TRY
BEGIN CATCH
IF @@trancount > 0
ROLLBACK TRANSACTION;
THROW;
END CATCH
END
We then test the code by creating a few products:
INSERT INTO Inventory.Product(name, Description,Cost)
VALUES ('Duck Picture','Picture on the wall in my hotelRoom',200.00),
('Cow Picture','Picture on the other wall in my hotelRoom',150.00);
Then, we start an invoice:
INSERT INTO Sales.Invoice(InvoiceNumber, CustomerName, InvoiceDate)
VALUES ('IE00000001','The Hotel Picture Company','2o12-01-01'),
Next, we add an InvoiceLineItem that’s clean, has the same price, and has no discount:
INSERT INTO Sales.InvoiceLineItem(InvoiceId, ProductId, Quantity,
Cost, Discount, DiscountExplanation)
SELECT (SELECT InvoiceId
FROM Sales.Invoice
WHERE InvoiceNumber = 'IE00000001'),
(SELECT ProductId
FROM Inventory.Product
WHERE Name = 'Duck Picture'), 1,200,0,'';
We check our log:
SELECT * FROM Sales.InvoiceLineItemDiscountAudit;
Nothing is returned on insert:
InvoiceLineItemDiscountAudit InvoiceId InvoiceLineItemId AuditTime
---------------------------- ---------- ----------------- ---------
SetByUserId Quantity Cost Discount DiscountExplanation
------------ ---------- ------ ----------- ---------------------
Then, we create a row with a discount percentage:
INSERT INTO Sales.InvoiceLineItem(InvoiceId, ProductId, Quantity,
Cost, Discount, DiscountExplanation)
SELECT (SELECT InvoiceId
FROM Sales.Invoice
WHERE InvoiceNumber = 'IE00000001'),
(SELECT ProductId
FROM Inventory.Product
WHERE name = 'Cow Picture'),
1,150,.45,'Customer purchased two, so I gave 45% off';
Checking the audit log this time:
SELECT * FROM Sales.InvoiceLineItemDiscountAudit;
Now, we see that a result has been logged:
InvoiceLineItemDiscountAudit InvoiceId InvoiceLineItemId AuditTime
---------------------------- ---------- ----------------- ----------------------
1 1 2 2012-02-18 23:03:05.823
SetByUserId Quantity Cost Discount
----------------------- ---------- ------ --------
DiscountExplanation
-----------------------------------------
Customer purchased two, so I gave 45% off
DML triggers make wonderful security devices for keeping an eye on what users do, because those triggers can be completely transparent to users and to programmers. The only catch is when an application layer isn’t passing the security context through to the application. Sometimes, the application uses one common login, and there isn’t any automatic way for the database code to determine which user is actually doing the DML operation. Most of the time when that is the case, you’ll have already dealt with the problem using some method (such as just passing the username to the stored procedure, adding a column to the table to hold the user that is doing the operation, and so on).
DDL triggers let you watch what users do, but instead of watching what they do to data, you can watch what they do to the system. They let us protect and monitor changes to the server or database structure by firing when a user executes any DDL statement. The list of DDL statements you can monitor is quite long. (There are server-level events, such as creating and altering logins, as well as for the database, including creating and modifying tables, indexes, views, procedures, and so on. For a full list, check SQL Server Books Online in the “DDL Events Groups” topic.)
DDL triggers are of no value in protecting data values, because they don’t fire for operations where data is changed or manipulated. They are, however, good for monitoring and preventing changes to the system, even by users who have the rights to do so. For example, consider the all-too-frequent case where the manager of the IT group has system administration powers on the database, though he or she can barely spell “SQL” (if this power wasn’t granted, it would seem like a slight to the abilities and power of this manager). Now, let’s assume that this manager is just pointing and clicking around the UI, and one click is to the wrong place, and all of a sudden, your customer table joins the choir invisible. Now, you have to restore from a backup and waste a day cleaning up the mess, while trying to figure out who dropped the table. (OK, so if you have constraints on your table, you can’t actually drop it that easily. And yes, to be honest, most every DBA has dropped some object in a production database. That ends the honest part of this section.)
Preventing a DDL Action
With a simple DDL trigger, we can prevent the accidental drop of the table by trapping for the event and stopping it, or we can log who it was who dropped the table. In the first example, I will create a DDL trigger that will prevent any alterations to the schema without the user going in and manually disabling this trigger. It is a great safeguard to secure your objects from accidental change.
CREATE TRIGGER tr_server$allTableDDL_prevent --note, not a schema owned object
ON DATABASE
AFTER CREATE_TABLE, DROP_TABLE, ALTER_TABLE
AS
BEGIN
BEGIN TRY --note the following line will not wrap
RAISERROR ('The trigger: tr_server$allTableDDL_prevent must be disabled
before making any table modifications',16,1);
END TRY
--using the same old error handling
BEGIN CATCH
IF @@trancount > 0
ROLLBACK TRANSACTION;
THROW;
END CATCH
END;
Now, we try to create a simple table:
CREATE TABLE dbo.testDDLTrigger --dbo for simplicity of example
(
testDDLTriggerId int identity CONSTRAINT PKtest PRIMARY KEY
);
We get the following error message:
Msg 50000, Level 16, State 1, Procedure tr_server$allTableDDL_prevent, Line 7
The trigger: tr_server$allTableDDL_prevent must be disabled before making any table modifications
Game over; player dumb. We could also log the error message, so we can see whether this happens often and send an e-mail to the support DBA team members so they can discover what is going on.
![]() Note I wouldn’t put the name of the trigger in the error message if this were a production application that had any external exposure. Otherwise, the hackers get everything they need to disable the trigger right in the error message.
Note I wouldn’t put the name of the trigger in the error message if this were a production application that had any external exposure. Otherwise, the hackers get everything they need to disable the trigger right in the error message.
Recording a DDL Action
The second case, and just as useful, is to log DDL that is executed in a database so you can see what has been done. Although stopping DDL is something I usually do in a production database, logging changes is something I often do in a development environment—not that logging is never useful in a production environment; it just shouldn’t be as necessary. Tables in the production system should be very stable and changed only in an organized manner, not just randomly by a user or a DBA. Sometimes, I will use DDL logging to catch things that are routine such as index changes, so I will know to watch the new indexes especially closely for a while to see whether they are valuable.
Let’s look at creating a trigger similar to the one created in the preceding section. The difference is that this time we will have the trigger monitor DDL changes, not prevent them. First, let’s drop the trigger created previously:
--Note: Slight change in syntax to drop DDL trigger, requires clause indicating
--where the objects are
DROP TRIGGER tr_server$allTableDDL_prevent ON DATABASE;
Now, we create a table to contain the history of changes to our table:
--first create a table to log to
CREATE TABLE dbo.TableChangeLog
(
TableChangeLogId int NOT NULL identity
CONSTRAINT pkTableChangeLog PRIMARY KEY (TableChangeLogId),
ChangeTime datetime NOT NULL,
UserName sysname NOT NULL,
Ddl varchar(max) NOT NULL
);
--so we can get as much of the batch as possible
And we build another trigger to fire when a user creates, alters, or drops a table:
--not a schema bound object
CREATE TRIGGER tr_server$allTableDDL
ON DATABASE
AFTER CREATE_TABLE, DROP_TABLE, ALTER_TABLE
AS
BEGIN
SET NOCOUNT ON; --to avoid the rowcount messages
SET ROWCOUNT 0; --in case the client has modified the rowcount
BEGIN TRY
--we get our data from the EVENT_INSTANCE XML stream
INSERT INTO dbo.TableChangeLog (ChangeTime, userName, Ddl)
SELECT getdate(), user,
EVENTDATA().value('(/EVENT_INSTANCE/TSQLCommand/CommandText)[1]',
'nvarchar(max)'),
END TRY
--using the same old error handling
BEGIN CATCH
IF @@trancount > 0
ROLLBACK TRANSACTION;
THROW;
END CATCH
END;
Now, we run this to create the dbo.test table:
CREATE TABLE dbo.testDdlTrigger
(
dbo.testDdlTriggerId int
);
DROP TABLE dbo.testDdlTrigger;
We check out the TableChangeLog data to see what has changed:
SELECT * FROM dbo.TableChangeLog;
This shows us our commands:
| TableChangeLogId | ChangeTime | UserName | Ddl |
| ---------------- | ---------- | -------- | --- |
| 1 | 2012-02-18 23:16:51.753 | dbo | CREATE TABLE dbo.testDdlTrigger |
| ( | |||
| testDdlTriggerId int | |||
| ) | |||
| 2 | 2011-02-18 23:16:51.793 | dbo | DROP TABLE dbo.testDdlTrigger |
Now, we can see what users have been up to in the database without them having to do anything special to cause it to happen (or without them even knowing, either).
![]() Tip It’s usually best when building production-quality applications not to have users dropping and creating tables, even with a good set of schema structures with which to work. DDL triggers give us the power to see what kind of activity is occurring. You can also use DDL triggers to prevent unwanted DDL from occurring, as I demonstrated earlier in this section as well.
Tip It’s usually best when building production-quality applications not to have users dropping and creating tables, even with a good set of schema structures with which to work. DDL triggers give us the power to see what kind of activity is occurring. You can also use DDL triggers to prevent unwanted DDL from occurring, as I demonstrated earlier in this section as well.
The last line of defense is the “security camera” approach, particularly if you are using a version that doesn’t support database auditing. Just watch the activity on your server and make sure it looks legit. This is probably the only approach that has a chance to work with malicious (or stupid) programmers and DBAs. I include DBAs in here, because there’s often no way to avoid giving a few of them system-administration powers. Hence, they might have access to parts of the data that they should never go to, unless there’s a problem. They might stumble into data they shouldn’t see, though as we discussed previously, we can use encryption to obfuscate this data. Unfortunately, even encryption won’t necessarily stop a user with sys_admin rights.
Using Profiler, we can set up filters to look at certain events that we know shouldn’t be happening, even when a DBA has access. For example, think back to our encryption example, where we stored the encryption password in the table. We could formulate a Profiler task to log only usage of this object. This log might be pretty small, especially if we filter out users who should be regularly accessing encrypted data. None of this is perfect, because any users who have admin rights to the Windows server and the database server could hide their activity with enough effort.
I won’t demonstrate building a server side trace, but you can use sp_trace_create and sp_trace_setevent to create a trace to watch for certain actions. Of course, profiler is way more than a security tool, and it’s a tool you really need to learn to be a great SQL programmer. For a deep look at profiler, check out my good friend Brad McGehee’s book Mastering SQL Server Profiler, published by Simple-Talk.
Best Practices
Security is always one of the most important tasks to consider when implementing a system. Storing data could be worse than not storing it, if it can be used for improper purposes.
- Secure the server first: Although this topic is outside the scope of this book, be certain that the server is secure. If a user can get access to your backup files and take them home, all the database security in the world won’t help.
- Grant rights to roles rather than users: People come and people go, but the roles that they fulfill will be usually be around for a long time. By defining common roles, you can make adding a new user easy (possibly to replace another user). Just make the users a member of the same role, rather than adding rights directly to the user.
- Use schemas to simplify security: Because you can grant rights at a schema level, you can grant rights to SELECT, INSERT, UPDATE, DELETE, and even EXECUTE everything within a schema. Even new objects that are added to the schema after the rights are granted are usable by the grantees.
- Consider security using stored procedures: Using stored procedures as the only way for a user to get access to the data presents the user with a nice interface to the data. If procedures are well named, you can also easily apply security to match up with the interfaces that use them.
- Don’t overuse the impersonation features: EXECUTE AS is a blessing, and it has opened up a world of possibilities. It does, however, have a darker side because it can open up too much of a security hole without careful consideration of its use. Add a database with TRUSTWORTHY access set to on, and a procedure can be written to do anything on the server, which could be exploited as a big security hole by a devious programmer.
- Encrypt sensitive data: SQL Server has several means of encrypting data, and there are other methods available to do it off of the SQL Server box. Use it as much as necessary, but make sure not to store everything needed to decrypt the data with the encrypted data, in case someone gets hold of the data. Use transparent data encryption to secure important files from exploit if they fall into the wrong hands.
- Use Profiler and DDL triggers to monitor system activity: Sometimes, it’s advantageous to keep an eye on user activity, and these tools give you the ability to do this in an easy manner.
- Segregate security between environments: Security in development environments will be very different. Take care not to end up with developers ending up with the same rights to production data as they have in development, because you use the same security script to create your development servers as you do in production. Developers generally should be given very few rights to production data to limit access to sensitive data.
Summary
Security is a large topic, and understanding all the implications is way more than we covered in this chapter. I discussed some of the ways to secure your data inside a single SQL Server database. This isn’t an easy subject, but it’s far easier than dealing with securing the SQL Server. Luckily, usually in the database we’re looking to protect ourselves from ordinary users, though doing a good job of encryption is a good barricade to keep most thieves at bay.
To provide this security, we discussed a range of topics for which we need to design security into our database usage:
- The basics of permissions-based security using SQL Server DDL statements and how this security works on SQL Server objects. This included using principals of several types: users, roles, and application roles, and then applying different security criteria to the base tables and columns in a database.
- Using coded objects to encapsulate statements that can limit the queries that users can execute. We discussed using several types of objects:
- Stored procedures and scalar functions: Giving advanced usages to users without letting them know how they’re doing it. Included in this section was how security works across database lines and server lines.
- Views and table-valued functions: Used to break tables up in a simple manner, either row-or column-wise. The goal is to make security seamless, such that the users feel that only this database has the data to which they have rights.
- We looked at obfuscating data to make it too darn hard to view the data unless you specifically try to, generally by using encryption to make the data unreadable without a key.
- Next, we discussed watching users in a manner that that’s analogous to how you might with a store security camera that watches all of the customers, looking for one to do something wrong. A few techniques we discussed were
- Using an audit trail: Giving the user an audit of what goes on in given rows and columns in the database. This is the typical method when it comes to most data, because it’s easy to give the users access to the lists of what has changed (and why, if the application asks for a reason with certain types of changes).
- DDL triggers: Auditing users who have rights to create new objects in your databases or server to make sure they aren’t doing anything out of the ordinary.
- Logging with a profiler: The most silent of devices, it can be used to capture all moves made on the server.
Securing your servers against most common threats is that ordinary users won’t go to great lengths to hack your database because getting caught can cause loss of employment. Hence, just setting up basic security is generally good enough for all but the really sensitive/valuable data (such as a database of credit card numbers linked with names and addresses of the card holders … not a good idea).
Of course, make sure that you understand that there is a lot more to security than just security on the database. The biggest task is limiting the people/processes that can even connect to the database to the correct set of users, and that means working with the administrators of your network, web sites, and applications to make sure to limit the threat surface as much as possible.