
Defining 3D Meshes
So far, you've only used a couple of triangles as placeholders for objects in your worlds. What about more complex objects?
We already talked about how the GPU is just a big, mean triangle-rendering machine. All the 3D objects, therefore, have to be composed of triangles as well. In the previous chapters, two triangles were used to represent a flat rectangle. The principles used there, like vertex positioning, colors, texturing, and vertex indexing, are exactly the same in 3D. The triangles are just not limited to lie in the x-y plane anymore; you can freely specify each vertex's position in 3D space.
How do you go about creating such soups of triangles that make up a 3D object? You can do that programmatically, as you've done for the rectangles of your sprites. You could also use software that lets you sculpture 3D objects in a WYSIWYG fashion. There are various paradigms used in those applications, ranging from manipulating separate triangles to just specifying a few parameters that output a so-called triangle mesh (a fancy name for a list of triangles that you'll adopt).
Prominent software packages like Blender, 3ds Max, ZBrush, and Wings 3D provide users with tons of functionality for creating 3D objects. Some of them are free (such as Blender and Wings 3D) and some are commercial (for example, 3ds Max and ZBrush). It's not within the scope of this book to teach you how to use one of these programs, so we'll do something else instead. All these programs can save the 3D models to different file formats. The Web is also full of free-to-use 3D models. In the next chapter, you'll write a loader for one of the simplest and most common file formats in use.
In this chapter, you'll do everything programmatically. Let's create one of the simplest 3D objects possible: a cube.
A Cube: Hello World in 3D
In the last couple chapters, you've made heavy use of the concept of model space. It's the space in which to define models; it's completely unrelated to the world space. You must use the convention of constructing all objects around the model space's origin so that an object's center coincides with that origin. Such a model can then be reused for rendering multiple objects at different locations and with different orientations in world space, just as in the massive BobTest example in Chapter 7.
The first thing you need to figure out for your cube is its corner points. Figure 10–11 shows a cube with a side length of 1 unit (for example, 1 meter). We also exploded the cube a little so that you can see the separate sides made up of two triangles each. In reality, the sides would all meet at the edges and corner points, of course.
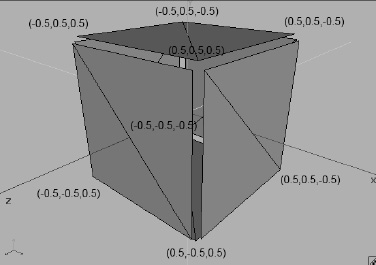
Figure 10–11. A cube and its corner points.
A cube has six sides, and each side is made up of two triangles. The two triangles of each side share two vertices. For the front side of the cube, the vertices at (−0.5,0.5,0.5) and (0.5,−0.5,0.5) are shared. You only need four vertices per side; for a complete cube, that's 6 × 4 = 24 vertices in total. However, you do need to specify 36 indices, not just 24. That's because there are 6 × 2 triangles, each using 3 out of your 24 vertices. You can create a mesh for this cube using vertex indexing, as follows:
float[] vertices = { -0.5f, -0.5f,  0.5f,

                      0.5f, -0.5f,  0.5f,

                      0.5f,  0.5f,  0.5f,

                     -0.5f,  0.5f,  0.5f,


                      0.5f, -0.5f,  0.5f,

                      0.5f, -0.5f, -0.5f,

                      0.5f,  0.5f, -0.5f,

                      0.5f,  0.5f,  0.5f,


                      0.5f, -0.5f, -0.5f,

                     -0.5f, -0.5f, -0.5f,

                     -0.5f,  0.5f, -0.5f,

                      0.5f,  0.5f, -0.5f,


                     -0.5f, -0.5f, -0.5f,

                     -0.5f, -0.5f,  0.5f,

                     -0.5f,  0.5f,  0.5f,

                     -0.5f,  0.5f, -0.5f,


                     -0.5f,  0.5f,  0.5f,

                      0.5f,  0.5f,  0.5f,

                      0.5f,  0.5f, -0.5f,

                     -0.5f,  0.5f, -0.5f,


                     -0.5f, -0.5f,  0.5f,

                      0.5f, -0.5f,  0.5f,

                      0.5f, -0.5f, -0.5f,

                     -0.5f, -0.5f, -0.5f

};


short[] indices = { 0, 1, 3, 1, 2, 3,

                    4, 5, 7, 5, 6, 7,

                    8, 9, 11, 9, 10, 11,

                    12, 13, 15, 13, 14, 15,

                    16, 17, 19, 17, 18, 19,

                    20, 21, 23, 21, 22, 23,

};


Vertices3 cube = new Vertices3(glGraphics, 24, 36, false, false);

cube.setVertices(vertices, 0, vertices.length);

cube.setIndices(indices, 0, indices.length);
You are only specifying vertex positions in this code. Start with the front side and its bottom-left vertex at (−0.5,−0.5,0.5). Then specify the next three vertices of that side, going counterclockwise. The next side is the right side of the cube, followed by the back side, the left side, the top side, and the bottom side—all following the same pattern. Compare the vertex definitions with Figure 10–10.
Next define the indices. There are a total of 36 indices—each line in the preceding code defines two triangles made up of three vertices each. The indices (0, 1, 3, 1, 2, 3) define the front side of the cube, the next three indices define the left side, and so on. Compare these indices with the vertices given in the preceding code, as well as with Figure 10–10 again.
Once all vertices and indices are defined, store them in a Vertices3 instance for rendering, which you do in the last couple of lines of this snippet.
What about texture coordinates? Easy, just add them to the vertex definitions. Let's say there is a 128×128 texture containing the image of one side of a crate. We want each side of the cube to be textured with this image. Figure 10–12 shows how you can do this.
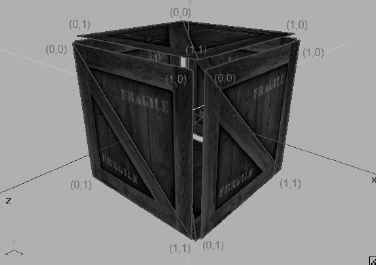
Figure 10–12. Texture coordinates for each of the vertices of the front, left, and top sides. (This is the same for the other sides as well.)
Adding texture coordinates to the front side of the cube would then look like the following in code:
float[] vertices = { -0.5f, -0.5f,  0.5f, 0, 1,

                      0.5f, -0.5f,  0.5f, 1, 1,

                      0.5f,  0.5f,  0.5f, 1, 0,

                     -0.5f,  0.5f,  0.5f, 0, 0,

                     // rest is analogous
Of course, you also need to tell the Vertices3 instance that it contains texture coordinates as well:
Vertices3 cube = new Vertices3(glGraphics, 24, 36, false, true);
All that's left is loading the texture itself, enabling texture mapping with glEnable(), and binding the texture with Texture.bind(). Let's write an example.
An Example
You want to create a cube mesh, as shown in the preceding snippets, with the crate texture applied. Since you model the cube in model space around the origin, you have to use glTranslatef() to move it into world space, much like you did with Bob's model in the BobTest example. You also want your cube to spin around the y-axis, which you can achieve by using glRotatef(), again like in the BobTest example. Listing 10–6 shows the complete code of the CubeScreen class contained in a CubeTest class.
Listing 10–6. Excerpt from CubeTest.java: Rendering a Texture Cube.
class CubeScreen extends GLScreen {

    Vertices3 cube;

    Texture texture;

    float angle = 0;


    public CubeScreen(Game game) {

        super(game);

        cube = createCube();

        texture = new Texture(glGame, "crate.png");

    }


    private Vertices3 createCube() {

        float[] vertices = { -0.5f, -0.5f,  0.5f, 0, 1,

                              0.5f, -0.5f,  0.5f, 1, 1,

                              0.5f,  0.5f,  0.5f, 1, 0,

                             -0.5f,  0.5f,  0.5f, 0, 0,


                              0.5f, -0.5f,  0.5f, 0, 1,

                              0.5f, -0.5f, -0.5f, 1, 1,

                              0.5f,  0.5f, -0.5f, 1, 0,

                              0.5f,  0.5f,  0.5f, 0, 0,


                              0.5f, -0.5f, -0.5f, 0, 1,

                             -0.5f, -0.5f, -0.5f, 1, 1,

                             -0.5f,  0.5f, -0.5f, 1, 0,

                              0.5f,  0.5f, -0.5f, 0, 0,


                             -0.5f, -0.5f, -0.5f, 0, 1,

                             -0.5f, -0.5f,  0.5f, 1, 1,

                             -0.5f,  0.5f,  0.5f, 1, 0,

                             -0.5f,  0.5f, -0.5f, 0, 0,


                             -0.5f,  0.5f,  0.5f, 0, 1,

                              0.5f,  0.5f,  0.5f, 1, 1,

                              0.5f,  0.5f, -0.5f, 1, 0,

                             -0.5f,  0.5f, -0.5f, 0, 0,


                             -0.5f, -0.5f,  0.5f, 0, 1,

                              0.5f, -0.5f,  0.5f, 1, 1,

                              0.5f, -0.5f, -0.5f, 1, 0,

                             -0.5f, -0.5f, -0.5f, 0, 0

        };


        short[] indices = { 0, 1, 3, 1, 2, 3,

                            4, 5, 7, 5, 6, 7,

                            8, 9, 11, 9, 10, 11,

                            12, 13, 15, 13, 14, 15,

                            16, 17, 19, 17, 18, 19,

                            20, 21, 23, 21, 22, 23,

        };


        Vertices3 cube = new Vertices3(glGraphics, 24, 36, false, true);
        cube.setVertices(vertices, 0, vertices.length);

        cube.setIndices(indices, 0, indices.length);

        return cube;

    }


    @Override

    public void resume() {

        texture.reload();

    }


    @Override

    public void update(float deltaTime) {

        angle += 45 * deltaTime;

    }


    @Override

    public void present(float deltaTime) {

        GL10 gl = glGraphics.getGL();

        gl.glViewport(0, 0, glGraphics.getWidth(), glGraphics.getHeight());

        gl.glClear(GL10.GL_COLOR_BUFFER_BIT | GL10.GL_DEPTH_BUFFER_BIT);

        gl.glMatrixMode(GL10.GL_PROJECTION);

        gl.glLoadIdentity();

        GLU.gluPerspective(gl, 67,

                           glGraphics.getWidth() / (float) glGraphics.getHeight(),

                           0.1f, 10.0f);

        gl.glMatrixMode(GL10.GL_MODELVIEW);

        gl.glLoadIdentity();


        gl.glEnable(GL10.GL_DEPTH_TEST);

        gl.glEnable(GL10.GL_TEXTURE_2D);

        texture.bind();

        cube.bind();

        gl.glTranslatef(0,0,-3);

        gl.glRotatef(angle, 0, 1, 0);

        cube.draw(GL10.GL_TRIANGLES, 0, 36);

        cube.unbind();

        gl.glDisable(GL10.GL_TEXTURE_2D);

        gl.glDisable(GL10.GL_DEPTH_TEST);

    }


    @Override

    public void pause() {

    }


    @Override

    public void dispose() {

    }

}
There is a field to store the cube's mesh, a Texture instance, and a float to in which to store the current rotation angle. In the constructor, create the cube mesh and load the texture from an asset file called crate.png, a 128×128-pixel image of one side of a crate.
The cube creation code is located in the createCube() method. It just sets up the vertices and indices, and creates a Vertices3 instance from them. Each vertex has a 3D position and texture coordinates.
The resume() method just tells the texture to reload it. Remember, textures must be reloaded after an OpenGL ES context loss.
The update() method just increases the rotation angle by which you'll rotate the cube around the y-axis.
The present() method first sets the viewport and clears the framebuffer and depthbuffer. Next set up a perspective projection and load an identity matrix to the model-view matrix of OpenGL ES. Enable depth testing and texturing, and bind the texture as well as the cube mesh. Then use glTranslatef() to move the cube to the position (0,0,−3) in world space. With glRotatef(),rotate the cube in model space around the y-axis. Remember that the order in which these transformations get applied to the mesh is reversed. The cube will first be rotated (in model space), and then the rotated version will be positioned in world space. Finally, draw the cube, unbind the mesh, and disable depth-testing and texturing. You don't need to disable those states; that is put in in case you are going to render 2D elements on top of the 3D scene. Figure 10–13 shows the output of the first real 3D program.
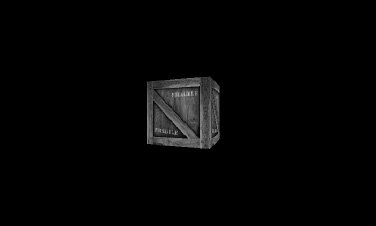
Figure 10–13. A spinning texture cube in 3D.