
![]()
Integrating Location-Based Features
We have been looking at many new features and capabilities in SharePoint 2013 related to building responsive web sites. With the rapid adoption of smart phones and tablets, we have the opportunity to use GPS capabilities in mobile devices to support location-based features in our web sites. Knowing the user’s location helps to boost the quality of the site. In this chapter, we demonstrate how to use the new geolocation metadata field in SharePoint 2013 and the HTML5 Geolocation API to integrate maps and location-based features into a site. First, we look at the basics of the HTML5 Geolocation API. Then we demonstrate the new geolocation features in SharePoint 2013. Finally, we explore how we can extend the new geolocation features in SharePoint 2013 and walk through an example by building our own SharePoint-hosted app to integrate SharePoint geolocation, HTML5 geolocation, and Bing Maps features into the Specter Group community site.
Our Scenario
In the public Specter Group site, we want to use geolocation features. Specter’s objective is to enable existing property owners to engage with other community members. Specter Group wants to display geolocation information for each community site. Based on our business requirements, each community site’s home page should display a map with a pin showing the location of this community on the map, as shown in Figure 12-1. The map displays the actual location of the community and the properties with pins. When a user clicks on the pin, a bubble displays the property owner’s family name. When a user adds a property to the community, the user can either let the site automatically detect the geolocation data for the user or the user can enter the address of the property before the property is added to the community list.
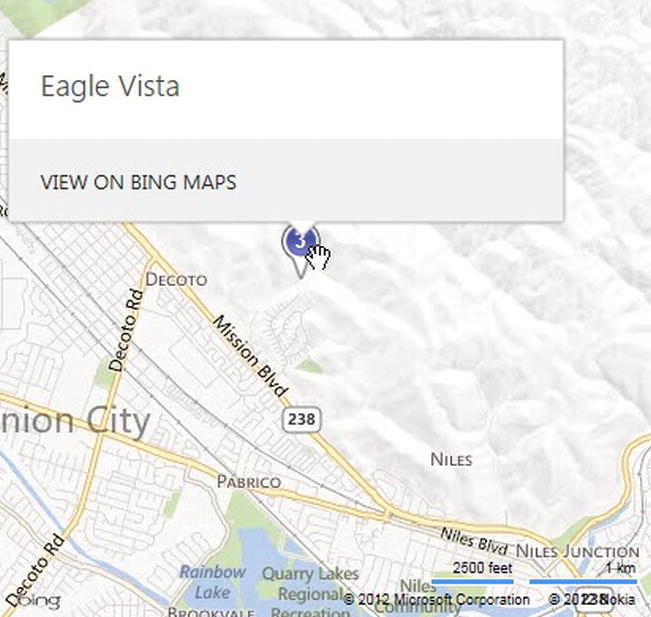
Figure 12-1. Example of map control on community site home page based on Specter Group’s business requirements
Leveraging user location to deliver enhanced experience is an important aspect of modern web development. To ensure a site gives users an adaptive experience, often we want to utilize the user’s location information. Today, geolocation is one of the best supported features across mobile browsers as well as desktop browsers. In the past, to know a user’s location, they had to manually enter their location or click on a map. Today, with the HTML5 Geolocation API, we can locate our users to show more relevant content based on their location and we can reduce manual data entry related to geolocation. There are a few ways a mobile browser or a desktop browser can detect its location. If the device is GPS-enabled, it can use the GPS on the mobile device to accurately determine the location. Another method is to use assistive GPS that uses triangulation among mobile phone towers to determine location. If the device is using WiFi from hotspots, it can use the hotspots to determine the location. If it is not a mobile device, such as a desktop browser, it can obtain location information using known IP address ranges. As web developers, we need to be aware of all the different methods a browser uses to detect location, as the solution might require a certain level of accuracy of the location returned.
![]() Note When it comes to sharing physical location of the user, privacy should be considered. Based on the Geolocation API, user agents must not send location information to web sites without the express permission of the user. For geolocation detection to work, the user must agree to share location information with the site.
Note When it comes to sharing physical location of the user, privacy should be considered. Based on the Geolocation API, user agents must not send location information to web sites without the express permission of the user. For geolocation detection to work, the user must agree to share location information with the site.
HTML5 Geolocation
To incorporate geolocation into our site, let’s first understand the HTML5 Geolocation API. The HTML5 Geolocation API is used to determine the geographical position of a user. Then we see how to display the result in a map using both Google Maps and Bing Maps service.
![]() Note For more information on how to use the HTML5 Geolocation API, refer to http://sprwd.com/z6kwj8.
Note For more information on how to use the HTML5 Geolocation API, refer to http://sprwd.com/z6kwj8.
We start with the HTML5 Navigator object and its attribute, geolocation object. We also have available to us the getCurrentPosition() JavaScript function that gets the user location. It takes two parameters in the form of callbacks, one for a successful location query and the other for a failed location query. The successful callback takes a Position object as a parameter. The failed callback takes the Error object.
Refer to Listing 12-1 for the following walkthrough. First, let’s check if geolocation is supported by the browser. Internet Explorer 9+, Firefox 3.5+, Chrome 5+, Safari 5+, Opera 10.6+, iPhone 3+, Android 2+, and Windows Phone 7.5+ all support geolocation features. It is important to consider that even with all the supported browsers, location information might still not be available because the user might be running an older browser or have devices that do not support geolocation, or the user might have disabled share location. In such cases, we should always provide an alternative method for the users to manually enter their location in the failed location query callback function.
Listing 12-1. Basic getCurrentPosition() Example to Obtain Your Current Coordinates
<html>
<body>
    <p id="demo">Click the button to get your coordinates:</p>
    <button onclick="getUserLocation()">Get</button>
    <script>
        var x=document.getElementById("demo");
        function getUserLocation(){
            if (navigator.geolocation) {
                navigator.geolocation.getCurrentPosition(showUserPosition, showError);
            }
            else{x.innerHTML="Geolocation is not supported by this browser.";}
        }
        function showUserPosition(position) {
            x.innerHTML="Latitude: " + position.coords.latitude +
                                   "<br>Longitude: " + position.coords.longitude;
        }
        function showError(error) {
            switch(error.code)  {
                case error.PERMISSION_DENIED:
                    x.innerHTML="User denied the request for Geolocation."
                    break;
                case error.POSITION_UNAVAILABLE:
                    x.innerHTML="Location information is unavailable."
                    break;
                case error.TIMEOUT:
                    x.innerHTML="The request to get user location timed out."
                    break;
                case error.UNKNOWN_ERROR:
                    x.innerHTML="An unknown error occurred."
                    break;
            }
        }
    </script>
</body>
</html
After checking that geolocation is supported, call the getCurrentPosition() method. If it is not supported, display a message to the user or allow the user to manually enter the information. After the getCurrentPosition function executes, if it queried the location successfully, it executes the successful callback function, showUserPosition(). The showUserPosition() function takes the Position object as its parameter, which contains the coordinates to be displayed. If the location query failed, it executes the showError function, and the code below displays an error message to the user based on the error code. If instead of displaying an error message, we want to allow users to enter an address, we can add the code for resolving an address into geolocation coordinates here as well. For information on how to implement this, refer to the section “Resolving Geolocation From an Address” later in this chapter.
After the user loads this page, the page will look like Figure 12-2.

Figure 12-2. HTML5 Geolocation API example site
As previously mentioned, due to user privacy, the geolocation position is not available until the user approves sharing location information with the site. As soon as the user clicks Get, the browser prompts the user to request permission to track the user’s physical location (see Figure 12-3).

Figure 12-3. The browser will request user permission to share location data with the site due to user privacy
After the user clicks Allow once, the result coordinates are displayed, as shown in Figure 12-4.
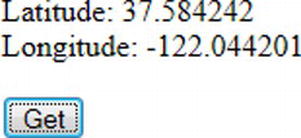
Figure 12-4. HTML5 Geolocation API example returns user's latitude and longitude values
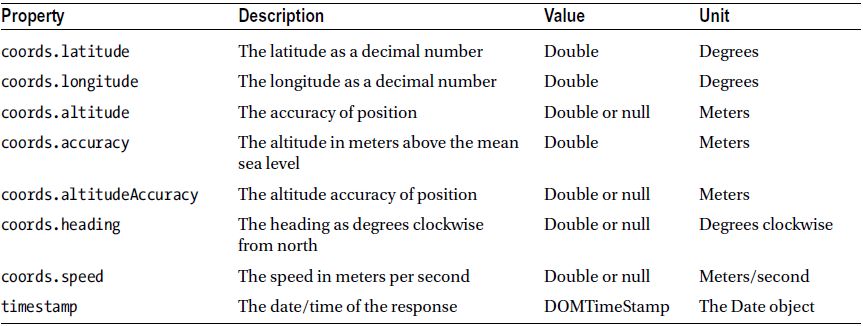
From the code in Listing 12-1, we can get the latitude and longitude values from the position object. There are additional properties we can use from the position object that can help the site. For instance, we can get the value of the accuracy property to evaluate if the location returned is acceptable. Using the speed property, we can determine if the user is moving. If the user is moving, we can use the watchPosition() function, which returns the current position of the user and continues to return updated positions as the user is moving. To stop the watchPosition() function , we can use the clearWatch() function. Refer to Table 12-1 for a list of properties returned by the HTML5 Geolocation API.
Table 12-1. HTML5 Geolocation API Properties and Functions
Displaying Results on a Map
With the location of the user available, we now have the option to display the location in a map. To display the result in a map, we need to use a map service that can use latitude and longitude values.
Using the Google Map service and the Google static maps API, we can update the HTML and JavaScript from Listing 12-1, providing an additional <div> container before the <script> block and replacing the showUserPosition() JavaScript function (see Listing 12-2).
Listing 12-2. Show a Map Using Coordinates Returned from HTML5 API and Google Maps API
<div id="mapholder"></div>
<script>
    function showUserPosition(position) {
        var latlon=position.coords.latitude+","+position.coords.longitude;
        var img_url="http://maps.googleapis.com/maps/api/staticmap?center="
            +latlon+"&zoom=14&size=400x300&sensor=false";
        document.getElementById("mapholder").innerHTML="<img src='"+img_url+"'>";
    }
</script>
After the page is loaded, the user sees a map like the one in Figure 12-5.
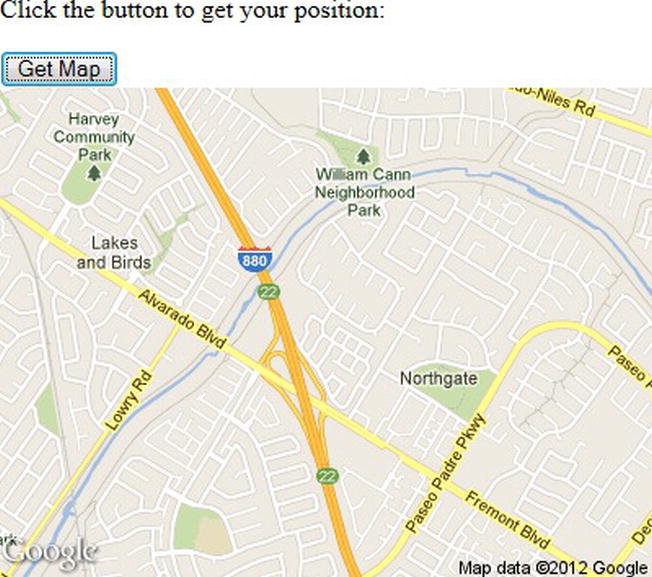
Figure 12-5. HTML5 Geolocation API example uses Google Maps service to display an area map centered on the current geolocation position returned from the browser
If we want to use Bing Maps, we can leverage the Bing Maps service and Bing Maps Interactive Software Development Kit (SDK) for AJAX version 6.3, as seen in Listing 12-3.
Listing 12-3. Show a Map Using Coordinates and the Bing Maps Service
<div id='myMap' style="position:relative; width:400px; height:400px;"></div>
<script type="text/javascript"
            src="http://ecn.dev.virtualearth.net/mapcontrol/mapcontrol.ashx?v=6.2">
</script>
<script>
    var map = null;
    function showUserPosition (position) {
        map = new VEMap('myMap'),
        map.LoadMap(new VELatLong(position.coords.latitude, position.coords.longitude),
                                10 ,'h' ,false);
    }
</script>
![]() Note To learn more about how to use Bing Maps Interactive SDK for AJAX version 6.3, refer to http://sprwd.com/dfsnvmc.
Note To learn more about how to use Bing Maps Interactive SDK for AJAX version 6.3, refer to http://sprwd.com/dfsnvmc.
After the page is loaded, the user sees something like Figure 12-6.
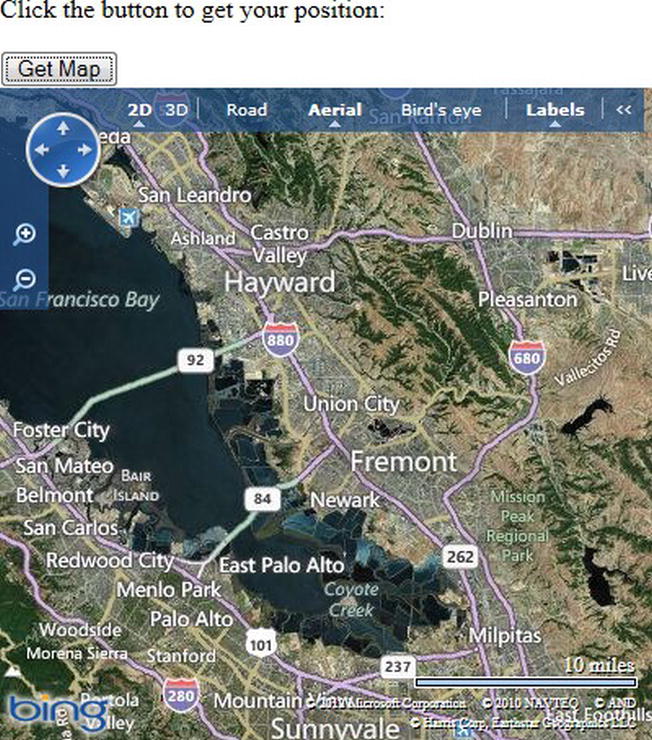
Figure 12-6. HTML5 Geolocation API example uses Bing Maps service to display an area map centered on the current geolocation position returned from the browser
Showing a Position Marker on the Map
Now that we have the map centered on our current location, we need to display a position marker on the map to show each location. In the following sections, we demonstrate two methods for showing a position marker by using the Google Maps JavaScript API and then the Bing Maps AJAX control 7.0 Interactive SDK.
Using Google Maps JavaScript API
To use Google Maps in the solution, we need to reference the Google Maps JavaScript API. First, we need to include the Google JavaScript API in the script header. Then, we need to create a Google Maps object and a Google Maps marker object for each position on the map, as shown in Listing 12-4.
Listing 12-4. Show a Pin on a Google Map Using Coordinates and Google Maps API (Based on Listing 12-2)
<div id="mapholder"></div>
<script src="http://maps.google.com/maps/api/js?sensor=false"></script>
<script>
    function showUserPosition(position) {
        lat=position.coords.latitude;
        lon=position.coords.longitude;
        latlon=new google.maps.LatLng(lat, lon)
        mapholder=document.getElementById('mapholder')
        mapholder.style.height='350px';
        mapholder.style.width='500px';

        var myOptions={
            center:latlon,zoom:14,
            mapTypeId:google.maps.MapTypeId.ROADMAP,
            mapTypeControl:false,
            navigationControlOptions:{style:google.maps.NavigationControlStyle.SMALL}
        };
        var map=new google.maps.Map(document.getElementById("mapholder"),myOptions);
        var marker=new google.maps.Marker({position:latlon,map:map,title:"Your location!"});
    }
After the page is loaded, the user sees a map like the one in Figure 12-7.
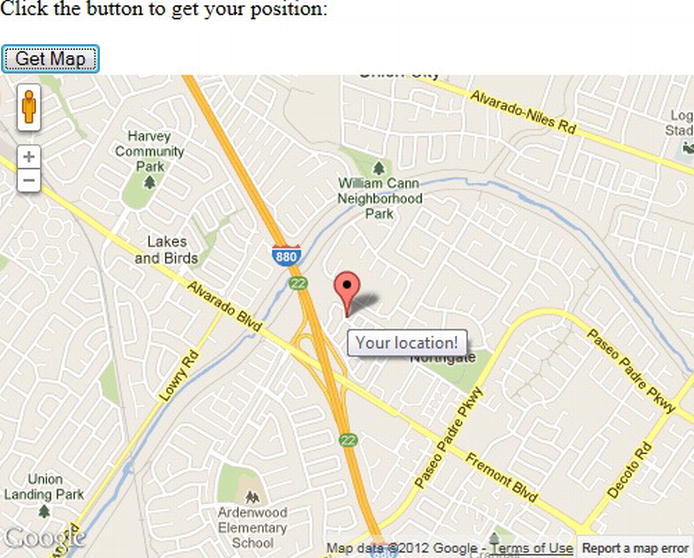
Figure 12-7. HTML5 Geolocation API example uses Google Maps service to display a position marker on a map for the current geolocation position returned from the browser
Using Bing Maps AJAX control 7.0 Interactive SDK
To use the Bing Maps service, to add pins to the map, we need to use Bing Maps AJAX control 7.0 Interactive SDK, which requires us to first create a Bing Maps key. Creating a Bing Maps account is quick and easy. Visit www.bingmapsportal.com to set up a Bing Maps key and to learn more about usage limits and options. Once logged in to www.bingmapsportal.com with a Microsoft account, click Create or view keys on the left menu (see Figure 12-8).
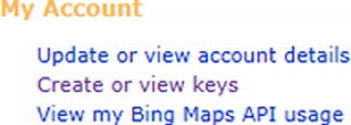
Figure 12-8. Create a Bing Maps key to use the Bing Maps service and API
We can now create a Bing Maps key for our site, in our example the Specter Group public web site. During the development cycle, we should create a trial key. A trial key is used for evaluation during a 90-day evaluation period and must not exceed 10,000 transactions of any type in any 30-day period. Once the site goes into production, depending on the size of the application, consider a basic key or an enterprise key. For the purpose of demonstration, we create a trial key (see Figure 12-9).
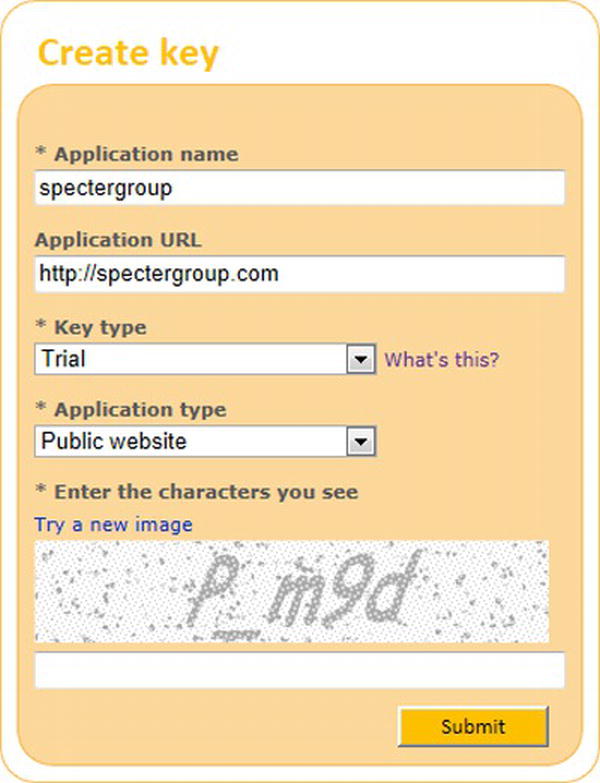
Figure 12-9. Create a trial Bing Maps key for Specter Group sites
Once the key is created, it is added to the list of keys and applications in the Bing Maps portal. We can then use the Bing Maps service and the Bing Maps AJAX control 7.0 Interactive SDK to create a map and add the user’s locations as pins to the map (see Listing 12-5).
![]() Note To use the Bing Maps AJAX control 7.0 Interactive SDK and the Bing Maps service, we need to add the new Bing Maps key into our code.
Note To use the Bing Maps AJAX control 7.0 Interactive SDK and the Bing Maps service, we need to add the new Bing Maps key into our code.
Listing 12-5. Show a Pushpin on a Bing Map Using Coordinates and Bing Maps Service (Based on Listing 12-3)
<div id='myMap' style="position:relative; width:400px; height:400px;"></div>
<script type="text/javascript"
            src="http://ecn.dev.virtualearth.net/mapcontrol/mapcontrol.ashx?v=7.0">
</script>
<script>
    var map = null;
    function showUserPosition(position) {
        var lat = position.coords.latitude;
        var long = position.coords.longitude;
        map = new Microsoft.Maps.Map(document.getElementById('myMap'),
            {credentials: 'Your Bing Maps key'});
        map.setView({ zoom: 10, center: new Microsoft.Maps.Location(lat, long) });
        var pushpin= new Microsoft.Maps.Pushpin(map.getCenter(), null);
        map.entities.push(pushpin);
        pushpin.setLocation(new Microsoft.Maps.Location(lat, long));
    }
</script>
After the page is loaded, the user sees a map similar to the one in Figure 12-10.
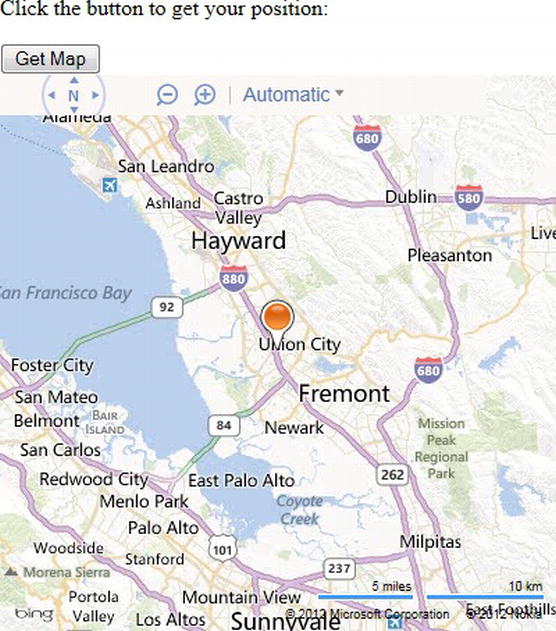
Figure 12-10. HTML5 Geolocation API example uses Bing Maps service to display a position marker on a map for the current geolocation position returned from the browser
Using SharePoint 2013 Geolocation Features
We just looked at the HTML5 Geolocation API and how to use it for a general web site. Now let’s look at what SharePoint has to offer by again visiting our scenario. For the public Specter Group site, we need to consider how to build the geolocation solution with SharePoint 2013. In the past with SharePoint 2010, we had to do a lot of work to build a geolocation solution using a combination of SharePoint lists, Silverlight 4, the SharePoint Silverlight client object model, and Bing Maps SDK. In SharePoint 2013, we can now build a geolocation solution with little effort and without outside objects such as Silverlight.
SharePoint 2013 introduces a new geolocation field type that enables us to create SharePoint lists with location information. With a column of type Geolocation, we can save location information as a paired value of latitude and longitude coordinates in decimal degrees (see Figure 12-11).
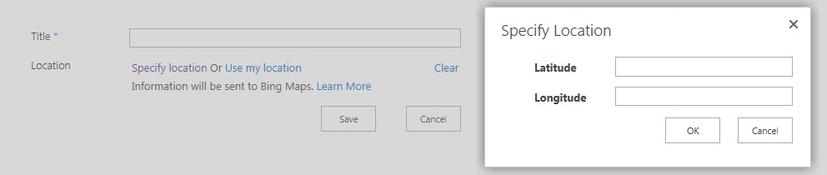
Figure 12-11. SharePoint 2013 introduces a geolocation-typed column that allows us to keep track of geolocation data in a SharePoint list. The column expects latitude and longitude decimal values
When a SharePoint list contains a geolocation-typed column, SharePoint automatically provides us with a map view that displays all the list items as pins on a Bing Maps Ajax v7.0 control as well as a list of the list items in the left pane. With both the Geolocation field and the Map view, we can now provide users with a map experience using the data we have stored in SharePoint (see Figure 12-12).
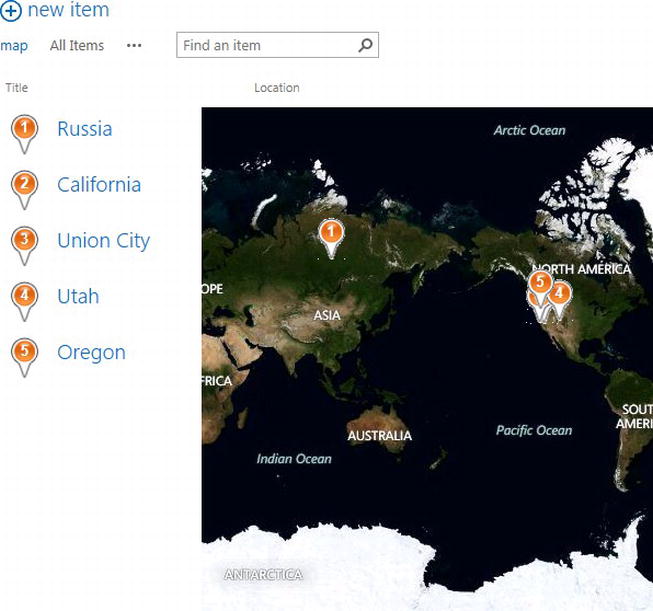
Figure 12-12. SharePoint 2013 lists containing a geolocation column can provide a map view to view the list data in a map experience
Enabling SharePoint Bing Maps Integration With PowerShell
Before we can use any of the new geolocation features in SharePoint 2013, we need to configure a Bing Maps key for the SharePoint environment. If a Bing Maps key is not available for the SharePoint environment, follow the creation process described earlier in this chapter. After a key has been obtained, we can set the Bing Maps key at the SharePoint farm level or at a web level. If a key is not set at the web level or at the farm level, the user sees an error similar to the one shown in Figure 12-13.
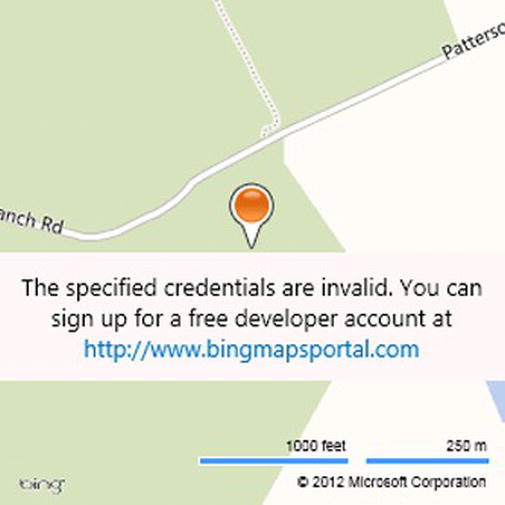
Figure 12-13. A warning will appear on a map before Bing Maps key is set at the SharePoint 2013 web or farm level
To set the Bing Maps key at the farm level, log on to the SharePoint farm with administrative privileges. Register the Bing Maps key for the SharePoint farm using SharePoint 2013 Management Shell, as seen in Listing 12-6.
Listing 12-6. PowerShell to Enable SharePoint Bing Maps Integration for the Whole Farm
Set-SPBingMapsKey -BingKey "Your Bing Maps key"
We can set the Bing Maps key at the web level programmatically using either the SharePoint .NET client object model or the SharePoint JavaScript client object model. We will go through the steps for setting the Bing Maps key programmatically in the section “Setting Bing Maps Key Using JavaScript Client Object Model” later in this chapter. It is important to note that the Bing Maps key set at the web level takes precedence over the Bing Maps key set at the farm level.
Adding a Geolocation Site Column Using PowerShell
Once we have enabled Bing Maps and SharePoint integration, we need to create a geolocation site column to be added to our Master Community content type or to be added to a custom list.
![]() Note From the SharePoint user interface, we cannot create a new column based on the new geolocation type. It can be done with PowerShell or programmatically. We demonstrate how to do so programmatically using client-side object model in the section “Creating a Custom List Instance With a Geolocation Column” later in this chapter.
Note From the SharePoint user interface, we cannot create a new column based on the new geolocation type. It can be done with PowerShell or programmatically. We demonstrate how to do so programmatically using client-side object model in the section “Creating a Custom List Instance With a Geolocation Column” later in this chapter.
- Using SharePoint 2013 Management Shell, create a geolocation site column with PowerShell. The PowerShell script in Listing 12-7 will create a geolocation site column for one of the Specter Group community sites.
Listing 12-7. Example of PowerShell Script to Create a Geolocation Site Column for a Site Collection
$weburl = "http://spectergroup.com/sites/EagleVista"
$fieldXml = "<Field Type ='Geolocation' DisplayName='Location' />"
$web = get-spweb $weburl
$field = $web.Fields.AddFieldAsXml($fieldXml)
$web.Update()
Note For demonstration purposes, we are using PowerShell to create a site column for a site collection. For production use, to ensure this type of column is available throughout SharePoint, we recommend creating this type of column within the content type hub so that it can be reused without going through PowerShell every time. For more information on how to set up Content Type hubs, refer to Chapter 6.
 - Navigate to the site column collection of the community site. We should see the new Geolocation column under Custom columns (see Figure 12-14). We can also add this column to the Master Community content type.

Figure 12-14. PowerShell created a geolocation-type site column
- With the new geolocation site column, we can now create a list for all the properties in a community. Create a new custom list called Houses.
- Add two columns, one text column called Family and one geolocation column called Location. Navigate to List Settings.
- To add a geolocation column to the custom list, click Add from existing site columns, then select Custom Columns from the drop-down list.
- From the Available site columns, select Location and click Add to add the column. Click OK. The custom list should now have the columns shown in Figure 12-15.
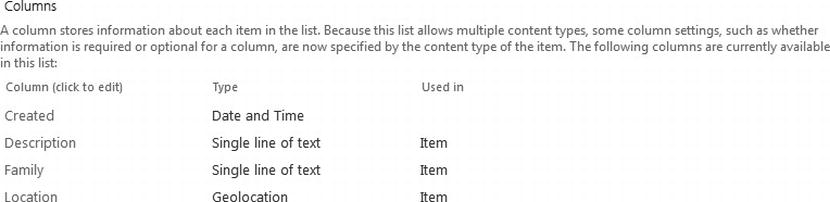
Figure 12-15. Add geolocation site column to a custom list
Based on Specter Group’s business requirements, when a community user adds a property to the community, the site can automatically detect the geolocation data for the user before the property is added to the community list. The new custom list we just created allows the community users to add a new property to the community by automatically detecting the user’s geolocation information. Users can also manually enter latitude and longitude values for their properties in the community (see Figure 12-16).
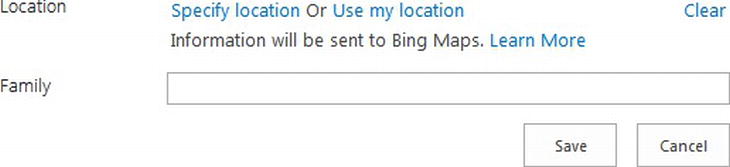
Figure 12-16. Create new list item by autodetecting location or by specifying latitude and longitude values
To specify the location, the user has two options. The user can click Use my location to allow the browser to detect his or her geolocation information. Note that after the user clicks the hyperlink, the browser requests the user’s permission to track his or her location. The user needs to click Allow to enable geolocation detection in the browser. Once the location is determined, the user sees the location in a Bing Maps control, as shown in Figure 12-17.
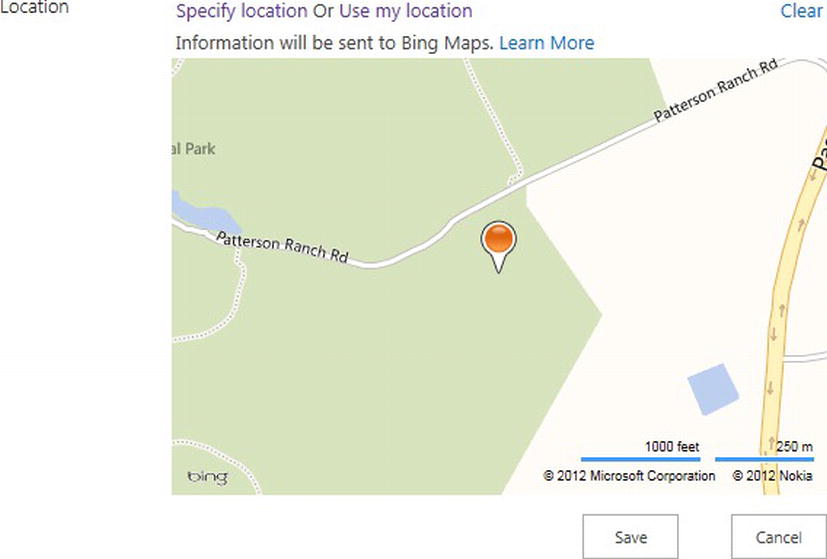
Figure 12-17. Autodetection of user's location when creating a new list item (new property in the community)
Alternately, the user can click Specify Location to manually enter a latitude value and a longitude value (see Figure 12-18).
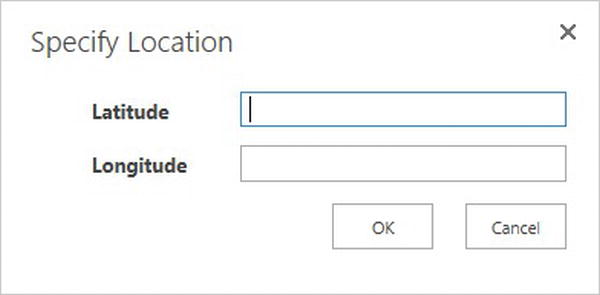
Figure 12-18. A user can manually enter a latitude and longitude value
![]() Limitation Although SharePoint offers users two options to create a location, both offer limited functionality and poor user experience. The first option only offers autodetection of the current location, rather than allowing the user to select a location. The second option is not user friendly, as most users do not have a way to get the latitude and longitude coordinates of a location. In the section “Enhancing Geolocation Features With a Custom SharePoint App” later in this chapter, we walk through how to build a solution to enhance the geolocation features in SharePoint.
Limitation Although SharePoint offers users two options to create a location, both offer limited functionality and poor user experience. The first option only offers autodetection of the current location, rather than allowing the user to select a location. The second option is not user friendly, as most users do not have a way to get the latitude and longitude coordinates of a location. In the section “Enhancing Geolocation Features With a Custom SharePoint App” later in this chapter, we walk through how to build a solution to enhance the geolocation features in SharePoint.
As stated in Specter Group’s requirements, each community site’s home page should display a map that shows the location of the community and the community properties with pins. When a user clicks on the pin, a bubble displays the property address details. We need to first add a Map view to the custom list we have created in the previous step. Then, we need to add the House list as a web part on the Community Home page so that the houses will be shown on a map on the Home page.
- Create a Map view for the custom list. On the List Settings page, create a new view using the Map View type and make it the default view for the list (see Figure 12-19).

Figure 12-19. Create a Map view for the custom list
- Navigate to the community site’s home page.
- Edit the page. Click anywhere within a content area. Select the Insert tab from the ribbon menu at the top of the page.
- Under Categories, click Apps. Under Parts, click the name of the custom list (Houses) we just created (see Figure 12-20). Then click the Add button to the right.
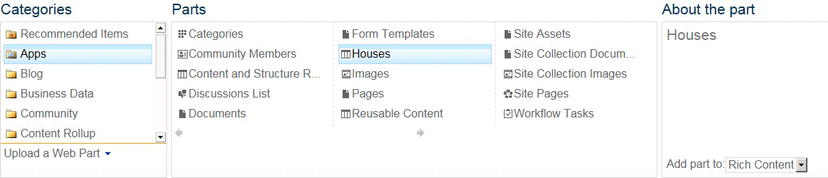
Figure 12-20. Add the custom list as a web part to the home page to view all items in a map on the home page
Once the list web part is added to the home page, it should look similar to the image in Figure 12-21. Note that values of all the non-geolocation-typed columns referenced by the view are displayed in the left pane next to the map control.
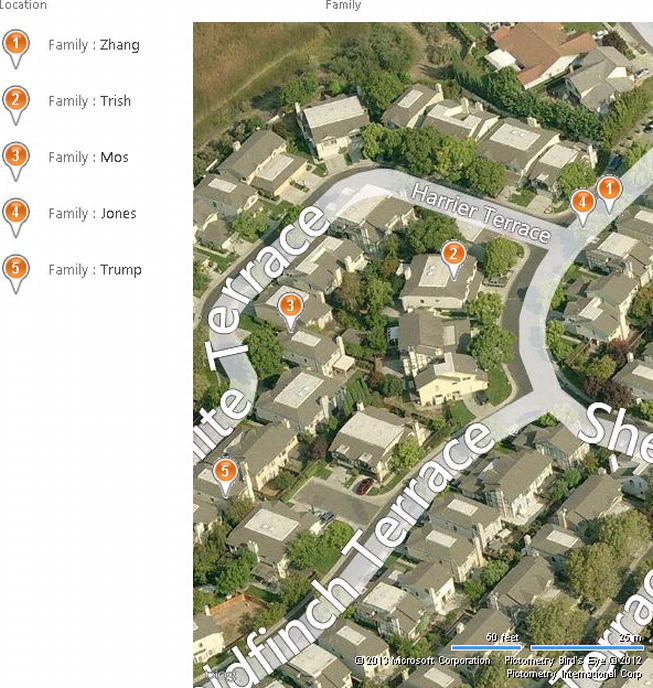
Figure 12-21. Custom list on the Community home page to display all Community properties in a map
Enhancing Geolocation Features With a Custom SharePoint App
In the previous sections, we have demonstrated how to accomplish all the Specter Group’s business requirements with only out-of-the-box geolocation features in SharePoint 2013. But what if we need to implement and deploy the same solution to multiple community sites? What if the users do not know the latitude and longitude values of their houses? In the following sections, we will extend the geolocation features available in SharePoint 2013 to meet all of our requirements by building our own Geolocation SharePoint App.
Getting Started
Before we dive into the implementation of a custom SharePoint App, let’s review the basics of SharePoint Apps and the prerequisites for creating a SharePoint-hosted App.
SharePoint Apps Overview
SharePoint 2013 introduces a new app model for creating applications in SharePoint. SharePoint Apps are self-containedpieces of functionalities that extend the capabilities of a SharePoint web site. Much like an app on a mobile device, SharePoint Apps can be discovered by users and administrators from the SharePoint App Store or from their organization’s private App Catalog and can be installed to their SharePoint sites. SharePoint Apps enable users to reuse the same content and functionalities across different sites. A SharePoint App is essentially an application that is registered with SharePoint to run in the scope in which it is installed. We can use SharePoint Apps to package data and functionalities to be reused by different sites while providing the same familiar user experience.
SharePoint Apps can be hosted on separate web servers, they can be hosted in Windows Azure, or they can be hosted within SharePoint. There are three hosting options for SharePoint Apps: SharePoint-hosted, provider-hosted, and autohosted. An app can be both SharePoint-hosted and remotely hosted. Each approach has its benefits.SharePoint-hosted apps only contain SharePoint components that are installed on the local SharePoint farm if on premises or on its own tenancy if on SharePoint online. Both provider-hosted and autohosted apps are meant for applications that include at least one remote component. Provider-hosted apps contain non-SharePoint components that are deployed and hosted on either a separate server on premises or on a cloud account. Autohosted apps are installed to a SharePoint host web with the remote components automatically installed into a Windows Azure web site account.
For the purposes of this chapter, we create a SharePoint-hosted app because all of the components are local SharePoint components. SharePoint-hosted apps are installed on a SharePoint site (referred to as the host web), and their resources are hosted on an isolated subsite of the host SharePoint site (referred to as the app web). This type of app is the best approach when we want to reuse common SharePoint artifacts, such as lists and web parts.
![]() Note SharePoint-hosted apps can use only client-side code and not any server-side code.
Note SharePoint-hosted apps can use only client-side code and not any server-side code.
Configuring an Isolated App Domain in SharePoint
In our development environment, we need to start by making sure we have configured an isolated app domain in the SharePoint 2013 dev farm to create and deploy SharePoint-hosted apps. The app domain should be a URL namespace we reserve as a namespace for all Specter Group SharePoint Apps. We can configure an app domain for SharePoint in Central Administration or through PowerShell.
![]() Note To configure a SharePoint farm to host SharePoint Apps, we have to create a new name in DNS to host apps and a wildcard cname record for the new domain so that all requests for the app domain will be directed to this instance of SharePoint. Refer to the following link for steps to configure an app domain: http://sprwd.com/262kbat.
Note To configure a SharePoint farm to host SharePoint Apps, we have to create a new name in DNS to host apps and a wildcard cname record for the new domain so that all requests for the app domain will be directed to this instance of SharePoint. Refer to the following link for steps to configure an app domain: http://sprwd.com/262kbat.
For demonstration purposes, we use PowerShell to configure an app domain for SharePoint. For Specter Group, we need to create an isolated app domain apps.spectergroup.com using SharePoint Management Shell as an administrator using the PowerShell command in Listing 12-8.
Listing 12-8. PowerShell to Configure App Domain for SharePoint
Set-SPAppDomain "apps.spectergroup.com"
In addition to creating the app domain, we also need to create a tenant name app using the PowerShell command in Listing 12-9.
Listing 12-9. PowerShell to Set app Tenant Name for SharePoint
Set-SPAppSiteSubscriptionName -Name "app"
Once this domain has been reserved, every time a SharePoint-hosted app is provisioned, the app will get a new URL that looks similar to http://app-898d05664cd685.apps.spectergroup.com.
Creating a New Active Directory Account for App Deployment
For developing and deploying SharePoint Apps, in SharePoint 2013, the system account is no longer supported to deploy or purchase any app from the market. It is now prohibited due to security reasons. We need to create a new Active Directory account for App deployment and log on to the development environment with the new account.
Create a new Active Directory account in the Specter group domain. Ensure that the account is a local admin as well as a farm admin in the SharePoint farm. Before creating and deploying any new apps, log on to the SharePoint development machine with the new account.
Installing Visual Studio 2012 and SharePoint Development Tools
Finally, in our development environment, we also need to install Visual Studio 2012 and SharePoint development tools for Visual Studio 2012. To read more about how to set up a SharePoint development environment, please refer to the section “On-Premises Development Environment” in the Appendix.
Creating a SharePoint-Hosted App
Using SharePoint development tools in Visual Studio 2012, we can create and deploy a SharePoint-hosted app.
- Right-click to run Visual Studio 2012 as an administrator.
- Click File
 New Project (see Figure 12-22).
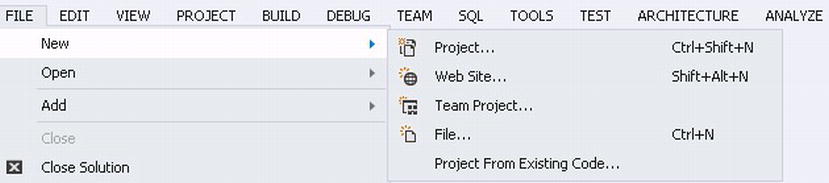
Figure 12-22. Create a new project in Visual Studio 2012
- At the New Project prompt, expand Office/SharePoint Apps, and select App for SharePoint 2013 (see Figure 12-23).
- Fill in the project name and file path information. Click OK.
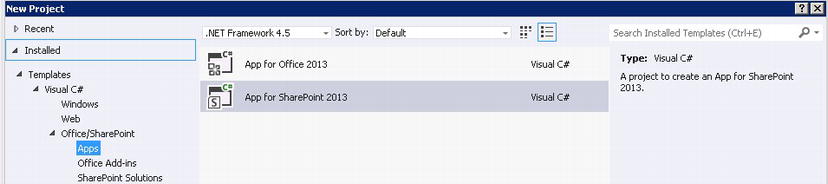
Figure 12-23. Create a new App for SharePoint 2013 project in Visual Studio
- At the New App for SharePoint prompt, do the following:
- a. Enter a name for the app.
- b. Enter a URL for the SharePoint site to deploy and test the app.
- c. Select SharePoint-hosted from the list of hosting options (see Figure 12-24).
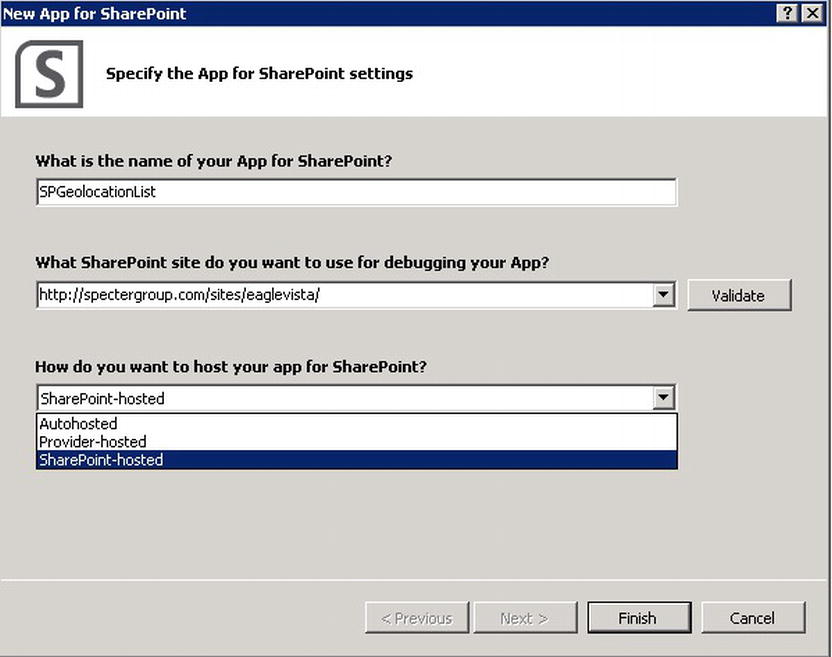
Figure 12-24. Specify settings for the new SharePoint App
- d. Click Finish.
Once the project is loaded in Visual Studio, select the name of the new project. In the Properties pane, enter a community site URL in the Site URL property. For our demonstration, it has been set to http://spectergroup.com/sites/eaglevista/ (see Figure 12-25). If we want to deploy the app to a different site, we need to update the Site URL property with the URL of the new site for deployment before we rebuild and redeploy the project.

Figure 12-25. Specify the URL of a SharePoint site to be used for testing and deploying the new app
Select the name of the new project, right-click the project, and select Build, then select Deploy. If the app did not install correctly, check to make sure the site URL is valid and administrative access has been granted for the developer to deploy the app on that site. If the following error is encountered, refer to the previous section, “Creating a New Active Directory Account for App Deployment” to create a new Active Directory user account specifically for deployment of apps. Then log into the development environment with the new Active Directory account.
Error occurred in deployment step 'Install app for SharePoint': The System Account cannot perform this action.
If the app is deployed successfully, navigate to the URL of the test site in the Site URL project property and click View all site content. The new app is now installed (see Figure 12-26).
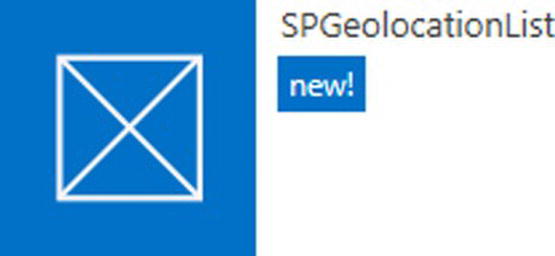
Figure 12-26. New App installed in SharePoint site
Click to launch the new app. If single sign-on has not been set up for the SharePoint domain or the app domain across the organization, you might be prompted for a credential, so enter a valid credential. The app shows the Default.aspx page by default, as shown in Figure 12-27.
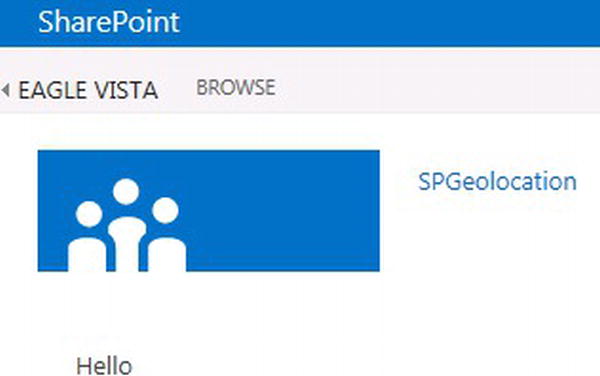
Figure 12-27. App launches with the Default.aspx page
Note, by default, an app’s AppManifest.xml file in the project has set the Start page property to be the Default.aspx page (see Figure 12-28). Therefore, when the app launches, Default.aspx is the first page we see. You can change this to point to another page in the App if desired.
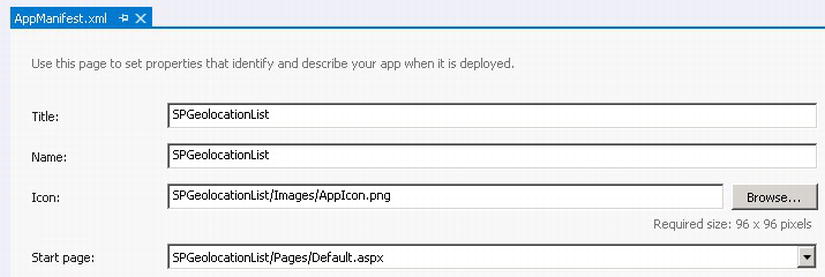
Figure 12-28. App is set to launch the Default.aspx page first
We now have successfully created and deployed a new SharePoint-hosted app. It does not do anything yet, but at least the shell is ready for our custom App. Before we add more content to the app, let’s review the project structure of a SharePoint-hosted app. Expand the app project in Visual Studio. The files and folders displayed in Figure 12-29 are included by default.
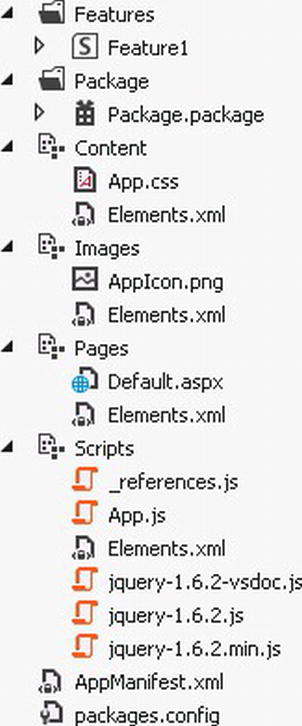
Figure 12-29. SharePoint-hosted app Project file structure
The Features folder is used to deploy features to SharePoint. By default, each app contains a feature called “[app name] Feature 1”. The feature is scoped at the web level and deploys all the files under Pages, Scripts, Content, Images, and any other items created in the app to SharePoint (see Figure 12-30). These features are similar to the features you might have created for SharePoint 2010.
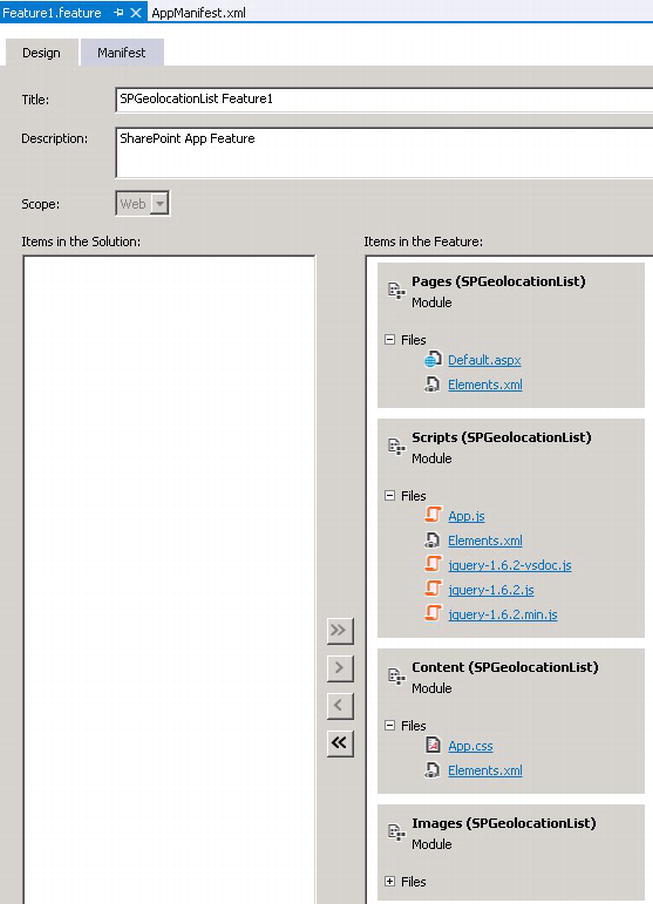
Figure 12-30. Features XML structure to deploy files in App to SharePoint
The Package folder in Figure 12-31 contains all the deployable files to the SharePoint server.
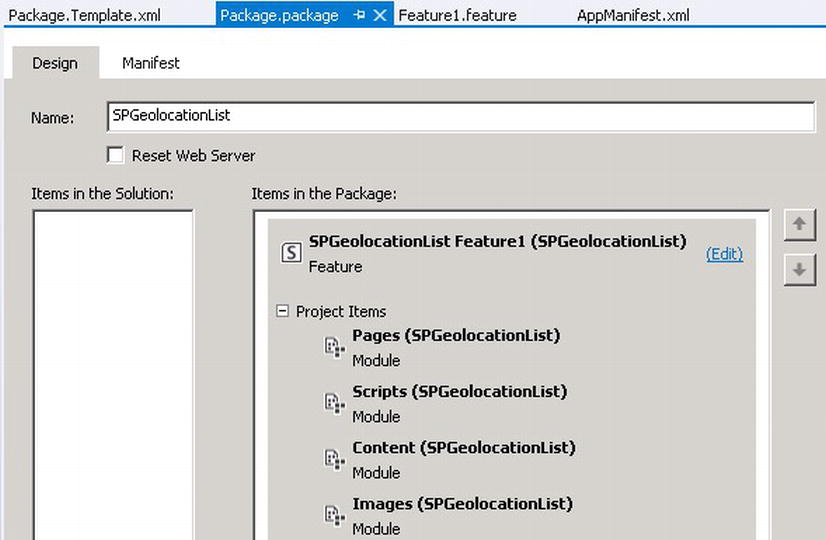
Figure 12-31. Package XML structure to deploy files in App to SharePoint
The Content folder in Figure 12-29 contains all CSS style sheets and any SharePoint components used in the app. For SharePoint components, we can add SharePoint lists, remote event receivers, content types, workflows, site columns, modules, SharePoint pages, Client web part for the host web, and user interface custom actions for the host web. For CSS files, we should keep our CSS inside of the App.css file because by default the Default.aspx page adds a reference to the App.css file. If we need to add new CSS files to the app, we need to first add the files under the Content folder, then we also need to add their references to the Default.aspx page under the page header section, as seen in Listing 12-10.
Listing 12-10. Add Referenced CSS and JavaScript Files to the PlaceHolderAdditionalPageHead Section in App’s Default.aspx File
<asp:Content ContentPlaceHolderId="PlaceHolderAdditionalPageHead" runat="server">
        <!-- Add your CSS styles to the following file -->
        <link rel="Stylesheet" type="text/css" href="../Content/App.css" />
        <!--the rest of the content block-->
</asp:Content>
The Images folder contains all the icons and images used in the app. We can change the app icon for our Specter Group apps by renaming our own logo file AppIcon.png. Ensure the icon image has the dimension of 96 × 96. After we redeploy the App, the new logo is now using our own logo, as seen in Figure 12-32.

Figure 12-32. New deployed App now using the modified AppIcon.png
The Pages folder contains all .aspx and .html pages created in the app. Note these pages are relative to the app web, not the host web. To view the content in the app in the host web, we need to create a client web part to surface the content in a SharePoint host web. Refer to the section “Creating an App Part to Display Geolocation App Content in Host Web” later in this chapter for more information.
The Scripts folder contains all the JavaScript files used in the app. In particular, we should keep our app JavaScript code inside of the App.js file because by default the Default.aspx page adds a reference to the App.js file. If we need to add new JavaScript files to the app, we need to first add the files under the Scripts folder, then we also need to add their references to the Default.aspx page under the page header section. Note, we can also add inline JavaScript code to the header section. The inline JavaScript code in Listing 12-11 triggers functions, specifically in this case the sharePointReady() function, to run after the SharePoint JavaScript sp.js loads to ensure the SharePoint clientcontext object is loaded.
Listing 12-11. Add Inline JavaScript Code to the PlaceHolderAdditionalPageHead Section in App’s Default.aspx File
<asp:Content ContentPlaceHolderId="PlaceHolderAdditionalPageHead" runat="server">
    <!-- Add your JavaScript to the following file -->
    <script type="text/javascript" src="../Scripts/App.js"></script>
    <script type="text/javascript" src="../Scripts/jquery-1.6.2.min.js"></script>
    <!-- The following script runs when the DOM is ready. The inline code uses a SharePoint feature to ensure -->
    <!-- The SharePoint script file sp.js is loaded and will then execute the sharePointReady() function in App.js -->
    <script type="text/javascript">
        $(document).ready(function () {
            SP.SOD.executeFunc('sp.js', 'SP.ClientContext', function () { sharePointReady(); });
        });
    </script>
    <!--the rest of the content block-->
</asp:Content>
The AppManifest.xml is the app definition file that defines the title, start page, permissions needed, feature prerequisites, and capability prerequisites for the app. When we open the XML file in an XML editor, we can also define Product ID, Version, SharePoint minimum version, and app permission requests (resources required by the app) for the app.
![]() Note When building Apps to access data from the host site or specific service applications, the App developer needs to make sure the App requests permissions it needs to run, through the app manifest file. The App installer must grant all the permissions the App requests before the App can run. To learn more about App permissions in SharePoint 2013, refer to http://sprwd.com/sbd564o.
Note When building Apps to access data from the host site or specific service applications, the App developer needs to make sure the App requests permissions it needs to run, through the app manifest file. The App installer must grant all the permissions the App requests before the App can run. To learn more about App permissions in SharePoint 2013, refer to http://sprwd.com/sbd564o.
Adding Geolocation Features to the SharePoint-Hosted App
Now that we have created a SharePoint-hosted app for our community site, let’s go through the implementation of adding enhancements to the geolocation features to meet Specter Group’s requirements.
Setting Bing Maps Key Using JavaScript Client Object Model
Earlier, we were able to set the Bing Maps key at the farm level using PowerShell. What if we do not have administrative access to the SharePoint servers to run PowerShell? What if we only want to set the Bing Maps key at the web level? We can do so by setting the Bing Maps key programmatically using either the SharePoint .NET client object model or the SharePoint JavaScript client object model. Because we are building a SharePoint-hosted app, we will need to use client-side API, such as the SharePoint JavaScript client object model to set the Bing Maps key.
- Open the App.js file to add the JavaScript in Listing 12-12 for setting the Bing Maps key.
Listing 12-12. Set the Bing Map Key Using the JavaScript Object Model
function sharePointReady() {
        context = new SP.ClientContext.get_current();
        web = context.get_web();
        var props = web.get_allProperties();
        props.set_item("BING_MAPS_KEY", "ApqzNRu0mn1Li2ngnD2x-
                ZCwalMB0m1IavSP5tcINeZRQ7feN1uppjEt-GpSPLiN");
        web.update();
        context.executeQueryAsync(onSetmapkeySuccess, onSetmapkeyFail);
}
function onSetmapkeySuccess() {
        alert("set map success");
}
function onSetmapkeyFail() {
        alert("set map failed");
}
- Recall that in Listing 12-11, the inline JavaScript code in the Default.aspx page triggers the sharePointReady() function to run after the SharePoint JavaScript’s sp.js loads to ensure the SharePoint clientcontext object is loaded.
- In App.js, the sharePointReady() function first gets the current SharePoint context, then uses the JavaScript object model to update the SharePoint web Bing Maps key property with a valid Bing Maps key if it doesn’t have one already.
- ExecuteQueryAsync takes in two parameters in the form of callback functions. Each callback will let us know if the execution completed successfully or failed.
After we rebuild and redeploy the app, we should see the alert success message shown in Figure 12-33 after loading the new app.
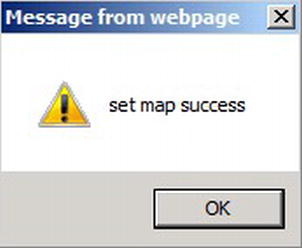
Figure 12-33. Bing Maps key set successfully at the web level using the JavaScript object model
Creating a Custom List Instance with a Geolocation Column
Once we have enabled Bing Maps and SharePoint integration using the JavaScript object model, we need to create a custom list instance within the App. Note that this custom list instance is not created for the host web; rather it will be part of the App web. The list instance will be available to users when they are in the App.
- In Visual Studio, below the app project, right-click the Content folder.
- Select Add New Item from the shortcut menu.
- At the Add New Item prompt, select List (see Figure 12-34).
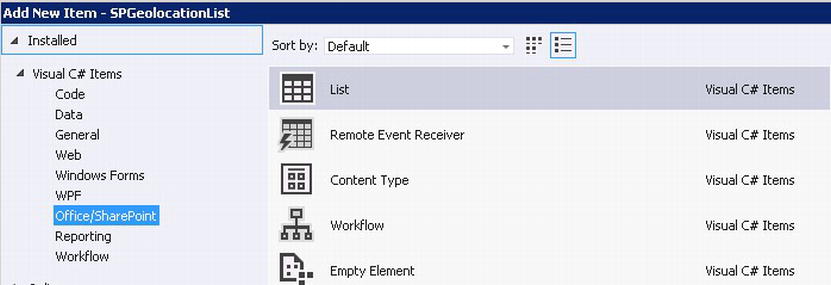
Figure 12-34. Add a custom list to the App from Visual Studio
- Provide a name for the List: LocationList.
- Click Add.
- When prompted to choose list settings, select Default (Blank) from the customizable list drop-down (see Figure 12-35).
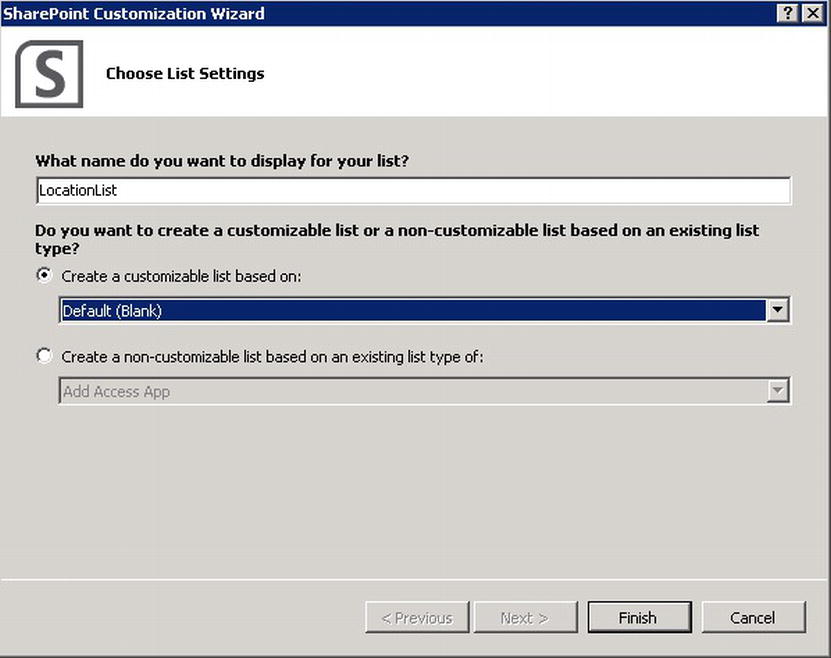
Figure 12-35. Create a customizable list
- Click Finish.
- After the list instance is created within the App, it will display the Columns view for us to add new columns to the custom list.
- Click on a new row and select the Location column of type Geolocation from the drop-down list (see Figure 12-36). We see this geolocation column in this development environment because we have previously added a geolocation-type column in this community site via PowerShell.
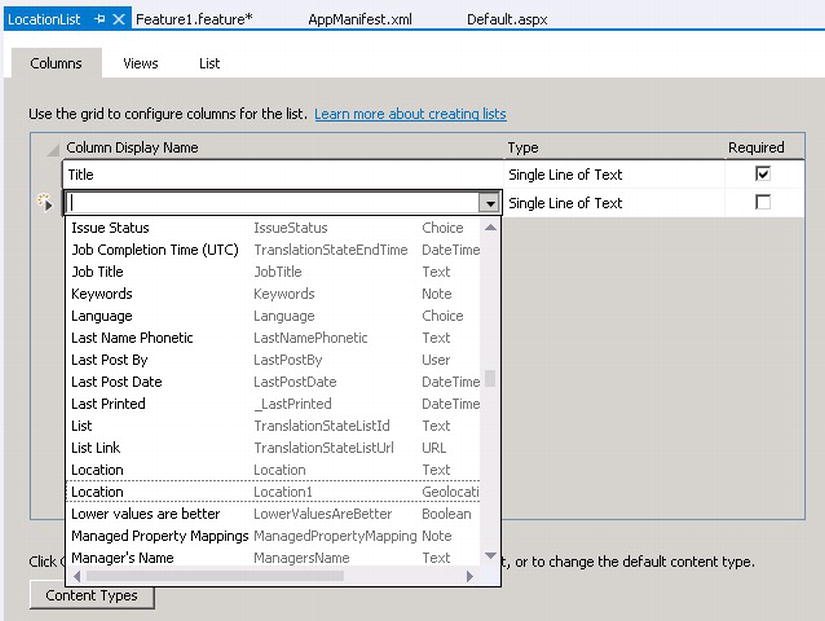
Figure 12-36. Add a geolocation column to the custom list
- Expand the Content folder and find the Schemas.xml file for the LocationList.
- Open Schemas.xml in the XML editor. Note the following column was added to the schema of the custom list. The specific GUIDs will be different in your environment.
<Field Type="Geolocation" DisplayName="Location" ID="{be075499-998a-4924-a69a-8fe11bcc612d}" SourceID="{b9497bff-6e4c-4f72-89dd-80be589aebd0}" StaticName="Location1" Name="Location1" /> - For users to interact with the new custom list instance in the App web, we can add a button on the Default.aspx page to allow users to navigate to the custom list (see Listing 12-13).
Listing 12-13. HTML Code Added to App’s Default.aspx page to Display Link to the Custom List Instance
<asp:Content ContentPlaceHolderId="PlaceHolderMain" runat="server">
    <div>
        <input type="button" id="button" value="Location List" onclick="location.href = '../Lists/LocationList'"/>
        <br /><br />
        <!-- ... rest of PlaceHolderMain ... -->
    </div>
</asp:Content>
After we deploy the app to the community site, the user can click the Location List button shown in Figure 12-37 to view the list.
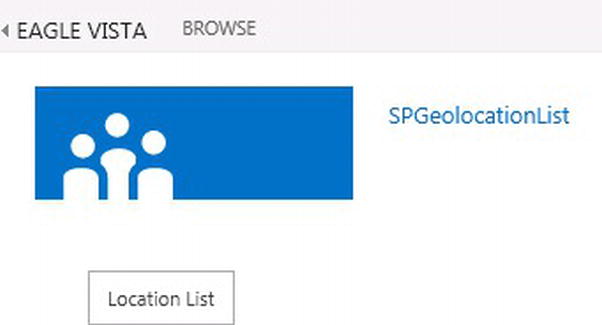
Figure 12-37. Click the Location List button in the App to navigate to the custom list
Then the user will see the custom list exactly like the out-of-the-box list we created earlier in the host web. The user can add a new item by clicking New item (see Figure 12-38) and then manually entering the latitude and longitude values or using the current location as detected by the browser.
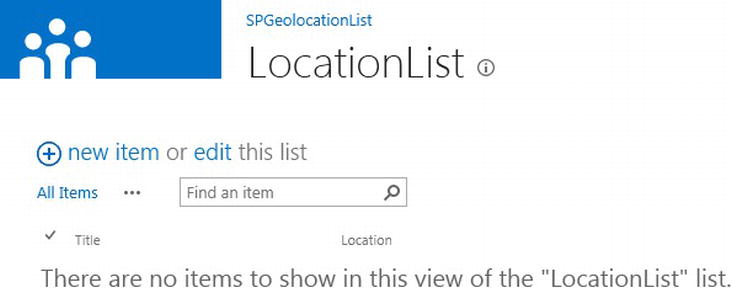
Figure 12-38. Custom list in the App has the same geolocation functionalities
Using the JavaScript Client Object Model to Add a List Item
Now to allow users to enter an address or automatically detect location, we need to allow them to do so on the Default.aspx page without having to go to the actual SharePoint list (LocationList) to add a new item. Before we look at how to add HTML controls to the Default.aspx page to trigger the JavaScript function createListItem(), let’s implement the JavaScript code for adding a new item to the list.
Open the App.js file in the Visual Studio project and add the JavaScript function in Listing 12-14 to the file. This function programmatically adds a new item to the LocationList custom list instance.
Listing 12-14. Using JavaScript CSOM to Add a List Item
//create an item in a list
function createListItem() {
    var oList = web.get_lists().getByTitle('LocationList'),

    var itemCreateInfo = new SP.ListItemCreationInformation();
    this.oListItem = oList.addItem(itemCreateInfo);
    oListItem.set_item('Title', title);

    alert('Adding new location: (lat: ' + locationLat + ' long: ' + locationLong + ')'),
    oListItem.set_item('Location1', 'POINT (' + locationLong + ' ' + locationLat + ')'),
    oListItem.update();

    context.load(oListItem);
    context.executeQueryAsync(
        Function.createDelegate(this, this.onQuerySucceeded),
        Function.createDelegate(this, this.onQueryFailed)
    );
}

function onQuerySucceeded() {
    alert('Item created!'),// + oListItem.get_id());
    window.location.reload();
}

function onQueryFailed(sender, args) {
    alert('Request failed. ' + args.get_message() +
        '
' + args.get_stackTrace());
}
- With the current SharePoint context, we can get the web object of the app web.
- Get the LocationList by doing a title lookup from the list collection.
- Create a new ListItemCreationInformation object to add a new item to the list.
- Once the item has been added, we need to set the list item’s fields one by one.
- a. First set the Title column value.
- b. Set the Location column value by constructing the value of the geolocation field with the actual latitude and longitude values in the “POINT (long, lat)” format.
- After the columns are set, we need to update the new list item to save the values.
Using HTML5 Geolocation API to Autodetect Location
Before we enable the App to trigger the JavaScript function we created in the previous section to programmatically add a new list item to the list, we need to add a few controls on the Default.aspx page to get information from the user.
- Open the Default.aspx page in the Visual Studio project.
- Add a text field familytext for the Title (Family) column.
- Add a button autodetectbutton for autodetecting the user’s location by calling the getcurrentaddress() function, which uses the HTML5 API to get the geolocation from the browser (see Listing 12-15).
Listing 12-15. Default.aspx HTML to Allow Browser to Autodetect User’s Location
<asp:Content ContentPlaceHolderId="PlaceHolderMain" runat="server">
    <div>
        *Family: <input id="familytext" type="text" style="width:400px"
                        value="Type family name here..." />
        <br /><br />
        <input type="button" id ="autodetectbutton" value="Use current location"
        onclick="getcurrentaddress();"/>
         <br /><br />
        <!-- ... rest of PlaceHolderMain ... -->
    </div>
</asp:Content>
In addition to getting information from the users, we also need to show users the actual list after the new items are created. Note that we are adding an XsltListViewWebPart control, which is the common web part for displaying any list in SharePoint.
- On the Default.aspx page, we need to add the XsltListViewWebPart control shown in Listing 12-16 to the page below the autodetectbutton button.
Listing 12-16. Add an XsltListViewWebPart Control to the Default.aspx Page to Show the Geolocation List
<WebPartPages:WebPartZone runat="server" FrameType="TitleBarOnly" ID="full" Title="loc:full" >
    <WebPartPages:XsltListViewWebPart ID="XsltListViewWebPart2" runat="server"
        ListUrl="Lists/LocationList" IsIncluded="True"
        NoDefaultStyle="TRUE" Title="locationlist"
        PageType="PAGE_NORMALVIEW" Default="True" ViewContentTypeId="0x">
    </WebPartPages:XsltListViewWebPart>
</WebPartPages:WebPartZone>
At this point, the Default.aspx page should contain the controls shown in Figure 12-39.
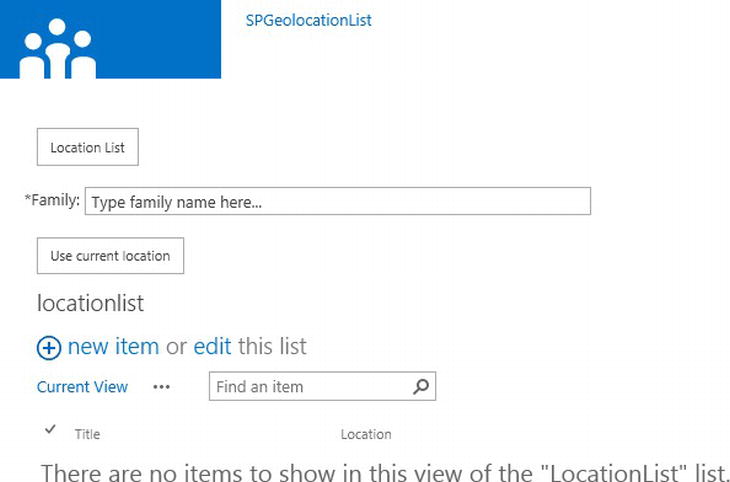
Figure 12-39. Default.aspx page to allow users to add information to the location list
Next, we need to add JavaScript functions for autodetecting the user’s location.
- Open the App.js file and add the JavaScript in Listing 12-17 for detecting geolocation.
Listing 12-17. JavaScript Function to Autodetect User’s Location Using HTML5 Geolocation API
function getcurrentaddress() {
    if (navigator.geolocation) {
        navigator.geolocation.getCurrentPosition(showPosition, showError);
    }
    else {
        alert("Geolocation is not supported by this browser.");
    }
}
function showPosition(position) {
    locationLat = position.coords.latitude;
    locationLong = position.coords.longitude;
    alert('Current lat: ' + locationLat + ' long: ' + locationLong);
    createListItem();
}
function showError(error) {
    switch (error.code) {
        case error.PERMISSION_DENIED:
            alert("User denied the request for Geolocation.");
            break;
        case error.POSITION_UNAVAILABLE:
            alert("Location information is unavailable.");
            break;
        case error.TIMEOUT:
            alert("The request to get user location timed out.");
            break;
        case error.UNKNOWN_ERROR:
            alert("An unknown error occurred.");
            break;
    }
} - The showPosition callback function resolves the latitude and longitude values and calls the createListItem() function in Listing 12-18 to create a new list item using the latitude and longitude values.
Listing 12-18. JavaScript Function to Create a New List Item Using the familytext Value as the Title of the New Item and the Latitude and Longitude Values as the Location
function createListItem() {
    var family = $('#familytext').val(); //get value for the Title column
    var oList = web.get_lists().getByTitle('LocationList'),

    var itemCreateInfo = new SP.ListItemCreationInformation();
    this.oListItem = oList.addItem(itemCreateInfo);
    oListItem.set_item('Title', family);    //set Title column to the familytext field value

    alert('Adding new location: (lat: ' + locationLat + ' long: ' + locationLong + ')'),
    //construct value for the geolocation column using the latitude and longitude
    //values we got from showPosition()
    oListItem.set_item('Location1', 'POINT (' + locationLong + ' ' + locationLat + ')'),
    oListItem.update();

    context.load(oListItem);
    context.executeQueryAsync(
        Function.createDelegate(this, this.onQuerySucceeded),
        Function.createDelegate(this, this.onQueryFailed)
    );
}
function onQuerySucceeded() {
    alert('Item created!'),// + oListItem.get_id());
    window.location.reload(); //reload the page to show new items
}
function onQueryFailed(sender, args) {
    alert('Request failed. ' + args.get_message() + '
' + args.get_stackTrace());
} - The showError callback function displays error messages to users when autodetection fails.
- With the geolocation values resolved in the showPosition() function and a valid value for the Title (family) column, we can now map the columns with these values to create a new list item in the createListItem() function (see Listing 12-18).
- Once the item has been added, we notify the user the item has been created and reload the page to allow the XsltListViewWebPart to show the latest items in the list.
After we redeploy the app, the user can now create a new item. The user enters a value for the Family text field. Then the user clicks the Use current location button. The user is prompted to allow the site to track physical location. If the user clicks Allow, an alert window shows the latitude and longitude values, as shown in Figure 12-40.
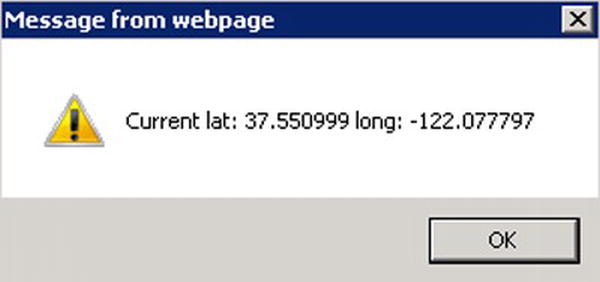
Figure 12-40. Alert window showing the user's current geolocation coordinates using HTML5 Geolocation API
The user then gets an alert confirming the item has been created. The page then refreshes to show the web part of the list with the newly created item (see Figure 12-41).
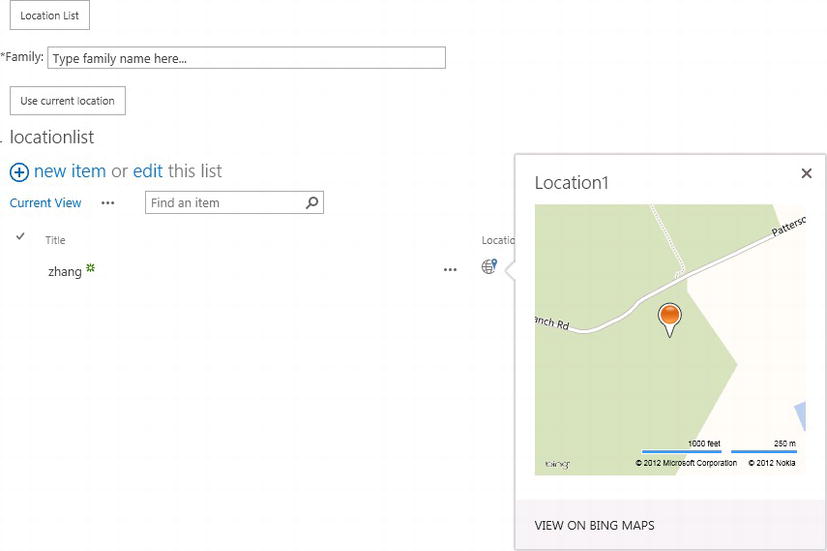
Figure 12-41. After the item has been programmatically added to the list
Resolving Geolocation from an Address
Autodetection of the location might not always be what the user is looking to do. Based on our requirements, community users would also like to enter the address of their properties regardless of where they are physically. We can support this by programmatically resolving geolocation information from a physical address entered by the user.
- Open the Default.aspx page.
- Under the header of the page, within the PlaceHolderAdditionalPageHead content placeholder, add a reference to the Bing Maps JavaScript as shown in Listing 12-19.
Listing 12-19. Add a Reference to the Bing Maps JavaScript API to the Default.aspx Page
<asp:Content ContentPlaceHolderId="PlaceHolderAdditionalPageHead" runat="server">
    <!-- Add reference to bing map -->
    <script src="http://ecn.dev.virtualearth.net/mapcontrol/mapcontrol.ashx?v=7.0"></script>
    <!-- ... rest of Content Placeholder Content ... -->
</asp:Content> - Below the autodetectbutton, add a text field addresstext for users to enter an address (see Listing 12-20).
Listing 12-20. New Controls to Add to the Default.aspx Page for Resolving Location From an Address
Type Address: <input id="addresstext" type="text" style="width:400px"
                          value="Type address here..." onclick ="clearaddressdefault();" />
<input type="button" id ="getaddressbutton" value="Get address" onclick="getaddress();"/><br />

<div id='mapDiv' style="position:relative; width:0px; height:0px;"></div> - Add a button getaddressbutton for users to trigger the getaddress() function, which uses Bing Maps JavaScript API to resolve latitude and longitude values from an address (see Listing 12-20).
- Add a div mapDiv to be used by Bing Maps JavaScript. We can hide it in our solution because we do not need the Bing Maps API to show a separate map control (see Listing 12-20).
- In the App.js file, at the top of the file, add a variable for the Bing Maps map object:
var map; - At the end of the SharePointReady() function, add the code in Listing 12-21 to initiate the map object using the Bing Maps key.
Listing 12-21. JavaScript Code to Initiate the Bing Maps Map Object
map = new Microsoft.Maps.Map(
           document.getElementById("mapDiv"),
           { credentials: "Your Bing Maps key",
mapTypeId: Microsoft.Maps.MapTypeId.road }); - Add the getaddress() function in Listing 12-22 to the App.js file to get the address from the addresstext text field.
Listing 12-22. JavaScript Functions to Request Bing Maps Service to Resolve Locations From an Address
function getaddress() {
    var address = $('#addresstext').val();
    ClickGeocode();
}

function ClickGeocode(credentials) {
    map.getCredentials(MakeGeocodeRequest);
}

function MakeGeocodeRequest(credentials) {
    var geocodeRequest = "http://dev.virtualearth.net/REST/v1/Locations?query=" +
        encodeURI(document.getElementById('addresstext').value) +
        "&output=json&jsonp=GeocodeCallback&key=" + credentials;
    CallRestService(geocodeRequest);
}

function GeocodeCallback(result) {
    alert("Found location: " + result.resourceSets[0].resources[0].name);

    if (result &&
        result.resourceSets &&
        result.resourceSets.length > 0 &&
        result.resourceSets[0].resources &&
        result.resourceSets[0].resources.length > 0) {

        //get lat and lon
        var lat = result.resourceSets[0].resources[0].point.coordinates[0];
        var long = result.resourceSets[0].resources[0].point.coordinates[1];
        locationLat = lat;
        locationLong = long;
        createListItem();
    }
} - Add the ClickGeocode() and the MakeGeocodeRequest function in Listing 12-22 to the App.js file. These functions make a request to the Bing Maps service to get an address resolved providing the Bing Maps key credential and the address entered by the user. Note, in the request, it also tells the service the name of the callback function: GeocodeCallback.
- Add the GeocodeCallback function in Listing 12-22 to the App.js file. This function is called when the service returns the geolocation result in JSON. We use the result object to get the name of the returned location and the latitude and longitude coordinates. Then we call the createListItem() function in Listing 12-18 to create a new item based on the new coordinates.
After we redeploy the app, the user can enter an address in the address field and click the Get address button, as shown in Figure 12-42, to have the geolocation coordinates resolved all from the Default.aspx page.
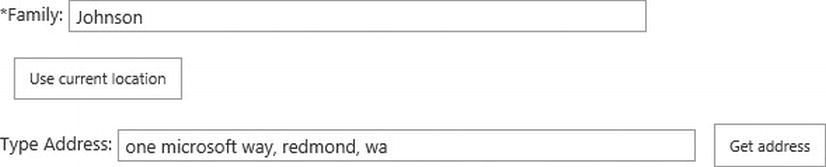
Figure 12-42. App now allows users to enter an address
After the user clicks the Get address button, if the location is found, the user sees an alert like the one in Figure 12-43.
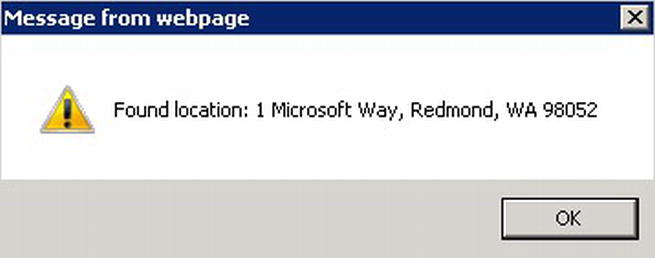
Figure 12-43. Alert showing the user the location has been found and the proper address as resolved by the Bing Maps service
After clicking OK, the user sees an alert confirming the item has been added to the list and the page refreshes with the latest item on the list, as shown in Figure 12-44.
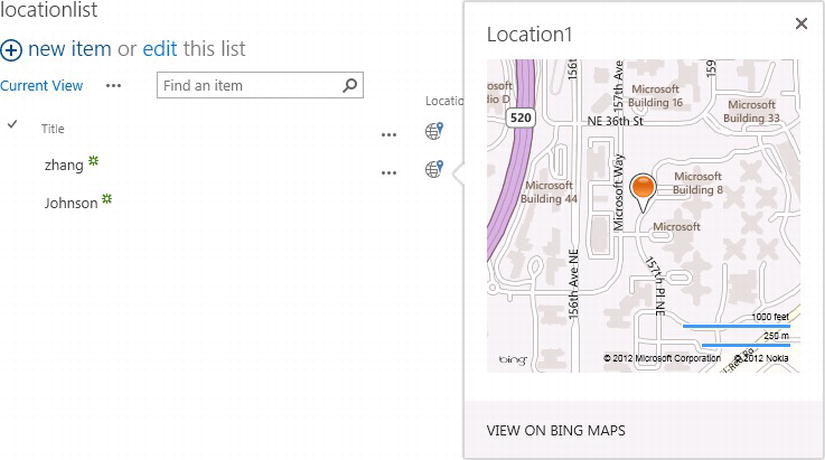
Figure 12-44. New list item added after user enters an address to be resolved into geolocation coordinates
Creating an App Part to Display Geolocation App Content in Host Web
As mentioned earlier in this chapter, SharePoint-hosted apps are installed on a SharePoint site (referred to as the host web), and their resources and content are hosted on an isolated subsite of the host SharePoint site (referred to as the app web). So far we have been performing all of our user actions in the app web instead of the host web (community site). Based on our requirements, we need to expose all the functionalities we have created to the host web (community’s home page). We can do so by creating an app part. With app parts, we can display the content in our app right in the host web using an IFrame.
![]() Note To learn more about creating app parts with SharePoint Apps, refer to http://sprwd.com/76uyrzd.
Note To learn more about creating app parts with SharePoint Apps, refer to http://sprwd.com/76uyrzd.
- Starting from Visual Studio, right-click the Content folder below the app project, and click Add New Item.
- At the Add New Item prompt, select Office/SharePoint and click Client Web Part (Host Web) (see Figure 12-45).
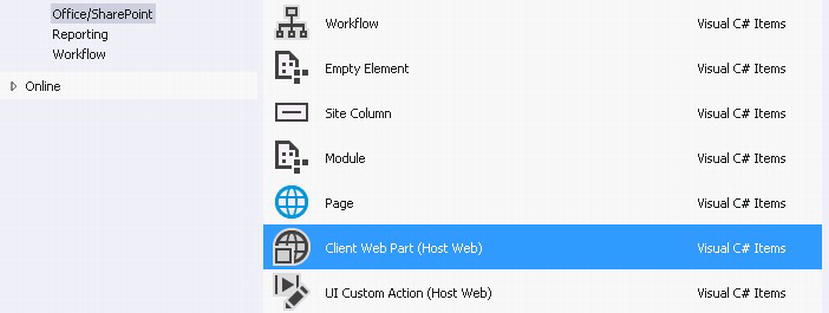
Figure 12-45. Add a client web part component to the App to surface content from the app web
- Name the web part SPGeolocationListWebPart.
- After the new client web part is added to the project, the Element.xml file (see Listing 12-23) for the web part will automatically open for editing. Within this file, we can edit the Title, Description, Default width, and Default height values. Make sure the name property of the web part is the same as the name of the web part file we just added to the project.
Listing 12-23. Client Web Part Contains an Element.xml File That Allows Configuration of Title, Description, Width, and Height
<ClientWebPart Name="SPGeolocationListWebPart"
                          Title="SPGeolocationListWebPart"
                          Description="This is the SPGeolocationListWebPart."
                          DefaultWidth="500"
DefaultHeight="600"> - Within the same Element.xml file, we also need to ensure the following section (see Listing 12-24) is set to the app’s Default.aspx page as the web part will render this page by default.
Listing 12-24. Use Element.xml File to Configure Page to Render Within the Client Web Part
<Content Type="html" Src="∼appWebUrl/Pages/Default.aspx" /> - For the client web part to surface content from the app, we need to add the AllowFraming tag in the Default.aspx page to allow it to render in an IFrame. Open the Default.aspx page and add the AllowFraming tag in Listing 12-25.
Listing 12-25. Add AllowFraming Tag to the Default.aspx Page to Ensure This Page Can Be Displayed in an IFrame
<WebPartPages:AllowFraming ID="AllowFraming1" runat="server" /> - After we redeploy the app, edit the community’s home page.
- Click the Insert tab on the ribbon, and then select App Part.
- From the list of App Parts, select the new Client web part we just deployed (see Figure 12-46) and add it to the page.
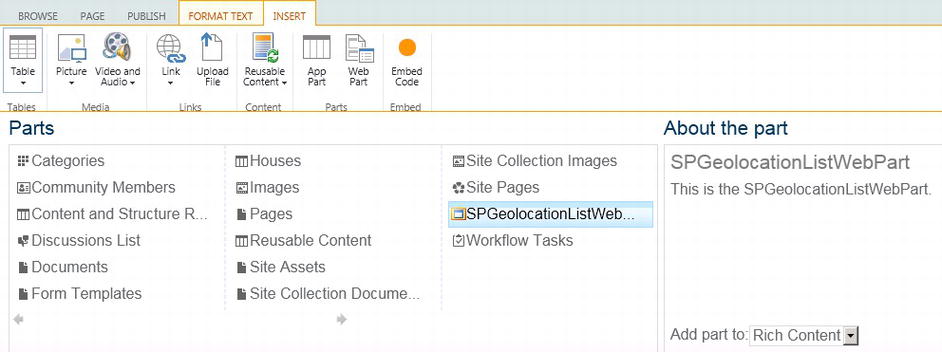
Figure 12-46. Add client web part to the community site home page (host web)
After the web part is added, users can perform all the functions they were doing in the app web in the host community site (see Figure 12-47).
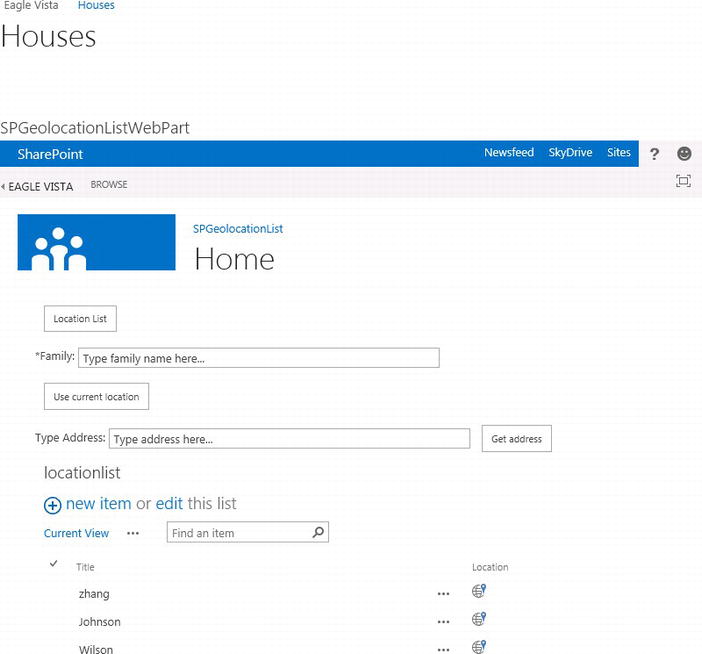
Figure 12-47. Work with the App and its content from the host web after adding the App's client web part to the page
Deploying the Geolocation App to an App Catalog
After we have implemented and tested the SharePoint-hosted app, we need to deploy it to an App Catalog in the Specter Group production site for more community sites to utilize the app.
If we do not have an App Catalog in our SharePoint environment, we need to create one.
- Navigate to Central Administration.
- On the Apps page, in the App Management section, click Manage App Catalog.
- Select a web application we want to create an app catalog for if it is not already selected.
- In the App Catalog site section, select Create a new app catalog site, then click OK.
After the App Catalog is created, we can navigate to the App Catalog site.
- From the development environment, move the .app SharePoint app file from the solution bin directory to a location that is accessible from the App Catalog.
- On the App Catalog site, find the Apps for SharePoint library, then click New app to add a new file with the .app extension (see Figure 12-48).
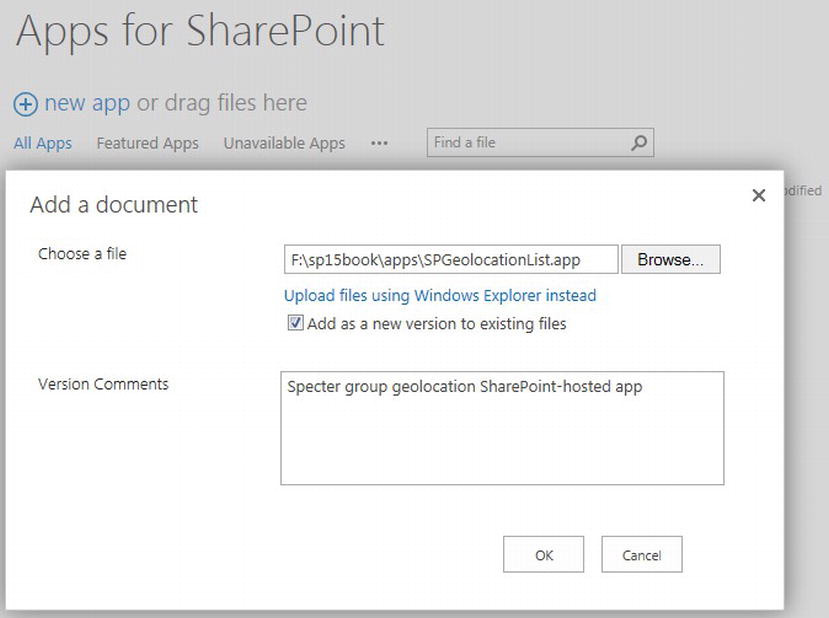
Figure 12-48. Add the App's package .app file to the App Catalog to deploy the App
- After the App is added, we need to add a few pieces of metadata for the new App.
- Under Category, select an existing value or provide a new value to group the apps in the App Catalog (see Figure 12-49).
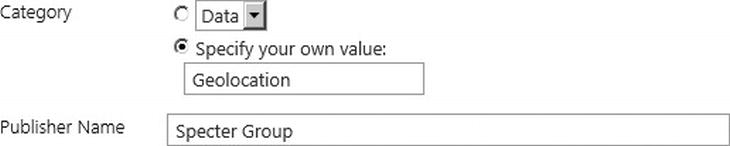
Figure 12-49. Add metadata to the newly deployed App
- Under the Publisher Name, in our case we specify Specter Group as the App’s publisher (see Figure 12-49).
- We also need to ensure the app is enabled for end users to find and to add to their site. Because this App is going to be needed for all the community sites, we should set the app to appear in the Noteworthy section (see Figure 12-50).

Figure 12-50. Enable the App to be searched and added to users' sites
Now that the app is in the App Catalog, a user can click Settings ![]() Add an app to find the app in the App Catalog, as seen in Figure 12-51.
Add an app to find the app in the App Catalog, as seen in Figure 12-51.
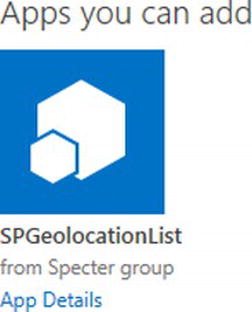
Figure 12-51. App as seen by users after it's added to the company's App Catalog
The user can double-click the app to add it. Before the app can be installed, the user must click Trust It to allow the app to be installed (see Figure 12-52).
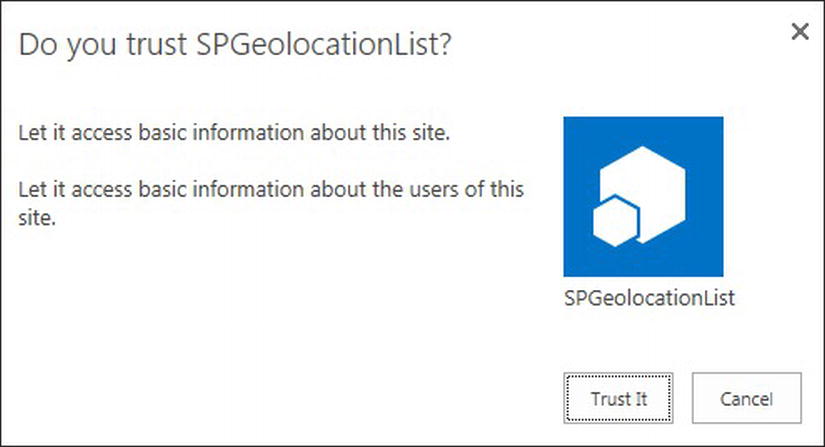
Figure 12-52. Users need to trust the app before it can be installed to their sites
After the app is added, the app looks like the following and is ready for use. Users can click to start the app and add and remove locations or they can add an App part (client web part) to any SharePoint page and use the app and its content within the host web.

Figure 12-53. The new app is added to the user's site ready for use
Summary
With the rapid adoption of smart phones and tablets, we have the opportunity to use GPS capabilities to support location-based features in our web site. In this chapter, we have demonstrated the basic features provided by HTML5 geolocation API and how we can utilize it in our own web site. We then learned how to configure and use the new geolocation column and the new map view in SharePoint 2013. Based on our business requirements, we needed to extend the SharePoint 2013 geolocation features by creating a geolocation SharePoint-hosted app. For the app, we used SharePoint JavaScript client object model to programmatically add a list item to a list. We also used the HTML5 Geolocation API to autodetect geolocation information from the user’s browser. We then used Bing Maps JavaScript API to resolve geolocation coordinates from a user-provided address. Finally, we created an App part that allows users to add a Client web part to display the content from the app in the host web.