
![]()
Configuring a Development Environment
Throughout this book you have been exposed to many aspects of working with SharePoint 2013, including how to brand SharePoint and how to build simple SharePoint Apps. Most SharePoint projects are developed not in a production environment, but rather in some type of development environment. If you do not have access to an existing development environment in your organization, this appendix is for you. If your organization already has a SharePoint 2013 development environment, or you are looking for additional options, you might find some useful alternatives in this appendix.
In this appendix we look at how you can quickly set up a SharePoint 2013 environment to work through the examples in this book. Many of the features outlined in this book are currently only available in on-premise environments, although often an Office 365 development site will be more than adequate. All of the examples provided in this book were built and tested in on-premise virtual machine environments as well as Cloudshare-based cloud environments.
This appendix also includes a detailed look at software tools first introduced in this book’s Introduction as well as additional tools that you might find useful. We have found these tools can help your SharePoint branding projects, including popular web editors and image creation and manipulation tools.
Types of Development Environments
There are two primary types of SharePoint development environments: on-premise environments and cloud-based environments. Each of these types of environments can also be split into subcategories.
With on-premise development environments, you can have SharePoint farms installed on servers that you access via a LAN, a VPN, or other such network connection. You might also have a SharePoint environment installed and running in a local virtual machine on your workstation itself.
There are also different types of cloud-based environments. The most well-known cloud-based SharePoint environment is Microsoft Office 365. There are other cloud solutions offered by companies such as Cloudshare (www.cloudshare.com), Rackspace (www.rackspace.com), and Windows Azure (www.windowsazure.com). The cloud offerings differ by company and have unique pros and cons.
If you do not already have an on-premise development environment available to you, we recommend that you use a cloud-based environment to work through the examples in this book because creating an on-premise development environment for SharePoint 2013 development can be time consuming, resource intensive, and difficult to set up and configure properly. We want you to be able to start working through this book today.
On-Premise Development Environment
Using a local on-premise, virtual-machine-based development environment is a popular solution, although creating such an environment is beyond the scope of this book. The hardware and software requirements and the configuration options are much higher than with previous versions of SharePoint. There are many good resources available online if you decide you want to use an on-premise development environment. Get started with the MSDN article “Start: Set up the development environment for SharePoint 2013” at http://sprwd.com/f7idv3n.
If you are interested in learning more about installing SharePoint 2013 in a virtual machine, refer to “Install and configure a virtual environment for SharePoint 2013” at http://sprwd.com/g2ru7ez and “How to: Set up an on-premises development environment for apps for SharePoint” at http://sprwd.com/57vo6u2. All of the examples in this book can be built on an on-premise, virtual-machine-based environment.
Cloud-Based Development Environment
As we previously stated, a cloud-based development environment is our recommended development environment if you do not already have an existing SharePoint 2013 development site. We review the most popular cloud environments along with how to sign up and configure them so that you can work through the examples in this book. In the next section we review which cloud-based development environment would be best for you, depending on which aspects of this book you intend to focus.
Office 365 Developer Site
Office 365 provides an exciting new development environment for SharePoint 2013. You can now sign up for and use an Office 365 Developer Site, which gives you many of the benefits on an on-premise SharePoint installation without the hassle of configuring and maintaining a SharePoint development farm. With the introduction of SharePoint 2013, SharePoint Online, the SharePoint component of Office 365, now allows access to the full publishing infrastructure for both public-facing and intranet sites. An Office 365 Developer Site can be used to sharpen your branding skills, as all branding examples up through Chapter 7 will function in a development site. Later chapters might not work in an Office 365 Developer Site as mentioned in each chapter. For those examples, a different cloud solution will be necessary.
An Office 365 Developer Site can also be used to build SharePoint-hosted apps and even apps for Office documents and mail items. An Office 365 Developer Site comes preconfigured with OAuth and you also get an isolated app domain for your SharePoint-hosted apps. SharePoint-hosted apps include certain limitations to server-side code, but with the greatly enhanced Client Side Object Model you might find the ease of use and configuration of an Office 365 Developer Site reason enough to do away with server-side code in your apps.
With an Office 365 Developer Site you can also deploy the Napa Office 365 Development Tools to your preconfigured site. The Napa tools can help jumpstart your SharePoint development by providing a browser-based development environment, freeing you from having to install Visual Studio to your workstation. The Napa tools are useful but you will find the toolset is designed for more simple application development. We recommend a local installation of Visual Studio to follow along with the examples in this book, but again, the Napa tools are worth considering for simpler SharePoint App development.
There are a few drawbacks with an Office 365 Developer Site. First, as of this printing, cross-site publishing is not available in Office 365. Further, the content search web part is also not available. You can use the search results web part, which is similar to the content search web part, in an Office 365 Developer Site. Unfortunately our examples in Chapters 8 and 9 require a different development environment.
![]() Tip For TechNet’s overview of Office 365 Developer Sites, visit “Sign up for an Office 365 Developer Site” at http://sprwd.com/x8dwotx.
Tip For TechNet’s overview of Office 365 Developer Sites, visit “Sign up for an Office 365 Developer Site” at http://sprwd.com/x8dwotx.
Signing Up for a Office 365 Developer Site
Before you can use an Office 365 Developer Site you must sign up for a Developer Site account.
- 1. Visit http://sprwd.com/x8dwotx for the most up-to-date up link to sign up for an Office 365 Developer Site account.
- 2. There are currently three ways to obtain an Office 365 Developer Site.
- a. If you have an MSDN subscription, Visual Studio Ultimate, and Visual Studio Premium with MSDN subscriptions, receive a 1-year Office 365 Developer Site.
- b. If you already have an Office 365 subscription at the E1 or E3 level you can provision a Developer Site from your Office 365 admin center.
- c. You can start a free 30-day free trial or purchase an Office 365 developer subscription.
![]() Note Further information on all three paths to a Developer Site can be obtained from the sign-in link provided in step 1.
Note Further information on all three paths to a Developer Site can be obtained from the sign-in link provided in step 1.
- 3. Once you have finished the sign-up process, you will be redirected to your Office 365 Admin Center page. Before you can begin building SharePoint Apps, you must wait for your SharePoint site to be provisioned, which may take a few additional minutes. Once SharePoint has been provisioned you can begin developing Apps, although you might first want to install the Napa Development Tools.
Installing Napa Development Tools
The Napa Development Tools App affords you the ability to build apps for both Office and SharePoint within a browser, without having to install any additional tools such as Visual Studio 2012. All you will need to do is add the Napa Development Tools App to your Office 365 SharePoint Online Development Site, launch the tool, and create an app for SharePoint all in the browser. An added plus is that once you are ready to leverage the power of Visual Studio, the Napa Developer Tools App provides a quick and easy method to download your project and resume your app development within Visual Studio itself.
- Log in to your Office 365 account and on the Admin Center page, click the Build Apps link at the top of the page.
- You are redirected to your SharePoint Online Developer Site home page. Click the Build an app tile to launch the App Development tool.
- If you have not yet added the Napa Development Tools App to this site, you will be redirected to the App Store to add it. The app is free and you will be asked to log in to the App Store to add the app. After the app has been installed, you are asked if you trust the Napa Office 365 Development Tools, which you must trust to continue.
- You will be redirected to your Developer Site. Return to your Developer Site home page and click the Build an app tile again. This time you are redirected to build a new app, using the power of the Napa Development Tools.
Additional Office 365 Developer Site Resources
TechNet provides an extensive array of additional resources for developing apps with Office 365 and SharePoint Online.
- Create apps for Office and SharePoint by using “Napa” Office 365 Development Tools
- How to: Create a basic app for SharePoint by using “Napa” Office 365 Development Tools
- How to: Create a basic SharePoint-hosted app
- How to: Create a cloud-hosted app that includes a custom SharePoint list and content type
Third-Party Cloud-Based Development Environments
To be able to work through every example in this book, you are going to need access to a full installation of SharePoint 2013. Office 365 provides you almost everything you need but as we saw in the previous section, there are limitations. If you are looking for a development environment that comes preconfigured, maybe even with all of the tools you will need installed, third-party clouds are for you.
The third-party cloud solutions that we recommend are different than Office 365. With Office 365 you only have access to your site via a browser-based interface or with a tool such as SharePoint Designer. The third-party clouds we recommend provide you your own virtual machine that includes a full installation of SharePoint. Although you are using the cloud to store your development environment, you are getting full, on-premise-like functionality.
There are multiple companies that provide SharePoint hosting and development services. We introduce three of them.
Cloudshare
Cloudshare provides development virtual machines preinstalled with different flavors of SharePoint including SharePoint 2010 and SharePoint 2013. These offerings include different license levels as well as different preinstalled development tools, such as Visual Studio and SharePoint Designer. New environments can be provisioned in minutes and Cloudshare accounts can be paid for on a month-to-month basis. Cloudshare only charges a fixed monthly fee, and they handle all server and software installation and maintenance, as well as all software licensing.
Cloudshare services have become a popular developer tool because of the rapid nature of site deployment and the ability to not have to concern oneself with licensing.
![]() Tip You can learn more about Cloudshare and their services at www.cloudshare.com. You can sign up for a free Cloudshare trial and be using many of the examples in this book in well under an hour.
Tip You can learn more about Cloudshare and their services at www.cloudshare.com. You can sign up for a free Cloudshare trial and be using many of the examples in this book in well under an hour.
All of the examples in this book were tested on Cloudshare environments, so if you are looking for a no-hassle development environment, this is the service for you.
As an added bonus of this book, we have provided a Cloudshare environment that has been preconfigured with Windows Server 2012, SharePoint 2013, Visual Studio 2012, and SharePoint Designer 2013. Not only that, but this environment also has a full and complete copy of the Specter Group site that we developed throughout this book. This provides you a hands-on site that you can dig into to see the entire site design in action. You can create a trial account at Cloudshare with a preloaded copy of our fully functional demo development server at http://sprwd.com/sprwd-cs-demo.
When you sign up for your trial account using the preceding link, you will be redirected to your Cloudshare account page. It will take a few minutes to create a new VM based on the snapshot of our demo environment. When the process is complete, you should see a page similar to Figure A-1. Two areas have been highlighted in the figure. The first is the minutes you have left until the VM turns itself off. Click Extend to extend your VM to 180 minutes. You can extend this time as often as you need. If the time expires, your VM will hibernate until you access it again. The second button highlighted is the button to click to open your VM directly in your browser.
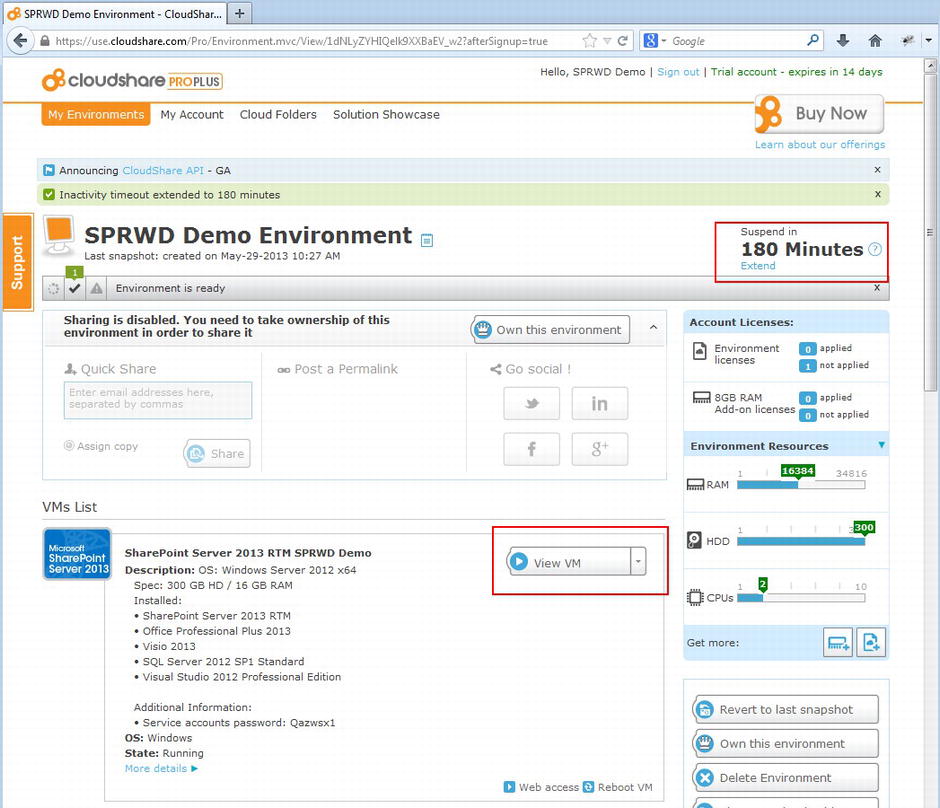
Figure A-1. Cloudshare demo environment account page
After you click the View VM button shown in Figure A-1, your VM will launch in your browser (see Figure A-2). Notice the icons in the upper right corner that allow you to view the VM in full screen mode and other views. You can even use Remote Desktop Connection Manager to connect to this VM using a Remote Desktop Connection. We also highlighted the VM settings menu tab found on the left of your browser where you can find VM settings including VM account information.
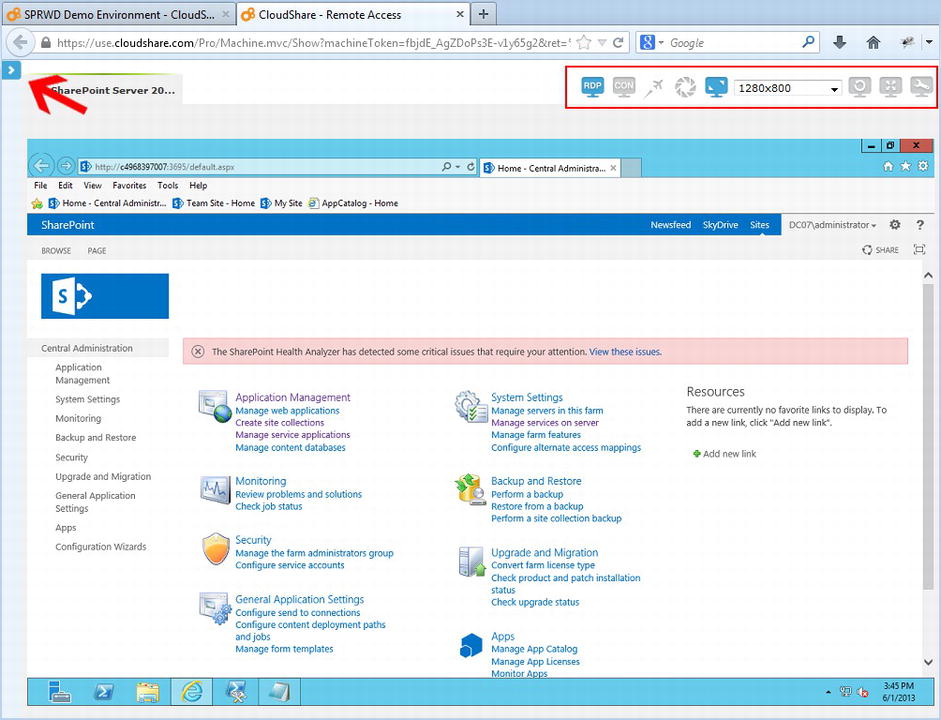
Figure A-2. Demo Cloudshare VM
There is much you can do with Cloudshare. We hope that even if you have your own on-premise or cloud-based development environment, you find that the demo VM helps you benefit from the material in this book. To learn more about how to use Cloudshare VMs, visit http://support.cloudshare.com.
Rackspace Services for SharePoint
If you are looking for a full installation of SharePoint in a cloud-based environment that is for development as well as ready for prime time, you will need an enterprise-level hosting service such as Rackspace. Rackspace has been providing site, server, and cloud hosting services for many years. They also provide tailored SharePoint hosting services.
The difference between a service such as Cloudshare and Rackspace is that Rackspace provides an always-on, enterprise-ready environment for full-fledged production sites as well as development servers. Rackspace does not offer all of the development tools preinstalled, nor will they handle all of the licensing for you. The server deployment process with Rackspace takes longer than with Cloudshare, but that is because you get to pick and choose what you want to install and how you want to install it.
![]() Tip You can learn more about Rackspace SharePoint services at www.rackspace.com/enterprise_hosting/sharepoint/.
Tip You can learn more about Rackspace SharePoint services at www.rackspace.com/enterprise_hosting/sharepoint/.
Windows Azure Infrastructure Services
Microsoft offers another cloud-based hosting solution that is more in line with the offerings of Rackspace Services for SharePoint. This service is a part of Windows Azure, Microsoft’s general cloud computing initiative, and is called Windows Azure Infrastructure Services.
With this cloud solution, Windows Azure handles the servers, network, storage, and virtualization while providing you an open environment to easily provision your own virtual machines. Windows Azure Infrastructure Services’ pricing model might be attractive to you when used for development as they offered metered usage. This means that you only pay by the hour while your virtual machines are active and when you are accessing your development environment.
Similar to Rackspace SharePoint services, with Windows Azure Infrastructure Services, you have to manage software licenses and software installation including account management. Essentially Windows Azure Infrastructure Services provides you almost all of the pros and cons of an on-premise development environment without having to manage the hardware.
![]() Tip You can learn how to create and set up an entire SharePoint 2013 Lab in the Cloud with Windows Azure Infrastructure Services at http://sprwd.com/cjqxzhg.
Tip You can learn how to create and set up an entire SharePoint 2013 Lab in the Cloud with Windows Azure Infrastructure Services at http://sprwd.com/cjqxzhg.
Choosing a Development Environment
Now that we have seen different types of development environments, we can determine which one is right for you. One method to determine the right environment to base your decision on your goals. Which examples in this book are most important to you? By looking at the tasks that you wish to accomplish, we can determine the best environment.
If you choose to use a cloud-based development environment, the best way to decide is to determine what your end needs are. Cloudshare provides a very inexpensive virtual machine development environment that you can create, remove, and replace in minutes. Cloudshare is best for those who want a development environment quickly but are willing to sacrifice some server configuration options. Rackspace, on the other hand, provides enterprise-level hosting services that are useful from development to full production on a large-scale farm. If you are looking for a more robust solution but are not as concerned about cost or the added time it might take to set up a development environment, Rackspace or Windows Azure is your best bet.
![]() Tip If you do not have a preexisting development environment available to you, and you wish to be able to work through all of the examples in this book, we recommend Cloudshare as the most cost-effective, hassle-free, feature-rich development environment.
Tip If you do not have a preexisting development environment available to you, and you wish to be able to work through all of the examples in this book, we recommend Cloudshare as the most cost-effective, hassle-free, feature-rich development environment.
Development Environment for Branding
To a great extent, the examples in this book relate around specific HTML and CSS design and UI tasks that might arise while branding a SharePoint 2013 site. As we have seen, most branding is accomplished with custom master pages, page layouts, CSS style sheets, images, and JavaScript files and libraries. None of these file types require a client-based .NET compiler such as Visual Studio 2012, nor do they require being built and deployed as an app. This being the case, your development environment can be much less complex than for developing apps. Your development environment could be any SharePoint installation that you have access to, including an off-site SharePoint development installation as well as a local virtual-machine-based SharePoint installation. Because you will access SharePoint using WebDAV with a client application such as Adobe Dreamweaver or SharePoint Designer 2013, you do not require direct access to the SharePoint hive the way you might for app development.
Therefore, if you are more interested in the branding aspects of this book, either an Office 365 Development Site or a cloud-based virtual machine from Cloudshare would work great. If, on the other hand, you intend to create and publish a branding app for SharePoint, you will likely need to consider an Office 365 Developer Site. This solution provides you the ability to create, package, and sell your branding App to the App Store much more quickly than with Cloudshare. Although this type of app development is outside of the scope of this book, in the case of a branding app, you would need a local installation of Visual Studio.
App Development Environment
App development, such as the Geolocation App developed in Chapter 12, might require a different type of development environment. This will depend on where you wish to host the app. As shown in Chapter 12, if you do not require access to server code (i.e., can use the JavaScript Object Model or the Client Side Object Model), a SharePoint hosted app will work. If this is the case, your development SharePoint installation need not be local, but does need to be configured with an isolated app domain. Office 365 is ideal in this situation.
If, on the other hand, your app requires full control permissions or access to server-side controls, your development environment must be a local, full SharePoint installation configured with an isolated app domain and Visual Studio 2012. In this case, without access to a local development environment provided by your organization, a third-party cloud provider such as Cloudshare is the way to go.
Successful SharePoint branding projects require certain types of software, many of which we describe and use throughout this book. We provided a list of software that you will need to have to work through the examples in this book in the Introduction. Next we introduce additional types of software that might help you with your project as well as specific software packages that we use ourselves and recommend.
Web Editor
Essentially every SharePoint 2013 branding project you encounter will require some sort of web site editing tool. With the power of WebDAV, any text editor will do, as you can map your SharePoint site’s WebDAV directory in Windows Explorer. As we show in Chapter 4, we also can use WebDAV how to map to this directory on a Mac as well. Once your SharePoint site’s WebDAV directory has been mapped, you can open .html, .css, and .js files, as well as copy images and other assets directly to your SharePoint site. Something as simple as Notepad might suffice. There are many more powerful tools that can help you write HTML and CSS code.
If you have branded a SharePoint 2010 or SharePoint 2007 site before, you are probably familiar with SharePoint Designer (SPD). With the new release of SharePoint 2013, Microsoft again released a new version of SPD, SPD 2013. Most of the features available to us in SPD 2010 are also available to us in SPD 2013, except a few very important features, the most popular of which was the Design View in SPD 2010. The Design View has been removed from SPD 2013, so we can only work with .html, .master, and .aspx pages in Code View.
SPD 2013 is offered as a free download from Microsoft and can be found at www.microsoft.com/en-us/download.
Pros:
- Free.
- Connects quickly and natively with SharePoint 2013.
- Includes many additional tools such as the ability to insert web parts directly into your code.
- Provides additional functionality such as the ability to check in, check out, and publish files.
- Can set the default and custom master page without having to use the browser.
- Includes intelliSENSE for standard HTML and CSS tagging.
- A generally all-around web editor for SharePoint 2013 branding assets.
Cons:
- There is no Design View or WYSIWYG editor.
- Does not natively recognize HTML5 or CSS3 tags.
- Ongoing support from Microsoft might be limited. There is no guarantee that the next version of SharePoint will include an updated version of SPD.
Adobe Dreamweaver, currently a part of Adobe’s Creative Suite, was just recently added as a valuable tool for directly branding SharePoint sites with the addition of Design Manager and general connectively with WebDAV now included with SharePoint 2013. Dreamweaver has been around for quite a while, and assuming you are using one of the more recent versions of Dreamweaver including CS6 or later, you can use many of the design features available in Dreamweaver for HTML5 and CSS3. Dreamweaver also includes a Design View like interface if you need to make simple design changes to a HTML master page or HTML page layout.
Using WebDAV, Dreamweaver can map itself to your SharePoint 2013 Master Page Gallery, thus allowing Dreamweaver to think it is working on a general site while SharePoint 2013 will handle the conversion of the .html files to .master and .aspx files.
Pros:
- A part of a very powerful suite of web site design tools, Adobe’s Creative Suite.
- Recognizes HTML5 and CSS3.
- Includes autocomplete and tag assistance (i.e., intelliSENSE).
- Contains SPD 2010 Design View like features.
- Is generally one of the powerful HTML5/CSS3 web site design tools available.
Cons:
- Is not free.
- Does not natively connect to SharePoint 2013, meaning you must check out, check in, and publish files via the web interface or SPD 2013. Also does not provide access to set the default or custom master page. This too much be completed in the browser.
- The Design View is not perfect, as the HTML page layouts do not always include all of the necessary HTML for a perfect view of how a page layout might appear.
Another popular free tool for web site editing is Notepad++ (http://notepad-plus-plus.org/). Notepad++ is a very simple yet powerful source code editing tool for many languages, including HTML, CSS, and JavaScript. Be aware that this is a coder’s tool; that is, it is for those of us who do not miss Design View in SharePoint 2013 because we never used it anyhow because it would mess up our HTML. If you are a coder and want an extremely lightweight tool to connect to your SharePoint 2013 branding assets, this is for you.
Pros:
- It’s free.
- Excellent, simple coder’s tool, providing a very lean program with little simple overhead so it loads fast and uses far fewer CPU cycles and memory than other design tools.
- Provides native recognition of most HTML, CSS, and JavaScript code, providing color coding and indentation.
Cons:
- Does not have any sort of Design View; this is a tool primarily for coders.
- Does not include autocomplete and tag assistance.
- Does not natively connect to SharePoint 2013, meaning you must check out, check in, and publish files via the web interface or SPD 2013. Also does not provide access to set the default or custom master page. This too much be completed in the browser.
You will want to use Visual Studio 2012 (Ultimate, Premium, or Professional) if you intend to develop SharePoint Apps, especially those that will not be SharePoint hosted. As we saw previously in this Appendix, if you plan to develop simple apps for SharePoint, you might consider an Office 365 Developer Site using the Napa Development Tools App, as that way you can use a browser-based version of Visual Studio. For complex apps, a locally installed version of Visual Studio 2012 is the way to go.
Microsoft provides Visual Studio as its premier application development tool. This tool can do it all from C++ development to Visual Basic development and of course SharePoint 2013 branding and app development. As of December 2012, Expression Blend, Microsoft’s primary competitor for Adobe Creative Suite, is being discontinued and bundled directly into Visual Studio. It appears as though Visual Studio might become the go-to tool for branding SharePoint 2013, although many developers already use Visual Studio for App development as well as for branding.
If you are building an app for SharePoint 2013 that utilizes the server-side object model, Visual Studio 2012 must be installed on the environment where SharePoint is hosted. With SharePoint 2010, we used to be able to install SharePoint directly in Windows 7 or Windows 8, but with SharePoint 2013, this is no longer the case. If you intend to use the client-side object model, you can connect a Visual Studio 2012 project to a SharePoint 2013 or Office 365 Developer Site for app development.
![]() Note Learn how to create Office 365 and cloud-based development environments earlier in this Appendix.
Note Learn how to create Office 365 and cloud-based development environments earlier in this Appendix.
When you install Visual Studio 2012 and Office Developer Tools for Visual Studio 2012, you get all of templates and tools to develop SharePoint 2013 on your local development machine.
Visual Studio Installation and Configuration
Installing Visual Studio and configuring it for SharePoint development is not difficult, but there are additional tools you will need to install.
- Install a typical installation of Visual Studio 2012. Refer to MSDN for general instructions: http://sprwd.com/32nyugj.
- After you have installed Visual Studio, you must download and install the Microsoft Office Developer Tools for Visual Studio 2012. Download this from MSDN at http://sprwd.com/ydnthq.
The Microsoft Office Developer Tools for Visual Studio 2012 will help you develop Apps for SharePoint-hosted, provider-hosted, and autohosted SharePoint Apps. If you intend to target x64-bit applications, you will need to install the x64-bit versions of the tool assemblies separately.
Although not directly required, it might be difficult to work with images needed throughout a site, including background images and textures and general site images without an image editor of some kind. We recommend any of the following.
Adobe Photoshop, also a part of Adobe’s Creative Suite, is the go-to tool for image creation and manipulation. This is a powerful tool for creating site mockups as well as creating, editing, and manipulating specific site images. Learn more at www.adobe.com/products/photoshop.html.
GNU Image Manipulation Program (GIMP; www.gimp.org) is an open source image manipulation program, very similar to Adobe Photoshop. Gimp is free, which is a huge plus, but if you are used to Photoshop then be ready for a shift in the development environment. The Gimp user interface is very different than the user interface for Photoshop. Once you get used to Gimp’s interface, you will likely find that Gimp is just as powerful and feature rich as Photoshop.
Adobe Illustrator
Adobe Illustrator, again a part of Adobe’s Creative Suite, provides a vector-based graphics tool. Illustrator was originally used for print projects such as banners, flyers, pamphlets, and so on, but for quite a while now it has also been used for web site mockup development as well as vector-based image creation. If you have not used a vector-based graphics program such as Illustrator you might be in for a shock. You will find that Illustrator has powerful mockup tools that can help you create images that can scale quickly and near perfectly because of the vector-based properties of graphics storage within Illustrator.
A big plus with Illustrator is that if you create image assets such as logos, background textures, and so on, in Illustrator, you can quickly copy these over to Photoshop or Gimp, even if you need to provide pixel placement of additional elements.
Xara Web Designer (www.xara.com/us/products/webdesigner/) is a very simple yet powerful web site design tool, targeting web site builders. The tool is inexpensive, yet it provides a feature-rich, template-based solution that gives the designer complete control of page layouts. It is kind of like a mashup of a web site editing tool such as Dreamweaver and a graphics tool such as Photoshop. The end mockups can be saved as layered Photoshop files for additional editing in Photoshop or even Gimp. But as an added plus, as you are creating a mockup of your sites and page layouts, Xara Web Designer also creates the HTML, CSS, and JavaScript necessary to generate the look you design. Xara Web Designer is therefore not only a graphics tool, but a light web site editor tool as well. We list it here as an image editor tool because you will likely want to use another web editor tool such as SPD, Dreamweaver, or even Notepad++ to tweak the HTML published by Xara Web Designer before importing your code to SharePoint 2013 Design Manager.
Summary
In this appendix we reviewed the different development environments available to you, including on-premise development, development for Office 365, and development on a cloud service such as Cloudshare. We dove into each environment type and walked through the installation or setup process. We concluded with a look at the different software packages that will make working with and developing for SharePoint 2013 possible.