
![]()
What’s New in SharePoint 2013 Web Content Management
SharePoint 2013 introduces new and improved features for web content management that simplify how we design Internet sites and enhance the authoring and publishing processes for our organization. This chapter provides an overview of the new features for web content management in SharePoint 2013. We also look at how we will be using these new features in later chapters to build our example web site.
In this release of SharePoint, the product offers new content publishing features that enable us to reuse our content across many site collections. With deep integration between Search and Content Management, SharePoint now services dynamic web content across different site collections. We can create a piece of content once and then enable the content to be reused by other publishing sites. Instead of the traditional structured navigation, new in SharePoint 2013, the managed navigation feature allows us to use taxonomy to design site navigation based on business concepts without changing site structures. The new feature also allows us to create seach engine optimization (SEO)-friendly URLs derived from the managed navigation structure. To support multilingual content on a site, SharePoint 2013 now has an integrated translation service that lets content authors select content for human translation or machine translation.
Responsive web design is important in modern Internet sites. SharePoint 2013 has been rearchitected to provide better support for HTML5, CSS3, and JavaScript. With the rapid growth of mobile devices, we need to ensure our site can handle mobile browsers. For the first time, SharePoint provides the ability to target a different look and feel for different devices with the new device channel feature. There are times when we need to extend SharePoint to add rich interactive features to our site. SharePoint 2013 allows us to do that with significant enhancements and added features to the SharePoint Client Object Model. For content authors and designers, new features for publishing sites minimize the special SharePoint knowledge required to successfully design and brand a SharePoint site. Designers and developers now have the flexibility to use the tools and technologies with which they are familiar.
SharePoint 2013 offers new features in site design, authoring, presentation, content reuse, metadata-driven navigation, adaptive experiences, device channels, and client object model.
Search-Driven Publishing Model
A SharePoint site collection is a structure of sites that is made up of one top-level site and many sites below it. The sites in a site collection can share many features, resources, designs, and content to provide end users with a unified web site experience within the same site collection. Before SharePoint 2013, for the purpose of publishing, we often had to implement two site collections: one for authoring the content and one for production. We were restricted to service content from only a single site collection. We had to build custom solutions to get content across multiple site collections. Now with SharePoint 2013, we can create and publish content to be consumed in one or more publishing site collections.
SharePoint 2013 uses search to service dynamic web content on sites and to provide user-behavior-driven recommendations. We start by enabling a list or a library as a catalog. Then the content in the catalog gets crawled and added to the search index. The new Cross-site publishing feature uses search technology to retrieve content from the search index. Refer to the section “Cross-Site Publishing” later in this chapter for more information. The content can then be displayed in a target publishing site collection by using one or more Content Search web parts, which is also a new feature in SharePoint 2013. Refer to the section “Content Search Web Part” later in this chapter for more information.
The new content model for SharePoint 2013 sites is centered on two main components: search index and shared metadata. With the content stored in the search index, metadata stored in the Term Store database, and analytics stored in SharePoint database, all the published content can be serviced to users through query rules and a recommendation engine. See the sections “Analytics and Recommendations” and “Query Rules” later in this chapter for more information. When consuming published content, SharePoint can automatically generate rollup pages for different categories of the content, which can lead to the content’s item detail pages, called Category pages. Refer to the section “Category Pages” later in this chapter for more information. Each of these pages is based on a template that can be customized by developers, known as a display template. See the section “Display Templates” later in this chapter for more information.
Cross-Site Publishing
New in SharePoint 2013, Cross-site publishing lets us store and maintain content in one or more authoring site collections, and the content can be displayed and serviced in different target site collections. When the content is changed in an authoring site collection, those changes are displayed on all site collections that are reusing this content as soon as the content has been recrawled.
![]() Tip The Cross-site publishing feature is only available in the Enterprise edition of SharePoint 2013. This feature is not available on Office 365 as of now. For more up-to-date information on feature availability on SharePoint online and license requirements, refer to Microsoft TechNet at http://sprwd.com/dhmpvbk.
Tip The Cross-site publishing feature is only available in the Enterprise edition of SharePoint 2013. This feature is not available on Office 365 as of now. For more up-to-date information on feature availability on SharePoint online and license requirements, refer to Microsoft TechNet at http://sprwd.com/dhmpvbk.
To enable a piece of content to be reused and shared, we need to activate the Cross-Site Collection Publishing feature on the authoring site collection containing the content. Similarly, to enable a target publishing site collection to consume published content, we also need to enable this feature on the target site collection. We can enable a site collection to use this feature on the site settings page by enabling the Cross-Site Collection Publishing site collection feature, as shown in Figure 1-1.

Figure 1-1. To use Cross-site publishing, enable the Cross-Site Collection Publishing feature
![]() Note You can learn more about Cross-site publishing in SharePoint 2013 in Chapter 8, when we demonstrate how to enable content in a list or library for reuse and how to consume the published content by a target site collection for our example site.
Note You can learn more about Cross-site publishing in SharePoint 2013 in Chapter 8, when we demonstrate how to enable content in a list or library for reuse and how to consume the published content by a target site collection for our example site.
Content Catalog
SharePoint 2013 has added the ability to designate any library or list as a catalog. Once Cross-Site Collection Publishing is enabled on a site collection, we can enable any library or list as a catalog. We can use one or more catalog-enabled lists to store information or web content. Using Cross-site publishing allows this information to be displayed and reused in one or more publishing site collections.
A catalog is a helper feature that defines behaviors on the list or library to ensure the content is available as published catalogs via search. A catalog is registered within search for predefined queries. It tells search that the content is a catalog and is “published” across site collections. It also tells search not to remove the HTML markup in the index so that it can be used to serve as published pages directly from search results. This allows content authors to have a central content authoring site, working with products or articles in a list-like fashion, and rendering it in different ways to end users. Once a list or library has been enabled as a catalog, a result source is automatically created for the list or library. The result source for a list or library limits the search scope to the content within the library or list. This will become very useful, as we will see in later chapters, when we need to limit a query in the new Content Search web part, a feature that is a part of the search-driven publishing model in SharePoint 2013, to a particular list by using the list’s result source.
![]() Note To learn more about the Content Search web part, refer to Chapter 9.
Note To learn more about the Content Search web part, refer to Chapter 9.
Category Pages
When we need to display content in a catalog in the same manner, we can create a Category page. Category pages are page layouts that display structured content. As discussed previously, new in SharePoint 2013, the managed navigation feature enables us to design site navigation based on business concepts instead of static site structure. SharePoint uses a managed metadata service to define and manage terms and term sets that can now be used for site navigation. For more information on how to set up and use a managed metadata service in SharePoint 2013, refer to the Microsoft TechNet documentation at http://sprwd.com/meztskk.
![]() Note To learn more about how to set up terms and term sets using the managed metadata service and how to create managed navigation using these terms, refer to Chapter 6, as we walk through the process of creating dynamic navigation for our example site.
Note To learn more about how to set up terms and term sets using the managed metadata service and how to create managed navigation using these terms, refer to Chapter 6, as we walk through the process of creating dynamic navigation for our example site.
We can associate a Category page with a specific navigation term in a term set that is used for managed navigation. When users click on a specific navigation term in the site navigation, they are routed to the corresponding Category page. The Category page has been configured with Content Search web parts. We can specify the query in the Content Search web part to use the current navigation term as part of the query. Then every time users browse to the Category page, the predefined query is automatically issued, and it returns and displays results from the search index.
Content Search Web Part
Previous versions of SharePoint used the Content Query web part (also known as CQWP) for content aggregation and rollup. The Content Query web part is still available in SharePoint 2013, but it can only aggregate data within a single site collection, it can only aggregate list information, and to change how results look, we had to customize the XSL of the web part. Similar to the function of the Content Query web part, SharePoint 2013 introduces the Content Search web part to allow developers and designers to pull content from many site collections. The new web part can return any content from the search index. Because the feature depends heavily on search functionality, it is important to note that the more often the search crawls, the more up-to-date the content is. In addition, SharePoint search only crawls major versions of content, not minor versions.
![]() Tip The Content Search web part is ideal for aggregating content from many site collections, for major versioned content, and for frequently indexed content. If displaying instant content in a single site collection is a must, use the Content Query web part instead. If you want to display minor versions of the content in a single site collection, you need to use the Content Query web part instead. If you need to return results from a site that has been marked to not be indexed, you need to use the Content Query web part instead.
Tip The Content Search web part is ideal for aggregating content from many site collections, for major versioned content, and for frequently indexed content. If displaying instant content in a single site collection is a must, use the Content Query web part instead. If you want to display minor versions of the content in a single site collection, you need to use the Content Query web part instead. If you need to return results from a site that has been marked to not be indexed, you need to use the Content Query web part instead.
Each Content Search web part is associated with a search query and displays the results for that search query. The query can be designed to pull content based on values on the page or within the URL. The results are then exposed to the page in JSON format. We can then use display templates to change how search results appear on the page. Display templates are snippets of HTML and JavaScript that render the information returned by SharePoint.
![]() Tip The Content Search web part feature is only available in the Enterprise edition of SharePoint 2013. It is also not available on Office 365 as of now. For more up-to-date information on feature availability on SharePoint online and license requirements, refer to Microsoft TechNet at http://sprwd.com/dhmpvbk.
Tip The Content Search web part feature is only available in the Enterprise edition of SharePoint 2013. It is also not available on Office 365 as of now. For more up-to-date information on feature availability on SharePoint online and license requirements, refer to Microsoft TechNet at http://sprwd.com/dhmpvbk.
To configure a Content Search Web Part, we have to first specify a query. This query is issued each time a user visits the page the web part is on. It is especially powerful when it is used in combination with managed navigation and Category pages, as we discussed earlier. We can restrict what results are returned from the web part by configuring the refiners and the query properties of the web part. We can restrict the results to content tagged with the current navigation term or content tagged with a static metadata term. The web part contains a query builder that helps us construct the query. The query builder also shows a real-time preview of the search result as we are configuring the web part. Figure 1-2 shows the query builder of the web part. The web part has restricted the results to return only items that have been tagged with the “Mobile” term. As shown in the search result preview, to the right of the query building, there are three results in the search index that have been tagged with the “Mobile” term.
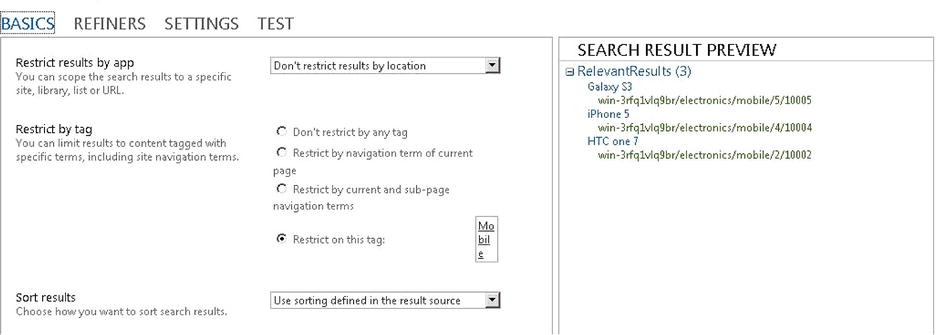
Figure 1-2. Configure the Content Search web part to restrict results by using the current navigation term or static tag
Once the query is defined, the web part also allows us to choose display templates to display the results. We can use the default out-of-the-box display templates offered by SharePoint. We can also create our own custom display templates by extending the basic display templates to customize the display of the results.
![]() Note To learn more about how to configure the Content Search web part and how to create custom display templates, refer to Chapter 9.
Note To learn more about how to configure the Content Search web part and how to create custom display templates, refer to Chapter 9.
Once we have configured all the properties for the web part, the web part will display a set of content that matches the query using the selected display template. Figure 1-3 shows an example of the displayed content.
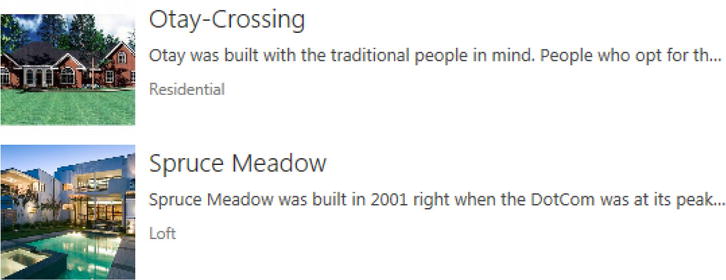
Figure 1-3. The Results web part will display a set of content from the Catalog using a defined display template
![]() Note You can learn more about the end-to-end process of search-driven publishing in SharePoint 2013 in Chapter 9, when we walk through how to publish content from an authoring site, how to consume the content from a target site, and how to customize the presentation of the aggregated content for our example site.
Note You can learn more about the end-to-end process of search-driven publishing in SharePoint 2013 in Chapter 9, when we walk through how to publish content from an authoring site, how to consume the content from a target site, and how to customize the presentation of the aggregated content for our example site.
Product Catalog Site Collection Template
Before SharePoint 2013, when we needed to create sites that were heavy in web content, such as public-facing sites, blogs, or marketing sites, we created publishing site collections to leverage the SharePoint publishing features. Similar to publishing site collections, SharePoint 2013 offers a new publishing site collection template called Product Catalog. Content from Product Catalogs is not just pages and page layouts; it consists of published lists and libraries. The Product Catalog site collection has the Cross-Site Collection Publishing feature enabled by default, the Product content type created to be used for the content’s content type, and the Product Hierarchy term set created for content tagging.
With a site collection that is created with the Product Catalog template, SharePoint guides us through all the steps necessary to set up a catalog of content. Following the guide, we need to first create site columns in the Product Catalog site for the properties of the publishing content so that the content can be searched by and filtered by these properties. For every set of content we plan to publish, we can combine similar properties to create corresponding site content types. The template already includes the default Product content type. Then for each type of content to publish, we can add site columns to the content’s content type. To ensure all content is categorized in the product catalog, we can add terms to the Product Hierarchy term set for mapping. Populate content for all the lists and libraries that have been enabled as catalogs. Enable search to crawl the content. Finally in search, modify the managed properties settings so that users can query and refine search results based on the properties in the catalog.
![]() Note To learn more about the complete end-to-end process of cross-site collection publishing, refer to Chapter 8.
Note To learn more about the complete end-to-end process of cross-site collection publishing, refer to Chapter 8.
Refiners and Faceted Navigation
We just spent some time talking about aggregating content from various site collections. When a page has lots of results, to help users quickly browse to the specific content they are looking for, we can add refiners to the page. Refiners were introduced in SharePoint 2010. They are based on managed properties from the search index. To show refiners on results, we need to ensure the managed properties in the results have been enabled as refiners in search. In SharePoint 2013, with catalogs (published content), managed properties represent the properties of items in the catalog-enabled list or library. The old Refinement Panel web part can be used to help users narrow the content from different catalogs.
Faceted Navigation is a new feature in SharePoint 2013 that helps users browse for content more easily by filtering on refiners that are tied to terms in the navigation. We can configure different refiners for different terms in the navigation so that users can use different sets of properties to narrow content depending on the navigation term. With Faceted Navigation, users can find the relevant content for each category faster.
Earlier, we talked about creating a Category page for every category of the content. Each Category page is configured to show items in a category as represented by a term in the navigation. Using Faceted Navigation, we can configure different refiners for different terms (categories) in a term set without having to create additional pages by allowing different terms to share the same category page. For example, we have an Internet site for a restaurant. Our content is a catalog of dishes. A term set is used to categorize different types of dishes, such as appetizers and desserts. The same Category page is used for both terms. After we enable the managed properties of salad and ice cream as refiners, we then configure Faceted Navigation so that salad is shown as a refiner for appetizers and ice cream is shown as a refiner for desserts. The user will see friendly URLs for both appetizers and desserts—http://restaurantname/menu/appetizers and http://restaurantname/menu/desserts—but in fact, both of these URLs will route the user to the same category page with different refiners.
Analytics and Recommendations
In SharePoint 2013, there is a new Analytics Processing component that runs analytics jobs to analyze content in the search index and user actions that were performed on a site to identify items that users perceive as more relevant than others. The new functionality for displaying content recommendations based on usage patterns uses the information from the analytics. By including recommendations on a page, we can guide users to other content that might be relevant for them. For example, like Amazon, we can guide users to popular items in a category or inform them that users who viewed one item also viewed another specific item. User actions on the site are counted and analyzed. Analytics data can influence search relevance based on content usage. The data is deeply integrated with the search engine. Calculations are injected into the search index as sortable managed properties.
Developers can extend the analytics engine using custom events. We could change the weight of a specific event based on our own custom criteria. For example, when someone rates an item with a Like on Facebook, the recommendation weight is 5. When someone buys an item, the recommendation weight becomes 20.
We can guide users by adding recommendations to the search results page. We can show the user what other users who viewed this document also viewed by configuring the Recommended Items web part to display recommendations for the item the user is viewing. We can also show the user the most popular items in this category by configuring the Popular Items web part to display the most popular items that satisfy the query.
Query Rules
In SharePoint 2010, to improve relevance on specific queries, we could promote results to the top of the page by creating Search Keywords and Best Bets. Now in SharePoint 2013, both Search Keywords and Best Bets are replaced by Query Rules. With Query Rules, instead of matching specific queries, it infers what the user wants. For example, when a user searches for “holiday pictures,” the Query Rules interprets it to show the user relevant image results with the word “holiday.” When a user searches for “expense sheet,” Query Rules promotes Excel spreadsheets that contain the word “expense.” Instead of promoting specific results, it promotes blocks of results relevant to the user’s query.
![]() Tip During an upgrade from SharePoint 2010 to SharePoint 2013, all existing Search Keywords will be automatically transformed into Query Rules. To create a Query Rule that acts like a Search Keywords feature, use the Query Matches Keyword Exactly condition when creating the Query Rule.
Tip During an upgrade from SharePoint 2010 to SharePoint 2013, all existing Search Keywords will be automatically transformed into Query Rules. To create a Query Rule that acts like a Search Keywords feature, use the Query Matches Keyword Exactly condition when creating the Query Rule.
Each Query Rule has its own context, which refers to the set of content (Result source) to which the Query Rule applies. For example, we can create a Query Rule for all the local SharePoint sites or we can create one that only applies to all pages libraries. For the latter, when search is conducted against all pages libraries, the Query Rule created for that context will be applied.
Query Rules can be very powerful using all the different out-of-the-box conditions, and in addition, we can even create advanced conditions using regular expressions. For example, one of the out-of-the-box conditions for a Query Rule is Query Matches Dictionary Exactly, which means the Query Rule is applied when the query matches one of the terms in a term set. This can be very useful when we want to return results for searches against a category of products or a business unit. Another powerful condition that can guide users is Result type commonly clicked. With this condition, the Query Rule looks at the user’s query. If people who executed the same query in the past found a particular result type (file type) useful, then the Query Rule applies. With this type of Query Rule, we can execute another query to return results of that result type (for instance, for a particular file type).
![]() Note To learn more about how to create your own Query Rules, refer to Chapter 9.
Note To learn more about how to create your own Query Rules, refer to Chapter 9.
Metadata and Navigation
With the new Managed Navigation feature, we can now define the structure of our site by tagging the content with business terms, which ensures the navigation on the site is aligned with the content.
![]() Tip Managed Navigation is only available in the Standard and Enterprise editions of SharePoint 2013. It is also available on Office 365. For more up-to-date information on feature availability on SharePoint online and license requirements, refer to Microsoft TechNet at http://sprwd.com/dhmpvbk.
Tip Managed Navigation is only available in the Standard and Enterprise editions of SharePoint 2013. It is also available on Office 365. For more up-to-date information on feature availability on SharePoint online and license requirements, refer to Microsoft TechNet at http://sprwd.com/dhmpvbk.
Taxonomies
Taxonomies and the Managed Metadata Service were introduced in SharePoint 2010. SharePoint uses the Managed Metadata Service to define and manage terms and term sets based on business logic, which can now be used for site navigation. For more information on how to set up and use the Managed Metadata Service in SharePoint 2013, refer to the Microsoft TechNet documentation at http://sprwd.com/meztskk.
SharePoint 2013 builds many new features on top of what SharePoint 2010 introduced. The most important change in managed metadata is the ability to create managed navigation using a term set. Anyone who has worked with managed metadata in SharePoint 2010 can recall only a restricted few users could have write permission to term sets. SharePoint 2013 enabled read and write permissions to groups of users. Term sets now have an “intended use” property to indicate if the term set should be used for tagging, search, navigation, and so on. In the past, term sets and terms were only accessible programmatically via server-side code. Now developers can work with term sets off the server by using client-side object model interfaces. New taxonomy management pages were added to reduce the number of people and instances needed to access the Term Store Manager Administration tool. SharePoint 2010 enabled administrators to copy and reuse terms. SharePoint 2013 introduces pinning, much like reuse, which blocks any changes where it is being reused. A term set or a set of terms can be pinned. Now all these features are available to us at the site collection level, not limited to just the central administration level.
Managed Navigation
In SharePoint 2013, the Managed Navigation feature enables us to create navigation based on taxonomy. We can drive our site navigation and URLs based on Term Store hierarchies derived from business concepts instead of site structures.
We can use the Taxonomy infrastructure to generate URLs and paths to content by using tagging and set the terms as navigation terms. Navigation Term sets are special term sets with the property of isNav. Navigation Term sets and Tagging Term sets can share the same terms. We can have a site collection level term set that can be shared outside of the site collection. We can combine portions of different term sets from different site collections to form the navigation of the whole site. When deciding on navigation, we can have a traditional structured navigation or we can use Managed Navigation.
We can have clean URLs and multilingual URLs for end users. We can copy the Navigation Term set and translate it into the same languages that are used for variations labels. In addition, Managed Navigation allows us to easily reorganize the content by modifying the term set instead of restructuring the actual content. With Managed Navigation, we can minimize the amount of physical pages for our site by using dynamic pages that are shared by multiple navigation terms. A single dynamic page can render different content for multiple navigation terms. Refer to the earlier section “Refiners and Faceted Navigation” for more information.
![]() Note You can learn more about Managed Navigation in SharePoint 2013 in Chapter 6 when we demonstrate how to design site structures and navigation with Managed Navigation.
Note You can learn more about Managed Navigation in SharePoint 2013 in Chapter 6 when we demonstrate how to design site structures and navigation with Managed Navigation.
Friendly URLs
It is important to ensure all web addresses for a modern web site are friendly URLs. Friendly URLs are easy to read and describe the content of the web page, which helps users remember the web address and helps describe the page to search engines.
Together with Managed Navigation and Category pages, we now have friendly URLs for our site. Another new Web Content Management capability in SharePoint 2013 is the native support for SEO. SharePoint 2013 allows content authors to provide SEO properties and metadata within the publishing pages.
We can use terms in a Navigation Term set to create friendly URLs. The URLs of category pages can be built from the terms of Navigation Term sets. Each friendly URL is relative to the root site URL. For example, we have a public site URL, http://spectergroup.com. We can create a new term called Marketing within a term set called Departments. We want to navigate to the marketing Category page by using the friendly URL, http://spectorgroup.com/departments/marketing. We can use Managed Navigation to set the friendly URL of the Marketing term as http://spectorgroup.com/departments/marketing, and the actual marketing page can be anywhere in the site. When users click Marketing in the navigation, they only see a friendly URL, http://spectorgroup.com/departments/marketing , not the actual location of the marketing page.
Content Authoring, Design, and Branding Improvements
Responsive web design has been adopted widely to create web sites that can now provide a user experience tailored to the specific resolution and capabilities of their device without the need to produce specific page layouts for each device. Designers and developers can use the technologies and tools they already know and love for site design and branding.
Content Authoring
Before SharePoint 2013, there were very limited features that helped with content authoring. Any time users wanted to create rich interactive content, they either had to know how to write HTML code or had to create the content in the SharePoint designer. Neither option was ideal for corporate business users.
SharePoint 2013 includes many improvements that can enable an end user to create rich interactive content right within SharePoint. Content authors can now create content that has pictures, videos, rich formatting, Excel tables, and more in Microsoft Word, then copy the content from Word and paste it directly into a Rich Text Editor web part, Content Editor web part, or an HTML field control while SharePoint automatically semantically corrects HTML markup display in the styles defined by the site designer. For content authors who need to work with videos, SharePoint 2013 has new video content type and an improved video upload process. When the user uploads a video to an asset library, thumbnail preview images are automatically created. We can also choose a frame from the video to use as the thumbnail preview image.
![]() Note For automatic creation of thumbnail images, make sure to install the Desktop Experience feature on the SharePoint web front-end servers.
Note For automatic creation of thumbnail images, make sure to install the Desktop Experience feature on the SharePoint web front-end servers.
When users need to embed dynamic content from other sites, they can insert an iframe element into an HTML field on the page. Note that to allow end users to insert iframes on any page, site collection administrators need to customize the field security settings (HTML Field Security) on the site settings page by adding the referenced external domains in the list of default trusted external domains. If users need to display different-sized versions of an image on different pages, they can use the new Image Renditions feature, described next.
Image Renditions
Often, the same image needs to be used across a site in standard formats. We might need to ensure all the images are consistent in size. Content authors might need to crop target areas of pictures. In SharePoint 2013, we can generate different renditions of the same image from the same source file. Site owners can specify the height and width for all images and create multiple renditions of an image. When content owners want to use an image on a page, they can select the image and the rendition they want to add. When first requested, SharePoint generates the image according to the rendition and saves the images to the SharePoint web front-end server’s disk for future requests.
![]() Note To use Image Renditions, we must enable the BLOB cache feature. For more information on how to configure BLOB cache, refer to http://sprwd.com/46zufa6.
Note To use Image Renditions, we must enable the BLOB cache feature. For more information on how to configure BLOB cache, refer to http://sprwd.com/46zufa6.
Image previews for an image rendition are by default generated from the center of the image. We can adjust the image preview for an image by selecting and resizing the portion of the image we want to use. Image Rendition can improve site performance by using smaller versions of images, which will reduce the size of the file download required by the client. To use Image Rendition, click Image Renditions on the site settings page. Create a new image rendition by specifying a name and the width and height in pixels for the rendition. To use the rendition, add an image to a page, then click Edit Image Properties to select the image rendition to apply from a list of renditions. Another way to use an image rendition is to specify a value in the RenditionID property for an image field control. We can also use an image rendition by pointing the image URL to a URL that has the RenditionID parameter.
Branding
Branding in SharePoint has always been a huge undertaking. New features for publishing sites in SharePoint 2013 minimize the special knowledge required to successfully design and brand a SharePoint site. To brand a SharePoint site, designers can create a site design as they typically would by implementing HTML, Cascading Style Sheets (CSS), and JavaScript. Designers can create these design files using the design tool with which they are familiar, whether that is Adobe Dreamweaver, Microsoft Expression Web, or another HTML editor. Unlike before, you do not have to use SharePoint Designer or Visual Studio 2013 to brand a SharePoint site. Designers now have the flexibility to use the tools of their choice.
The process for web design in SharePoint 2013 is to start with tools like Dreamweaver. SharePoint 2013 allows developers and designers to copy non-SharePoint-specific design assets and upload them to SharePoint. Then, SharePoint infrastructure takes the HTML and CSS files uploaded and automatically converts them to SharePoint specific assets (*.master and *.aspx).
Figure 1-4 is a process flow diagram of design and branding in SharePoint 2013.
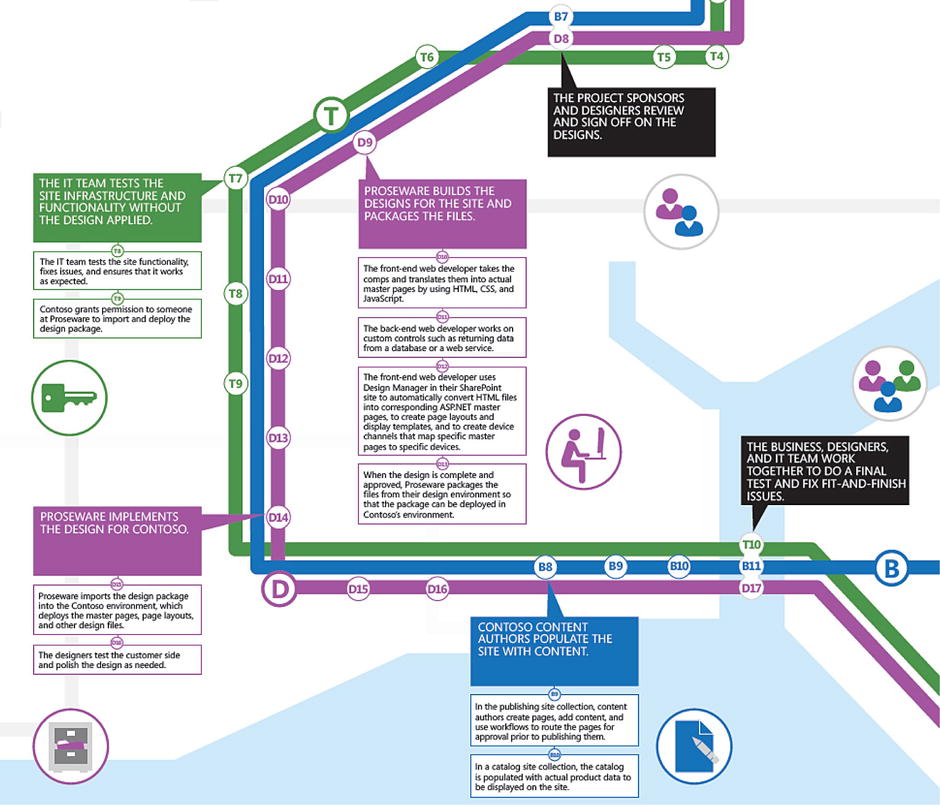
Figure 1-4. A process flow diagram of design and branding in SharePoint 2013
- We start with the customer’s project sponsors and the design agency review and sign off on the designs.
- Then the design agency takes the comps and translates them into design files for the site using Dreamweaver or another HTML editor.
- The designer then uses Design Manager in their SharePoint site to automatically convert HTML files into corresponding ASP.NET master pages, to create page layouts and display templates, and to create device channels that map specific master pages to specific devices. Design Manager, Display Templates, and Device Channels are dicussed in more detail later in this chapter.
- Once the design is completed and approved, the design agency packages the files from the design environment into a design package so that the design can be deployed in the customer’s environment.
- The design package is deployed into the customer’s environment, which deploys the master page, page layouts, and other design files.
- Finally, we need to test and polish the design in the new environment as needed.
![]() Note To learn more about branding and how to convert a standard HTML web template into a SharePoint master page using new features in SharePoint 2013, refer to Chapter 4.
Note To learn more about branding and how to convert a standard HTML web template into a SharePoint master page using new features in SharePoint 2013, refer to Chapter 4.
Device Channels
For the first time, SharePoint provides the ability to target a different look and feel for different devices with the new device channel feature. SharePoint 2013 allows us to design sites for multiple screens and browsers—desktop, tablet, mobile, and so on—all served from the same URLs to optimize search engine ranking. A new feature called device channels can help us map devices and browsers to the appropriate master pages, templates, layouts, or panels. For each device channel, we can define devices that are applicable to by adding device inclusion rules with user agent substrings (see Figure 1-5). Device channels are especially useful when we need to define a rendering that is optimal for a specific device.
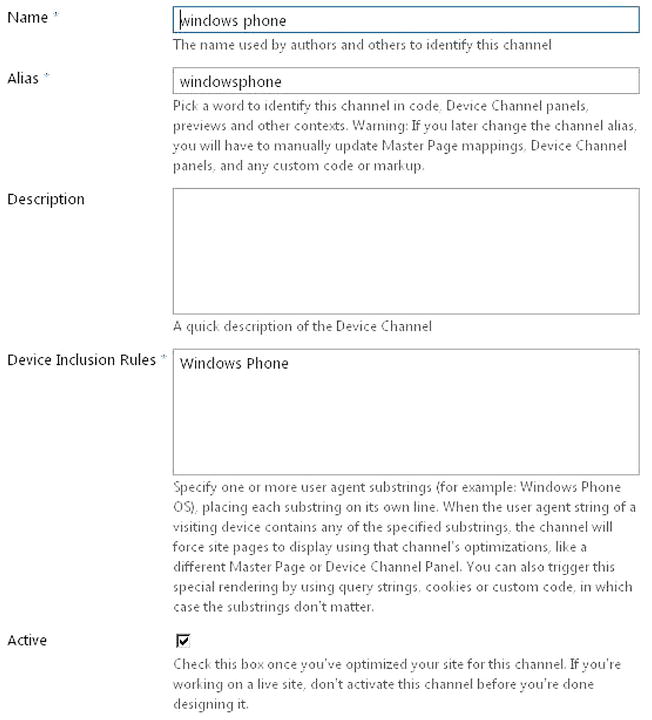
Figure 1-5. For each device channel, define devices that are applicable to by adding device inclusion rules with user agent substrings
A channel can be associated with a master page, allowing for specific branding implementations for specific devices. If we need to create a separate look for the channel, we can customize an existing master page, then publish it before using it as a master page. Once we have the master page we want, we can set the master page for the site and then the master page we want to use for the specific channel.
We can selectively include or exclude portions of page layout for each channel. In the case where a device belongs to multiple channels, we can rank the channels so that devices with a higher ranking get the channel specifically for them first. All page layouts work with all the channels defined. To set the page layout designs apart between channels, we can use the Device Channel Panel control. The Device Channel Panel can be added to a page layout to control what content is rendered in which channel.
![]() Note You can learn more about device detection in SharePoint 2013 in Chapter 5 when we show how to build a responsive web design to target specific devices.
Note You can learn more about device detection in SharePoint 2013 in Chapter 5 when we show how to build a responsive web design to target specific devices.
Design Manager
One of the key features that will help us with branding in SharePoint 2013 is the new Design Manager feature. Design Manager provides one single place to upload design files, edit master pages, edit display templates to customize the display of search results, edit page layouts, publish and apply design, manage device channels for rendering of the site on mobile browsers, and export design packages. To launch Design Manager, shown in Figure 1-6, click Site Settings and then click Design Manager.
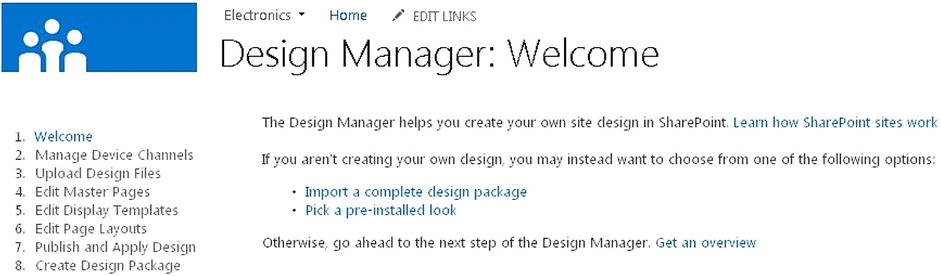
Figure 1-6. Use Design Manager to manage device channels, upload design files, edit master pages, edit display templates, edit page layouts, publish and apply design, and export design packages
Design Manager makes it easy to implement custom branded sites. First, designers can upload design assets (HTML, CSS, images, etc.) to Design Manager in a development environment. We can map the site collection as a network drive to upload the HTML version of the master page, upload CSS and JavaScript files, and access design files for editing. We can also edit SharePoint design files in Dreamweaver by opening the file from the mapped drive.
In SharePoint, designers can customize the master pages and page layouts with real-time preview of all the design components. When customizing the master page and page layouts, Design Manager provides a snippet gallery to make it easier for designers to add SharePoint components to the page. Design Manager generates HTML snippets of the controls so that they can be used in any web design tools. This ensures designers can use any web design tools because SharePoint and ASP.NET markups will be ignored in web design tools. Finally, when everything is completed, designers can export a design package as a *.wsp file to implement the custom branding in a production environment.
A design package contains all the content we have added or changed in the master page gallery, style library, theme library, device channels list, and page content types. Note that a design package does not include pages, navigation settings, or Term Store. In the new SharePoint environment, importing the design package will cause all the design assets in the design package to overwrite any existing files on the site, and the imported design will be applied as the current site design. The site’s default and system master page, theme, and alternate CSS will all be set to the files in the design package.
Design Manager is available at the top-level site of a site collection. It is a feature that is part of the Publishing Portal site template. With Design Manager, we can add custom SharePoint components and ribbon elements. We can use several out-of-the-box SharePoint master pages and page layouts as our starting point to customize our own.
![]() Note You can learn more about how to convert a standard HTML web template into SharePoint master pages using the new Design Manager in SharePoint 2013 in Chapter 4.
Note You can learn more about how to convert a standard HTML web template into SharePoint master pages using the new Design Manager in SharePoint 2013 in Chapter 4.
Snippet Gallery
Designers can now configure SharePoint controls without knowing too much about SharePoint using the Snippet Gallery. We can quickly and easily add more functionalities to our site by adding many out-of-the-box SharePoint components to our pages. The Snippet Gallery is a page that shows us all the SharePoint components we need for the page we are designing. First we select a SharePoint component to add to the page, and then configure its properties, edit the generated HTML, and add CSS to brand the component. Then we can copy the resulting HTML snippet into our design files.
Display Templates
Before SharePoint 2013, to customize the display of search results, we had to write custom XSL to change the look and feel. It was also very limited in how much we could enhance. In SharePoint 2013, built on top of the Core Results web part, display templates can be used to design the presentation of search results. Use provided templates or create custom display templates to define the look and the overall structure of search results, to customize the look of groups of results, and to change how each result item is presented.
![]() Note To learn more about how to create custom display templates, refer to Chapter 9.
Note To learn more about how to create custom display templates, refer to Chapter 9.
Web Content Management Client Side Object Model
Because Web Content Management sites are based on SharePoint sites, lists, and libraries, developers can interact with the content by using standard SharePoint application programming interfaces (APIs). Before SharePoint 2013, to leverage Publishing namespaces, we had to leverage the server-side API. SharePoint 2013 exposes standard APIs to enable client-side and remote development opportunities. Developers can now interact with the content by using the Publishing and Taxonomy namespace in the client-side object model. Most of the server-side APIs are now available in corresponding client-side object model, Silverlight, and JavaScript assemblies. Some SharePoint APIs are even available in Windows Phone framework. To learn more about server-side API reference, client-side API reference, and JavaScript API reference in SharePoint 2013, refer to the Microsoft MSDN documentation at http://sprwd.com/uqaibqq.
![]() Note You can learn more about the SharePoint 2013 client-side object model in Chapter 10 when we show how to build rich interactive forms and in Chapter 12 when we demonstrate how to use the JavaScript client object model to interact with SharePoint lists in a SharePoint App.
Note You can learn more about the SharePoint 2013 client-side object model in Chapter 10 when we show how to build rich interactive forms and in Chapter 12 when we demonstrate how to use the JavaScript client object model to interact with SharePoint lists in a SharePoint App.
Support for Multilingual Sites
Although SharePoint 2010 supported building multilingual web sites using Variations, content translation required a fair amount of manual work. To export content for translation, we have to mark the column containing the content in the site as translatable. Export content for translation then exports all the content in the site to be translated, instead of providing a granular set of content to translate. After we choose Export Variation, all the content, variation information, and translatable field information will be exported into a content migration package. Identifying the content and the relevant fields to be translated is not straightforward. We have to first identify which field to translate by cross-referencing field IDs and then identifying which actual content should be translated.
In SharePoint 2013, the Variations feature continues to make content available to specific audiences on different sites based on the language settings of their web browser. Exporting and importing content for translation is much easier with the new translation package. Each translation package contains one file with source and target language information and the content to be translated. SharePoint 2013 now has an integrated translation service that lets content authors select content for human translation or specify content for machine translation (using the integrated Bing translator). These capabilities not only provide support for multilingual sites, but also ensure that content is created once and reused. After the content is first translated using Variations, the content in different languages is crawled. The result can be rendered in different languages for different audiences on different devices.
![]() Note The Machine Translation Service feature is available in all editions of SharePoint 2013. It is also available on Office 365. For more up-to-date information on feature availability on SharePoint online and license requirements, refer to Microsoft TechNet at http://sprwd.com/dhmpvbk.
Note The Machine Translation Service feature is available in all editions of SharePoint 2013. It is also available on Office 365. For more up-to-date information on feature availability on SharePoint online and license requirements, refer to Microsoft TechNet at http://sprwd.com/dhmpvbk.
Variations for Multilingual Sites
In SharePoint 2010, we could use Variations to make content available to users based on languages, devices, or branding needs. In SharePoint 2013, variation is used exclusively for multilingual sites. The Variations feature copies the content from a source variation site to one or more target variation sites to make the content available to different users across different sites. Users are redirected to the appropriate variable site based on the language setting in their browser. Content authors now have the ability to replicate an entire list or multiple labels on source variation sites to be propagated to target sites. It’s important to note that list items such as documents, images, or announcements propagate independently from pages. The content author only needs to republish the content that was modified. SharePoint 2013 improves performance for variation by enabling bulk export of pages. It creates smaller export packages of content to allow for easy start and stop of the replication of content.
Integrated Translation Service
In SharePoint 2013, content can be automatically translated using the Bing translation service or by exporting the content in industry-standard XLIFF file format for third-party translation. After the content is translated, it can be imported back into SharePoint. We can export content for translation at a granular level, instead of at the site level. Each translation package contains one file with source and target language information as well as the content to be translated. In addition, the navigation taxonomy can be exported for external translation, which enables the site to have multilingual friendly URLs.
![]() Note You can learn more about support for multilingual web sites in SharePoint 2013 in Chapter 14 when we demonstrate how to build multilingual sites using the Variations, Machine Translation Service, and exporting content for third-party translation.
Note You can learn more about support for multilingual web sites in SharePoint 2013 in Chapter 14 when we demonstrate how to build multilingual sites using the Variations, Machine Translation Service, and exporting content for third-party translation.
Summary
With the rapid growth of devices and browsers people use today to access the Internet, there is an immense need to build web sites that use responsive design to adapt to the capabilities of a specific browser or device. SharePoint 2013 has been rearchitected to provide better support for HTML5, CSS3, and JavaScript. For the first time, SharePoint provides the ability to target different devices. Also new to SharePoint, designers and developers have the flexibility to use the tools and technologies with which they are familiar. With significant enhancements to the client object model, SharePoint 2013 allows you to build rich interactive web sites. For the first time in SharePoint, you no longer need to develop custom solutions to service content across site collections. SharePoint 2013 introduces a cross-site publishing feature that works together with search to bring content together across site collections. For the first time in SharePoint, managed metadata is integrated with content publishing to allow you to drive your site navigation and to build friendly URLs based on Term Store hierarchies derived from business concepts instead of site structures.