
![]()
Supporting Multilingual Web Sites
To compete in today’s globalized marketplace for products and services, businesses need to ensure their web sites support multiple languages. The majority of the Internet’s content is in English and as a result, it is also one of the most competitive languages to market in. There are other huge markets to be targeted that are much less saturated and provide more cost-effective marketing opportunities. Potential customers in different markets appreciate businesses that make the effort to provide them information about products and services in their native language. Many users become disengaged with sites that do not facilitate access through their local languages. A company’s web site can demonstrate the company’s maturity and show customers the company is capable of conducting business in multiple languages. The need for multilingual web sites is growing. More companies are making the investment to make their web sites multilingual, which has produced measurable improvements in company sales and customer satisfaction. In this chapter, we build our own multilingual sites using the Variations and Translation Services features in SharePoint 2013.
Multilingual Support
When we create an Internet site, it’s important to note that the instant we publish a page onto the World Wide Web, it becomes global. We need to ensure the site is flexible and adaptable to international requirements. The process is less painful if we plan for multilingual support from the start, before the site first launches. Adapting the site content for international users requires a two-step process: localization and optimization.
The localization aspect requires a professionally qualified native-speaking translator for each of the target languages. The translation of the site is made easier if we use minimal rich media content, as it’s difficult to edit, copy, and perform word counts, processes that are crucial to translation.
To optimize the site for international users, we shouldn’t translate our keywords and phrases directly from our English language site. People might use abbreviations, acronyms, or synonyms to search for products and services locally. We should instead research key terms users use to search for items in their respective markets. We can then incorporate these keywords and phrases into our professionally translated site. We should always keep search engine optimization (SEO) in mind when building modern Internet sites. Having the site content in different languages allows for different versions of keyword targeting and a better chance of attracting more users through search engines.
Most browsers today detect localization of the user, which allows web sites to dynamically display content in the targeted language. In some cases, we might want to consider creating an entrance page or a menu to allow users to choose a navigation language for the site.
Our Scenario
The public Specter Group web site is targeted to showcase community properties to public visitors and potential buyers. Based on market research and census data, most of Specter Group’s communities are located in areas that have a high percentage (40%) of German-speaking population. To attract more visitors, Specter Group plans to provide a multilingual experience on the public site. Specter Group’s objective is to enable users to view content on the site and find the information they need in the language of their choice. Although the majority of the content published in the site will be in English, the most important content about the company and company news will be available in German and English. In addition, Specter Group wants the site to automatically detect the user’s localization and display the content in the target language per the user’s browser settings.
Multilingual Enhancements in SharePoint 2013
Microsoft has made several enhancements in multilingual functionality since SharePoint 2010. Things are much faster, repeatable, and manageable.
Before we dive into specific multilingual features in the following sections, let’s compare the new features in SharePoint 2013 with how things worked in SharePoint 2010. Using features from its predecessors, SharePoint 2013 is still using the Labels and Variations features for translation. The Variations feature has been available since SharePoint 2007. Although variations underwent technical changes in the last few iterations of the product, the concept remains unchanged in SharePoint 2013. When we do translation exports from one site to another variation site, the export packages are much smaller compared to a single big job in SharePoint 2010. Unlike the exported CAB package generated by SharePoint 2010, SharePoint 2013 is now using the industry-standard XLIFF file format to export content for translation to a third-party translation service and to import the content back to SharePoint after it has been translated. SharePoint now relies on timer jobs that run a queue or a replication list. As the queue gets processed, items in the queue get marked as replicated. If we need to stop or pause the replication process for any reason, as soon as the process restarts again, it will go back to the queue or the replication list and continue to process where it left off. This process enables us to publish more than one label at a time.
New in SharePoint 2013, a publishing page’s metadata emits the page’s language for search engines at the time it performs the indexing. Another new feature is the machine-based translation via the Bing Translation service. This allows the content to be automatically translated in the cloud. Before SharePoint 2013, lists and libraries that did not have content pages did not automatically have the content replicated and we did not have the option to enable replication unless the content was referenced from within a page that was replicated. Now in SharePoint 2013, we can replicate a list or library and translate it from one label to another.
![]() Tip The Variations feature is available in the Standard and Enterprise editions of SharePoint 2013. They are also available on Office365 for Midsize business and above. For more up to date information on feature availability on SharePoint online and license requirements, refer to Microsoft TechNet at http://sprwd.com/dhmpvbk.
Tip The Variations feature is available in the Standard and Enterprise editions of SharePoint 2013. They are also available on Office365 for Midsize business and above. For more up to date information on feature availability on SharePoint online and license requirements, refer to Microsoft TechNet at http://sprwd.com/dhmpvbk.
Along with the cross-site publishing feature, host header site collections, and managed navigation features, we now have the ability to have multilingual-friendly URLs. We can export content for translation to a third-party translation service by using the industry-standard XLIFF file format and import the content back to SharePoint after it has been translated. This can be done on an entire label, one page, navigation, or selected items. Instead of pushing the updated content, label owners are notified of changes and can pull content on demand.
![]() Tip For SharePoint apps, if the app specifies supported languages or locales, then the app will fail to install if the supported languages are not included in the server language packs installed on the SharePoint installations. Note that this is not an issue for Office 365 as all language packs have been installed there.
Tip For SharePoint apps, if the app specifies supported languages or locales, then the app will fail to install if the supported languages are not included in the server language packs installed on the SharePoint installations. Note that this is not an issue for Office 365 as all language packs have been installed there.
Planning for Multilingual Sites
Multilingual sites support users in different regions who speak different languages to access the content of the site. We can use SharePoint 2013 variations features to create multilingual sites to make it easy to track site content updates and changes. Before we start the implementation, we need to determine the languages and locales requirements of our site to plan for which language features and components to install and configure on our servers.
Language and Locale Requirements
It’s important to determine all the languages and locales we have to support for the Specter Group site now and in the future. It is easier to install language support during initial deployment instead of waiting to install when the servers are running in a full production environment. The actual content of a site can be created in any language. We do not have to create a site in a specific language to view the content in that language. The locales are regional settings that specify how numbers, calendars, dates, and times are displayed. Locales are independent of the language of the site. Unlike language setting of a site, locales can be changed at any time. If there is a need to add additional languages to the site in the future, we need to first ensure the site supports multilingual when it was created. To design a site with multilingual support, refer to the section “Implementing Multilingual” later in this chapter. Then, we need to ensure the language pack for each additional language is deployed to the environment and a new variation label for each additional language is created for the site.
![]() Important After a site has been created for a specific language, the default language of the site cannot be changed. The user can use the multilingual user interface to select an alternative language in which to display the site.
Important After a site has been created for a specific language, the default language of the site cannot be changed. The user can use the multilingual user interface to select an alternative language in which to display the site.
For Specter Group, we need to support both the English and the German language today and maybe Spanish in the future. The locales we need to support are en-us for the English (United States) locale, de-de for the German (Germany) locale, and es-es for the Spanish (Spain) locale.
![]() Note For a list of supported languages and locales, refer to http://sprwd.com/yrazwyy.
Note For a list of supported languages and locales, refer to http://sprwd.com/yrazwyy.
Plan for Variations and Labels
The variation feature enables us to make the same content available to specific audiences across different sites in different languages depending on the language settings. Each site collection can have one variation hierarchy defined. We can create target sites for different languages and locales based on a source site with a language and locale within the same site collection. A variation consists of a set of labels, one for each language. Then the variation feature will create subsites, one for each label (language). We need to determine what labels we need to create based on the list of languages we need to support. Then we need to decide what language the source content should be. For more information on how to use Variations for multilingual sites, refer to the section “Creating Variation Hierarchy.”
![]() Note A variation can have only one source label and cannot be changed after it’s created. Each variation hierarchy can have up to 50 labels for a site collection. Practically speaking, because the Variations feature is only applicable at the site collection level, when a site collection supports multilingual, it supports the creation of variation labels for one variation hierarchy within the site collection. With the limitation of 50 labels for each variation hierarchy, we can have no more than 50 languages for a given site collection.
Note A variation can have only one source label and cannot be changed after it’s created. Each variation hierarchy can have up to 50 labels for a site collection. Practically speaking, because the Variations feature is only applicable at the site collection level, when a site collection supports multilingual, it supports the creation of variation labels for one variation hierarchy within the site collection. With the limitation of 50 labels for each variation hierarchy, we can have no more than 50 languages for a given site collection.
Variation supports friendly URLs to help users navigate to the language of their choice. We can then export and import content for translation by a third party using the industry-standard XLIFF file format. Within an exported package, we can include labels, a page for translation and replication, a variety of list items, and navigation.
For Specter Group, we will have two labels, one as the source, en-us English (United States), and one as the target, de-de German (Germany). In the future, we might need to create another target label, es-es Spanish (Spain).
Language Pack Requirements
Every language has a language pack. A language pack is a set of files that when installed enables the user to interact with an application in a language other than the one in which the application was initially created, including other font characters if they are necessary. Based on the list of languages we want to support in the site, we need to install all the corresponding language packs on our web front end and application servers in our server farm. To learn how to install language packs, refer to the section “Deploying Language Packs” later in this chapter. Once the language packs are installed, language-specific site templates become available in SharePoint for creating new sites, as shown in Figure 14-1.

Figure 14-1. As soon as a language pack is installed in the farm, we can create a new site collection in that language
After a site is created with a specific language site template, many user interface elements will then be displayed in the language of the specified site template, such as ribbon elements, list and site column headers, site settings, lists, document libraries, site templates, and managed metadata tagging (see Figure 14-2).
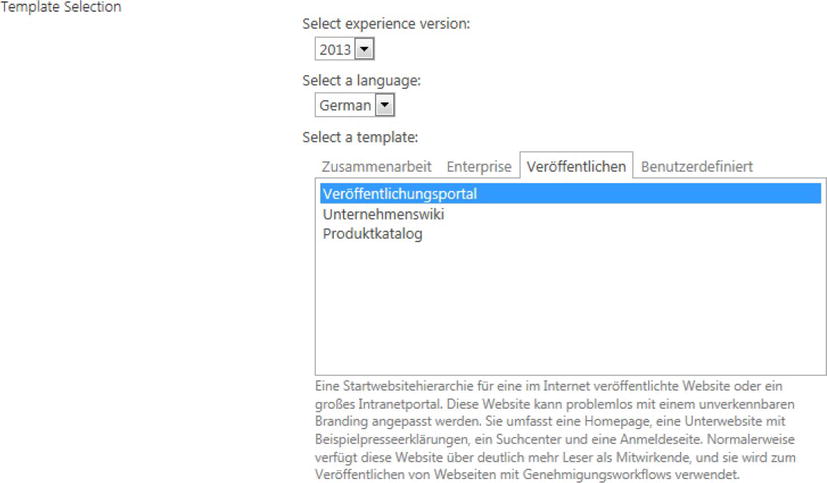
Figure 14-2. Once a language is selected during the new site collection creation process, we will see all the language-specific site templates
![]() Note Once language packs are installed, they provide translation only for the user interface elements, not for the content created in pages or web parts.
Note Once language packs are installed, they provide translation only for the user interface elements, not for the content created in pages or web parts.
By default, sites and site collections are created in the base language in which the SharePoint product was installed. For instance, if we have a French version of SharePoint 2013, then the default language for creating new sites will be French. If we need to create sites, site collections, or web pages in a language other than the default SharePoint product language, we must first install the language pack for that other language on all the web front-end and application servers before we can select the language to create a new site.
![]() Note Each language has a specific language pack. We must install the language pack on all of the web front-end and application servers to ensure the servers can render the content in the specified language.
Note Each language has a specific language pack. We must install the language pack on all of the web front-end and application servers to ensure the servers can render the content in the specified language.
Content Translation
Translating content can be a time-consuming process. We need to determine what type of translation service we want to use for the site based on time, resource, cost, and quality requirements. We demonstrate both machine translation and manual translation in later sections of this chapter. To read more about how to set up machine translation, refer to the section “Machine Translation” later in this chapter. For our scenario, Specter Group not only wants to translate the content into the language, but also to ensure the meaning of the content is preserved. To ensure quality of the translation as well as to save time, we use a translation agency to translate the content. We need to export the content for translation to the third-party translation service by using the industry-standard XLIFF file format and import the content back to SharePoint after it has been translated.
Navigation Term Sets
When planning for multilingual sites, we need to determine how to provide multilingual support for site navigation. If we are creating a static site navigation, then we need to manually translate the navigation terms into each target language. If we are using the Managed Navigation feature to use term sets to create the site navigation in publishing site collections, then we need to copy the navigation term set from the authoring site and translate it into the same language that is used for variation labels.
![]() Note To learn more about how to set up terms and term sets using Managed Metadata Service and how to create managed navigation using these terms, refer to Chapter 6 as we walk through the process of creating dynamic navigation for our example site.
Note To learn more about how to set up terms and term sets using Managed Metadata Service and how to create managed navigation using these terms, refer to Chapter 6 as we walk through the process of creating dynamic navigation for our example site.
Optimize for Search
Most popular search engines today use the content of the page to determine its language. To ensure the language is obvious to the search engine, avoid having side-by-side translations and avoid content in one language with the navigation in another. Leverage the URL to provide guidance about the page’s language and content.
To attract more visitors, we need to increase the discoverability of our site through popular search engines. To boost the rankings of our site, we need to ensure certain search keywords and translated keywords are included in our URLs. We can also use the URL to provide guidance to the search engine and to the visitors about the page’s language and content. In SharePoint 2013, we can leverage term sets and labels to generate our site URLs to ensure keywords and localizations of a page are included in the friendly URL.
If the site is required to target content to a specific country, then using a country-code top-level domain (ccTLD) such as .es for Spain and .fr for France in the URL can be useful. This can have the added benefit of giving the localized site a more local feel, which can help engender trust. For such a scenario, we can use cross-site publishing together with the variations and translation features to create multiple sites that target different countries. Because our Specter Group site is for visitors in the United States and Germany, we need to create two site collections: Spectergroup.com for English and Spectergroup.de for German.
We need to translate not only the content itself, but also the URLs of our site. The URLs of a site are one of the most important page properties that determine the ranking and discoverability of a page in search results. We need to leverage the URLs to increase the visibility of our site in search engines. In the section “Manual Translation” later in this chapter, we look at how to translate the URLs of a page during the translation process.
Deploying Language Packs
Language packs are required to enable multilingual support in SharePoint without requiring separate installations. We must install language packs, which contain language-specific site templates, on all web and application servers.
![]() Note Once a site or site collection has been created with a language-specific site template, the site or site collection will always display the content in that particular language.
Note Once a site or site collection has been created with a language-specific site template, the site or site collection will always display the content in that particular language.
Each language has a unique language identifier (language ID), which is used by all SharePoint components to determine the language to display and how to interpret content that is put on the site.
![]() Caution When uninstalling SharePoint, we must uninstall the language packs before we uninstall SharePoint.
Caution When uninstalling SharePoint, we must uninstall the language packs before we uninstall SharePoint.
Downloading Language Packs
To install language packs, we must first download the language packs for each language we want to support.
- Navigate to the download link for SharePoint Server 2013 language packs.
 Note To download the language pack for SharePoint Foundation 2013, go to http://sprwd.com/10ch7jB. As of this writing, the language pack for SharePoint Server 2013 is not publicly available. You must download the language pack through an MSDN subscription. If you have access to MSDN, go to http://sprwd.com/68tn7k6 and select the language from the menu on the left.
 - From the download page, click the Change language drop-down box to select the language.
- Click Download to download the executable.
- The page will present a dialog box. Click Save to download the executable file to the local computer.
- In our case, we started with the English version of SharePoint 2013. To support German language, we select the German language package to download (see Figure 14-3).
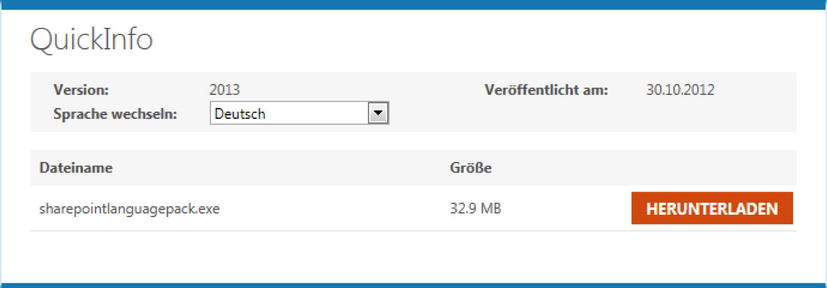
Figure 14-3. Select a language pack to download
Installing Language Packs on the Web and Application Servers
In our server farm environment, we need to install the German language pack to all the SharePoint web front-end and application servers. We need to log in to each server with an account that is a server administrator on the servers as well as a security administrator in SQL. Then we run setup.exe for the language pack. When prompted with the Microsoft Software License Terms page, select the I accept the terms of this agreement check box. Then click Continue. The Setup Wizard installs the language pack.
After the installation is completed, run the SharePoint products configuration wizard to ensure the language pack is installed and configured successfully for SharePoint.
![]() Note The SharePoint products Configuration Wizard can detect when a server in the farm does not have the language pack installed. It will stop the configuration process until all servers have the new language pack installed.
Note The SharePoint products Configuration Wizard can detect when a server in the farm does not have the language pack installed. It will stop the configuration process until all servers have the new language pack installed.
After running psconfig, make sure to deactivate and reactivate any language-specific features before using the new language pack.
After the language pack is installed, the language-specific site templates are added to the following directory:
%COMMONPROGRAMFILES%Microsoft SharedWeb server extensions15TEMPLATELanguageID
In our case, after installing the German language pack, all site templates are in the following directory:
%COMMONPROGRAMFILES%Microsoft SharedWeb server extensions15TEMPLATE1031
The 1031 folder is the language ID for German (Germany). At this point, Specter Group site owners and SharePoint administrators can create sites and site collections based on the German-language site templates by selecting German from the Select a language drop-down list (see Figure 14-4).
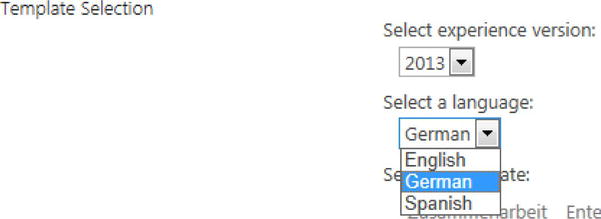
Figure 14-4. Create a new site collection or site using all the available languages in the environment
Implementing Multilingual
Now that we have the language packs installed in our environment, let’s proceed to implement the site to provide multilingual support with SharePoint 2013 multilingual features.
We start with the Specter Group News site collection as our authoring site collection with the Variation feature enabled, as shown in Figure 14-5. The content is created and maintained in the News site collection and is accessible to content authors only. Using the cross-site publishing feature, we then publish the news content from the News variation webs to the public Specter Group English and German site collections, as shown in Figure 14-5.
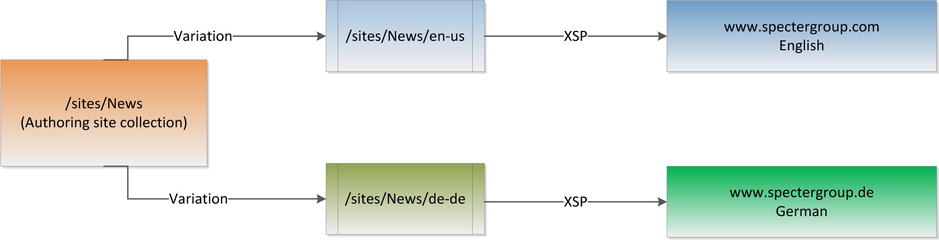
Figure 14-5. Multilingual solution using variation and cross-site publishing features in SharePoint
To support multilingual, we need to first define a source language with its hierarchy and for every language (label) that we create to mirror the content. With this design, we have a single site collection with a hierarchy of webs for every language.
For the Specter Group News site, we need to create a publishing site collection, /sites/news, as our authoring site collection for all news content. First we need to configure Variation settings on our authoring site collection.
From /sites/news Site Settings, under Site Collection Administration, click Variations Settings to open the screen shown in Figure 14-6.
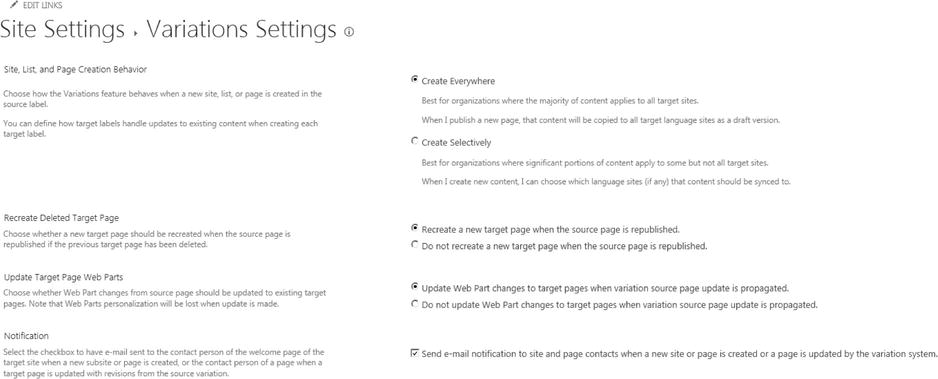
Figure 14-6. Configure settings for Variations feature in a site collection
For the Site, List, and Page Creation Behavior setting, selecting the Create Everywhere option will allow the content on the source variation site to be automatically created on all the target variation sites. If the Create Selectively option is selected, then the content author needs to manually select the target variation site to publish each time.
To create the variation hierarchy, we need to create variation labels. First, we create a root variation label (en-us) and then we create a target variation label (de-de).
- Navigate to Site Settings and click Variation Labels, which opens the screen shown in Figure 14-7.
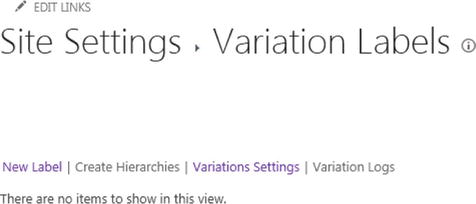
Figure 14-7. From Site Settings, click Variation Labels to create variation labels and hierarchies
- Click the New Label link to create a label. For the first label, the Create Variation Label page will be presented to configure the root label (see Figure 14-8).
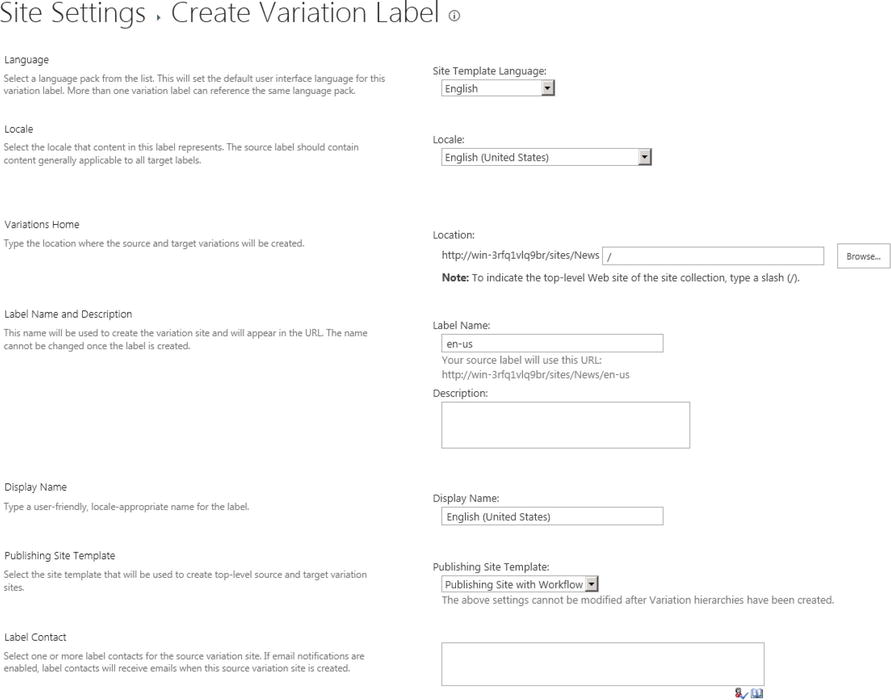
Figure 14-8. Create source label first before creating all other target labels
- Because our root label is en-us, we need to select English from the Language drop-down list.
- Select English (United States) for the Locale setting.
- For the Variations Home setting, we want to enter / to make sure the root site, /sites/news/, is the home site for all variation features.
- For Label Name and Description settings, ensure we have en-us as our root label. Leave all other settings as the defaults.
- Click Create to complete. Navigate back to the Variation Labels page and you should see the new “en-us” label created (see Figure 14-9).

Figure 14-9. From the Variation Labels page, view all the labels and hierarchies created
- To create the target German variation label, click the New Label link.
- From the Configure Your Target Label page shown in Figure 14-10, choose German from the Language drop-down list.
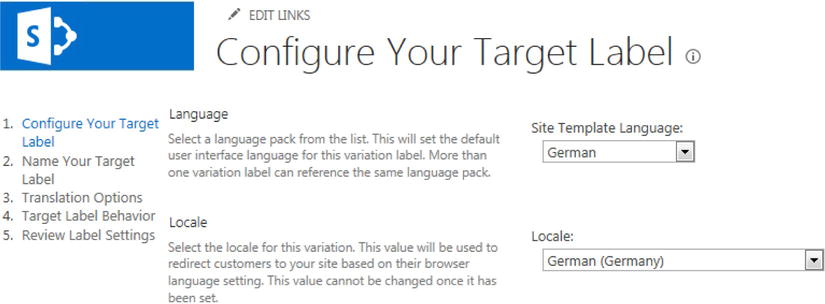
Figure 14-10. Create a target label by specifying a language and locale
- Select German (Germany) from the Locale drop-down list.
- On the Name Your Target Label page shown in Figure 14-11, ensure the label name is de-de.

Figure 14-11. Specify a name and what content to propagate for the new target label
- For Hierarchy Creation, select the type of content the target site wants to propagate from the source site. In our case, we want to propagate everything from source site to target site.
- While creating these variation labels, we can configure how translation needs to happen. For the purpose of showing manual and machine translation, we allow both human and machine translation (see Figure 14-12).
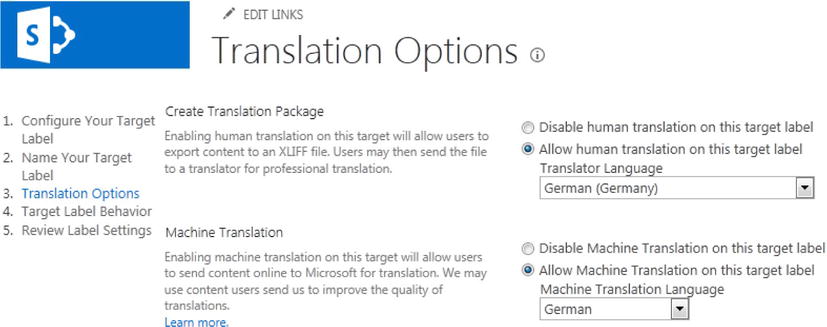
Figure 14-12. For the new target label, specify the method of translation to enable
- We also need to configure target label behavior to ensure page changes are propagated from the source to the target sites. For Page Update Behavior, we need to specify whether we want to automatically push updates from the source page to the target site as a draft version or we need a target site contributor to review the change before syncing the current source version to the target as a draft version. In our case, we want to have SharePoint automatically push the update to the target (see Figure 14-13).

Figure 14-13. Specify how updates should be propagated for the new target label
- Navigate back to the Variation Labels page. You should see both the new en-us label and the new de-de label created (see Figure 14-14). Notice in some cases, the new target label is not hyperlinked and the Hierarchy Is Created column has a value of No.

Figure 14-14. View the new target label after it has been created
Note At this point, if the target label is not hyperlinked and the Hierarchy Is Created column has a value of No, then we need to complete two steps to ensure the hierarchy and the label subsites are created successfully. First, to ensure a subsite is created for each target label, we need to click the Create Hierarchies link on the Variation Labels page. View all site content to make sure a subsite has been created for the new target label. Then, to ensure the Hierarchy is created, the Variations Create Hierarchies Job Definition timer job needs to run successfully. - To ensure the Variations Create Hierarchies timer job is running, go to Central Administration. Click Monitoring in the left navigation menu. Then click Check job status to find the Variations Create Hierarchies Job Definition timer job to ensure the job ran (see Figure 14-15).
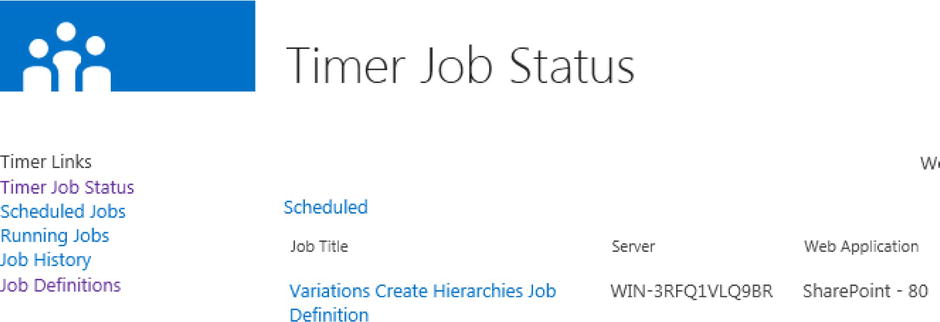
Figure 14-15. View timer job status for all variation-related jobs
- If the job did not run, we can go to Central Admin to trigger the job manually to run now. Click Job Definitions on the left navigation menu. Find and click the Variations Create Hierarchies Job Definition timer job. From Edit Timer Job, click Run Now button to trigger the job to run immediately (see Figure 14-16).
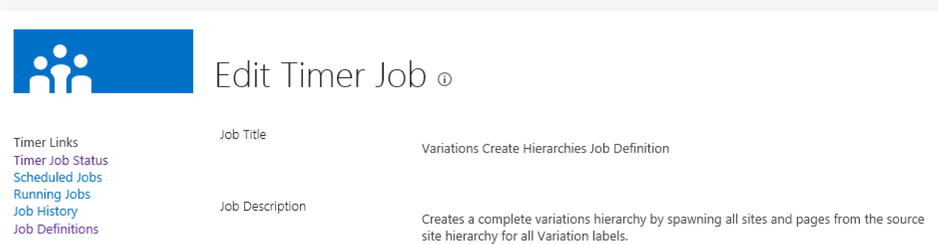
Figure 14-16. Edit a timer job to run the job immediately
- After the job is completed, navigate back to the Variation Labels page, as shown in Figure 14-17. You should see the new en-us label and the new de-de label created and the Hierarchy is Created column has the value of Yes for all the labels.

Figure 14-17. View the new target label along with the navigation URL of the subsite and the status of the creation of the hierarchy
- To ensure each label has a subsite, click Site Contents on the left navigation menu, which opens the screen shown in Figure 14-18.
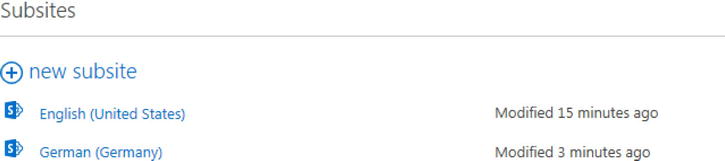
Figure 14-18. View All site content to view subsites created for each label
- By default, when users navigate to the variation root site (/sites/news), they are redirected to the appropriate top site of a variation label based on the language setting of their web browser. As soon as variation is enabled for a site collection, a new redirect page, VariationRoot.aspx, is added to the root site’s Pages library (see Figure 14-19).
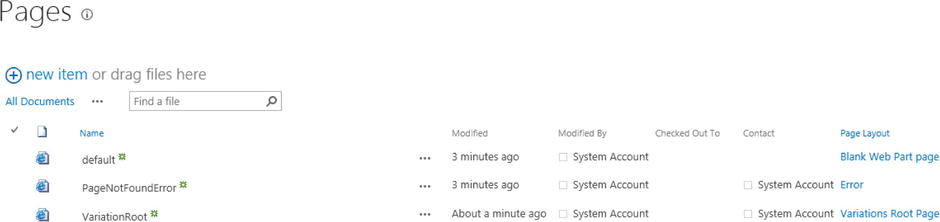
Figure 14-19. After variation labels are created, the VariationRoot page is created for redirecting users to the top site of a variation label based on the language setting of the user's browser
- From the variation root site’s Site Settings, click Welcome Page link. The Welcome page is set to the VariationRoot.aspx page, which redirects the user to the appropriate top site of a variation label based on the user’s browser language setting.
- It is possible to change this behavior by updating the VariationRoot redirection page with a custom page that redirects the user based on other criteria. To test the default behavior, change the browser setting to German language. For Internet Explorer, from Internet Options, click Languages.
- At the Language Preference prompt, add the German (Germany) language we want to use. Once the language is added, promote the language to the top so that the browser will use German first, as shown in Figure 14-20.
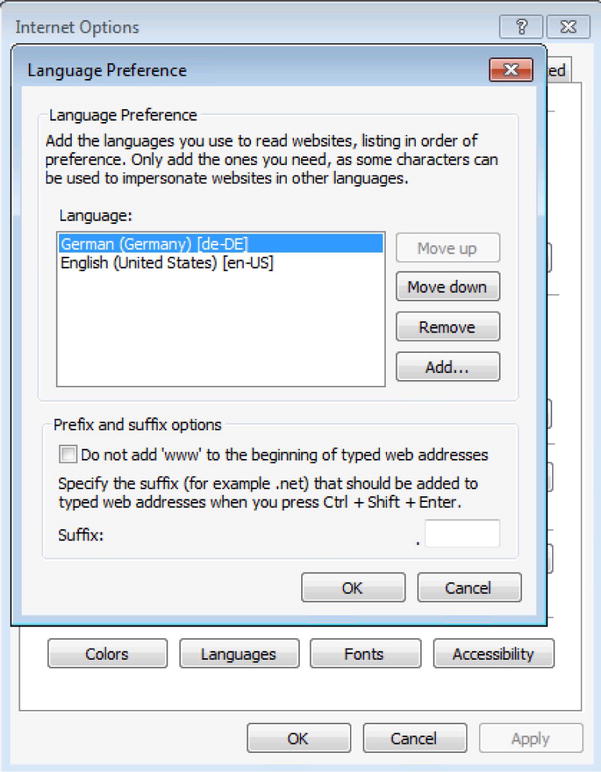
Figure 14-20. Configure the language setting in Internet Explorer
- Close all the browsers and relaunch the /sites/news site. You should be redirected to the /sites/news/de-de welcome page (see Figure 14-21).
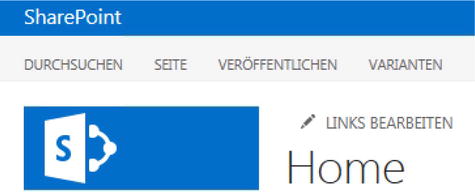
Figure 14-21. Users will be redirected to the home page of the variation site matching their language settings
Setting Up Translation
SharePoint 2013 introduces Translation Services. Using Translation Services, we can choose to have the content translated automatically by machine translation or we can use manual translation using XLIFF translation packages to export the content from SharePoint and have the content translated by a translation agency. Machine translation is fast and reduces costs, but artificial intelligence today still lacks the ability to ensure the meaning of the content is preserved. To ensure the quality of the translation and to save time, it makes sense to use a translation agency to manually translate the content.
Creating Content
Before we set up translation, we need to create some content. We first create a new page in the English source site and add some content to the page (see Figure 14-22). Then we publish the page.
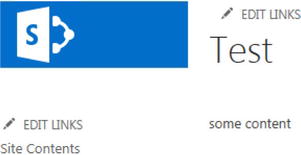
Figure 14-22. Create a new page in source label site to be published and propagated to the target labels
After a few minutes, navigate to the de-de target label site. We should see the new page in the target site (see Figure 14-23).
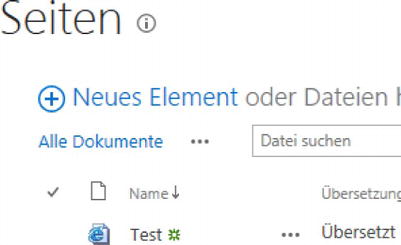
Figure 14-23. New page is propagated to all target label sites
If we don’t see the new page in the target site or if we want to push the updates to the target site without waiting, we can navigate to the pages library in the English source site and click Update all targets on the Variations ribbon toolbar (see Figure 14-24).
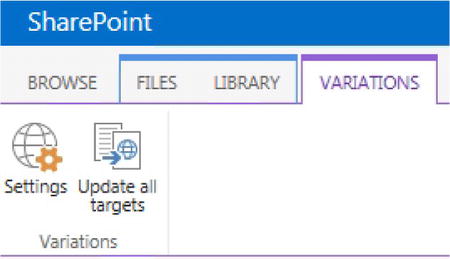
Figure 14-24. Manually push all updates to all target sites instead of waiting for SharePoint to automatically push updates
From the target /sites/news/de-de German site, you should see a new page in the Pages Library that was propagated from the source /sites/news/en-us English site. Navigate to the new test page. You should see the same English content on the target German page. To perform translation, we can choose from the options on the Varianten (Variations) ribbon toolbar shown in Figure 14-25.
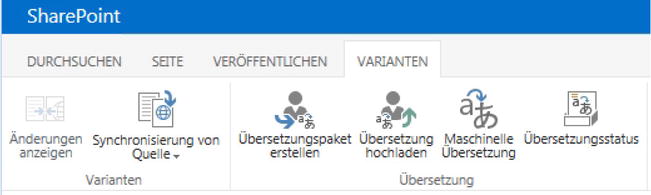
Figure 14-25. Variation ribbon toolbar contains options for translation
For the purpose of demonstration, we use the English equivalent screen shot of the Variation ribbon toolbar (see Figure 14-26).
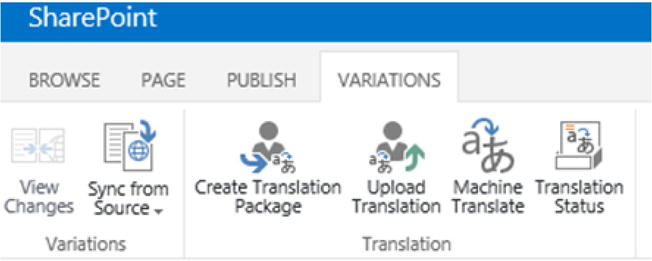
Figure 14-26. Variation ribbon toolbar (in English) contains options for translation
Machine Translation
In some situations, we might want to rely on machine translation to provide a quick way to translate certain content. New in SharePoint 2013, we can now integrate with Bing Translation to automatically translate the content.
Setting Up Machine Translation
To enable machine translation, we need to create a Machine Translation Service application and configure the Machine Translation Service from Central Administration or PowerShell.
![]() Note For more detailed information on creating a Machine Translation Service application and configuring the Machine Translation Service, go to TechNet at http://sprwd.com/34ceirg. Because machine translation depends on access to the Bing Translation service, ensure the server running machine translations can connect to the Internet.
Note For more detailed information on creating a Machine Translation Service application and configuring the Machine Translation Service, go to TechNet at http://sprwd.com/34ceirg. Because machine translation depends on access to the Bing Translation service, ensure the server running machine translations can connect to the Internet.
Performing Machine Translation
For machine translation, we can select a page to translate. Then choose the Machine Translate icon from the Variations ribbon toolbar (refer to Figure 14-26). We see a note for submitting the machine translation request and a message that the process will take a few minutes.
![]() Note The first time we use machine translation in the environment after it’s been set up will take a longer time (around 30 minutes) to complete the process because the process also includes time to initiate communication between the Bing Translation service and the server on which the machine translation service is running.
Note The first time we use machine translation in the environment after it’s been set up will take a longer time (around 30 minutes) to complete the process because the process also includes time to initiate communication between the Bing Translation service and the server on which the machine translation service is running.
To view the status of the translation request, we can click the Translation Status icon on the Variation ribbon toolbar (refer to Figure 14-26). This action will take us to the Translation Status list in the root site to view the queue for translation requests and the status of each request (see Figure 14-27).
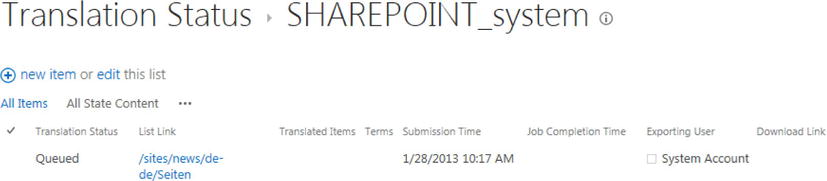
Figure 14-27. View status of a new translation request. Initially, request is in Queued state
Initially, the status of a request is Queued. After a few minutes, the queued request will change its Translation Status from Queued to In Progress (see Figure 14-28).
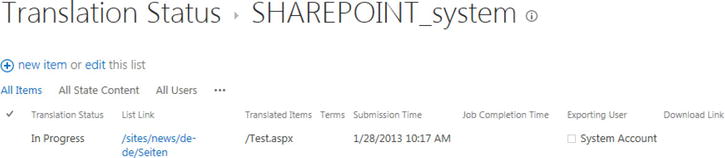
Figure 14-28. Once the translation request is being processed, the status changes to In Progress
During the machine translation process, there are a few timer jobs that will run. To view the status of these timer jobs, go to Central Administration. Click Monitoring in the left navigation menu. Then click Job Definitions to find timer jobs related to the Machine Translation Service (see Figure 14-29).

Figure 14-29. Machine translation related timer jobs
To trigger these timer jobs to run immediately, we can click on the timer job, then click Run now. If we want these timer jobs to run more often, we can configure the recurring schedule of the job to run more often, from Hourly to Minutes (see Figure 14-30).
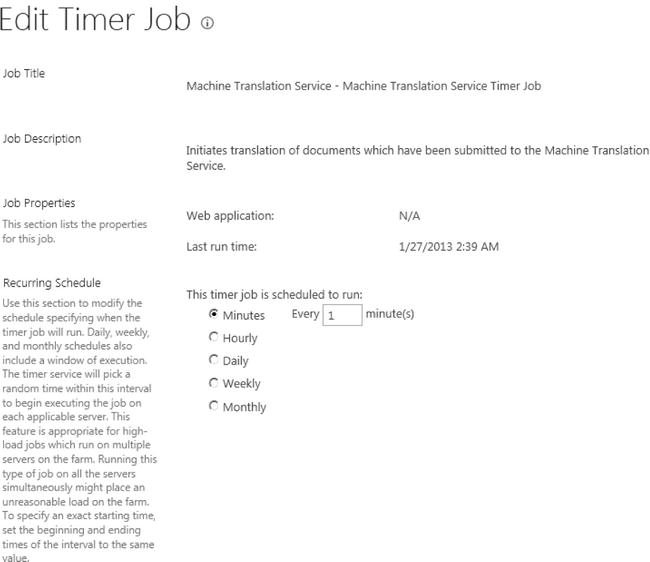
Figure 14-30. Edit a timer job to configure it to run more often by changing it to run in minutes
To look at the translation jobs and status in detail, we can navigate to the Variation Logs list in the variation root site (/sites/news). In our case, the log indicates a translation package for the page we want to translate has been created and exported for machine translation (see Figure 14-31).
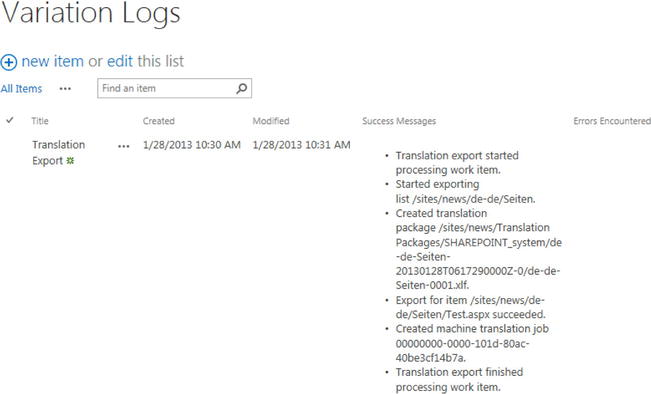
Figure 14-31. View Variation Logs to see when a translation package is exported for machine translation
After about five minutes (30 minutes if it is the first time we are making a machine translation request), the page is translated. From Variation Logs, note the machine translation job completes with importing the translation package with the translated content (see Figure 14-32).
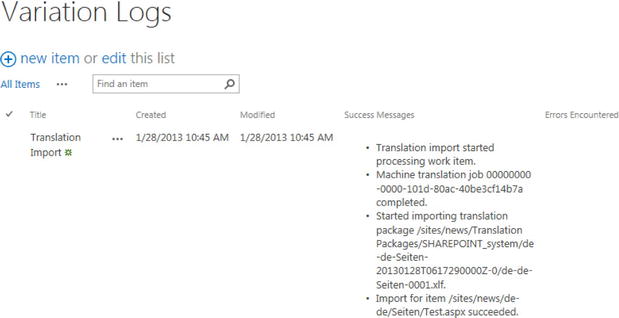
Figure 14-32. Once machine translation has translated the content, a translation package is imported into SharePoint for the target label
In the Translation Status list, the machine translation request has been completed and the status is shown as Translated (see Figure 14-33). Note the whole process took about 30 minutes from the first time a machine translation request is made.
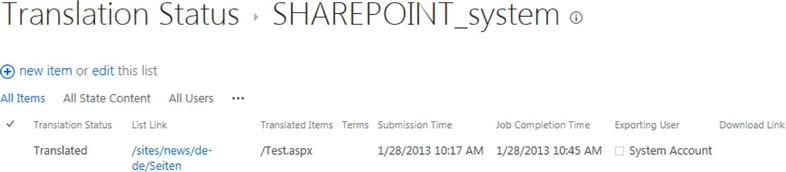
Figure 14-33. Once machine translation is completed, the translation request is in Translated status
Navigate to the translated page on the target site (de-de subsite), and you should see translated content on the page, as shown in Figure 14-34.
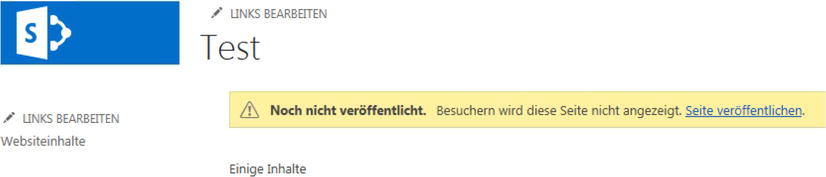
Figure 14-34. Content on target label site is now translated by machine translation (Bing Translation service)
Going forward, we could use machine translation to translate the News content for Specter Group. For example, to create a new page for quarter earnings, we first create the page in the Pages library from the en-us source site, as shown in Figure 14-35.

Figure 14-35. Example of a page created in source label site
We then perform the steps outlined in this section to allow machine translation on the new page. The result page in the German site (/sites/news/de-de) looks like Figure 14-36.
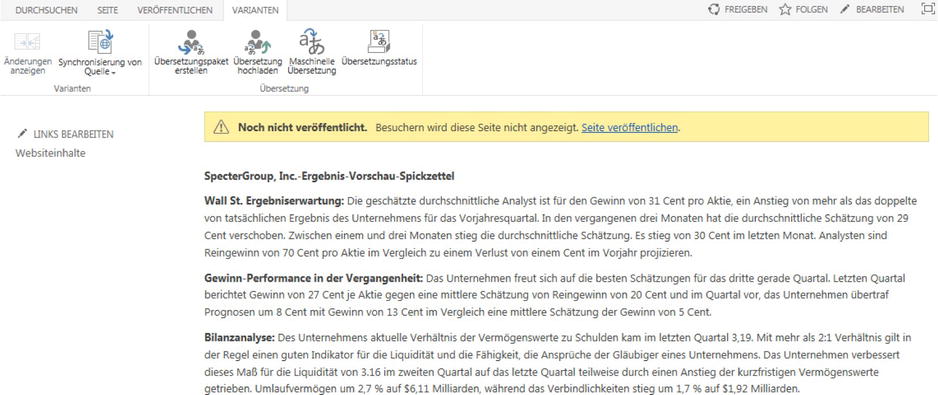
Figure 14-36. Example of a translated page in target label site
Manual Translation
Machine translation is fast and reduces costs. However, for our scenario, Specter Group not only wants to translate the content into the language, but also to ensure that the meaning of the content is preserved. To ensure quality of the translation as well as to save time, we will be using a translation agency to translate the content. We need to export the content for translation to the third-party translation service by using the industry-standard XLIFF file format and import the content back to SharePoint after it has been translated.
To demonstrate this process, let’s first create a new page, Manual translation page, and add some content to the page in the English source site (see Figure 14-37).
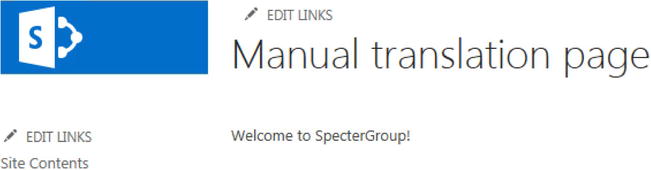
Figure 14-37. Create a page in source label site to be propagated to target label sites
After we have published the page, wait a few minutes for the updates to propagate to the target German site. Once the new page is added, select the page, then click the Create Translation Package icon in the Variations ribbon toolbar. Then we will be prompted by the browser to download the exported Translation package.
![]()
Figure 14-38. Translation package in XLIFF format is exported
Download the file and save it locally. This file contains all the information needed to get the content translated. At this point, we want to send this file to a translation agency to get the content translated. Then import the updated translation package back to SharePoint. From the Translation Status list, as soon as we request creation of a translation package, a new human translation request is queued (see Figure 14-39).
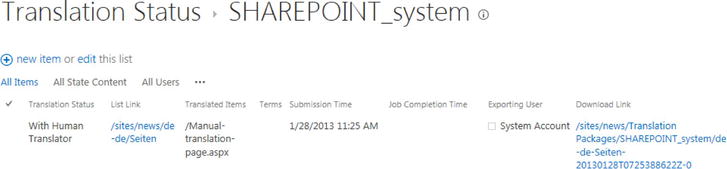
Figure 14-39. View translation status of a manual translation request
For the purpose of demonstration, let’s take a look at the XLIFF file we just downloaded by opening the file in Notepad. The file contains source and target language information as well as the content to be translated in HTML format, as you can see in Figure 14-40.
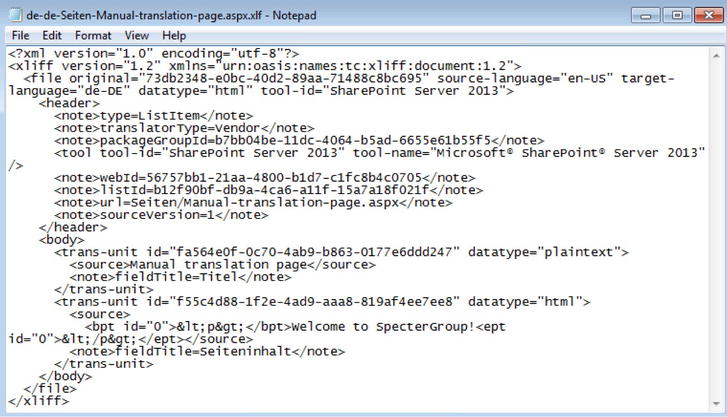
Figure 14-40. Translation package exported to be translated
Once we get the translated XLIFF file back from a translation agency, the file will be updated with the target (translated) content, as shown in Figure 14-41. Note, the page title element has a target property that contains a translated value and the page content element has a target property that contains a translated value.
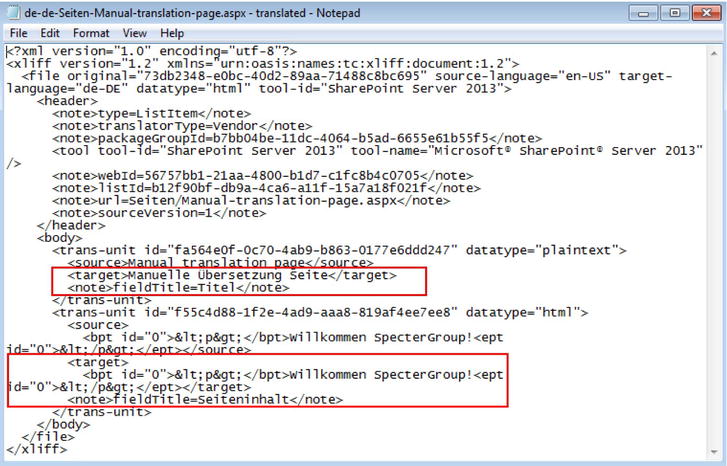
Figure 14-41. Translation package containing translated content and page title to be imported
We can now import the translation package for the page by clicking the Upload Translation icon on the Variations ribbon toolbar. Then we are prompted to provide a file location to the XLIFF file (see Figure 14-42).
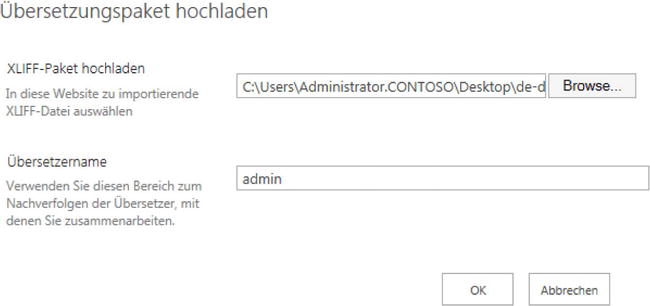
Figure 14-42. Import translation package into SharePoint
Once importing the translation package is completed, navigate to the target page on the German site. Note in Figure 14-43 that both the content and the page title are now translated.
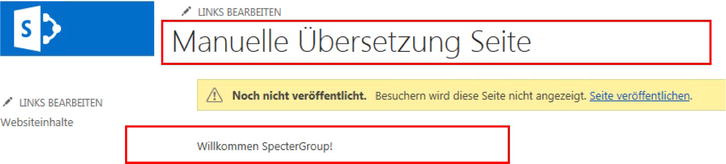
Figure 14-43. Translated content with translated page title in target label site
Often we might want to look at the method of translation or the name of the translator we used for a page. To do so, navigate to the target site’s pages library, and next to each translated page, in the Translator Name column, you see the name of the translator if translated manually or Machine Translation Service if translated by machine (see Figure 14-44).

Figure 14-44. For all translated pages, view pages in target the site to reference translator name
Setting Up Cross-Site Publishing
We now have the Specter Group News site collection as our authoring site collection with Variations enabled. The content is created and maintained in the News site collection, specifically in the English source site, and is accessible to content authors only. Using the Cross-Site Collection Publishing feature, we publish the news content from the News variation webs to the public Specter Group English and German site collections.
We first need to create a publishing site collection with English language for the Specter Group English site, www.spectergroup.com. Then we need to create a publishing site collection with German language for the Specter Group German site, www.spectergroup.de.
- From the Specter Group News site collection, navigate to Site Settings to enable the Cross-Site Collection Publishing feature, shown in Figure 14-45.

Figure 14-45. To use cross-site publishing, enable the Cross-Site Collection Publishing feature
- Navigate to the Pages library in /sites/news/en-us and enable the library as a catalog.
- Navigate to the Pages library in /sites/news/de-de and enable the library as a catalog.
- From www.spectergroup.com, connect to the English catalog from /sites/News/en-us.
- From www.spectergroup.de, connect to the German catalog from /sites/News/de-de.
- Once cross-site publishing is set up, as soon as a page is published from its authoring site in /sites/news/en-us or /sites/news/de-de, it will appear on www.spectergroup.com and www.spectergroup.de, respectively.
![]() Note You can learn more about the cross-site publishing feature in SharePoint 2013 in Chapter 8, where we demonstrate how to enable content in a list or library for reuse and how to consume the published content by a target site collection for our example site.
Note You can learn more about the cross-site publishing feature in SharePoint 2013 in Chapter 8, where we demonstrate how to enable content in a list or library for reuse and how to consume the published content by a target site collection for our example site.
Summary
Today, many companies operate globally. Even when dealing with home markets, companies often need to appeal to customers who speak different languages. To attract visitors and potential customers, companies need to make the effort to provide users with information about products and services in their native language. More companies are making the investment to make their web sites multilingual, which has produced measurable improvements in company sales and customer satisfaction. Providing multilingual support for a public web site is one of the most important decisions when planning for a new web site. Using the new translation and publishing capabilities provided by SharePoint 2013, we were able to build a multilingual web site using the standard functionalities.