
![]()
JavaServer Faces
In this chapter, we will explore the Java application framework called JavaServer Faces (JSF). In addition to learning some of the new JSF classes, the advantages of the JSF architecture will be explained and the tutorials will demonstrate how quickly a JSF application can be generated with a minimal amount of coding.
We will also introduce Service Data Objects (SDO), database connections, and scripting variables and demonstrate the advantages and limitations of using these new tools for accessing databases.
At the end of this chapter, you should understand:
- The JSF framework
- Facelets
- Pagecode classes
- Database connections
- Navigation Rules
- The SDO Relational Records and Relational Record Lists
- Scripting variables
- Links and parameters
You should be able to:
- Define and use a database connection
Create a JSF application that:
- displays data from a database table
- uses JSF components and SDO to insert and edit data in a database
JSF Overview
Do you feel that things have gotten very complicated? Well, they have! (Model, view, controller, database access and all the classes that are needed to do it, JSPs, servlets, Web pages, tags, tag libraries, Web Deployment Descriptors, URIs, etc.) It almost makes you long for the good old days of client-based applications. To simplify and standardize applications, new “frameworks” such as Struts and Java Server Faces (JSF) have been introduced. Frameworks impose a “standard” for defining and organizing an application’s components (classes, Web pages, JSPs, etc.) and include new technology (i.e., Facelets, enhanced visual components, navigation rules, scripting variables) to quickly create an application. For example, both Struts and JSF come with new Java classes and tools that make implementing the MVC architecture easier and with fewer errors. Although the Struts framework is a very useful and has been around longer then JSF, the JSF framework is the direction of the future.
As mentioned, the MVC architecture dictates that an application should separate the content (i.e., the model), controller, and presentation functions (i.e., the view). JSF applications implement the model as Java beans that are subclasses of PageCodeBase. The class PageCode Baseis an example of the new technology that comes with JSF. Further, the controller function is not coded in a Servlet or JSP in a JSF application, instead, the controller function is defined as a set of Navigation Rules and implemented using XML. The view is made up of Facelets (Web pages that use JSF visual components) and/or Web pages. As always, RAD’s Page Designer helps the programmer build the presentation layer (i.e., the GUI) quickly and, in the case of JSF, automatically generates the model component (the pagecode classes) associated with each Facelet.
There are also a new set of components called SDO (Service Data Objects) that provide easy access to databases. RAD allows programmers to combine SDO with JSF visual components to provide data manipulation functions with a minimum of coding. The JSF framework also includes specialized tags for defining and using JSF components.
Tutorial: Creating a JSF Project
Facelets must be created in Dynamic Web Projects that are configured to support JSF. Once a project is created, a Facelet is created with a wizard (just as you have done before). To build the Facelet in Page Designer, drag and drop JSF components from the Palette onto it (just as you dragged and dropped AWT, Swing, and HTML components onto frames, JSPs, and Web pages).
- 1. Begin creating a new Dynamic Web Project by clicking File, New, and then Dynamic Web Project.
- 2. Specify TutorialsJSF as the project name, change the Configuration to JavaServerFaces v2.0 Project and then click the Modify button (see Figure 12-1).
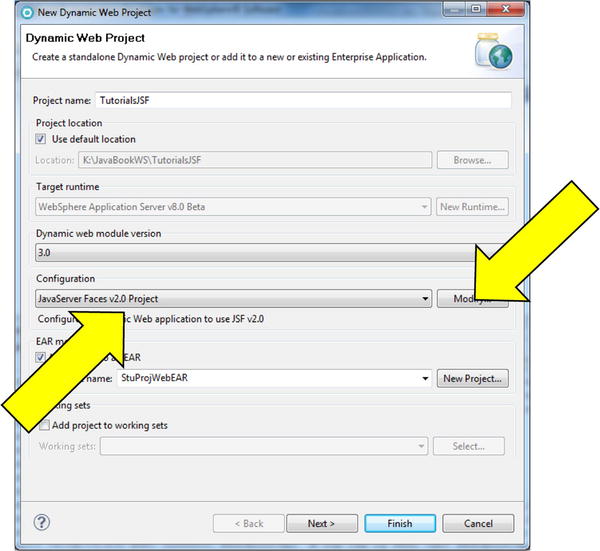
A configuration defines what technologies/functions are included in a project. These various options are called Project Facets. Figure 12-2 shows that the JavaServer Faces v2.0 Project configuration consists of several Project Facets. You can modify the configuration by simply clicking the checkboxes. For this project, we will include JSTL.
- 3. Click the JSTL checkbox to select it and then the OK button.

RAD requires that each Dynamic Web Project be part of an EAR. An EAR is another type of archive file (like JAR and WAR). An EAR, however, can contain both client and server components. RAD will force you to add the project to an EAR even if only server-side components are being created. In this example, we will create a new EAR to hold the project.
- 4. Click the New Project button and on the New EAR Application Project window, specify TutorialsJSFEAR as the Project name then click the Finish button.
The new EAR project will be added to the Explorer pane and you will be prompted to switch to the JEE perspective. Because we are creating only server-based components, we want to stay in the Web perspective.
- 5. Click the No button.
- 6. On the New Dynamic Web Project window, click the Finish button.
The TutorialsJSF project will appear in the Explorer pane and the Technology Quickstart pane will be displayed with links to extensive help information and examples of Web application development.
- 7. Close the Technology Quickstart pane.
A JSF project’s view is comprised of webpages and Facelets. A Facelet is very similar to a JSP. The difference and advantage to the Facelet is that JSF 2.0 components can be used instead of the html components. (The JSF components have more functionality than the html components.)
Tutorial: Creating a Facelet with Page Designer
Using Page Designer, we will create a Facelet and add JSF and SDO components to access the Employee table.
- In the Explorer, click on the TutorialsJSF/WebContent folder to select it.
- Click File, New, and then Folder.
- At the New Folder window, specify c12 as the folder name and click the Finish button.
- With the folder c12 still selected, click File, New, and then Web Page.
- At the New Web Page window, specify AllEmps as the file name, Facelet as the template and click the Finish button.
A new Facelet will be created and stored in a file called AllEmps.xhtml in c12 and an editing session started. Notice that the Palette has a Standard Faces Components tray that contains the JSF visual components “that come with the JSF framework.” The JSF components provide the same functions as AWT, Swing, and HTML components but, as mentioned earlier, have additional capability. When a JSF component is added to a Facelet, JSF tags for the component are added in the Facelet.
Tutorial: Using SDO components
AllEmps will use a Relational Record List (RRL) SDO to display all of the rows from the Employee table. A RRL creates and uses many JSF components to do this. While creating the RRL, a database connection object will be created (using a RAD wizard) which is required for the RRL to work. The advantage to creating a connection object in a JSF application is that any Facelet can access the connection. In other words, you do not have to define a connection in each Facelet or servlet.
- 1. In the Palette, expand the Data and Services tray and select SDO Relational Record List.
- 2. In the Page Designer view, click anywhere on the Facelet.
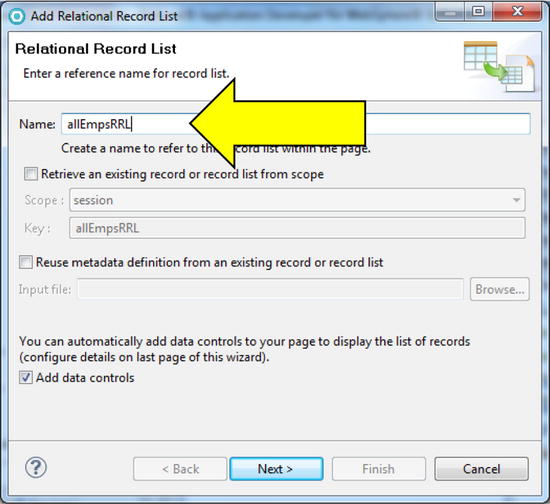
The Add Relational Record List window will be displayed. A name for the RRL must be specified in this window.
- 3. In the Name field specify allEmpsRRL (see Figure 12-3) and click the Next button.
The Record List Properties pane will be displayed (see Figure 12-4).
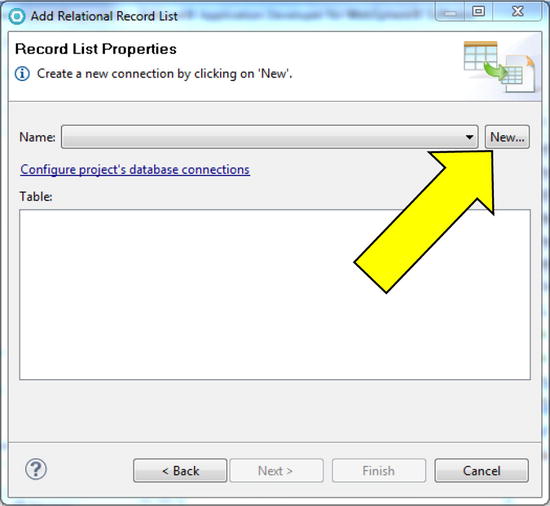
An RRL needs to be associated with a particular data source—in this case, a database table. To do this, you must tie the RRL to a connection. As you may remember, a connection contains all the information needed to access a particular schema (and, optionally, a table within the schema). If a connection already exists, its name can be entered in the connection Name field. However, no connections currently exist, so we need to define one.
- 4. Click the New button (indicated by the arrow in Figure 12-4).
The New JDBC Connection window will be displayed (see Figure 12-5). There’s a sample Derby DB connection already defined but we have to create a new connection to access the Employee table.

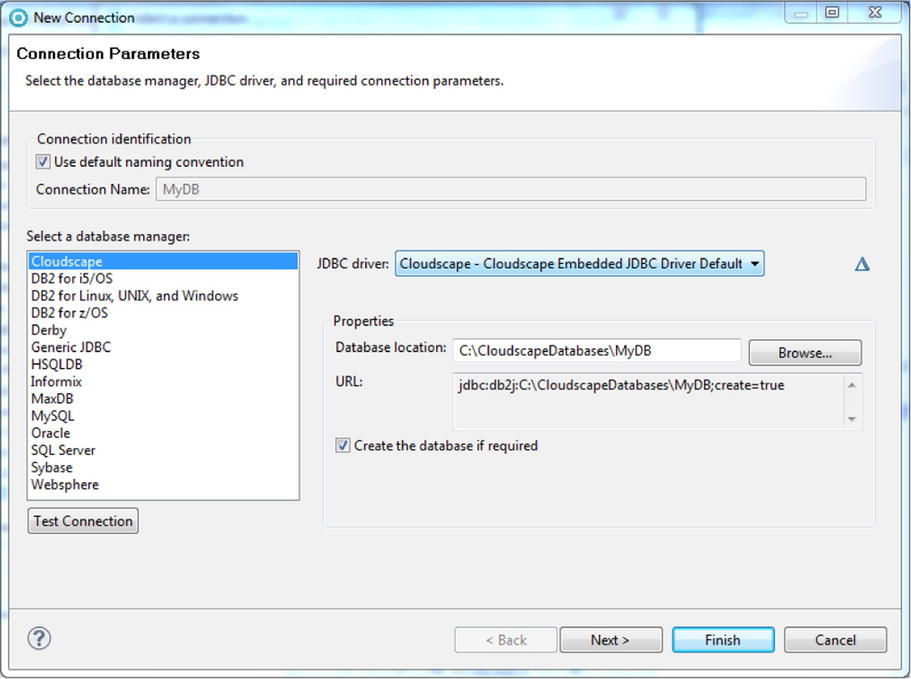
- 5. Click the New button.
The New Connection window will be displayed with Cloudscape selected as the default DBMS (see Figure 12-6). There are a variety of managers that can be selected; however, notice that Microsoft Access is not one of them.
The DBMS selected in the left-hand pane will dictate which fields are displayed and active on the right side of the window. For instance, if an Oracle DB is specified, the SID and Port number fields will be active and required (see Figure 12-7). However, if a DB2 for i5/OS database is selected, these fields will not be displayed (see Figure 12-8).
Be careful and make sure the correct information for your database is specified in the required fields. At a minimum, the host location, user id, and password must be specified. The connection type, location of the driver, and/or a port id may be required, depending on the type of DBMS.
Notice that RAD assumes that the default naming convention will be used. The default naming convention dictates that the host address be used as the connection name. We will define a more meaningful name.
- 6. Select the appropriate DBMS, deselect the Use default naming convention checkbox and, in the Connection name field, enter TNT_Employee_Con.
- 7. Enter the values from the database chapter for the required parameters (User ID, Password, Host address, etc.) and click the Test connection button (in the lower left of the window).
If the connection information is correct, a message will be displayed saying the connection was successfully established.
- 8. To continue adding the relational records list, click the OK button to close the Test Connection window then click the Finish button on the New connection and the Select a connection windows.
The Add Relational Record List window will be redisplayed with the new connection name and the available database(s). This is the start of the wizard where the specific table and/or records and fields to be accessed are specified.
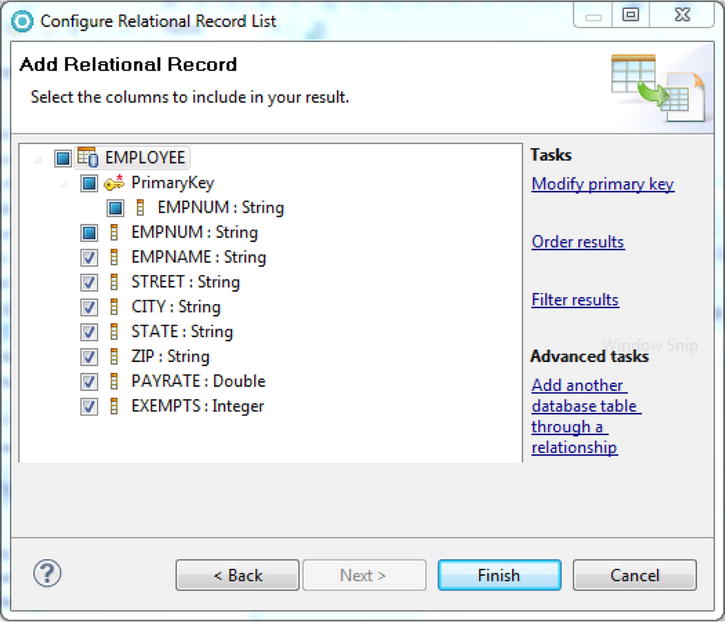
- 9. Scroll down (if needed) and expand the TNT database item, select the Employee table (see Figure 12-9), and click the Next button.
The Add Relational Record pane is displayed with a warning message. When the Employee table was created, a key was not defined. The RRL requires a key.
There are several useful options to control both the content and appearance of the table data on this window. For example, a condition can be specified to select only certain records. In addition, the order in which the records are listed can be controlled and fields can be excluded from the displayed data.
- 10. Click the Modify primary key option.
The “Edit primary keys” window will be displayed (see Figure 12-10).
- 11. Click EmpNum in the left pane.
The right arrow button between the two panes will become active.
- 12. Click the right arrow button to move EmpNum into the right pane (see Figure 12-11), then click the Close button.
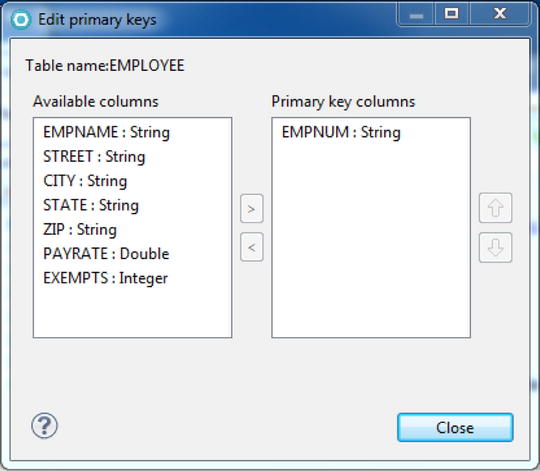
The Add Relational Record List pane will be redisplayed and EmpNum will be defined as the key field.
- 13. Click Finish.
RAD reads the Employee table’s field definitions and generates a dataTable (and many other components) in AllEmps to display the Employee information (see Figure 12-12).
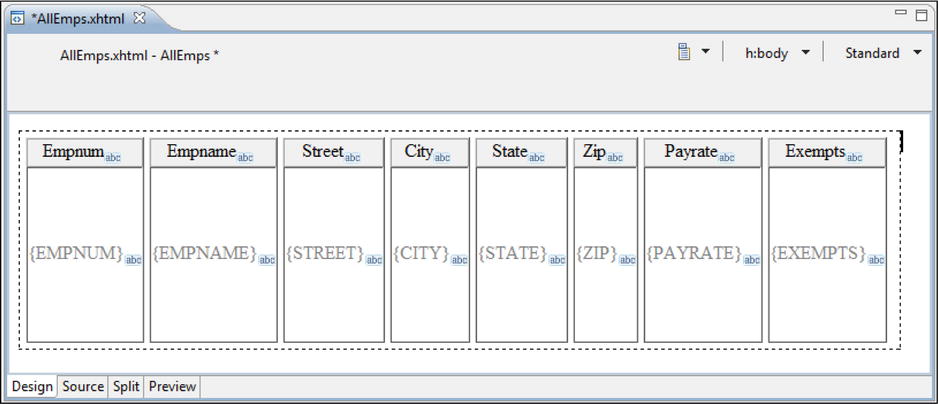
In the dataTable, each Employee field will be displayed in an outputText field (indicated by the field name in braces). RAD has “bound” each column’s outputText field to a field in the RRL. For example, selecting any of the outputText fields and switching to the Properties view will show that the value property of the outputText field contains an EL statement identifying the RRL data field. This means that the outputText field will display the value(s) from table for that field/column. We will explore the implications of binding a visual component to a data object in more detail later in this chapter.
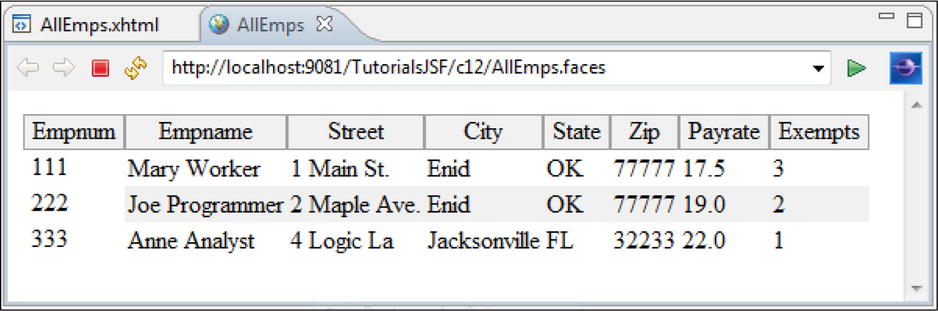
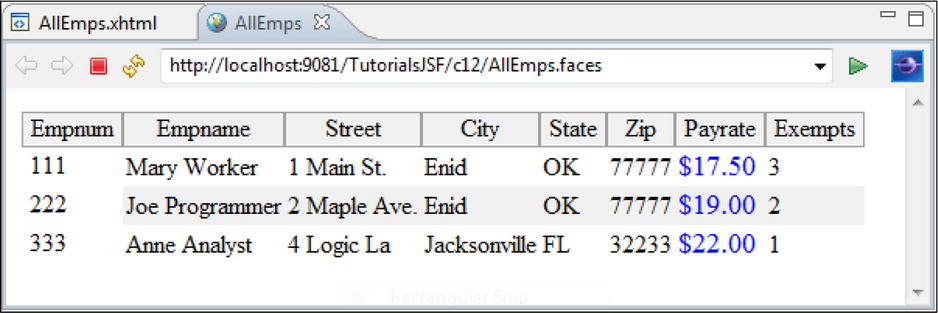
- 14. Run AllEmps on the server.
The results should look like Figure 12-13. Notice that the name of the page in the address window is AllEmp.faces not AllEmp.xhtml. This will be important later when we want to navigate between the pages.
Accessing and formatting data from a database using an SDO is surprisingly easy. The programmer does not have to worry about connections, page context objects, SQL statements, and so on. However, SDO objects are more limited than coding a JSP from scratch. For example, in a RRL the data is only displayed in an output text field. A programmer could modify the JSP/SDO code to change this or add code so that another visual component uses the RRL fields. However, this is not to be taken lightly. A thorough understanding of how the JSF and SDO components work is needed to accomplish this. We will show more of the SDO capabilities and demonstrate the complexity involved in changing and working with them.
Tutorial: Formatting a Facelet
All of the text and visual components in a Facelet can be moved, sized, and formatted just like all the other visual components we have used so far. In other words, you can use the Properties view or click and drag in the Page Designer view to manipulate the formatting property values. However, the Facelets Properties view has a slightly different look and feel.
- 1. In the Page Designer view, click on the {PAYRATE} field in the Payrate column, as seen in Figure 12-14.
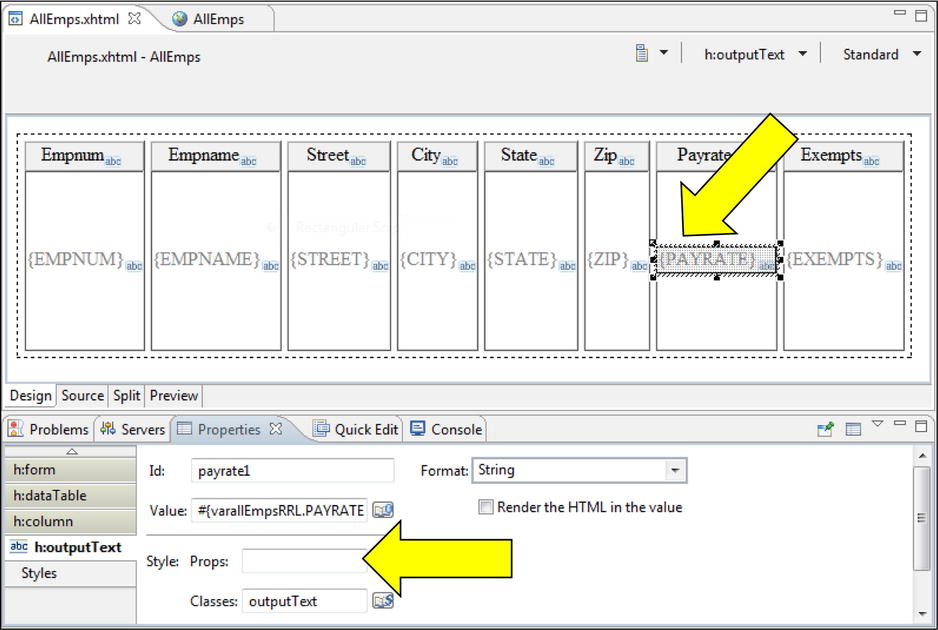
Notice that a name (the Id property) is defined for the outputText field. The format of the data can be specified from a list of predefined formats. In this example, String is the default format; however, Payrate really should be defined as a Number.
- 3. Click on the Format drop-down button and select Number.
Several new Number formatting option components will be displayed.
- 4. Click on the Type drop-down button to display the four subtype options and select Currency.
- 5. Click on the Style: Props: (i.e., Style Properties) drop-down button (see the second arrow in Figure 12-14).
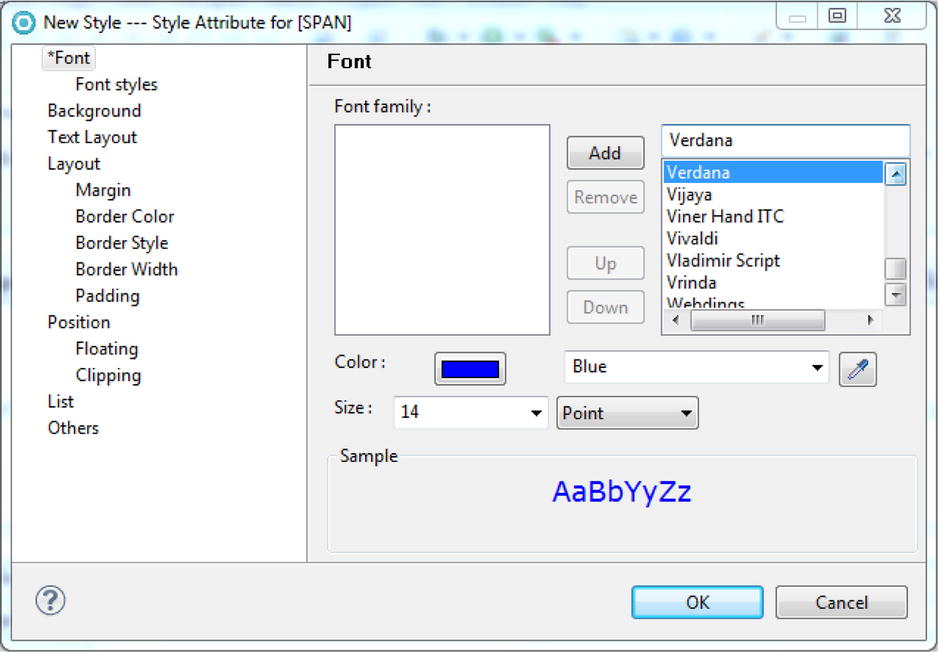
The New Style window is displayed with all the formatting options for the pay rate field. The appearance of the field text can be controlled, as well as, other field appearance properties such as background color and the field’s alignment within the column. We’ll make some simple font changes.
- 6. Choose the Font family, Color, and Size options as seen in Figure 12-15 and click the OK button.
Notice the tabs on the left of the Properties view. Instead of clicking on a visual component to select it (which sometimes requires a sharpshooters aim), you can select a component by clicking one of the tabs. For example, we could display and set the properties of the Payrate column or the entire Employee table by clicking the appropriate tabs.
For now, let’s test and make sure it works.
- 7. Save AllEmps.xhtml and then refresh the browser.
The page will be redisplayed with the formatting changes as seen in Figure 12-16.
As previously mentioned, you can control which data fields are displayed and the order of the fields. These controls are easily defined in the RRL configuration.
- 8. Go back to the AllEmps.xhtml edit session.
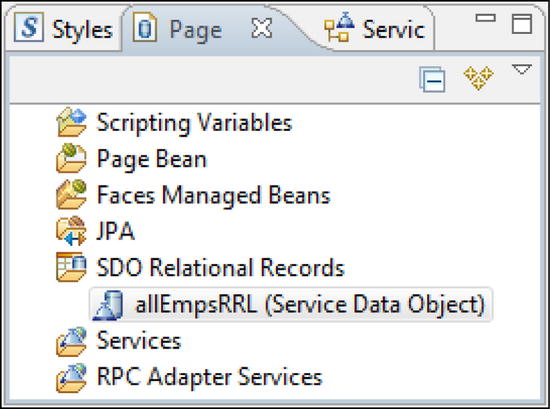
- 9. In the Page Data view (lower left pane, see Figure 12-17), right-click allEmpsRRL (Service Data Object) and, from the shortcut menu, select Configure.
- 10. At the Configure Relational Record List click the Reuse metadata checkbox, the Next button, and then at the Record List Properties pane click the Next button again.
The Add Relational Record pane will be displayed (see Figure 12-18). Fields can be included or excluded from the page by clicking the checkbox next to the field name. We will specify that only employees from Oklahoma be displayed and change the sort order of the data.
- 11. Click the Order results task to display the Orders window.
- 12. On the Orders window, click payrate in the left-hand pane and then click the first arrow button to move the field to the right-hand pane.
- 13. Click the Descending radio button.
The Orders window should look like Figure 12-19.
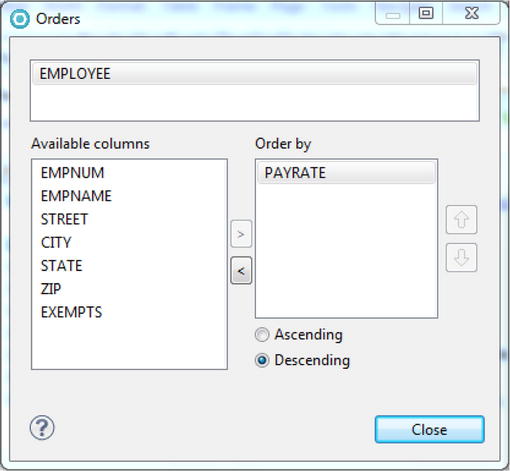
- 14. Click the Close button.
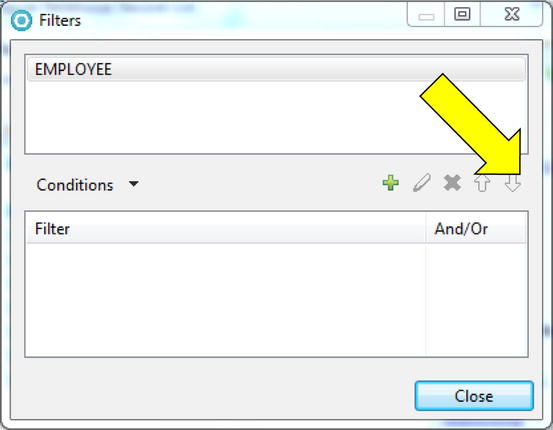
- 15. On the Add Relational Record pane, click the Filter results task to display the Filters window.
- 16. On the Filters window, start to define a filter condition by clicking the green plus sign indicated by the arrow in Figure 12-20.
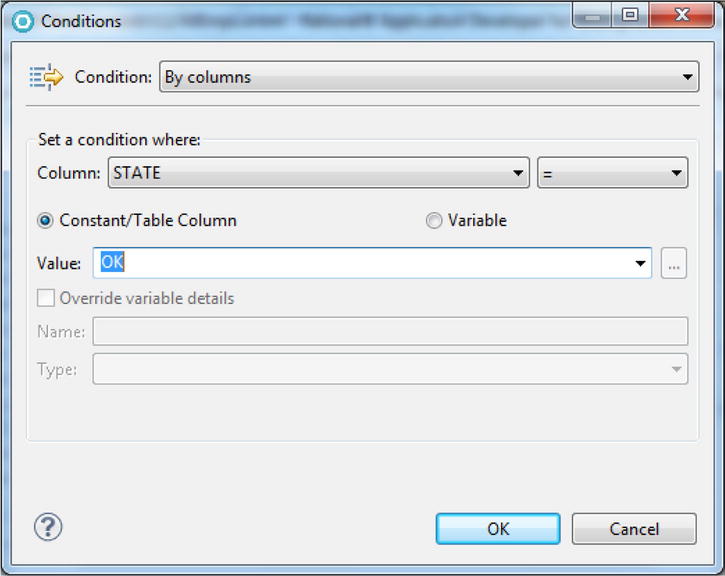
The Conditions window will be displayed, which allows the programmer to select only certain rows from a table based on the value of a particular column (i.e., field). To specify a condition, display a list of all the column names in the table by clicking the drop down button to the right of the Column field, then select a field. Next, choose from a standard list of comparison operators (=, <, >, etc.) and, finally, define a value (or another field that contains a value) to compare the field to. In this case, we want only the rows where the state field has a value of OK.
- 17. Specify the values as seen in Figure 12-21 and click the OK button.
The filters window will be redisplayed with the new filter condition. From this window more filter conditions can be added (and connected with ANDs and ORs) or filter conditions can be edited and deleted by selecting the condition and clicking the appropriate icon (pencil for edit, X for delete).
- 18. Click the Close button and then the Finish button to save the changes to allEmpsRRL.
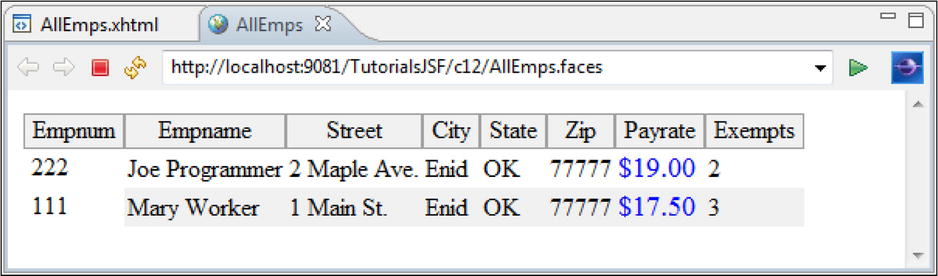
- 19. Save AllEmps and refresh the browser window that is currently displaying AllEmps.
The browser window will display the two employees from Oklahoma and list them in descending order by payrate (as seen Figure 12-22).
AllEmps is now a bad name because users will naturally assume that the page displays all the employees. We could rename the Facelet but instead we’ll remove the filter.
- 20. Display the Filters window and click on the condition.
- 21. Delete the condition by clicking the X.
- 22. Close the window, save the change, refresh the AllEmps page in the browser and confirm that all the employees are displayed.
Are you amazed at how easy it was to access a data file? The SDO RAD, and the JSF components did quite a bit of work for you. To explain every object that was created or used is beyond the scope of this text. However, to modify the application, there are several classes whose function and interactions you need to understand.
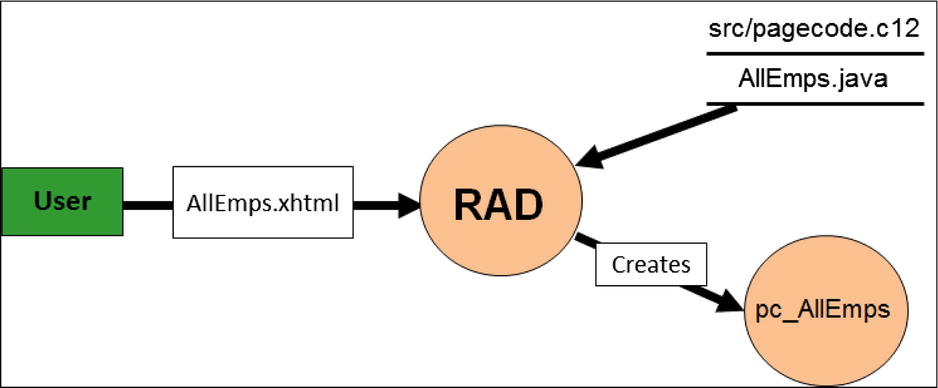
First, remember that the Facelets file suffix in the browser address field is faces. When the resource type specified is faces, the server knows that there is an associated “pagecode” class that needs to be instantiated and defined as a bean. You may be wondering, “What is a pagecode class?”
Expanding the TutorialsWebJSF/Java Resources/src folder will reveal two folders called pagecode and pagecode.c12. RAD creates the pagecode folder whenever a Standard Faces Component, Facelet Tag, or Data and Services items is added to the first Facelet in a project. In addition, a Java class with the same name as the Facelet is created in the appropriate “pagecode” folder. In the example above, a folder, called c12 was created in WebContent and the Facelet was created inside of it. Therefore, when the RRL was added to the AllEmps Facelet, RAD created an additional folder called pagecode.c12. The classes (i.e., the pagecode classes) have the same name as the Facelets and extend the class PageCodeBase. The PageCodeBase class is one of those classes that “come with” JSF. When the PageCode folder was created, RAD also imports PageCodeBase.java into the project. (Expand the pagecode folder in JavaResources/src to see the PageCodeBase.java file.) PageCodeBase contains all the basic functions and variables for a Facelet. Because our pagecode classes extend PageCodeBase, they inherit these functions and variables.
Get ready. Here comes a really big concept. When a new Facelet function is defined (for instance, adding a RRL to a Facelet using Page Designer), RAD generates and inserts the methods and variables to perform that function into the pagecode class. When the Facelet tags try to access the RRL data, the server makes sure that the appropriate methods are invoked to retrieve the data.
Let’s walk through, step-by-step the process that occurred when we created the AllEmps Facelet.
When AllEmps was created in c12, RAD created a new file of type xhtml. The xhtml file (in WebContent/c12) holds the Facelet (the View portion of our application). See Figure 12-23.

When the first Standard Faces Component was added to the Facelet (the RRL), RAD created a folder in Java Resources/src and a java file with the same name as the Facelet. Because AllEmps was in a folder called c12, the source code folder was called pagecode.c12. The java file holds the source code for the pagecode subclass associated with the Facelet, that is, the pagecode class holds the Facelet’s logic (the Model portion of the app). See Figure 12-24.

In addition, when the RRL was added to the Facelet (and the connection was defined and assigned to the RRL), RAD generated all the Java code needed to retrieve the employee information and put that code into AllEmps.java (the pagecode class). Displaying the AllEmps.java source code will reveal many methods. The one that does most of the “heavy lifting” regarding accessing the data is called doAllEmpsRRLFetchAction().
As with all java classes, RAD also generates the pagecode class file (the bytecode file) from the pagecode source (i.e., from the .java file). In the Web perspective, the class files are hidden. To prove that they are there, use Windows My Computer to display the workspace/project folder. Then drill down into WebContent/WEB-INF/classes/pagecode/c12 and the AllEmps.class file will be shown.
RAD also put into the Facelet all the JSF and Facelet tags needed to access the pagecode bean, retrieve the data and display the data. Display the Facelet source code and see all the work RAD has done for you!
When the Facelet is requested, the server creates the pagecode object (from the class file) and defines the object as a Java bean with a scope of request. The bean name begins with the letters pc (standing for pagecode), an underscore, and then the name of the Facelet. In this example, the bean is called pc_AllEmps (see Figure 12-25).
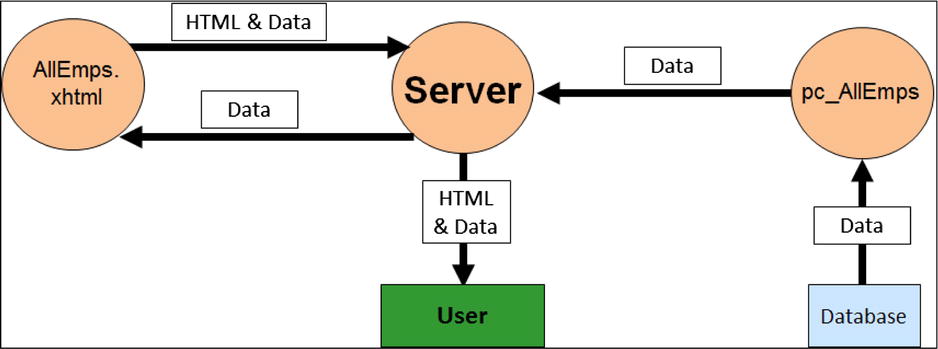
In AllEmps Facelet, the value attribute (value= "#{pc_AllEmps.allEmpsRRL}") of the dataTable tag tells the server to invoke the bean’s (i.e., the pagecode subclass’) getAllEmpsRRL() method. (In JSF, EL statements can begin with a $, as with JSPs, or a # as above.) getAllEmpsRRL() returns the employee information from the database as a list. The power/magic of the dataTable tag is that it will iterate through the list and generate HTML for multiple rows. The HTML and data is passed back to the server and the server sends it to the browser (see Figure 12-26).
That’s enough for now.
Are you asking, “Why do I have to know all this?” Well, to enhance the application you are going to have to get your hands dirty and do some coding. (Sorry, Page Designer can’t do it all for you!) In addition, to modify the code, you need to understand which classes and methods to modify, which files hold the source code, and where the files are located.
Tutorial: Linking Web Pages to a Facelet
The AllEmps Facelet is relatively simple. It retrieves information from the database and displays it on a page. The application, however, must be expanded to include functions to insert and modify employee information. These functions will be provided by new Facelets using SDO. In addition, the application needs Web pages with links to the various application options (i.e., the Facelets that will provide the functions).
- 1. Close all Browser and Editor sessions.
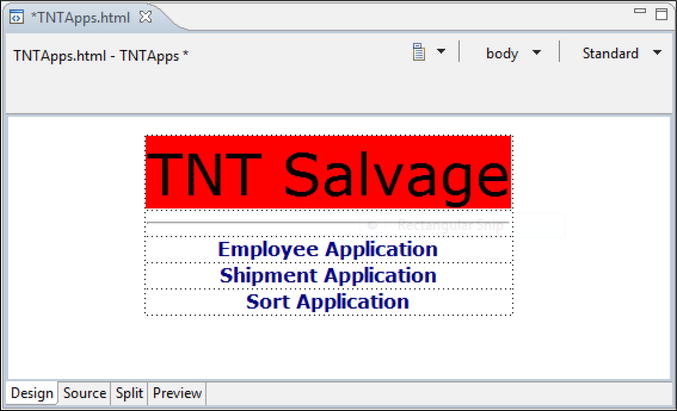
- 2. In TutorialsJSF, create a new HTML/XHTML web page called TNTApps.
- 3. In Design view, drag and drop a HTML table with five rows and one column and set the border width to zero.
- 4. In the Properties view, change the table’s Layout Alignment to center.
- 5. In the first cell:
- a. Set the Background color to red
- b. Add the text TNT Salvage
- c. Set the text font to Verdana, color to black, and size to 36
- 6. From the Palette’s HTML Tags drawer, drag and drop a Horizontal Rule into the second cell.
- 7. In the last three cells:
- a. Add the text Employee Application, Shipment Application, and Sort Application
- b. Bold and center the text and set the font to Verdana and color to Navy
The page should look like Figure 12-27.
- 8. Save the file.
- 9. Save the file again, this time as EmpApps.
- 10. In EmpApps, change the text in the last three cells to Display All Employees, Insert An Employee, and Update An Employee.
- 11. Save EmpApps.
- 12. In TNTApps, select the text Employee Application.
- 13. In the Command Bar, click on Insert then Insert Link . . . to display the Insert Link window.
- 14. At the Insert Link window, click the Browse button and select File . . . from the menu.
- 15. In the File Selection window, expand WebContent, select EmpApps.html, and click OK.
The Insert Link window will contain EmpApps.html as the URL
- 16. Click the OK button and save the file.
The Employee Application text should be underlined and appear in a different color then the other text.
- 17. Switch to the Preview view and click on Employee Application link.
The EmpApps page should be displayed.
- 18. In the Design view of EmpApps, highlight the text Display All Employees and click on Insert then Insert Link . . . .
- 19. At the Insert Link window, click the Browse button and select File . . . from the menu.
- 20. In the File Selection window, expand the WebContent/c12 folder, click on AllEmps.xhtml, and then click the OK button.
The URL will be displayed as c12/AllEmps.faces. Even though the file name for the Facelet is AllEmps.xhtml, the resource is specified as AllEmps.faces.
- 21. Click the OK button.
To access a Facelet from a Web Page, we must run the Web page on the server. This is because the server must create the bean and execute the methods indicated in the Facelet.
- 22. Run TNTApps on the server, and then select Employee Application.
- 23. On EmpApps, select Display All Employees.
The AllEmps page will be displayed with the three employee records.
Tutorial: Inserting Data Using a Relational Record (RR)
Let’s insert some data
- 1. Close all RAD sessions and, in WebContent/c12, create a new Facelet called InsertEmp.
- 2. In the Design view, click on SDO Relational Record (not SDO Relational Record List) in the Palette’s Data and Services drawer and then click on the Facelet.
- 3. At the Add Relational Record window, specify empRR as the name, click on the Creating a new record radio button, and click the Next button (see Figure 12-28).

The Record Properties pane will be displayed in the Add Relational Record window.
- 4. Make sure TNT_Employee_Con is specified as the connection name.
- 5. If necessary expand the TNTDB item, click on the Employee table, and then the Next button.
Notice that you do not have to define a connection. RAD remembers the connection information defined earlier and allows the connection to be used in any class within the EAR.
Yay, RAD!
- 6. On the Add Relation Record pane, click on the Modify primary key task, specify empnum as the key (just as you did earlier with the Relational Record List) and click the Close button.
- 7. Click the Finish button.
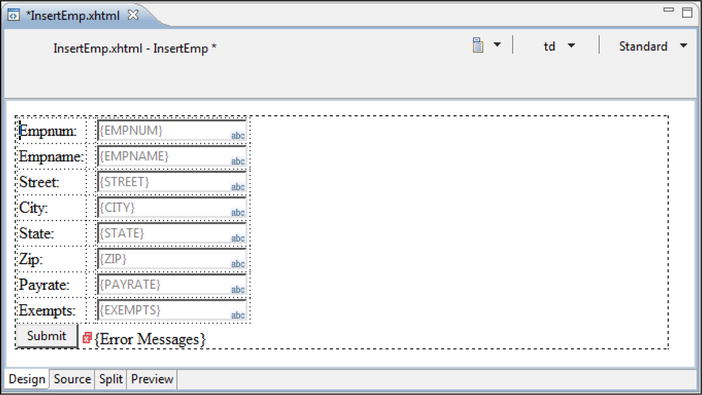
You have just created a Facelet that can insert a row into a database table. The InsertEmp Facelet should look like Figure 12-29. It’s not very pretty but the format of the text can be modified, the table and input fields can be repositioned and resized, and so on. We are going to concentrate on the SDO data functions, not the JSF formatting options.
- 8. Save InsertEmp.
- 9. In EmpApps.html, make the text “Insert An Employee” a link to InsertEmp. (When identifying the file, don’t forget to specify faces as the file extension.)
- 10. Save EmpApps, run TNTApps on the server, and click Employee Application.
- 11. Click on Insert An Employee.
InsertEmp should be displayed.
- 12. Specify information for a new employee as in Figure 12-30 and click the Submit button.
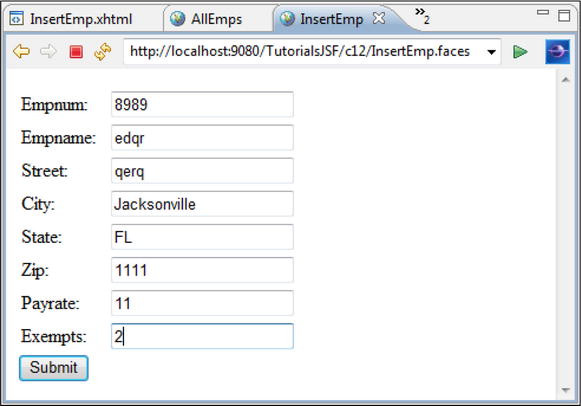
Nothing appears to happen, even though the data was inserted into the table. We’ll verify this by displaying all the employees.
- 13. In the browser, click the back button twice.
- 14. On the EmpApps page, click the Display All Employee option.
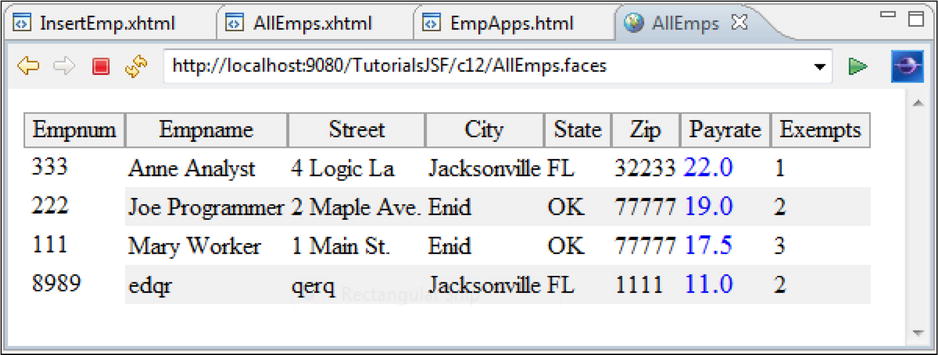
The browser will look like Figure 12-31.
Can you believe how easy it is to develop these functions using SDO and JSF? (Especially considering how long it took to code the database access functions in Chapter 10.) Of course, many niceties are missing. For example, after inserting the record, the entry fields should be blanked out and a successful insertion message should be displayed. Also, none of the entered data was validated nor can we display the gross salary or tax amounts. These functions can be coded in the pagecode class by the programmer. For now, however, we will finish the application by adding functions to update and delete employee information.
Updating Data Using SDO and JSF
Update and delete functions are a little more complicated than display and insert. To modify or delete, the user must first specify the employee to modify. The application must then retrieve and display that employee’s information. This “display Facelet” must have options to modify and delete which means two Facelets are needed: one Facelet to get the employee number and one to display the specified employee information with the modify and delete options. We will create GetEmp to retrieve the employee number and UpdateEmp will display the specified employee and have the capability to update or delete. This means that two processes must occur:
- After the employee number is specified on GetEmp, UpdateEmp must be executed.
- GetEmp must make the employee number accessible to UpdateEmp.
To run UpdateEmp after the GetEmp submit button is clicked, we will create a JSF framework item called a navigation rule. Navigation rules comprise the controller function of a JSF application. Navigation rules define what resources should be accessed based on events and outcomes. Navigation rules eliminate the need to code redirects and forwards as in JSPs thereby separating the controller function from the view. But where is the controller function moved to? The controller function is defined in a project file called faces-config using XML (eXtensible Markup Language. We will show the XML that defines a navigation rule but more importantly, we will show how to have RAD generate the XML for us.
To satisfy number 2 (from above), we will first use a type of scripting variable called a session scope variable. A session scope variable is accessible by any Java object within the EAR. This variable will hold the employee number. We will use binding to ensure that GetEmp sets the variable’s value to the employee number and that UpdateEmp retrieves the employee number from the variable.
Scripting variables are a very powerful tool; however, scripting variables and SDO (RRLs and RRs) do not work as smoothly together as JSF and SDO do.
Tutorial: Defining a Scripting Variable
We will go through the procedure for creating and using the scripting variable (because they are so useful) and then show how SDOs, links, and parameters can be used to perform the same function.
- 1. Close any open editing or browser sessions.
- 2. In TutorialsJSF/WebContent/c12, create a new Facelet called GetEmp.
- 3. Insert an HTML table with one column, three rows, and a border width of zero, and center the table on the page.
- 4. In the first cell, enter the following text: Enter the employee number to update and click the Submit button.
- 5. From the Standard Faces Component drawer in the Palette, click on the Input component and then click on the second cell in the table.
- 6. From the Standard Faces Component drawer in the Palette, click on the Button - Command component and then click on the third cell in the table.
- 7. On the left side of the Properties view, click the td tab (see Figure 12-32).
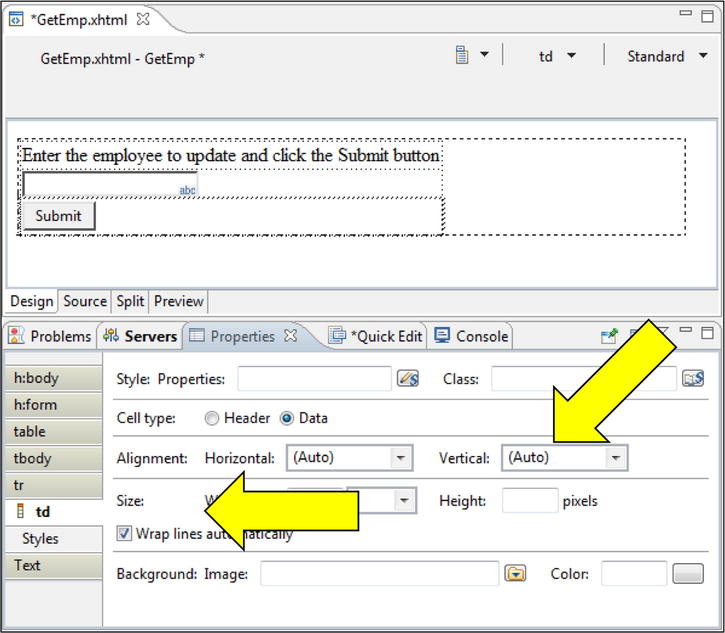
- 8. Center the button by clicking the Alignment Horizontal drop-down button and select Center from the options.
- 9. Center the Input component (just as you centered the Submit button).
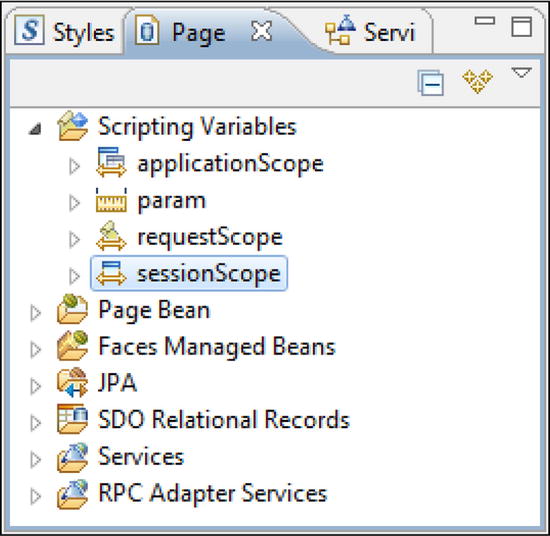
- 10. In the Page Data view, expand Scripting Variables and then double click sessionScope (see Figure 12-33).
The Configure sessionScope window will be displayed. To create a session variable we just need to specify a variable name and a type.
- 11. At the Configure sessionScope window, click the Add . . . button to display the Add Session Scope Variable.
- 12. Specify empNum as the Variable name, java.lang.String as the Type (see Figure 12-34), and click the OK button.
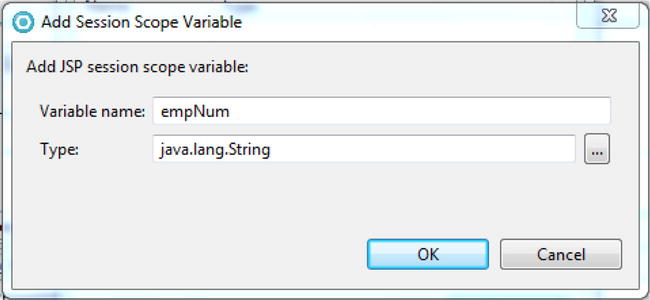
The Configure sessionScope will be redisplayed with the empNum variable listed.
- 13. Click the Close button.
In the Page Data pane, expand the sessionScope item to display the new empNum scripting variable. This means that the session variable was created (which we will really prove in the next tutorial). Notice that no Java had to be entered (i.e., no PageContext object created, no getSession method or setAttribute method invoked, etc) to create this session-wide variable. The JSF framework and RAD handle it all. However, we do need to get the employee number from the input field into the scripting variable. This will be done through binding.
Binding a Data Object to a Visual Component
When a data object is bound to a visual component, they share the same value. Changing one’s value will change the other’s value. However, binding works differently with different visual components. For example, when AllEmps was created, each RRL field (i.e., a data object) was automatically bound to an outputText component (a visual component generated when the JSF Output component was added to the page). In that case, because an outputText field can’t be changed by a user, the RRL field can’t be modified from the page. However, when the bound outputText component is displayed, the value in the RRL field will be displayed. InsertEmp also employed binding but in that case, inputText components were bound to RR fields. Because inputText fields can be modified, this means the RR fields can be modified from the page.
In both these earlier examples, binding was done automatically because a SDO was used (i.e., a RRL or RR was used). In GetEmp, the session variable (another type of data object) needs to be bound to the generated inputText field so that when the employee number is entered, the session variable is changed. Because a JSF Input component is not an SDO, the programmer must bind the visual component and data object. Fortunately, binding in RAD is easy.
Tutorial: Binding
Let’s try binding:
- 1. From the Page Data view, drag and drop the empNum variable onto the inputText component.
Yes, that is all it takes to bind. Notice that in the Properties view RAD put an EL statement into the value property and in Page Designer the variable name appears in the inputText component (within braces).
To finish GetEmp, we will define a navigation rule to run UpdateEmp when the Submit button is clicked. However, before the navigation rule is created, UpdateEmp should be created. We will create a very basic UpdateEmp (for testing purposes) and then come back to GetEmp to define the navigation rule. We will then test that the navigation rule works and complete UpdateEmp.
- 2. Save GetEmp.
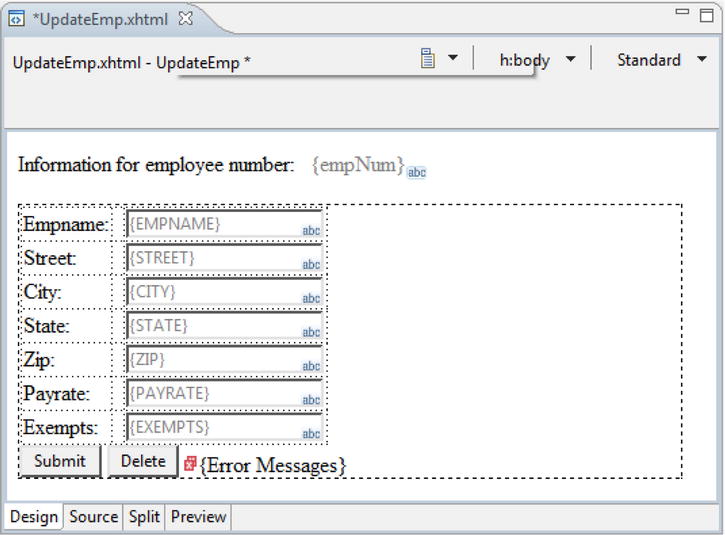
- 3. In TutorialsJSF/WebContent/c12, create a new Facelet called UpdateEmp.
- 4. Insert the text “Information for employee number:”.
- 5. Insert a space after the colon and then insert an Output component to the right of the space. (In the source code you may have to insert the non-breaking space numeric entity,  , after the colon and move the static text’s end paragraph tag, </p>, after the outputText tag.)
- 6. Drag and drop the empNum scripting variable from the Page Data view onto the Output component.
This binds the scripting variable to the outputText field. This also means that when the page is displayed, the scripting variable value will be shown.
- 7. Save UpdateEmp.
We will now define a navigation rule in GetEmp, then test that the empNum variable value is being set by GetEmp and displayed by UpdateEmp.
Navigation rules are defined for a component(s) and, in this case, the component is the Submit button on GetEmp. A navigation rule dictates which resource to “go to” for the outcome of an action. You may be wondering, “What is an action?” In a Facelet, an action is simply a method in the RAD-generated pagecode class. The method (i.e., the action) is coded such that the method returns a string (i.e., an outcome), and the method name is doXXXAction, where XXX is the visual component name.
The method-naming convention must be followed because this is how the server knows which method in the pagecode class to execute when an event occurs to that visual component (e.g., the button is clicked). For instance, to define a navigation rule for button1 (the Submit button), a method called doButton1Action must be defined in the pagecode class. Inside of the doButton1Action method any Java statements can be entered; however, a return statement must be coded to return a string value. This returned value is the outcome of the method/action. Different outcome values (i.e., string values) can be returned based on the processing within the action (i.e., the method) and there can be many navigation rules, each based on a different outcome value.
As you probably suspect, RAD makes defining a default action easy. Default actions return an empty string as an outcome. (Yes, an empty string is a valid outcome!)
Tutorial: Defining a Navigation Rule
For this example, we will generate a success outcome and a single navigation rule.
- 1. In the Page Designer, click on GetEmp’s Submit button.
- 2. Display the Properties View and scroll to the right to show the navigation rules table.
The Properties view should look like Figure 12-35. Before defining the navigation rule, however, the action (i.e., the method in the pagecode class GetEmp.java) must be created. The programmer can go directly into GetEmp.java and code the method, but RAD provides a much easier way to create the method.
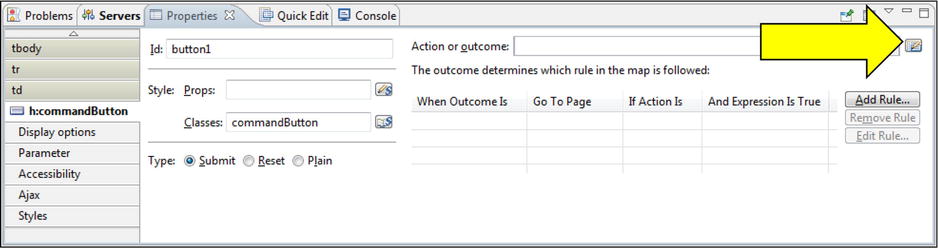
- 3. Click on the “Select or code an action” icon (indicated by the arrow in 12-35) and from the shortcut menu choose “code an action.”
This brings up the Quick Edit session for a small portion of code within GetEmp java. The tabs along the left are options for the specific action/method to be created.
- 4. On the left of the Quick Edit view, click on the Command tab (indicated by the arrow in Figure 12-36) and then click anywhere in the source code (in the right of the pane).
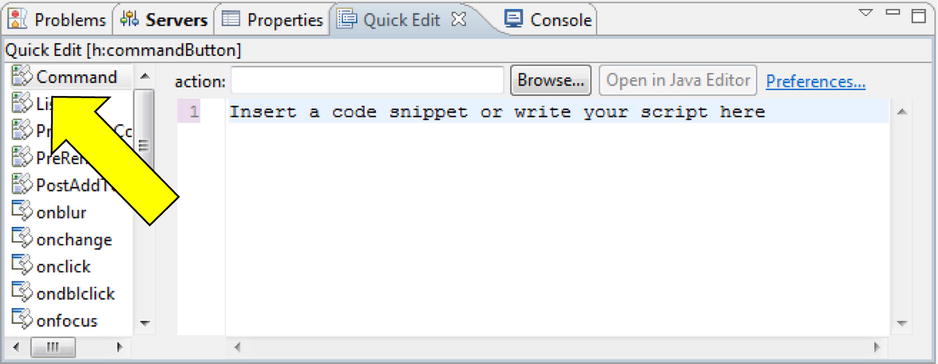
Clicking the source code tells RAD to:
- A. Create a doButton1Action method in the pagecode subclass (i.e., GetEmp.java)
- B. Insert comments explaining the type of statements the programmer should enter
- C. Insert a return statement for a null string
- D. Start a Quick Edit session for the doButton1Action method
Notice that Quick Edit does not show (or provide access to) the doButton1Action method header or the method body’s opening and closing braces.
To generate a doButton1Action method in GetEmp.java, the default code in the Quick Edit view must be modified.
- 5. In the Quick Edit view, insert the text success between the double quotes of the return statement and save GetEmp.
Scroll to the end of the GetEmp.java source code and confirm that RAD inserted the following doButton1Action method.
public String doButton1Action() {
 // This is java code that runs when this action method is invoked
 // TODO: Return outcome that corresponds to a navigation rule
 return "success";
}
For the time being, we will leave this very dull action as is.
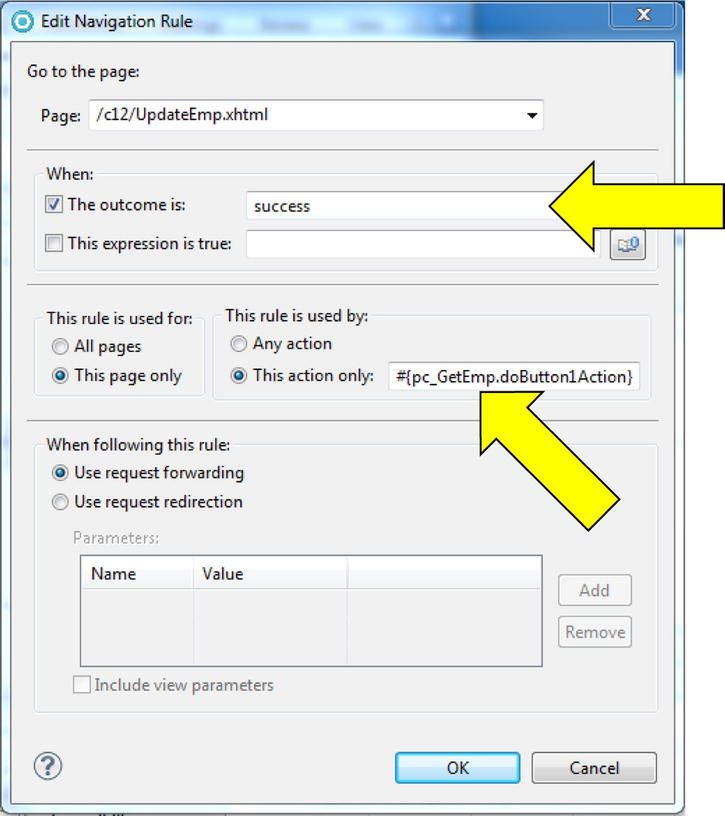
- 6. Switch back to the Properties view for the Submit button and start defining a navigation rule by clicking the Add Rule . . . button.
The Add Navigation Rule window will be displayed. The only rule property that must be defined is the go to the page; however, we can also define the rule as a default. In other words, we can associate this rule with all components, pages, and/or outcomes. If there were several buttons on the page, the rule could be applied to all of them.
- 7. From the Page drop-down button, select /c12/UpdateEmp.xhtml.
We will not change any of the other options on this page. This means that any outcome of any component action on this page will result in the UpdateEmp Facelet being invoked. For instance, if there were multiple buttons, any action against these buttons would invoke this navigation rule.
- 8. Click the OK button.
The Properties View will be redisplayed and the rule will be shown in the navigation rules table. If you’d like to see the XML that was generated, double click the faces-config file in WEB-INF. Then in the FacesConfiguration Overview, click the Source tab and scroll to the end.
It is time to test the rule to see if it works and that the employee number is being set by GetEmp and being retrieved by UpdateEmp.
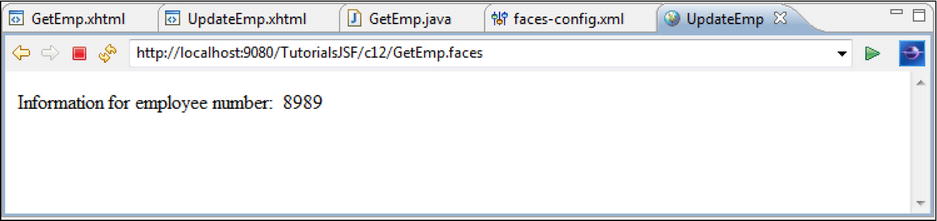
- 9. Run GetEmp.xhtml on the server.
GetEmp should be displayed in the browser.
- 10. Specify 8989 as the employee number and click the Submit button.
The browser should display the UpdateEmp page with the employee number 8989 (see Figure 12-37).
Excellent!
Tutorial: Updating and Deleting Using a Relational Record
All we need to do now is change UpdateEmp so that it actually updates and deletes.
- 1. Close any open editing or browser sessions and open an editing session for UpdateEmp.jsp.
- 2. In Design view, click on a Relation Record item in the Data and Services drawer and then click beneath the existing text.
The Add Relation Record window will be displayed. As with AllEmps and InsertEmp, this window allows us to specify controls. Unlike earlier when we created display or create controls, UpdateEmp needs controls to both update and delete.
- 3. Specify empRRUpdate as the name and click the “Updating an existing record” radio button.
By choosing the update option, RAD will create buttons, methods, and variables for both the update and delete functions.
- 4. Click the Next button.
- 5. Make sure TNT_Employee_Con is specified as the Connection name.
- 6. Scroll down the tree diagram, expand TNTDB, click on Employee and then the Next button.
- 7. On the Add Relational Record pane, click on the Modify primary key link and specify the employee number field as the key.
- 8. On the Add Relational Record pane, click the Filter results option.
The Filters window will be displayed as shown in Figure 12-38. RAD automatically generates a condition that indicates a parameter called EMPNUM will determine which record will be displayed. We need to change this condition so that the scripting variable empNum determines the employee information displayed.
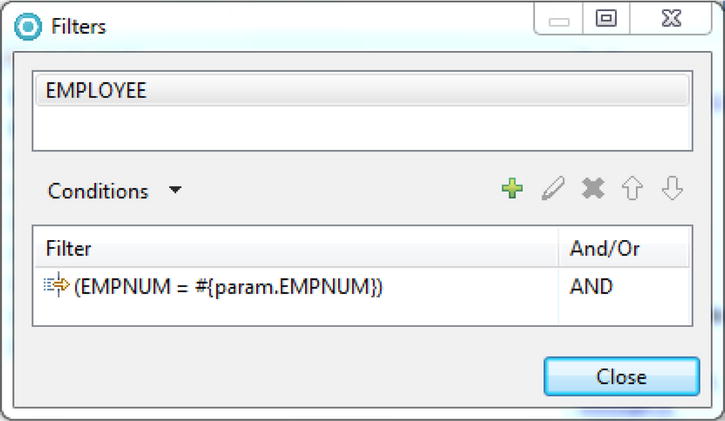
- 9. Click on the filter condition and then the Pencil icon to edit the condition.
- 10. On the Conditions window, click the . . . button to the right of the Value field’s drop-down button (indicated by the arrow in Figure 12-39).
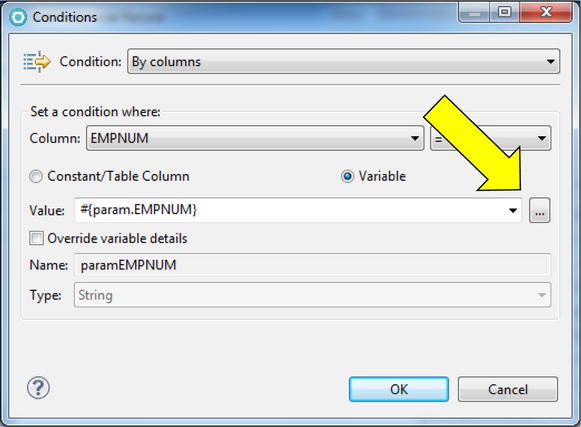
- 11. On the Select Page Data Object window, expand the sessionScope item (in the tree diagram) and then click on empNum (see Figure 12-40).
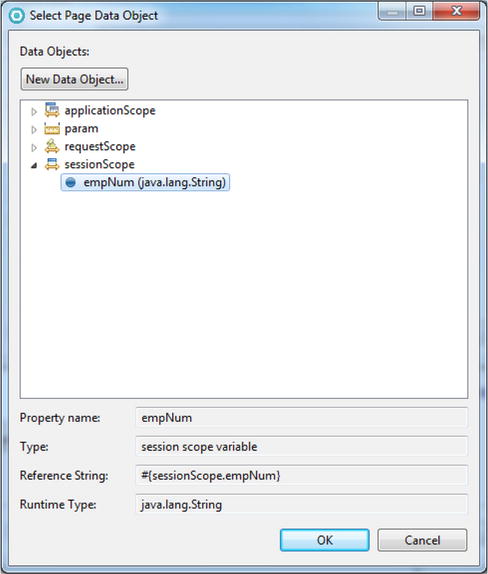
Notice that the Reference String field (toward the bottom of the window) now contains an EL statement that indicates the sessionScope variable.
- 12. Click the OK button and then click the OK button to save the changes to the condition.
- 13. Click the Close button to save the changes to the filter
- 14. On the Add Relation Record pane, click the Next button.
- 15. On the Configure Data Controls pane, click the checkbox next to empnum to unselect the field.
We already have the employee number displayed on the page in an outputText field, so we are removing this field from the Relational Record (this also prevents the user from changing an employee’s employee number.
- 16. Click the Finish button.
UpdateEmp.xhtml should look like Figure 12-41.
Just like the insert page, RAD has created inputText components for each selected field in the database table and bound the fields to the RR data components. RAD has also created two buttons that will invoke the update and delete functions in the pagecode class (i.e., UpdateEmp.java). If you look at the UpdateEmp.xhtml source code, you’ll see that the EL statement for each button’s action parameter invokes a particular method in the bean/pagecode class (pc_UpdateEmp). For example, the Submit button invokes the doEmpRRUpdateUpdateAction method. Where did that method come from? RAD automatically generated these methods when the Updating option was selected in step 3.
Although RAD has done a wonderful job, the default text for the Submit button should be changed. Submit does not really describe what clicking the button will do, so we will change the text to Update.
- 17. Click on the Submit button and, in the Properties view, click the Display options tab.
- 18. Specify Update in the Button label field and save UpdateEmp.
Now we need to update the Employee Applications Web page to link to GetEmp.xhtml.
- 19. Start an editing session for EmpApps.html.
- 20. Highlight the Update An Employee text.
- 21. Click on Insert, Link, and then specify c12/GetEmp.faces as the URL.
- 22. Click the OK button, save EmpApps and UpdateEmp and close the edit sessions.
Test time.
Tutorial: Testing the Update and Delete Functions
Let’s make sure it all works:
- 1. Run TNTApps.html on the server.
- 2. Click on the Employee Applications link.
- 3. Click the update link.
- 4. Enter 8989 as the employee number and click Submit.
UpdateEmp should be displayed with employee’s 8989 information (see Figure 12-42).
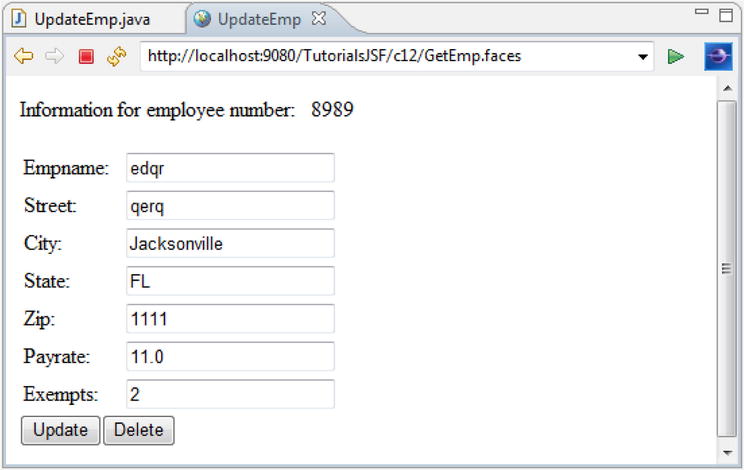
- 5. Change the employee name to Frank Tester, the street address to 4 Try Again Rd, and Zip code to 32244, and click the Update button.
If you got error messages in the console when you clicked the Update button, it could be because the value entered is too big. If a database character field value is entered that is not the database field maximum size, many DBMSs will pad the value with spaces. For example, the employee name field was defined as 25 in length. When edqr was entered as the name, the DBMS may have put 21 spaces at the end of edqr. When the info for employee 8989 was displayed, the name displayed was actually edqr. If you replaced edqr with Frank Tester, the actual value in the field was 33 characters in length—the 12 characters that comprise the name plus the 21 blanks that the DBMS added.
You can prove this by clicking in the far right of any text field that contains character data that isn’t the maximum field size. The cursor is placed after the spaces, well after the last visible character. So to get around the error, simply select the characters and the spaces in the text field then type the new information.
- 6. Click the browser’s back button until the Employee Applications page is redisplayed.
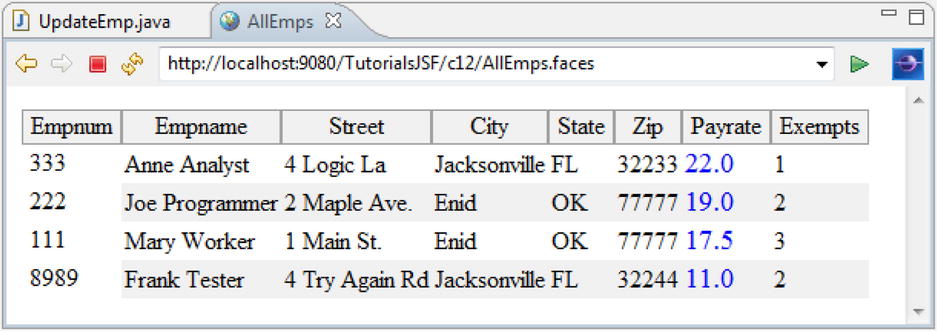
- 7. Click on the Display All Employees link.
(If Frank Tester’s info doesn’t appear, refresh the page.) The browser should look like Figure 12-43.
- 8. Click the browser’s back button until the Employee Applications page is redisplayed.
- 9. Choose Update An Employee and specify Frank Tester’s employee number 8989.
- 10. On UpdateEmp, click the Delete button.
The input fields will be cleared.
- 11. Click the browser’s back button until the Employee Applications page is redisplayed.
- 12. Click on the Display All Employees link.
Only three employees should appear and Frank Tester should no longer be displayed. (If Frank Tester appears, refresh the page.)
- 13. Choose Update An Employee, specify 8989, and click Submit.
Notice that the update page is displayed with no data (rightfully so because we deleted Frank Tester). However, the console is full of error messages with the originating message saying, “an index is out of bounds.” Because there is no employee 8989, when the RR attempts to read the data from the DBMS there is an error. When there is no employee to update, the update page really shouldn’t be displayed but unfortunately, this is not how the RR functions.
Building the update Facelet was remarkably easy; however, getting the RR to work with the DBMS was not, and the RR does not handle the “employee number not found” condition very well. SDOs are very powerful but, as mentioned, they often “do not play well” with non-SDO technologies. So in the next tutorial we will address some of these shortcomings.
Tutorial: Fixing the Application
There are several ways to fix the problems. The harder, but prettier way, is to change the pagecode classes associated with UpdateEmp (to trim off the spaces) and GetEmp (to check that the employee does exist in the DBMS). In addition, better navigation rules will be needed.
To check that an employee exists modify the GetEmp’s doButton1Action to check to see if there is an employee record for the employee number specified. This would require importing DBAccess and Employee from TutorialsWeb/c11 into TutorialsJSF/JavaResources/src/pagecode. c12. (On the paste, RAD will change their package statements from c11 to pagecode.c12. Wasn’t that nice of RAD!)
In doButton1Action, create an Employee object and then use the scripting variable to retrieve the record from the database. Remember, the Employee class does not throw an exception if no record is found so doButton1Action must check to see if employee information exists in the employee object. If there is an employee name, then a “success” outcome will be returned.
If there is no employee name, then employee number should be blanked out of the inputText field and an “employee doesn’t exist” error message displayed on GetEmp.xhtml. To do this add a JSF Output field (which generates an outputText field called text2) to the page. In addition, create a sessionScope scripting variable (named msg) and bind it to text2. Then in doButton1Action, blank out the value in the scripting variable empNum. Because the scripting variable is bound to the text field, the text field will be blanked out also. Place the error message text in the scripting variable msg. Once again, because of binding the message will appear in the output field. Finally, we want to return an outcome of “failure”.
The navigation buttons still need to be changed so that only when success is returned is UpdateEmp.xhtml displayed. On failure, GetEmp.xhtml will be redisplayed with the error message and the invalid employee number erased.
The following is the new doButton1Action method:
public String doButton1Action() {
      String Num = (String) getSessionScope().get("empNum");
      Employee emp = new Employee();
      emp.getEmpInfo(Num);
      getSessionScope().put("msg", "");
      if (emp.getEmpName().length() > 0) {
            return "success";
      } else {
             getSessionScope().put("msg", "Employee number " +
getSessionScope().get("empNum") +
" doesn't exist, please re-enter.");
             getSessionScope().put("empNum", "");
             return "failure";
      }
}
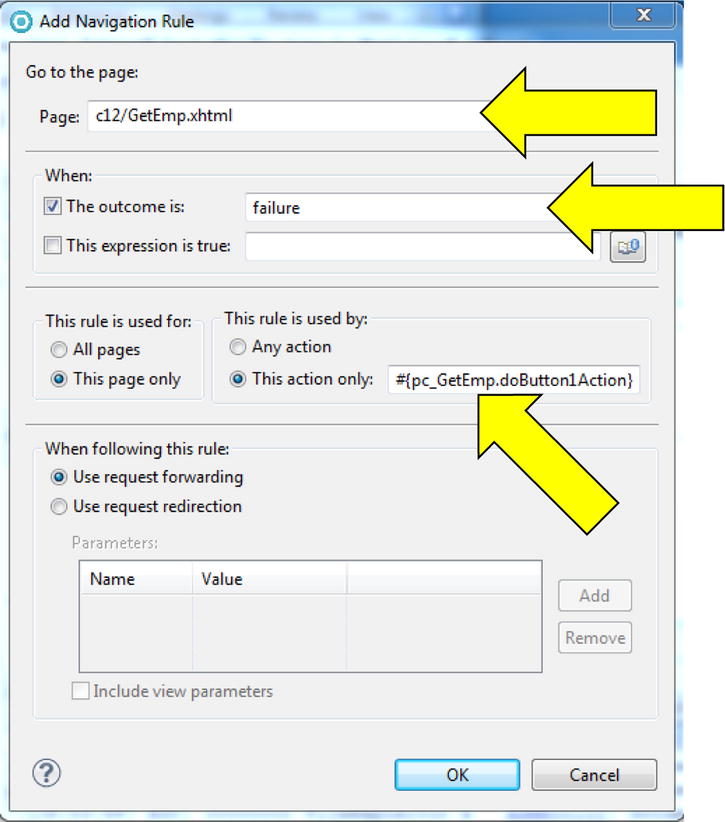
As mentioned, the old navigation rule must be changed so that it is not the default. This rule (displaying UpdateEmp.xhtml) should only be executed when the outcome is “success” (see Figure 12-44). Create a new navigation rule for the “failure” outcome that redisplays getEmp (see Figure 12-45).
- 1. Make the changes specified above.
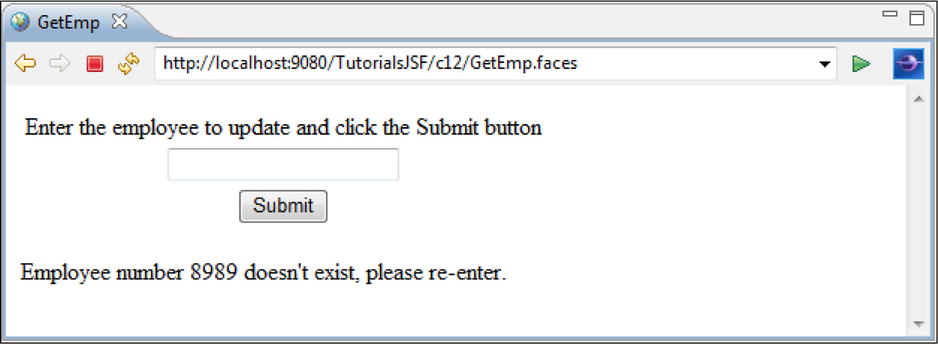
- 2. Display GetEmp.xhtml, specify 8989, and click Submit.
The result should look like Figure 12-46.
That was quite a bit of work, wasn’t it? Isn’t JSF supposed to make things easier?
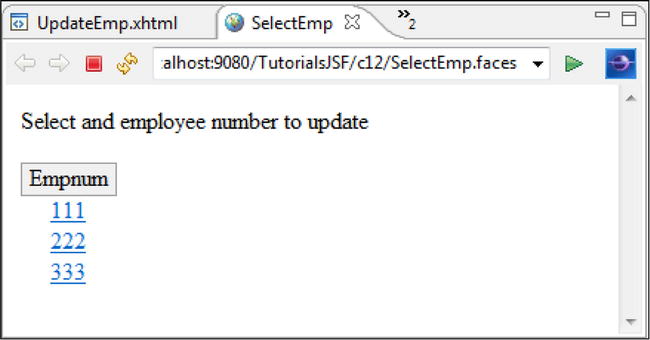
Instead of all that coding, we could instead create a new Facelet (to replace GetEmp) that uses a RR to display all the valid employee numbers as links to the update page. The problem with this is it does not have as “clean” a user interface. Seeing it in action will help explain what we mean by “clean”.
- 3. Create a new Facelet in c12 called SelectEmp.
- 4. Add the text: Select an employee number to update.
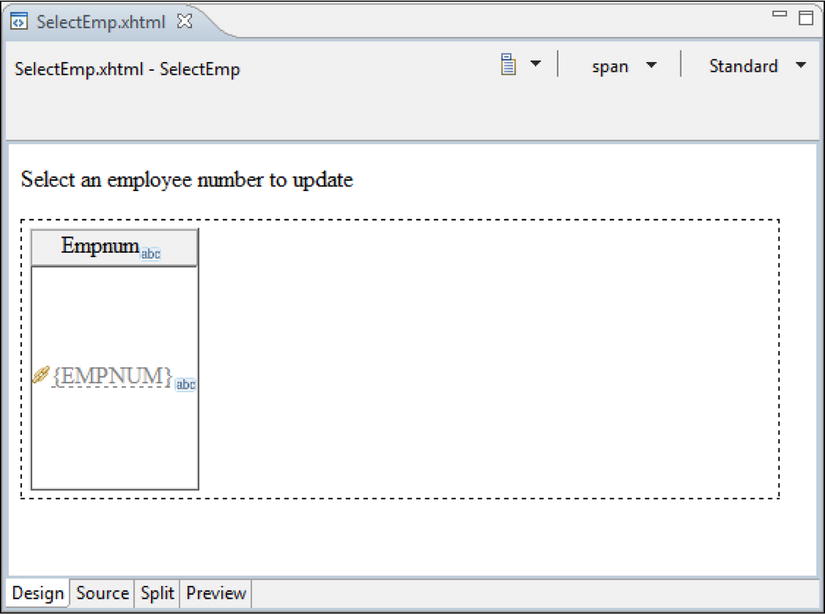
- 5. Add an RRL called selectEmpRRL that connects to the Employee table and only displays the employee number field.
Page Designer should look like Figure 12-47.
- 6. In the Standard Faces Components tray, click Link and then click on the employee number outputText field.
- 7. In the properties view, add a navigation rule that specifies /c12/UpdateEmp.xhtml as the Page for any action and delete the Label text (i.e., Link).
When the link to UpdateEmp is executed, we will pass the selected employee number as a request parameter to UpdateEmp and have empRRUpdate use that value in the filter condition.
- 8. Make sure the link is selected and on the left of the Properties view, click the Parameter tab beneath the link tab.
- 9. Click the Add Parameter button and in the Name area specify employeeNumber.
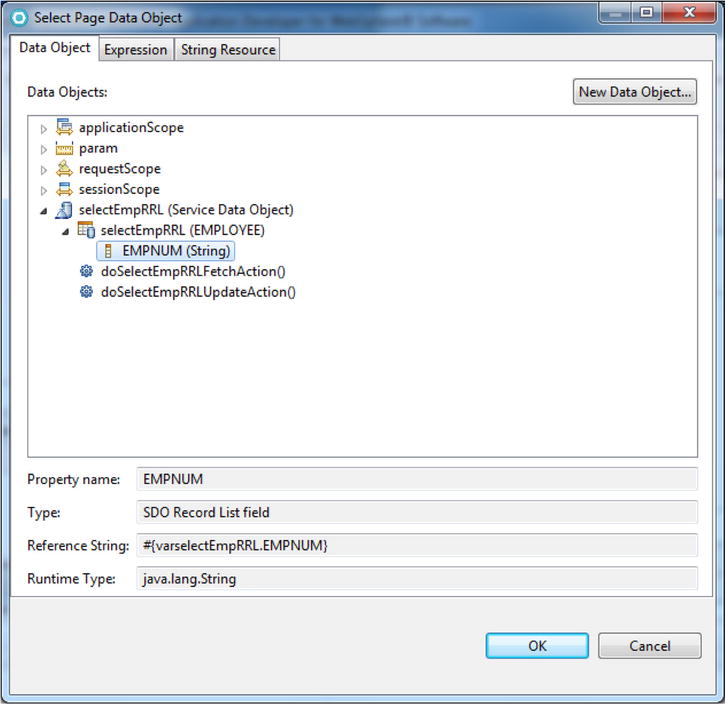
- 10. Click the Value field to display the drop-down button and click the drop-down button to display the Select Page Data Object window.
- 11. Expand the selectEmpRRL items, choose the EMPNUM field (see Figure 12-48), and click the OK button.
- 12. Save SelectEmp.
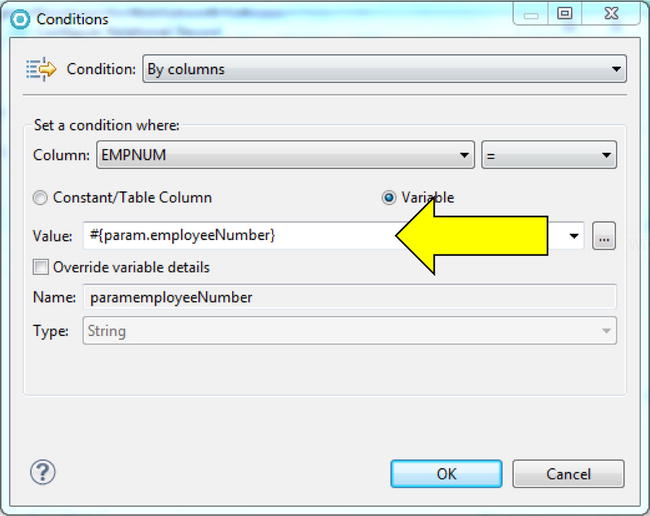
UpdateEmp.xhtml must be changed to use the parameter when retrieving the employee data for update. When configuring the relational record, you must check the Reuse metadata definition checkbox before you can access the filter.
- 13. Edit EmpRRUpdate’s filter value to use the employeeNumber parameter (see Figure 12-49) and in the source code change the output text value to #{param.employeeNumber}.
- 14. Save UpdateEmp and run SelectEmp on the server.
The browser should look like Figure 12-50.
- 15. Click on employee number 111.
- 16. Expand the browser window to display the full address as in Figure 12-51.
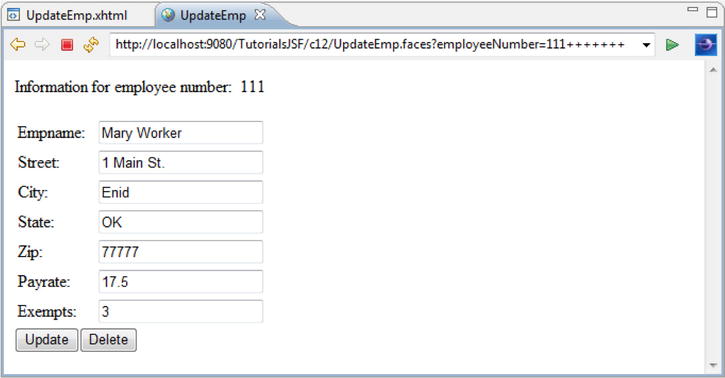
Notice that the value for employeeNumber is specified as 111 followed by seven plus signs. Any guesses on what is going on?
Do you remember that earlier we discovered that the values in the text fields were being padded with blanks? In this case, because we bound the parameter to the RRL’s employee number field, the parameter field was also padded with spaces (+ is the URL representation of a blank space).
Because it didn’t require any coding, this solution (links and parameters) was much easier to implement. However, if there are many employees, users would have to scroll extensively to locate the desired employee number and SelectEmp would be very “busy” visually.
So which is the best solution? Unfortunately, there is no easy answer to the “which way is best” question. Using either technology (scripting variables vs. links and parameters) is viable. When making the decision on which technologies/solutions to use, an organization must weigh the business need (how important is it to make the application available) versus how important it is to carefully design the application and choose the best technology to maximize eye appeal, performance, ease of use, code reuse, and maintainability.
Let’s look at the results:
- In the TutorialsJSF project, a new package in WebContent named c12.
- In WebContent/c12, the following new Facelet files:
AllEmps.xhtml          GetEmp.xhtml                    InsertEmp.xhtml
SelectEmp.xhtml UpdateEmp.xhtml - Inside of Java Resources: src, three folders called:
com.ibm.faces.sdo pagecode pagecode.c12 - Inside of pagecode.c12, the following new Java files:
AllEmps.java         DBAccess.java        Employee.java
GetEmp.java          InsertEmp.java       SelectEmp.java
UpdateEmp.java - In the WebContent folder, two new Web pages called TNTApps and EmpApps (that provide links to the Employee functions) and page.jsp.
- The employee JSF-based application can insert, display, and update employee information (using SelectEmp.jsp) in a database.
Review Questions
- What is a pagecode class?
- What is a framework?
- Explain binding.
- What are the advantages of a Facelet over a JSP?
- What is a Service Data Object?
- What is the purpose of a session scope variable?
- What is the purpose of navigation rules?
- In a JSF application, which components provide the model, view, and controller functions?
You will create a Shipment application to insert, update, display, and delete shipment information in a DBMS using the JSF framework.
- 1. Create a new Dynamic Web Project, that is configured for JSF called ReviewExJSF and add it to a new EAR called ReviewExJSFEAR.
- 2. Copy the TNTApps and EmpApps Web pages from TutorialsJSF to ReviewExJSF.
- 3. Make a copy of EmpApps called ShipApps
- 4. On ShipApps, change the text to read Display All Shipments, Insert A Shipment, Update A Shipment.
- 5. On TNTApps, add a link to ShipApps.
- 6. In ReviewExJSF/WebContent, create a new folder called c12.
- 7. In c12, create a Facelet called DisplayShip.
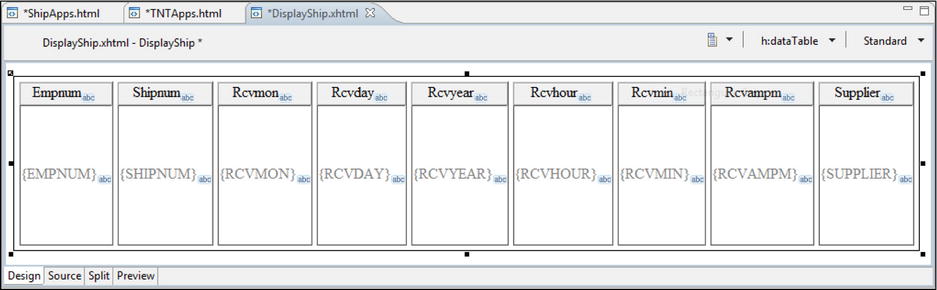
- 8. In DisplayShip:
- A. Add a relational record list called shipRRL
- B. Create a new database connection to the Shipment table called TNT_Shipment_Con and define TNT_Shipment_Con as the connection for shipRRL
- C. Define the key of the table as shipment number
DisplayShip should have all the fields as in Figure 12-52.
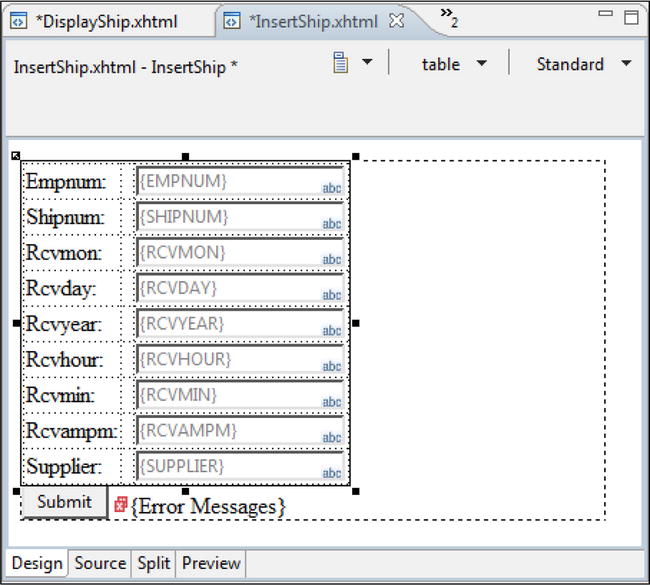
- 9. In c12, create a Facelet called InsertShip.
- 10. In InsertShip, add a relational record called shipRR that:
- A. Has a control option for creating a new record
- B. Uses TNT_Shipment_Con to connect to the Shipment table
- C. Has a key defined as shipment number
InsertShip should look like Figure 12-53.
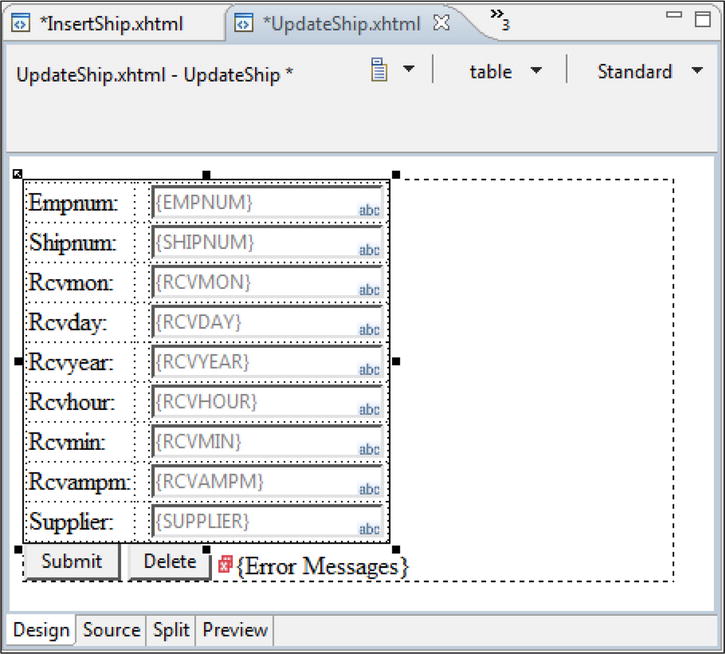
- 11. In c12, create a Facelet called UpdateShip.
- 12. In UpdateShip, add a relational record called shipRRU that:
- A. Has control options for updating an existing record
- B. Uses TNT_Shipment_Con to connect to the Shipment table
- C. Has a key defined as shipment number
- D. Has a filter condition that uses a parameter called shipNum.
UpdateShip should look like Figure 12-54.
- 13. In DisplayShip:
- A. Define a link to UpdateShip.xhtml for the shipment number field.
- B. Add a parameter to the link called shipNum.
- C. Specify shipRRL’s shipnum field as the value of shipNum.
- 14. Define navigation rules for all buttons on InsertShip and UpdateShip, so that all outcomes go to DisplayShip.
- 15. On ShipApps, add a link to DisplayShip for the text Display All Shipments and Update A Shipment.
- 16. On ShipApps, add a link to InsertShip for the text Insert A Shipment.
- 17. Save all the source code.
Results of the Review Exercise
After the review exercise we have:
- In the ReviewExJSF project, a new package in WebContent named c12 that has the following Facelet files:
DisplayShip.xhtml InsertShip.xhtml UpdateShip.xhtml - Inside of Java Resources/src, a new folder called pagecode.c12 containing:
DisplayShip.java InsertShip.java UpdateShip.java - Three new Web Pages called TNTApps, EmpApps, and ShipApps that provide links to the Shipment and Employee functions.
- The JSF-based application can now insert, display, and update shipment information in a database.
Check that the Exercise Was Done Correctly
Finally, let’s check it all worked:
- 1. Run TNTApps.html on the server and choose the Shipment Application option.
- 2. From the ShipApps page, select the insert option and insert the following information for a shipment:
- A. employee: 222
- B. shipment number: 1000
- C. the current date and time
- D. supplier: Fred Meyers
- 3. The DisplayShip page should be displayed with the shipment 1000 information.
- 4. Click shipment number 1000.
- 5. The UpdateShip page should be displayed with shipment 1000’s information.
- 6. Change the employee number to 111 and click the Submit button.
- 7. The DisplayShip page should be displayed with the shipment 1000’s employee number equal to 111.
- 8. Click shipment number 1000.
- 9. The UpdateShip page should be displayed with shipment 1000’s information.
- 10. Click the delete button.
- 11. The DisplayShip page should be displayed without shipment 1000.