
![]()
Installing a Java Application on WAS
In this appendix, you will learn what a JEE application server is and how to move a server-based application from RAD onto a WebSphere Application Server (WAS) using the WAS Administrative Console. In addition, you will learn about EARs (Enterprise Archive files) and WARs (Web Archive files) and how to export EARs and WARs using RAD. This appendix assumes that you have completed at least the JSP chapter but will demonstrate how to install and access the server-based applications created in Chapter 9.
Application Servers
What makes a computer an application server? The computer must have a communication line linked to a network, a network address, and, most importantly, be running application server software. Oracle dictates a set of rules called JEE (Java Enterprise Edition) that define how the Java application server must work. There are a variety of vendors who supply application server software, but all “JEE application servers” must follow Oracle’s rules. (IBM's WebSphere Application Server (WAS) was one of the first certified JEE servers.)
For example, the JEE rules dictate where all the server-based application components are stored on the server. In other words, specific directories hold the various server-based application pieces (Web pages, Java classes, JSPs, etc.). Therefore, to publish a Web page or application to the Web, you need access to a computer that is acting as an application or Web server, and you need to know where to put the files. In the earlier days of server-side programming, the programmer had to move the files into the correct directories on the server. Fortunately, JEE also defines specialized files, EARs and WARs, to store all the application components in the correct directory structure.
Many years ago, Sun Microsystems defined the specifications for JARs (Java Archive Files). JARsare Zip files with a specific folder structure to hold multiple Java classes. JAR files are a very easy way to move and store many Java classes at once (just as Zip files are an easy way to move and store multiple PC files).
WARs and EARs are JAR files with extra information about the server-side application (i.e., a list of the class files and Web pages, security information, where the files are stored, etc.). Both WARs and EARs hold server-based applications, but EARs support very complex applications (e.g., applications that are installed across many servers, have client-based components, use application-wide database connections, etc.) In other words, EARs are more complicated than WARs. Fortunately, you don’t have to worry about the internal structure of either of these files (and be happy you don’t), because RAD creates EARs and WARs for you.
Just as you must first export the PC-based application class files before installing them, the server-based components must be exported. As you may have noticed, the number of individual files in a server-based application can be quite large. Fortunately, RAD lets you export an entire project at once and if the project is exported as an EAR or WAR, RAD will maintain the correct directory structure.
- 1. In the Navigator pane select the TutorialsWeb project, then click File, and Export.
The Export window will be displayed.
- 2. Expand the JEE and Web items as in Figure C-1.
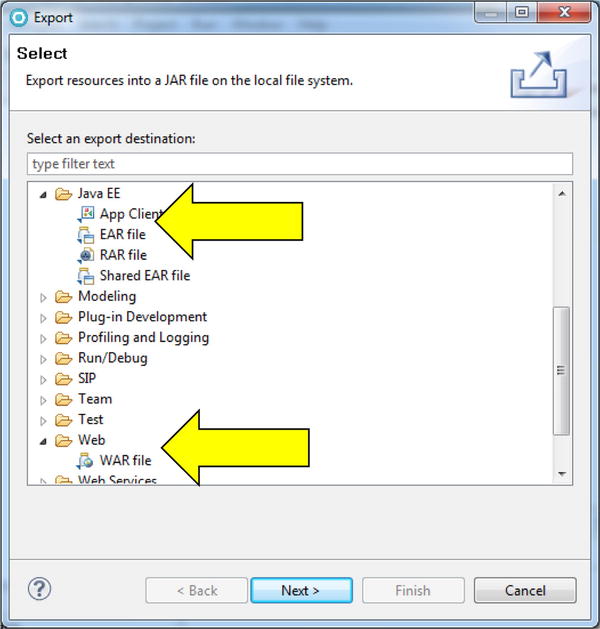
Notice that there are options to export as an EAR or a WAR. Because TutorialsWeb is not a very complex application, we do not need the added capability (and overhead) of an EAR file.
- 3. Select WAR file and click the Next button.
The “Export Resources to a WAR file” window will be displayed. At this window, you must specify where to store the WAR file. You can use the browse button to navigate to the location or simply specify the drive and path. In addition, you must give the WAR file a name.
Notice that there is also an option to export the source code. Generally, source code is not placed on the server. Because only programmers (not users) need access to source code, there is no good reason to store a copy on the server. In addition, having another copy of the source code could complicate future updates (e.g., which version of the source is the most recent?) and could pose a security risk if it fell into the wrong hands.
- 4. Specify a destination and deselect the Export source files option as in Figure C-2.
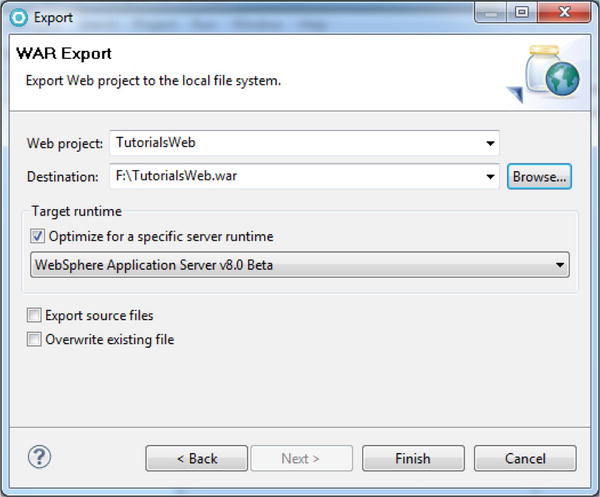
- 5. Click the Finish button.
- 6. Verify that the WAR file was exported by using My Computer to view the location.
Amazingly, RAD and WAS make the process to install an application that encompasses hundreds or thousands of Web pages and Java classes as simple as installing a single Web page.
The first nice WAS feature we’ll look at is remote installation. This means you do not have to physically access the server to load the WAR file and install the application. Instead, the server is accessed with the browser and the WAR file is transferred from the PC to the server. (Of course, this assumes you have the authority to install applications on the server.)
To perform the installation, first access the WAS Administrative Console page. This is done by starting a browser session and entering the URL or IP address of the WAS and specifying the admin directory. In this example, we use the host address of WAS-server. You will have to substitute your host IP address or URL in all the examples.
- 1. Start the browser and specify the following URL: http://WAS-server:9061/admin/
Notice that in addition to the host address, we specified a port number (9061). Multiple servers can be running on one host computer. The way the computer distinguishes between the various servers is by the port number. (A more user-friendly site would have created separate URLs for the various servers, thereby relieving the user of having to remember the port number.)
The WAS default is to run the administrative/technical functions on one port (9061) and the user applications on another port (9081). In addition, we must specify the admin subdirectory so that the Administrative Console logon window is displayed as in Figure C-3. (Again, your URL may have different port numbers and the console may be in a different subdirectory.)
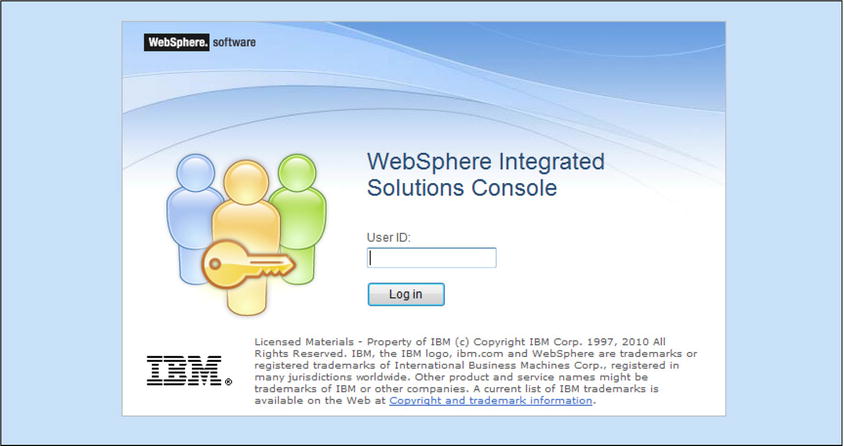
The logon screen may only require a user ID, but most “real world” sites will also require a valid password.
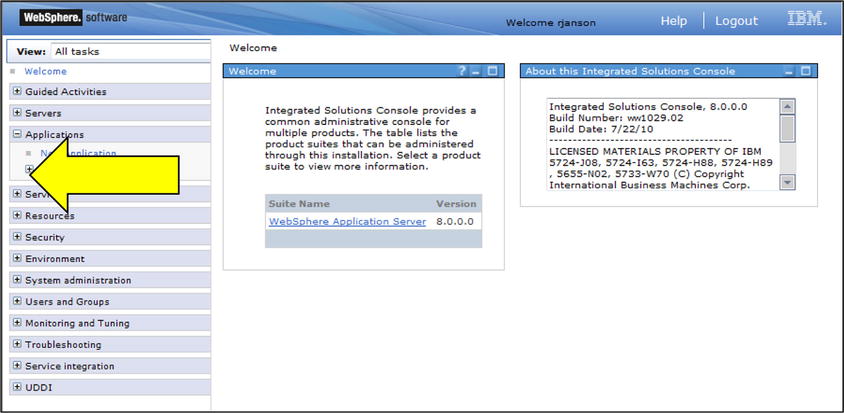
The Administrative Console home page is displayed. Notice that the left pane displays various function categories (servers, applications, security, etc.). Clicking an item will display a subtree of functions.
We must first install the application and then start it.
- 3. Expand the Applications options (as in Figure C-4) and click New Application.
The new application pane will be displayed (as in Figure C-5). WAS allows many “enterprise applications” to be grouped into a “business level application.” An application can also be added as an asset and then added to the business level application. Our simple application doesn’t need a business level app, so we will simply add an Enterprise application. (WAS will actually create a default business application and add our enterprise application to it.)
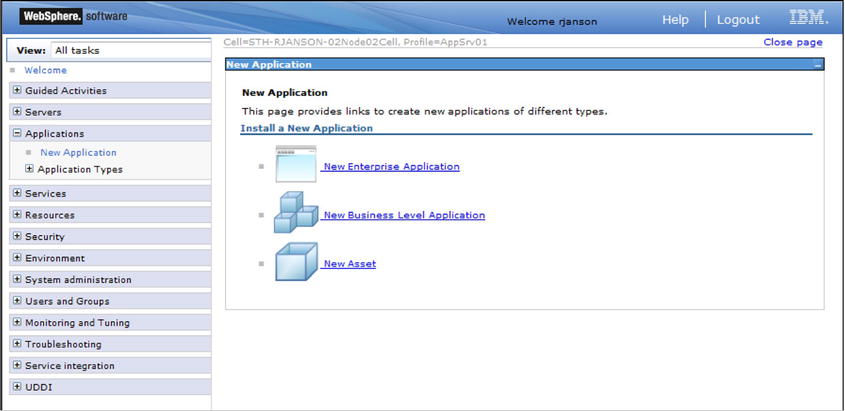
- 4. Click the New Enterprise Application link.
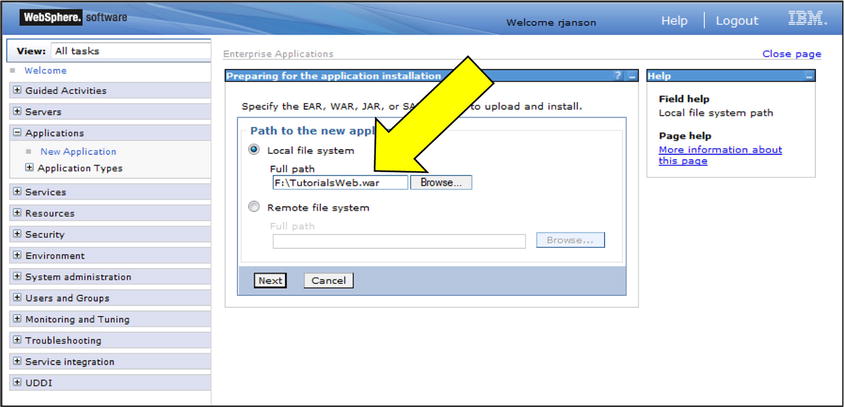
Installing the application begins with a one-step preparation that simple consists of identifying the WAR file.
- 5. In the Preparing for the application installation pane (see Figure C-6), specify the WAR file’s local path (i.e., its location on the PC) and click Next.
The How to install pane will be displayed (as in Figure C-7). There are two options for installing. The Detailed option results in an eleven step installation with all the sorts of configuration options. Although there are many important options in the detailed installation, our simple application can use the Fast Path method and its relatively simpler 5 step installation.
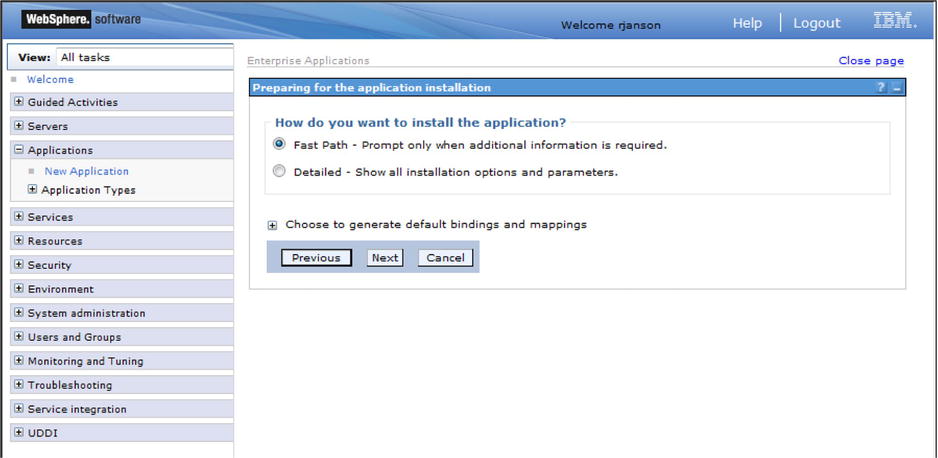
- 6. Leave Fast Path selected and click Next.
The first Install New Application page (Step 1: Select installation options) will be displayed as in Figure C-8. This page actually has a performance option where we will change the default. Usually the server waits until the first time a JSP is requested to convert the JSP to a servlet. As you know from running the JSPs in RAD, this can take a while. So instead of making the first user wait for the conversion, we will instruct WAS to convert all JSPs to servlets when the application is installed. This means that the installation will take longer, but no users will have to wait longer for pages.
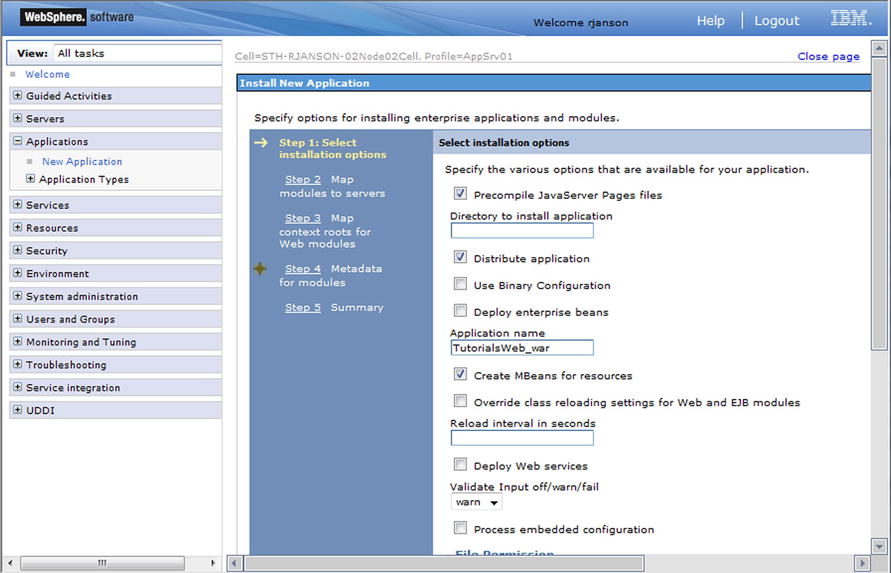
- 7. On the Step 1 page, click the “Pre-compile JSP” option (as in Figure C-8), then scroll down the page and click the Next button.
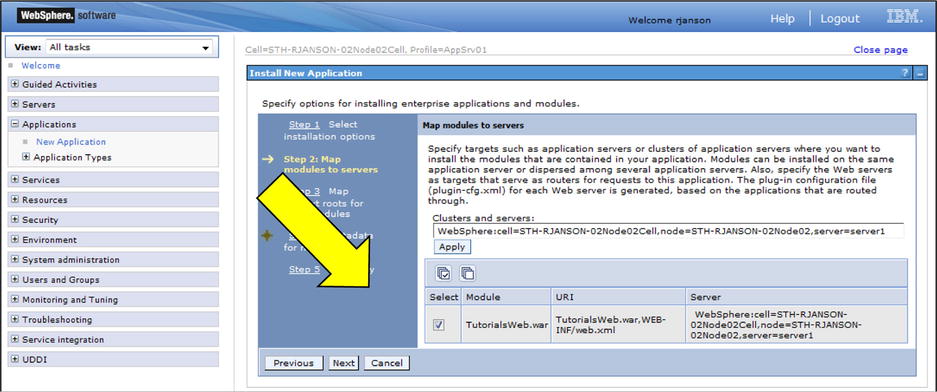
- 8. On the Step 2 page, click the TutorialsWeb checkbox (as in Figure C-9), then click Next.
The Step 3 page (Figure C-10) requires that a context rootbe specified. The context root is part of the URL. Besides containing the host address (WAS-server:9060) and the particular page (Howdy.html), the URL often has a path. This path usually corresponds to the directories where the file being accessed is stored. However, instead of being restricted to the actual path (which can be very long and prone to typing errors), most servers allow you to define a context root (i.e., an alias). The server associates any requests for that context root to the actual location (directory path) of the application. For example, when we accessed the administrative console we specified a context root of admin/. This does not mean that the Web pages and classes that make up the administration functions are stored in a folder called admin. They are probably buried deep within folders and subfolders. So the context root admin simply makes it easier to specify the location.
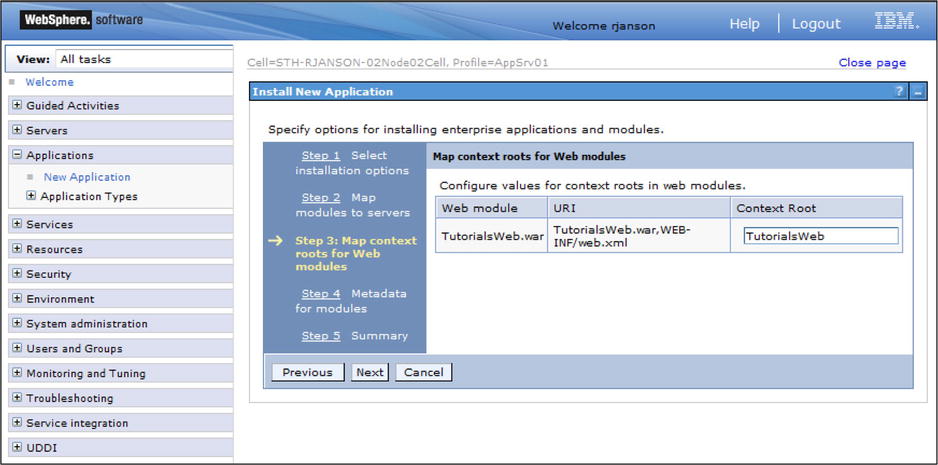
When specifying a context root, theoretically any text can specified. However, if the components are stored in a specific folder (like TutorialsWeb) and a context root is specified that is different from the folder names, the links between Web pages, servlets, and JSPs may not work. Without a more detailed explanation of context roots and how to avoid problems, it is best to simply use the project name as the context root.
- 9. On the Step 3 page, leave the default context root and click Next.
The Step 4 page controls whether WAS should generate default information (called metadata) about the various components of the application.
- 10. Simply accept the default on page 4 by clicking Next and on the Step 5 summary page click Finish.
WAS will begin the installation and depending on the speed of the host computer, this may take a while. After the installation is complete, a message page will be displayed. If all went well, there will be a “installed successfully” message toward the bottom of the page and a link to save the changes to the Master Configuration (see Figure C-11).
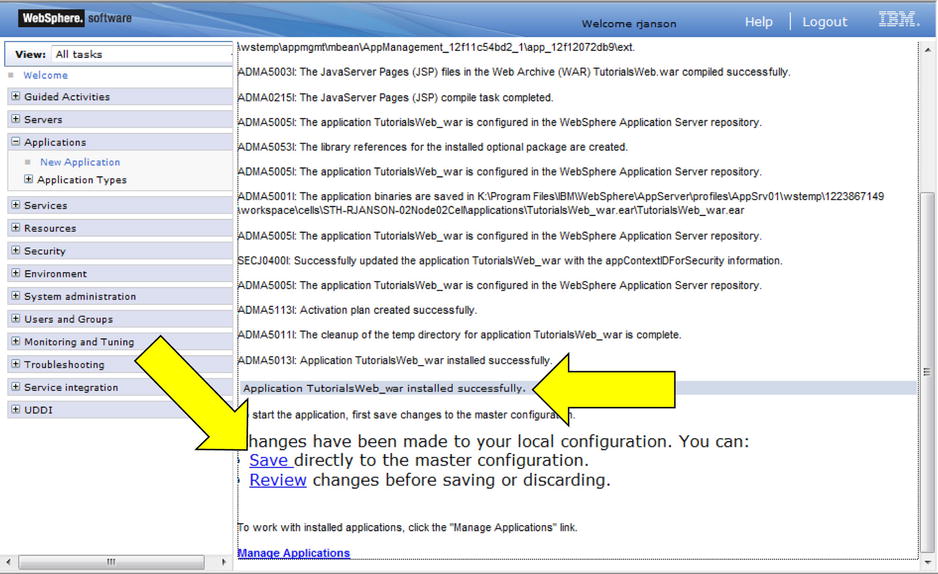
- 11. Double-click the “Save directly to the master configuration.” link to save the changes and install the application.
The “Preparing for the application installation” page will be redisplayed. This means that the application was successfully installed and saved on the server. Now we need to start the application.
- 12. On the left of the “WebSphere Integrated Solutions Console” page, expand the Application Types item and the click the “WebSphere enterprise applications” link.
The Enterprise Applications page will be displayed (see Figure C-12). Notice that the TutorialsWeb application is listed but its status is stopped (indicated by a red “x”).
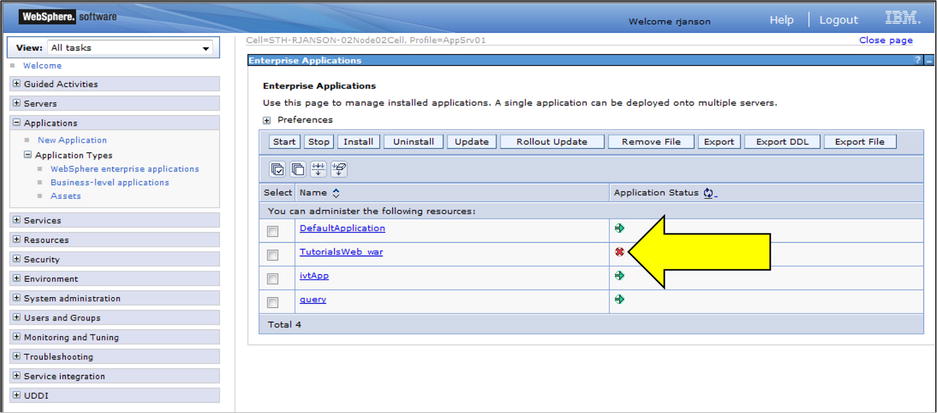
- 13. Start the application by clicking the checkbox next to TutorialsWeb.war, and then click the Start button (see Figure C-13).
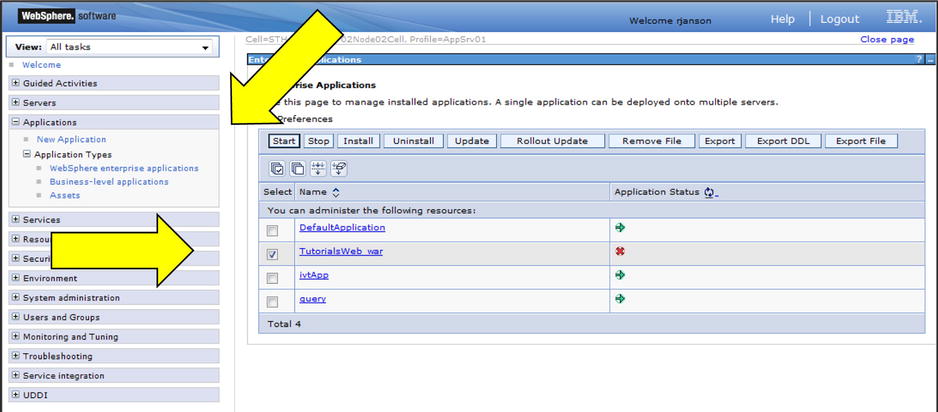
When the application is successfully started, a message will be displayed at the top of the page and the status will be changed to started (indicated with a green arrow where the red “x” was before). We will now verify that the application is available by using the browser to access some of the Web pages in the application.
Tutorial: Accessing a WAS Application
- 1. Start the browser and specify http://yourhost:port#/TutorialsWeb/c9/HowdyJSP.jsp (substitute your host address and port number for the text yourhost:port#).
The Howdy page created in Chapter 9 will be displayed as in C-14.
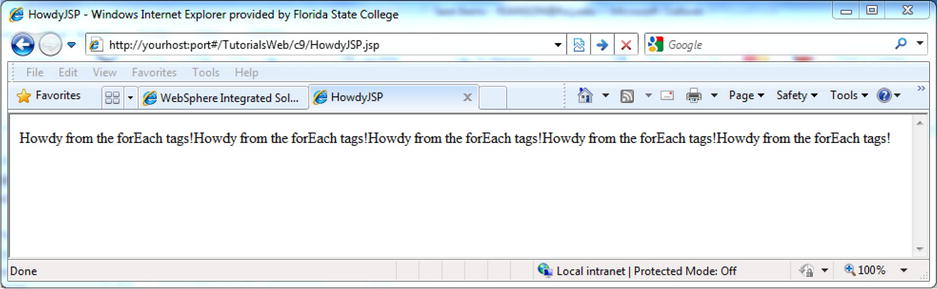
Note that a different port number is required for the application than for the administrative console. Usually the ports differ by 20. In other words, if the admin port was 9061 then the application server port is 9081.
Of course, one simple JSP does not an application make.
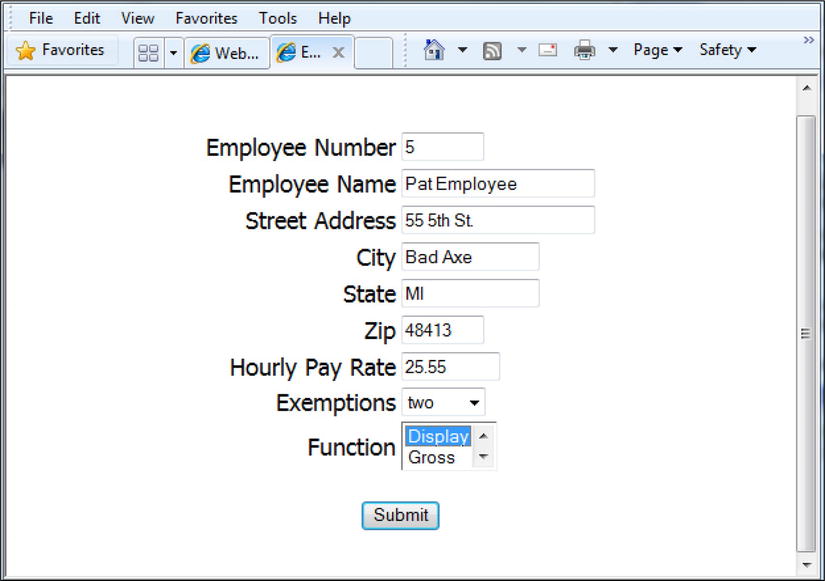
- 2. Display the EnterEmpInfoJSP from Chapter 9 by changing the URL to identify TutorialsWeb/c9/EnterEmpInfoJSP.jsp
- 3. In EnterEmpInfoJSP, specify the information as seen in Figure C-15, select Display as the function, then click Submit.
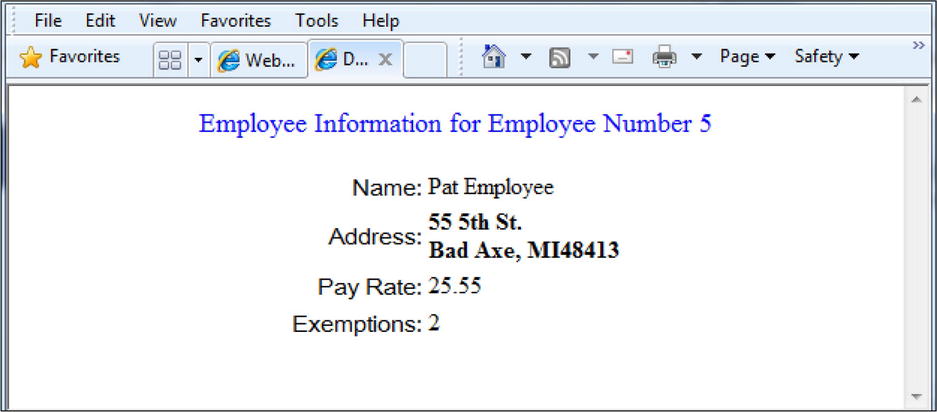
DispEmpInfoJSP will be invoked and the Employee information will be echoed back as seen in Figure C-16. Notice that the URL address in the browser identifies the page as Enter-EmpInfoJSP not DispEmpInfoJSP.
To thoroughly check the application, you should ensure that the correct JSPs and information are displayed for the Gross and TaxAmt functions.
- The file TutorialsWeb.war is on the C: drive.
- The TutorialsWeb project is successfully installed and running on the WAS.
Review Exercise
- Export the ReviewExWeb project as a WAR to the C: drive.
- Install ReviewExWeb.war on the WAS and start the ReviewExWeb application.
Results of the Review Exercise
- The file ReviewExWeb.war is on the C: drive.
- The ReviewExWeb project is successfully loaded and running on the WAS.