
CloudVision is a framework that will allow a pile of cool management features in the future. For now, it gives you the ability to instant message (IM) commands to your switch, after which the switch sends its response (if any) back to you with another IM.
When I tell people that they can IM commands to their Arista switches without having to log in to them, I get mixed reactions ranging from nerdy appreciation for a cool feature that they never even considered a possibility, to outright horror that such a thing might exist. Personally, I think it’s one of the coolest features I’ve ever seen, but it’s rare that I recommend its use. That said, in the right environment, it could be an amazing tool that can make your life much easier. Let’s take a look and see how such a powerful feature could be put to good use.
CloudVision is an extension to EOS (as of version 4.9.3.2) that allows the switch to participate in XMPP-based near real-time messaging. XMPP is a protocol commonly used for open source client/server chat, and is defined in RFC 3920, entitled Extensible Messaging and Presence Protocol (XMPP). The RFC has this to say about XMPP:
While XMPP provides a generalized, extensible framework for exchanging
XML data, it is used mainly for the purpose of building instant
messaging and presence applications that meet the requirements of RFC
2779 (Instant Messaging / Presence Protocol Requirements).
One or more XMPP servers are required for CloudVision to work. Arista recommends the ejabberd server, and that seems to be the standard, but any server/client system that supports XMPP can be used. I do recommend that if you use this feature, you ensure that only clients within your secured environment can access your switch. My reasons for this recommendation should become fairly obvious as you see how CloudVision works.
I’ll not cover the details of configuring and running an XMPP server in this book, opting instead to use the publicly available jabber.org server. Please note that I do not recommend this for production use in any way, shape, or form. Your XMPP server should be secured and inside your firewall, accessible from the outside only through VPN or other similarly secure means.
Warning
That’s worth a bigger warning. When using this feature, make sure that you only use private, secure XMPP servers. The reasons for that should be fairly obvious, but let me be blunt. With the current iteration of CloudVision, if you use a public XMPP server, anyone who knows the username assigned to your switch can access your switch from anywhere in the world without so much as a password.
I will also warn you that the temptation will be great to use a public server, or to allow outside access to your XMPP server. Don’t. Why do I warn about the possibility of temptation? Because CloudVision is a seriously cool feature. I mean seriously cool! Let’s take a look and you can decide for yourself.
The current Arista web page describes CloudVision, and on that page is a list of downloads, separated by EOS version. You can also download the extensions from the support download page, which requires a valid login.
Note
I’ve been told that CloudVision will likely be integrated into EOS by the end of 2012, so look forward to this chapter looking very different in the second edition of Arista Warrior!
There are different versions of this extension, so make sure you download the correct one for your version of EOS. For this chapter, I’ll be using EOS version 4.8.1 and CloudVision version 1.1.0_4.8. Though EOS version 4.9.3.2 is the latest EOS available, a matching CloudVision has not yet been released, and the 4.8 version of CloudVision does not work with EOS 4.9.3.2. Believe me, I tried.
Note
This changed a bit at the absolute last minute in the production of this book. As a result, part of this chapter contains commands from EOS 4.9 and CloudVision version 1.2.3_4.9.
The first step is to get CloudVision onto the switch. To simplify
matters, I’ve loaded it on my local server. Using the copy command, I’ll copy it to the
extension: drive:
Arista#copy http://www.gad.net/A/CloudVision-1.1.0_4.8.swix extension:I’ll use the show extensions command, just to
make sure it’s really there:
Arista#sho extensions
Name                           Version/Release           Status RPMs
------------------------------ ------------------------- ------ ----
CloudVision-1.1.0_4.8.swix     1.1.0/496645.EOS481.7     A, NI     1

A: available | NA: not available | I: installed | NI: not installed |
F: forced
Comfortable that the file got transferred properly, I’ll install it
using the extension
extension-name command:
Arista#extension CloudVision-1.1.0_4.8.swix
If this extension modifies the behavior of the Cli, any running Cli
sessions will need to be reset in order for the Cli modifications to
take effect.
Indeed, we do need to exit and restart CLI, since this extension will add commands to the CLI:
Arista#exitArista login: admin Last login: Thu May 31 14:33:03 on ttyS0 Arista>enArista#
Remember, if you want your installed extensions to survive a reboot, you’ll need to copy the installed extension status to the boot extensions configuration:
Arista#copy installed-extensions boot-extensionsA quick look to make sure that this was really done is always a good idea for neurotic admins like me:
Arista#sho boot-extensions
CloudVision-1.1.0_4.8.swix
Warning
If you don’t configure the extension to be installed at boot, all of your XMPP configuration will disappear after booting. I forget to do this every time, and I sit there scratching my head trying to figure out what’s wrong. Don’t forget to make your extensions load at boot!
With the extension loaded, we can get down to the business of
configuring XMPP. All XMPP commands for CloudVision are entered after issuing the
management xmpp command, which only
become available after exiting and restarting the CLI (you only need to do
this once). This will put you into mgmt-xmpp
configuration mode. Note that no commands issued in this mode are active
until you exit from the mode:
Arista(config)#management xmppThe first thing that the switch needs to know is where the XMPP
server is. I’ve configured my switch with a username and password on the
publicly available jabber.org server, so that’s what
I’ll configure with the server
command:
Arista(config-mgmt-xmpp)#server jabber.orgIf you’re using a private jabber server (and you really should),
then you’ll need to know the configured server name. Next, I have to tell
the switch what username and password it will use to connect to the
server. Every switch configured with CloudVision will need to have its
own username and password. Not surprisingly, this step is configured using
the username
username password password
command. Usernames with XMPP look like email addresses in that they use
the format username@domain:
Arista(config-mgmt-xmpp)#username [email protected] password PIE!As of May 2012, there is no ability to encrypt the password, and it even tells you that in a sort of passive-aggressive way if you ask for help on the command:
Arista(config-mgmt-xmpp)#username [email protected] password ?
  LINE  The UNENCRYPTED (cleartext) XMPP password
One of the cooler abilities of this feature is that switches
can belong to groups. The groups don’t need to be preconfigured anywhere.
When you start a group with the matching name (most XMPP clients allow
this), the switch will automatically join. Don’t worry, I’ll show that in
action in a bit. What you need to know is that the group name is just like
a username, but it must include conference before the
domain, separated by a period. Here, I’ve
configured the switch for the group called [email protected]:
Arista(config-mgmt-xmpp)#switch-group [email protected]Note
Private XMPP servers might be configured to use a word other than
conference, but conference is the
default.
Finally, you can issue shut and
no shut commands just like you would an
interface, and you’ll need to issue the no
shut command to make it work (I forget this easily 90% of the
time). I’ve seen this feature get a bit confused, causing the switch to
say that it’s connected, but not appearing in my contact list. When that
happens, going into management xmpp and doing a shut and no
shut on the switch fixes it right up (after you exit the
mode):
Arista(config-mgmt-xmpp)#no shutTo make it all take effect, exit this configuration mode:
Arista(config-mgmt-xmpp)#exitAnd we’re done! Once I hit exit, I can add
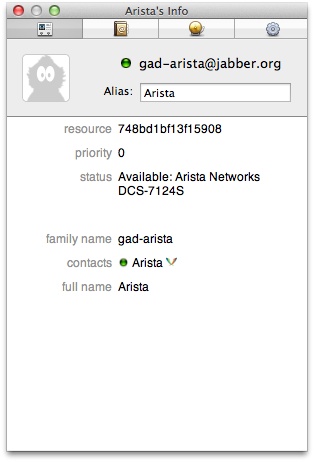
the switch to my contact list. I added an alias so that the switch just appears as
Arista in my client. The info screen for my switch’s
contact can be seen in Figure 29-1. I’m using a Mac, and
the IM client I’m using is Adium, which supports XMPP. I’ve got a user
configured for myself named GADify@jabber.org on the jabber.org server.
Note
As you might have noticed, I can be a little nutty about capitalizing my initials, even for things like XMPP usernames. Case is irrelevant in XMPP addresses, just as it is in email addresses.
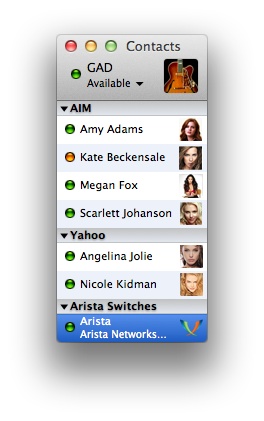
And now, my Arista switch appears in my contact list next to all my other close friends, as you can see in Figure 29-2. If you have your client set to approve new contacts, you’ll have to go through the approval process.
At this point, I can send the switch commands right from my IM
client. Let’s try something simple, like the show
version command. The output from my short IM session is shown in
Figure 29-3.

When I saw this feature for the first time, I started to question
things. First off, notice that I was not challenged for a password, or a
username, or anything. I issued a show command from my
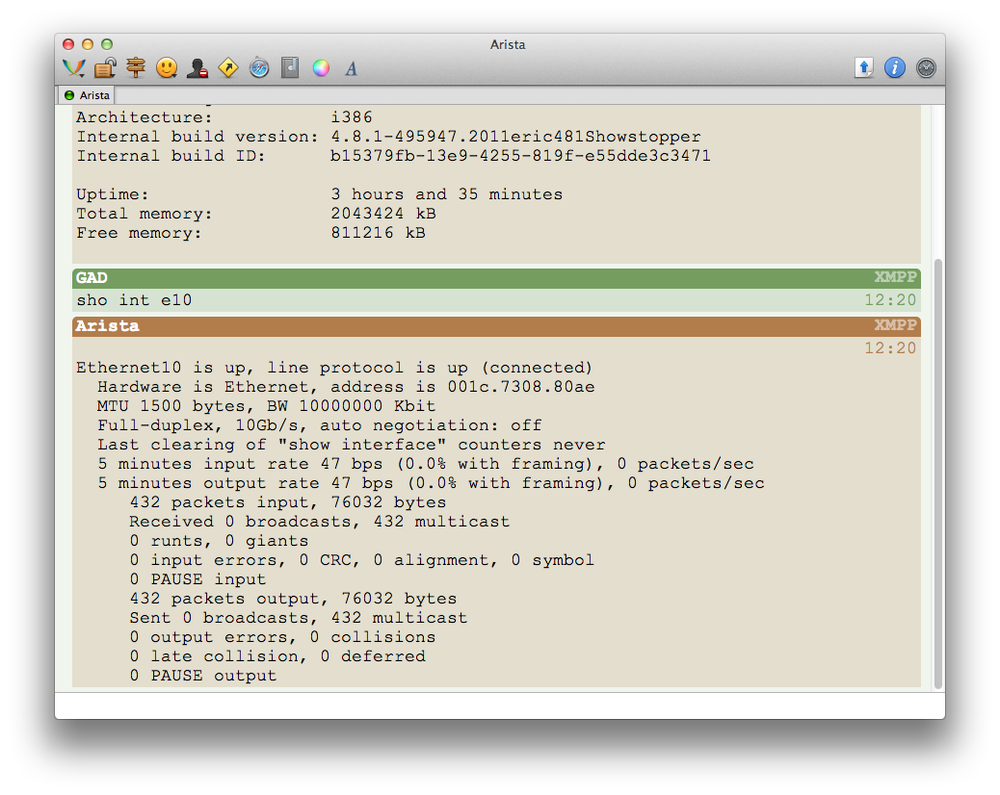
IM client, and the switch responded with the output. Let’s try another.
How about show interface ethernet10?
The output is shown in Figure 29-4.
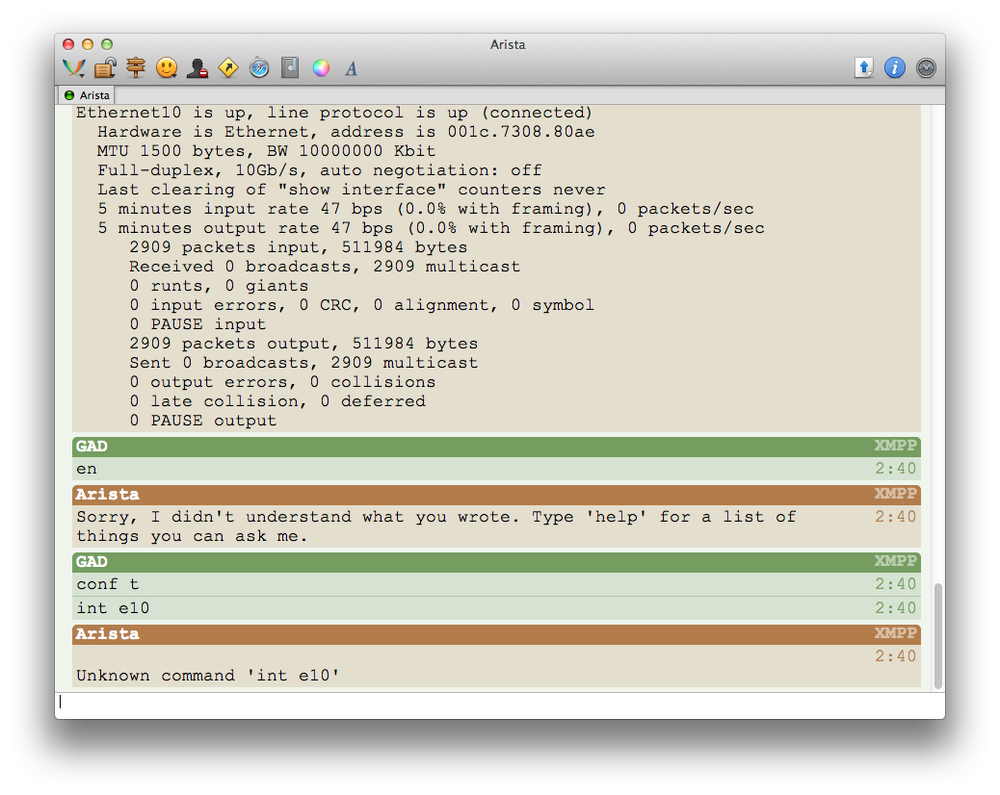
But that was just a show command. What about
enable commands? In Figure 29-5, I try to issue the
following commands, in order: en,
conf t, and int e10. From the command line, this would have
the following effect:
Arista>enArista#conf tArista(config)#int e10Arista(config-if-Et10)#
Sending en results in the
message, Sorry, I didn’t understand what you wrote. Type ‘help’
for a list of things you can ask me. The command conf t seemed to have no effect at all, and
int e10 resulted in an
Unknown command ‘int e10’ error. So it would appear
that we couldn’t configure the switch through XMPP. That doesn’t seem very
useful now, does it?
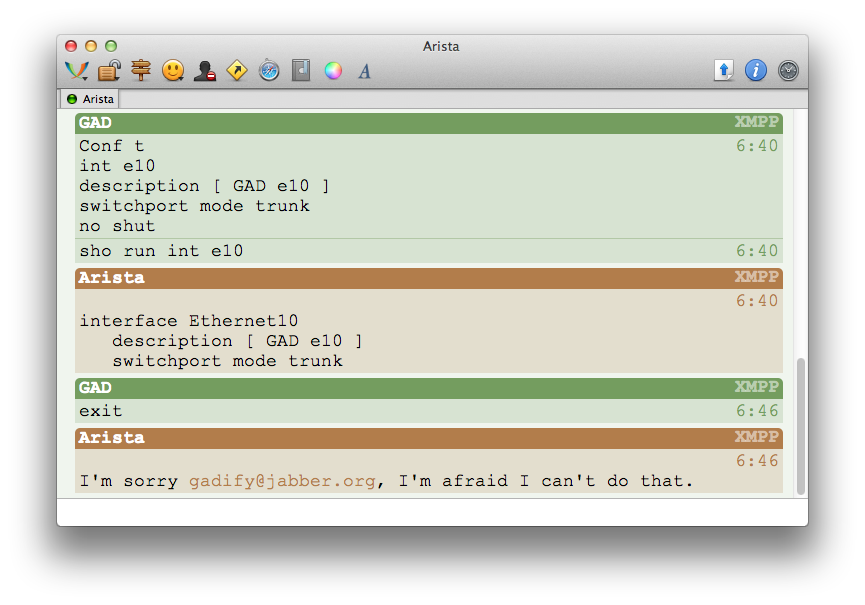
I then thought about how I might write CloudVision, and came to the conclusion that I wouldn’t want to leave the switch in configuration mode after sending an IM. I thought that if I were to write it, I might make the client only accept multiple commands from a single IM, which would allow me to paste chunks of configuration in at once, but not interactively. So I decided to send the following config snippet to my switch in a single IM to see how it would behave:
Conf t
 int e10
 description [ GAD e10 ]
 switchport mode trunk
 no shut
In Figure 29-6, I send the
command sho run int e10 in order to
show the original condition of the interface’s configuration, then I paste
the entire chunk from the previous post, all in one IM. I then issue the
show run int e10 command again to show
that the commands were accepted. As you can see, it worked like a
charm.
Warning
In order to enter configuration mode and change the config, you’ll need to enter all of the configuration commands into a single IM.

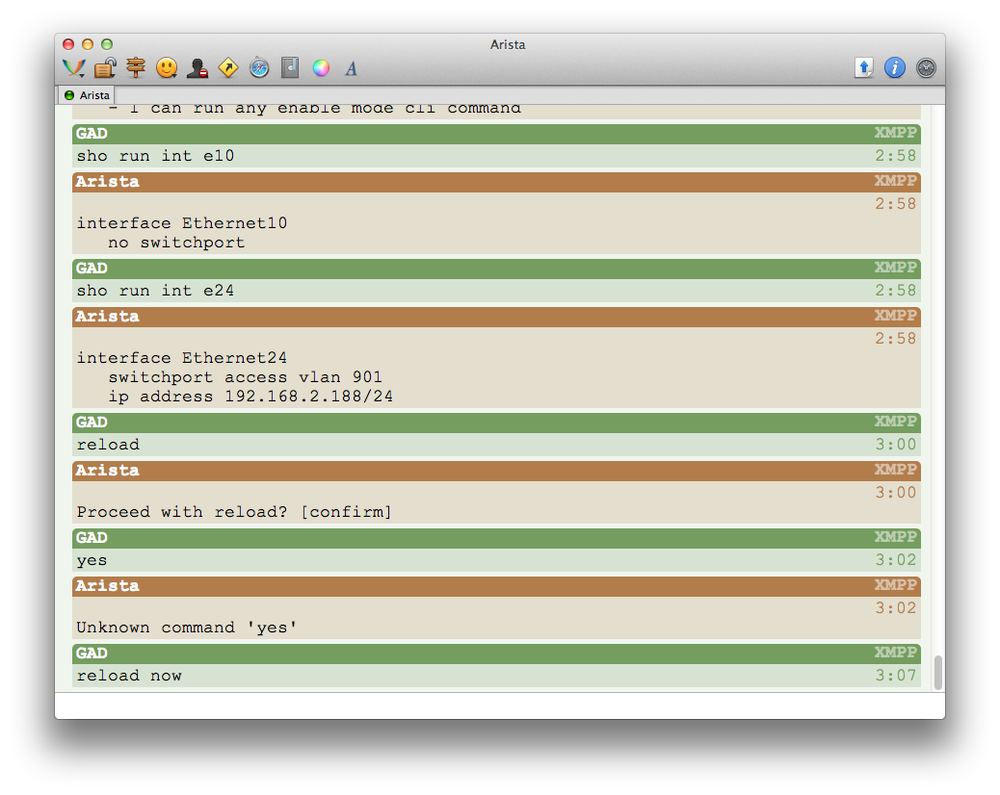
So what else can we do? Well, the switch told us to type “help” for a list before, so let’s go ahead and do that. This results in the response, Here are some of the things I can help you with: - I can run any enable mode cli command. That’s mostly true, provided you paste the commands together in one IM, as I showed previously.
As a fun aside, here’s a bit of nerdtastic coding I found: I decided to see
if I could issue the exit command, and
when I tried, I got the response, I’m sorry
[email protected], I’m afraid I can’t do
that shown in Figure 29-7. Either the original
developers had a sense of humor along with a love for classic science
fiction, or my switch has become self-aware. I’m hoping for the former,
because I really don’t have the time to fight off another robot
invasion.
What else can we do in enable mode? How about reloading the switch?
This doesn’t seem to work, even when pasting reload and
yes in a single IM. While we can’t reboot with the
interactive reload command, EOS allows
you to reboot without interaction using the reload now command, which works just fine
through CloudVision. You can see the results of me doing this to my switch
in Figure 29-8. Note that
there is no warning, and no indication that the switch actually did
reload, aside from the fact that I lost connection to the switch for a
short time while it reloaded. Even the show
reload cause command was vague:
Arista#sho reload cause
Reload Cause 1:
-------------------
Reload requested by the user.

Recommended Action:
-------------------
No action necessary.

Debugging Information:
----------------------
None available.
This does lead me to one of my main concerns with the CloudVision feature: I could not find any log of the fact that the system was reloaded though XMPP, nor any indication of what user initiated the request.
Note
I spoke with Arista about this, and they agreed that it would be a great idea, so although I complain about it in this chapter, I’m sure that most of my annoyances will be resolved in future code.
Using EOS version 4.8.1 and CloudVision 1.1.0_4.8 (the latest version available as of May 2012), I could find no accountability whatsoever for CloudVision commands. This alone would make me not want to use this feature in a production environment.
In my experience, one of the ways that disgruntled or otherwise troublesome employees cause trouble is through devices with little or no user accountability. In the case of CloudVision, I’d have to rely on the IM client logs, which are easily cleared or modified. I would like to see the XMPP user configuration somehow tied to Authentication, Authorization, and Accounting (AAA), and logs recorded that show all XMPP user activity.
To be fair, most (if not all) XMPP servers can log IMs being sent, and most clients do so by default, so the messages sent by users to the switch are likely logged somewhere. I’d really like to see it logged in the switch though, since as a network guy, I may not have easy access to the XMPP server.
Note
The marketing material for CloudVision says that it is “authenticated, encrypted, and fully logged.” (For details, assuming it hasn’t changed, see http://www.aristanetworks.com/products/eos/cloudvision). When I asked the developer that worked on CloudVision about this, he said that meant that the XMPP server did all the logging.
CloudVision can be configured to allow the switch to join group chats. This is one of the most powerful and useful features of CloudVision, for reasons that should become apparent shortly.
In order to allow the switch to join a group chat, enter the command
switch-group
group-name in the management xmpp block. The group name is in the
format of [email protected]. If you’re a “just
gloss over the details now and wonder why it doesn’t work later” type
(like I am), the word conference must precede the
domain, separated by a period. Since my switch is an Arista 7124, I’ll add
it to a group called
[email protected]:
Arista(config)#management xmppArista(config-mgmt-xmpp)#switch-group [email protected]
The switch can belong to more than one group. I’ll add another called gad-all:
Arista(config-mgmt-xmpp)#switch-group [email protected]You can add multiple groups with one command by separating them with a space. For example, the same two groups could be added as follows:
Arista(config-mgmt-xmpp)#switch-group [email protected][email protected]
The switch will separate each group out into its own command in the running-config:
management xmpp
   no shutdown
   server jabber.org
   username [email protected] password PIE!
   switch-group [email protected]
   switch-group [email protected]
I have two other switches, located in my secret underground lair, also configured with XMPP. These two switches are Arista 7050s and have been named SW10 and SW11, and have been configured as follows in XMPP. Here’s SW10:
management xmpp
   no shutdown
   server jabber.org
   username [email protected] password Arista
   switch-group [email protected]
   switch-group [email protected]
And here’s SW11:
management xmpp
   no shutdown
   server jabber.org
   username [email protected] password Arista
   switch-group [email protected]
   switch-group [email protected]
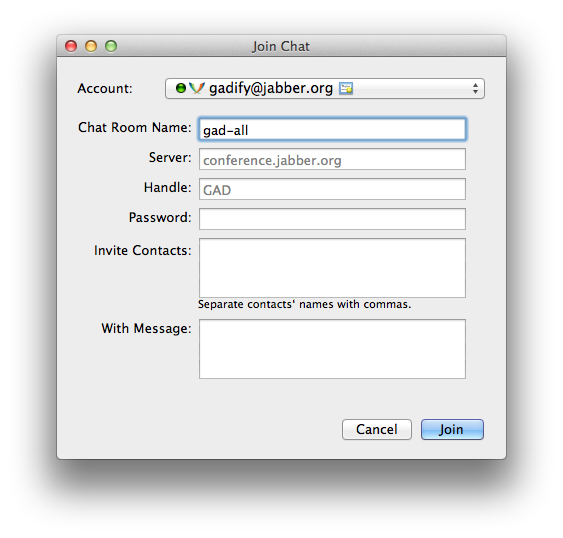
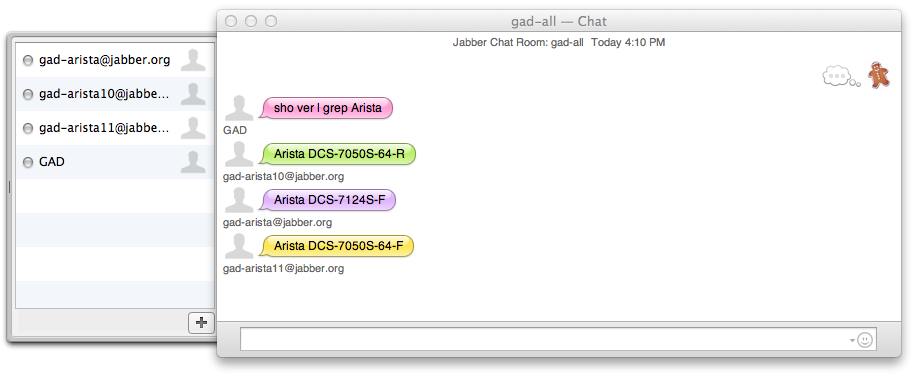
Of course, I could IM to any of them directly, but that’s only the beginning of the fun. Since they’re all in the switch group gad-all, I’ll open a new group chat in my XMPP client using that as the room name, as shown in Figure 29-9.
I’ve seen issues with XMPP and popular clients like Trillian and iChat where once the group is closed, trying to get back into it reports an error, as shown in Figure 29-10.
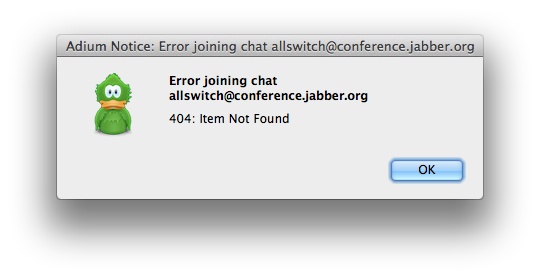
If you see this, it may clear itself after a time when the server times out the old room name. To prevent a 404 error from happening, when you first make the group chat with your XMPP client, make the room persistent. This option should be available in your client when you create the group. The error shown previously shows a different group name because I copied it from my experiments before I knew what was wrong.
Note that when I joined the group chat, I did not invite my
switches. As soon as the room becomes available, they joined the group. If
for some reason they don’t appear in your group chat, invite them. If they
still don’t join, check your configuration. A simple misspelling in the
group name is usually the cause. To show how the group behaves, I’ll send
the command show version | grep Arista
to the group, which should report the model number. The results are seen
in Figure 29-11.
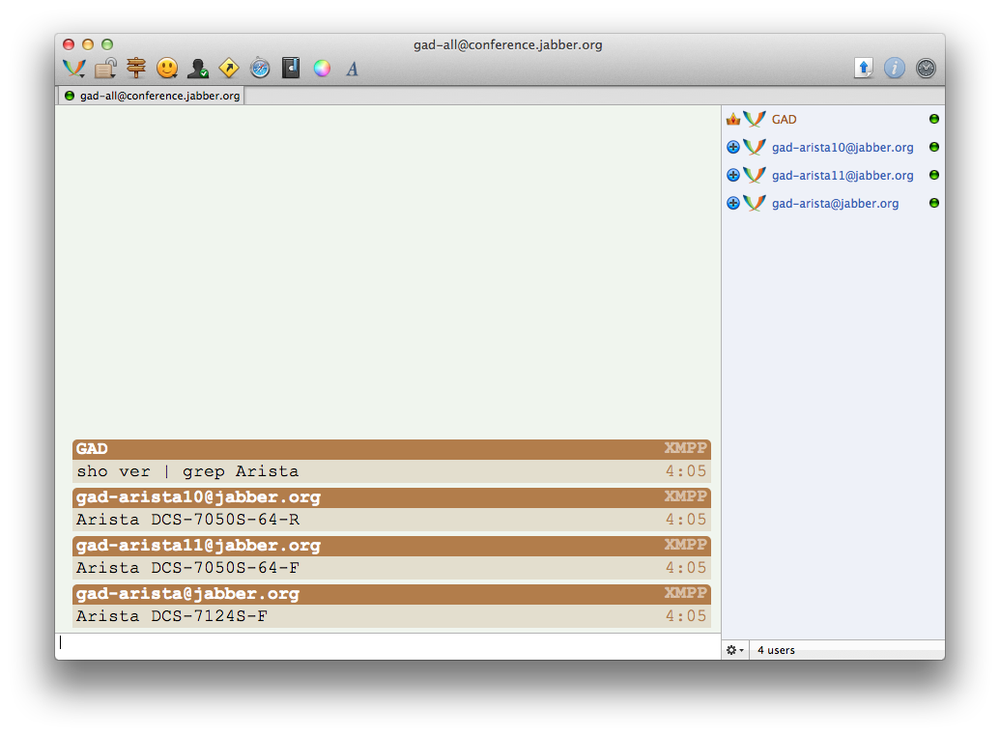
Every switch in the group received the command, processed it, and sent the results back to the group chat. This is a very cool feature, no doubt, but the group is not secured in any way. In Figure 29-12, someone who is definitely not me has attached to the group and is able to not only see everything I do, but can also send commands to the group.
Most XMPP servers allow chat groups to be created with passwords,
but as of EOS version 4.8.5, there is no option to specify a password on
the switch-group command. This is
another reason I’m not a fan of using CloudVision in a production
environment, and definitely not with a public XMPP server. Though there
may be ways to secure this on a private XMPP server, there is not from the
switch.
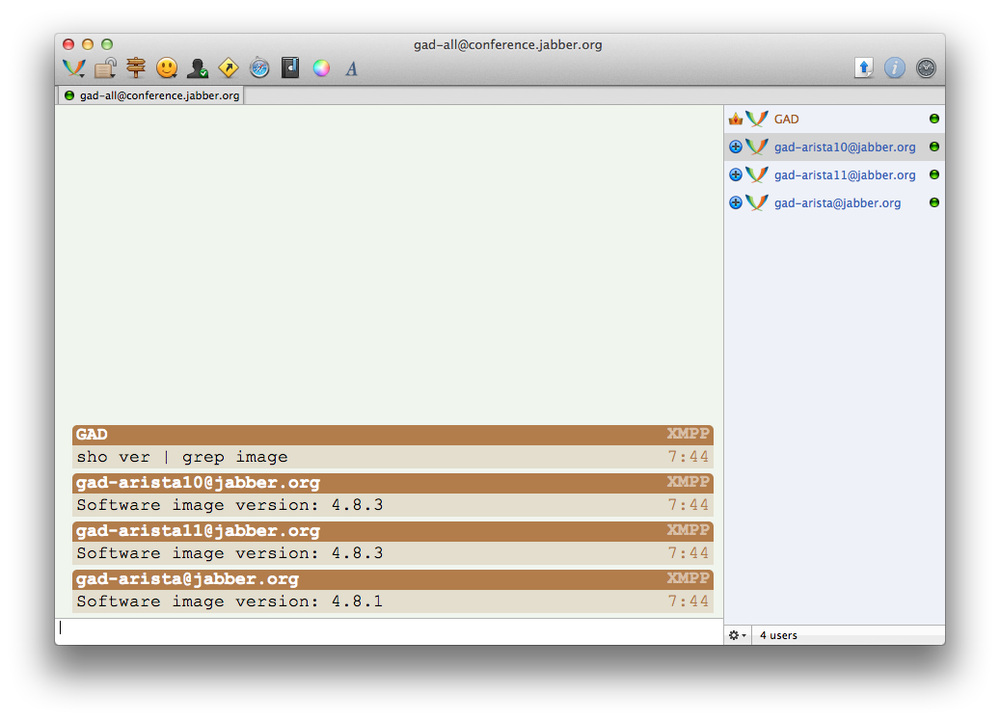
Enough about the shortcomings, let’s do something cool. Let’s use
the gad-all group to determine the versions of EOS
installed on each switch. In Figure 29-13, I’ve sent the
command sho version | grep image to
retrieve the installed version of EOS on all of the switches in my
group.
They’re all a bit out of date, so let’s copy some newer code to the switches. With one IM, I can initiate a copy on all three switches, as shown in Figure 29-14.
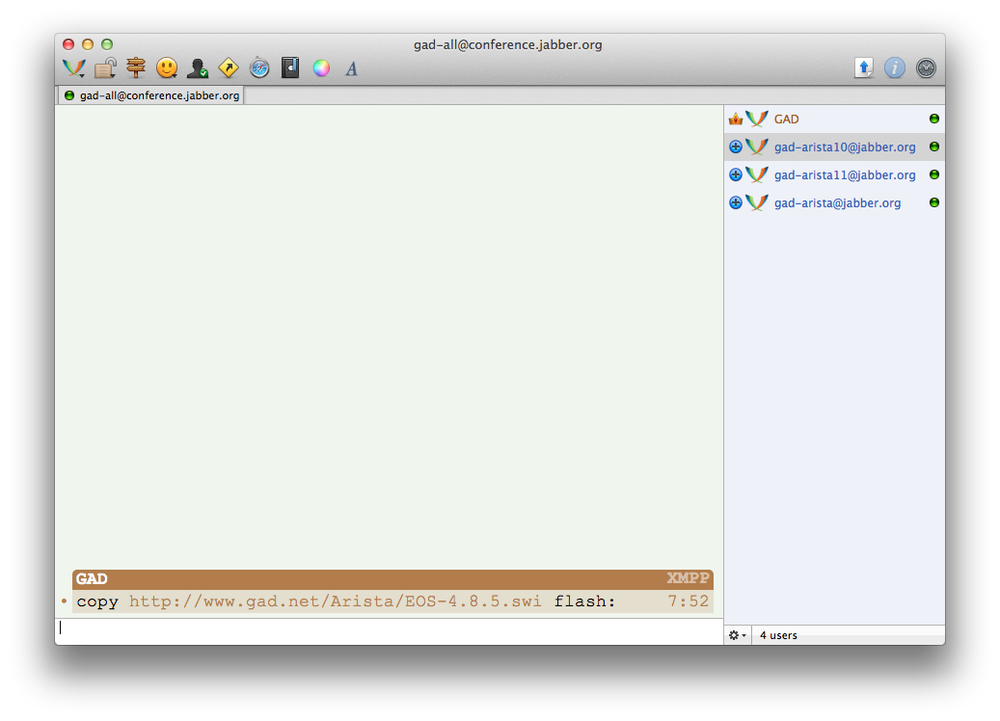
Though EOS version 4.9.3.2 is the latest as of June 2012, I needed to keep to the latest 4.8.x code because there was not yet a CloudVision released for version 4.9.3.
Note that when using XMPP, you won’t get any status messages that you would see from the command line. For example, if I were to initiate the same copy from the command line of one of my switches, I would see this:
Arista(config)#copy http://192.168.1.200/Arista/EOS-4.8.5.swi flash:
Arista/EOS-4.8.5.swi' at 45684057 (19%) 20.90M/s eta:8s [Receiving data]
This type of continuously updating status is not practical over
XMPP, so instead, we get no response at all, not even a message indicating
that the file has been successfully copied. There’s no reason to blame
CloudVision about this though, since all it does is act as a portal to
EOS. To see if the file is done, execute the dir command, either locally on the switch or
through CloudVision. If you see your file with an odd extension like
.X85GBp, then the file is still in transit. When it’s
done, this extension will disappear:
SW11#dir EOS-4.8.5*
Directory of flash:/EOS-4.8.5*
-rwx 62428337 Jun 9 23:02 EOS-4.8.5.swi.X85GBp
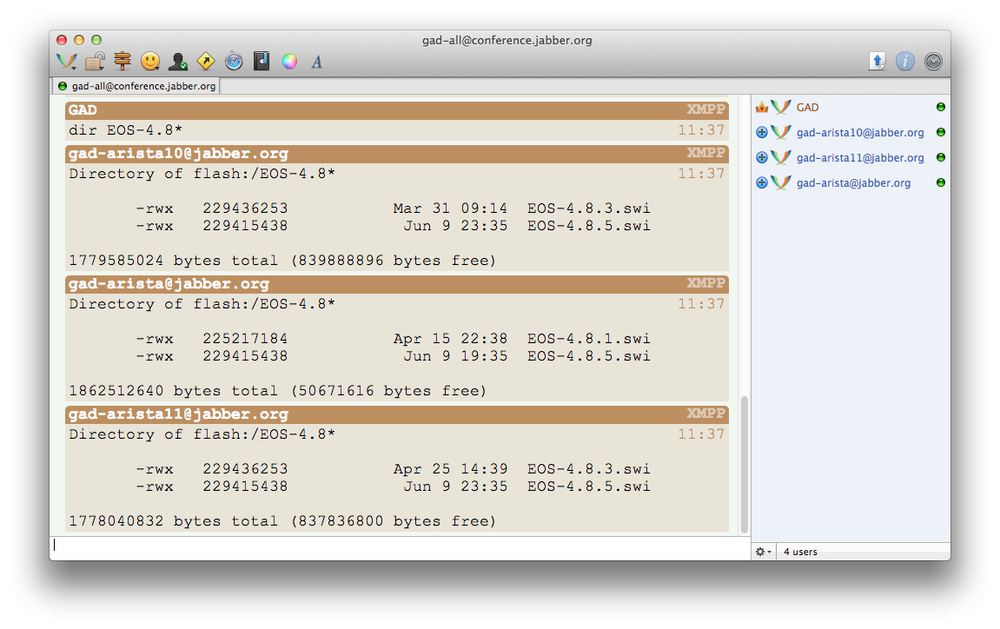
1778040832 bytes total (1004822528 bytes free)When using CloudVision remotely, as I am for the examples in this
chapter, I’ve noticed that the switches have a tendency to become
unavailable during large file transfers like this. That may be due to the
way I’ve designed my lab (using a public XMPP server), or may have
something to do with the way XMPP presence works. Either way, I’ve found
that as soon as the file transfer is complete, the switches become
available again. Just to be sure, I’ll send the dir EOS-4.8* command to them. The results are
shown in Figure 29-15.
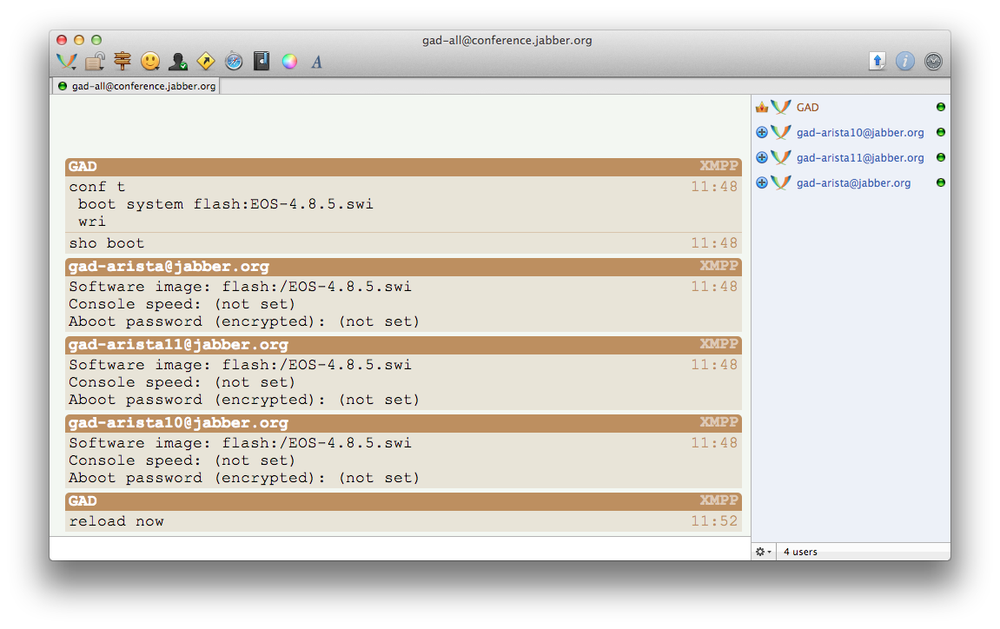
With the file safely stored on all three switches, let’s upgrade them all. The steps for this, as shown in Chapter 7, are to set the boot statement, then reload. Setting the boot statement requires entering config mode, so we’ll need to paste the commands together. Here’s what I plan to send:
conf t
 boot system flash:EOS-4.8.5.swi
 wri
My experience shows that these commands won’t produce a response in
my IM client, so I’ll add a final command, show
boot, to see if they worked. If all looks well, I’ll reboot the
switches with the reboot now command.
The results of these commands are shown in Figure 29-16.
Again, the results of the reload
now command are not visible through CloudVision, so you’ll have
to take my word for it that all three switches rebooted.
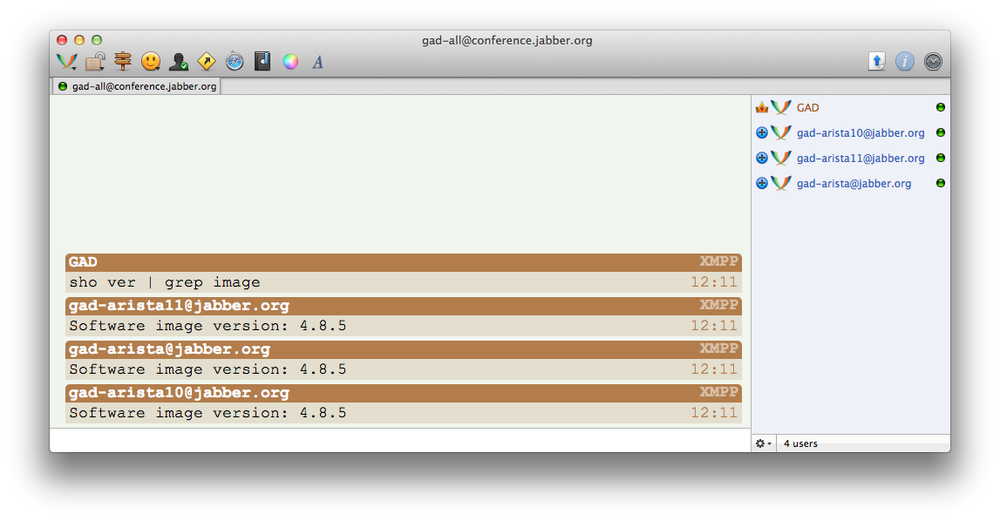
Once the switches came back online, I issued the show version | inc image command one more time
to see if the upgrade worked. As you can see in Figure 29-17, it worked
perfectly. I love it when technology makes me efficient! Efficiency means
more time for important things like lunch.
Upgrading all three switches at once is pretty cool, but let’s think a step further. Imagine that you have 100 switches installed in a data center, in 50 MLAG pairs. With MLAG ISSU, you could upgrade them all without incurring an outage (assuming everything was properly dual homed). Of course properly using MLAG ISSU means that only one switch in the pair can be upgraded at a time. Imagine that all of the switches had CloudVision installed, and the switches were in three switch groups: left, right, and all. By sending upgrade commands like we did in this chapter to only the left switches, you could upgrade 150 switches without leaving your desk, without causing an outage, and without spending more than about three minutes of your time. After waiting five more minutes to let the MLAG peers sync, you could then upgrade the other half of your switches. Assuming that you previously loaded the code onto your switches, the entire time needed to upgrade 300 switches, including the wait for MLAG, would be about 11 minutes. That’s the kind of increase in productivity that makes CloudVision exciting.
You could group switches in any way you can imagine. By switch type (7124, 7050, 7500, etc.), by function (spline, leaf, core, distribution, etc.), by location, by floor, or by any other grouping you can conjure up.
CloudVision is still in its infancy as of mid-2012, but there are a
couple of tools that can be used to see the status of XMPP on the switch.
The first is show xmpp
status, which shows the status of the switch’s user, and of the
switch’s connectivity to the configured XMPP server.
Arista#sho xmpp status
XMPP Server: jabber.org port 5222
Client username: [email protected]
Connection status: connected
I’ve mentioned that I’ve seen CloudVision get in a funky state.
Here’s an example of what that looks like, and how a
shut/no shut fixes it right
up:
SW11#sho xmpp status
XMPP Server: jabber.org port 5222
Client username: [email protected]
Connection status: not connected
As you can see, the status shows that it’s not connected. There
might have been a server problem, or a connection problem. For whatever
reason, the link to the server is not active. I’ll go in and
shut/no shut the XMPP
session:
SW11#conf tSW11(config)#management xmppSW11(config-mgmt-xmpp)#shutSW11(config-mgmt-xmpp)#no shutSW11(config-mgmt-xmpp)#exitSW11(config)#exit
At this point, I’ll check the status again:
SW11#sho xmpp status
XMPP Server: jabber.org port 5222
Client username: [email protected]
Connection status: connected
And there you go. Everything is back to normal.
Another useful command is show xmpp
neighbors. This command will show a list of XMPP users that are
able to IM to the switch. Note that I could only get this to work on EOS
4.9.4 or later using CloudVision version 1.2.3_4.9 or later:
Arista#sho xmpp neighbors
Neighbor                       State           Last Seen Login Time
------------------------------ --------------- -------------------------
[email protected]        present         0:00:13 ago
[email protected]        present         0:00:13 ago
[email protected]              present         0:00:13 ago

Neighbor                       Status Message
------------------------------ ----------------------------------------
[email protected]        Arista Networks DCS-7050S-64
[email protected]        Arista Networks DCS-7050S-64

[email protected]
With the newer version of code, I can send XMPP messages between
switches with the xmpp send command.
I’ll send the show version command to
the switch, highlighted in bold previously. The switch I’m sending from is
a 7124S. The switch I’m sending to
([email protected]) is a 7050S-64:
Arista#xmpp send [email protected] command show ver | inc Arista
message from user: [email protected]
--------------------------------------------------

Arista DCS-7050S-64-F
That’s pretty slick! Imagine the cool things you can do combining this with event manager, email, and any number of other features.
Warning
If you’ve upgraded to 4.9.4 or 4.10 and are using a management VRF, this will break CloudVision version 1.2.3 since the DNS servers must be moved to the management VRF.
This version of CloudVision also introduces the ability to send
XMPP messages through a bash command named XmppCli. To run the same command I showed
previously, I’ll use the bash command XmppCli
[email protected] -c 'show ver | inc Arista'. The command
I want to send must be surrounded by single or double quotes and preceded
by the –c flag:
[admin@Arista ~]$XmppCli [email protected] -c 'show ver |inc Arista'response from: [email protected] -------------------------------------------------- Arista DCS-7050S-64-F
The ability to run XMPP commands from bash means that you can now script control of multiple switches from other switches. Or you can send emails when a switch goes down since you can monitor it from another switch. The possibilities are almost endless.
Packets are encrypted when using CloudVision, which I’m very glad to
see since the running-config can be sent. Figure 29-18 shows a Wireshark
screenshot of the packets resulting from my sending the show int e10 command to a switch through
CloudVision. The packet shown is part of the actual returned text. As you
can see in the ASCII section of the dump (bottom pane), the text is
unreadable. In other words, neither the commands sent, nor the replies
sent are in clear text.
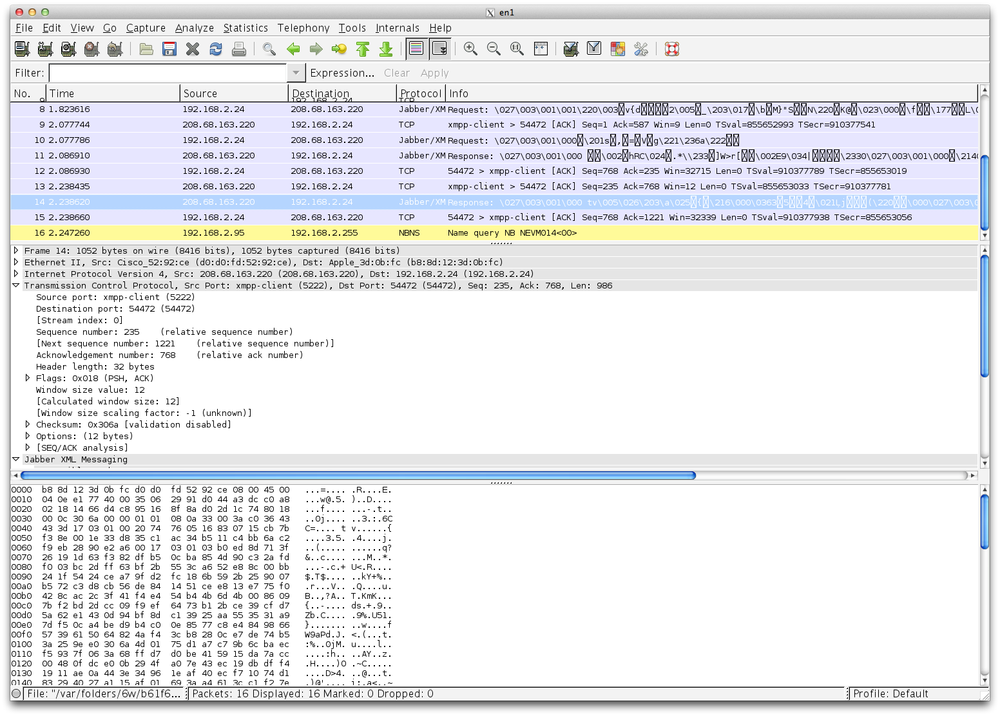
Figure 29-18. Wireshark capture of the results from the command show int e10 being sent through
CloudVision
Though I whine a bit about my perceived shortcomings regarding CloudVision, I think these issues will be resolved in future releases. I think that in its current state, CloudVision is great for an environment where you have absolute control over the XMPP server, and where only a small subset of trusted people have the ability to make use of it. It would especially work well in a lab, or in a tightly secured environment.
I see some seriously cool applications in this feature’s future. How about an Event Monitor trigger that sends an IM when a certain message is logged? Or when a certain user logs in? Or when the CPU goes over 70%? Or when a port’s utilization goes over 70%? I think you get the idea. I’ll be watching this feature closely, because I think it has the potential to be a game changer.