
After you finish planning a project and get approval from everyone necessary, you save a baseline of the project and give the signal for work to begin. You may be tempted to sit back at this point and rest on your…ahem…laurels. The hardest part of your job as project manager is done, right?
Wrong. Now that you’ve stepped over the threshold from planning into execution, plenty of challenges await. The execution phase is when you really earn your salt as a project manager: You monitor progress, evaluate performance, make adjustments as necessary, and manage the changes inevitable in projects.
Before you can see how the project is doing and make corrections, you need to know where the project stands. Tracking progress is all about data gathering: tasks completed, hours worked, and costs incurred. This chapter begins with the first hurdle—collecting progress data from your team—and shows you several ways to do it.
The second step is entering progress data into your Project file. This chapter describes how to enter progress data, depending on the information you collect. You’ll also learn how to update progress at the assignment level, whether task by task or for the entire project.
Depending on your project’s requirements, just knowing what percentage of a task’s work is complete may be enough. For example, Susan says she’s 100 percent complete on two tasks and 25 percent complete on a third task, and you have all the information you need to update the schedule. On the other hand, a customer’s contract terms may require you to account for every hour worked, and by whom, before you see a payment. In this case, Susan has to tell you how many hours she worked on each task every day of the previous week.
Quick and dirty vs. detailed and time-consuming are the two extremes of project tracking. Whether you choose one of these methods or some happy medium depends on your organization, the type of project, and the level of detail your stakeholders need. From a practical standpoint, it also depends on how much time you have to gather and incorporate progress data into the project plan.
Project doesn’t make it easy to decide, because you can enter progress information in any of the following Project fields:
Note
Project extrapolates information you enter into one progress tracking field into other, if not all of, the other progress tracking fields. That is, the values for one field affect the values of others.
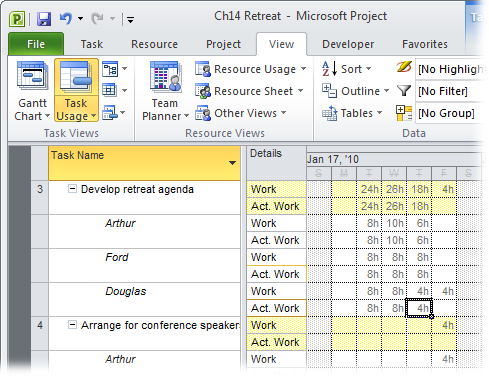
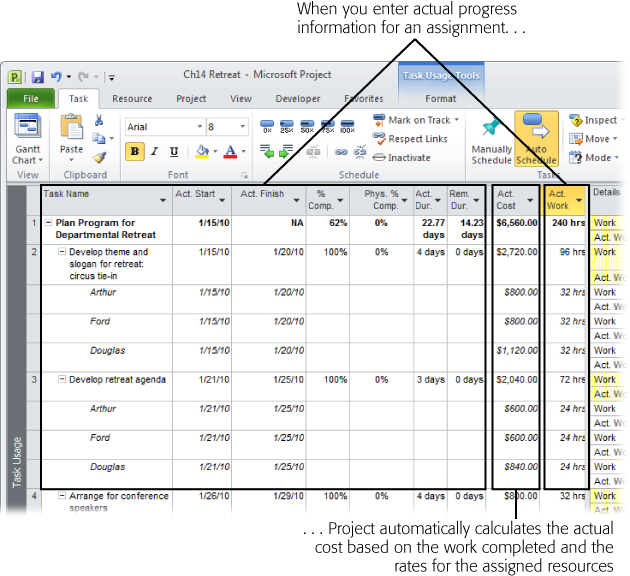
If you’re going for quick and easy progress reporting, fill in actual start, percent complete, and remaining duration. For more detailed progress reporting, you need to gather actual start, actual work, and remaining work. If you want highly detailed progress reporting, also enter actual and remaining work in the Task Usage or Resource time-phased portion of the Usage view, as illustrated in Figure 14-1.
Once you’ve chosen your preferred progress tracking approach, the battle has only begun. In this section, you’ll learn ways to obtain the progress information you need without pulling team members’ teeth. You’ll also learn about Project views that help you ask the right questions and get the most complete progress information.
You can get most progress information from your team members, although it’s not always as easy as it sounds. This section describes some of the best methods for extracting reliable and consistent information from resources.
Note
If your organization uses Project Server, then team members can submit their progress information through the Project Web App interface. The data is automatically available for you to review and incorporate into your project plan.
The best place to be to record progress information is at your computer with the Resource Usage view applied in Project. By applying the Should Start/Finish By filter using the start and finish dates of the reporting period, you can see the tasks you need to update. The Resource Usage view groups assignments by resource, so you can enter progress information on all assignments for one resource and then move on to the next resource. If you update work hours, then the Work table has all the work-related fields, as shown in Figure 14-2. The Task Sheet view with the Tracking table is another candidate for a progress reporting view. You can apply the Using Resource filter to create a data collection printout.
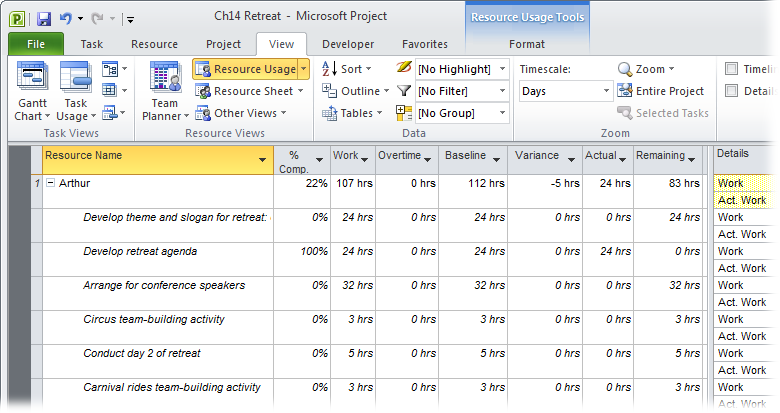
Figure 14-2. The Resource Usage view groups assignments under the assigned resource. If you want to use a table with the progress tracking fields you use, copy one of the built-in tables, and then modify the fields in the copy to the ones you use (page 611).
You may want to print a report to hand out to resources to request their progress info. Project has several reports that show assignments, which you can use as data-gathering worksheets:
Who Does What report. This report shows all assignments grouped under the assigned resources.
Who Does What When report. This report shows all assignments grouped under the assigned resources with time-phased dates for each assignment.
To-Do List. This report prompts you for the resource whose to-do list you want to print and then displays all assignments for that resource in date order, with the duration, start date, and finish date.
To print any of these reports, choose Project→Reports→Reports. Double-click Assignments, and then double-click the report you want. Click Print.
Email is an easy way to request and receive regular progress reports about current tasks, as you can see in Figure 14-3. You can copy and paste the progress data you receive in an email into the corresponding Project fields (Copying Tasks from an Email).
For small projects, “project management by walking around” can be the answer to data gathering. You actually get up from your desk and meet briefly with each team member, pen in hand, asking for progress information on tasks that are happening right about now. An alternative is to collect progress data during regular status meetings with the entire team or during one-on-one meetings with individual team members. Although they may not be as efficient as email, meetings like these can convey progress as well as updates on issues, risks, accomplishments, and successes.
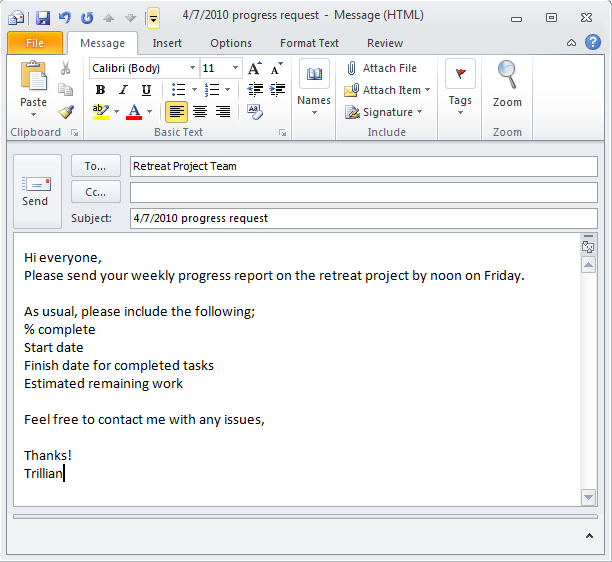
Figure 14-3. You can automate reminders by using Microsoft Outlook or another similar email and calendar program to create and send a recurring appointment to all team members. A reminder pops up each time progress reports come due.
Tip
Don’t underestimate the psychology of competition when going around a table for task progress reports. No one wants to look like a slacker when others are successfully ticking off their tasks one after another. It’s counterintuitive, but such status meetings can actually increase your team’s productivity.
Many organizations ask people to submit timesheet and cost information into specialized tools like an accounting or time-tracking system. The box on Getting Team Members to Submit Progress talks about some of the problems you may face trying to work with other systems.
If team members are already entering progress information into another system, find out if you can obtain that information so they don’t have to report progress data twice. Cajole your good buddy in accounting or IT into creating a periodic report of this information in an Excel spreadsheet or Access database. If the tasks in the other system map to the tasks in your project (see the box on When Your Project and the Tracking System Don’t Jibe if they don’t), then you can import that data into your project plan, as described on Importing Data into Project.
If you’re bringing information in from another tracking system, designating accounting codes for tasks or resources can help you get data to the right place. For that matter, you may find accounting codes useful if you send information from your Project file to another system. If the accounting code is for resources, consider using the Code field, which is just a built-in resource text field to use however you wish. Otherwise, you can create a custom text or number field. Find details about creating an accounting code on Creating Multilevel Accounting Codes.
Some key resources may be inanimate objects. No, not like George in the corner cubicle, but rather equipment resources, material resources, and cost resources. Just because you can’t chat up these types of resources at the water cooler doesn’t mean you can ignore progress information for them. They often represent significant project costs, and their progress is essential to accurately reflecting progress and cost in your Project file.
One way to obtain this information is to have one of the human resources report on when equipment resources start working, how many pounds of goop were actually used, or the actual cost of the flight from headquarters to Timbuktu. The people who operate machinery, handle material, or spend money are the logical choices. Even if no one works directly with these resources, you can still assign progress-reporting responsibility to someone or do it yourself. See the box on When Your Project and the Tracking System Don’t Jibe for a tip on documenting the owner of this reporting responsibility.
Another idea is to check with the bean counters. The organization’s general ledger or accounting system may contain time and costs incurred by equipment, material, and cost resources. If so, you may be able to obtain an Excel or Access file of the data to import into Project (Importing Data into Project).
Note
If your organization uses the enterprise project management features of Project Professional and Project Server, you can designate a different assignment owner for certain resources that don’t have access to Project Server. Not only does this feature provide for people who don’t have access to Project Server, but it’s also especially handy for making sure that someone reports on progress for equipment, material, and cost resources in that program. (And if you don’t have Project Professional or Project Server, see the box on When Your Project and the Tracking System Don’t Jibe for a workaround.)
Progress information based on what actually happened is usually referred to as project actuals. Actuals are made up of data like actual duration, actual start, actual work, and percent complete. (The box on Baseline, Scheduled, and Actual Values explains the difference between baseline, scheduled, and actual values in Project.)
In this section, you’ll learn how to enter actual progress information into your Project file, including the best dialog boxes, tables, and fields for this purpose. This section covers more popular techniques for tracking progress in Project. Some techniques update from the task’s point of view, and other techniques update from the resource assignment’s point of view. You’ll also learn how to quickly “catch up” to your project if it’s gotten stalled for some reason. Finally, you’ll learn about the best ways to update cost information in your project.
Note
Although you can also enter remaining information, such as remaining duration or remaining work, those are not considered actuals. That information is a readjustment of the estimate of time needed in the future to complete the task.
You can update progress for entire tasks, whether or not you assign resources to them. This section describes three effective methods for updating task progress: percent complete, actual and remaining duration, and actual start and actual finish. (If you want to update individual assignments, see Updating the Project Using Resource Assignment Progress.)
You can update task progress in several places, each with its pros and cons. Choose from one of the following locations:
The Mark on Track command (choose Task→Schedule→Mark on Track) changes a task to 100% complete and sets the actual start and finish dates to the scheduled task dates. This command is helpful only when a task is complete and finished according to plan.
The Update Tasks dialog box (choose Task→Schedule→Mark on Track→Update Tasks) includes all the fields you might use to update progress. If several tasks have the same update values, you can select all the tasks before you open the dialog box. Then you enter the update information, and the program applies the changes to all the tasks. However, if each task has a unique update value, you need to open and close the dialog box for every task you want to update.
The Tracking table (choose View→Data→Tables and then choose Tracking on the drop-down list) in a task-oriented view is the fastest way to enter progress for one task after another. The table also shows how Project updates other progress fields based on the information you enter.
The Task Details Form (choose View→Split View, turn on the Details checkbox, choose More Views, and then double-click Task Details Form) displays the values for the task you selected in the top pane’s view. You need to select the Actual option if you want to type actual dates. Right-click the Task Details form and then choose Work if you want to type actual and remaining hours.
Percent complete is the easiest type of progress to obtain, but it’s the least accurate. If you don’t need precise hours and you just want to know the percentage of the task duration that’s complete, enter task progress as percent complete, like this:
In a task-oriented view such as the Gantt Chart view, apply the Tracking table, and then select the task whose percent complete you want to update.
To update several tasks that have the same percent complete value, select them all at once. If the tasks are adjacent to one another in the table, just drag across the task names to select them all. You can also Shift-click to select adjacent tasks or Ctrl-click to select nonadjacent tasks.
Choose Task→Schedule→Mark on Track→Update Tasks.
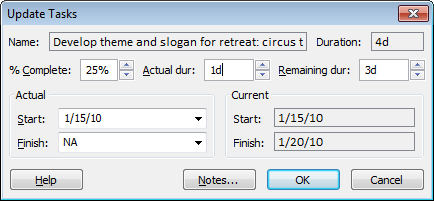
Project displays the Update Tasks dialog box, shown in Figure 14-4. You can also type a percentage in the Tracking table’s % Complete column.
Figure 14-4. The Update Tasks dialog box includes % Complete, Actual Duration, Remaining Duration, and Actual Start and Finish, so you can report progress any way you want. If you type a value in % Complete and Actual Duration, the program calculates the Remaining Duration and updates the task duration. For example, if you type 25% for % Complete and 1d (a day) for Actual Duration, the Remaining Duration changes to 3d (3 days) and the new scheduled duration is 4d (4 days).
In the % Complete box, type the percent complete for the selected task(s).
To keep things simple, you may want to limit the values to a few standard percentages like 25%, 50%, 75%, and 100%. If you do, you can update a task’s % Complete field from the task mini-toolbar. Right-click the task and then, on the mini-toolbar, click the 100% down arrow and choose the value you want.
When you enter percent complete for a task, Project calculates other progress-related fields. In the Gantt Chart view, a black line appears in the center of task bars to show how much of the total task is completed, as illustrated in Figure 14-5.
If you don’t enter the actual start, then Project sets the actual start to the task’s scheduled start date. If you don’t enter remaining duration, then Project calculates the remaining duration from the percent complete and actual duration. See the box on Project’s Progress Calculations for Tasks to learn more about the formulas Project uses to calculate the progress fields.
Tip
If many tasks have the same percent complete values, you might find it faster to enter percent complete directly into the table. Right-click the Select All cell at top right of the table, and then choose Tracking to apply the Tracking table to the Gantt Chart view. Enter the percent complete in the “% Comp.” field for each applicable task. To copy a value to other cells, select the cell. Then drag the black square in the bottom-right corner of the cell.
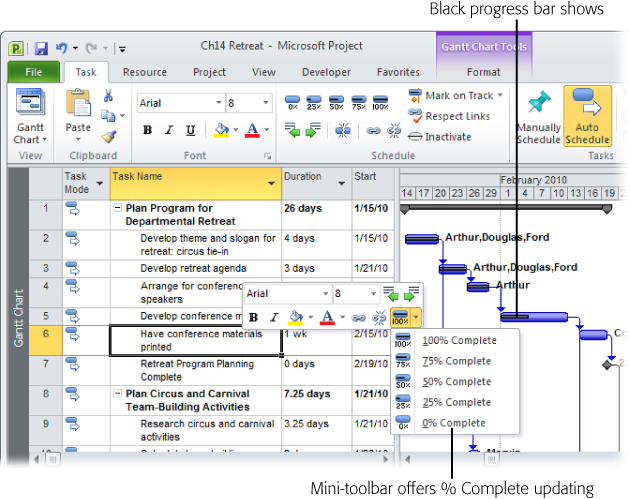
Figure 14-5. The mini-toolbar is convenient if you update progress using percent complete. Right-click a task, click the 100% down arrow to get a drop-down list for 0%, 25%, 50%, 75%, and 100%, and then choose the appropriate percent complete command. Project updates that task. The thin black bar within the task bars shows the completed duration on the task.
In this method, you specify the duration that’s complete and a forecast for the remaining duration. It’s more accurate than the simplistic percent complete method, because it gives you the opportunity to tell Project that you expect the task to take longer than you’d originally planned. (If you enter percent complete and actual duration, Project calculates remaining duration.) To enter task progress using actual and remaining durations, follow these steps:
In a task-oriented view like the Gantt Chart view, select the task whose actual duration and remaining duration you want to update.
You can also work in other task-oriented views like the Calendar view or the Network Diagram view.
Choose Task→Schedule→Mark on Track→Update Tasks.
Project displays the Update Tasks dialog box, which shows any existing values for actual and remaining duration. The sum of actual and remaining durations is the scheduled duration. If you’re comfortable working directly in tables and like to watch the change highlighting feature color the table cells, you can also enter actual and remaining values directly in the Tracking table.
In the “Actual dur” box, enter the actual duration.
Use the normal time period abbreviations, like 6h, 2d, or 1w.
In the “Remaining dur” box, enter the remaining duration for the selected task, and then click OK.
When you enter an actual duration, the value in the “Remaining dur” box and Duration box doesn’t change immediately. Project doesn’t recalculate the fields in the dialog box until you click OK.
On the Tracking table, you can see that Project has updated the Actual Start and % Complete fields based on your duration entries. If resources are assigned, Project also updates the Actual Work field. Likewise, if you had set up these resources with cost rates, then Project automatically updates the Actual Cost field.
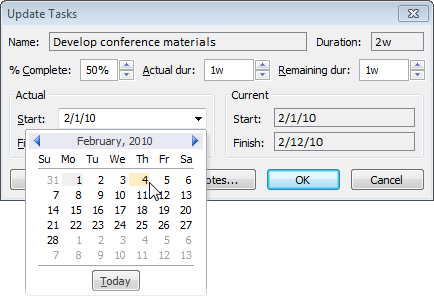
If a task is complete, then the actual start and actual finish dates are the best values to enter. You can set the % Complete field to 100%, but if you do that, then Project assumes that the task started and finished on the scheduled dates. Do the following to enter task progress using actual start and actual finish dates:
In a task-oriented view like the Gantt Chart view, select the task whose actual start and actual finish you want to update.
If you have several tasks that share the same actual start and finish dates, you can select them all at once and then update their dates in one fell swoop.
Choose Task→Schedule→Mark on Track→Update Tasks.
Project displays the Update Tasks dialog box. If you select just a single task, then the Current section displays the scheduled start and finish dates. If you select multiple tasks, then the Current section boxes are blank.
Under Actual, click the arrow in the Start box, and then choose the actual start date from the calendar drop-down menu, as shown in Figure 14-6. Do the same in the Finish box to set the actual finish date.
Looking at the Tracking table, notice that Project updates not only the actual start and finish fields, but also the percent complete, actual duration, and remaining duration fields. If resources are assigned, then the actual work and actual cost fields are updated as well. If you have change highlighting turned on (See Why Tasks Occur When They Do), then the ripple effect of delayed tasks appears immediately.
Say a task is partially complete and several days have passed since your status date with no additional progress. You can update the task to show the completed work occurring prior to the status date or move the incomplete work to resume as of the status date. Select the task and then choose Task→Tasks→Move. On the Move drop-down menu, choose Completed Parts to Status Date to move the complete work prior to the status date. Or choose Incomplete Parts to Status Date to move the incomplete work into the future.
When resources are assigned to tasks, you can take progress updates to a more detailed level of tracking. Instead of showing progress on the task as a whole, you can show progress on individual assignments within the task. Admittedly, for tasks that have only one resource assigned, you don’t see much of a difference. But for tasks that have multiple resources assigned, entering updates at the assignment level provides more detailed progress information.
You have to enter more data to update resource assignments this way, but it makes your progress information more accurate. Plus, Project uses progress on individual assignments to determine progress statistics for the task as a whole. You don’t have to resort to guesswork about a task’s overall percent complete when, for example, one resource is 100 percent complete, another is 40 percent complete, and the third is 25 percent complete.
This section describes three effective methods for updating resource assignment progress: percentage of work complete, actual work complete and remaining work, and actual work complete by time period. You’ll also learn how to create a specialized tracking view that simplifies entering progress information for resource assignments.
Note
When you enter progress updates for tasks, Project ordinarily rolls down these values to the assignment level, calculating the actual and remaining work and cost for associated assignments. If you prefer to enter these values yourself, choose File→Options, and then choose Schedule. Turn off the “Updating task status updates resource status” checkbox. You can then specify the actual assignment progress when you get it.
Percent complete (% Complete field) refers to completion for a task as a whole, based on duration. Percentage of work complete (% Work Complete) refers to completion based on the number of hours worked divided by the baseline work hours. Do the following to enter resource assignment progress as percentage of work complete:
Display the Task Usage or Resource Usage view. Choose View→Data→Tables→Work to apply the Work table to the view and see progress-related fields for assignments.
In the Task Usage view, the column is titled “% W. Comp.” If you don’t see the “% W. Comp.” column initially, drag the divider between the view’s table and timescale to the right until you see the column.
In the Resource Usage view, the column is labeled “% Comp.”, but the field behind the scenes is still % Work Complete.
Tip
To see how actuals affect the schedule when you update progress in a usage view, start by displaying the Gantt Chart view in the top pane. Then display the Task Usage view in the bottom pane by choosing View→Split View, turning on the Details checkbox, and then choosing Task Usage in the Details drop-down list. As you enter actuals in the Task Usage view, you see tasks change (including change highlighting) in the Gantt Chart view.
Select the assignment whose percentage of work complete you want to update.
In the Task Usage view, Project lists the assigned resources under each task. In the Resource Usage view, Project lists the assigned tasks under each resource. Remember that the assignment is the intersection of tasks with resources.
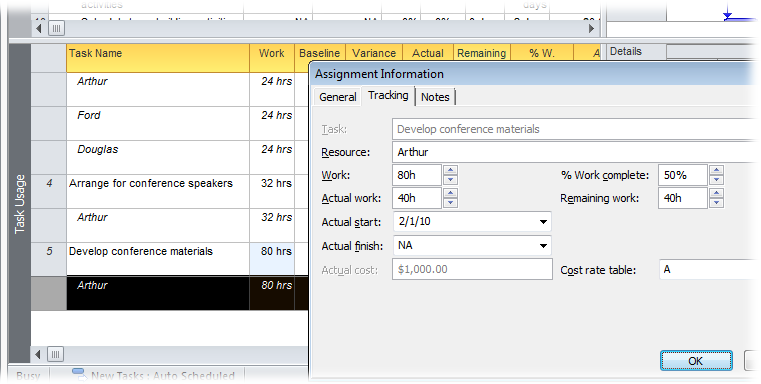
Double-click the assignment.
Project opens the Assignment Information dialog box.
Select the Tracking tab.
The Tracking tab shows several fields you can use to update progress for the individual assignment, as shown in Figure 14-7.
In the “% Work complete” box, enter the percentage that represents the progress the resource has made.
Remember, enter the percent complete reflecting the progress on this assignment, not the entire task. Before you click OK, check the assignment’s actual start and remaining work. If you don’t enter the actual start, Project sets the Actual Start field to the assignment’s scheduled start date. If you don’t enter remaining work, Project calculates the remaining work from the percentage of work complete.
If you enter only percent work complete without actual start or actual finish, you can enter percent work complete in the “% W. Comp.” field in the Task Usage view or the “% Comp.” field in the Resource Usage view (these headings both represent the % Work Complete field). Remember to enter the value for the assignment, not for the task or resource.
While duration refers to the span of time from the beginning of a task until the end, work on an assignment refers to the person-hours a resource is assigned to work. Project can calculate work from duration and vice versa, but they don’t measure the same thing. If you gather hours worked from resources, then entering the actual and remaining work provides the most accurate picture of progress and the corresponding labor costs.
To enter actual work complete and remaining work on an assignment, do this:
In the Task Usage or Resource Usage view, select the assignment whose actual and remaining work you want to update.
If multiple assignments have the same actual and remaining work values, you can select them and update their progress at the same time.
Double-click the selected assignment.
Project displays the Assignment Information dialog box.
Select the Tracking tab.
The Tracking tab includes the “Actual work” and “Remaining work” boxes. Any existing values for actual and remaining work appear in the boxes. The value in the Work box (scheduled work) is the sum of actual work and remaining work. (In Project, the Work field represents scheduled work—the total of actual work performed and the current estimate of remaining work. To learn more about the difference between baseline, scheduled, and actual values, see the box on Baseline, Scheduled, and Actual Values.)
In the “Actual work” box, enter the actual work amount that has already been done.
Use the normal time period abbreviations like 8h, 5d, or 2w.
In the “Remaining work” box, enter the remaining work hours needed to complete the selected assignment. Click OK.
When you enter actual work, at first the values in the Work and “Remaining work” boxes don’t change. However, after you enter remaining work and click OK, Project recalculates the Work value.
Make sure the actual start date is correct. Change it if necessary. If you don’t enter the actual start, then Project sets it to the assignment’s scheduled start date.
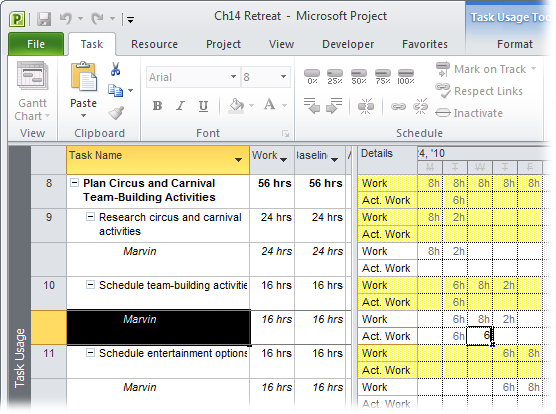
For the ultimate in progress detail and accuracy, you can enter actual work by time period. Be forewarned, however, that this is the most time-consuming method for tracking progress, for you and for your resources. You enter actual work in the time-phased portion of a usage view, showing how much work was done on an assignment in each time period (day, week, or whatever).
To enter actual work by time period, follow these steps:
Display the Task Usage or Resource Usage view.
Not only do the usage views show assignment information, but they also show time-phased information, like work or cost values over time.
Display Actual Work in the time-phased portion of the view by choosing Format→Details and turning on the Actual Work checkbox.
You can also simply right-click in the time-phased portion of the usage view, and then, on the shortcut menu, choose Actual Work.
With either method, Project adds a row labeled Act. Work to the time-phased portion of the usage view.
In the time-phased portion of the view, drag the right edge of the Details column to the right to show the full text.
On the status bar, drag the Zoom slider until the timescale for the usage view shows the level of time detail you want to work with. For example, you can show days, weeks, or months in the timescale.
In the table area, select the assignment whose actual work you want to update.
You can actually have one assignment selected in the sheet portion, while another assignment is selected in the time-phased portion of the usage view.
To display the cells for the assignment in the time-phased portion of the view, choose Task→Editing→Scroll to Task.
Project scrolls the time-phased portion of the view to show when work is scheduled to begin on the selected assignment.
In the Act. Work field in the assignment row, type the actual work values in the appropriate time periods, as shown in Figure 14-8.
If a resource tells you more time is needed, update the Remaining Work cell in the table to the value you received. If you don’t explicitly enter a value for remaining work, then Project calculates it by simply subtracting the actual work you just entered from the scheduled work.
Tip
If you want to add a field to the time-phased portion of the view that’s not available on the Format tab or shortcut menu, choose Format→Details→Add Details. In the Detail Styles dialog box, select the Usage Details tab. In the “Available fields” box, select the field you want to add, and then click Show. Use the Move arrows to specify the order of fields in the view.
Sometimes, a project goes off kilter and you need a quick way to recover. For example, maybe several months of work was complete when you were told to stop work immediately. Then a month later, the project is on again. Unfortunately, in the interim, the dates in your Project file marched forward assuming that people were going to do those tasks when they were scheduled.
Or say you were suddenly drafted to handle customer problems onsite. Upon your return, you’re relieved to find tasks completed and milestones met. Except…the Project file doesn’t have any actual values for the time you were away. The prospect of gathering and incorporating several weeks’ worth of actuals into the file is too overwhelming, especially given the other activities you’re behind on.
In this section, you’ll learn about two quick-fix recovery methods. One method lets you reschedule unfinished work to move the start or resume dates of all tasks to the present date so you can continue from this point forward. Another method is like the cat that falls off the sofa and lands on its head, then walks away acting as if it meant to do that all along. This is the automatic project update method, which says, essentially, that all tasks in the project have been done exactly according to plan.
If your project was interrupted midstream and is now resuming, then you have a lot of schedule dates to adjust. Rather than adjust dates manually, it’s simpler to have Project reschedule any uncompleted work. To do so, follow these steps:
Display any task-oriented view.
The Update Project dialog box is available only for task-oriented views.
To reschedule only certain tasks, select them and then choose Project→Status→Update Project.
The Update Project dialog box appears, as shown in Figure 14-9.
Select the “Reschedule uncompleted work to start after” option, and then type the date when work should resume.
Any tasks that were in progress when the project was halted resume on that date. It also means that any unstarted tasks scheduled to start before that date now start on this new date instead. Any successors linked to those tasks reschedule to follow their predecessors as normal.
To reschedule only selected tasks, select the “Selected tasks” option. Click OK.
Otherwise, Project reschedules the entire project, as shown in Figure 14-10.
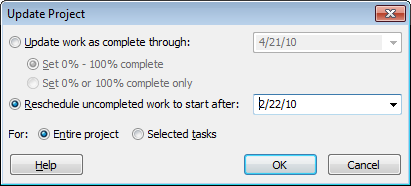
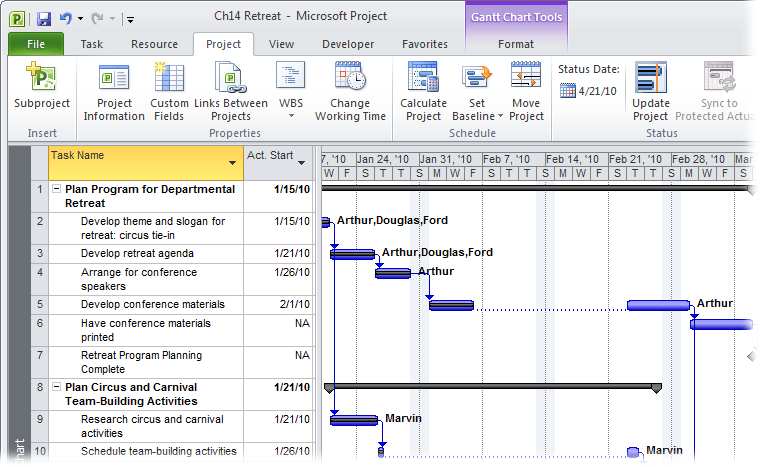
Figure 14-10. When you reschedule uncompleted work, in-progress tasks show a stop/start split with dotted lines. Any unstarted tasks begin after the specified date, and their successor tasks are scheduled beyond that according to the task dependencies you’ve defined.
After you reschedule your project, examine it carefully for issues you need to address. If you had set date constraints or created manually scheduled tasks, then reset them as necessary. Check for conflicts between constraints and predecessors (Task Inspector: Help with Schedule Problems). Also look at milestone dates and the project finish date to see if you shouldadjust them because of the delay, and look at the project costs to see if anything is now going over budget.
If necessary, submit the new schedule to the managing stakeholders and get their approval again. Once that’s done, you may want to save a new baseline. You can either overwrite your original baseline or save a second baseline and work with that as your primary benchmark from now on (Editing a set baseline).
Anyone who says a project has gone exactly as planned is bound to get some suspicious glances. However, suppose your project has been progressing with no major mishaps, and you have also fallen woefully behind in entering progress updates. You can enter a set of automatic updates that says all work is completed or in progress exactly as scheduled through a specified date.
Tip
Keep in mind that updating a project automatically compromises the accuracy of your project data, so you should use it only as a last resort. If you use project actuals for billing or other accounting purposes, then don’t use automatic updates. In that case, you simply have to gather the back data and update your file.
To globally update work as completed according to the schedule, follow these steps:
Display any task-oriented view.
For example, you can choose the Calendar view or the Detail Gantt view.
If you want to update only certain tasks, select them.
Drag across adjacent tasks or Ctrl-click to select nonadjacent tasks.
Choose Project→Status→Update Project.
The Update Project dialog box appears.
Make sure the “Update work as complete through” option is selected.
Project makes the date box for that option available.
In the date box, enter the cutoff date for updating as scheduled.
This means that Project automatically enters progress update information, such as 100 percent complete, for any tasks scheduled to take place before the specified date.
If you want Project to update tasks with partial percent complete, select the “Set 0% - 100% complete” option.
This option means that some tasks (the ones that are scheduled to start before and finish after the cutoff date) may update to 50 percent or 75 percent, for example.
If you want Project to update only tasks that should have been 100 percent complete before the specified date, then select the “Set 0% or 100% complete only” option.
If you want to update only selected tasks, select the “Selected tasks” option, and then click OK.
Otherwise, Project updates all applicable tasks throughout the entire project.
Projects can potentially have up to five different sources of costs: human resources, equipment, materials, cost resources, and fixed costs for tasks. Each of these costs needs actual cost information before you can see where you stand against the project budget. In this section, you’ll learn how to update each of these five cost sources. The Cost table is a great starting point, with fields for baseline, scheduled, actual, and remaining costs. You can apply the table to a usage view to see costs for individual assignments as well.
You can also insert cost-related fields like Actual Cost into any table. Just remember that these fields represent task costs in a task-oriented table. When you add these fields to a resource-oriented table, their values relate to resources. When you add these fields to a usage view, you can see values for the individual assignments.
If you set up resources with standard rates, overtime rates, and costs per use (Defining Costs for Work and Material Resources) and assign the resources to tasks, then Project calculates actual cost as soon as you enter actual work. You never have to update actual labor and equipment costs yourself. See for yourself when you apply the Tracking table to a task-oriented view like the Task Usage view, shown in Figure 14-11.
With equipment resources, the challenge is making sure that actual work time is reported. Designate an assignment owner for equipment resource assignments (Entering Actual Progress in Project).
With standard rates or costs per use in place for your material resources and the material resources assigned to tasks, Project calculates the actual cost for material resources based on the number of units used or the amount per time period, like 20 boxes of goop at $100 per box or four boxes of goop per day times a 5-day task duration times $100 per box. The actual cost for the material resource is based on the actual duration of the task.
If the actual amount of material used isn’t correct, you can change it in the Actual Work field for the material resource assignment. Use the Task Usage view, Resource Usage view, or the Tracking tab on the Assignment Information dialog box.
When you assign a cost resource to a task, you enter the estimated cost (Preparing for Cost Calculations). However, when you enter actual progress for task or resource assignments, Project doesn’t include cost resources in its actual cost calculations. Progress information is based on duration or work completed, and cost resources operate independently of time spent on a task. This disconnect means that you could set a task to 100 percent complete, but the cost of the cost resource would still show remaining cost, as illustrated in Figure 14-12.
Figure 14-12. If you assign a cost resource to a task that also has work and material resources, then when you enter actual progress, Project calculates actual work and material costs, but not cost resource costs. If cost resources are the only type of resource assigned to the task, then cost resource costs become actual costs when you enter actual progress.
If a task has work and cost resources assigned, then you have to explicitly update the actual cost for cost resources. To enter cost resource costs as actual costs, follow these steps:
In the Task Usage or Resource Usage view, double-click the cost resource assignment for the task.
Project displays the Assignment Information dialog box.
Select the Tracking tab.
For cost resources, the only fields available are "% Work complete” and “Actual cost”.
Although cost resources are independent of work amount, you can enter a percentage in the “% Work complete” field, and Project calculates an actual cost amount accordingly.
For example, suppose you specified $2,420.00 for the Airfare cost resource on this task. If you enter 50% in the “% Work complete” field, then the “Actual cost” field changes to $1,210.00.
You can also simply enter a value in the “Actual cost” field. If it’s not the full amount planned, then the remaining amount goes into the Remaining Cost field for the assignment (the field isn’t included in the Assignment Information dialog box).
Although cost resources have mostly replaced fixed costs on tasks, you may have a fixed cost or two lurking in your project (Entering an Oddball Cost for a Task). If you use fixed cost, then when you enter actual progress information on a task, Project calculates the actual cost for the fixed cost along with the work and material costs.
For example, if you had a fixed cost of $300 on a task, and you say that this task is now 50 percent complete, Project moves $150 of the fixed cost to the actual cost side of the equation and leaves the other $150 in the remaining cost side. The actual cost for the task is the total of these fixed cost values and any resource costs on the task.
Unlike most other fields, Project doesn’t have a separate field for actual fixed costs. The value in the Fixed Cost field is the total of your estimated fixed costs and actual fixed costs, so be sure to update the Fixed Cost field with the current fixed cost value. The Cost table includes the Fixed Cost field.