
When users sign up for an account on your website, they trust that you will keep their data safe and secure. Unfortunately, as the popularity of your application increases, so does the likelihood of attack. Even if your application is not popular yet, it can still fall victim to automated systems that scan the web looking for vulnerable sites.
In this chapter, you’ll learn about four of the most common security vulnerabilities and how to protect your site from them. We’ll discuss authorization, injection, cross-site scripting, and cross-site request forgery attacks.
You created an authentication system in Chapter 9, but authentication is not the same thing as authorization. Authentication identifies a user. Authorization specifies what a logged-in user can access within your application. Your authentication system uses an email address and a password to identify a user. Authorization systems usually deal with roles or privileges.
At this point, you aren’t defining roles for the users in your application, but some privileges should be in place. For example, a user should be able to view and edit his or her own posts but only view posts belonging to another user. A user should also be able to moderate comments on his or her own posts, even if another user added the comment.
An authorization attack occurs when a user manages to bypass privileges and access a resource that is owned by another user. The most common type of authorization attack is known as an insecure direct object reference, which means the user can manipulate the URL to access a restricted resource in your application.
Let’s look at an example from your social app. This code sample creates a method to allow users to edit previously created text posts, but it includes a resource lookup that allows an insecure direct object reference:
def edit
  @text_post = TextPost.find(params[:id])
end
This method finds the TextPost to edit using the
id parameter passed in as part of the URL, regardless of who
originally created it. Because this code doesn’t check which user is trying to
access the post, any authenticated user could edit any post in the application. All the
user has to do is open one of his or her posts to edit, work out which part of the URL
represents the post id, and change that value to another post’s
id.
You only want users to be able to edit their own posts. This next listing shows a better way to handle this lookup:
def edit
  @text_post = current_user.text_posts.find(params[:id])
end
By using current_user.text_posts, the find
method is restricted to only posts belonging to the current user. Now if a user changes
the id in the URL in an attempt to modify another user’s post,
the find will fail and the user should see the 404 error page. If a
resource is owned by a user, always reference that user when finding the resource in the
database.
Now that you know the correct way to find a post to be edited, add the previous method
to the text post controller at
app/controllers/text_posts_controller.rb. When the user submits the
edit text post form, the changes are sent to the
update action. Use the same authorization idea to add an
update method for text posts:
   def update
➊    @text_post = current_user.text_posts.find(params[:id])
➋    if @text_post.update(text_post_params)
       redirect_to post_path(@text_post), notice: "Post updated!"
    else
      render :edit, alert: "Error updating post."
    end
   end
This method finds the correct text post ➊ belonging to the current user
and calls the update method ➋ using the
params from the text post form. If the call to
update is successful, the text post is updated in the database and
the user is redirected to the updated post. Otherwise, the edit view is
rendered again with an error message.
Next, create the file app/views/text_posts/edit.html.erb and add
the edit view for text posts:
<div class="page-header">
  <h1>Edit Text Post</h1>
</div>

<%= render 'form' %>
This view is the same as the new view for text posts except for the
heading. This view reuses the form partial you created in the last chapter. Finally, add a
link to the edit action in the TextPost partial at
app/views/text_posts/_text_post.html.erb.
      <%= text_post.body %>

➊     <% if text_post.user == current_user %>
        <p>
        <%= link_to 'Edit', edit_text_post_path(text_post),
              class: "btn btn-default" %>
        </p>
      <% end %>
    </div>
  </div>
This link should only appear if the text post belongs to the current user ➊.
Editing image posts follows the same pattern. Add the edit and
update methods, complete with authorization, to
app/controllers/image_posts_controller.rb, create an
edit view for image posts at
app/views/image_posts/edit.html.erb, and add a link to the
edit action in the ImagePost partial at
app/views/image_posts/_image_post.html.erb. These steps are covered
in Exercise 1 at the end of this chapter.
An injection attack occurs when input from a user is executed as part of the application. Injection attacks are extremely common, especially in older applications.
The first rule of avoiding injection attacks is never trust input from the user. If an application does not ensure that all data entered by a user is safe, then it is vulnerable to injection attacks. Keep this in mind as we look at two types of injection attacks in this section: SQL injection and cross-site scripting.
In a SQL injection attack, user input is added directly to an SQL statement. If a malicious user provides actual SQL code as input, he or she could bypass your application’s authorization system, query your application’s database, and obtain or delete restricted information.
For example, consider an application where the Rails built-in secure password
feature is not used. Instead, the developer stores usernames and passwords in the
database and has written his or her own authenticate method to verify
a user’s credentials. This custom User.authenticate method
shows what not to do, as it’s vulnerable to SQL
injection:
  class User < ActiveRecord::Base
➊   def self.authenticate(username, password)
➋     where("username = '#{username}' " +
            "AND password = '#{password}'").first
    end
  end
This method accepts arguments for username and
password ➊. These values are entered by the user and passed
to the controller as parameters. These variables are then added to a
where call using string interpolation ➋.
This method returns the correct user object for valid username and password
combinations. For example, assuming a User with
username tony and password secret, this method
returns the User:
User.authenticate("tony", "secret")
 => #<User id: 1, username: ...>
The method call then generates the following SQL code:
SELECT * FROM "users"
WHERE (username = 'tony' AND password = 'secret')
ORDER BY "users"."id" ASC
LIMIT 1
This method also works correctly when passed invalid username and
password combinations:
User.authenticate("tony", "wrong")
 => nil
In this case, the password is not valid so the method returns
nil. So far, so good!
Unfortunately, savvy attackers know a handy SQL string that allows them to
bypass completely this authenticate method: ' OR
'1'='1. In SQL, the statement '1'='1' evaluates to
TRUE, so if it is added to any other conditional statement with
OR, the entire conditional evaluates to
TRUE.
Let’s see what happens when this string is passed to the authenticate method
for username and password:
User.authenticate("' OR '1'='1", "' OR '1'='1")
 => #<User id: 1, username: ...>
I didn’t pass the method any valid data, so how did the
authenticate method succeed? The SQL code generated by the method
call shows the trick:
SELECT * FROM "users"
WHERE (username = '' OR '1'='1' AND password = '' OR '1'='1')
ORDER BY "users"."id" ASC
LIMIT 1
Even though there is no user with an empty string for username
and password, the addition of OR '1'='1' causes
the WHERE clause to evaluate to TRUE and the
method returns the first user in the database. The attacker is now logged in as the
first user. This attack is made worse by the fact that the first user in the database
usually belongs to the application’s creator, who might also have special
privileges.
Thankfully, you can usually find SQL injection errors just by looking at your code
carefully. If you see string interpolation inside a where method,
assume it is dangerous and needs to be corrected.
If you must build your own query string, switch to hash conditions:
def self.authenticate
  username = params[:username]
  password = params[:password]

  where(username: username,
        password: password).first
end
Here, the string is completely removed from the call to the
where method.
Cross-site scripting (XSS) is another common injection attack. In a cross-site scripting attack, an attacker is allowed to enter malicious JavaScript code into your application. Any text field can potentially be used in a cross-site scripting attack. When another user views a page with malicious JavaScript, the user’s browser executes the code as if it were part of your application.
Cross-site scripting vulnerabilities can be exploited to deface your website or even display fake log-in forms in an attempt to steal user credentials. The possibilities are almost endless if an attacker is able to inject code into your site.
Rails includes protection from cross-site scripting by default. Your application is safe from XSS attacks unless you explicitly bypass this protection. As a quick check, try entering the following JavaScript code in the body of a new text post:
<script>alert('XSS'),</script>After saving this post, you should see that before displaying text on the page, as shown in Figure 11-1, Rails first escapes all HTML tags by replacing special characters with their corresponding character entities.
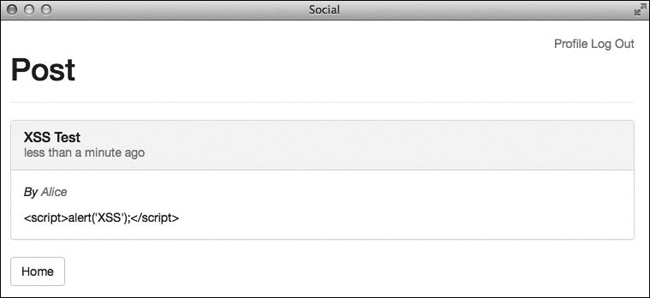
For example, less-than signs are replaced with < and
greater-than signs with >. Instead of being executed, the
code is displayed on the page like any other text. So if you never plan to allow users
to enter HTML into your site, your application is safe from cross-site
scripting.
Unfortunately, users might like to enter HTML tags to format their posts in your
application. In this case, your site will need to accept at least a few HTML tags. You
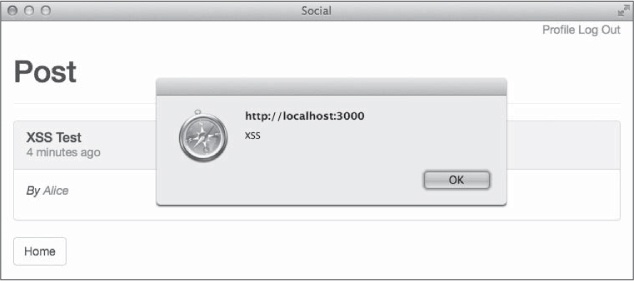
can turn off the automatic escaping of HTML tags by using the raw
helper method in your view. Open
app/views/text_posts/_text_post.html.erb and add
raw before text_post.body:
--snip--
  <%= raw text_post.body %>
--snip--
Now when you refresh the page in your browser, the script tag will not be escaped, and you should see a pop-up window with the text “XSS,” as shown in Figure 11-2.
The trick is to let your application only accept safe tags, such as
<strong> for bold, <em> for
italics, and <p> for marking paragraphs, while rejecting
dangerous tags such as <script>. You might be tempted to
write your own helper method to deal with these dangerous tags, but thankfully, Rails
provides the sanitize helper method to take care of this for
you.
The sanitize helper method removes all HTML tags that are not
explicitly allowed by its whitelist. You can see the list of allowed tags by entering
ActionView::Base.sanitized_allowed_tags in a Rails
console.
Try a few examples of the sanitize method in the Rails console
to familiarize yourself with how it works:
irb(main):001:0> helper.sanitize("<p>Hello</p>")
 => "<p>Hello</p>"
irb(main):002:0> helper.sanitize("<script>alert('XSS')</script>")
 => ""
You can specify your own array of allowed tags by including a value for the
tags key in the options hash:
irb(main):003:0> helper.sanitize("<p>Hello</p>", tags: ["em", "strong"])
 => "Hello"
Now that you’ve seen the sanitize method in action,
replace the raw method call with sanitize in the
TextPost partial you edited earlier.
--snip--
  <%= sanitize text_post.body %>
--snip--
Refresh the page again and you should no longer see the alert.
A cross-site request forgery (CSRF) attack occurs when one of your application’s users visits another site that has been modified by an attacker to target your site specifically. The malicious site attempts to use your application’s trust in this user to submit requests to your application.
To exploit a CSRF vulnerability, the attacker must first find the vulnerability in your application. Next, he or she must create a page with a link to the vulnerability. Finally, the attacker must trick your application’s users into visiting the malicious page and activating the link.
Imagine you are building an online payment application. Your application includes a
transfer action that accepts amount and
to parameters that specify how much money to transfer to another
user.
An attacker could study the requests generated by your site and attempt to replicate those requests on his or her own site using something as simple as an HTML image tag:
<img src="http://yoursite.com/transfer?amount=100&to=attacker">Every time someone visits this page, the user’s browser issues a GET request to your site when it tries to load this image. If the visitor is logged in to your site and your site is vulnerable to CSRF attacks, $100 is transferred from the visitor’s account to the attacker’s account.
You aren’t building a payment site, but your site is vulnerable to a CSRF attack. In Chapter 10, you added a method for one user to follow another user on the site. In doing that, you added the following line to config/routes.rb:
get 'follow/:id', to: 'users#follow', as: 'follow_user'
By looking at the request created when I click the Follow button, I can create a
malicious link to exploit this vulnerability. Assuming my account’s
id is 10, the link would look like this:
<img src="http://yoursite.com/follow/10">Now all I need to do is convince other users to visit a page containing this image tag and they will follow me automatically.
You can prevent CSRF attacks in two steps. First, include a user-specific token with all requests that change state in your application, and ignore any request that does not include this token. Second, never use a GET request to change state. If a request could create or change data in the database or the session, it should use POST.
Rails takes care of including a secret token and denying requests by default. Open the application layout at app/views/layouts/application.html.erb to see the code for including the token:
<%= csrf_meta_tags %>
Load your site in a web browser and then view source to see the
meta tags generated by this method in the page’s
head.
<meta content="authenticity_token" name="csrf-param" />
<meta content="KA1Q/JoVfI+aV6/L4..." name="csrf-token" />
You can also see the authenticity_token in a hidden field
included with every form in your application. Every time you submit a form, the value
from this hidden field is included with the other parameters. The
authenticity_token is also automatically included with all POST
requests.
Now open app/controllers/application_controller.rb to see the code that actually denies invalid requests:
protect_from_forgery with: :exception
Here, Rails goes one step further and raises an exception for requests that don’t include the CSRF token. This exception is logged and can be used to track down attackers.
You must handle the second step yourself. Any time you add a controller action, make
sure you do not use a GET request if the action could change data. The
follow action added in Chapter 10 creates a record
in the database, so it should be a POST request. The POST request automatically includes
the authenticity_token, and Rails verifies the token thanks to the
protect_from_forgery method in
ApplicationController.
To correct this vulnerability in your application, open
config/routes.rb and change the follow action
to use POST instead of GET:
--snip--
post 'follow/:id', to: 'users#follow', as: 'follow_user'
--snip--
Now update the link in app/views/users/show.html.erb to use the POST method instead of the default GET:
<%= link_to "Follow", follow_user_path(@user),
      method: :post, class: "btn btn-default" %>
With these two changes, the follow action should now be safe from
CSRF attacks.
Malicious users and sites are unavoidable on the Web today. As your application gains popularity, the risk of attack rises. Thankfully, Rails provides the tools you need to protect your application and your users from attacks.
The security vulnerabilities covered in this chapter were taken from the Top 10 list published by The Open Web Application Security Project (OWASP). Visit http://www.owasp.org/ to find your local OWASP chapter and discuss application security at free meetings in your area.
Now that your application is functional and secure, we’ll look at performance in the next chapter. No one likes a slow web application! Here again, Rails provides several tools for improving your application’s performance, but you have to put them to use.