In the last chapter, we learned how to overclock various models of Raspberry Pi to increase their computational power. In this chapter, we will learn how to write parallel programs with Python and MPI4PY. I prefer Python due to its simplicity, and the code in Python is less scary. We will explore MPI concepts and implement those in Python with MPI4PY.
The MPI concepts we will study and implement are as follows:
MPI rank and processes
Sending and receiving data
Data tagging
Broadcasting data
Scattering and gathering data
Basics of MPI4PY
In the earlier part of this book, we studied a few MPI concepts. Let’s study a few more in this chapter.
MPI uses the concept of Single-Program Multiple-Data ( SPMD ). The following are the key points in SPMD architecture :
All processes (known as ranks) run the same code and each process accesses a different portion of data.
All processes are launched simultaneously.
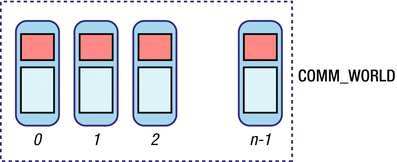
A parallel program is decomposed into separate processes, known as ranks. Each rank has its own address space, which requires partitioning data across ranks. Each rank holds a portion of the program’s data in its own private memory. Ranks are numbered sequentially from 0 to n-1. The following diagram (Figure 8-1) depicts the multiple ranks running simultaneously.

Figure 8-1. Multiple ranks running simeltaneously
In the next section, we will see a basic program with ranks.
Getting Started with MPI4PY
Let’s get started with the simple Hello World! program in Python with MPI4PY.
Listing 8-1. prog01.py
from mpi4py import MPIimport syscomm = MPI.COMM_WORLDname = MPI.Get_processor_name()sys.stdout.write("Hello World!")sys.stdout.write(" Name: %s, My rank is %d " % (name, comm.rank))
In the code above (Listing 8-1), the statement from mpi4py import MPI imports the needed MPI4PY libraries. In Chapter 6 we studied the concept of communicators in MPI. MPI.COMM_WORLD is the communicator. It is used for all MPI communication between the processes running on the processes of the cluster. Get_processor_name() returns the hostname on which the current process is running. comm.rank is the rank of the current process. The following diagram (Figure 8-2) depicts COMM_WORLD.

Figure 8-2. COMM_WORLD
You might have noticed that we are using sys.stdout.write() for printing on the console. This is because I want the code to be compatible for both interpreters of the Python programming language, python (the interpreter for Python 2) and python3. In this book, we won’t be using any feature or programming construct specific to either interpreter. Thus, the code can be run using both interpreters.
We have started coding in this chapter, and the next chapters have a lot of code samples and exercises. It is a good idea to organize the code and the data in separate directories. Run the following commands in lxterminal one by one:
mpirun -hostfile myhostfile -np 4 mkdir /home/pi/bookmpirun -hostfile myhostfile -np 4 mkdir /home/pi/book/codempirun -hostfile myhostfile -np 4 mkdir /home/pi/book/code/chapter08
This will create the same directory structure on the all nodes of the mini-supercomputer. Now save the above code in a file called prog01.py in the ∼/book/code/chapter08 directory. Copy the code file to that directory on all the nodes using scp as follows:
scp book/code/chapter08/prog01.py 192.168.0.2:/home/pi/book/code/chapter08/scp book/code/chapter08/prog01.py 192.168.0.3:/home/pi/book/code/chapter08/scp book/code/chapter08/prog01.py 192.168.0.4:/home/pi/book/code/chapter08/
Finally, run it with mpirun on pi001 as follows:
mpirun -hostfile myhostfile -np 4 python3 ∼/book/code/chapter08/prog01.pyThe following is the output:
Hello World! Name: pi001, My rank is 0Hello World! Name: pi002, My rank is 1Hello World! Name: pi004, My rank is 3Hello World! Name: pi003, My rank is 2
We have to follow the same steps for all the other code examples we will discuss in the rest of the chapter. Let me repeat them again in brief: create a Python code file in the chapter08 directory, copy that file to the chapter08 directory of all the nodes of the cluster, and finally use mpirun with the Python interpreter to execute the code.
Conditional Statements
We can use conditional statements in the MPI4PY code as follows (Listing 8-2):
Listing 8-2. prog02.py
from mpi4py import MPIimport syscomm = MPI.COMM_WORLDsys.stdout.write("My rank is: %d " % (comm.rank))if comm.rank == 0:sys.stdout.write("Doing the task of Rank 0 ")if comm.rank == 1:sys.stdout.write("Doing the task of Rank 1 ")
In this code, we’re checking if the process rank is 0 or 1 and then printing more messages to the console. Run the program with mpiexec as follows:
mpirun -hostfile myhostfile -np 4 python3 ∼/book/code/chapter08/prog02.pyThe output of the program above (Listing 8-2) is as follows:
My rank is: 0Doing the task of Rank 0My rank is: 1Doing the task of Rank 1My rank is: 3My rank is: 2
Checking the Number of Processes
Let’s write the code (Listing 8-3) to display the rank and the number of MPI processes .
Listing 8-3. prog03.py
from mpi4py import MPIimport syscomm = MPI.COMM_WORLDrank = comm.ranksize = comm.sizesys.stdout.write("Rank: %d," % rank)sys.stdout.write(" Process Count: %d " % size)
In the code above, comm.size gives the number of MPI processes running across the cluster. Run the code above with mpiexec as follows:
mpirun -hostfile myhostfile -np 4 python3 ∼/book/code/chapter08/prog03.pyThe output is as follows:
Rank: 0, Process Count: 4Rank: 1, Process Count: 4Rank: 2, Process Count: 4Rank: 3, Process Count: 4
Sending and Receiving Data
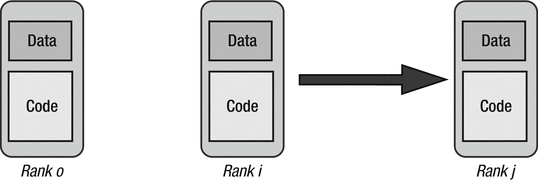
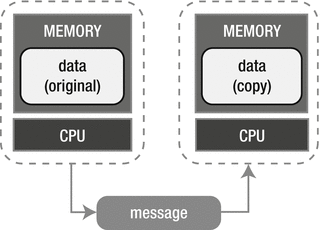
Using send() and receive() for data transfer between processes is the simplest form of communication between processes. We can achieve one-to-one communication with this. The following diagram (Figure 8-3) explains this clearly.

Figure 8-3. One-to-one communication
Let’s see the code example (Listing 8-4) for the same.
Listing 8-4. prog04.py
from mpi4py import MPIimport timeimport syscomm = MPI.COMM_WORLDrank = comm.ranksize = comm.sizename = MPI.Get_processor_name()shared = 3.14if rank == 0:data = sharedcomm.send(data, dest=1)comm.send(data, dest=2)sys.stdout.write("From rank %s, we sent %f " % (name, data))time.sleep(5)elif rank == 1:data = comm.recv(source=0)sys.stdout.write("On rank %s, we received %f " % (name, data))elif rank == 2:data = comm.recv(source=0)sys.stdout.write("On rank %s, we received %f " % (name, data))
In the code example above, we are sending data from the process with rank 0. The processes with rank 1 and 2 are receiving the data.
Let’s run the program.
mpirun -hostfile myhostfile -np 4 python3 ∼/book/code/chapter08/prog04.pyThe output of the program above (Listing 8-4) is as follows:
On rank pi002, we received 3.140000On rank pi003, we received 3.140000From rank pi001, we sent 3.140000
Dynamically Sending and Receiving Data
Until now, we have written conditional statements for the processes to send and receive data. However, in large and distributed networks this type of data transfer is not always possible due to constant changes in the process count. Also, users might not want to hand-code the conditional statements.
The example below (Listing 8-5) demonstrates the concept of dynamic data transfer .
Listing 8-5. prog05.py
from mpi4py import MPIimport syscomm = MPI.COMM_WORLDrank = comm.ranksize = comm.sizename = MPI.Get_processor_name()shared = (rank+1)*(rank+1)comm.send(shared, dest=(rank+1) % size)data = comm.recv(source=(rank-1) % size)sys.stdout.write("Name: %s " % name)sys.stdout.write("Rank: %d " % rank)sys.stdout.write("Data %d came from rank: %d " % (data, (rank-1) % size))
In the code above (Listing 8-5), every process receives the data from the earlier process. This goes on till the end and wraps around so that the first process receives the data from the last process.
Let’s run the code.
mpirun -hostfile myhostfile -np 4 python3 ∼/book/code/chapter08/prog05.pyThe output of the code is as follows:
Name: pi001Rank: 0Data 16 came from rank: 3Name: pi002Rank: 1Data 1 came from rank: 0Name: pi003Rank: 2Data 4 came from rank: 1Name: pi004Rank: 3Data 9 came from rank: 2
As discussed earlier, the process with rank 0 (the first process) receives the data from the process with rank 3 (the last process).
Data Tagging
In the earlier example (Listing 8-5), we studied how to send and receive data with MPI. This raises a basic question for curious programmers: how do we exchange multiple data items between processes? We can send multiple data items from one process to another. However, at the receiving end, we will encounter problems in distinguishing one data item from another. The solution for this is tagging. Have a look at the code example (Listing 8-6) below.
Listing 8-6. prog06.py
from mpi4py import MPIimport syscomm = MPI.COMM_WORLDrank = comm.ranksize = comm.sizename = MPI.Get_processor_name()if rank == 0:shared1 = {'d1': 55, 'd2': 42}comm.send(shared1, dest=1, tag=1)shared2 = {'d3': 25, 'd4': 22}comm.send(shared2, dest=1, tag=2)if rank == 1:receive1 = comm.recv(source=0, tag=1)sys.stdout.write("d1: %d, d2: %d " % (receive1['d1'], receive1['d2']))receive2 = comm.recv(source=0, tag=2)sys.stdout.write("d3: %d, d4: %d " % (receive2['d3'], receive2['d4']))
In the example above, we are sending two different dictionaries shared1 and shared2 from the process with rank 0 to the process with rank 1. At the source, shared1 is tagged with 1 and shared2 is tagged with 2. At the destination, we can distinguish the different data items from the tags associated with them.
Run the code above (Listing 8-6) with the following command:
mpirun -hostfile myhostfile -np 4 python3 ∼/book/code/chapter08/prog06.pyThe output is as follows:
d1: 55, d2: 42d3: 25, d4: 22
Data tagging gives programmers more control over the flow of data. When multiple data are exchanged between processes, data tagging is a must.
Data Broadcasting
When data is sent from a single process to all the other processes then it is known as broadcasting . Consider the following code (Listing 8-7):
Listing 8-7. prog07.py
from mpi4py import MPIimport syscomm = MPI.COMM_WORLDrank = comm.rankif rank == 0:data = {'a': 1, 'b': 2, 'c': 3}else:data = Nonedata = comm.bcast(data, root=0)sys.stdout.write("Rank: %d, Data: %d, %d, %d "% (rank, data['a'], data['b'], data['c']))
In the code above (Listing 8-7), in the if statement we are assigning a dictionary to data only if the rank of process is 0. bcast() broadcasts the data to all the processes.
Run the program.
mpirun -hostfile myhostfile -np 4 python3 ∼/book/code/chapter08/prog07.pyThe output is as follows:
Rank: 0, Data: 1, 2, 3Rank: 1, Data: 1, 2, 3Rank: 2, Data: 1, 2, 3Rank: 3, Data: 1, 2, 3
Data Scattering
In broadcasting, we send the same data to all the processes. In scattering, we send the different chunks of the data to all the processes. For example, we have a list with four items. In broadcasting, we send all these four items to all the processes, whereas in scattering, we send the items of the list to the processes, such that every process receives an item from the list. The following program (Listing 8-8) demonstrates this.
Listing 8-8. prog08.py
from mpi4py import MPIimport syscomm = MPI.COMM_WORLDsize = comm.Get_size()rank = comm.Get_rank()if rank == 0:data = [x for x in range(0,size)]sys.stdout.write("We will be scattering: ")sys.stdout.write(" ".join(str(x) for x in data))sys.stdout.write(" ")else:data = Nonedata = comm.scatter(data, root=0)sys.stdout.write("Rank: %d has data: %d " % (rank, data))
In the code above (Listing 8-8), we are creating a list with the name data which has a number of elements equal to the process count in the cluster. scatter() is used to scatter the data to all the processes.
Run the code.
mpirun -hostfile myhostfile -np 4 python3 ∼/book/code/chapter08/prog08.pyThe following is the output:
Rank: 1 has data: 1We will be scattering: 0 1 2 3Rank: 0 has data: 0Rank: 2 has data: 2Rank: 3 has data: 3
As we can see, each process receives an item from the list. The limitation of scatter() is that the size of the data list we are scattering must not exceed the number of processes.
Data Gathering
The idea of gathering the data is opposite of scattering. The master process gathers all the data processed by the other processes.
The program below (Listing 8-9) demonstrates the gather() method.
Listing 8-9. prog09.py
from mpi4py import MPIimport syscomm = MPI.COMM_WORLDsize = comm.Get_size()rank = comm.Get_rank()if rank == 0:data = [x for x in range(0,size)]sys.stdout.write("We will be scattering: ")sys.stdout.write(" ".join(str(x) for x in data))sys.stdout.write(" ")else:data = Nonedata = comm.scatter(data, root=0)sys.stdout.write("Rank: %d has data: %d " % (rank, data))data *= datanewData = comm.gather(data, root=0)if rank == 0:sys.stdout.write("We have gathered: ")sys.stdout.write(" ".join(str(x) for x in newData))sys.stdout.write(" ")
In the program above (Listing 8-9), the master process scatters the list of numbers. All the MPI processes receive an element from the list (the size of the list equals the number of MPI processes). Each process performs an operation of the element it receives. In our case, it is the calculation of the square of the number. However, in real-world supercomputing, the operation could be quite complex.
Once the operation completes, the master process gathers all the processed elements in a new list.
Run the code.
mpirun -hostfile myhostfile -np 4 python3 ∼/book/code/chapter08/prog09.pyThe output is as follows:
Rank: 1 has data: 1Rank: 3 has data: 3We will be scattering: 0 1 2 3Rank: 0 has data: 0We have gathered: 0 1 4 9Rank: 2 has data: 2
Conclusion
In this chapter, we were introduced to the MPI4PY library for Python. We learned and experimented with various interesting concepts in parallel programming with MPI4PY. In the next chapter, we will get started with the SciPy stack in Python 3 with Raspberry Pi.
