In this chapter, you will learn how to define Chart of Accounts, Create General ledgers, and assign chart of accounts to company codes.
Define Chart of Accounts.
Create General Ledgers.
Define the Chart of Accounts (using four characters ID).
Define the properties of the Chart of Accounts.
Assign Chart of Accounts to Company Code.
Master Data
Master Record contains vital data or information held in a business system database that remains relatively unchanged over a long period of time. This is the case in an environment where sets of data are commonly accessed, used, and shared by different individuals for different purposes across an organization in order to fulfill business processes in real time.
Information that aids efficient business processes, which tends not to change frequently relating to an object, are held in the system database. The idea behind this process is to avoid having to re-enter the same information twice by users, thereby saving input time, and avoiding unnecessary waste of system resources and redundancies by having to enter information in the system more than once.
Typical Examples of Master Data in a database in SAP S4 HANA are Customer Data, Vendor Data, Bank Data, GL Account, Material, etc.
Transaction Data: These are information triggered as a result of events arising from day to day business transactions. A typical transaction data is time driven with numerical value and often refers to one or more objects in the system.
Examples of transaction data in SAP S4 HANA are Invoice, Payment, Credit memo, Goods Receipt.
Table data: Contains information about objects, like Payment Terms, Tolerances, and Pricing Conditions.
Defining Chart of Accounts
Determine the accounts classification.
End users’ requirements to ascertain which G/L accounts are needed.
Identify the accounts which are no longer required.
The G/L accounts that are used for automatic postings.
The G/L accounts which are non-operating accounts under P&L group.
The legal framework to define financial statement version.
The fort of report.
B/S and P&L formats.
Internal reporting requirements.
In SAP S4 HANA, a chart of accounts is a fundamental tool that contains a listing of accounts in the general ledger used by a company or several company codes for posting transactions. Transactions are categorized by transaction type in the chart of accounts.
The Chart of Accounts contains basic information about the structure of general ledger accounts in SAP S4 HANA, such as account number, account name, and other control information relating to how the GL account is created and functions within SAP S4 HANA.
Define the basic structure for creating general ledger accounts.
Gives one or more company codes the option to use the same chart of accounts.
In addition to the minimum operational chart of accounts, you can assign two more charts (country specific and/or group) to your operational chart of accounts. Country specific chart of accounts will allow you to generate reports to meet country specific reporting requirements, while group chart of accounts helps with consolidation reporting.

Steps involved in Chart of Accounts customization
It is mandatory that each company code in SAP S4 HANA be assigned an operational chart of accounts. One operational chart of accounts can be assigned to several company codes with the same general ledger structure.
Operational Chart of Accounts.
Group Chart of Accounts.
Country Specific Chart of Accounts.
The functions of each of the chart of accounts are explained below:
Operational Chart of Accounts: this is often referred to as common chart of accounts. It is used to post, record, and report financial accounting and cost transactions on a daily basis. Each company code in SAP S4 HANA must be assigned an operational chart of accounts.
Group Chart of Accounts: this is applicable in an environment where each company code in the same company generates its own financial reports, and the company also prepares its own consolidated financial reports by bringing together the financial reporting of each company code in a single financial report. Consolidation financial reporting is possible in SAP S4 HANA via group chart of accounts.
Let’s look at how to define chart of accounts in SAP S4 HANA.
Creating Chart of Accounts
Case study: Your task as SAP FI consultant is to create the Chart of Accounts and assign the chart of accounts you have created to your company code.
You have a choice to either create your own chart of accounts or our use the standard chart of accounts provided by SAP in the system.
We advise that you use the standard chart of accounts INT supplied by SAP in the system as this will meet your requirements. When you use a standard chart of accounts, you are also using the associated properties with it.
The chart of accounts you create will contain a list of General Ledgers (G/L) that will be used by your company code for posting transactions and financial reporting. Chart of Accounts is created at the global level. This means that the chart of accounts you created will be available to all company codes in the client. The following menu path will take you to the screen where you can customize your chart of accounts: IMG: Financial Accounting ➤ General Ledger Accounting ➤ Master Data ➤ G/L Accounts ➤ Preparations ➤ Edit Chart of Accounts List.

The initial screen where you start creating chart of accounts.
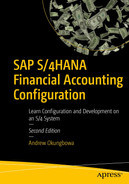
The screen you define your chart of accounts
Update the following fields:
Chart of Accts: Enter a four digit-character ID as your chart of accounts key. This key will allow you to identify your chart of accounts from the list of charts of accounts in the system. The four digit-character you use is unique to your chart of accounts. It cannot be used for other chart of accounts in the system.
Description: Enter short text description for your chart of accounts in this field. In this activity we used – Chart of Accounts – C100 as our description.
General specifications: In SAP S4 HANA, chart of accounts are maintained in the language that you specify here. In this field, you choose the language that you want to use to maintain your chart of accounts from the language list in Maint. Language field. Master data can only be displayed and maintained in the language you specified in this field. Secondly, enter the length of your G/L account number in the Length of G/L account number field below. The GL account number length is from 1-10 digits.
Consolidation: Enter the group chart of accounts used by your corporate group in this field. The chart of accounts you enter here will be required when creating corporate General Ledger accounts that are used for consolidation financial statements for corporate groups.
Status: This field allows you to activate the block checkbox. This function will allow the system to block posting to the general ledger, unless deactivated. For example, you can activate block status during customizing until you have completed you configuration. We recommend that you do not activate this function unless you client requested it.
After updating the New Entries: Details of Added Entries (Figure 2-3), hit enter on your keyboard and save your work.
The next step is to assign company code to the chart of accounts you have created.
Assign Company Code to Chart of Accounts
One chart of accounts can be assigned to one or more company codes, but only one chart of accounts is assigned to a company code. Just like the basic chart of accounts, only one country specific chart of accounts is assigned to a company code. The basic chart of accounts and country specific charts of accounts can be assigned to a company code simultaneously.
Country Specific Chart of Accounts: This is optional. However, it may be mandatory in a situation where a company code in a corporate group is required to produce a financial report to meeting a country’s reporting requirements.
To assign your chart of accounts to your company code follow this menu path: IMG: Financial Accounting ➤ General Ledger Accounting ➤ Master Data ➤ G/L Accounts ➤ Preparations ➤ Assign Company Code to Chart of Accounts.
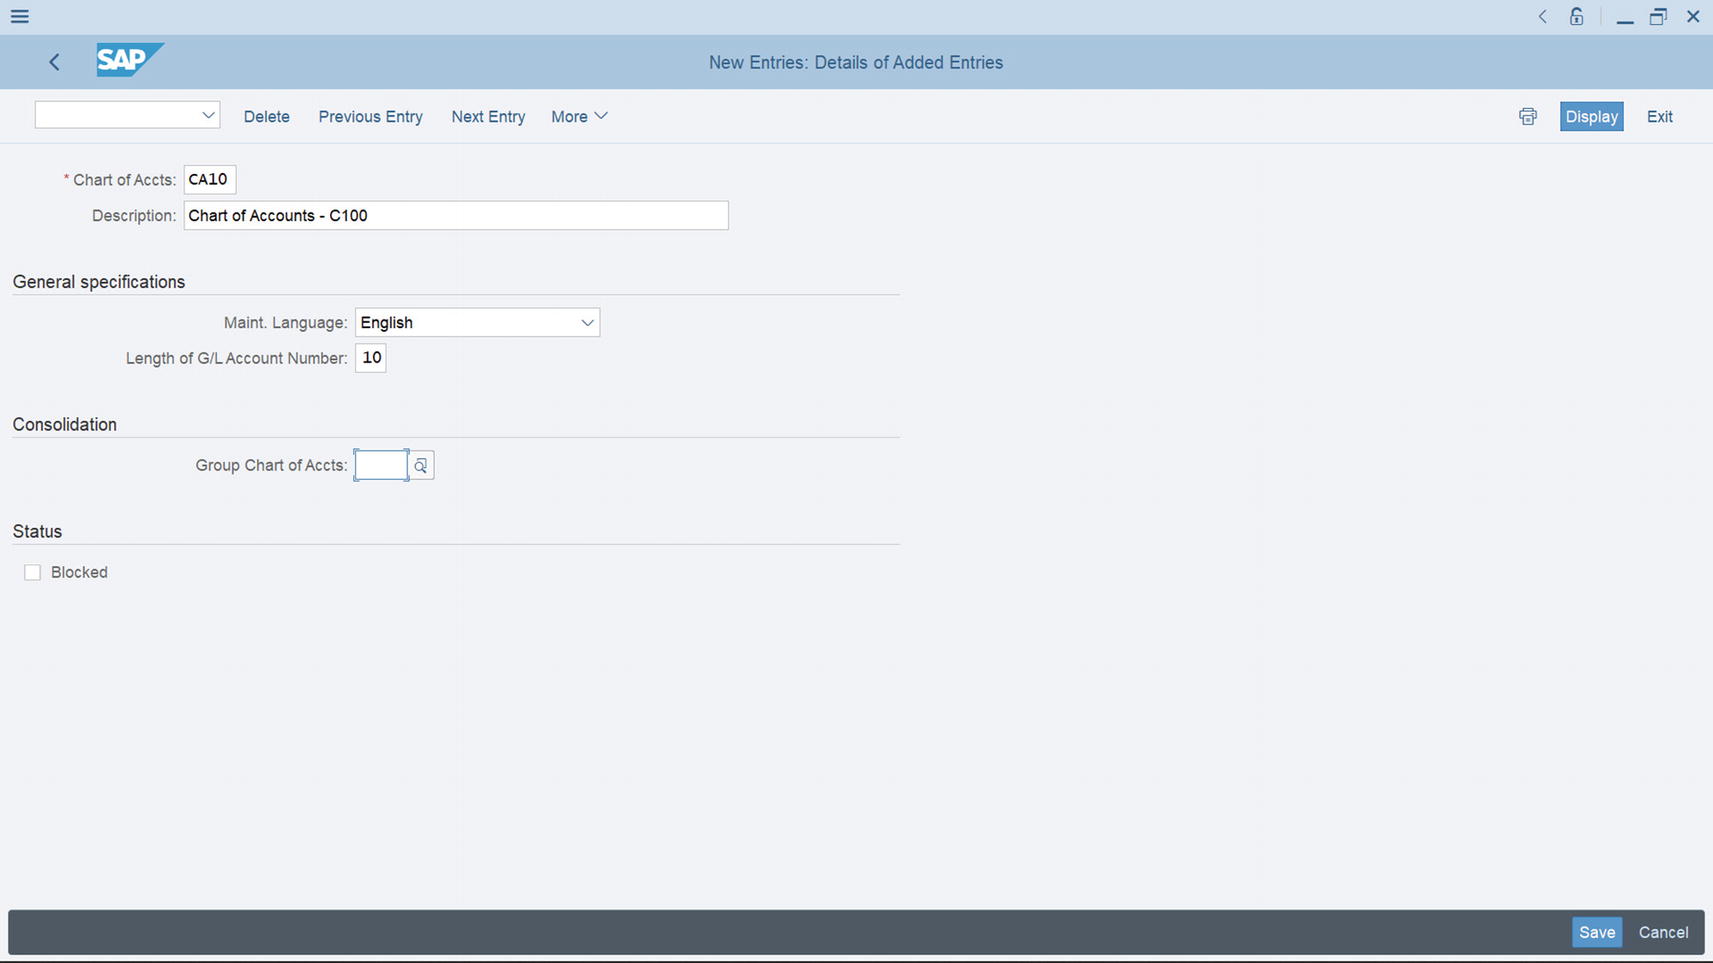
The screen where chart of accounts are assigned to company codes
Using the Match code search for your chart of accounts and enter your chart of accounts in the Chrt/Accts field. If your client is required to complete country specific financial reporting, then update the Cty ch/act field with your country specific chart of accounts.
After assigning your chart of accounts to your company code, press enter on your keyboard and save your work.
Define Account Group
The next step in our customizing is to define account groups. A chart of Accounts holds a large number of account types and they determine how G/L Accounts are created in SAP S4 HANA. For proper accounting management, account types are systematically classified into appropriate account groups by grouping similar accounts together within the same General Ledger. For example, all G/L accounts relating to revenue are grouped together and assigned to the same number range interval. GL Accounts belonging to the following account groups such as Liabilities Expenditure, Assets, etc., are grouped together in the appropriate group and number range.
It determines the number range interval assigned to account when creating G/L account.
It determines the screen layout for creating G/L accounts in company code area.
It is possible for you to create your own Account Groups or copy some of the standard Account Groups supplied by SAP in the system.
In this activity, instead of creating your own account groups from scratch, you will copy the predefined universal account groups: AS (Fixed assets accounts), CASH (Liquid funds accounts), GL (General ledger accounts), MAT (Materials management accounts), PL (P&L statement accounts), RECN (Recon. Accts Ready for input), and SECC (Secondary costs/revenues) from Chart of Accounts – INT, supplied by SAP in the system and modify them to meet your requirements. Chart of accounts are not company specific; they can be used across company codes.
You can create your own account groups using up to 10 digits. However, we advise you to copy the predefined account groups supplied by SAP in the system and modify to meet your requirements.
Case study: You are required to define Account Groups for your company code by copying INT account groups supplied by SAP in the system and modifying them to meet your requirements.
It is a lot easier to copy predefined chart of accounts supplied by SAP in the system and modify them to meet your requirements instead of creating fresh charts of accounts from scratch.
Whether you are copying or creating your own account groups follow this menu path: IMG – Financial Accounting ➤ General Ledger Accounting ➤ Master Data ➤ G/L Accounts ➤ Preparations ➤ Define Account Group

Another entry dialog box
A List of Values You Can Use for Your Account Groups
Chrt/Accts | Acct Group | Name | From Acct | To Acct |
|---|---|---|---|---|
INT | AS | Fixed assets accounts | 999999999 | |
INT | CASH | Liquid funds accounts | 999999999 | |
INT | GL | General ledger G/L accounts | 999999999 | |
INT | MAT | Material management accounts | 999999999 | |
INT | PL | P&L accounts | 999999999 | |
INT | RECN | Recon. Account ready for input | 999999999 | |
INT | SECC | Secondary Costs/Revenues | ZZZZZZZZZZ |
There is no restriction to the chart of accounts you can use. We have decided to use the charts of accounts above, because we believe that these charts of accounts are sufficient for this purpose.

List of Chart of Accounts
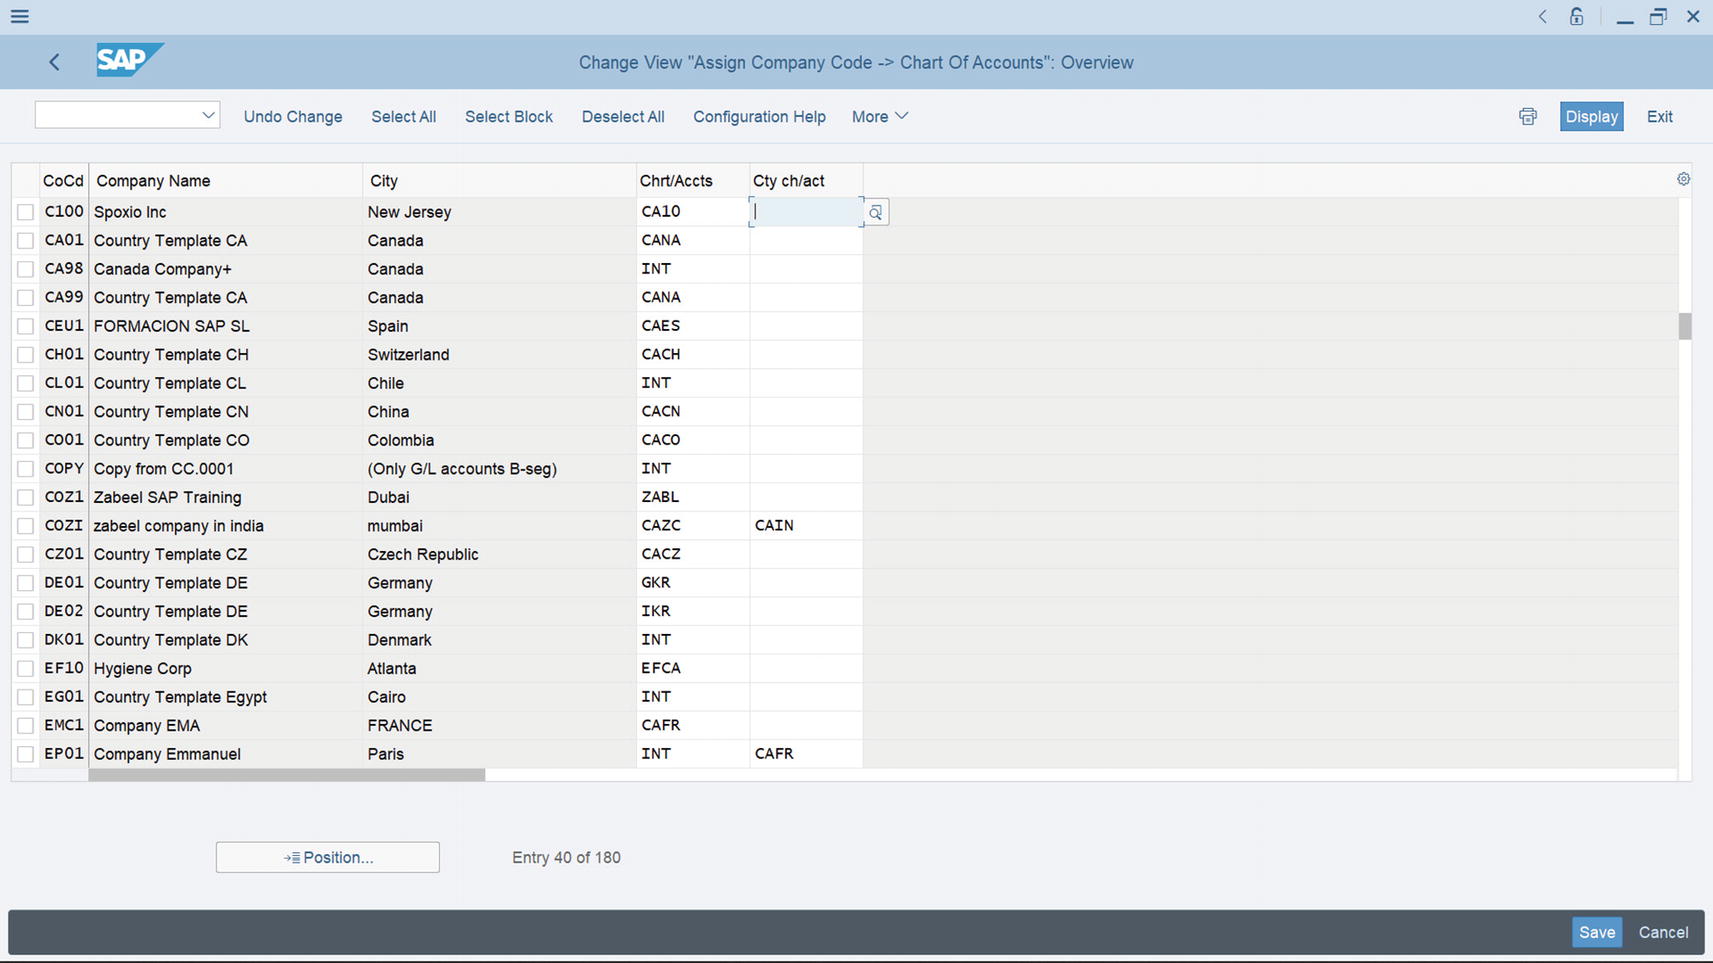
Updated chart of accounts list
The system will ask you to Specify target entries on the status bar at the bottom left of the screen. Change the Chart of Accounts INT to your chart of accounts (CA10) and Click the Copy button at the bottom right of the screen. The system will notify on the Status bar at the bottom of the screen that the Number of copied entries (including transactions):7. Save your account groups.
The final step in this activity is to define the Retained earnings account. This account will allow the system to transfer the net profit or loss in the P&L account to the balance sheet at the end of the year. Although P&L account Group is defined in the chart of accounts, it is also important to define retained earnings account separately as this will allow the system to carry forward profit and loss in the P&L account at the end of the year to the balance sheet as retained earnings.
Define Retained Earnings Account
In accounting, a portion of the profit made at the end of a fiscal year is held back as Retained Earnings (Net Profit) after distributing dividends to the shareholders in proportion to their investment in a corporation. Normally, the Net Profit or net loss figure at the end of a fiscal year is carried forward to Retained Earnings in the Balance Sheet.

Illustration of Retained Earnings in Income statement and balance sheet
The amount carried forward is either added to the shareholders’ equity if profit is realized or deducted from the shareholders’ equity if loss is incurred. This indicates the profit position of a corporation.
In customizing, retained earnings are assigned to Profit and Loss (P&L) Statement account type defined in the Chart of Accounts area of the P&L account. What happens is that at the end of the year, the system will automatically carry forward the balance of the P&L account to the Retained Earnings account.
To go to the screen where you will define Retained Earnings follow this menu path: IMG: Financial Accounting ➤ General Ledger Accounting ➤ Master Data ➤ G/L Accounts ➤ Preparations ➤ Define Retained Earnings Account. The Enter Chart of Accounts dialog box pops up. This dialog box will allow you to assign your chart of accounts to the retained earnings you defined.

Assigning your chart of accounts to retained earnings
Enter your chart of accounts in the chart of accounts field (CA10) and click Continue at the bottom of right of the dialog box (Figure 2-9).
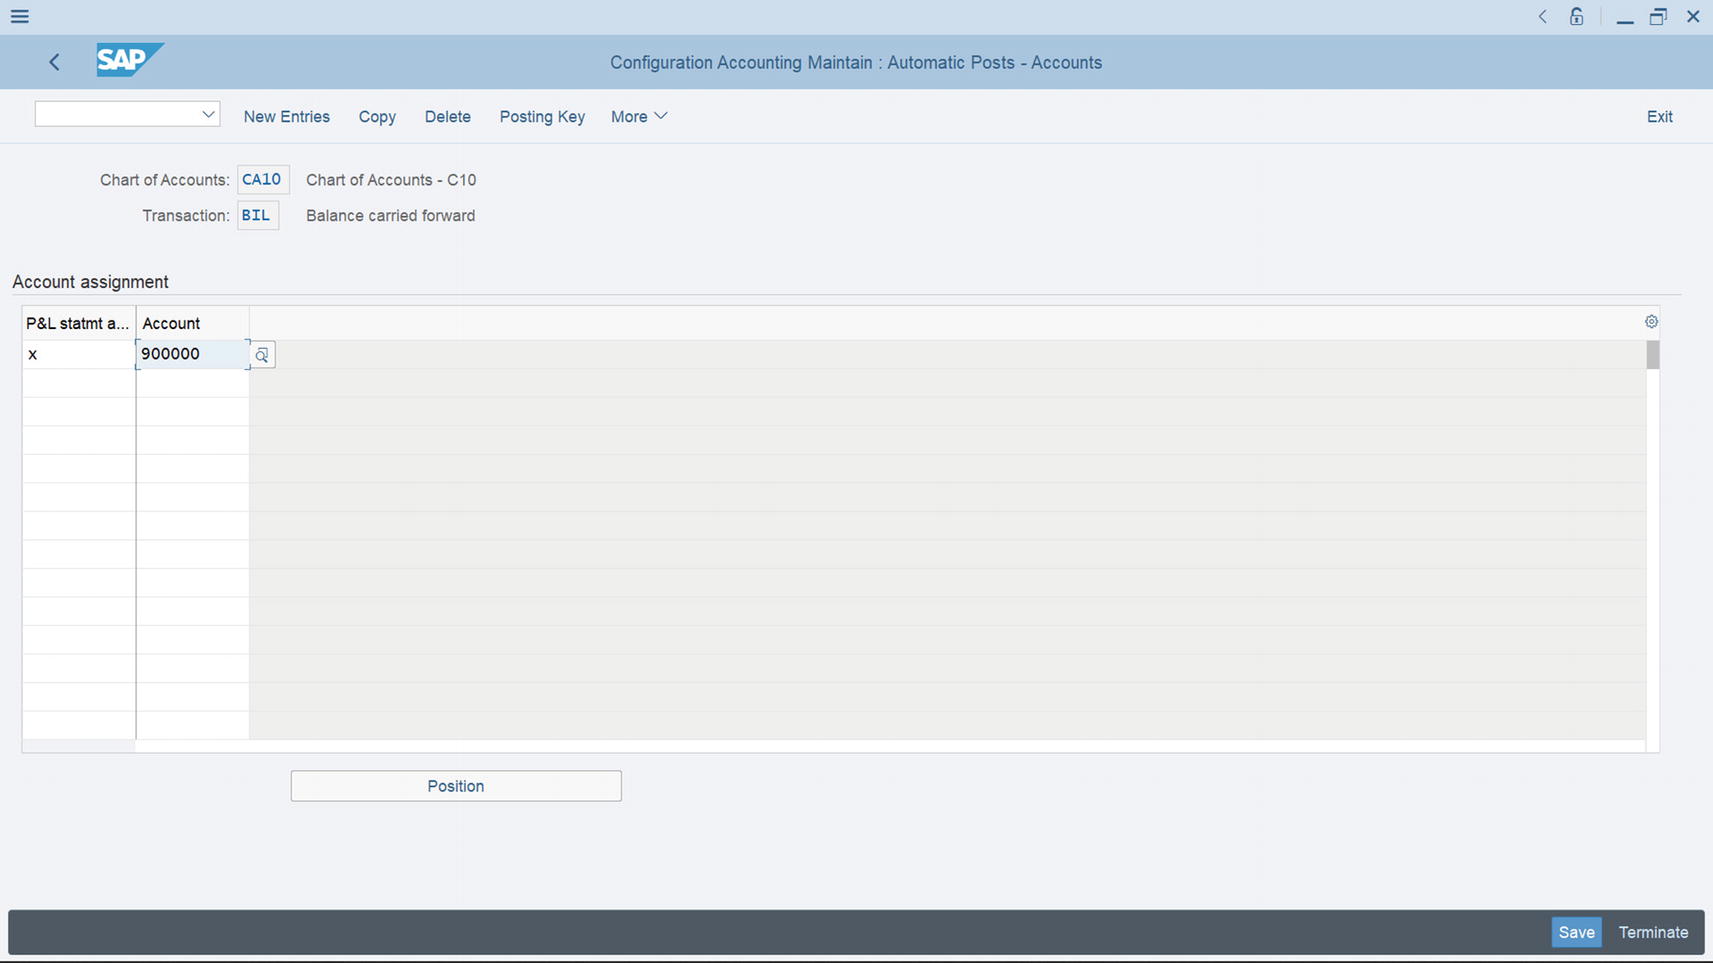
The screen where you define your retained earnings account.
Enter X as your account type in the P&L ststmt (Statement) column and your G/L account in the Account column. In this activity, we used X as our account type and 900000 as our G/L account. Click save at the bottom right of the screen. Since you have not created a G/L account for retained earnings, the system will issue a warning message on the message status bar at the bottom of the screen that Account 900000 was not created in the charts of accounts XXXX (CA10). Later in Chapter 5 you will learn how to create G/L accounts. Hit the enter button on your keyboard twice and the system will automatically save the retained earning you have defined. The system will notify you that your Changes have been made in the status bar at the bottom of the screen.
X is the symbol used in SAP to represent an account type for retained earnings in the P&L statement. If you have more than one retained earnings, you will not be able to use account type X again since it has been used. You have to assign account type Y and the next one Z to another account types, respectively.
Summary
In this chapter, we looked at what a chart of accounts is and how to define chart of accounts. You learned how to create a chart of accounts, which will serve as the structure for G/L accounts that you will be creating in Chapter 5. You also learned how to assign the chart of accounts you created to a company code. In order to complete this activity, you copied account groups from INT (international chart of accounts), which you modified to meet your requirements. Finally, you learned how to define retained earnings account and an account type which you assigned to your P&L account. This enables the system to automatically transfer the net profit or loss to the balance sheet.
The next chapter looks at the importance of document control in SAP S4 HANA and explains how it affects the documents posted in the system.