In this chapter, we will be looking at how to create G/L Accounts, use Line items, and open item management in G/L Account.
Explain what a general ledger is.
Describe what a master record is.
Create a G/L account master record.
Use a template to copy a G/L account.
General Ledger
General Ledger Accounts comprises the Chart of Accounts section and Company Code section. G/L Account is created in the chart of accounts and further configurations are carried out to meet company codes requirements.
Business transactions are sorted and stored in GL accounts that apply the double entry principle – dual control (debit and credit). Transactions posted to GL accounts are classified into assets, liabilities, income, and expenditures from which financial statement are drawn.
All transactions with business partners in SAP are posted to sub-ledgers in SAP S4 HANA. These transactions could be either debit or credit transactions. Several sub-ledgers are created to handle transactions in the system. The summary of all transactions in sub-ledgers are automatically posted to the reconciliation (general ledger) accounts by the system in real-time. For example, in Figure 1-5, the amounts of $1,500 and $2,000 were posted to Machinery and $5,000 posted to Buildings sub-ledgers. The system will automatically post the balance of both items in the sub-ledgers to a reconciliation (General ledger account) – Asset.
GL Reconciliation
Reconciliation accounts are GL accounts that hold sub-ledger balances. Reconciliation accounts could be referred to as GL accounts containing sub-ledger totals. All postings to sub-ledgers are automatically posted to GL reconciliation accounts by the system. Therefore, reconciliation accounts are GL Accounts summaries of sub-ledgers in SAP R/3.
Reconciliation accounts are assigned to business partners in the business partners’ master record. A business partner could be an organization or a subsidiary that your organization does business with.
Sub-ledgers are subsets of the general ledger used in recording individual items and transactions in accounting. Sub-ledgers include individual accounts payable, accounts receivable, assets and bank accounts information. They hold accounts payable details such as vendor’s name, number of transactions, dates, discounts, and payment terms. Transactions are posted in the system as they arise in the sub-ledger. The balance of the sub-ledger are posted to reconciliation accounts. Simply put, the balances in sub-ledger accounts are posted to reconciliation accounts. The advantage of a reconciliation account is that it gives you a snapshot of the sub-ledger.
Reconciliation accounts are G/L accounts that hold sub-ledger balances. Reconciliation accounts could be referred to as G/L accounts containing sub-ledger totals. Therefore, reconciliation accounts are G/L account summaries of sub-ledgers in SAP HANA. Reconciliation accounts are assigned to business partners in the business partners’ master records.
No postings are made to reconciliation account by users. All postings to reconciliation accounts are carried out by the system automatically in real-time.
Next, you need to know what a general ledger master record is and how it controls accounting transactions in the general ledger accounts.
What is a Master Record?
A master record contains vital information held in a business system database that remains relatively unchanged over a long period of time. This is the case when sets of data are commonly accessed, used and shared by different individuals for different purposes across an organization in order to fulfill business processes in real-time. For example, a vendor’s details held in the system may be used by various departments. The sales team needs the vendors’ details in order to send them sales offers; the marketing department needs this information to send out marketing promotions; the finance department needs the information for invoices and other accounting purposes; and so on.
Information that aids efficient business processes and tends to relatively remain unchanged (such as customer/vendor names and addresses) are held in the system’s database. The idea behind maintaining a master record is to avoid having to re-enter the same information multiple times, thereby saving input time and avoiding unnecessary waste of system resources and redundancies (to free stage space and improve system speed). It is better to not have to enter or store the same data in the system database several times.
The function of the G/L account master is that it controls accounting transactions postings in SAP S4 HANA.
Some typical examples of master data in SAP S4 HAN include customer data, vendor data, bank data, G/L accounts, material data, and so on.
Transaction Data: Data triggered as a result of events arising from day-to-day nosiness transactions. A typical transaction data is time-driven with a numerical value and often refers to one or more objects in the system. Examples of transaction data in SAP S4 HANA include invoices, payments, credit memos, and goods receipts.
Table Data: Sets of tables containing data about objects, such as payment terms, tolerances, pricing conditions. and so on.
Now that you know what a master record is, let’s look at how to create G/L account master records in SAP S4 HANA. A G/L master record contains data relating to a G/L account that remains in the system for a while. The data held in the G/L master record controls the general ledger accounts behavior. The G/L master record also governs the treatment and posting of accounting transactions to the G/L accounts in the system.
Creating G/L Account Master Records
Various options are available when creating G/L master records in SAP S4 HANA:
Creating G/L accounts with reference: This allows you to copy existing G/L accounts from another company code to yours. The company code you are copying the G/L accounts from is referred to as the “source” company code and your company code is the “target” company code. SAP comes with a standard chart of accounts and model company codes in the system, along with sets of G/L account master records. The benefits of copying existing G/L accounts master records is that your G/L account master records will inherit properties of the source G/L accounts you copied, which saves time.
Data transfer workbench: This is when you transfer G/L account master records from a legacy system. This function is ideal when you want to transfer G/L accounts from another system in SAP.
By copying: The system allows you to copy G/L account master records already in the system. This is possible only when you have an existing chart of accounts that meets your requirements. For example, a chart of accounts that has a structure that matches your G/L account master record could be copied.
By creating manually: This is when you have to physically create G/L account master records individually. The drawback to this method is that it is time consuming, especially when you have to create large numbers of G/L accounts.
Mergeing of General Ledger and Cost Element.
Secondary cost element, which is used in cost accounting, is now part of GL and can now be created in GL.
General ledger extension to incorporate all changes in SAP S4 HANA.
Removal of transaction codes such as KA01, KA02, and so on, have been removed from the GL.
New field that allows for G/L Account Type specification of how the G/L account can function in Financial Accounting (FI) and Controlling (CO).
Fiori App applicable for managing G/L Account Master Data.
GL master data account type classifications such as:
X-Balance Sheet Account (Balance Sheet Accounts).
N-Non-operating Expenses or Income (Profit & Loss accounts used only in FI).
P-Primary Costs or Revenue (this forms part of Profit and Loss accounts applicable in both FI and CO).
S-Secondary Costs (this forms part of Profit and Loss accounts applicable in both FI and CO).
S-Secondary Costs (Profit and Loss accounts used only in CO for internal reporting).
Let’s look at how to create G/L accounts in SAP S4 HANA. In this activity, we will create G/L accounts manually. This will give us the fundamental understanding of how to create G/L accounts step-by-step. We will also look at how to copy G/L accounts using existing accounts as a template.
All transactions in SAP FI work with GL Accounts.
Case Study: You are to create a G/L account for Office stationery supplies.
Creating a G/L Account – Office stationery supplies
Let’s start by creating a G/L account for Office supplies. Use this menu path to go to the screen where you will create your G/L account: IMG: Financial Accounting ➤ General Ledger ➤ Master Data ➤ GL Accounts ➤ G/L Account Creation and Processing ➤ Edit G/L Account Centrally.
You can also get to the screen on the user side of the system by following this menu path: SAP Easy Access: Accounting ➤ Financial Accounting ➤ General Ledger ➤ Master Records ➤ GL Accounts ➤ Individual Processing ➤ Centrally.
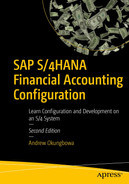
The screen where you create your G/L account
The Edit G/L Accounts Centrally has four important buttons that will help you create and navigate your G/L account:
Display ![]() This button is used to display a G/L account already existing in the system. By clicking this button, the system will automatically display a list of all the G/L accounts in the system.
This button is used to display a G/L account already existing in the system. By clicking this button, the system will automatically display a list of all the G/L accounts in the system.
Change ![]() This button is used to change or edit G/L account details of existing G/L accounts. When you need to edit your G/L account click this button and the system will allow to edit your G/L account accordingly.
This button is used to change or edit G/L account details of existing G/L accounts. When you need to edit your G/L account click this button and the system will allow to edit your G/L account accordingly.
Create ![]() Tis button is used to create a new G/L account of your own from scratch.
Tis button is used to create a new G/L account of your own from scratch.
Create with Template ![]() This button allows you to copy an existing G/L account in the system using a template. This can be very handy if you want to copy similar G/L accounts because it allows the system to classify similar G/L accounts into the same account group and number range intervals.
This button allows you to copy an existing G/L account in the system using a template. This can be very handy if you want to copy similar G/L accounts because it allows the system to classify similar G/L accounts into the same account group and number range intervals.
Since we are creating our own G/L account, click the Create button and update the following fields:
G/L Account: Every G/L account in SAP S4 HANA must be assigned a number, which serves as the G/L account number. Enter your G/L account number in the G/L account field. The G/L account number you enter here is restricted to the length of the G/L account number you specified when customizing the “Create Chart of Accounts” section in Chapter 2. The G/L account number is used to reference the G/L account.
Company Code: Every company represented in SAP S4 HANA must be assigned a company code. Company codes are assigned to G/L accounts in the system. Enter your company code in the company code field. The company code you enter in this filed will allow you to assign a G/L account to your company code
The number you enter in the G/L Account field must be within the number range intervals you defined for your account groups in Chapter 2.
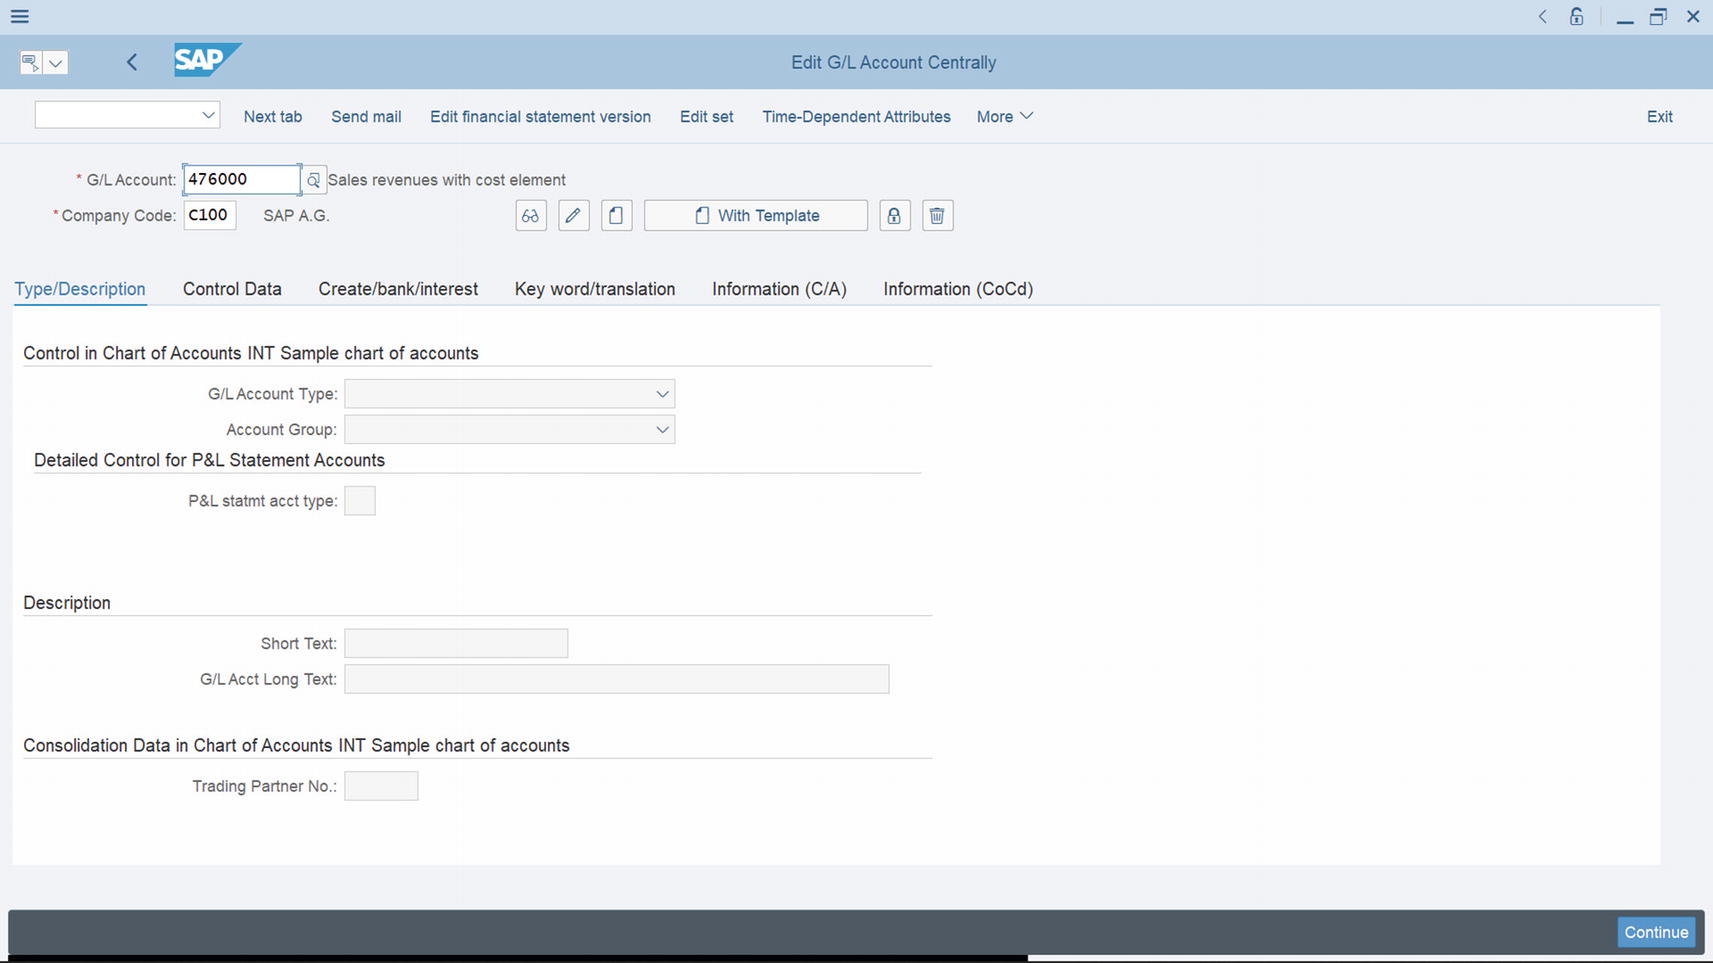
The next step in this activity is to update the Description section of the screen. Click the Create button to activate the description section of the screen in Type/Description section of the screen.
Creating G/L account centrally in Chart of Accounts section
Update the following fields:
Control in Chart of Accounts section of the screen
G/L Account type: When you click the dropdown arrow by the field, a list of account types is displayed. Select the appropriate account type from the list. In this activity, since we are creating a G/L account for Office supplies, we selected Primary Costs or Revenue as this best fit our requirements.
Account Group: Click the dropdown arrow at the right side of the screen and select the account group that fits your G/L accounts from the displayed account group list – General G/L Accounts.
In the Description section, enter a short text and a long text in each of the fields, respectively, as in Figure 5-2.
Description section of the screen
Short Text: When creating a G/L account, you need to give a short descriptive name to your G/L account. This will allow you to identify individual G/L accounts in your company code.
G/L Acct Long Text: Likewise, the G/L account long test account field will allow you to use a more detailed description for your G/L account.
In the Consolidation Data in Chart of Accounts section in Figure 5-2, you can enter a trading partner and group account number for your G/L account. This is important if your company belongs to a group and prepares consolidated financial statements for its corporate group. In that case, you should enter the company code responsible for the preparation of the consolidated account for the corporate group in the Trading Partner No. field and enter the consolidated G/L account number in the Group Account Number field. The consolidated G/L accounts allows your organization to prepare consolidated financial statements for the corporate group in SAP S4 Hana.
The next step in this activity is to update the fields in the Control Data section of the screen.
Click the Control Data tab in the middle of the screen to go to the control section of the screen.

Data control screen section of G/L Account
Update the following fields in the Control Data screen:
Account control in company code Section
Account Currency: This is the company code section of the G/L account master record data where you specify the currency for your G/L accounts. It is important to use your company code local currency for your G/L account for each company code. The advantage of using local currency is that it allows postings to be made to the G/L account in any currency and then converted. Postings made in foreign currency are translated into local currency. However, you can also choose to specify foreign currency as your G/L account currency. The drawback to this approach is that posting to the G/L account can only be made in the foreign currency you have specified. The system automatically defaults to the local currency of your company code when creating a G/L account. In this activity we examined a US-based company, so the company code currency is USD (US Dollar).
Balances in Local Crcy Only: Select the Only Balances in Local Currency checkbox, if the transactions posted to this account must be maintained in local currency only. When you select this function, the system will display and manage all currencies in the G/L master record in local currency (i.e., the company code local currency). This is important if you do not want the system to post any exchange rate difference that may occur, but you want to clear several currencies arising from transactions with your company code currency (local currency). It is important to note that you do not click the Only Balance In Local Currency checkbox for Accounts Payable (AP) and Accounts Receivable (AR) reconciliation accounts, because most transactions posted in AP & AR are in various currencies. Only Balances In Local Currency is selected for Balance sheet accounts without open item management, cash discount account clearing, or Goods Received (GR)/ Invoice Receipts (IR) clearing accounts.
Tax Category: This function allows you to specify if the G/L account is tax relevant. Using the search function button next to the Tax Category field, select the appropriate tax symbol that you want to use in your G/L account from the displayed tax list. The Tax Category could either be input tax or output tax. For example, if input tax is selected, every posting to this G/L account must contain input tax. In this activity, we used in input tax “-” as the tax category.
Posting Without Tax Allowed: This allows postings without tax to be posted in the G/L account, even though the tax category indicate is set.
Recon. Account for Account type: In the G/L master record, you use the Reconciliation Account for Account Type dropdown menu to specify that the G/L account is a reconciliation account. This function allows you to select from a list of reconciliation account types, for example, Assets, Customers, Vendor, and so on. Once this option is set, the G/L account will be considered a reconciliation account by the system. It is advisable that you maintain at least one reconciliation in the general ledger. Every posting in the sub-ledger in SAP S4 HANA is automatically posted to a corresponding reconciliation account. The reconciliation accounts are updated with sub-ledger balances as soon as transactions are posted in the bus-ledger. This procedure allows you to generate financial statements at any time from the general ledger.
Open Item Management: By activating this checkbox in the G/L master record, when you display line items in an account, the system will display all line items in the account marked as open or cleared. This option is ideal if you want to see items not cleared, or outstanding balances at any given point in time in an account. This makes it possible for you to determine if a posting exists in the G/L account that needs offsetting against a particular business transaction (i.e., clearing an open item with payment).
Bank account.
GR/IR Accounts.
Salary accounts.
Sort Key | Description |
|---|---|
001 | Posting date |
002 | Doc. No, fiscal year |
003 | Document date |
004 | Branch account |
005 | Loc.currency amount |
006 | Doc.currency amount |
007 | Bill/exch.due date |
008 | Cost center |
009 | External doc.number |
You can access a detailed list of sort keys provided by SAP in the system by using the search function on the sort key field.
The system automatically fills the assigned field in the line item based on the sort key you assigned to your general ledger master (This is done in the company code segment of your company code). When you assign a posting date as your sort key, as we did in this activity, the system will automatically sort your line items based on your defined criteria according to posting date. Likewise, when you define a document date, the system will use the posting date to display your line items, and so on.
The final step in this activity is to assign a Field status group to the G/L account in the Control of document creation in the company code section. To go to the screen where you can do this, click Create/bank interest tab.

Create/bank interest section of G/L account
The field status group field determines whether a field should be suppressed, required, or optional during document entry. If a field is set to suppressed, users will not be able to enter data into it during document entry. If a field is set to required entry, users are required to enter data into the field during document entry. If optional entry is set for a field, users have the discretion to either enter data or not to enter data into the field. The field status groups are entered in the field status field of the general ledger master record in the company code-specific area of each G/L account.
A field status variant contains a field status group, and a field status group is assigned to a company code in SAP S4 HANA. SAP comes with predefined field status groups, which you can use as your field status variant. It is also possible to create your own field status group(s). However, we advise that you use the predefined field status group provided by SAP in the system. By creating your won field status group, you also have to define the associated tables, and this can be time consuming.
Figure 5-5 shows some predefined field status groups in SAP S4 HANA. You can also access this list by using the search function by the filed status group field.

A list of some of the standard SAP S4 HANA supplied field status groups
Enter the field status group that meets your requirement in the Field status group field. In this activity, we used G004 – Cost accounts as our field status group. The reason we used G004 as the field status group is because office supplies is an expense, and when you post entries in the G/L account, the system will automatically ask for the cost center, which you have to enter in the cost center field of the document entry screen before you can post the document.
Once you have updated your screen, save your work by clicking the save button at the bottom right of the screen
Finally, in the next activity, we will be looking at how to create a G/L account with a template.
Creating G/L Account With Template
Creating a G/L account with a template allows you to copy an existing G/L account in the system from another company code using the With Template function. This can be very handy and make it easier for you to create G/L accounts by copying an existing G/L account and modifying it to meet your requirements.
To be able to copy another G/L account, you must make sure that your company code maintains the same number range intervals in the chart of accounts.
Case study: Since you maintain the same chart of account number range interval with Company code 1000, your task is to copy Domestic Travels Expenses (flat Rate Input Tax) with G/L Account 474100 from company code 1000 and adapt it to meet your requirements.
To go to the screen where you will copy an existing G/L account follow this menu path: IMG: Financial Accounting ➤ General Ledger ➤ Master Data ➤ GL Accounts ➤ G/L Account Creation and Processing ➤ Edit G/L Account Centrally.

Copying an existing G/L account

Reference account screen
Update the following fields:
G/L Account: Enter the G/L account you want to copy from the reference company you are copying in this field.
Company Code: Enter the reference company code of the company whose G/L account you want to copy in this field.

Copied G/L account
Save your work.
Summary
This chapter explained what a general ledger is and also described what a master record is. You went through the customization steps involved in creating a G/L account master record and learned to copy a G/L account using an existing G/L account as a template. You also looked at the relationship among G/L accounts, sub-ledger, and reconciliation accounts.
In the next chapter, you will learn how to set automatic open item clearing and how to define the exchange rate and foreign exchange rate valuations.