
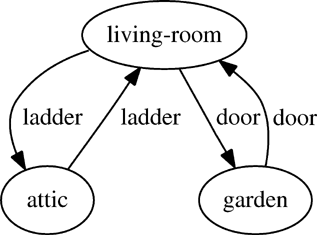
Graphviz generates graphs from your data. Indeed, you saw a simple Graphviz representation of the wizard’s house in Chapter 5:
Graphviz is open source and available from the Graphviz website (http://www.graphviz.org/). After you’ve downloaded and installed it, creating a graph is easy. First, you’ll create a DOT file that describes the shape of your graph. For example, in Graphviz, create a file named test.dot on your computer and enter the following information:
digraph {
a->b;
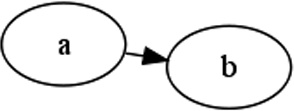
}This defines a directed graph with nodes A and B connected by an arrow. (There are numerous syntax options available in the DOT file format, as documented at the Graphviz website.)
Now, to generate a graphical bitmap from the DOT file, run neato (one of the Graphviz utilities) from the command line, as follows:
neato -Tpng -O test.dot
This should create a picture in the file test.dot.png that looks like this:
As you can see, Graphviz is simple to use. It can even generate large, complicated graphs quickly, with only minor graphical glitches. (Since perfect graph layouts are still an unsolved problem in computer science, Graphviz layouts aren’t perfect. They are, however, closer to perfect than you might expect.)
Now that you have Graphviz up and running, let’s create a library of commands that will let us conveniently draw graphs with Lisp. We can use this to draw some graphs of our adventure game world.
Note
The graph utilities used in the examples in this chapter perform certain system calls in a way that is not part of the Common Lisp standard. They are available only in the CLISP environment. The code would require some modifications to run within other Lisp systems.
In order to create a graph drawing library, we want to generate a Graphviz DOT file that captures all the details of a graph. To do this, we will need to convert the identifiers of the nodes the player can visit, convert the edges connecting these nodes, and generate labels for every node and edge. We will test our library using the nodes representing the map of the wizard’s world.
When converting nodes into DOT format, the first thing we need to do is to convert the node identifiers into valid DOT identifiers. We do this by writing a dot-name function:
(defun dot-name (exp)
  (substitute-if #\_ (complement #'alphanumericp) (prin1-to-string exp)))
A node in DOT format can contain only letters, digits, and the underscore character. To make sure the node identifier we’re using is legal, we’ll change any forbidden characters to underscores. Here are examples of the dot-name function in use:
>(dot-name 'living-room)"LIVING_ROOM" >(dot-name 'foo!)"FOO_" >(dot-name '24)"24"
This function accepts any basic Lisp type, which we can then convert to a string using the prin1-to-string function. We can process the resulting string and substitute underscores as needed.
Note
For the sake of simplicity, our dot-name function assumes that no node identifiers differ only in their nonalphanumeric components. For instance, if we had one node called foo? and another node called foo*, the dot-name function would convert them both to foo, causing the names to clash.
The substitute-if function substitutes values based on the result of a test function:
> (substitute-if #e #'digit-char-p "I'm a l33t hack3r!")
"I'm a leet hacker!"
The test function in this example, digit-char-p, tells us if a character in a string is a numerical digit. Test functions like this, which accept a value and determine truth based on that value, are often referred to as predicates.
Another interesting property of the substitute-if function is that we can use it on lists as well:
> (substitute-if 0 #'oddp '(1 2 3 4 5 6 7 8))
'(0 2 0 4 0 6 0 8)
Here, all odd numbers in a list have been replaced by the number 0. The substitute-if function is one example of a generic function—a function that can accept multiple datatypes as parameters and handle them appropriately. (Generic programming is discussed in Chapter 9.)
When we use substitute-if in our dot-name function, we substitute only those characters that aren’t alphanumeric. While no predicate that tests for exactly this is available for us in Common Lisp, it is easy to create this predicate on the fly. The following fragment in the dot-name function creates a predicate function for us with exactly the right behavior:
(complement #'alphanumericp)
Lisp already has a predicate function that tells us if a character is alphanumeric, called alphanumericp. However, we want to substitute only characters that are not alphanumeric. We can create this opposite (or complement) function to alphanumericp by passing it to a higher-order function named complement.
By passing this function into substitute-if, we get the behavior we want, without needing to use defun to pollute the top level with a new function just to feed to substitute-if.
Note
Common Lisp has a function called substitute-if-not that could have been used in the dot-name function in lieu of substitute-if to allow us to leave the not out of the lambda function. However, Lisp functions that end in not are better avoided. They may be removed from future versions in the ANSI Common Lisp standard, which means they are considered deprecated.
Now that we can tweak our node identifiers to make them appropriate for DOT, let’s write another function that will generate the label that should appear in the node when it is drawn. The label will consist of the node name and the data linked to the node in the node alist. But we also need to make sure that we are not trying to put too much text in the label. Here is the code that generates the label:
 (defparameter *max-label-length* 30)

  (defun dot-label (exp)
    (if exp
     (let ((s (write-to-string exp :pretty nil)))
       (if (> (length s) *max-label-length*)
           (concatenate 'string (subseq s 0 (- *max-label-length* 3)) "...")
            s))
      ""))
*max-label-length* ![]() is a global variable that determines the maximum number of characters for the label. If a node label is larger than the limit
is a global variable that determines the maximum number of characters for the label. If a node label is larger than the limit ![]() , it gets cropped, and an ellipsis is added to indicate that fact
, it gets cropped, and an ellipsis is added to indicate that fact ![]() . The
. The write-to-string function ![]() is similar to the
is similar to the prin1-to-string function we used earlier—it writes an expression to a string.
The :pretty parameter is an example of a keyword parameter, which is used by certain Lisp functions to let you choose which parameters you want to pass in. In the case of write-to-string, it tells Lisp not to alter the string to make it pretty. Without this, Lisp would place new lines or tabs into our converted string to make it look more pleasing to the eye. By setting the :pretty keyword parameter to nil, we are telling Lisp to output the expression without any decorations. (Having new lines in a label can confuse Graphviz, so we don’t want to give Lisp any ideas.)
Now that we can generate both a name and label for each node, we can write a function that takes an alist of nodes and generates the DOT information that encodes them, like so:
(defun nodes->dot (nodes)
This function uses mapc to go through every node in the list of nodes ![]() , and
, and princ prints each node in the DOT format directly to the screen. mapc is a slightly more efficient variant of mapcar; the difference is that it does not return the transformed list. The nodes->dot function uses the dot-name ![]() and
and dot-label ![]() functions we created to convert the data.
functions we created to convert the data.
Later, when we want to generate a file that contains this information, we’ll write a function that takes this data from the console.
It may seem a bit odd to use the console as an intermediary for generating a file, instead of just writing directly into a file, but this is actually a common paradigm in Lisp. One immediate benefit of this approach is that we can easily debug the code in the REPL, where the printed lines are easy to see.
Now let’s try using the nodes->dot function to generate the DOT information for the nodes in the wizard’s house:
>  (nodes->dot *wizard-nodes*)
LIVING_ROOM[label="(LIVING-ROOM (YOU ARE IN TH..."];
GARDEN[label="(GARDEN (YOU ARE IN A BEAUT..."];
ATTIC[label="(ATTIC (YOU ARE IN THE ATTI..."];
Here, you can see the nodes of the wizard’s house and an abbreviated version of the information attached to each node, shown in DOT format. Notice that we are not interested in the value returned from the nodes->dot function—only in the information it prints in the REPL. Lispers would say that we are only interested in the side effects of this function. Although mapc does not return the list, it still causes the code to iterate through the list and generate the same printed output that using mapcar would have, so it generates the same side effects as mapcar, a bit more quickly.
The next step is to generate the DOT information for the edges that link our nodes. These will become the arrows in our visual graph. The function edges->dot generates the necessary data, again by printing it directly to the console.
(defun edges->dot (edges)
  (mapc (lambda (node)
          (mapc (lambda (edge)
                  (fresh-line)
                  (princ (dot-name (car node)))
                  (princ "->")
                  (princ (dot-name (car edge)))
                  (princ "[label="")
                  (princ (dot-label (cdr edge)))
                  (princ ""];"))
                (cdr node)))
        edges))
Let’s use this function to generate the DOT information for the edges of the wizard’s house:
>(edges->dot *wizard-edges*)
Here, we can clearly see the relationships between the nodes in the wizard’s house, in the DOT format. For instance, the first line ![]() indicates that the player can walk from the
indicates that the player can walk from the LIVING_ROOM node to the GARDEN node by using an edge labeled (WEST DOOR).
To complete our generation of the DOT data, we call both nodes->dot and edges->dot, and wrap it up with some extra decoration, as follows:
(defun graph->dot (nodes edges)
This function ties everything together by defining our graph as a directional graph ![]() , and then calling our
, and then calling our nodes->dot ![]() and
and edges->dot ![]() functions.
functions.
Here’s what the final DOT information for our wizard game looks like, as created by our new library:
> (graph->dot *wizard-nodes* *wizard-edges*)
digraph{
LIVING_ROOM[label="(LIVING-ROOM (YOU ARE IN TH..."];
GARDEN[label="(GARDEN (YOU ARE IN A BEAUT..."];
ATTIC[label="(ATTIC (YOU ARE IN THE ATTI..."];
LIVING_ROOM->GARDEN[label="(WEST DOOR)"];
LIVING_ROOM->ATTIC[label="(UPSTAIRS LADDER)"];
GARDEN->LIVING_ROOM[label="(EAST DOOR)"];
ATTIC->LIVING_ROOM[label="(DOWNSTAIRS LADDER)"];}
We can now generate a proper Graphviz DOT file that captures all the details of our wizard map that we need to generate a pretty picture. These include the nodes the player can visit, the edges connecting these nodes, and labels for every node and edge.
To turn the DOT file into an actual bitmap, we capture the DOT file data, put it into a file, and then execute the dot command directly from the system command line, like this:
This function performs the most critical actions in our graph drawing library, using some advanced Lisp techniques.
First, to keep this dot->png function as reusable as possible, the graph->dot function isn’t called directly. Instead, we write dot->png to accept a thunk ![]() .
.
It is common in Lisp to create small functions that have zero arguments. These functions are officially called nullary functions. However, Lispers will often create such functions in order to describe a computation that they don’t want to run until later. In this scenario, a function without arguments is commonly called a thunk or a suspension. In this case, the thunk our dot->png function needs would be a function that, when called, prints a DOT file to the console.
Why is a thunk useful in our dot->png function? Remember that the easiest way for us to write and debug graph->dot and other DOT file functions is to have them print their results directly to the console. When we call graph->dot, it doesn’t return its results as a value, but, instead, prints them at the console as a side effect. Therefore, we can’t just pass the value of graph->dot to dot->png. Instead, we pass in graph->dot as a thunk. Then dot->png is responsible for calling graph->dot, capturing the results, and sending them to a file.
Since it is so common to generate textual data with a computer program, this particular technique is used a lot in Lisp code: First, we print stuff right to the console; next, we wrap it in a thunk; finally, we redirect the results to some other location.
As you’ll see in Chapter 14, Lispers who follow the functional programming style eschew this technique, because side effects are required when printing to the console.
The function with-open-file enables dot->png to write information to a file ![]() . To give you a feel for how this function works, here’s an example that creates a new file named testfile.txt and writes the text “Hello File!” to it:
. To give you a feel for how this function works, here’s an example that creates a new file named testfile.txt and writes the text “Hello File!” to it:
In this example, you can see that the first item ![]() passed into
passed into with-open-file becomes the name of a special Common Lisp datatype called a stream, which is created for us by with-open-file.
Printing functions, such as princ, can accept a stream as an optional parameter. In this case, these printing functions won’t print anything to the console, but instead will print to the stream object.
It is important to understand that with-open-file creates a stream variable from a stream variable name, in the same way that let creates a variable from a variable name:
body has my-stream defined...)body has my-variable defined...)
So if we pass the name my-stream in at the front of the first list to with-open-file ![]() , this is analogous to defining
, this is analogous to defining my-variable at the start of a let ![]() . A variable named
. A variable named my-stream will be available to us in the body of with-open-file ![]() , in the same way that
, in the same way that my-variable will be available to us in the body of the let ![]() .
.
But don’t worry too much about exactly what a stream is just yet. We’ll be looking at them more closely in Chapter 12. For now, you just need to know that a stream is an object that can be connected to a file, and we can pass it to functions (such as princ) to write stuff to the connected file.
The with-open-file command also makes heavy use of keyword parameters. Let’s look at our previous example of this command again:
 (with-open-file (my-stream
                   "testfile.txt"
                   :direction :output
                   :if-exists :supersede)
(princ "Hello File!" my-stream))A keyword parameter has two parts: the name of the parameter and the value of the parameter. The name of the parameter is always a symbol beginning with a colon. This example has two keyword parameters: :direction ![]() , which is set to
, which is set to :output (we’re only writing to the file and not reading it), and :if-exists ![]() , which is set to
, which is set to :superseded (if a file by that name already exists, just toss out the old version).
with-open-file has keyword parameters because opening a file is a complex operation, and many esoteric options are available. If with-open-file just gave you regular parameters to set all this, every call to with-open-file would be long and cumbersome due to all the parameters. Also, humans have a hard time looking at a long list of parameters and remembering which one does what.
As you’ve probably noticed, symbols in Common Lisp sometimes begin with a colon. This includes keyword parameters, which always start with a colon. This is because a regular symbol in Lisp can refer to something else. For instance, we could set a variable cigar equal to 5 and then return it:
>(let ((cigar 5))cigar)5
However, sometimes we don’t want a symbol to refer to something else. We want to use the symbol outright, and we want it to have its own meaning. A colon-prepended symbol in Common Lisp (not surprisingly, called a keyword symbol) always means itself:
:cigar:CIGAR(let ((:cigar 5)):cigar)*** - LET: :CIGAR is a constant, may not be used as a variable
As you can see, the keyword symbol :cigar can be evaluated right at the REPL and already has a value ![]() . Its value is, conveniently,
. Its value is, conveniently, :cigar. If we try to redefine :cigar to something else, Common Lisp won’t let us ![]() . The fact that it is constant is useful, because a Lisp compiler can potentially optimize this simple type of symbol more than it can optimize other types. Also, we can reduce errors in our code by using keyword symbols in places where we know a symbol just has a meaning in its own right. Sometimes a cigar is just a cigar.
. The fact that it is constant is useful, because a Lisp compiler can potentially optimize this simple type of symbol more than it can optimize other types. Also, we can reduce errors in our code by using keyword symbols in places where we know a symbol just has a meaning in its own right. Sometimes a cigar is just a cigar.
Our dot->png sends our data to the file in a slightly different way than is shown in this example: by declaring the name of the stream to be *standard-output* (a special global variable in Common Lisp that controls the default location to which printing functions send their output). As a result, any printing done inside the thunk will be redirected to our DOT file.
Let’s look at our dot->png function again to see this:
(defun dot->png (fname thunk)
So how exactly does the dot->png function cause our DOT data to get saved to a file instead of just going to the console? To answer this, you’ll need to exercise your brain a bit. Also, you’ll need to recall our discussion of local and dynamic variables in Chapter 2.
Remember that the let command usually creates a lexical, or local, variable. As we’ve discussed, the stream variable created by with-open-file is analogous to using let to create a variable. Hence, it usually leads to the creation of a lexical stream variable for us.
However, if a dynamic variable already exists with the same name, let will instead, temporarily, override the value of the dynamic variable to the new value. *standard-output* is such a dynamic variable. This means that we can temporarily override the value of *standard-output* to a new value by passing it into our with-open-file command ![]() .
.
In the body of the with-open-file, where we call our thunk ![]() , any values printed to the console will now be automagically routed to our file, instead. The surprising thing (enabled by the design of lexical and dynamic variables in Common Lisp) is that this is also true for the
, any values printed to the console will now be automagically routed to our file, instead. The surprising thing (enabled by the design of lexical and dynamic variables in Common Lisp) is that this is also true for the princ statements in our graph->dot function, even though they are called indirectly from dot->png.
Lastly, we need a function that ties together all the pieces to let us easily create a graph from some nodes and edges:
This function takes the name of a DOT file (as the variable fname), as well as the graph’s nodes and edges ![]() , and uses them to generate the graph. To do this, it calls
, and uses them to generate the graph. To do this, it calls dot->png ![]() and creates the appropriate thunk—a
and creates the appropriate thunk—a lambda function ![]() . As is usual for a thunk, it takes no parameters.
. As is usual for a thunk, it takes no parameters.
The graph->dot function is called inside the thunk ![]() as a delayed computation. Specifically, if we had called
as a delayed computation. Specifically, if we had called graph->dot directly, its output would just show up in the console. However, when inside the thunk, it will be called at the leisure of the dot->png function, and the output will be used to generate the DOT file with the filename passed in as the first parameter to graph->png.
Let’s try out our new function to draw a graph of the wizard’s house!
(graph->png "wizard.dot" *wizard-nodes* *wizard-edges*)
After calling this function, you should now see a file named wizard.dot.png, a picture of the map of the wizard’s house:
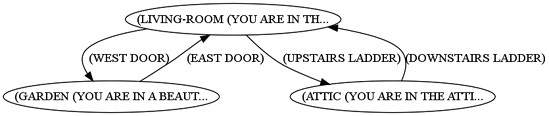
This may not be the prettiest graph on the planet, but it’s packed with information and is very easy to understand. Also, the code is extremely flexible, and places few dependencies on our node and edge data.
With these utilities in our arsenal, we can now easily create graphs from any interconnected data in our Lisp programs. You’ll find this technique to be a valuable debugging tool when you need to deal with complicated data.