
The SVG format is a file format for drawing graphics. In this format, you specify objects like circles and polygons, and then pass them to a compatible computer program to view. Because the SVG format specifies a drawing using pure math functions instead of raw pixels, it is easy for a program to render an SVG image at any size, making images in this format easily scalable.
The SVG format is currently receiving a lot of attention from web developers. All modern browsers (excluding Microsoft Internet Explorer) support SVG natively. Recently, Google released a set of libraries called SVG Web that adds decent support for SVG, even in Internet Explorer. This allows SVG to work in more than 90 percent of current web browsers. Finally, SVG has become a practical and efficient option for drawing graphics on websites.
The SVG format is built on top of the XML format. Here is an example of what a complete SVG file looks like:
<svg xmlns="http://www.w3.org/2000/svg">
<circle cx="50"
cy="50"
r="50"
style="fill:rgb(255,0,0);stroke:rgb(155,0,0)">
</circle>
<circle cx="100"
cy="100"
r="50"
style="fill:rgb(0,0,255);stroke:rgb(0,0,155)">
</circle>
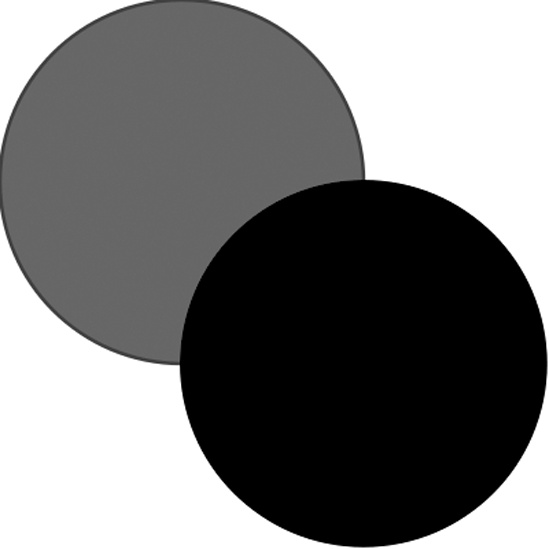
</svg>Simply copy this text and place it in a file named example.svg (or download this file from http://landoflisp.com/). Then you can open the file from the Firefox web browser (the Safari, Chrome, and Opera web browsers should also work).
Here is what you should see, with a red and blue circle:
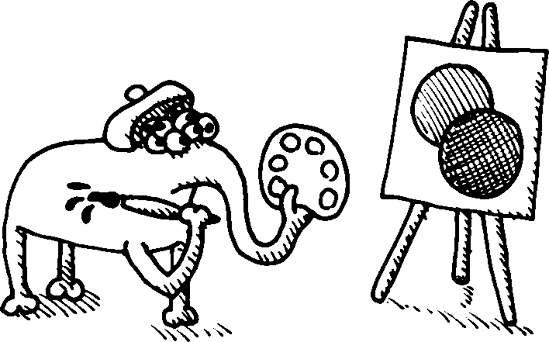
Now, let’s write some macros and functions to let us create a picture like this directly in Common Lisp!
The XML data format (just like the HTML data format) consists primarily of nested tags:
 <mytag>
      <inner_tag>
      </inner_tag>
 </mytag>
Every tag ![]() also has a matching closing tag
also has a matching closing tag ![]() . The closing tag has the same name, but with a slash preceding it. Additionally, tags may contain attributes:
. The closing tag has the same name, but with a slash preceding it. Additionally, tags may contain attributes:
<mytag color="BLUE" height="9"></mytag>
In this example, we create a tag named mytag that has the attribute of being blue and has a height of 9.
Often, when writing a macro to perform a task, you’ll find a lot of what your macro needs to do can be handled by a function instead. Because of this, it is often prudent to first write a helper function that does most of what the macro needs to do. Then you write the macro, keeping it as simple as possible by leveraging the helper function. This is what we’re going to do as we write a macro to create XML-style tags in Lisp.
Here is our helper function, called print-tag, which prints a single opening (or closing) tag:
(defun print-tag (name alst closingp)(princ (string-downcase name))
(mapc (lambda (att)
(format t " ˜a="˜a"" (string-downcase (car att)) (cdr att))) alst)
(princ #>))
First, the print-tag function prints an opening angle bracket ![]() . Since this is only a character, we use the literal character syntax by prefixing the bracket with #. Then we check the predicate
. Since this is only a character, we use the literal character syntax by prefixing the bracket with #. Then we check the predicate closingp ![]() . If it is true, the tag needs to have a slash in front of it to make it a closing tag. Then we print the name of the tag, converted to lowercase with the
. If it is true, the tag needs to have a slash in front of it to make it a closing tag. Then we print the name of the tag, converted to lowercase with the string-downcase function ![]() . Next, we iterate through all the attributes in the
. Next, we iterate through all the attributes in the alst of attributes ![]() and print out each attribute/value pair
and print out each attribute/value pair ![]() . Finally, we end by putting in a closing angle bracket
. Finally, we end by putting in a closing angle bracket ![]() .
.
The following is an example use of the print-tag function. Since it is a plain function and not a macro, it’s easy to debug in the REPL. This is another reason why helper functions are a good idea when creating macros.
> (print-tag 'mytag '((color . blue) (height . 9)) nil)
<mytag color="BLUE" height="9">
As you can see, this function does a fine job of printing an XML tag. However, it would be a real chore if all tags had to be created in this way. That’s why we’re going to write the tag macro next.
The tag macro we’ll create has been adopted from the macro of the same name in Paul Graham’s Arc Lisp dialect. It improves on the print-tag function in several crucial ways, all of which could not be remedied without having a macro:
Tags always come in pairs. However, if we want to nest tags, a function would not be able to print tags that surround the tags printed inside it. This is because it requires us to execute code before and after nested tags are evaluated. This is possible in a macro, but not a function.
Tag names and attribute names usually do not need to change in a dynamic way. Because of this, it’s redundant to need to prefix tag names with a single quote. In other words, tag names should by default be treated as if they were in data mode.
Unlike tag names, it’s very desirable for the values of attributes to be dynamically generated. Our macro will have a syntax that places the attribute values into code mode so we can execute Lisp code to populate these values.
Ideally, this is how we would like the tag macro to work, when we use it in the REPL:
> (tag mytag (color 'blue height (+ 4 5)))
<mytag color="BLUE" height="9"></mytag>
Notice that the tag name and attribute list no longer need quotes in front of them. Additionally, it is now easy to calculate an attribute dynamically with Lisp code. In this case, we’re calculating that the height is 4 plus 5.
Here’s the macro that accomplishes this task:
(defmacro tag (name atts &body body)
As you would expect, the macro first calls print-tag to generate the opening tag ![]() . This is a bit tricky when we generate the alist of attributes for
. This is a bit tricky when we generate the alist of attributes for print-tag, since we want the values for the attributes to be in code mode. We accomplish this by wrapping the attributes using list ![]() . Then we
. Then we mapcar through the attributes, which we’ve paired with the pairs function ![]() . (Remember that we created the
. (Remember that we created the pairs function toward the end of the previous chapter.) For each attribute pair, we generate a code fragment in the list that consists of cons, without a quotation mark in front of the value of the attribute, so that we can dynamically calculate it ![]() .
.
Next, we put all the code nested inside our tag macro, so that it is called after the opening tag ![]() . Finally we create a closing tag
. Finally we create a closing tag ![]() .
.
To make more sense of how this macro handles the attribute list, let’s pass the output from our example to macroexpand:
>(macroexpand '(tag mytag (color 'blue height (+ 4 5))))(PROGN (PRINT-TAG 'MYTAG
Looking at the macro expansion, it should be clear how the tag macro builds the attribute list to pass to print-tag ![]() and how it allows us to dynamically generate attribute values, such as the height attribute
and how it allows us to dynamically generate attribute values, such as the height attribute ![]() .
.
Here is another example of this macro in use, now with two inner tags:
>(tag mytag (color 'blue size 'big)(tag first_inner_tag ())(tag second_inner_tag ()))
Notice how it correctly surrounds the inner, nested tags with proper XML opening and closing tags. Note also that I have added line breaks and indentation to the output ![]() for clarity. The actual output of the
for clarity. The actual output of the tag function always prints on a single line, without line breaks or indentation.
The tag macro can be used for generating XML or HTML. For instance, we could do the following to generate a “Hello World” HTML document:
>(tag html ()(tag body ()(princ "Hello World!")))<html><body>Hello World!</body></html>
Since HTML uses predefined tags (unlike XML, where the tags can have any name), we could write simple macros for specific HTML tags that make them even easier to write HTML in Lisp. For instance, here are some simple html and body macros:
(defmacro html (&body body)
  `(tag html ()
        ,@body))
(defmacro body (&body body)
  `(tag body ()
        ,@body))
Now we could write our “Hello World” HTML example even more elegantly:
>(html(body(princ "Hello World!")))<html><body>Hello World!</body></html>
However, we want to use the tag macro to create SVG drawings instead. So let’s expand our DSL for the SVG domain.
First, let’s write the svg macro, which embodies an entire SVG image. Here it is:
(defmacro svg (&body body)
The svg macro is built on top of the tag macro. SVG images, for our purposes, require two special attributes to be created:
The
xmlnsattribute tells the SVG viewer (in our case, the Firefox web browser) where it can find the proper documentation for the SVG format.The second attribute enables hyperlinks inside the picture
. We’ll be using this hyperlinking feature in more advanced examples, starting in the next chapter.
To draw pictures, we’ll need to manipulate colors. To keep things simple, we’re just going to represent colors as RGB triples stored in a list. For instance, the color (255 0 0) is bright red.
Often, it is useful to generate lighter or darker variants of a particular color. The following brightness function does this for us:
(defun brightness (col amt)
  (mapcar (lambda (x)
        (min 255 (max 0 (+ x amt))))
      col))
If you pass bright red into this function and set the brightness to negative 100, you can see that it will generate a darker red:
> (brightness '(255 0 0) −100)
(155 0 0)
Next, let’s create a function that sets the style of an SVG picture element:
(defun svg-style (color)
    (format nil
           "˜{fill:rgb(˜a,˜a,˜a);stroke:rgb(˜a,˜a,˜a)˜}"
            (append color
                   (brightness color −100))))
The svg-style function accepts a color, and then sets the fill and stroke (outline) of a picture element ![]() . By using our brightness function, we can make the outline a darker variant of the fill
. By using our brightness function, we can make the outline a darker variant of the fill ![]() . This way, we need to specify only a single color for every element in our pictures, while maintaining a pleasing appearance.
. This way, we need to specify only a single color for every element in our pictures, while maintaining a pleasing appearance.
Now, let’s create a function to draw a circle. Since we won’t need to nest other SVG tags inside a circle, there is no need to write a macro for drawing circles—a function suffices.
(defun circle (center radius color)
We’ll want to set the center, radius, and color of each circle. The center needs to be assigned to the cx ![]() and
and cy ![]() SVG attributes of the circle. The radius is put in the
SVG attributes of the circle. The radius is put in the r attribute ![]() . We set the style of our circle with our
. We set the style of our circle with our svg-style function ![]() .
.
We are now ready to draw the simple SVG picture of two circles shown earlier, using our new DSL! Here’s how we do it:
>(svg (circle '(50 . 50) 50 '(255 0 0))(circle '(100 . 100) 50 '(0 0 255)))<svg xmlns="http://www.w3.org/2000/svg" xmlns:xlink="http://www.w3.org/1999/ xlink"><circle cx="50" cy="50" r="50" style="fill:rgb(255,0,0);stroke:rgb(155,0,0)"></circle><circle cx="100" cy="100" r="50" style="fill:rgb(0,0,255);stroke:rgb(0,0,155)"></circle></svg>
We now have a functional SVG DSL. Let’s add some more functionality to our DSL so we can appreciate the power a DSL can give to our programs.
Let’s add a new function to our SVG DSL that makes it easy to draw an arbitrary polygon:
(defun polygon (points color)
An SVG polygon stores all the points of the polygon in the points attribute ![]() . We construct the list of points by using a
. We construct the list of points by using a format statement, which contains the ˜{ ˜} control strings ![]() . Remember from Chapter 11 that these control strings let us iterate through a list inside the
. Remember from Chapter 11 that these control strings let us iterate through a list inside the format function. In this case, we’re iterating through the list of points. We then flatten the list of point pairs using mapcan ![]() , which you may remember is the same as using a
, which you may remember is the same as using a mapcar followed by an append.
In this example, we’re going to draw some random walks. A random walk is a graph of what you would get if you decide, at each moment in time, to flip a coin and then move either up or down a step. Random walks are very similar in behavior to stocks in the stock market. They are often used as a starting point for financial modeling. Here is a function that generates a random walk:
(defun random-walk (value length)
    (unless (zerop length)
      (cons value
           (random-walk (if (zerop (random 2))
                             (1- value)
                           (1+ value))
                         (1- length)))))
This function builds a list of numbers, starting with the value parameter. Then it increases or decreases this value randomly. We choose which direction to move using the random function ![]() . (Note that, in order to keep it simple, this function isn’t tail call optimized, since the
. (Note that, in order to keep it simple, this function isn’t tail call optimized, since the cons happens after the recursive call.)
Here’s an example of how we can use the random-walk function:
> (random-walk 100 10)
(100 101 102 101 100 101 102 103 102 103)
Now let’s use our SVG DSL to draw a slew of random walks in a picture:
(with-open-file (*standard-output* "random_walk.svg"
                   :direction :output
                  :if-exists :supersede)
   (svg (loop repeat 10
              do (polygon (append '((0 . 200))
                                   (loop for x
                                         for y in (random-walk 100 400)
                                         collect (cons x y))
                                  '((400 . 200)))
                            (loop repeat 3
                                 collect (random 256))))))
Since the amount of data created in this example is quite huge, we’re dumping the data straight to a file (named random_walk.svg), instead of printing it to the REPL. We do this by redirecting the *standard-output* dynamic variable ![]() , a technique introduced in Chapter 12. Notice how we can mix Lisp code freely with our DSL commands. For instance, we can loop right inside the SVG macro to generate 10 polygons at once
, a technique introduced in Chapter 12. Notice how we can mix Lisp code freely with our DSL commands. For instance, we can loop right inside the SVG macro to generate 10 polygons at once ![]() .
.
To make the graph pretty, we’re going to fill in the area under each graph line with a color. To do this, we’ll represent each line using a polygon, with the base line along the bottom of the graph (with a y-coordinate of 200) included as points to close the shape:
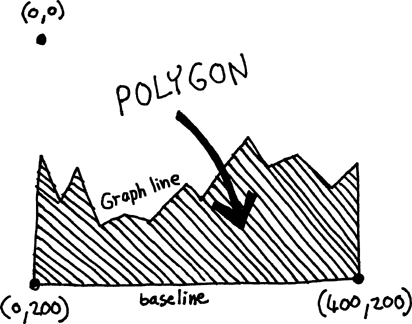
This is why we add points for the bottom-left ![]() and bottom-right
and bottom-right ![]() corner as we create each polygon. For even more fun, we also randomize the color of each graph line
corner as we create each polygon. For even more fun, we also randomize the color of each graph line ![]() .
.
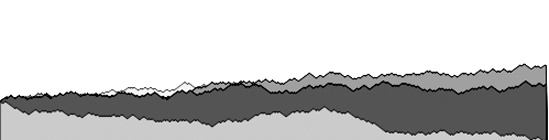
Here is an example of some random graphs generated by this very simple DSL code:
Now that you’ve seen how easily you can write XML, HTML, and SVG DSLs in Lisp, let’s create an entirely different kind of DSL—one that will let us build custom game commands for our Wizard’s Adventure Game from Chapter 5 and Chapter 6!