This chapter describes the basic elements necessary to create your own stop-motion animation: camera, tripod, computer, software, set, lights, and some basic supplies. Mainly I will focus on how to get equipped for a very simple setup that can be placed in the average home or classroom. With this setup, you should be able to complete the animation exercises described in later chapters and continue on with your own experimentation. If you have the time, space, money, and energy, you can move on from there to high-end equipment that would match that of a major commercial studio. But first, learn to crawl before you get to walking.
“A film is never really good unless the camera is an eye in the head of a poet.” | ||
| --Orson Welles | ||
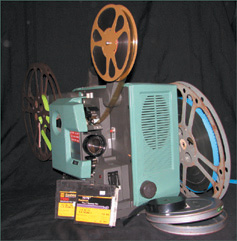
The camera is your most important piece of equipment for shooting stop-motion animation. Cameras able to shoot moving pictures have been around since the late 1800s. They started as an extension of still photography and evolved to the point where they were used to capture the images necessary to create unique entertainment, and the movie industry was born. Standard film used for movies is 35 millimeters in width, thus being referred to as 35mm film. This is the kind of film projected at your local movie theater. As early as 1923, the Eastman Kodak company began searching for a way to make film that was less expensive and cumbersome to use. The results were film stocks in 16mm, and even smaller 8mm, including a special brand called Super 8mm. By the 1950s, movie cameras moved from Hollywood into the hands of families everywhere for shooting their own home movies. This invention allowed anyone to become a filmmaker, and if this person’s camera had a single-frame capability, he could be an animator, too! The movie film inside the camera would then be developed at a film processing lab, and then you would thread it into an 8mm or 16mm movie film projector for viewing (see Figure 4.1).
Home movie cameras, mostly Super 8mm, continued their popularity until the development of video, which hit its stride in the late 1970s. By the time the 1980s arrived, families were now shooting with video “camcorders” onto standard VHS tapes. I remember the first video camera my family bought, which was connected to a separate VCR that would hang off a shoulder strap! Luckily, this antiquated, painful method soon evolved into smaller Hi-8 and Mini DV tape formats using cameras that fit into the palm of your hand. For shooting animation, video cameras have never proved to be useful at all by themselves, for none of them were capable of capturing single frames. (At the most, some modern models have a built-in feature for capturing six frames at a time, and then those frames can be loaded into a computer and the extra frames deleted. It’s a very laborious process that doesn’t have a great deal of flexibility for easy animating.) Eventually there came some useful devices for storing individual video frames. The Perception Video Recorder (computer system for rendering real-time playback) and Lunchbox systems (hardware for capturing video images) began being used by studios for doing simple frame grabbing, which allowed animators to see their animation evolve in real time. This equipment could be purchased for home use, but not for most animators’ average budgets. With the advent of every home having its own personal computer, affordable video cards began being developed that could capture images digitally from a camcorder directly into the computer. This breakthrough led to the development of software that was specifically catered for capturing single images from a video camera to create stop-motion animation. In this setup, the camera itself does not store images but serves only as an eye for providing the images captured digitally inside the computer. This method is the most common now for shooting animation at home or in school, and it has also made its way into commercial production. To get the most out of this book and to complete the exercises later on, you will need a video camera, capture card, and software for your computer. However, film is not entirely obsolete yet, so I will discuss it briefly as well.
Film has been used for a long time to shoot stop-motion animation, and most people working in the medium today, including myself, started off using film, so I do have a bit of a nostalgic soft spot for it. The best part about film is how it looks when it’s finally projected; I love watching animation on film and relishing the stark, crisp quality of image you can achieve with it. There is something quite fantastic about seeing those images projected with real light behind them, and I even enjoy the aesthetic quality of dancing dust and film scratches. However, the actual process of shooting on film does have some disadvantages that are only made more significant by today’s digital age. Shooting your animation on film means that all of your frames are stored inside the camera, and there is no way to know how your animation looks until you’ve spent a great deal of money getting it processed at a film lab. There is also the added step of setting the exposure to capture the right amount of light entering the lens. Speaking from personal experience, it’s very frustrating spending hours on an animation piece, only to get the film back with the image too light (overexposed) or too dark (underexposed) as a result of improper exposure. Despite these facts, there are purists who continue to use film and professionals who still use it for commercial productions. The best compromise is to use film for capturing the final animation images along with a digital method for storing frames and checking the animation in progress. This can be accomplished with a video assist attached to the viewfinder of the camera that is fed to a computer monitor. If you are a beginner in shooting stop-motion animation, I wouldn’t personally recommend starting with film, because it just gives you more technical things to think about and slows down the learning curve. The best place to learn all of the technical skills required for shooting on film is probably in film school, which is where I learned them. All the same, following are some tips and basic information about film cameras should you decide to experiment with them. If you don’t mind the challenges involved in getting there, there’s nothing quite like watching your animation projected onto your living room wall or against a bed sheet in your backyard on a warm summer night.
The cheapest method of shooting film is with Super 8mm. The older, regular 8mm is hard to find, and it’s even harder to find a film lab that will process it for you nowadays. For even better quality and availability, use 16mm film. Affordable cameras can be found in some antique camera shops, or more likely at second-hand resellers. A good place to shop might be on eBay, as long as you bid on equipment from a reliable seller with good feedback. The best kind of 16mm camera for shooting animation is a Bolex (see Figure 4.2).

Any kind of camera you use must have single-frame capability, meaning that you can capture one frame of film at a time with the touch of a button. It’s vital to have a cable release mechanism that can be attached to the camera so that the camera does not have to be touched, thereby avoiding the risk of its shifting during shooting. Hitting the button at the end of the cable will expose each frame you shoot. Most Bolex cameras run on a spring device that must be cranked before shooting. When you shoot live-action footage, the crank will unwind until its cycle is through, and it will need to be wound up again, much like a wind-up toy. For animation, a wind-up device has some drawbacks, in that you run the risk of the crank unwinding in the middle of your shot, and also it can create exposure fluctuation. So it’s best to rig your Bolex with an electric single-frame motor. When shooting on film, you will also need a light meter to determine how to set your exposure. By holding the white dome of the light meter in front of the object you are shooting and pushing a button, a metered dial will indicate to you which f-stop to set your exposure to. A zoom lens is recommended for any kind of film camera, as it will give you a wide range of shots and allows you to keep your camera a good distance away from your subject and still create close-ups. To make sure your image is in focus, zoom all the way in for an extreme close-up on any part of your subject. Turn the focus dial until the image in the viewfinder is in perfect focus and you can see grain in the viewfinder. Then zoom out to the exact framing you want, and every frame will be in focus.
A 100-foot roll of 16mm film contains about two and a half minutes of footage at 24 frames per second. The film must be loaded into the camera in complete darkness, usually done inside a special black bag that blocks out all light. If your film is exposed to light before use, no images can be captured onto it, and if light hits it after shooting, all of your footage will be washed away. There is no way to see what you’re doing while loading it, so it’s best to practice first with previously exposed scrap film so that you know where the gate, sprockets, and reels are inside. When buying film, you should know that there are two kinds—reversal and negative—available in either black-and-white or color. All Super 8mm and some 16mm is reversal film, which is exposed in the camera, developed, and projected as is. There is only one resulting print that exists, so it is not the best choice for duplication. The only way to make a copy of reversal film is to make a contact print, which works fine for black-and-white, but not for color. Reversal is a less expensive option and good for simple experiments and short film exercises. Negative film is exposed in the camera and developed as a negative image, exactly like still photo negatives that you get from your local photo-developing station. The negative is your original source material and must be handled with care and never projected. A positive image print is made from the original negative, and that is the print you would project.
If your scenes have been shot out of order and editing is needed, the positive print is used as your “work print,” which you can splice together into the proper sequence. The film has numbers on the edge between the sprockets, so your edited work print can be sent to a film processing lab along with the original, untouched negative. A technician there will then conform your negative in a special environment that leaves it free from scratches and dust, cutting it to match your work print according to the numbers on the film. The conformed negative is then developed into your “answer print” for projection, and duplicates can be made for distribution. Film processing and conforming is extremely expensive, but, as I said, worth it if you really want to pursue it. Make sure you consult a team of trusted colleagues, your local library, or the Internet to help you, as there is much more to learn than what I have described here.
For more immediate results, and with less stress, slightly less cash, and more creative control, it is best in this digital age to learn the craft of stop-motion with a computer, stop-motion software, and a way to capture images digitally. Before I go any further, I should pause for a moment to emphasize a certain fact: The technology for this kind of digital setup is constantly changing. Even as I write this chapter, software programs are being upgraded and different video formats are phasing out, with new ones rising in popularity. Who knows...in a few years we might be shooting stop-motion with cell phones! This section of the book should help you learn about some different formats and the constant variables you should be aware of, no matter how much things change in the future. As far as what kinds of equipment you use, that is totally up to your personal preferences, budget, and overall purpose for shooting stop-motion. The highest quality possible may be important if you are making a short film for distribution, but only marginally important if you are a beginner just learning how to animate.
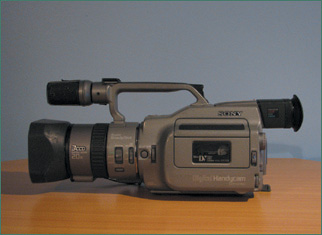
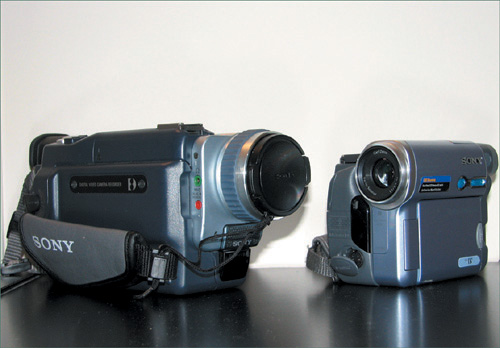
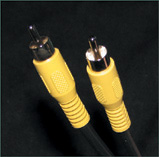
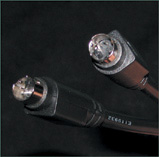
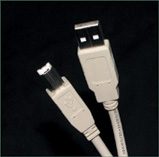
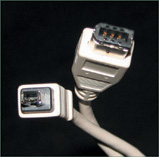
Any kind of video camera will work for shooting stop-motion animation, but it’s important to know a little bit about the different kinds. Older cameras from the ’80s to early ’90s are analog only, which means images are recorded onto magnetic videotape, and RCA jacks are used for outputting the image. More recent trends have moved toward digital cameras that record images digitally with better resolution, either in Hi-8 or Mini DV format (see Figures 4.3 and 4.4). Many of them still have analog or S-video outputs, as well as USB and Firewire outputs (see Figures 4.5–4.8). Prices for digital video cameras vary, from the “home movie” purpose handheld camcorder you can buy in your local electronics store to more professional cameras for studio use, which can cost up to several thousand dollars. Another option would be a broadcast video camera that will provide images without a tape-recording mechanism. You will not be recording on tape when shooting stop-motion, so if the camera will not record, it doesn’t matter.
Make sure your video camera has manual options for focus, zoom, and exposure. When you shoot your animation, always have your camera set to manual focus instead of auto focus. If auto focus is left on while animating, the camera will need a few seconds to adjust after you move away from the puppet each frame. If you then capture the frame too quickly, the camera might not be finished focusing itself. Manual focus alleviates this problem, so you will always know that every frame looks sharp. You can focus the camera the same way you would using film. Having a manual exposure will also allow you to control the brightness of your scene. Light meters can be used to ensure an accurate exposure if you wish, but video is much more predictable than film, and what you see is what you get. Another important setting to adjust on your camera is white balance. Place a white piece of paper or foam board in front of the camera and push the white balance button until the camera sets itself to recognize everything that is white in the frame.
While shooting your animation, make sure there is no videotape cassette inside the camera. Your images will not be stored on tape, but rather in your computer using stop-motion software, which I will go into detail about shortly. When there is a tape inside a video camera that is not recording, most cameras will utilize a function that automatically shuts it off after a few minutes, which you do not want happening while you shoot. Do not use a battery while shooting either, as this will reduce the amount of time allotted to you for shooting. It is far better to plug your camera into the wall with the AC adaptor so that it will always be on. Some cameras have a demo mode that automatically activates when the camera is turned on. Demo mode automatically runs through all of the camera’s special features such as titles, borders, no-shake mode, and special video effects. Make sure demo mode is off before you start shooting.
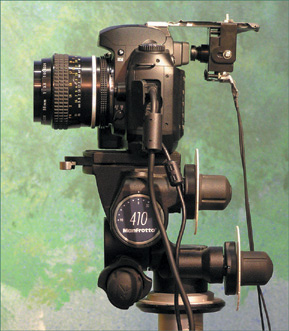
The option of shooting stop-motion with a digital still camera is currently a growing trend for professionals and hard-core indies who are intent on getting the best resolution possible. SLR (single lens reflex) cameras are not cheap. Certain brands of cameras like Canon Powershots provide a cheaper alternative but may not have all of the manual settings found in more high-end models. The settings on many digital SLR cameras are all manual, and they are extremely complex to use. An SLR camera connected to your computer can capture each frame as a high-definition image to a directory straight on your hard drive, and the image quality will match that of film. For stop-motion, using a digital still camera alone will not provide you with a live video feed necessary for using the functions of stop-motion software such as frame grabbing or onion skinning, which I will explain further in this chapter. It must be equipped with a video assist method that will give you the live feed for using the software to register your movements. (See Figure 4.9, and read the interview with Nick Hilligoss in Chapter 12 to learn about his setup using a digital SLR camera.) Recent upgrades to certain stop-motion software programs include automatic plug-ins for certain brands of SLR cameras and the opportunity to keep the image directory and video assist synced, with a remote function to capture frames using the software. This option is a huge technological breakthrough that has made its way from the industry into the modern home studio for professional use, and the implications for shooting stop-motion in beautiful high-definition are very exciting. If you want to create films in this manner, keep your day job and save up for buckets of hard drive space and the SLR camera itself.
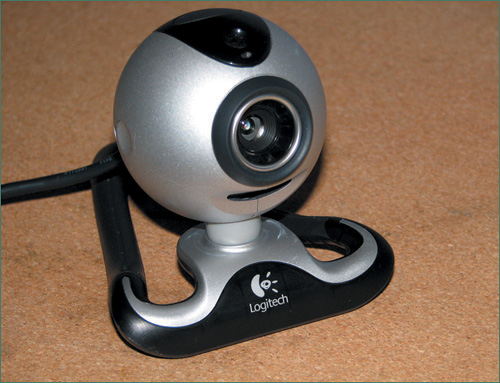
If you cannot afford a film or video camera, the cheapest and most straightforward method for capturing your stop-motion images is to use a webcam (see Figure 4.10), which can be fed right into your computer with a USB connection, with no need for a capture card. For simple beginner exercises, webcams work very well and also use up less physical space. Most of them do not provide full resolution, but there are now a few on the market that do, so do your research, as this technology will only continue to improve as time rolls on. If you use a webcam, do not use the little cradle stand they typically come with. The camera will not be held steady this way. You need to get one that has a tripod attachment, and, as with all cameras, lock it down so it will not move at all.
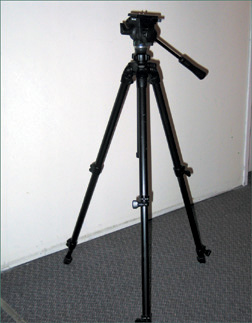
There are no “handheld” shots in animation! The most important thing about your camera, especially for the exercises in this book, is that it must not move, because any movement will cause your final image to shift around when played back at speed. Any kind of tripod (see Figure 4.11) will work to accomplish this, but make sure it’s a good one without loose parts. A tripod has different dials and knobs that are used to adjust its height and position. Once the tripod has been set up the way you want it, tighten the knobs as far as they will go, taking care not to use so much strength that you break them off. The knobs can be rather delicate on some models. Some tripods will have a level feature with a tiny air bubble to help you ensure it is parallel with the ground. Check your image in the viewfinder or on the monitor to make sure your picture is not crooked. The tripod needs to be secured to the floor so that it will not shift during your shoot, so the floor in your studio space must be level and flat. Loose wooden floorboards or uneven foundations in a room will cause your tripod to shift as you or anyone else walks around. Floors made of tile or concrete lend themselves best to securing a tripod. A cheap method is sticky tack (if the tripod legs have smooth rubber tips), hot glue, or the ever-handy duct tape solution. The tripod can always be nailed or screwed into the floor as well. To keep it steady, a good extra piece for your tripod is a spreader that attaches to each leg and can be nailed, taped, or glued down, or weighted with sandbags. If your budget allows, it’s worth it to invest in a really nice professional tripod from a photography or film supplier.
For more elaborate shots in stop-motion involving camera movement, a geared tripod head will allow you to animate the camera to create simple pans or tilts, if you want to create shots like this. You can attach a dial with markings that will serve as a guide for moving the camera slightly for each frame. This must be done with extra special care but can add a lot of cinematic life to your animation. Moving shots can also be done with a dolly that moves the camera along for each frame. Professionals on million-dollar films like Corpse Bride use a motion control camera rig to create any kind of moving shots. Motion control involves a computer that can be programmed with the exact start and end position of a camera move, including everything in between, even zooms and rack focusing. Exposures are plugged into the motion control so that after each frame is exposed, the camera is automatically moved into the next stage of its programmed movement. For our simple purposes, this is all pretty high-end stuff, but it’s worth building into your studio if you want to go more high-tech. It’s a good idea, at least, to experiment and know how it is done.
Whatever kind of computer you currently have, it can likely be used for shooting stop-motion once you have a video capture card installed and a good software program. If you want to shoot your images at full resolution and have them play back at the proper speed, you should ideally have something close to at least 1GB of RAM in your computer. Make sure you have as much hard drive space as possible, as your files can get very large, especially if you are shooting a short film with many scenes. Ideally, you should have a separate hard drive just for your stop-motion media files, either inside the computer or as an external drive that connects by Firewire. You can also save your files to your internal hard drive and use the external as a back-up drive.
Currently, capture cards can be purchased rather inexpensively, especially ones that give you the option of analog inputs. A popular brand that works well for stop-motion capture is the Osprey card. It’s now becoming more common for computers to come with a straight Firewire connection so that a capture card is not even entirely necessary. The convenience factor behind Firewire has much to do with its popularity, although the image it creates for live video is actually a compressed image that has an effect on the color seen by the camera. An analog S-video connection will not give you compression, so in many cases this might give you the most accurate capture of what the camera actually sees. If your stop-motion program allows for frame averaging, or if you are shooting with an SLR camera, this may also balance out any drawbacks to using a Firewire connection. Again, this is one of those areas where you just have to do your research and roll with the times as the technology changes. We are currently entering the age of HD (High Definition) video becoming standard, and this will likely surpass the quality of S-video and Firewire.
A new revolution was born the moment that specific software for stop-motion animation was developed and made available for home or professional use. One of the first software programs to come along was Stop Motion Pro, a PC-based program created by a company out of Australia. I first purchased it many years ago for use on a student film and have used it for my own work and my part-time course at VanArts ever since. For Mac users, one of the earliest programs developed was FrameThief, which places such as Cuppa Coffee Studio in Toronto still use for their productions. Since the development of these pioneering tools, many other programs have become available. Many of them are similar, but they vary in price and special features. Almost all stop-motion programs can be downloaded and purchased over the Internet. Some are for PCs only, and some are for Macs only. Some of them work only with a USB or Firewire connection, and others will work with an analog connection. There are now stop-motion programs that are compatible with certain brands of digital still cameras. Each software program will have its own Web site with information on its features, technical requirements, and usually a free trial download. The free trial will allow you to use it on your computer, but not always necessarily save your files. There will usually be a watermark or a line through the viewfinder to prevent you from creating any finished animation files without paying for them. Once you have tried a software package for a limited number of times as a free trial, you can pay for your own license by filling out an order form on the Web site. Once the license is paid for, a code may be e-mailed to you enabling you to fully activate your software and use it for saving your own animation files.
To make full use of this book and to have the most convenient means to create your animation, the software you use should have, at the very least, the following features:
Frame toggling. This is a term that means the same thing as frame grabbing or frame storing. As you start capturing frames, you should be able to “toggle” between the last frame you captured and the live frame you are animating. This is the stop-motion equivalent to flipping two sequential drawings, as in 2D animation. Toggling your frames allows you to check each movement before capturing it. This is the most common feature that any good stop-motion software must have, and it is something that Lunchbox frame-grabbing systems could do before any of these software applications became available. Even programs that are not the most ideal for stop-motion will have ways to accomplish frame toggling. As with this feature and many others, it helps if your software of choice has keyboard shortcuts to help speed along production.
Onion skinning. This feature allows you to see your current live frame as a transparent “ghost” image superimposed over your last stored frame (see Figure 4.12). It’s especially useful for making very minute registered movements, and it also comes in handy when mishaps happen such as bumping the camera or set. You can also completely remove your puppet or object from the set to manipulate it, and use the onion skin reference to place it back in line with your previous frame. It is very much like using a light table for 2D animation, which allows you to see two or more drawings superimposed over each other. Some programs have an option for changing how many frames you can display as onion skin at once. For most intents and purposes, all you really need to see is the one previous frame. Seeing too many frames blended together can sometimes be confusing to look at.
Instant real-time playback. In addition to being able to compare your last stored frame with your current live frame, you should be able to view all of your previously stored frames in sequence at the proper speed. This will further aid you in making sure that your scene is turning out exactly the way you want it. The most standard frame rate for animation and playback is 24 frames per second, so make sure your software is capable of shooting at this frame rate.
Frame editing and looping. It’s very common to make mistakes while shooting your animation. You might get punchy with the capture button and shoot a frame before taking your hand or head away completely. You might also accidentally leave a sculpting tool sitting on your set when capturing. When mishaps like this happen, you need an instant way of cutting out frames with mistakes in them so that you can reshoot them. You can also take advantage of frame editing if you wish to go back and reanimate a certain series of frames to get a better result. A frame-editing function should also allow you to copy and paste frames, so if you animate an action that you want repeated in a cycle, you can copy/paste to repeat frames so they do not have to be animated again. When you play back your scene, it’s extremely helpful to have a loop function so that the scene will repeat itself after reaching the last frame. This allows you to sit back and analyze the movement, or simply enjoy it, without manually repeating the Play button.
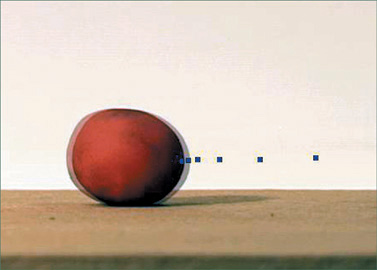
Markers. Before these programs were available, animators with a video monitor could draw marks on the screen to help plan their animation. This can still be done on a computer monitor, in addition to a built-in feature in the software itself that is now possible. Markers are simply computerized dots that can be placed on the screen to help register and plan out your intended movements (see Figure 4.13). Most programs allow you to create markers by simply clicking on the screen. It’s useful to be able to change colors and sizes of your markers if you are trying to keep track of several different parts of your puppet’s movement. You should be able to delete or move individual markers on the screen. The markers will not show up in your captured animation when it plays back.
Exporting into movie files. The raw data of captured frames is created with the software and can only be edited or added to within that software. To view your animation outside the software used to create it, and ultimately create a version that can be used for post-production and editing, you must be able to export your animation as an independent movie file. The more options you have for different file formats, the better, because they give you flexibility depending on how you plan to distribute your animation. Here is a summary of the most common formats for movie files:
Avi. This is a standard video media file that will typically export as an uncompressed movie. The quality is very high, but the file size is also very large, so playing the exported avi by itself for viewing purposes will not usually play back without chugging, even on a fast computer. An uncompressed avi file can be imported into any editing software (like Adobe Premiere) for editing and adding sound or music. From this uncompressed, edited footage, the editing program can export it as an Mpeg or QuickTime file for delivery.
Mpeg. Some stop-motion programs will export movies as Mpegs, which are smaller than avi files and more suited for playing back your animation in real time. They only export at half the resolution of an avi, so although they work fine for playing back your animation, an Mpeg file is not the best to use for editing. Mpeg1 format is the standard for VCD, and an Mpeg2 file created by editing software at full resolution from an uncompressed avi is the final delivery format for DVD.
QuickTime. This is a file type that carries over from Macs but can run on a PC as well, usually with the extension .mov. The QuickTime player software will also play avi files if they are created with the right codec. For playback on the Internet, QuickTime files are the best files to use.
It’s also useful if your software is able to export each frame as an individual file, such as a Targa, Jpeg, or Bitmap file. If you export your entire animation scene as a sequence of frames, you can import them into an editing program like Adobe Premiere and maintain a high level of quality. Targas provide the best quality, with each frame being sharp and clear if being exported from the actual stored frames in the stop-motion software. Exporting individual frames is useful if you want to manipulate certain frames in Photoshop for adding effects like motion blur, fixing mistakes, and removing support rigs or wires.
Frame averaging. I mention frame averaging as a useful feature for professional work, where you certainly want the best picture quality possible. Frame averaging improves the quality of each frame as it is captured while animating, and can be set to varying degrees for different levels of picture quality and video noise reduction. If your subjects are lit very well, frame averaging may not always be necessary, unless you are extremely particular about sharp images. The only frustration with frame averaging at a high level is that it can take anywhere from 10 to 30 seconds to average each time you click the Capture button, and this waiting can slow down the animation process. The speed of your computer will also have an effect on how long frame averaging takes. The wait is worth it for a low-cost alternative to fancy cameras to achieve high resolution.
Audio sync. This function is needed only if you are animating to music, sound effects, or dialogue with a prerecorded track, which I will discuss in more detail in Chapter 9, “Puppet Animation.” It gives you the ability to see your animation and sound together and make sure they are truly in sync, without the added step of compositing sound and picture together in another software program.
Rotoscoping. This is a very useful feature, but I mention it as the last “requirement” feature because I don’t think it should be used too literally. Rotoscoping is a technique that has its origins in 2D animation, first patented and utilized in the 1920s by the Fleischer studio, which was famous for Popeye, Betty Boop, and Koko the Clown. It consisted of shooting live action on film and tracing over each frame on paper to create animation with an exact resemblance to real live movement. Some very innovative and surreal effects have been created throughout history with the rotoscope technique. The problem with it, however, is that it too often creates dull, lifeless animation due to the lack of exaggeration. Animation is not fulfilling its full potential when it strives to literally duplicate reality to an exact degree. There needs to be an element of exaggeration injected into it if it is to be believable. It is also a somewhat wasted use of animation, if the point is to mimic live footage that has already been captured. Many stop-motion software applications now have a synchronized rotoscope function that allows you to import video clips and superimpose them frame by frame as a transparent image over your animation. The clip may be reference footage of yourself or another actor shot with a video camera or webcam. By lining up your puppet with the actor in the video clip, you can literally copy the movement for a life-like effect where the puppet will move exactly the same way. In some cases for very complicated actions, this could possibly prove a great benefit, but I would not suggest relying on it too much. The reason I do not recommend using the rotoscope feature too literally for animation, especially for beginners, is because it can become too much of a crutch and can stifle the learning process. Live-action timing is not the same as animation timing, and if copying live action is done too accurately per frame, you will never learn to develop your own sense of timing for animation. So I would suggest using the rotoscope window as a way to have live-action reference there in front of you as a guide, but not as something that always needs to be superimposed over the frame for exact replication. Have your reference footage in the rotoscope window alongside your animation so that you can analyze it frame by frame and figure out how to create the same motion with your puppet, but with a degree of exaggeration, too.
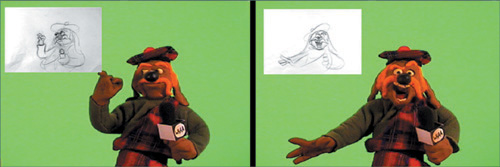
I think a much better use of any superimposed rotoscoping for stop-motion is if a 2D animation sequence is used for matching the puppet, because this is still an animated reference. In 1994, an animated short called The Big Story was created by Tim Watts and David Stoten, featuring clay characters modeled after a Kirk Douglas caricature. The film was animated in rough 2D animation and then replicated frame for frame in clay animation, and the results were superb. Since I also work in both mediums, I have found 2D reference extremely useful for my own animation (see Figure 4.14), and I enjoy experimenting with making stop-motion do whatever 2D can do, while still taking advantage of the medium.
Chroma-key. Many stop-motion software programs now have a built-in feature for chroma-key, which means compositing video footage into any area of the frame that is a specific flat color. It is the same technology used for weather reports on TV and blue-screen or green-screen compositing in movies. For learning animation, it is not a necessary feature, but more of an extra bonus for cool effects or filmmaking, so I will discuss it more later on.
So these are the major software features I would say are the most important for having a convenient set of tools at your disposal for a good animation experience. Another feature that many stop-motion programs have is a time-lapse feature, which is not really relevant to the exercises in this book but fun to experiment with all the same. Time-lapse photography is a film method in which frames are taken at intervals of seconds, minutes, hours, or days apart, to simulate a long period of time passing in a matter of seconds. It is commonly used in music videos and commercials to create effects like fast-moving clouds, blooming flowers, and building construction. There was once an independent filmmaker who made a time-lapse film by pointing a film camera out his window looking out at a garden. At the same times every day for a few years, he took a frame of film, and the result was a fast moving look at the seasons changing. If your stop-motion software has a time-lapse feature, you can set it to automatically capture frames at any interval you wish. It’s a fun technique to play with, and it’s useful for science class demonstrations, too, to show the process of anything that normally develops over a long period. Time-lapse photography has opened our imaginations to the wonders of our natural world in a very unique way.
Whichever software or camera you use along with this book or for your own future projects is up to you, according to your personal preferences and, ultimately, your budget. Some programs are free, but they will not likely have as many bells and whistles as the ones that cost money. Overall, most available programs for stop-motion are not very expensive. I will not go into much detail on the different packages available, as stop-motion expert Lionel Ivan Orozco has already done a great job on this page of his Web site: www.stopmotionworks.com/stopmosoftwr.htm. As the site mentions, you can download free trials of different software to your computer, try it out, and uninstall the program after using it, before purchasing an actual license to save your own work. Remember, software changes, and upgrades are released all the time, so it’s good to move with the times and try to take advantage of new technology as it grows.
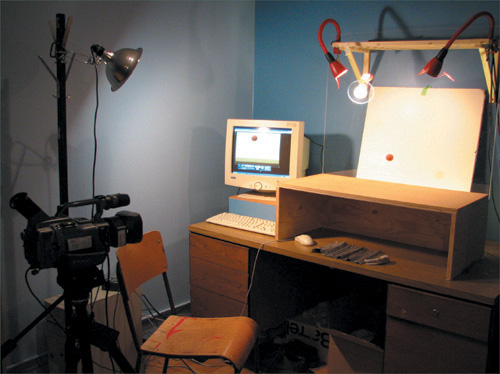
For simple animation exercises, a set does not need to be elaborate. It can be as simple as a tabletop. The important thing is that whatever you use as your stage, ideally it should be set up so that you can have everything you need within reach, especially the objects you are animating. Most ready-made desks and tables are designed to have a waist-level surface since that best suits the purpose they were made for. To have your puppet at this level can be hard on your back, so it’s preferable to have it closer to eye level. This height also gives you a better sense in real space of what your puppet should look like on camera. You can build a table from scratch at a height that works best for you, or you can build a separate tabletop set to place onto a standard desk.
The examples shown in Figures 4.15 and 4.16 show how a slot has been built into the set for fitting a sheet of Plexiglas, which can be placed either behind or in front of a puppet on stage to achieve certain effects. The advantages of a separate tabletop are many, in that you can keep supplies underneath it where they are accessible and out of the camera’s view. You can also easily drill holes for tie-downs, which are screws that go through your puppet’s feet to anchor it to the ground. A wooden platform can be used as a simple surface, and any kind of additional surface can be attached to it. Having a sheet of cork bulletin board material is useful because any holes drilled into it can be hidden rather easily by filling them with loose cork pieces. Clay does not stick to it well, but thumbtacks can be stuck in with the clay surrounding it, giving it extra stability. The cork board can be screwed into the wood so that it can be removed if a different surface is desired. Sticky tack is also a very handy material for adhering anything that should not move, including the tabletop to the desk. Your computer and monitor should be close by so that you can have easy access to the keyboard for capturing.
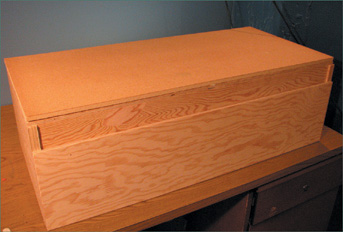
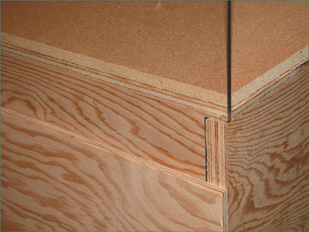
Figure 4.16. Here is a close-up of how the Plexiglas has been cut to fit neatly into the back of the stage.
Overall, how much space you use for your set determines how much space is available to you. Whether you are setting up in a small apartment or a large basement, you must work with what you have. The most important thing to remember is to make sure you choose a room without windows. If you do not have such a room, you will only be able to animate at night when your outdoor lighting conditions will not change. There must be no sunlight cast onto your puppet stage, because the light will change over the span of your shooting and will affect the lighting in your animation. Above your stage, it is useful to have a shelf installed, which can serve many purposes—for example, setting up a plate of glass or strings rig for flying objects, and attaching lights.
To get a high-quality image on camera, whatever lights preexisting in the room in which you shoot will not be enough. You will need extra lighting on your subject. If your set is too dark, your images will be grainy on video and hardly visible at all on film. For simple exercises, lighting does not need to be extremely elaborate. All you really need is enough light to illuminate your puppets and make them look good on camera. You can easily use any kind of cheap lights that you would find at your local hardware or furniture store. I have found simple halogen floods useful, as well as adjustable desk lamps from Ikea that have a snake neck for extra filler light. A very popular option among stop-motion animators is pinspot disco lights (see Figure 4.17), which can be found at DJ or party supply shops, because they are a comfortable size and can be adjusted to a variety of settings for the amount of light projected. For studio productions, some popular lighting kits include Dedo kits and Pepper kits, with Quartz lights that maintain a comparatively cool temperature, which is a plus for stop-motion.
If possible in your space, it is convenient if some lights can be suspended above your stage, rather than on the floor surrounding you. This setup avoids the possibility of bumping into light stands and having extra clutter. Getting the right lighting for your studio space requires a lot of experimentation and patience. You also need to be very careful when handling the lights, as the really bright ones get hot and can burn you badly. Take care to make sure your studio room has enough power to withstand the total voltage you use to light your set. Wattages for simple stop-motion lighting can be low to anywhere between 100 and 650 watts.
There are three kinds of lights for a standard lighting setup:
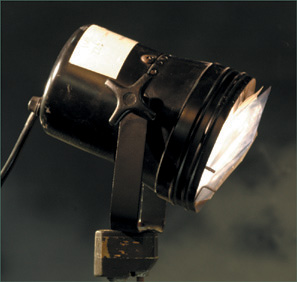
The key light (Figure 4.18) is your main light source and is typically the hardest light used. The direction of the key light is usually from above, at an angle to the subject. A key light from above is especially common in a simulated exterior scene, since it is supposed to represent the sun or moon as the key light source.
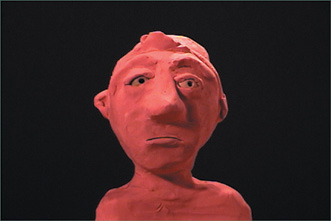
The fill light (Figure 4.19) is a softer light used to fill the shadows created by the key light. As an alternative to an actual light, sometimes a white reflective surface, such as a piece of foam board, will serve the same purpose. Or, the light may be pointed away from your subject and bounced off a white surface to wash the set with more ambient illumination.
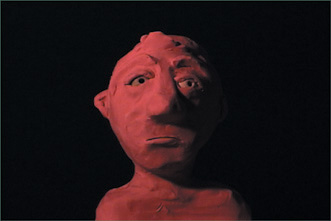
The kicker light (Figure 4.20) gives a rim of light to the edge of the subject to help separate it from the background.

Lighting is used to great effect in creating mood and drama when making your own films, which I will talk more about in Chapter 13, “Making a Film.” For the purpose of learning basic stop-motion, just focus on a basic lighting setup until you are ready to take things further.
In the next chapter, there are several exercises that involve animating clay on glass, so you will at least want a good lighting setup to make this effective, as shown in Figure 4.21. You will want to avoid seeing too much reflection from the glass, so you want to light things in a way that the glass will be invisible and the illusion of clay objects defying gravity can be achieved. After much experimentation, a simple lighting setup I have found that works is to have at least one key light pointing directly at the set, with two fill lights at a 45-degree angle (more or less) to the glass, and some kind of backlight behind the set. Use a white or light-colored background (made simply with a piece of poster board or foam board), and it will be nearly impossible to see any reflections or smudges on the glass. You may also find it necessary to angle the glass back slightly (by attaching it to a shelf, perhaps) so that the tabletop surface does not reflect onto it.
Once the stage is set, you need something to animate. In later chapters on animating and puppet building, I will be making many references to the kinds of supplies you will need for different aspects of stop-motion animation. Rather than listing all of them here and explaining what they are for without context, I have spread them out throughout the book so that you can just make note of what you need as you continue to read through it. Since most of the exercises in the next chapter on basic animation will be done with clay, for now I will just focus on clay-related supplies you will need to get started.
The kind of clay to use for animation is oil-based modeling clay that will stay soft and not dry up and become hard when left sitting out. Water-based clay that dries in the air or in a firing kiln is commonly used for pottery and sculpture but is not suited for animation. Read the label and make sure it indicates that the clay will not harden. Clays will come in a variety of different colors. You can also mix your own colors by melting colors together in a pot, or simply kneading them together in your hands. The heat from your skin will also soften the clay as you work with it.
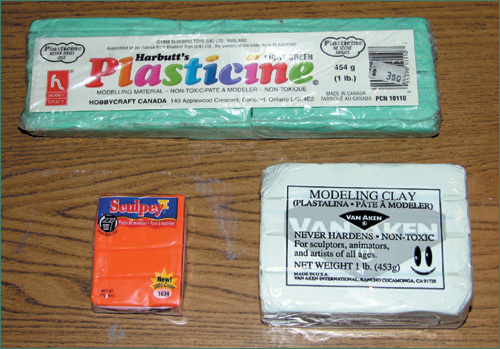
Animation clay is available under several different names and brands (see Figure 4.22). One of the standard brands that originates from the UK is called Plasticine. (In Bristol, the vernacular term is “PlasTERcine.”) A very popular North American brand of clay is Van Aken’s Plastalina. These two types are very similar and both work very well, although Plasticine tends to be slightly softer than the Van Aken brand. When clay gets too soft, it can sometimes be difficult to work with, especially under hot lights. An even softer brand from Van Aken is ClayToons, which works well, but the color comes off on your hands and is extremely messy. Other countries and manufacturers make different kinds of clay under all kinds of names, so use whatever is most easily found wherever you are, but avoid cheap dollar-store brands that are marketed toward kids, as these will typically be too messy to work with.
Sculpey and Fimo are soft polymer clay materials that can be baked in an oven for hardening and are commonly used for sculpting props or puppet appendages that are not supposed to change shape. Sculpey is slightly harder and less greasy than modeling clay, so it is easier to work with for sculpting, and some of my students have experimented with using it for animation. It can often work for facial features like eyebrows, mustaches, or anything that you want only subtle movement with. The hardness of the Sculpey compared with Plasticine prevents colors from blending together too much, but you must watch out for its tendency to crack and crumble.
You will also need some sculpting tools with a variety of different shapes and surfaces. Experiment with different tools and see what kinds of patterns or shapes can be created with them on a lump of clay. Some tools are best suited for creating intricate patterns or textures for clay sculpture that is not intended to move. Detailed textures such as fish or dragon scales are a difficulty in clay animation, in that your sculpture needs to be handled to give it the illusion of life, and these details will be quickly smudged away after a few frames. If your puppet is to have a detailed texture while still maintaining a clay appearance, then sculpt those parts of your puppet with Sculpey and bake it, leaving the more expressive parts that will move as modeling clay. A classic example of this method is Nick Park’s Wallace character (of Wallace & Gromit). The green sweater he wore in his first three short films was made of a hard baked clay material so that it would not be smudged during the animation.
Clay is hard to keep clean during animation. You may find yourself needing to clean off your puppets or clay objects often, as dirt and oil from your fingers will find its way onto the surface as you work with it. Scraping off thin layers of dirt with a flat sculpting tool will keep things clean, but take care not to disturb your volumes too much. Keep some baby wipes nearby so that you can keep your fingers as clean as possible. When using different colors together at once, watch out for unwanted blending or running together of the colors. Under the lights, your clay will soften and can cause this to happen.
Once you have a simple set, lights, camera/computer, and something to animate, you are ready to start your journey as a stop-motion animator. As you set up all of these items for your studio space, work with the space you have as best you can to ensure that you have enough room to maneuver and to reach your puppets and capture method without too much trouble. Remember, everything in your studio space must be as sturdy as possible so that nothing will move except your puppet and you. As you weave through your set, taking care not to bump into lights, camera, or stage, suddenly your awareness of the physical space around you becomes different. It is an awkward dance, like walking on a tightrope or eggshells, treating everything as delicate and precious. One false move, and hours of hard work can be lost. So it should go without saying, as a final word of advice: KEEP DOGS, CATS, AND SMALL CHILDREN OUT!