
Chapter 21. Serverless computing
In this final chapter, let’s gaze into the future with serverless computing. If you’re a developer, the idea of containers that we examined in chapter 19 may have been appealing because there’s less of a need to configure the underlying infrastructure for your applications. If so, you’re going to love the Azure serverless components! And if you’re an IT administrator who suddenly wonders what your job will include if there are no servers in the future, don’t worry! Serverless computing may be more of a marketing term, and many of the server and infrastructure skills you have continue to apply!
In Azure, two main offerings provide serverless compute features: Azure Logic Apps and Azure Function Apps. In this chapter, we explore what each service offers and how they can work together. To make sure your serverless applications can communicate with each other and pass data around, we also discuss messaging services like Azure Event Grid, Service Bus, and Event Hubs.
21.1. What is serverless computing?
To say that that serverless computing is without a server is just plain wrong—a server, somewhere, runs some code for you. The difference from IaaS application workloads like Azure VMs and PaaS workloads in web apps is that serverless applications are usually broken down into smaller discrete units of an application. You don’t run a single, large application; instead, you run bite-sized application components. If this sounds like the containers and microservices that we discussed in chapter 19, don’t worry that you’re going crazy—serverless computing has a lot of overlap with those topics in terms of how you design your applications. Figure 21.1 shows how an application is broken into small components that run on a serverless computing provider and provide small units of output.
Figure 21.1. In a serverless computing environment, each application is broken down in small, discrete units of application components. Each component runs on a serverless computing provider, such as Azure Function Apps, and output is produced that can then be consumed by other serverless application components or other Azure services such as Azure IoT or Azure Storage.

In Azure, serverless computing covers two primary services:
- Azure Logic Apps—To respond to certain inputs and triggers, logic apps let you visually build workflows that can process and generate additional
actions in a point-and-click, no-code-required way. Logic apps can be built by users with no programming or IT infrastructure
background. A simple logic app outline is shown in figure 21.2.
Figure 21.2. In a logic app, an input could be when a tweet is posted, a file is uploaded, or a message is received from an IoT device. The logic app applies rules and filters to the data and determines if the message meets criteria you define. Output actions, such as generating an email, are then completed. All this logic involves no programming or application infrastructure other than an Azure subscription.
There are no security updates to maintain and no design requirements around high availability or the ability to scale. The Azure platform automatically handles this. Hundreds of prebuilt connectors exist for logic apps to integrate with services such as Twitter, Office 365, SharePoint, and Outlook. You can respond to public tweets about your company or product, email an alert when a file is uploaded to SharePoint, or send a notification when a message is received from an IoT device.
- Azure Function Apps—To run small blocks of code, function apps let you use common programming languages such as C#, Node.js, or Python without
any additional infrastructure management. Your code runs in a secure, isolated environment, and you’re billed based on memory
consumption per second. Figure 21.3 outlines the basic process for a function app.
Figure 21.3. As with a logic app, an event notification or trigger usually starts an Azure function. The function app contains a small unit of code that executes a specific task. There’s no infrastructure to configure or maintain. Only your small code block is required. Once the code execution is complete, the output can be integrated with another Azure service or application.
There’s no VM to maintain, and no web app is required. You don’t have to worry about high availability or scale, because the Azure Function Apps service handles this for you. All you provide is your code, and the Azure platform makes sure that whenever you need to run that code, resources are available to process your request.
Logic apps require no code, so they have a wider potential user base. Business application owners or finance and accounting teams, for example, can build their own logic apps without having to write code. Function apps provide more control and flexibility and let you handle events in a specific way and better integrate with other application components.
Both logic apps and function apps provide a way for you to carry out actions based on triggers without having to maintain any application environment or infrastructure. A server somewhere in Azure runs your logic app or function, but from your perspective as the IT administrator or developer, these are serverless technologies.
21.2. Azure messaging platforms
In chapter 12, we looked at how to monitor and troubleshoot Azure resources, and in chapter 16 we saw how to use Azure Security Center to detect issues and perform update management. Both features rely on streams of data, such as the Azure VM diagnostics extension, to inform the platform what’s happening in the VM. The Azure diagnostics and monitoring platforms are great, and other services such as Web Apps, Azure Container Instances, and Azure IoT Hub can also stream service diagnostics for central analysis.
With serverless applications, you often need a way to exchange messages and transmit actual application data, not just troubleshoot diagnostics or status updates. That’s when you need a messaging platform.
21.2.1. Azure Event Grid
What if you just want to report on certain actions or activities being completed? In automation workflows and serverless computing, the ability to carry out an action in response to an event is useful, as shown in figure 21.4.
Figure 21.4. Azure services like Azure IoT and Azure Storage can send notifications to Azure Event Grid. These notifications may happen when a message is received from an IoT device or a file is uploaded to storage. Azure Event Grid allows other services and providers to subscribe to these notifications to perform additional actions in response to events.

Let’s examine a couple of scenarios that you may be able to use in your pizza store:
- Message received in an IoT hub—An IoT device connected to the IoT hub may report a temperature reading in an oven or a delivery vehicle’s location. The IoT hub is configured to forward a notification to Azure Event Grid. An Azure function is subscribed to the Event Grid notifications for the IoT hub and runs a small serverless application component to log the information to Cosmos DB and send an email notification. You could also use logic apps instead of Azure function apps, depending on how complex the application response needs to be.
- File uploaded to Azure storage—The marketing department may upload to storage a promotional coupon to save money on a pizza order. When a new file is created, a notification is sent to Event Grid. A webhook is subscribed to Event Grid and posts a copy of the image from storage to Twitter. This tweet lets customers know about the deal of the week or money-saving coupon.
These scenarios are for truly hands-off serverless computing scenarios, but Event Grid can also integrate with more traditional resources such as VMs and web apps. For example, a resource group can be configured to send notifications to Event Grid. There are many ways to create a VM, such as in the portal, with the Azure CLI, or with a Resource Manager template, so you want to make sure the VM is correctly configured for Update Management through Security Center. An Azure Automation runbook could be subscribed to Event Grid for notifications about VM create operations and would then on-board the VM to the Update Management service and install required security or application updates.
21.2.2. Azure Event Hubs and Service Bus
Event Grid can work with many Azure resources, and it’s well-suited to serverless computing with logic apps or function apps. But logic apps and function apps can run based on other data inputs, such as event hubs or a service bus. Let’s look at the differences between these various messaging services so that you can best decide when to use them:
- Azure Event Hub lets you receive a stream of data, such as from IoT devices or application telemetry. Event hubs provide a low-latency messaging platform capable of handling millions of events per second from multiple concurrent providers. The data received in the event hub can then be processed by other services, as shown in figure 21.5.
Figure 21.5. IoT devices connect to the IoT hub and can stream all their sensor data. There could be hundreds or thousands of connected IoT devices. Azure Event Hubs handles all these separate data streams and allows services such as Azure HDInsight to process the raw data in Hadoop or Spark clusters to analyze and generate reports.

Azure Service Bus allows application components to exchange message data, such as the storage queues that we examined in chapter 4. Storage queues are an earlier, more basic implementation of a messaging platform in Azure. A service bus provides more advanced features such as guaranteed ordering of messages, atomic operations, and sending messages in batches. Figure 21.6 outlines a common scenario for a service bus.
Figure 21.6. Messages are placed in a service bus queue by application components—a frontend app, in this example. Other middleware or backend applications can then pick up these messages and process them as needed. Here, a backend application picks up the message and processes it. Advanced messaging features include guaranteeing the order of messages on the queue, locking messages, timeouts, and relays.

With three services that let you transmit, receive, and process data between applications and services in Azure, which one do you use and when? Table 21.1 provides a high-level recap of the Event Grid, Event Hubs, and Service Bus services.
Table 21.1. Each service is designed to cover a different scenario. Event Grid lets you react to events, Event Hubs lets you stream large amounts of data, and Service Bus lets you transmit messages between services and application components.
|
Azure service |
Provides |
Use case |
|---|---|---|
| Event Grid | Distribution of events | Perform an additional action based on an event occurrence. |
| Event Hubs | Data streams | Receive and transmit large volumes of concurrent data. |
| Service Bus | Message transmission | Provide communication between services and apps. |
Azure logic apps and function apps can be trigged by all three messaging platforms. Let’s create a service bus that can be used to trigger a logic app.
21.2.3. Creating a service bus and integrating it with an IoT hub
In this scenario, you use a service bus to transmit messages received from an IoT hub. Your simulated Raspberry Pi device from the previous chapter generates temperature readings and transmits those to the IoT hub. If the temperature is higher than 30°C, another piece of data is included in the message from the IoT device: temperatureAlert = true. Figure 21.7 outlines how you can integrate an IoT hub with the service bus to process messages with this temperature alert.
Figure 21.7. When your simulated Raspberry Pi IoT device sends message data, a temperature reading of 30°C or more generates an alert. Messages tagged with this alert are placed on a service bus. These messages can then be used to trigger logic apps.

1. Open the Azure portal, and select Create a Resource at upper left in the menu.
2. Search for and select Service Bus, and then choose Create.
3. Provide a name, such as azuremol, and then select the Basic pricing tier.
4. Choose Create New Resource Group, and provide a name, such as azuremolchapter21. Make sure the location is the same as for the resources created in chapter 20, such as East US. The interaction between a service bus queue, a logic app, and a function app may have issues if you aren’t consistent with your locations. Leave the other defaults, and choose Create.
5. Once the resource has been created, select your resource group, and then choose the service bus you created in the previous step. Select Queue, and then enter a name, such as azuremol. Leave all the other defaults, and choose Create.
With a service bus and a queue created, how do you configure an IoT hub to use them? In the IoT hub, you define endpoints as the destination for messages received from IoT devices. A default endpoint exists in the IoT hub for all messages that don’t meet the defined criteria. You can configure the service bus as an endpoint to receive messages. A route is then defined that includes criteria for which messages should be directed to an endpoint. In this example, that route requires any message that contains temperatureAlert = true in the message body to be routed to the service bus endpoint, as shown in figure 21.8.
Figure 21.8. As messages are transmitted from IoT devices to an IoT hub, they can be routed to specific endpoints based on criteria you define. Messages that contain a temperature alert in the message body can be routed to an endpoint that uses the service bus queue. Messages placed on the service bus queue that contain a temperature alert can then be used to trigger things like Azure logic apps or function apps.

To configure an IoT hub to route temperature alert messages to the service bus, complete the following steps.
1. Select your resource group from the previous chapter, such as azuremolchapter20, and then choose the IoT hub.
2. Under Messaging in the navigation bar on the left, select Endpoints. Choose Add an Endpoint.
3. Provide an endpoint name, such as azuremol, and then select Service Bus Queue from the Type drop-down menu.
4. Select your service bus queue namespace, such as azuremol, and then your actual queue.
5. To direct messages to this endpoint, create a route. Under Messaging in the navigation bar on the left, select Routes. Choose Add a Route.
6. Provide a name, such as temperatureAlert. Set Data Source to Device Messages, and then select the endpoint created in the previous step, such as azuremol.
7. In the Query string text box, enter the following:
8. Your route should look like the example shown in figure 21.9. When you’re finished, select Save.
Figure 21.9. Select your service bus endpoint, and then enter the query string that gets any message received from IoT devices tagged with a temperature alert.

You now have a simulated Raspberry Pi device that sends data to the IoT hub, and a route to place messages that contain a temperature alert on a service bus message queue. You don’t really have an application yet—there’s nothing you can do with the data on the service bus queue. What might you want to do with a temperature alert? Sending an email notification is a common example, so let’s see how you can trigger a logic app each time a message is placed on the service bus queue.
21.3. Creating an Azure logic app
As you saw when we discussed logic apps earlier in the chapter, a message received from a service bus queue can be used as a trigger to start the execution process. You use the IoT hub to process the messages received from IoT devices and only route to the service bus queue endpoint messages that contain temperatureAlert = true in the message body. With this approach, your logic app only runs when a temperature alert is generated.
Figure 21.10 outlines what your logic app does. When a message is placed on the service bus queue, the logic app runs and sends an email alert.
To create a logic app, complete the following steps.
1. In the Azure portal, select Create a Resource at upper left in the menu.
2. Search for and select Logic App, and then choose Create.
Figure 21.10. Each message received on the service bus queue from the IoT hub triggers the logic app. When the logic app runs, it sends an email notification through a defined mail provider.

3. Provide a name, such as azuremol, and select your resource group, such as azuremolchapter21. Leave the other defaults, and choose Create.
4. Once the resource has been created, select your resource group, and then open the logic app. The Logic Apps Designer wizard opens. Select the template for “When a message is received in a Service Bus queue,” as shown in figure 21.11.
Figure 21.11. To get started with your logic app, select the template for “When a message is received in the Service Bus queue.”

5. Select Create, and then provide a name, such as azuremol. Choose your service bus queue, such as azuremol, and then choose Create, as shown in figure 21.12.
Figure 21.12. Enter a name for your service bus connection, and select your queue from the Connection Name list. Then, select the RootManageSharedAccessKey connection name, and choose Create.

6. Select Continue, and then choose your service bus queue name, such as azuremol. Choose New Step.
7. To add an action, search for email. Select your provider, such as Gmail - Send an Email, Outlook.com - Send an Email, or SMTP - Send an Email, as shown in figure 21.13.
Figure 21.13. Search for and select your current email provider, such as Gmail or Outlook.com. You can also choose SMTP - Send an Email to manually configure a different provider.

8. Sign in to your email provider to authorize mail routing and confirm that you wish to grant logic apps permissions to send email.
9. Provide a recipient email address at which you receive email; an email subject, such as Temperature alert; and a message body, such as High temperature detected on IoT device.
10. Save the logic app.
Let’s pause and review what you’ve built in the last few exercises, as shown in figure 21.14. This basic serverless application design doesn’t include any controls that limit the number of messages to be sent. In the logic app, you could define that you only want to send a maximum of five e-mail alerts and then wait for 30 minutes before sending more. As part of your application design, you should consider how you want to be notified of situations like this. You could also configure the logic app to read in the message data from the service bus queue and include the timestamp of the IoT device message and the actual recorded temperature. We discuss how to do this in the next exercise.
Figure 21.14. The simulated Raspberry Pi device sends a message to the IoT hub every 2 seconds that contains temperature sensor readings. If the temperature is above 30°C, a temperature alert is noted. The IoT hub routes any messages that contain a temperature alert to a service bus queue. Messages on this queue trigger an Azure logic app to run. The logic app is connected to an e-mail provider, such as Outlook or Gmail, and sends an e-mail notification about the temperature warning from the IoT device.

Let’s see this basic serverless application in action.
To run your simulated Raspberry Pi device and test your logic app, complete the following steps.
1. Open a web browser to the simulated Raspberry Pi IoT device from the previous chapter: https://azure-samples.github.io/raspberry-pi-web-simulator. Verify that your IoT hub connection string is still added in the code window. Choose Run the App.
2. Simulated temperature and humidity sensor readings are generated every 2 seconds, and a message is sent to the IoT hub. It may take a few messages before a simulated temperature reading of 30°C is generated and shown in the output window.
The IoT hub routes any messages that contain temperatureAlert: true to the service bus endpoint. As these messages are placed on the service bus queue, the logic app picks them up and sends an email through the defined provider. You then receive an email to notify you of a high temperature reading. This process should only take a few seconds, end to end.
3. The simulated Raspberry Pi device generates messages every 2 seconds, so stop the app unless you like a lot of email alerts!
When you receive email alerts, the message doesn’t contain a lot of information. Your logic app doesn’t extract the message contents from the service bus and format the information. It would be great if the alert email could include the IoT device name or the temperature recorded. How can you process each message and perform some analysis on it? What about the other Azure serverless component we looked at—Azure function apps?
21.4. Creating an Azure function app to analyze IoT device data
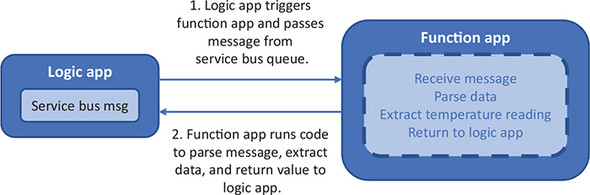
To extend your current serverless application, you can trigger an Azure function app from within your logic app. Message data from the service bus can be sent to a function app for analysis of the recorded temperature. The email notification sent by the logic app can then include information about the IoT device name and the recorded temperature. The interaction between the logic app and the function app is shown in figure 21.15.
Figure 21.15. The logic app triggers the function app. The message received on the service bus queue is passed into the function. Code in the function app parses the message, extracts the temperature, and returns that value to the logic app. It takes a few milliseconds for the function app to run this code, so the cost to performing these compute tasks is fractions of a cent.
To create a function app and trigger it from the logic app, complete the following steps.
1. In the Azure portal, select Create a Resource at upper left in the menu.
2. Search for and select Function App, and then choose Create.
3. Provide a name, such as azuremol, and select your resource group, such as azuremolchapter21. Leave the OS as Windows.
4. There are two Hosting Plan options. A Consumption Plan lets you pay per execution, and the resources you require are dynamically assigned at runtime. For more consistent, production-ready applications, you can use an App Service Plan that provides a fixed, predictable cost.
Choose use a Consumption Plan, and then make sure you select the same region as your logic app, such as East US.
5. Leave the other defaults to create a named storage account, and then choose Create.
6. It takes a minute or two to create the function app. Once the resource has been created, select your resource group, open your logic app, and select Edit.
7. In the Logic App Designer, select New Step, and then choose to add an action.
8. Search for and select Azure Functions, and then choose the function created in the previous steps, such as azuremol. Choose Create New Function.
9. Provide a function name, such as analyzeTemperature. Delete any existing code, replace it with the code from the following listings, and then choose Create.
Listing 21.1. analyzeTemperature Javascript code for a function app
module.exports = function (context, data) { 1
var buffer = new Buffer(data.ContentData, 'base64') 2
var decodedString = buffer.toString(); 3
var objects = JSON.parse(decodedString); 4
var temperature = objects["temperature"]; 5
context.res = { 6
body: { 6
analysis: "Recorded temperature was " + temperature + "!" 6
} 6
}; 6
context.log("Recorded temperature was " + temperature); 7
context.done(); 8
};
- 1 Every JavaScript function app starts with exporting a function that contains a context object. This context object is used to pass data back and forth.
- 2 Reads in message content from the service bus
- 3 Decodes from base64
- 4 Creates a JSON object of decoded service bus messages
- 5 Extracts the recorded temperature from the IoT device
- 6 Builds a response to send back to the Logic App
- 7 Outputs the temperature to the console log
- 8 Every JavaScript function app must end with a call to context.done, which tells the function app that your code is finished.
10. Back in the Logic App Designer for your function step, select the Request Body text box, and then choose Service Bus Message.
11. In the Logic App Designer, drag and drop to reorder the steps so that the Send an Email action is below the analyzeTemperature function app step, as shown in figure 21.16.
Figure 21.16. Drag the Send an Email action below the analyzeTemperature function. Select the end of the message Body, and the Dynamic content dialog appears. To insert the temperature value computed by the function app, select the message Body from the analyzeTemperature function.

12. Select the Send an Email action, and then choose the text box for the Body of the email message.
13. From the analyzeTemperature function, select the Body response, as shown in figure 21.16.
14. In the Logic App Designer, select Save.
Your serverless application has a lot of moving parts. Let’s examine what you’ve built before you run the simulated Raspberry Pi IoT device to generate email alerts that include the temperature reading as computed by the function app. Figure 21.17 provides an overview of all the components now in use in the serverless application.
15. Open your simulated Raspberry Pi device in a web browser, and run the application. Each time the temperature alert is generated, the logic app triggers the function app to extract the temperature data from the message body and include that in the email notification. It may take a few moments for a temperature reading to be higher than 30°C that then flags the message with a temperature alert. When that alert is set and the messaged is processed, you receive an email notification that reports what that temperature was.
Figure 21.17. As messages are received from the simulated Raspberry Pi device, any messages that contain a temperature alert are routed to the service bus queue endpoint. Messages on the service bus queue trigger a logic app, which passes the message to a function app. A JavaScript function parses the temperature reading and returns it to the logic app, which then sends an e-mail notification that includes the temperature recorded by a sensor on the IoT device.

Take a deep breath and pat yourself on the back. That was a lot to do on your lunch break!
21.5. Don’t stop learning
This chapter contained a lot of new concepts. In fact, the last few chapters have contained many new ideas and technologies! Don’t worry if you’re struggling to understand how you can begin to implement all these Azure services, such as containers, AI and ML, and serverless computing. These chapters were to show you what’s possible in Azure and that you don’t need to be limited to performing a lift and shift of legacy applications. As you start to build and run applications in Azure, take the opportunity to modernize applications and review management or deployment workflows. There are many Azure services that simplify and speed up the application lifecycle, so don’t feel like you have to stick with running VMs because that’s what the business is comfortable using.
Yes, Azure offers lots of new, shiny services, but they all largely build on core infrastructure components that were discussed in the main chapters earlier in this book. Developers can start to use the latest application design approaches that involve Kubernetes or serverless computing, and admins can reuse their on-premises datacenter knowledge with cloud computing fundamentals and troubleshooting techniques. As your business needs grow, Azure can support them.
In chapter 1, I was open and honest stating that I wouldn’t cover every service in Azure. There are many more Azure services to learn about and more depth to get into about the services we did look at in the book. I hope you’ve found at least a few areas that interest you and motivate you to explore some more. My favorites include virtual machine scale sets, Cosmos DB, and Azure Kubernetes Service.
21.5.1. Additional learning materials
I’m biased, but a great place to continue learning about Azure is https://docs.microsoft.com/azure. All the core Azure service documentation, architecture guides, reference and SDK resources, and samples are there. Each Azure service has its own set of quick-starts, tutorials, and samples, along with conceptual information and individual how-to guides.
If you get serious, there are certification options for Azure. Individual exams include Implementing Microsoft Azure Infrastructure Solutions (70-533) and Developing Microsoft Azure Solutions (70-532). These exams can count toward wider certification paths such as the Microsoft Certified Solutions Expert (MCSE) in Cloud Platform and Infrastructure, and there are even Linux-focused certifications such as Managing Linux Workloads on Azure (70-539).
21.5.2. GitHub resources
Throughout this book, you’ve used code samples, templates, and sample applications from https://github.com/fouldsy/azure-mol-samples. These samples should stay updated as new versions of the Azure CLI are released, and the GitHub repo also includes PowerShell examples and templates for all the exercises. This book focused on the Azure CLI in the Azure Cloud Shell, but feel free to explore what each exercise looks like in PowerShell or a template.
If you notice any problems with the samples, please create an issue in GitHub at https://github.com/fouldsy/azure-mol-samples/issues. Things move fast in Azure, and I want to make sure you always have the latest, working samples to help you learn. Feel free to make suggestions, too! All the Azure docs from https://docs.microsoft.com/azure also accept feedback, issues, and edits, so as you explore the rest of what’s on offer in Azure, feel free to get involved and help others learn and grow.
21.5.3. One final thought
Take a deep breath and realize that change is now normal. New features and services release almost daily. Azure, like all major cloud computing providers, may look and feel ever-so-slightly different than the last time you used it (an hour ago). If you have the core fundamental skills and understanding that you’ve hopefully learned in this book, you can adapt and grow with all the new opportunities Azure offers. You always have something new to learn, and I’d love to hear what you end up building and running in Azure!