
Start by opening the GameScreen scene you created earlier by double-clicking on it. There should just be a Main Camera and nothing else. Make the background color of the Main Camera black, just like you did earlier, and set the position to X: 3, Y: 6, Z: -10.
A prefab is a type of asset, a reusable GameObject that is accessible from the Project panel. Prefabs can be added into any scene, multiple times per scene. When you add a prefab to a scene, an instance is created of it. All prefab instances are linked to the original prefab. No matter how many instances exist in your project, when you make a change to the prefab, you will see the change applied to all instances of it.
In order to create a prefab, drag a GameObject that you've created in the scene into the Project panel, we're using the Prefabs folder to store ours. The GameObject's name will turn blue to show that it is a prefab.
We're going to need five prefabs in our game; a wall, a floor, a goal, a crate, and a player. Let's just use cubes for now, we can pretty things up later. Click on GameObject | CreateOther | Cube, and a cube will appear in your Hierarchy panel. Click on it to select it, then click on Edit | Duplicate, you'll need to keep doing that until you have created five cubes in total. Click on each one in turn and rename it. Call them wall, floor, goal, crate, and player. Before we make them prefabs, we need to set up the transform of some of them.
Click on the goal GameObject and in the Information panel, set the scale to X: 1, Y: 0.1, Z: 1, and then do the same with the floor GameObject.
Drag each of the new GameObjects in to the Prefabs folder we created in the Projects panel. They should appear in the folder along with a blue cube icon. The GameObject will remain in the Hierarchy panel but the color of its name will have changed from white to blue. Once you have dragged all five GameObjects in the Prefabs folder, you can delete them from the Hierarchy panel.
Our game would be pretty boring with gray cubes for every single model so let's give them some color. For the purposes of this book, we're just going to use self-illuminating, diffused materials on the prefabs, but if you are good with a graphics package you can easily drag a texture into these materials to add some polish to your game. Right-click on the Materials folder in your Project panel and click on Create | Material. Call the new material wall. In the Inspector panel, click on the drop-down menu next to Shader and select Self-Illumin | Diffuse. Just below that, you'll see Main Color with a white color swatch next to it. Click on the swatch and change the color to red then close the color palette window. With your new material selected, click on Edit | Duplicate, you'll need to keep doing that until you have created five materials in total. Click on each one of the duplicated materials and rename it. We already have the wall material, so call the duplicated ones floor, goal, crate, and player. Set colors in the same way as before for each one in turn. Make floor as light gray, goal as bright green, crate as brown, and player as blue.
Click and drag each material to its respective prefab, this will assign the material to the prefab and make out game more colorful.
An array is a reference to a list of objects that you can iterate through numerically. We are going to be storing tile IDs in our array. The ID of the tile will tell us if it's a floor, a wall, a crate, a player or a goal. You will see in the following code that a list is supplied that shows what kind of tile each number represents.
You may have heard of two-dimensional arrays, these are arrays where each object is an array; they are useful for storing map data of a tile based game in as you have columns and rows. We're going to be using a three-dimensional array. The top-level of the array is going to be the number of the level we're on, each element inside that top-level array will represent a row of the game map and each element of the second-level array is going to be a tile ID.
By using an array to store our level data, it means we can easily store our level layouts in a matter of bytes, and by establishing where our play is in the array we get collision detection for very little effort.
Create a new C# script in the scripts folder and call it Sokoban, then double-click on the script to edit it. Add the following code just above the Start method:
// Legend
// 0 = Floor
// 1 = Wall
// 2 = Goal
// 3 = Crate
// 4 = Player
// -1 = Empty tile


// Create the top array, this will store the level arrays
int[][][] levels =
{
  // Create the level array, this will store the row array
  new int [][] {
    // Create all row array, these will store column data
    new int[] {1,1,1,1,1,1,1,1},
    new int[] {1,0,0,1,0,0,0,1},
    new int[] {1,0,3,3,0,3,0,1},
    new int[] {1,0,0,1,0,1,0,1},
    new int[] {1,0,0,1,3,1,0,1},
    new int[] {1,0,0,2,2,2,2,1},
    new int[] {1,0,0,1,0,4,1,1},
    new int[] {1,1,1,1,1,1,1,1}
  }
};
We're only going to have one level for the moment. You can visualize the level quite easily when you look at the three-dimensional array like this.
Now add the following code below the closing bracket of our levels array:
public Transform wall;
public Transform floor;
public Transform goal;
public Transform crate;
public Transform player;
int playerRow;
int playerCol;
Transform thePlayer;
string movingCrate = "";
int amountOfCrates = 0;
Defining the variables here means we will be able to access them from all methods in this class. The ones that are prefixed with public will be exposed inside the Unity development environment. The playerRow and playerCol methods are going to be used in our level-rendering code and the crate related ones are going to be for moving the crates and checking if we've finished the level or not.
We now have the level map in our three-dimensional array, our prefabs to act as the building blocks for our level, and the materials to give them some color, which means we're ready to actually build the level now!
Double-click on your Sokoban script to open it in MonoDevelop, and above the Start method, add the following code:
void BuildLevel () {
  // Loop through the level array
  for (int i = 0; i< levels[0].Length; i++) {

    // Loop through the row array
    for (int j = 0; j < levels[0][i].Length; j++) {

      // What value is the tile in this column
      switch (levels[0][i][j]) {
        case 0: // Floor
        Instantiate(floor,
          new Vector3 (i, -0.6f, j),
        Quaternion.identity);
        break;
        case 1: // Wall, add a floor below it
        Instantiate(
          floor,
          new Vector3 (i, -0.6f, j),
        Quaternion.identity);


        Instantiate(
          wall,
          new Vector3 (i, 0, j),
        Quaternion.identity);
        break;
        case 2: // Goal
        Instantiate(
          goal,
          new Vector3 (i, -0.6f, j),
        Quaternion.identity);
        break;
        case 3: // Create, add a floor below it
        Instantiate(
          floor,
          new Vector3 (i, -0.6f, j),
        Quaternion.identity);
        Transform crateCubeInstance = Instantiate(
          crate,
          new Vector3 (i, 0, j),
        Quaternion.identity) as Transform;
        crateCubeInstance.name =
        "crate_" + i + "_" + j;
        amountOfCrates++;
        break;
        case 4: // Player, add a floor below it
        Instantiate(
          floor,
          new Vector3 (i, -0.6f, j),
        Quaternion.identity);
        thePlayer = Instantiate(
          player,
          new Vector3 (i,0, j),
        Quaternion.identity) as Transform;
        thePlayer.name = "Player";
        playerRow = i;
        playerCol = j;
        break;
      }
    }
  }
}
That does look like quite a lot of code but it's only using three principles, let's go through what they are:
- The
forloop: The firstforloop is iterating through the rows in level 1, we only have one of those so far, so we're just using index 0 in the array. The second for loop is iterating through each column segment in that row. - The
switchstatement: We pass the tile ID, which we get from the column array, into the switch statement which will evaluate what was passed in and respond with the appropriate case. - The
Instantiatemethod: This is the method that loads the prefabs we created earlier and attaches them to the scene. You will see that we passInstantiateto one of thepublic Transformvariables we created earlier.
We have to call the method after creating it so change Start to Awake and add the method call inside there. The final method should look like the following code:
void Awake () {
  BuildLevel();
}
As our prefabs are all one unit in size in both X and Z axis, we can just use the int that are defined in the for loops. As we are setting the walls, player, and crate Y to 0, their Y boundaries will be from -0.5 to 0.5 as Unity will place the center of the GameObject at the location specified. It is for this reason that we set the Y position of the floor and goal GameObjects to -0.6.
- Click on GameObject | Create Empty and a new GameObject will appear in the Hierarchy panel with the name GameObject.
- It should already be highlighted, so click on it once more and the name will become editable; call it
Sokoban. - Drag the
Sokobanscript to the GameObject, and you will see your five exposed, publicTransformvariables in the Inspector panel. - Click and drag each prefab to its respective Transform variable, this will assign the prefab to the variable.
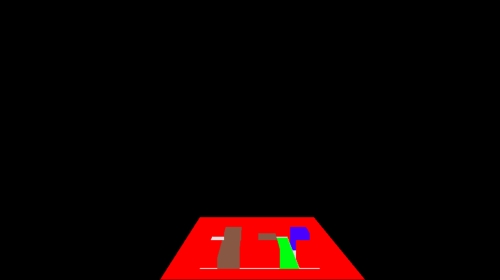
- Click on Build, Run and Compile Application on the Ouya panel, and then proceed past the title screen and you should hopefully see a screen like the following screenshot:
Common fail points are forgetting to add the script to a new GameObject in this scene or neglecting to add the prefabs to the exposed public Transform variables in the Inspector panel.