
Instead of giving us developers a unitypackage file to download, the Ouya team give us a Unity project and we need to build it ourselves. The benefit of this is that the Ouya team can update the files on GitHub and, if we have cloned the repository, we'll be able to pull an update easily and rebuild the packages. The following steps will guide you through creating the Ouya unitypackage file that, after importing, will enable us to configure the Ouya project settings and allow us to deploy to Ouya itself:
- Open Unity and navigate to File | Open Project | Open Other. You'll need to navigate to where you unzipped the Ouya Unity files and press Select Folder. Depending on how up-to-date the files are you may get a message from Unity about upgrading the project, if it asks for an upgrade, then let it proceed.
- To generate the
unitypackagefile, we will need to configure the Ouya project settings which on importing will allow us to deploy to Ouya itself. Click on OUYA | Export Core Package and after a short delay a window will open and you should see a file namedOuyaSDK-Core. - We're now going to create a new Unity project. We'll need to set it to be for the Android platform, set up the Android requirements, and then set up the Ouya-specific requirements. Create a new project in Unity, call it
Sokoban, and navigate to File | Build Settings, then click on Android and click on Switch Platform. Now click on the Player Settings button from the same window. A tab should appear, click on Other Settings and then click on the drop-down box next to Minimum API Level, you will need to select Android 4.1 'Jelly Bean' (API Level 16). Next, click on Resolution and Presentation and set the Default Orientation to Landscape Left. - Finally, navigate to Assets | Import Package | Custom Package… and select the
OuyaSDK-Corefile that was created a moment ago. Import all the files and then, once they have processed, you will see a new menu item at the top of the screen: OUYA.
Each game for Ouya must have a unique bundle identifier. A bundle identifier is used to identify your app in the app store, link purchases from the app to your account, and let other processes know what is running.
Because Unity interfaces with Ouya as an Android app with a Java plugin it means there are three bundle identifiers: one for the Unity project, one for the Android Manifest file, and one for the Java plugin, if there are any mismatches your app won't deploy on to Ouya. The first step is coming up with your bundle identifier, they are normally created in reverse-domain notation, for example: com.companyName.productName. For the purposes of this book we'll use com.generic.sokoban.
Thankfully, Ouya now provides a way to sync the bundle identifier from Unity in to the two other places.
In the Player Settings menu, click on the Android icon and then click on Other Settings and then type the bundle identifier in the textbox marked Bundle Identifier*.

Navigate to Window | Open Ouya Panel. A panel will appear and you will most likely see a [error] (bundle mismatched) warning. Click on Sync Bundle ID and after a few moment that warning should go away.
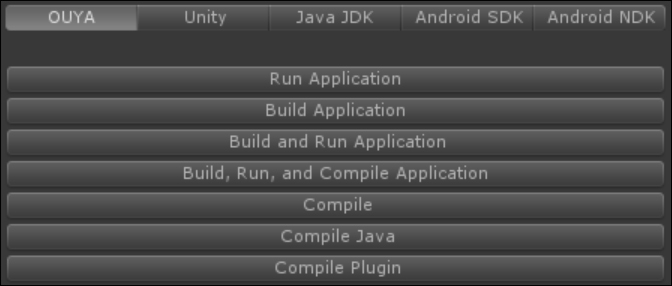
The following is the screenshot of Ouya Panel, you use it to configure all the paths that the Ouya Unity plugin requires.
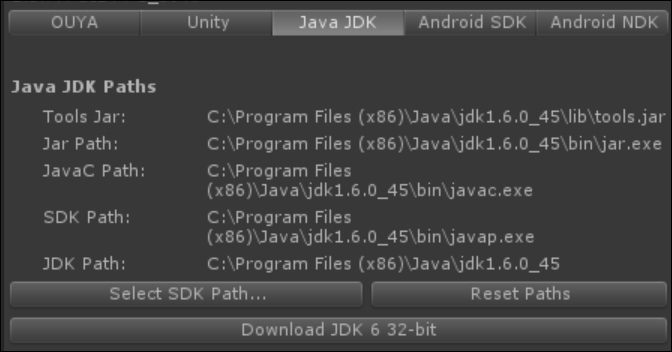
Click on the third tab, Java JDK, and then click on Download JDK 6 32-bit. A browser will open and you will need to accept the license agreement and then click on Windows x86. Oracle will ask you to sign in, do so if you already have an account, if not then create one and download the Java JDK. Run the installer and leave all the options as default, once it's finished head back over to Unity. Click on Select SDK Path… and then navigate to the default install location of the Java JDK, for me the location is c:/Program Files (x86)/Java/jdk1.6.0_45.
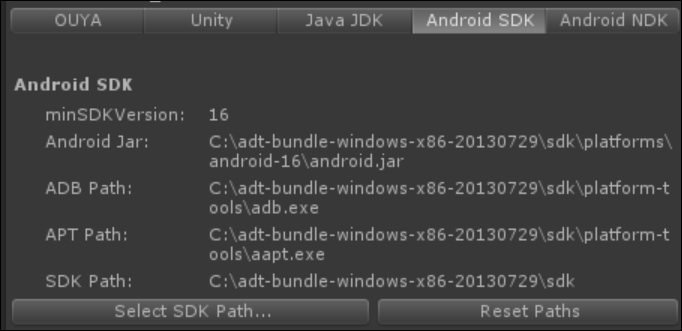
Now click on the fourth tab, Android SDK, and then click on Select SDK Path… and navigate to your root Android SDK folder.
For me the location is c:/adt-bundle-windows-x86-20130729/sdk. The labels at the top of the panel should go from gray to white. If the APT Path is still gray then make sure you copied the aapt.exe from (your root Android SDK install folder)/build-tools/17.0.0 to (your root Android SDK install folder)/platform-tools.
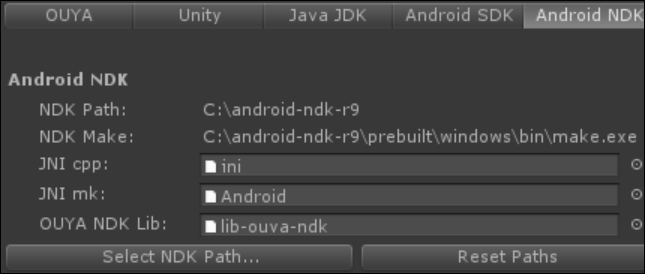
Finally, we have to set up the Android NDK paths. Click on the fifth tab, Android NDK, and then click on Select NDK Path… and navigate to your root Android NDK folder. Now click on Select NDK Make Path… and navigate to your (root Android NDK folder)/prebuilt/windows/bin/make.exe.
Now the Java JDK, Android SDK, and Android NKD have been set up, we need to compile everything. The Ouya Panel makes this really easy. Click on the first tab, OUYA, and you will see three buttons:

Press each one in turn, you should see results in the console, hopefully with no errors. If you do have errors, read them carefully as they usually explain what the issue is. It's normally to do with one of the tabs being set up incorrectly so check each tab in turn, ensuring all the fields that have path names are in white, not gray.
That's Ouya Panel, set up and configured properly. While it does seem like a long process to set it up, it saves your configuration so you only need to do it the once.
Open the Project panel in Unity and navigate to Ouya | SDK | Editor | Prefabs | OuyaGameObject. Drag an instance of this prefab in to the scene and select it. In the Inspector panel you will see a DEVELOPER_ID field, you will need to paste your Developer ID in there. If you don't know what yours is then log in at https://devs.ouya.tv/developers. You'll see Developer UUID (used for configuring in-app purchases). Copy the Developer ID from there and paste it in to the DEVELOPER_ID field in Unity.
We're now ready to see all your hard work so far pay off.
If you have the basic version of Unity then click on Compile on the Ouya Panel and you'll see few command prompts open and close, when it's finished navigate to File | Build & Run.
If you have the pro version of Unity then you can use the Build, Run and Compile Application button. Click on it and you'll see a few command prompts open and then close, followed by the Unity build progress bar.
If all has gone according to plan, in a few moments you'll see a Unity splash screen followed by the blue hue of your default scene and main camera.
Common fail points here are Unity not finding the Ouya or the app opening and then closing immediately. If Unity cannot find the Ouya make sure you have followed all the steps from the Connecting Ouya to your Windows/Mac computer section of this chapter. If the app is opening and then immediately closing again, make sure you have added the required prefabs and entered your Developer ID in to the OuyaGameObject prefab. If it is still opening and then immediately closing, make sure you have also compiled the Java JDK, the Android SDK, and the Android NDK, as described in the Setting up Ouya Panel section of this chapter.
You can breathe a sigh of relief now, that's the boring bit over with.