
In the last section of this chapter, we are going to use all the hardware that we connected to the project for another cool application: accessing a secret piece of data with your fingerprint.
It can, for example, be a secret code that you only want to be accessible with your own fingerprint. We will use the LCD screen for this, removing the need to have the serial monitor opened.
The following is the complete code for this part, excluding the functions to read the fingerprint sensor data:
// Libraries
#include <Adafruit_Fingerprint.h>
#include <SoftwareSerial.h>
#include <LiquidCrystal_I2C.h>
#include <Wire.h>

// LCD Screen instance
LiquidCrystal_I2C lcd(0x27,20,4);

// Function to get fingerprint
int getFingerprintIDez();

// Init Software Serial
SoftwareSerial mySerial(2, 3);

// Fingerprint sensor instance
Adafruit_Fingerprint finger = Adafruit_Fingerprint(&mySerial);

// Relay parameters
int relayPin = 7;
bool relayState = false;

// Your stored finger ID
int fingerID = 0;

// Counters
int activationCounter = 0;
int lastActivation = 0;

// Secret data
String secretData = "u3fks43";

void setup()
{

  // Start Serial
  Serial.begin(9600);

  // Set the data rate for the sensor serial port
  finger.begin(57600);

  // Check if sensor is present
  if (finger.verifyPassword()) {
    Serial.println("Found fingerprint sensor!");
  } else {
    Serial.println("Did not find fingerprint sensor :(");
    while (1);
  }
  Serial.println("Waiting for valid finger...");

  // Set relay as output
  pinMode(relayPin, OUTPUT);

  // Init display
  lcd.init();
  lcd.backlight();
  lcd.clear();
  lcd.setCursor(0,0);
  lcd.print("Scan your finger");
}

void loop()
{
  // Get fingerprint # ID
  int fingerprintID = getFingerprintIDez();

  // Activation ?
  if ( (activationCounter - lastActivation) > 2000) {

    if (fingerprintID == fingerID) {

      lcd.clear();
      lcd.setCursor(0,0);
      lcd.print("Access granted!");
      lcd.setCursor(0,1);
      lcd.print("Your secret data is:");
      lcd.setCursor(0,2);
      lcd.print(secretData);

      if (relayState == false) {
        relayState = true;
        digitalWrite(relayPin, HIGH);
      }
      else if (relayState == true) {
        relayState = false;
        digitalWrite(relayPin, LOW);
      }
      lastActivation = millis();
    }
  }
  activationCounter = millis();
  delay(50);
}
As you can see, this code has some common parts with the code that we saw in the earlier section. Therefore, we are only going to talk about the most important elements here.
It starts by including the required libraries:
#include <Adafruit_Fingerprint.h>
#include <SoftwareSerial.h>
#include <LiquidCrystal_I2C.h>
#include <Wire.h>
Then, we need to create an instance of the LiquidCrystal_I2C LCD screen:
LiquidCrystal_I2C lcd(0x27,20,4);
We will also define a string containing our secret data:
String secretData = "u3fks43";
Of course, feel free to put anything here. Then, in the setup() function, we will initialize the LCD screen:
lcd.init();
lcd.backlight();
lcd.clear();
lcd.setCursor(0,0);
lcd.print("Scan your finger");
Then, in the loop() function of the sketch, if we are outside of the activation period of 2 seconds, we will compare the fingerprint that was measured with the ID that we set in the sketch. If this is correct, we will print a message on the LCD saying that the access was granted along with the secret data:
if (fingerprintID == fingerID) {

      lcd.clear();
      lcd.setCursor(0,0);
      lcd.print("Access granted!");
      lcd.setCursor(0,1);
      lcd.print("Your secret data is:");
      lcd.setCursor(0,2);
      lcd.print(secretData);
Now, it's time to test the sketch. Get all the code, for example, from the GitHub repository of the project and upload it to the board.
Then, place your finger that you previously recorded on the sensor. This is what you should see:
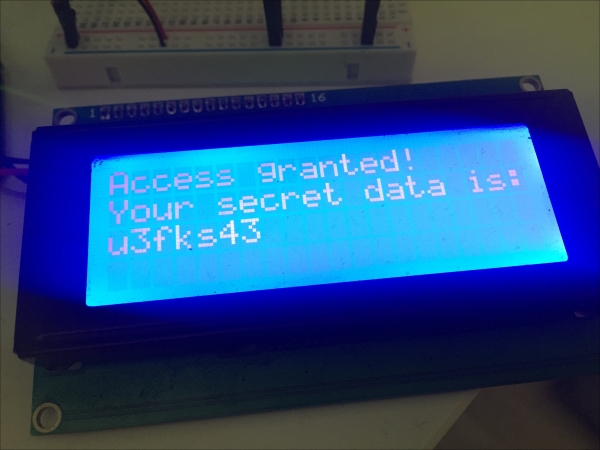
If you can see the preceding result, congratulations, you just built your own fingerprint access control system!