Now that our hardware is ready, we are going to test the FONA shield to see whether it is correctly connected and can connect to the network. As a test, we will send an SMS to the shield and also read all the messages present in the SIM card.
This is the complete Arduino sketch for this part, minus some helper functions that won't be detailed here:
// Include library
#include "Adafruit_FONA.h"
#include <SoftwareSerial.h>

// Pins
#define FONA_RX 2
#define FONA_TX 3
#define FONA_RST 4

// Buffer for replies
char replybuffer[255];

// Software serial
SoftwareSerial fonaSS = SoftwareSerial(FONA_TX, FONA_RX);
SoftwareSerial *fonaSerial = &fonaSS;

// Fona
Adafruit_FONA fona = Adafruit_FONA(FONA_RST);

// Readline function
uint8_t readline(char *buff, uint8_t maxbuff, uint16_t timeout = 0);

void setup() {

  // Start Serial
  while (!Serial);
  Serial.begin(115200);
  Serial.println(F("FONA basic test"));
  Serial.println(F("Initializing....(May take 3 seconds)"));

  // Init FONA
  fonaSerial->begin(4800);
  if (! fona.begin(*fonaSerial)) {
    Serial.println(F("Couldn't find FONA"));
    while(1);
  }
  Serial.println(F("FONA is OK"));

  // Print SIM card IMEI number.
  char imei[15] = {0}; // MUST use a 16 character buffer for IMEI!
  uint8_t imeiLen = fona.getIMEI(imei);
  if (imeiLen > 0) {
    Serial.print("SIM card IMEI: "); Serial.println(imei);
  }

}

void loop() {

  // Get number of SMS
  int8_t smsnum = fona.getNumSMS();
  if (smsnum < 0) {
    Serial.println(F("Could not read # SMS"));
  } else {
    Serial.print(smsnum);
    Serial.println(F(" SMS's on SIM card!"));
  }

  // Read last SMS
  flushSerial();
  Serial.print(F("Read #"));
  uint8_t smsn = smsnum;
  Serial.print(F("

Reading SMS #")); Serial.println(smsn);

  // Retrieve SMS sender address/phone number.
  if (! fona.getSMSSender(smsn, replybuffer, 250)) {
    Serial.println("Failed!");
  }
  Serial.print(F("FROM: ")); Serial.println(replybuffer);

  // Retrieve SMS value.
  uint16_t smslen;
  if (! fona.readSMS(smsn, replybuffer, 250, &smslen)) { // pass in buffer and max len!
    Serial.println("Failed!");
  }
  Serial.print(F("***** SMS #")); Serial.print(smsn);
  Serial.print(" ("); Serial.print(smslen); Serial.println(F(") bytes *****"));
  Serial.println(replybuffer);
  Serial.println(F("*****"));

  // Flush input
  flushSerial();
  while (fona.available()) {
    Serial.write(fona.read());
  }

  // Wait
  delay(10000);

}
Now, let's see the details of this sketch. It starts by including the required libraries:
#include "Adafruit_FONA.h"
#include <SoftwareSerial.h>
Then, we will define the pins on which the FONA shield is connected:
#define FONA_RX 2
#define FONA_TX 3
#define FONA_RST 4
We will also define a buffer that will contain the SMS that we will read from the shield:
char replybuffer[255];
Then, we'll use a SoftwareSerial instance to communicate with the shield:
SoftwareSerial fonaSS = SoftwareSerial(FONA_TX, FONA_RX);
SoftwareSerial *fonaSerial = andfonaSS;
We will also create an instance of the FONA library:
Adafruit_FONA fona = Adafruit_FONA(FONA_RST);
Then, in the setup() function of the sketch, we will start the Serial object for the purpose of debugging and print a welcome message:
while (!Serial);
Serial.begin(115200);
Serial.println(F("FONA basic test"));
Serial.println(F("Initializing....(May take 3 seconds)"));
After that, we will initialize the FONA shield:
fonaSerial->begin(4800);
if (! fona.begin(*fonaSerial)) {
  Serial.println(F("Couldn't find FONA"));
  while(1);
}
Serial.println(F("FONA is OK"));
Then, we will read the IMEI of the SIM card in order to check whether the shield is working and whether a card is present:
char imei[15] = {0}; // MUST use a 16 character buffer for IMEI!
uint8_t imeiLen = fona.getIMEI(imei);
if (imeiLen > 0) {
  Serial.print("SIM card IMEI: "); Serial.println(imei);
}
Now, in the loop() function of the sketch, we will first count the number of text messages present in the card:
int8_t smsnum = fona.getNumSMS();
if (smsnum < 0) {
  Serial.println(F("Could not read # SMS"));
} else {
  Serial.print(smsnum);
  Serial.println(F(" SMS's on SIM card!"));
}
Then, we will also read the last one and print it on the serial monitor:
// Read last SMS
flushSerial();
Serial.print(F("Read #"));
uint8_t smsn = smsnum;
Serial.print(F("

Reading SMS #")); Serial.println(smsn);

 // Retrieve SMS sender address/phone number.
if (! fona.getSMSSender(smsn, replybuffer, 250)) {
  Serial.println("Failed!");
}
Serial.print(F("FROM: ")); Serial.println(replybuffer);

// Retrieve SMS value.
uint16_t smslen;
if (! fona.readSMS(smsn, replybuffer, 250, &smslen)) { // pass in buffer and max len!
  Serial.println("Failed!");
}
Serial.print(F("***** SMS #")); Serial.print(smsn);
Serial.print(" ("); Serial.print(smslen); Serial.println(F(") bytes *****"));
Serial.println(replybuffer);
Serial.println(F("*****"));
Once that's done, we will flush the SoftwareSerial instance and wait for 10 seconds until the next read:
// Flush input
flushSerial();
while (fona.available()) {
  Serial.write(fona.read());
}

// Wait
delay(10000);
Note
Note that the complete code for this section can be found on the GitHub repository of the book at https://github.com/marcoschwartz/arduino-secret-agents.
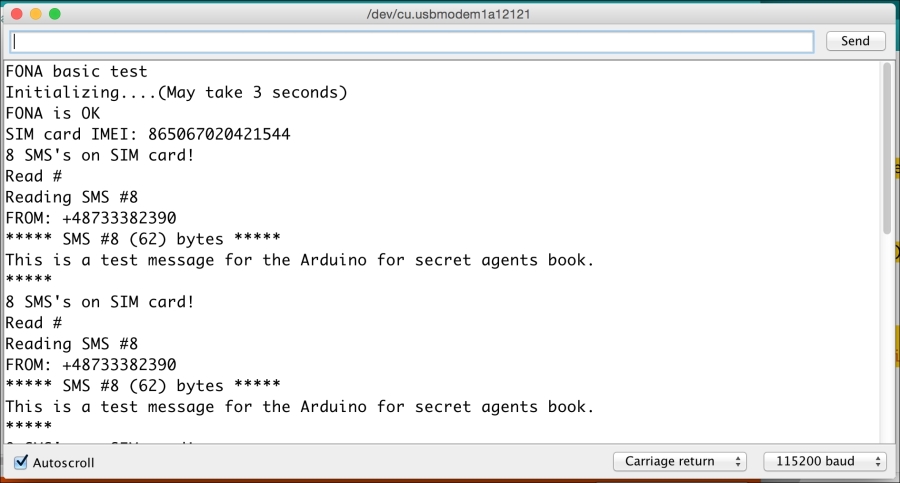
It's now the time to test the FONA shield. Make sure that you get all the code and open it in your Arduino IDE. Then, upload the code to the board and open the serial monitor. You should see the following screenshot:

If everything is working fine, you should see the IMEI number of the SIM card and then the latest SMS in the card. You can test it by sending a message to the phone number of the SIM card; it should immediately show in the next reading of the SIM card. If this works, congratulations! You can now move to the next section.
