
As discussed in our first chapter, there are two options of connecting to our data, namely, Live and Extract. With the Live option, Tableau connects directly to our data and maintains a Live' connection with the data source. In Live connection, Tableau leverages the capabilities of our data source and hence the speed of our data source will determine the performance of our analysis. Whereas, the Extract option helps us import the entire data or subset of our data into Tableau's fast data engine as an Extract. This basically creates a .tde file which stands for Tableau Data Extract.
So far we have used the Live connect option for connecting to our data sources. However, in this section, we will focus on the Extract option.
Typically, Extracts are used for the following reasons:
- Improving performance: If the data source speed is hampering the performance of our analysis, then we can use an Extract. This could be the case when connecting to flat files such as Excel, text files, Access, and so on.
- Enabling more advanced capabilities: Connecting Live to Excel using the legacy connection does not allow certain functions to be used; for example, Count Distinct, Creating Sets, or Combining Sets, and so on. Creating an Extract helps overcome this limitation of connecting Live to Excel using legacy connection.
- Doing an offline analysis: An Extract helps provide offline access to our data.
We can create Extracts at two levels. The first is when we are connecting to the data, and the second is after we have already connected to the data using the Live connection. The first approach is fairly simple as we get the Live or Extract option right at the stage where we define the data sources. Refer to the following screenshot:

As mentioned earlier, when we create an Extract, we create a .tde file. This .tde file is a compressed version of our data, stored in a columnar fashion which is stored on our computers. Further, because of its architecture-aware nature, the Extract file allows us to fully exploit all our machine memory without really having to limit our data size to the capacity of our hardware. Unlike some other tools, the in-memory concept of Tableau is slightly different. Rather than getting all the data onto our machine memory all at once, Tableau will store the data on our disk and load it into the memory as and when required for our visualization. This makes sure that the .tde has the speed benefits of the traditional in-memory solutions without the limitations of having to fit our data into the memory all at once.
Creating the Extract from the data connection window is simple as we just need to select the radio button which reads as Extract. However, in this recipe, we will take a look at how to create an Extract after we have already gone ahead with the default Live connection. A point to remember is that no matter which approach we take, it still gives us the same window for doing the necessary selections for creating our Extracts. Let's get started with the recipe to create an Extract.
We will create an Extract on the already connected data source called Orders (Sample - Superstore Subset (Excel)) in Tableau. In the previous recipes, we had connected Live to the Orders sheets of the Sample - Superstore Subset (Excel).xlsx file.
Since, we have already made a Live connection to this data source, we will see how to create an Extract after the data source had been connected.
- Let us create a new sheet and rename it
Extract. - In the Data window, right-click on the Orders (Sample - Superstore Subset (Excel)) data connection and select the option of Extract Data….. Refer to the following screenshot:

- When we do that, we get a dialog box as shown in the following screenshot:
- We will click on the Extract button at the bottom of the dialog box and when we do that, we will be asked to save the
.tdefile. Save this.tdefile asOrders (Sample - Superstore).tdetoDocumentsMy Tableau RepositoryDatasourcesTableau Cookbook data. - Once we save the
.tdefile to our desired location, we may get a message box saying Processing Request which essentially gives us an update on how many rows of data are being retrieved into the.tdefile. However, if the dataset is small, then we may not even get this message. In either case, once the import is done, the message box will disappear and the data source icon will change in the Data window. Refer to the following screenshot:
- This changed icon indicates that we are no longer connected to the Excel file using a Live connection, and instead we are working with an Extract of the data. Now, in order to use this data, we will create a view for our sheet by creating a bar chart of Profit by Ship Mode. Refer to the following screenshot:

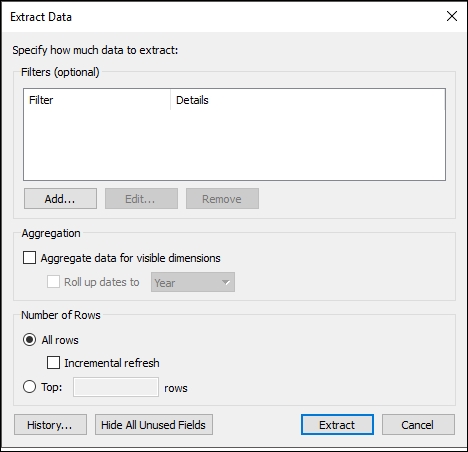
When we create an Extract either at the stage of establishing the data connection for the first time or after we have already connected to the data using the default Live connection, we get the dialog box as shown in the following screenshot:

The first section which says Filters (optional) is the section where we define the filters to fetch the subset of the entire data. In order to do so, we will have to click on the Add… button and we will get the list all the Dimensions and Measures that are available in the dataset.
Please note that, if we are using the Filter option for extracting data at the point of making the connection for the first time, then we will get only the fields that are coming from the data, whereas when we use this option at the point where we have already created a Live connection and then wish to create an Extract, then we will also get the list of calculated fields (if any) that we may have created while being connected Live to the data.
Further, the next section of the Extract dialog box says Aggregation. Here we can specify whether to aggregate the data for visible dimensions by selecting the option of Aggregate data for visible dimensions. When we select this option, then the measures are aggregated using their default aggregation and this in turn reduces the size of the Extract file and also helps in improving the performance. Further, when we select this option, there is another selection which gets enabled called Roll up dates to. This option helps us to aggregate the data at a specified date level such as Year, Quarter, Month, and so on. So if we have day level transactional data, and we select the option of aggregating data by rolling up dates at a month level, then instead of showing values at the day level, these transactional day level values will be aggregated to a month level. Refer to the following screenshot for more clarity:

The next section of the Extract dialog box says Number of Rows. Here, we can select the number of rows that we wish to extract. We can either extract All the rows or Top N rows. In this case, Tableau will first apply any filters and aggregations that we have specified and then extract the number of rows from the result. In this same section, we also see an option of Incremental refresh. As you know, when we create an Extract it stores data at a particular point in time and it needs to be updated on a regular basis to reflect the latest data, while in order to refresh the Extract, we can select the Incremental refresh option. This option will append only those records that are newly added in the data source into our Extract. It will not hamper the existing records. This will reduce the refresh time of the Extract. However, if we don't select this option, then by default Tableau does a full refresh and the whole Extract is regenerated right from the first record. This ensures that we have an exact copy of the underlying data source. However, a full refresh will typically take more time as compared to the Incremental refresh depending on how big the extract is.
In order to refresh the Extract in Tableau Desktop, we will have to right-click on the extracted data source in the Data window and select the Extract | Refresh option. Refer to the following screenshot:

Further, just after the Number of Rows section in the Extract dialog box, there is a button called History… which shows us the history of when the Extract was refreshed. The Extract History dialog box shows the date and time for each refresh, whether it was full or incremental, the number of rows that were added, and the name of the source file if the refresh was from a file. Just adjacent to the History button, there is also another button called Hide All Unused Fields.This basically excludes all the unused fields or hidden fields from the Extract that is being generated.
Now, once we have created an Extract and we wish to toggle between the Live connection and the Extract, then we can do so by unchecking the Use Extract option that is available when we right-click on the extracted data source in the Data window. Refer to the following screenshot:

Note
In order to know more about Extracts, refer the following link: http://onlinehelp.tableau.com/current/pro/desktop/en-us/extracting_data.html