
So far, you learned how to obtain the kernel source code, how to set up the system, how to configure the kernel, and how to create your first custom kernel image. The next step is about equipping your device with your new kernel. To achieve this, we are going to analyze the internal structure of the boot.img file used by every Android device.
A custom ROM comes with four .img files, necessary to create a working Android system. Two of them (system.img and data.img) are compressed images of a Linux compatible filesystem.
The remaining two files (boot.img and recovery.img) don't contain a standard filesystem. Instead, they are custom image files, specific to Android. These images contain a 2KB header sector, the kernel core, compressed with gzip, a ramdisk, and an optional second stated loader.
Android provides further info about the internal structure of the image file in the boot.img.h file contained in the mkbootimg package in the AOSP source folder.
The following screenshot shows a snippet of the content of this file:
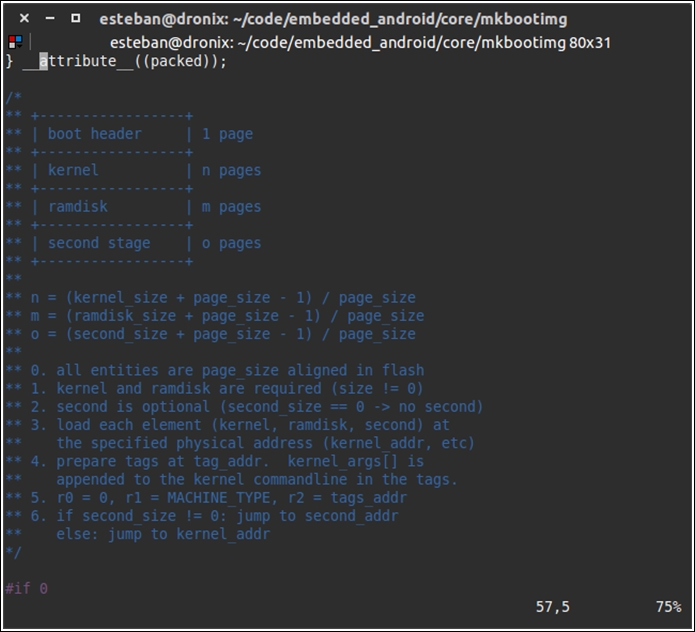
As you can see, the image contains a graphical representation of the boot.img structure. This ASCII art comes with a deeper explanation of sizes and pages.
To create a valid boot.img file, you need the kernel image you have just built and a ramdisk. A ramdisk is a tiny filesystem that is mounted into the system RAM during the boot time. A ramdisk provides a set of critically important files, needed for a successful boot sequence. For instance, it contains the init file that is in charge of launching all the services needed during the boot sequence.
There are two main ways to generate a boot image:
- We could use the
mkbootimgtool - We could use the Android build system
Using mkbootimg gives you a lot of freedom, but comes with a lot of complexity. You would need a serious amount of command-line arguments to properly configure the generating system and create a working image. On the other hand, the Android build system comes with the whole set of configuration parameters already set and ready to go, with zero effort for us to create a working image. Just to give you a rough idea of the complexity of mkbootimg, the following screenshot shows an overview of the required parameters:
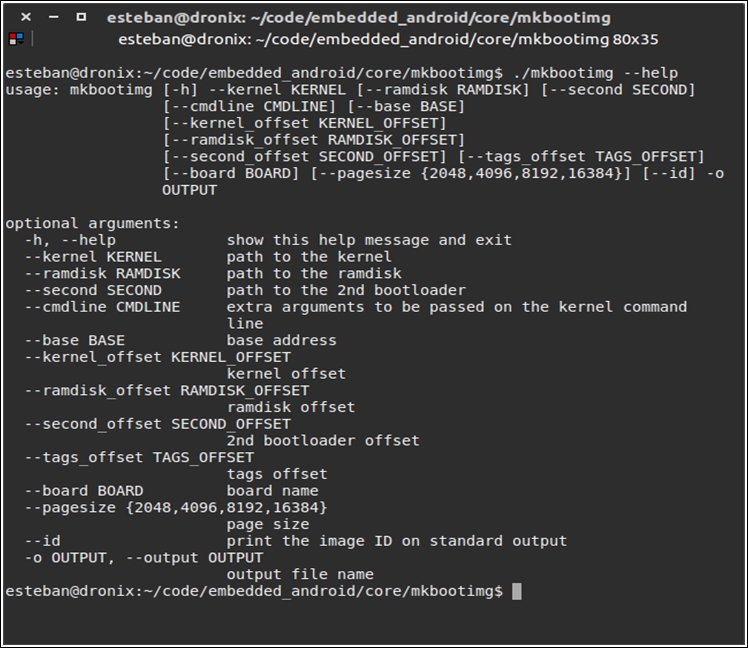
Playing with something so powerful is tempting, but, as you can see, the amount of possible wrong parameters passed to mkbootimg is large. As pragmatic developers, dealing with mkbootimg is not worth the risk at the moment. We want the job done, so we are going to use the Android build system to generate a valid boot image with no effort.
In the previous chapters, you created a custom version of the whole system using Android source code and a properly configured build system. We are going to take advantage of all the work that we have already done to complete this new step. All that you need to do is export a new environment variable, pointing to the kernel image you have created just a few pages ago. With your trusted terminal emulator, launch:
$ export TARGET_PREBUILT_KERNEL=<kernel_src>/arch/arm/boot/zImage-dtb
Once you have set and exported the TARGET_PREBUILT_KERNEL environment variable, you can launch:
$ make bootimage
A brand new, fully customized, boot image will be created by the Android build system and will be placed in the following folder:
$ target/product/<device-name>/boot.img
With just a couple of commands, we have a brand new boot.img file, ready to be flashed. Using the Android build system to generate the boot image is the preferred way for all the Nexus devices and for all those devices, such as the UDOO, that are designed to be as close as possible to an official Google device.
For all those devices on the market that are compliant to this philosophy, things start to get tricky, but not impossible. Some manufactures take advantage of the Apache v2 license and don't provide the whole Android source code. You could find yourself in a scenario where you only have the kernel source code and you won't be able to leverage the Android build system to create your boot image or even understand how boot.img is actually structured.
In these scenarios, one possible approach could be to pull the boot.img from a working device, extract the content, replace the default kernel with your custom version, and recreate boot.img using mkbootimg: easier said than done.
Right now, we want to focus on the main scenario, dealing with a system that is not fighting us. In the upcoming chapters, you will learn how to fight back and take full control of the system.
Once you have your brand new, customized boot image, containing your customized kernel image, you only need to flash it to your device. We are working with Google devices or, at least, Google-compatible devices, so you will be able to use fastboot to flash your boot.img file to your device.
To be able to flash the image to the device, you need to put the device in fastboot mode, also known as bootloader mode. Every device has its own way to reach this mode, so, according to the device you are using, you can examine the table in Chapter 4, Moving to Real-World Hardware with all the steps to reach the fastboot mode.
Once your device is in fastboot mode, you can connect it via USB to your host computer. Fire up a terminal emulator and launch the command to upgrade the boot partition:
$ sudo fastboot flash boot boot.img
In a few seconds, fastboot will replace the content of the device boot partition with the content of your boot.img file. When the flashing process is successfully over, you can reboot your device with:
$ sudo fastboot reboot
The device will reboot using your new kernel and, thanks to the new USB TTL support that you added a few pages ago, you will be able to monitor the whole boot sequence with your terminal emulator.