
In this topic, we will look into how to convert our Arduino connected PowerSwitch Tail into a simple web server to handle client requests, such as the following:
- Turn ON the PowerSwitch Tail
- Turn OFF the PowerSwitch Tail
And other useful information such as:
- Display the current status of the PowerSwitch Tail
- Display the presence or absence of the main electrical power
A web server is a piece of software which serves to connected clients. An Arduino web server uses HTTP on top of TCP and UDP. But remember, the Arduino web server can't be used as a replacement for any web server software running on a computer because of the lack of processing power and limited number of multiple client connectivity.
In this section ,you will learn how to build a web-based control panel for controlling the PowerSwitch Tail through the Internet.
We will use the Arduino programming language and HTML that's running on the Arduino web server. Later, we will add HTML radio button controls to control the power switch.
Using the HTTP GET method, you can send a query string to the server along with the URL.
The query string consists of a name/value pair. The query string is appended to the end of the URL and the syntax is http://example.com?name1=value1.
Also, you can add more name/value pairs to the URL by separating them with the & character, as shown in the following example:
http://example.com?name1=value1&name2=value2.
So, our Arduino web server can actuate the PowerSwitch Tail using the following URLs:
- To turn ON the PowerSwitch Tail:
http://192.168.1.177/?switch=1 - To turn OFF the PowerSwitch Tail:
http://192.168.1.177/?switch=0
The following sketch can be used by the web server to read the incoming client requests, process them, and actuate the relay inside the PowerSwitch Tail:
- Open your Arduino IDE and type or paste the code from the
B04844_01_02.inosketch. - In the sketch, replace the MAC address with your Arduino Ethernet Shield's MAC address:
byte mac[] = { 0x90, 0xA2, 0xDA, 0x0B, 0x00 and 0xDD }; - Replace the IP address with an IP valid static IP address in the range of your local network:
IPAddress ip(192,168,1,177);
- If you want the IP address dynamically assigned by the DHCP to the Arduino Ethernet Shield, do the following:
- Comment the following line in the code:
//IPAddress ip(192,168,1,177);
- Comment the following line in the code:
//Ethernet.begin(mac, ip);
- Uncomment the following line in the code:
Ethernet.begin(mac);
- Comment the following line in the code:
- The following two lines will read the incoming HTTP request from the client using the
EthernetClientclass'sread()method and store it in a string variablehttp_Request:char c = client.read(); http_Request += c;
- The following code snippet will check whether the HTTP request string contains the query string that is sent to the URL. If found, it will turn on or off the PowerSwitch Tail according to the name/value pair logically checked inside the sketch.
The
indexOf()function can be used to search for the string within another string. If it finds the stringswitch=1inside the HTTP request string, the Arduino board will turn digital pin 5 to the HIGH state and turn on the PowerSwitch Tail. If it finds the textswitch=0, the Arduino board will turn the digital pin 5 to the LOW state and turn off the PowerSwitch Tail.if (httpRequest.indexOf("GET /?switch=0 HTTP/1.1") > -1) { relayStatus = 0; digitalWrite(5, LOW); Serial.println("Switch is Off"); } else if (httpRequest.indexOf("GET /?switch=1 HTTP/1.1") > -1) { relayStatus = 1; digitalWrite(5, HIGH); Serial.println("Switch is On"); } - Select the correct Arduino board and COM port from the menu bar.
- Verify and upload the sketch into your Arduino UNO board (or the Arduino Ethernet board).
- If you have to choose DHCP to assign an IP address to your Arduino Ethernet Shield, it will be displayed on the Arduino Serial Monitor. On the menu bar, go to Tools | Serial Monitor. The Arduino Serial Monitor window will be displayed with the IP address assigned by the DHCP.
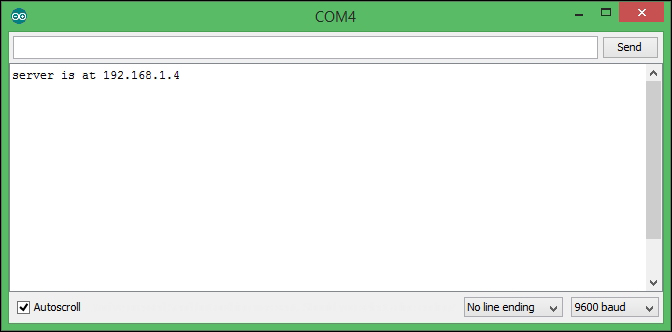
The IP address assigned by the DHCP
- Plug the PowerSwitch Tail LINE side into the wall power socket and connect the lamp into the LOAD side of the PowerSwitch Tail. Make sure that the lamp switch is in the ON position and all the switches of the wall power socket are in the ON position.
- Open your Internet browser and type the IP address of your Arduino Ethernet Shield with HTTP protocol. For our example it is
http://192.168.1.177. Then hit the Enter key on your keyboard. - The web browser sends an HTTP request to the Arduino web server and the web server returns the processed web content to the web browser. The following screen capture displays the output in the web browser.
- Type
http://192.168.1.177/?switch=1and hit the Enter key. The lamp will turn on. - Type
http://192.168.1.177/?switch=0and hit the Enter key. The lamp will turn off. - If you have connected your Arduino Ethernet Shield to your home wireless network, you can test your PowerSwitch Tail using your Wi-Fi connected smartphone as well. If you have the idea to add port forwarding to your router, you can then control your switch from anywhere in the world. Explaining about port forwarding is out of scope of this book.
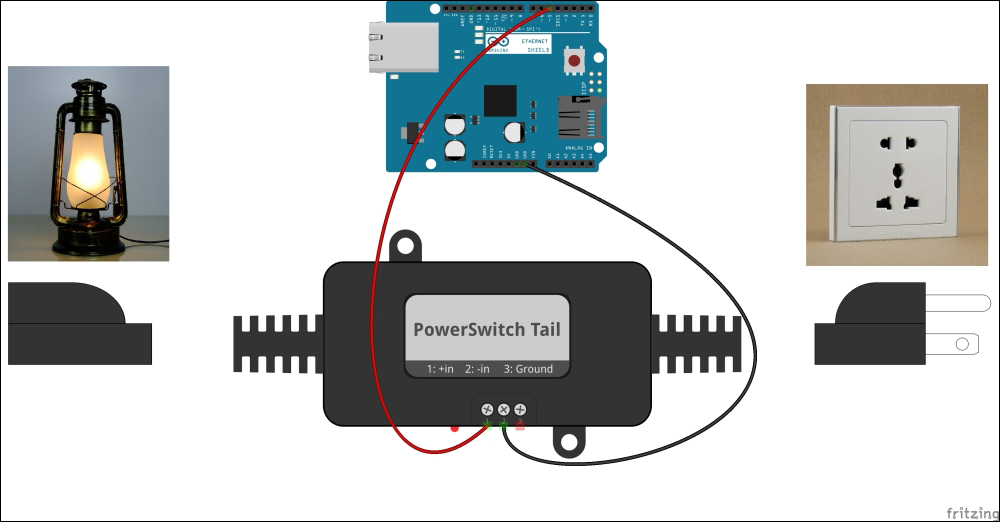
Electric lamp controlled by PowerSwitch Tail
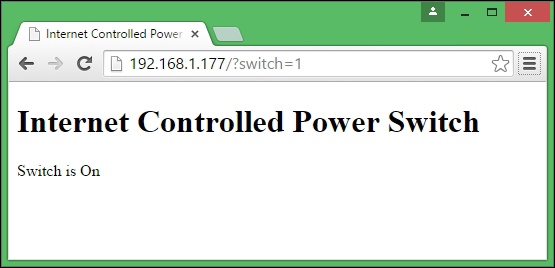
PowerSwitch Tail control panel accessed by Google Chrome browser
You can sense the availability of mains electricity in your home and read the status before actuating the PowerSwitch Tail.
You will need the following hardware to build the sensor:
- A 5VDC 2A wall adapter power supply (https://www.sparkfun.com/products/12889)
- A 10 kilo Ohm resistor (https://www.sparkfun.com/products/8374)
Follow the next steps to attach the sensor to the Arduino Ethernet Shield:
- Connect the positive wire of the 5V DC wall adapter power supply to the Ethernet shield digital pin 2.
- Connect the negative wire of the wall adapter power supply to the Ethernet shield GND pin.
- Connect the 10 kilo ohm resistor between the Ethernet shield digital pin 2 and the GND pin.
- Plug the wall adapter power supply into the wall.
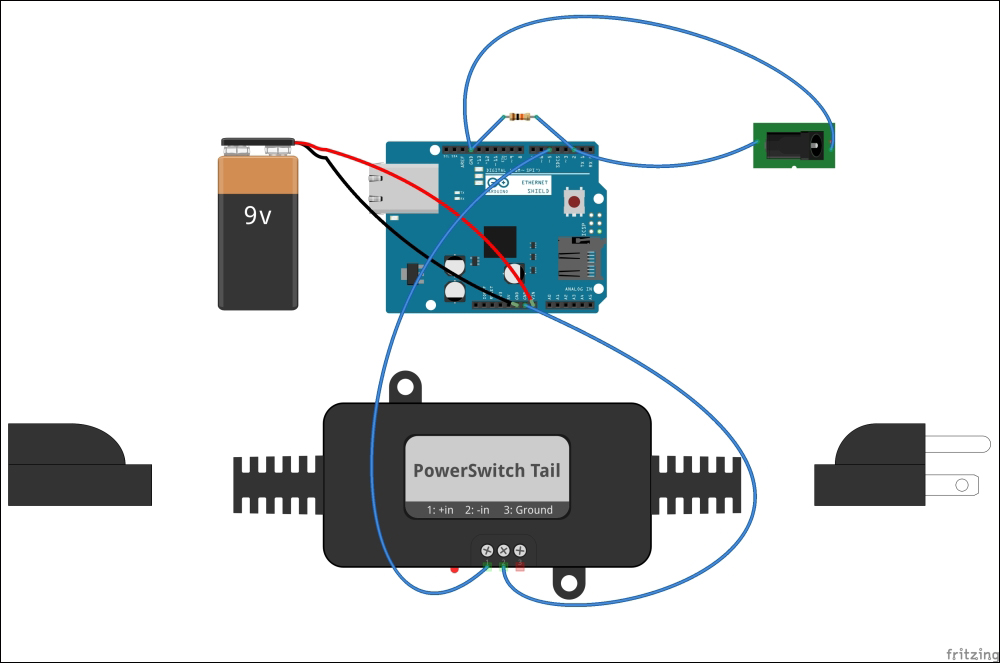
A wiring diagram
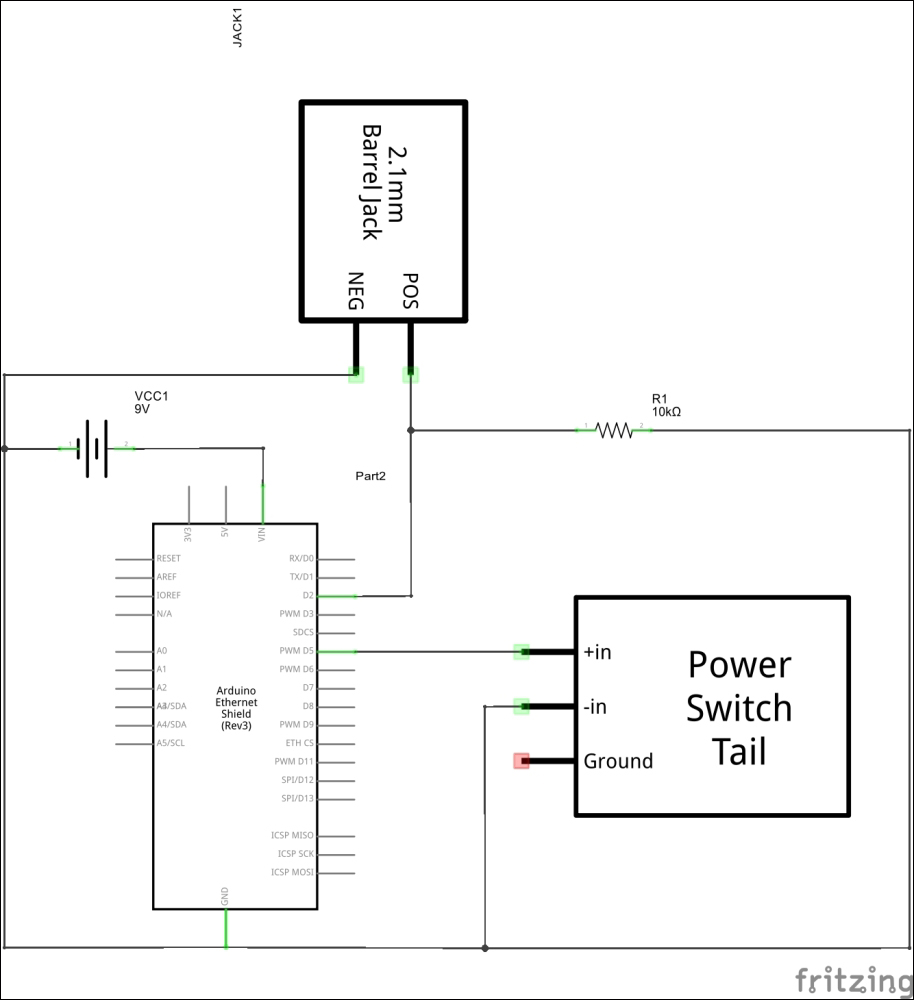
Schematic
The previous sketch is modified to check the availability of the mains electricity and operate PowerSwitch Tail accordingly. The 5V DC wall adapter power supply plugged into the wall keeps the Arduino digital pin 2 in the HIGH state if mains electricity is available. If mains electricity is not available, the digital pin 2 switches to the LOW state.
- Open your Arduino IDE and paste the code from the sketch named
B04844_01_03.inofrom the code folder of this chapter. - Power up your Arduino Ethernet Shield with 9V battery pack so that it will work even without mains electricity.
- The Arduino digital pin 2 is in its HIGH state if mains electricity is available. The
hasElectricityboolean variable holds the state of availability of the electricity. - If only the mains electricity is available, the PowerSwitch Tail can be turned ON. If not, the PowerSwitch Tail is already in its OFF state.
The following Arduino sketch adds two radio buttons to the web page so the user can easily control the switch without typing the URL with the query string into the address bar of the web browser. The radio buttons will dynamically build the URL with the query string depending on the user selection and send it to the Arduino web server with the HTTP request.
- Open your Arduino IDE and paste the code from the sketch named
B04844_01_04.inofrom the code folder of this chapter. - Replace the IP address with a new IP address in your local area network's IP address range.
IPAddress ip(192,168,1,177);
- Verify and upload the sketch on your Arduino UNO board.
- Open your web browser and type your Arduino Ethernet Shield's IP address into the address bar and hit the Enter key.
- The following code snippet will submit your radio button selection to the Arduino web sever as an HTTP request using the HTTP GET method. The radio button group is rendered inside the
<form method="get"></form>tags.client.println("<form method="get">"); if (httpRequest.indexOf("GET /?switch=0 HTTP/1.1") > -1) { relayStatus = 0; digitalWrite(9, LOW); Serial.println("Off Clicked"); } else if (httpRequest.indexOf("GET /?switch=1 HTTP/1.1") > -1) { relayStatus = 1; digitalWrite(9, HIGH); Serial.println("On Clicked"); } if (relayStatus) { client.println("<input type="radio" name="switch" value="1" checked>ON"); client.println("<input type="radio" name="switch" value="0" onclick="submit();" >OFF"); } else { client.println("<input type="radio" name="switch" value="1" onclick="submit();" >ON"); client.println("<input type="radio" name="switch" value="0" checked>OFF"); } client.println("</form>");
Also, depending on the radio button selection, the browser will re-render the radio buttons using the server response to reflect the current status of the PowerSwitch Tail.