
Arduino WiFi Shield allows you to connect your Arduino board to the Internet wirelessly. In the previous chapter, you learned how to connect the Arduino board to the Internet using an Ethernet shield with a wired connection. Unlike a wired connection, a wireless connection provides us with increased mobility within the Wi-Fi signal range, and the ability to connect to other Wi-Fi networks automatically, if the current network loses connection or has insufficient radio signal strength. Most of the mechanisms can be manipulated using the Arduino Wi-Fi library, a well-written piece of program sketch. The following image shows the top view of an Arduino WiFi Shield. Note that two rows of wire wrap headers are used to stack with the Arduino board.
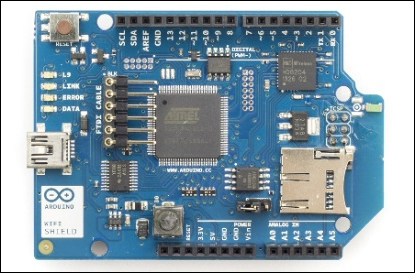
Arduino WiFi Shield (top view) Image courtesy of Arduino (https://www.arduino.cc) and license at http://creativecommons.org/licenses/by-sa/3.0/
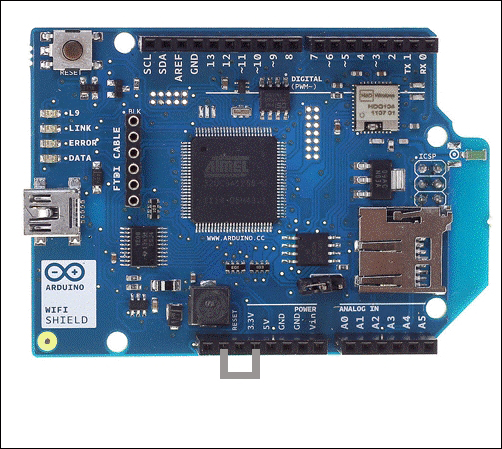
The following image shows the bottom view of an Arduino WiFi Shield:

Arduino WiFi Shield (bottom view) Image courtesy of Arduino (https://www.arduino.cc) and license at http://creativecommons.org/licenses/by-sa/3.0/
Before using the Arduino WiFi Shield with this project, upgrade its firmware to version 1.1.0 or greater, as explained in the following official Arduino page at https://www.arduino.cc/en/Hacking/WiFiShieldFirmwareUpgrading.
The default factory-loaded firmware version 1.0.0 will not work properly with some of the Arduino sketches in this chapter.
Simply plug in to your Arduino WiFi Shield on top of the Arduino board using wire wrap headers so the pin layout of the Arduino board and the WiFi Shield will be exactly intact together.
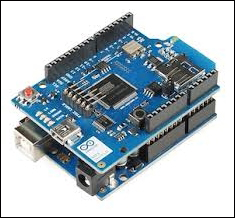
Arduino WiFi Shield is stacked with Arduino UNO
You can use the Arduino UNO REV3 board directly without any hacking for this project. However, you can still use an Arduino UNO board earlier than REV3 with a simple hack.
First, stack your Wi-Fi shield on the Arduino board, and then connect your Wi-Fi shield's IOREF pin to the 3.3V pin using a small piece of jumper wire.
The following image shows a wire connection from the 3.3V pin to the IOREF pin.
A jumper wire attached from 3.3V TO IOREF Image courtesy of Arduino (https://www.arduino.cc) and license at http://creativecommons.org/licenses/by-sa/3.0/
Your WiFi shield may have an SD card slot that communicates with your Arduino board via the digital pin 4. Arduino UNO communicates with the WiFi shield using digital pins 11, 12, and 13 over SPI bus. Also, the digital pin 10 is used as SS. Therefore, we will not use these pins with our project. However, you can use the digital pin 4 by using the following software hack.
pinMode(4, output);
digitalWrite(4, HIGH);
Before getting started with the WiFi library, you have to apply the following fixes to some of the files inside the Arduino WiFi library:
- Navigate to the
WiFifolder in the libraries folder - Open the
wifi_drv.cppfile located in theutilityfolder undersrc. - Find the
getCurrentRSSI()function and modify it as follows:int32_t WiFiDrv::getCurrentRSSI() { startScanNetworks(); WAIT_FOR_SLAVE_SELECT(); // Send Command SpiDrv::sendCmd(GET_CURR_RSSI_CMD, PARAM_NUMS_1); uint8_t _dummy = DUMMY_DATA; SpiDrv::sendParam(&_dummy, 1, LAST_PARA); //Wait the reply elaboration SpiDrv::waitForSlaveReady(); // Wait for reply uint8_t _dataLen = 0; int32_t rssi = 0; SpiDrv::waitResponseCmd(GET_CURR_RSSI_CMD, PARAM_NUMS_1, (uint8_t*)&rssi, &_dataLen); SpiDrv::spiSlaveDeselect(); return rssi; } - Save and close the file.
To connect your Arduino WiFi shield to a Wi-Fi network, you should have the SSID of any available Wi-Fi network. SSID (Service Set Identifier) is the name of the Wi-Fi network that you want to connect to your Arduino WiFi shield. Some Wi-Fi networks require a password to connect it with and some are not, which means open networks.
The Arduino WiFi library provides an easy way to connect your WiFi shield to a Wi-Fi network with the WiFi.begin() function. This function can be called in different ways depending on the Wi-Fi network that you want to connect to.
WiFi.begin(); is only for initializing the Wi-Fi shield and called without any parameters.
WiFi.begin(ssid);connects your WiFi shield to anOpen Networkusing only theSSIDof the network, which is the name of the network. The following Arduino sketch will connect your Arduino WiFi shield to an open Wi-Fi network which is not password protected and anyone can connect. We assume that you have a Wi-Fi network configured asOPENand named asMyHomeWiFi. Open a new Arduino IDE and copy the sketch namedB04844_02_01.inofrom theChapter 2sample code folder.#include <SPI.h> #include <WiFi.h> char ssid[] = "MyHomeWiFi"; int status = WL_IDLE_STATUS; void setup(){ Serial.begin(9600); if (WiFi.status() == WL_NO_SHIELD){ Serial.println("No WiFi shield found"); while(true); } while ( status != WL_CONNECTED){ Serial.print("Attempting to connect to open SSID: "); Serial.println(ssid); status = WiFi.begin(ssid); delay(10000); } Serial.print("You're connected to the network"); } void loop (){ }- Modify the following line of the code according to your Wi-Fi network's name.
char ssid[] = "MyHomeWiFi";
- Now verify and upload the sketch in to your Arduino board and then open the Arduino Serial Monitor. The Arduino Serial Monitor will display the status about the connection at the time it was connected similar to follows.
Attempting to connect to open SSID: MyHomeWiFi
You're connected to the network
WiFi.begin(ssid,pass); connects your WiFi shield to a WPA2 (Wi-Fi Protected Access II) personal encrypted secured Wi-Fi network using SSID and password. The shield will not connect to Wi-Fi networks that are encrypted using WPA2 Enterprise Encryption. We assume that you have a Wi-Fi network configured as WAP2 and named as MyHomeWiFi.
- Open a new Arduino IDE and copy the sketch named
B04844_02_02.inofrom theChapter 2sample code folder.#include <SPI.h> #include <WiFi.h> char ssid[] = "MyHomeWiFi"; char pass[] = "secretPassword"; int status = WL_IDLE_STATUS; void setup(){ Serial.begin(9600); if (WiFi.status() == WL_NO_SHIELD) { Serial.println("WiFi shield not present"); while(true); } while ( status != WL_CONNECTED) {Serial.print("Attempting to connect to WPA SSID: "); Serial.println(ssid); status = WiFi.begin(ssid, pass); delay(10000); } Serial.print("You're connected to the network"); } void loop(){ } - Modify the following line of the code according to your Wi-Fi network's name.
char ssid[] = "MyHomeWiFi";
- Now verify and upload the sketch in to your Arduino board and then open the Arduino Serial Monitor. The Arduino Serial Monitor will display the status about the connection at the time it was connected similar to follows.
Attempting to connect to WPA SSID: MyHomeWiFi
You're connected to the network
WiFi.begin(ssid, keyIndex, key); is only for use with WEP encrypted Wi-Fi networks. WEP networks can have up to four passwords in hexadecimals that are known as keys. Each key is assigned a Key Index value. Configure your Wi-Fi network as a WEP encryption and upload the following sketch into your Arduino board. But remember the WEP is not secure at all and don't use it with your Wi-Fi networks. Instead of that use WPA2 encryption which is highly recommended.
- We assume that you have a Wi-Fi network configured as
WPEand named asMyHomeWiFi. Change the configuration back to the WPA2 as quickly as possible after testing the following code snippet. Open a new Arduino IDE and copy the sketch namedB04844_02_03.inofrom theChapter 2sample code folder.#include <SPI.h> #include <WiFi.h> char ssid[] = "MyHomeWiFi"; char key[] = "D0D0DEADF00DABBADEAFBEADED"; int keyIndex = 0; int status = WL_IDLE_STATUS; void setup(){ Serial.begin(9600); if (WiFi.status() == WL_NO_SHIELD) { Serial.println("WiFi shield not present"); while(true); } while ( status != WL_CONNECTED) { Serial.print("Attempting to connect to WEP network, SSID: "); Serial.println(ssid); status = WiFi.begin(ssid, keyIndex, key); delay(10000); } Serial.print("You're connected to the network"); } void loop(){ } - Modify the following line of the code according to your Wi-Fi network's name:
char ssid[] = "MyHomeWiFi";
- Now verify and upload the sketch in to your Arduino board and then open the Arduino Serial Monitor. The Arduino Serial Monitor will display the status about the connection at the time it was connected similar to follows.
Attempting to connect to WEP network, SSID: MyHomeWiFi
You're connected to the network