
Let's take a look at using seams effectively. Remember that the Unwrap tool will essentially flatten your object for texturing, splitting, and flattening along the lines we have marked as seams. For different primitive shapes such as cubes and cylinders, there are some best practices to be aware of. Knowing these standard unwraps can help us later when we run into more complex shapes, such as our tentacles.

Practice makes perfect! Cubes and other primitive shapes are a great way to brush up on UV unwrapping
When unwrapping a cube, it is important to minimize the number of seams used. This is why we unwrap in a cross shape with the top face at the center. Let's try it!
- Head up to the Scene Layout dropdown and select UV Editing from the list.
- Select the default cube in the scene and head to Edit mode. Choose Line selection from the selection modes at the bottom of the screen and locate the top face. This will be our reference point as we add our seams.
- Locate the front face. This can be done by pressing 1 on the number pad or selecting Front from the View menu. This will be our second point of reference as we unwrap:

Select the front two edges and mark them as seams
- Time to create our first seams. Now that we know where our top and front faces are, let's add our first two seams there. Select the two edges shown in the preceding screenshot, click on the Shading / UVs tab in the Tools panel, and click on the Mark Seams button. This will turn the lines red.
- Now mark the other two vertical edges on the back face. This will create the cross layout we want.
- Lastly, we want to detach the bottom face from all the other faces except the front. Select the three edges that connect the bottom face to the side and back faces. Mark those as seams.
- Let's Unwrap! Click on the face selection mode and press A to select all of the cube's faces. Now press the U key and select Unwrap from the menu. Your UV map should look like our unwrapped cube.

An unwrapped cylinder. Many of the Artefact's 42 shapes will be similar to this
Unwrapping a cylinder is even easier than unwrapping a cube. To unwrap this type of primitive shape, create your seams all the way around the top and bottom faces and then one seam that runs from top to bottom. Try it out and see if your results are similar to what is shown in the preceding screenshot. It's kind of like putting a label on a soup can.
Once we have a good handle on unwrapping basic primitives, it's time to start tackling the Artifact, piece by piece!

Results of unwrapping the bottom
Let's get started with the bottom portion:
- In Object mode, select the bottom portion of the Artifact and press Shift + H. This will isolate our selection by hiding everything that is not selected. Next, head up to the Scene Layout drop-down box and select UV Layout. This will split your screen into two large viewports: one for manipulating your object and another for working with your UV map:

Marking the seams on the bottom portion of the Artefact
- Time to cut some seams. Unwrapping this part of our creation is not unlike unwrapping a cylinder. Let's first create the seam to detach the inside. Select the top edge loop by selecting Line mode, click the first line of the edge loop, hold the Alt key, and select the second line of the loop. This will select the entire loop for you. Now head to the tools panel and select the Shading/UVs tab. Now click on Mark Seam. This will highlight your selected edge loop in red, letting you know that Blender will use this loop as a seam in your UV unwrap.
- Now repeat the process to select the edge around the bottom face and turn that into a seam as well.
- Finally, complete the process by selecting edges in a vertical line that runs down from the top marked edge loop to the bottom loop. Mark this as a seam as well, just like we would to unwrap a cylinder.
- Time to Unwrap! Set your Screen Layout to UV Editing. Now turn off Face select mode and press A to select all your faces. Finally, press U and select Unwrap from the menu. Check out the results and see if they are similar to the UV map shown previously.
And we're done with the bottom! Not too hard is it? We will find that many of the pieces of the Artifact unwrap very similarly to cubes and cylinders. This gives us an easy starting point for each piece, taking the guesswork out of getting started:

The results of unwrapping the top
The top should be just like the bottom piece:

The seams are marked just like the bottom portion and it's similar to unwrapping a cylinder primitive
- Grab the edge loop around the top polygon and mark that as a seam for the Unwrap tool.
- Select one of the bottom edge loops around where the top and the bottom pieces meet and mark this as a seam as well.
- Create a vertical seam to connect the other two seams, similar to what we did for the bottom piece.
- Finally, select all of the faces and use the Unwrap tool again. The result should be very similar to what we have for the bottom.
Now that we have the top and the bottom pieces unwrapped, let's switch gears and take a look at the gear (switch gears, get it?):

We will use Smart UV Project to unwrap the gear section
For this piece, we are going to use Smart UV Project.
This leaves us only two sets of objects left, the pistons and the tentacles. The processes for both will be similar. We will delete all but one and UV map it. When we copy the mapped section again to replace the deleted pieces, they will keep all of our UV mapping. Now that's working smart!

Unwrapping the bottom portion of the piston
Now to take a look at the Piston:
- Choose which set of piston parts you wish to unwrap and delete all the others. We will be replacing them shortly:

Unwraps just like a cylinder!
- Start with the bottom piece of the piston. The UV map for this will be similar to a cylinder. Starting at the top, select the top edge loop where the sides and the top meet and mark that as a seam.
- Next, select the edge loop right before the bottom starts to curve away from the side, and mark that a seam.
- Finally, open the Unwrap menu and select Unwrap!
- Now, delete the top part of the piston and copy the bottom, since the top is just a duplicate of the bottom.
- This next part covers a few steps. For each of the smaller middle sections, they are simply cylinders and unwrap using the method we spoke of earlier in the chapter. Unwrap all three cylinder sections:

Duplicating the piston parts, just like we did before
- With all of the parts unwrapped, select all of the piston parts in Object mode and duplicate them to replace the pistons we deleted. Congratulations! We have now unwrapped seven pistons!
Lastly, let's take a look at what it will take to unwrap the tentacle:
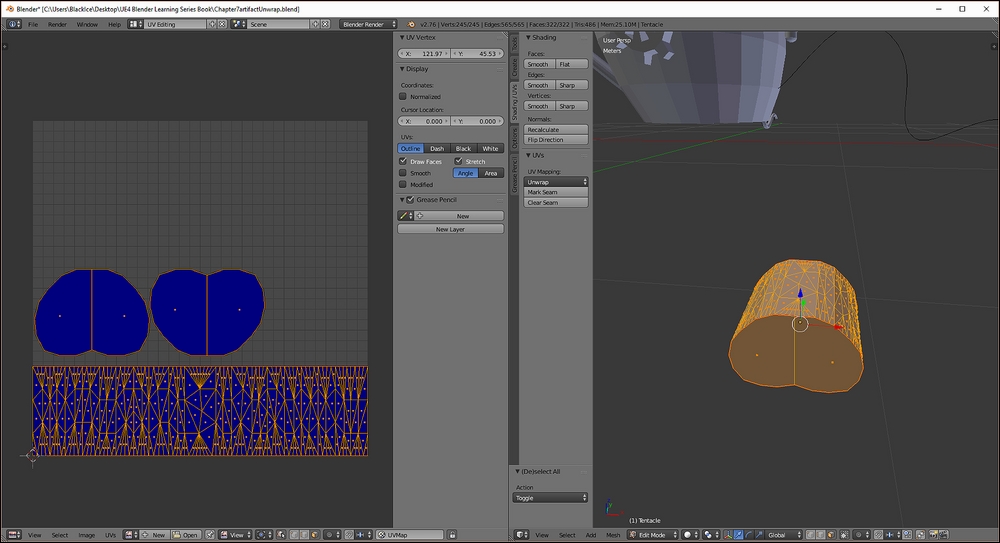
The unwrap for the tentacle. Don't be scared!
Although it may look complicated, it is not much different than a cylinder. However, there is a bit of prep we have to do before we unwrap it:
- Select one tentacle piece and delete the others. We will unwrap one and copy it:

Delete every tentacle except for one
- We are going to use the Decimate modifier to reduce the triangle count on our tentacles. Select the Modifier menu (the small wrench) over in the Properties pane. Click on the Add Modifier dropdown and choose Decimate from the options. In the Decimate modifier itself, turn on the Triangulate option. UE4 will triangulate it anyway, so why not have Decimate get a head start. The goal of using Decimate is to find a ratio that lowers the number of tris that are part of an object, while still maintaining its overall shape. Now, click and slide on the Ratio option. We are going to Decimate our tentacle by lowering the ratio to somewhere between
.70and.80. This will remove about 20-30% of the triangles and make the entire tentacle more manageable for UE4. Once you have found a Ratio that looks good, click on Apply:
Marking the seams on the tentacle. Again, it is very similar to a cylinder.
- Surprisingly, unwrapping our tentacle is not unlike unwrapping a cylinder, and we will treat it roughly the same way. First, turn off the modifiers we placed on the tentacle by clicking on the eye icon on each of the modifiers in the Modifier menu. Then, select the edge loops around the top and bottom polygons and make them seams. Finally, create a vertical seam to connect these two seams, press U to bring up the Unwrap menu, and select Unwrap.
Each of our pieces is now unwrapped and ready to go! Back in Chapter 3, It's Time to Customize! we exported our shape out of Blender as a .FBX file and then brought it into Unreal. This time, we are going to take a look at the different types of texture map that go into making a top notch material and create something spectacular using Allegorithmic's Substance Painter.